
Kubernetes is the most popular orchestrator for deploying and scaling containerized systems. You can use Kubernetes to reliably build and distribute your applications in the cloud.
In this getting started beginner’s guide, you’ll learn what Kubernetes can do and how to get started running your own containerized solutions.
What is Kubernetes?
Kubernetes is an open-source system that automates container deployment tasks. It was originally developed at Google but is now maintained as part of the Cloud Native Computing Foundation (CNCF).
Kubernetes has risen to prominence because it solves many of the challenges around using containers in production. It makes it easy to launch limitless container replicas, distribute them across multiple physical hosts, and set up networking so users can reach your service.
What is Kubernetes used for?
Kubernetes is used to manage and scale applications running in containers, which are small, isolated environments. It simplifies the reliable management of numerous apps and services, even when they are distributed across multiple servers.
Kubernetes automates things like:
- Starting new apps when needed.
- Restarting apps if they crash.
- Spreading out work so that no one part of the system is overloaded.
- Scaling up or down based on demand.
CNCF / Linux Foundation research shows that around 80% of respondents run Kubernetes in production, and another ~13% are testing it, underscoring that K8s is now the default platform for containerized workloads.
Is Kubernetes easy to learn?
Learning Kubernetes can be challenging, particularly for those who are new to container orchestration and cloud-native environments. Most developers begin their container journey with Docker. While this is a comprehensive tool, it’s relatively low-level and relies on CLI commands that interact with one container at a time. Kubernetes provides much higher-level abstractions for defining applications and their infrastructure using declarative schemas you can collaborate on.
Check out our Docker vs. Kubernetes Comparison.
Kubernetes features
Kubernetes has a comprehensive feature set that includes a full spectrum of capabilities for running containers and associated infrastructure:
- Automated rollouts, scaling, and rollbacks – Kubernetes automatically creates the specified number of replicas, distributes them onto suitable hardware, and takes action to reschedule your containers if a node goes down. You can instantly scale the number of replicas on-demand or in response to changing conditions such as CPU usage.
- Service discovery, load balancing, and network ingress – Kubernetes provides a complete networking solution that covers internal service discovery and public container exposure.
- Stateless and stateful applications – While Kubernetes initially focused on stateless containers, it’s now also got built-in objects to represent stateful apps too. You can run any kind of application in Kubernetes
- Storage management – Persistent storage is abstracted by a consistent interface that works across providers, whether in the cloud, on a network share, or on a local filesystem.
- Declarative state – Kubernetes uses object manifests in YAML files to define the state you want to create in your cluster. Applying a manifest instructs Kubernetes to automatically transition the cluster to the target state. You don’t have to manually script the changes you want to see.
- Works across environments – Kubernetes can be used in the cloud, at the edge, or on your developer workstation. Many different distributions are available to match different use cases. Major cloud providers like AWS and Google Cloud offer managed Kubernetes services, while single-node distributions such as Minikube and K3s are great for local use.
- Highly extensible – Kubernetes packs in a lot of functionality, but you can add even more using extensions. You can create custom object types, controllers, and operators to support your own workloads.
With so many features available, Kubernetes is ideal for any situation where you want to deploy containers with declarative configuration.
How does Kubernetes work?
Kubernetes has a reputation for complexity because it has several moving parts. Understanding the basics of how they fit together will help you start out on your Kubernetes journey.

A Kubernetes environment is termed a cluster. It includes one or more nodes. A node is simply a machine that will run your containers. It could be physical hardware or a VM.
The cluster has nodes and a control plane. The Kubernetes control plane coordinates the entire cluster’s operations, schedules new containers onto available nodes and provides the API server that you interact with. It’s possible to run a cluster with multiple control plane instances to create a highly available setup with greater resiliency.
Here are the most important Kubernetes elements:
| Kubernetes component | Description |
| kube-apiserver | This is the part of the control plane that runs the API server. It’s the only way to interact with a running Kubernetes cluster. You can issue commands to the API server using the Kubectl CLI or an HTTP client. |
| kube-controller-manager | The controller manager starts and runs Kubernetes’ built-in controllers. A controller is essentially an event loop that applies actions after changes in your cluster. They create, scale, and delete objects in response to events such as an API request or increased load. |
| kube-scheduler | The scheduler assigns new Pods (containers) onto the nodes in your cluster. It establishes which nodes can fulfill the Pod’s requirements, then selects the most optimal placement to maximize performance and reliability. |
| kubelet | Kubelet is a worker process that runs on each of your nodes. It maintains communication with the Kubernetes control plane to receive its instructions. Kubelet is responsible for pulling container images and starting containers in response to scheduling requests. |
| kube-proxy | Proxy is another component found on individual nodes. It configures the host’s networking system so traffic can reach the services in your cluster. |
Kubectl is usually the final piece in a functioning Kubernetes environment. You’ll need this CLI to interact with your cluster and its objects. Once your cluster’s set up, you can also install the official dashboard or a third-party solution to control Kubernetes from a GUI.
Kubernetes installation and setup example
There are many different ways to get started with Kubernetes because of the range of distributions on offer. Creating a cluster using the official distribution is relatively involved so most people use a packaged solution like Minikube, MicroK8s, K3s, or Kind.
Check out how to install Kubernetes using these four different methods.
We’ll use K3s for this tutorial. It’s an ultra-lightweight Kubernetes distribution that bundles all the Kubernetes components into a single binary. Unlike other options, there’s no dependencies to install or heavy VMs to run. It also includes the Kubectl CLI that you’ll use to issue Kubernetes commands. The core Kubernetes concepts are the same across distributions.
Running the following command will install K3s on your machine:
$ curl -sfL https://get.k3s.io | sh -
...
[INFO]  systemd: Starting k3s
It automatically downloads the latest available Kubernetes release and registers a system service for K3s.
After installation, run the following command to copy the auto-generated Kubectl config file into your .kube directory:
$ mkdir -p ~/.kube
$ sudo cp /etc/rancher/k3s/k3s.yaml ~/.kube/config
$ sudo chown $USER:$USER ~/.kube/config
Now tell K3s to use this config file by running the following command:
$ export KUBECONFIG=~/.kube/configYou can add this line to your ~/.profile or ~/.bashrc file to automatically apply the change after you log in.
Next run this command:
$ kubectl get nodes
NAME       STATUS   ROLES                  AGE    VERSION
ubuntu22   Ready    control-plane,master   102s   v1.24.4+k3s1
Note: Output shown for Kubernetes 1.34. Your version may differ slightly.
You should see a single node appear, named with your machine’s hostname. The node shows as Ready so your Kubernetes cluster can now be used!
Kubernetes basic terms and concepts
Your cluster’s running, but what can you do with it? It’s worth getting familiar with some key Kubernetes terms before you continue.
1. Nodes
Nodes represent the physical machines that form your Kubernetes cluster. They run the containers you create. Kubernetes tracks the status of your nodes and exposes each one as an object. You used Kubectl to retrieve a list of nodes in the example above.
While your fresh cluster has only one node, Kubernetes advertises support for up to 5,000 nodes. It’s theoretically possible to scale even further.
2. Namespaces
Kubernetes namespaces isolate different groups of resources. They avoid name collisions by scoping the visibility of your resources.
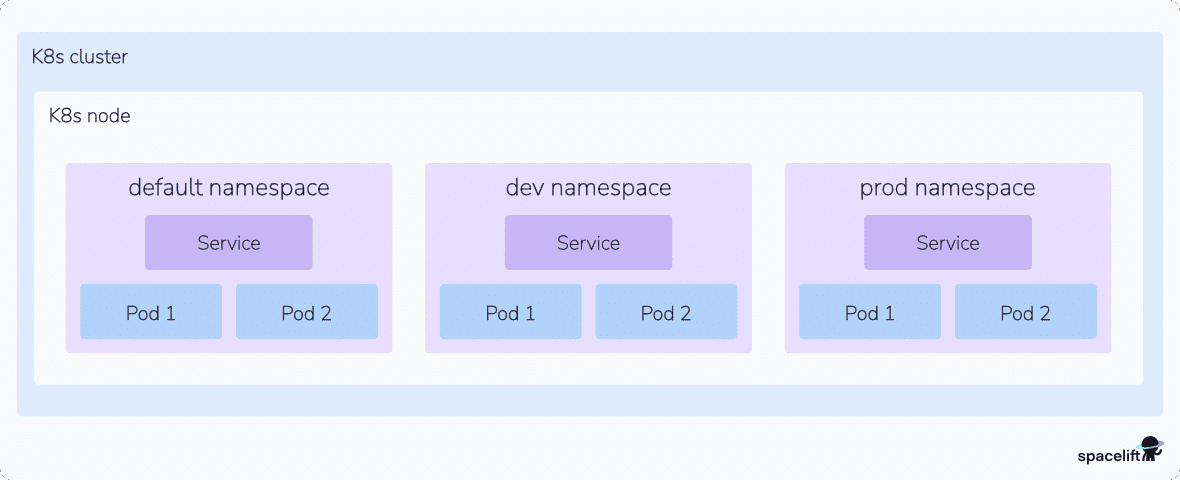
Creating two objects with the same name is forbidden within the same namespace. If you’re in the default namespace, you can’t create two Pods that are both called database, for example. Namespaces resolve this by providing logical separation of resources. Two namespaces called app-1 and app-2 could each contain a Pod called database without causing a conflict.
Namespaces are flexible and can be used in many different ways. It’s a good idea to create a namespace for each workload in your cluster. You can also use namespaces to divide resources between users and teams by applying role-based access control.
3. Pods
Pods are the fundamental compute unit in Kubernetes. A Pod is analogous to a container, but with some key differences. Pods can contain multiple containers, each of which shares a context. The entire Pod will always be scheduled onto the same node. The containers within a Pod are tightly coupled so you should create a new Pod for each distinct part of your application, such as its API and database.
In simple situations, Pods will usually map one-to-one with the containers your application runs. In more advanced cases, Pods can be enhanced with init containers and ephemeral containers to customize startup behavior and provide detailed debugging.
4. ReplicaSets
ReplicaSets are used to consistently replicate a Pod. They provide a guarantee that a set number of replicas will be running at any time. If a node goes offline or a Pod becomes unhealthy, Kubernetes will automatically schedule a new Pod instance to maintain the specified replica count.
5. Deployments
Deployments wrap ReplicaSets with support for declarative updates and rollbacks. They’re a higher level of abstraction that’s easier to control.

A Deployment object lets you specify the desired state of a set of Pods. This includes the number of replicas to run. Modifying the Deployment will automatically detect the required changes and scale the ReplicaSet as required. You can pause the rollout or revert to an earlier revision, features that aren’t available with plain ReplicaSets.
Learn how to create a Kubernetes Deployment YAML file.
6. Services
Kubernetes Services are used to expose Pods to the network. They allow defined access to Pods either within your cluster or externally.
Ingresses are closely related objects. These are used to set up HTTP routes to services via a load balancer. Ingresses also support HTTPS traffic secured by TLS certificates.
Read more: Kubernetes Ingress with NGINX Ingress Controller Example
7. Jobs
A Kubernetes Job is an object that creates a set of Pods and waits for them to terminate. It will retry any failed Pods until a specified number have exited successfully. The Job’s then marked as complete.
Jobs provide a mechanism for running ad-hoc tasks inside your cluster. Kubernetes also provides CronJobs that wrap Jobs with cron-like scheduling support. These let you automatically run a job on a regular cadence to accommodate batch activities, backups, and any other scheduled tasks your application requires.
8. Volumes
Volumes mount external filesystem storage inside your Pods. They abstract away the differences between different cloud providers’ storage implementations.
Volumes can be shared between your Pods. This allows Kubernetes to run stateful applications where data must be preserved after a Pod gets terminated or rescheduled. You’ll need to use a volume whenever you’re running a database or file server in your cluster.
9. Secrets and ConfigMaps
Secrets are used to inject sensitive data into your cluster, such as API keys, certificates, and other kinds of credentials. They can be supplied to Pods as environment variables or files mounted into a volume.
ConfigMaps are a similar concept for non-sensitive information. These objects should store any general settings your app requires.
10. DaemonSets
Kubernetes DaemonSets are used to reliably run a copy of a Pod on each of the Nodes in your cluster. When a new Node joins, it will automatically start an instance of the Pod. You can optionally restrict DaemonSet Pods to only running on specific Nodes in more advanced situations.

DaemonSets are useful when you’re adding global functionality to your cluster. DaemonSets are often used to run monitoring services and log aggregation agents. Placing these workloads into a DaemonSet guarantees they’ll always be running adjacent to your application’s Pods. It ensures metrics and logs will be collected irrespective of the Node a Pod gets scheduled to.
11. Networking policies
Kubernetes supports a policy-based system for controlling network traffic flows between your Pods. You can isolate sensitive Pods from other resources to prevent attackers moving through your infrastructure.
Network policies are expressed as an object that targets one or more matching Pods. Each Pod can be the subject of both ingress and egress policies. Ingress policies define whether incoming traffic is allowed, while egress rules affect outbound flows. Communications between two Pods are only permitted when no networking policy on either Pod denies ingress or egress from the other.
12. HorizontalPodAutoscaler (HPA)
A Kubernetes object that automatically adjusts the number of Pod replicas in a Deployment, StatefulSet, or ReplicaSet based on observed metrics such as CPU, memory, or custom application metrics. The HPA continuously watches these metrics and scales your workload up when demand increases and back down when traffic drops, helping you keep applications responsive while avoiding over-provisioning.
In practice, you define target thresholds (for example, 70% CPU utilization), and Kubernetes lets the HPA handle the scaling decisions for you.
13. Workloads (Deployments, StatefulSets, Jobs)
Workloads are higher-level Kubernetes objects that define how your application runs on the cluster.
- Deployments manage stateless applications, handling rolling updates and rollbacks for you.
- StatefulSets are similar but designed for stateful workloads that need stable network identities and persistent storage (for example, databases or clustered services).
- Jobs (and CronJobs) run finite, one-off or scheduled tasks until completion, such as data processing or report generation.
Together, these workload types let you describe very different runtime patterns declaratively, while Kubernetes takes care of scheduling, scaling, and lifecycle management.
Learn more: What Is Kubernetes Architecture?
Using Kubectl to interact with Kubernetes
Now you’re familiar with the basics, you can start adding workloads to your cluster with Kubectl. Here’s a quick reference for some key commands.
List Pods
This displays the Pods in your cluster:
$ kubectl get pods
No resources found in default namespace
Specify a namespace with the -n or --namespace flag:
$ kubectl get pods -n demo
No resources found in demo namespace
Alternatively, get Pods from all your namespaces by specifying --all-namespaces:
$ kubectl get pods --all-namespaces
NAMESPACE     NAME                                      READY   STATUS      RESTARTS   AGE
kube-system   coredns-b96499967-4xdpg                   1/1     Running     0          114m
...
This includes Kubernetes system components.
Create a Pod
Create a Pod with the following command:
$ kubectl run nginx --image nginx:latest
pod/nginx created
This starts a Pod called nginx that will run the nginx:latest container image.
Create a Deployment
Creating a Deployment lets you scale multiple replicas of a container:
$ kubectl create deployment nginx --image nginx:latest --replicas 3
deployment.apps/nginx created
You’ll see three Pods are created, each running the nginx:latest image:
$ kubectl get pods
NAME                     READY   STATUS    RESTARTS   AGE
nginx-7597c656c9-4qs55   1/1     Running   0          51s
nginx-7597c656c9-gdjl9   1/1     Running   0          51s
nginx-7597c656c9-7sxrc   1/1     Running   0          51s
Scale a Deployment
Now use this command to increase the replica count:
$ kubectl scale deployment nginx --replicas 5
deployment.apps/nginx scaled
Kubernetes has created two extra Pods to provide additional capacity:
$ kubectl get pods
NAME                     READY   STATUS    RESTARTS   AGE
nginx-7597c656c9-4qs55   1/1     Running   0          2m26s
nginx-7597c656c9-gdjl9   1/1     Running   0          2m26s
nginx-7597c656c9-7sxrc   1/1     Running   0          2m26s
nginx-7597c656c9-kwm6q   1/1     Running   0          2s
nginx-7597c656c9-nwf2s   1/1     Running   0          2s
Expose a Service
Now let’s make this NGINX server accessible.
Run the following command to create a service that’s exposed on a port of the Node running the Pods:
$ kubectl expose deployment/nginx --port 80 --type NodePort
service/nginx exposed
Discover the port that’s been assigned by running this command:
$ kubectl get services
NAME         TYPE        CLUSTER-IP     EXTERNAL-IP   PORT(S)        AGE
kubernetes   ClusterIP   10.43.0.1      <none>        443/TCP        121m
nginx        NodePort    10.43.149.39   <none>        80:30226/TCP   3s
The port is 30226. Visiting <node-ip>:30226 in your browser will show the default NGINX landing page.
You can use localhost as <node-ip> if you’ve been following along with the single-node K3s cluster created in this tutorial. Otherwise run the get nodes command and use the INTERNAL-IP that’s displayed.
$ kubectl get nodes -o wide
NAME       STATUS   ROLES                  AGE    VERSION        INTERNAL-IP
ubuntu22   Ready    control-plane,master   124m   v1.24.4+k3s1   192.168.122.210
Using port forwarding
You can access a service without binding it to a Node port by using Kubectl’s integrated port-forwarding functionality. Delete your first service and create a new one without the --type flag:
$ kubectl delete service nginx
service/nginx deleted

$ kubectl expose deployment/nginx –port 80
service/nginx exposed
This creates a ClusterIP service that can be accessed on an internal IP, within the cluster.
Retrieve the service’s details by running this command:
$ kubectl get services
NAME     	TYPE    	CLUSTER-IP   	EXTERNAL-IP   PORT(S)   AGE
nginx   	ClusterIP   10.100.191.238   <none>    	80/TCP	2s
The service can be accessed inside the cluster at 10.100.191.238:80.
You can reach this address from your local machine with the following command:
$ kubectl port-forward service/nginx 8080:80Visiting localhost:8080 in your browser will display the NGINX landing page. Kubectl is redirecting traffic to the service inside your cluster. You can press Ctrl+C in your terminal to stop the port forwarding session when you’re done.
Port forwarding works without services too. You can directly connect to a Pod in your deployment with this command:
$ kubectl port-forward deployment/nginx 8080:80Visiting localhost:8080 will again display the NGINX landing page, this time without going through a service.
Apply a YAML file
Finally, let’s see how to apply a declarative YAML file to your cluster. First, write a simple Kubernetes manifest for your Pod:
apiVersion: v1
kind: Pod
metadata:
  name: nginx
spec:
  containers:
	- name: nginx
	  image: nginx:latest
Save this manifest to nginx.yaml and run kubectl apply to automatically create your Pod:
$ kubectl apply -f nginx.yaml
pod/nginx created
You can repeat the command after you modify the file to apply any changes to your cluster.
In practice, most teams avoid creating resources by hand with kubectl create or kubectl run in production. Instead, they store YAML manifests in Git and use kubectl apply -f (or a GitOps tool) to manage changes declaratively. This makes rollbacks, reviews, and audits much easier.
Now you’re familiar with the basics of using Kubectl to interact with Kubernetes! If you’d like a printable reference with all the kubectl commands used here (and more), grab our Kubernetes Commands Cheat Sheet.
Managing Kubernetes with Spacelift
If you need assistance managing your Kubernetes projects, look at Spacelift. It brings with it a GitOps flow, so your Kubernetes Deployments are synced with your Kubernetes Stacks, and pull requests show you a preview of what they’re planning to change.
To take this one step further, you could add custom policies to reinforce the security and reliability of your configurations and deployments. Spacelift provides different types of policies and workflows that are easily customizable to fit every use case. For instance, you could add plan policies to restrict or warn about security or compliance violations or approval policies to add an approval step during deployments.
You can try Spacelift for free by creating a trial account or booking a demo with one of our engineers.
Key points
Kubernetes is the leading container orchestrator. In this article, we’ve explored its features, looked at how it works, and covered the most important object types you’ll use to assemble your applications. You can also check out 15 challenges and pitfalls to look for each time you use Kubernetes and take a look at the guide to Kubernetes certification.
Beyond the theory, you’ve also seen how to start your own Kubernetes cluster with the popular K3s distribution. Now you can build and run your own containerized systems at scale with minimal manual configuration. You’re ready to continue your Kubernetes adventure by moving to more advanced topics – look out for future tutorials on our blog!
Manage Kubernetes Easier and Faster
Spacelift allows you to automate, audit, secure, and continuously deliver your infrastructure. It helps overcome common state management issues and adds several must-have features for infrastructure management.
