
Kubernetes is a container orchestration platform that enables you to manage and deploy applications across multiple clusters. However, interacting with these clusters requires authentication and configuration details, which is where kubeconfig files come into play.
What we will cover:
- What is a Kubeconfig file?
- The benefits of using a Kubeconfig file
- Example Kubeconfig file
- How to create a Kubeconfig file?
- How to use a Kubeconfig file?
- Tip: Quickly switch contexts with kubectx
- How to manage Kubeconfig files?
- How to export and merge Kubeconfig files together
- Kubeconfig and security
- Tools to use with Kubeconfig files
What is a Kubeconfig file?
Kubeconfig are YAML files that configure Kubectl, the default Kubernetes client tool. These essential files define the cluster Kubectl commands will target and the user credentials they’ll authenticate with.
Kubectl automatically loads the Kubeconfig file stored at ~/.kube/config. You can access multiple clusters with one Kubectl installation by specifying a different file, either by setting the KUBECONFIG environment variable or using Kubectl’s --kubeconfig flag:
$ KUBECONFIG=/my/kubeconfig kubectl get pods$ kubectl get pods --kubeconfig /my/kubeconfigThis approach is inconvenient when you have several different clusters, however. You need to remember the path to each Kubeconfig file and must specify it each time you run Kubectl.
A better alternative is to merge your files into one, then use Kubectl’s built-in config management features to switch between clusters seamlessly. Let’s see how.
The benefits of using a Kubeconfig file
Switching to a single Kubeconfig file lets you more efficiently organize your Kubernetes cluster access.
Here are some of the benefits you’ll gain:
- One file can contain all your clusters and users. No more duplication of Kubeconfig files each time you need to connect as a new user account, or register an additional cluster.
- You can quickly switch between configs by running Kubectl commands. Kubectl natively supports multiple config contexts within a single Kubeconfig file. The CLI includes commands for inspecting your active context and switching to another – we’ll see these below.
- You don’t have to remember to set KUBECONFIG or –kubeconfig every time you use Kubectl. Kubeconfig contexts you select within Kubectl are automatically persisted until you make another change. You don’t have to repeat the –kubeconfig flag with every command, or restore the value of KUBECONFIG after you reopen your terminal window.
- You can easily inspect the file to view the complete list of clusters you’ve used. Ever forgotten which clusters you have access to, or misplaced an important Kubeconfig file? This is a common problem for admins working with multiple clusters, where Kubeconfigs can become scattered across your storage drives. When you use a single file, you can view all your clusters in one location.
These advantages mean a single Kubeconfig file is often the most effective option for Kubernetes developers and administrators. This doesn’t mean they’re always the best approach, though – in some situations, it can make sense to split up connections, such as when different files require unique security characteristics or are intended for specific situations.
Example Kubeconfig file
Below is an example of a Kubeconfig file.
apiVersion: v1
clusters:
- cluster:
   certificate-authority-data: LS0tL..
   server: https://127.0.0.1:64914
   name: kind-kind
- cluster:
   certificate-authority-data: LS0tLS1C..
   server: https://127.0.0.1:60963
   name: kind-ope
- cluster:
   certificate-authority: /Users/flaviuscdinu/.minikube/ca.crt
   extensions:
   - extension:
       last-update: Thu, 16 Feb 2023 14:50:26 EET
       provider: minikube.sigs.k8s.io
       version: v1.28.0
     name: cluster_info
   server: https://127.0.0.1:49731
   name: minikube
contexts:
- context:
   cluster: kind-kind
   user: kind-kind
 name: kind-kind
- context:
   cluster: kind-ope
   user: kind-ope
 name: kind-ope
- context:
   cluster: minikube
   extensions:
   - extension:
       last-update: Thu, 16 Feb 2023 14:50:26 EET
       provider: minikube.sigs.k8s.io
       version: v1.28.0
     name: context_info
   namespace: default
   user: minikube
 name: minikube
current-context: minikube
kind: Config
preferences: {}
users:
- name: kind-kind
 user:
   client-certificate-data: LS0t…
   client-key-data: LS0t…
- name: kind-ope
 user:
   client-certificate-data: LS0t..
   client-key-data: LS0t…
- name: minikube
 user:
   client-certificate: /Users/flaviuscdinu/.minikube/profiles/minikube/client.crt
   client-key: /Users/flaviuscdinu/.minikube/profiles/minikube/client.key
In the Kubeconfig, you can define multiple cluster connections, including credentials and the default namespaces to use.
Here are some of the attributes that can be configured:
- kind – specifies the object type, in this case: Config
- clusters – list of clusters that you can connect to (in our case, there are three clusters)
- contexts – different working environments for your cluster
- current-context – specifies the active context
- users – list of users that can access the clusters
How to create a Kubeconfig file?
Creating a Kubeconfig file involves defining the necessary parameters required for connecting to your cluster. Even though the majority of Kubernetes services have a mechanism for appending configuration data to your kubeconfig, you could still do it manually if you’d like.
To do that, you need to:
- Identify cluster details (API Server URL, cluster name, user credentials, certificate authority data)
- Create a basic kubeconfig file in ~kube/configInclude apiversion (v1)
Include apiversion (v1):
apiVersion: v1Add the clusters attribute:
apiVersion: v1
kind: Config
Add the contexts attribute and the current context:
apiVersion: v1
kind: Config
clusters:
- cluster:
   certificate-authority-data: my_ca_data
   server: my_server
   name: my_cluster
contexts:
- context:
   cluster: my_cluster
   user: user
current-context: my_cluster
Add the users:
apiVersion: v1
kind: Config
clusters:
- cluster:
   certificate-authority-data: my_ca_data
   server: my_server
   name: my_cluster
contexts:
- context:
   cluster: my_cluster
   user: user
current-context: my_cluster
users:
- name: my_cluster
  user:
   client-certificate-data: LS0t…
   client-key-data: LS0t…
How to use a Kubeconfig file?
Let’s go over the steps.
1. Add clusters to a Kubeconfig file
Let’s get started adding some cluster connections to Kubeconfig. Use the config set-cluster command to register a new cluster. You must supply a name for the cluster, its API server URL, and the path to its TLS certificate authority file:
$ kubectl config set-cluster production --server=https://1.1.1.1 --certificate-authority=~/.kube/production.ca.crt
Cluster "production" set.
To add another cluster, simply repeat the command with different arguments:
$ kubectl config set-cluster staging --server=https://2.2.2.2 --certificate-authority=~/.kube/staging.ca.crt
Cluster "staging" set.
If you’re running a local cluster without TLS, you can disable TLS verification instead of supplying certificate authority data:
$ kubectl config set-cluster staging --server=https://2.2.2.2 --insecure-skip-tls-verify
Cluster "staging" set.
View all the clusters present in your active Kubeconfig file with the config get-clusters command:
$ kubectl config get-clusters
NAME
staging
production
2. Add users to a Kubeconfig file
Next you need to add user credentials for each of your clusters. The config set-credentials command registers credentials in several different formats.
Specify the name of your new credentials entry as the command’s first argument. This name will be used to refer to the credentials when you link them to your cluster in the next step.
Flags must also be set to supply the user’s authentication data. This example creates a user entry called production-admin that authenticates with a token:
$ kubectl config set-credentials production-admin --token=cfrDHdb2
User "production-admin" set.
Token-based auth is the correct method when your user is a service account created within Kubernetes. Use --username and --password instead if you’re using HTTP Basic Auth, or set --client-certificate and --client-key for certificate-based authentication.
Repeat the command to add another user for your staging cluster:
$ kubectl config set-credentials staging-admin --token=WLOBZKM7
User "staging-admin" set.
After you’ve added your credentials, you can view them with the config get-credentials command:
$ kubectl config get-users
NAME
production-admin
staging-admin
3. Create Kubeconfig contexts
Now you’re ready to link your clusters and credentials together as functioning configuration contexts. A context is a combination of cluster and credentials; Kubectl connects to the cluster specified by your selected context, using its configured credentials.
Contexts are created by the config set-context command. Specify the name of your new context as the command’s argument, then set the --cluster and --user flags to reference the respective entries in your Kubeconfig file:
$ kubectl config set-context production --cluster production --user production-admin
Context "production" created.

$ kubectl config set-context staging --cluster staging --user staging-admin
Context "staging" created.
You can view the contexts within your Kubeconfig file by running config get-contexts:
$ kubectl config get-contexts
CURRENT   NAME         CLUSTER      AUTHINFO           NAMESPACE
          production   production   production-admin
          staging      staging      staging-admin
4. Use contexts in Kubectl
Once you’ve created your contexts, you can switch between them by running the config use-context command. Kubectl will mark the specified context as the current one. The cluster and user it specifies will be targeted by all subsequent commands, until you switch away to a different context.
$ kubectl config use-context production
Switched to context "production".

# Connects to the "production" cluster as "production-admin"
$ kubectl get pods

$ kubectl config use-context staging
Switched to context "staging".

# Connects to the "staging" cluster as "staging-admin"
$ kubectl get pods
The currently selected context is indicated by an asterisk in the get-contexts command’s output:
$ kubectl config get-contexts
CURRENT   NAME         CLUSTER      AUTHINFO           NAMESPACE
          production   production   production-admin
*         staging      staging      staging-admin
You can override the current context for a specific command with Kubectl’s --context flag:
# Always gets Pods in the "production" cluster
$ kubectl get pods --context production
This avoids having to switch context twice when you need to quickly run one command against a particular cluster, then revert to the previous one.
5. Add namespaces to Contexts
Contexts can also specify a default namespace. Kubectl commands will target the namespace set in the context, unless you override it with the --namespace or -n flag.
To assign a namespace to a context, run config set-context and include the --namespace flag:
$ kubectl config set-context staging --namespace demo-app
Context "staging" modified.

$ kubectl config use-context staging
Switched to context "staging".

# Connects to the "staging" cluster as "staging-admin" and gets Pods in the "demo-app" namespace
$ kubectl get pods
Kubectl merges your new config values with the context’s existing ones when you run set-context. You only need to supply new values for the fields you want to update.
Tip: Quickly switch contexts with kubectx
Switching between contexts with kubectl config use-context is simpler and less repetitive than juggling separate Kubeconfig files with KUBECONFIG or --kubeconfig. You can make it even easier by installing two Kubectl plugins: kubectx and kubens. These let you rapidly switch between contexts and namespaces using quick shortcuts.
It’s easiest to install the tools using Krew, Kubectl’s plugin manager. Run the script on the Krew website to download it if you need to.
Afterwards, run the following commands to install the plugins:
$ kubectl krew install ctx
$ kubectl krew install ns
With the plugins installed, you can view the contexts available in your Kubeconfig file by running kubectl ctx:
$ kubectl ctx
production
staging
The active context will be highlighted. Switch to a different context by supplying its name as an argument to the ctx command:
$ kubectl ctx production
Switched to context "production".
Similarly, kubectl ns lists and navigates between namespaces in your active cluster:
$ kubectl ns
default
kube-node-lease
kube-public
kube-system

$ kubectl ns default
Context "production" modified.
Active namespace is "default".
These time-saving aliases for kubectl config commands help you efficiently work across clusters and environments.
How to manage Kubeconfig files?
Kubeconfig lets you edit your config files at any time. Change the properties of clusters, contexts, and users by repeating the set-cluster, set-context, and set-user commands with appropriate flags to apply the change you need:
$ kubectl config set-cluster staging --server=https://127.0.0.1
Cluster "staging" set.
You can always check which context you’ve selected by running config current-context:
$ kubectl config current-context
production
Clusters, contexts, and users can be deleted with their respective delete- commands.
There’s no confirmation prompt, so check you’ve typed the correct name before pressing enter!
$ kubectl config delete-user staging-admin
deleted user staging-admin from /home/user/.kube/config
To view the contents of your current Kubeconfig file, run kubectl config view:
$ kubectl config view
apiVersion: v1
clusters:
- cluster:
    certificate-authority: /home/james/~/.kube/production.ca.crt
    server: https://1.1.1.1
  name: production
- cluster:
    certificate-authority: /home/james/~/.kube/staging.ca.crt
    server: https://127.0.0.1
  name: staging
contexts:
- context:
    cluster: production
    user: production-admin
  name: production
- context:
    cluster: staging
    namespace: demo-app
    user: staging-admin
  name: staging
current-context: production
kind: Config
preferences: {}
users:
- name: production-admin
  user:
    token: REDACTED
It displays the same content as if you’d accessed the file directly, including the clusters, users, and contexts you’ve registered.
How to export and merge Kubeconfig files together
Got lots of existing Kubeconfig files for different clusters? You can merge them into a single file, then set up contexts to access your environments.
First, set the KUBECONFIG environment variable to reference all your files. Separate each file’s path with a colon (:) character:
$ export KUBECONFIG=~/.kube/kubeconfig-1:~/.kube/kubeconfig-2Next use Kubectl’s config view command with the --flatten flag to export a new combined Kubeconfig file:
$ kubectl config view --flatten > ~/.kube/configThe resulting Kubeconfig will be the product of merging all the individual files together. You can now use the clusters and users in the merged file to set up your contexts.
Kubeconfig and security
Kubeconfig files are sensitive assets that should be treated with caution. Whether you merge your files or keep them separate, remember that anyone with access to them can connect to your cluster.
Avoid sharing Kubeconfigs and ensure they don’t get accidentally committed to code repositories. If you know or suspect that a file has been leaked, you should immediately take action to invalidate the credentials it contained. Replace the secrets for service accounts and revoke any user tokens that may have been exposed from your identity provider.
You should also be wary of using Kubeconfig files you don’t trust. It’s possible to create malicious Kubeconfig files that execute arbitrary code on your host. Kubeconfigs you receive are best treated similarly to shell scripts. Don’t use them without inspecting their content, even if the source seems to be genuine.
Tools to use with Kubeconfig files
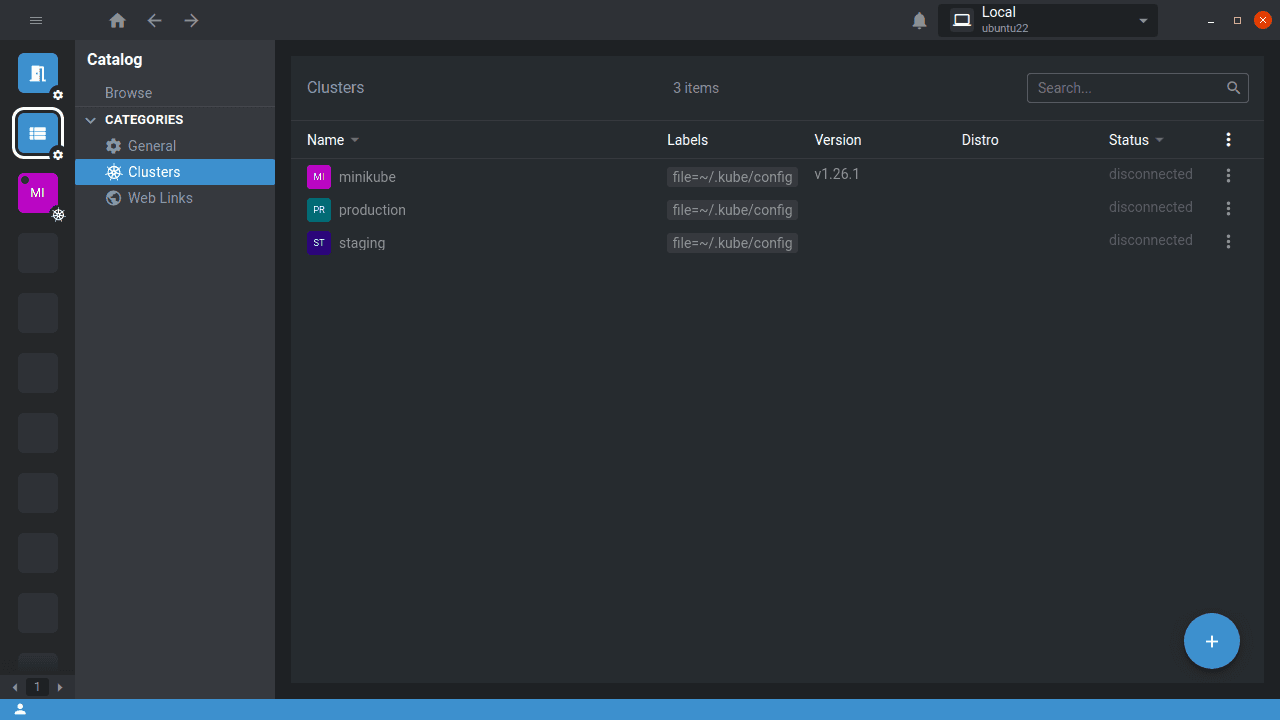
Kubeconfig files work with more than just Kubectl. Other Kubernetes ecosystem tools such as Helm and graphical clients like Lens also support the clusters, users, and contexts you create. Opening Lens after following the steps in this tutorial will automatically show your cluster connections, for example:
Key Points
Multi-cluster Kubernetes access doesn’t have to mean multiple Kubeconfigs, cumbersome environment variables, and confusion over which file is correct for each situation. Merging your Kubeconfigs into one file lets you use Kubectl’s built-in commands for quickly switching between clusters, users, and contexts.
While this simplifies ease-of-use, it still requires you to share sensitive cluster credentials and certificates before users can connect. Use a centralized infrastructure automation platform like Spacelift to avoid this risky practice. Spacelift provides precise guardrails that let your developers ship straight to Kubernetes clusters without breaking security and compliance requirements.
Want to learn more about Kubernetes and Kubectl? Try our beginners tutorial, or check out the advanced topics on the Spacelift blog.
The most flexible management platform for Infrastructure as Code
Spacelift is a sophisticated SaaS product for Infrastructure as Code that helps DevOps develop and deploy new infrastructures or changes quickly and with confidence.
Kubernetes Reference Documentation. kubectl config set-credentials. Accessed: 22 October 2025
Kubernetes Reference Documentation. kubectl config set-cluster. Accessed: 22 October 2025
Kubernetes Documentation. Authenticating. Accessed: 22 October 2025
Kubernetes Documentation. Delete/invalidate a ServiceAccount token. Accessed: 22 October 2025
Kubernetes Documentation. Organizing Cluster Access Using kubeconfig Files. Accessed: 22 October 2025
