
Note: On AKS clusters that use Microsoft Entra ID and run Kubernetes 1.24+, the kubeconfig uses the kubelogin (client-go exec) plugin by default. So ensure the environment running kubectl/Helm (e.g., your Spacelift runner) has kubelogin installed, or fetch credentials with az aks get-credentials, which outputs the kubelogin format for these clusters.
Running a Kubernetes cluster can be complex, requiring careful management and maintenance to ensure that it runs efficiently, reliably, and securely.
The first step is figuring out how to set it up. After that, you need to decide how to add various components to it. While there are many methods to consider, let’s focus on the ones that are straightforward and effective.
Deploying a Kubernetes Cluster
If you are using any cloud provider for your workloads, the quickest and easiest way to deploy a Kubernetes cluster is to use a service from that provider.
AWS offers Amazon Elastic Kubernetes Service (EKS), Microsoft Azure offers Azure Kubernetes Service (AKS), and Google Cloud offers Google Kubernetes Engine (GKE). These services abstract away much of the complexity of managing infrastructure and can help you get up and running quickly.
Cloud providers can theoretically provide unlimited scalability, meaning you can quickly scale up or down based on your workload. This ensures that your applications remain responsive even when you are experiencing high growth. Cost-effectiveness is another important consideration, as the majority of these services offer a pay-as-you-go model, so you pay only for what you use.
In addition, high availability and disaster recovery features ensure your cluster remains available during failures, network outages, and other disruptions.
Enhanced security is another benefit of deploying your Kubernetes cluster inside a cloud vendor. It is easier to implement RBAC, and SSO integrations and monitor for potential threats and vulnerabilities. Taking advantage of native integrations between the cluster and other cloud services will help in building more complex applications while saving time.
The most effective way to deploy a Kubernetes cluster inside a cloud provider is using Terraform. You can check Terraform’s documentation for the resources that can deploy Kubernetes clusters. Better yet, the Terraform registry has a module that does that for you.
Deploying Resources inside the Kubernetes Cluster
While Terraform can be used to manage the underlying infrastructure that supports a Kubernetes cluster, it is generally not recommended to use Terraform to deploy resources directly inside a Kubernetes cluster.
This is partly due to what the community dictated. Communities are created around powerful tools, for which these communities establish best practices —and managing Kubernetes resources with Terraform is not one of them.
Kubernetes uses YAML files to define and manage most resources inside the cluster, such as pods, deployments, and services. These files are typically stored in a version control system and can be easily applied, updated, or deleted using kubectl commands. Using Terraform to manage Kubernetes resources can introduce unnecessary complexity and confusion.
While Terraform can manage a wide variety of infrastructure resources, it is not specifically designed for managing Kubernetes resources. Using it for this can lead to a more error-prone and cumbersome deployment process and also make it more difficult to troubleshoot issues with your Kubernetes resources.
Helm and Kustomize provide a more streamlined solution.
Helm is a package manager for Kubernetes that allows you to define and deploy sets of Kubernetes resources using a simple templating language. Helm charts can be versioned and managed using source control and can be easily shared and reused within your organization.
Kustomize is designed to simplify the process of deploying Kubernetes manifests. It uses “kustomizations”, a reusable and customizable template that can edit both simple Kubernetes manifests and helm templates.
Kubernetes has a sophisticated resource management system that allows you to define and enforce resource quotas, limits, and requests. When using Terraform to deploy resources directly inside a Kubernetes cluster, you may bypass this built-in resource management system, potentially leading to over-provisioning or other resource-related issues.
Example nginx pod manifest
apiVersion: v1
kind: Pod
metadata:
 name: nginx
 labels:
   name: nginx
spec:
 containers:
   - name: nginx
     image: nginx
     ports:
       - containerPort: 80
Same nginx pod deployment with Terraform
resource "kubernetes_pod" "nginx" {
 metadata {
   name = "nginx"
   labels = {
     name = "nginx"
   }
 }
 spec {
   container {
     image = "nginx"
     name  = "nginx"

     port {
       container_port = 80
     }
   }
 }
}
As you can see from the code example, the YAML approach is easier to read and write and the configuration, overall, seems slightly less cluttered.
The obvious best practice is to create the Kubernetes cluster using Terraform and resources using plain manifests, helm, or Kustomize. But how can we add them together in a single workflow?
One option would be to use a provisioner in Terraform, like local-exec to run the commands there, right? Well, that wouldn’t be advisable as provisioners can be pretty unstable.
What about a CI/CD pipeline? That would make total sense — except that you will need to write a lot of code for the pipeline, which will create errors and can be really error-prone.
Spacelift Stack Dependencies
At Spacelift, we’ve got you covered when it comes to deploying a cluster and then deploying your application inside it. With the Stack Dependencies feature, you don’t need to use unstable provisioners or build complicated pipelines; the only thing you need to do is create a dependency between stacks.
This blog post explains how to configure Stack Dependencies and the benefits of using this feature, but don’t worry, we will give you an example for this one too.
We will build a Kubernetes cluster in Azure using one Terraform stack, and we will have another stack for Kubernetes that will simply deploy a pod in the newly created cluster.
Let’s start with the Terraform stack. For that, I will use this k8s module. I have created a repository that leverages this module, and I will create a stack based on it.
As we are using Azure and we don’t want to leverage static credentials, let’s use a cloud integration for Azure.
In your Spacelift account, go to Cloud Integrations and select Azure:

Next, add a name to your integration and get the details for:
- Tenant ID: This can be found in Microsoft Entra ID service
- Default Subscription ID: Go to Subscriptions and select the subscription you want to have as default for the integration
After you’ve filled in the details, click on Create Integration and you will be redirected to a new screen:

In this view, you will see information about your integration, and if everything is ok, you can click on Provide Consent. It can take several minutes for your application to become available in Azure, and if the admin consent process fails initially, simply try again after a few minutes and everything should be created successfully.
For your integration to work, you need to go back to your Azure account and provide access to the enterprise application that was generated to your subscription/resource group or whichever service you want to access. To simplify things, I will provide access to the entire subscription I’ve added as default in the integration.
In the Azure Portal, go to Subscriptions, select your subscription, and then click on Access Control IAM:

Here, click on Add role assignment and select Privileged administrator roles. Select a role (I’ve selected contributor) and click on Next.

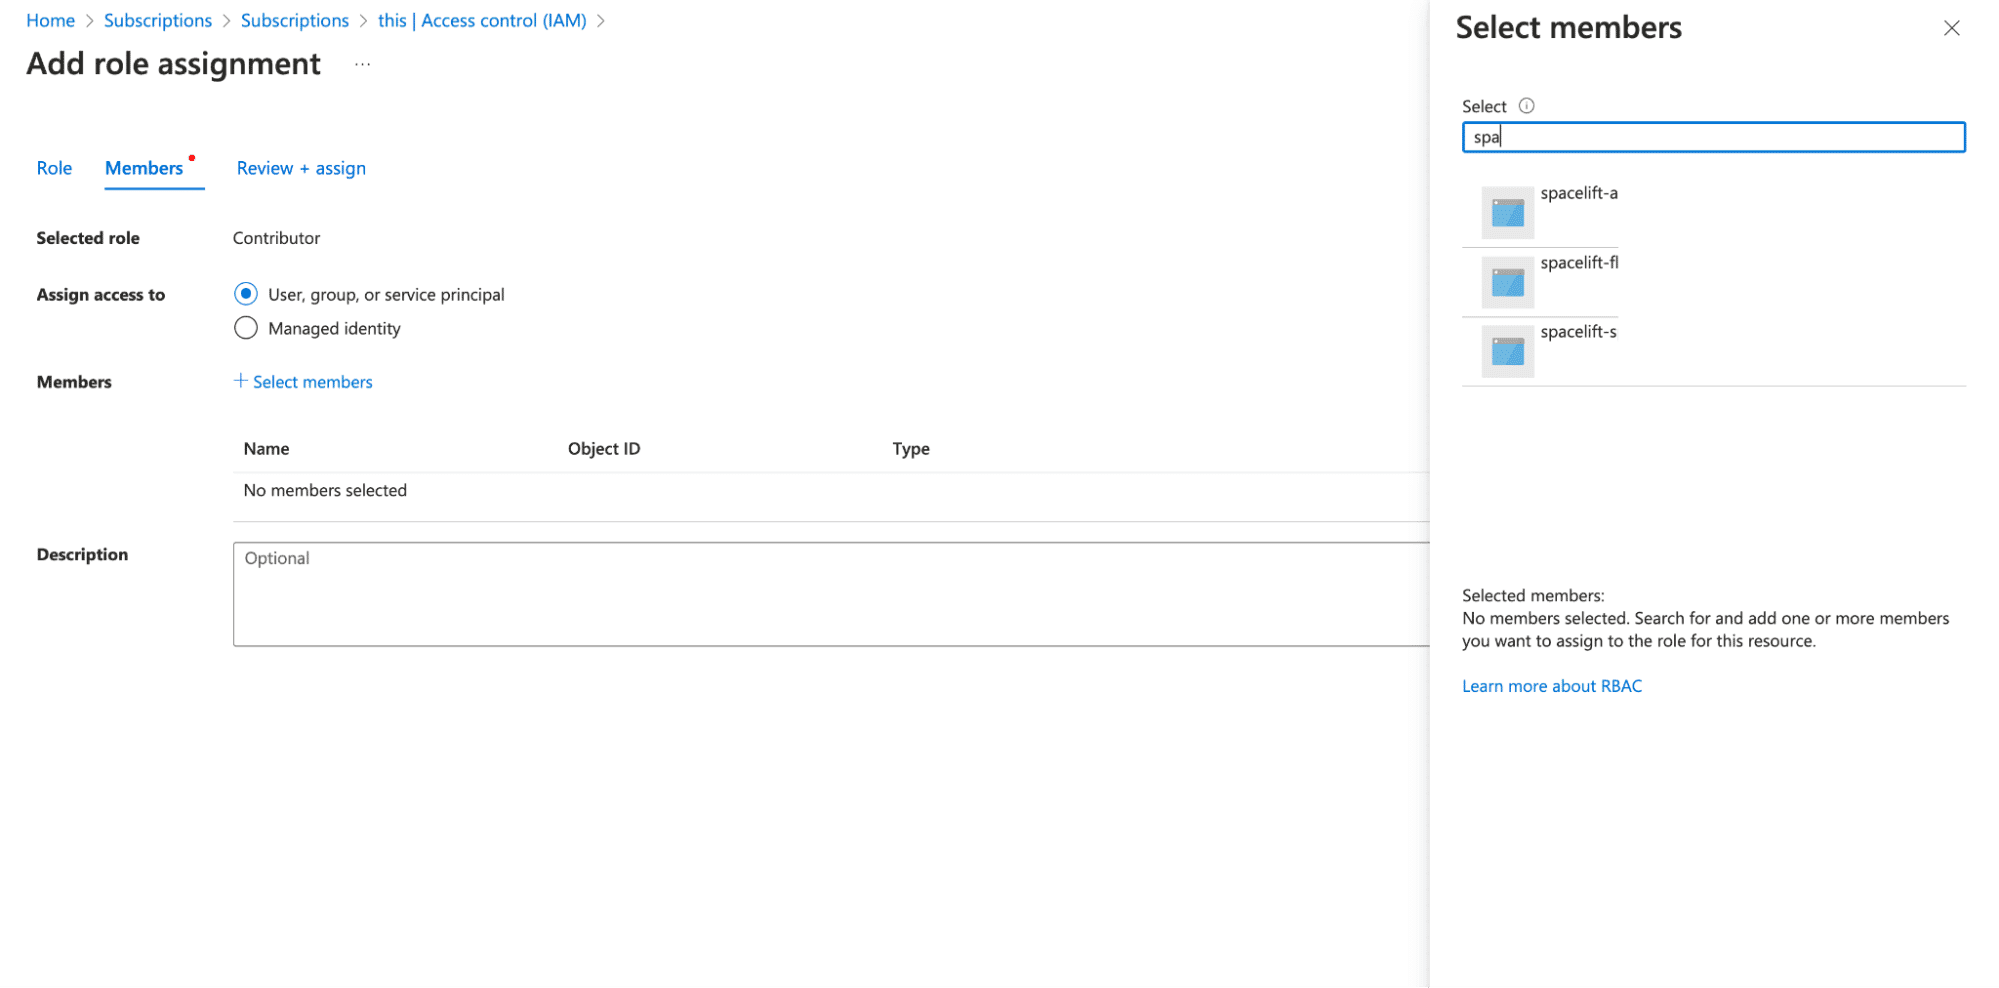
In the Members tab, keep the assign access to User, group, or service principal option on, click on select members, and search for the enterprise application that was generated (its name is similar to the name you’ve added to the cloud integration).
In the review tab, click on review and assign and you are good to go.
Now, let’s create the Terraform Stack. I am using the code from here. This code will only create an AKS cluster inside Azure and will export the kubeconfig as an output.
In your Spacelift account, go to Stacks and create a new stack:

Add a name for your stack, select your space, add optional labels and descriptions, and click on Continue.
Select the git repository containing the code, branch, and folder path in your repository if it is different from the root directory:

Leave the backend as the default Terraform option:

You don’t need to do anything In the Define Behavior tab, so accept the defaults and click on Save Stack.
Now, let’s create the K8s stack. I am using the configuration from here, and this will only deploy nginx inside a k8s cluster.
The steps will be similar, but you will need to change the repository path to the path containing the k8s-related deployment, the backend to k8s, and also do some small interventions in the Define Behavior tab.

In the Define Behavior tab, we will create the kubeconfig file based on the output exposed by the Terraform stacks using the following commands:
mkdir /mnt/workspace/.kube
printf "%s\n" "$kubeconfig" > /mnt/workspace/.kube/config
We will name the output in the first stack kubeconfig to make the above configuration work properly.
Now, let’s go back to the first stack and assign the cloud integration we have created.

Next, let’s go to the dependencies and create a dependency to the second stack:

Next, click on Add output reference, select the kube_config output, and name it kubeconfig. This ensures the value of the kube_config output gets passed to the second stack as an environment variable with the name kubeconfig.

Now, as we’ve created a dependency between the first and the second stack, whenever the first stack gets triggered, if it finishes a run successfully the second stack will also run automatically.
After we trigger a run for the first stack, the second stack will be in a queued status, waiting for the first one to finish:

You can see a plan before confirming the run on the k8s stack, and you can easily apply it by clicking on the Confirm button.
It is worth mentioning that stack dependencies are directed acyclic graphs, enabling you to define any number of dependencies between any number of stacks, with the caveat of not being able to create loops.
Spacelift offers a dependencies graph view for seeing all the dependencies that are between a stack and other stacks by simply going to the dependencies tab and selecting the dependencies graph:

For our use case, there is only one dependency, but imagine how useful this could be if you have numerous dependencies for your workflows.
Key points
In this article, we’ve explored some best practices for deploying your K8s cluster and showed you how easy it is to set up dependencies between multiple stacks inside Spacelift for a highly efficient pipeline.
With Spacelift, operating the K8s cluster becomes easier, and the ability to create dependencies really elevates your workflow.
If you want to learn more about Spacelift, create a free account today or book a demo with one of our engineers.
The Most Flexible CI/CD Automation Tool
Spacelift is an alternative to using homegrown solutions on top of a generic CI. It helps overcome common state management issues and adds several must-have capabilities for infrastructure management.
