
Kubernetes runs your containers, but it won’t tell you how to organize the dozens of YAML files that describe them. That gap is why Helm and Kustomize exist.
Helm packages and versions your application as a chart and manages its release lifecycle. Kustomize patches raw YAML with overlays and needs no templates. Both make deploying and managing Kubernetes applications easier, and they take opposite approaches to get there.
In this article, we will discuss Helm and Kustomize, what you can do with them, how to use them, and what are the differences between these tools.
We will cover:
How we compared these platforms
We aim to make our recommendations practical and vendor-neutral. We based this comparison on each vendor’s public documentation and pricing pages, hands-on experience using both tools, and the dimensions that matter most in practice.
What is Helm?
Helm is the de facto package management solution for Kubernetes. A package manager automates the process of installing, upgrading, configuring, and removing software packages. Like Yum/RPM/APT in the Linux ecosystem and Chocolatey/Homebrew in Windows/Mac machines, Helm simplifies the software installation lifecycle in Kubernetes.
Accepted into the Cloud Native Computing Foundation (CNCF) on June 1, 2018 at the Incubating level, Helm moved to the Graduated maturity level on May 1, 2020. A project at the CNCF Graduated is considered to be stable, widely adopted, and production-ready, attracting thousands of contributors.
With Helm, you can define, install, and upgrade complex Kubernetes applications using a single command rather than manually creating and managing all the necessary Kubernetes objects yourself. Helm accomplishes this by providing a templating engine that allows you to define the components of your application as Helm charts, which can then be easily installed and managed. Helm charts can also be shared and reused, making it easier to distribute and collaborate on complex Kubernetes applications.
Example of a Helm Chart
Helm Charts are packages of pre-configured Kubernetes resources. A Helm Chart contains all the necessary information to deploy a specific application or service, including the Kubernetes manifests, environment variables, and other configuration settings.
A chart is organized as a collection of files inside a directory. The directory name is the chart’s name (without versioning information). For example, as shown on the Helm documentation, a chart describing WordPress would be stored in a wordpress/ directory with a structure that matches the image below.

In the above image, Helm reserves the use of the charts/, crds/, and templates/ directories.
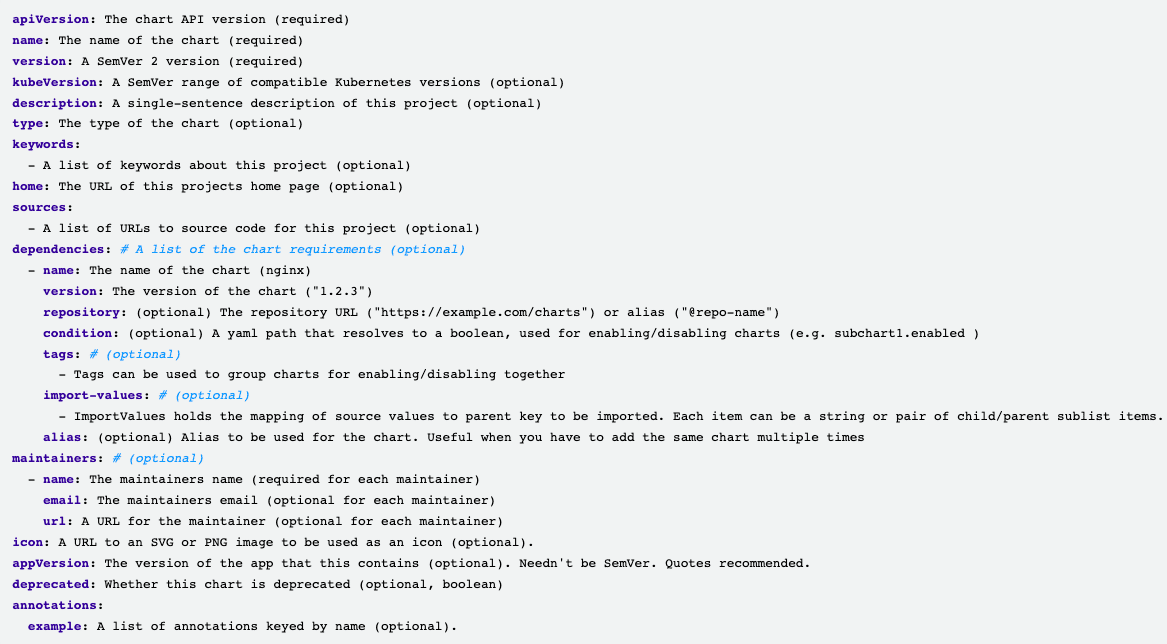
The Chart.yaml file is required for a chart and contains the following fields as in the image below.
How to use a Chart Registry
When you create Helm charts, you store them in chart repositories hosted in any OCI (Open Container Initiative) container registries, either on a local system or online. The way by which you would host a Chart on a registry is dependent on the particular registry. See this Helm documentation on hosting on several registries.
Use the following command to log in to a registry with the Helm CLI installed:
$ helm registry login [host] [flags]See the helm registry login documentation for all flag options. To log out, you use the helm registry logout command.
Download a repository in a registry:
$ helm pull [chart URL | repo/chartname] [...] [flags]Using the above command, it is also important to check the registry documentation to be sure you have all the right command sequences. See the helm pull documentation for all flag options.
Chart versioning
Helm chart versioning is the process of assigning unique version numbers to different releases of a Helm chart.
Every chart must have a version number that follows the SemVer 2 standard. Packages in a repository are identified by their name plus version.
For example, an httpd chart which version field is set to version: 1.2.4 will be named httpd-1.2.4.tgz.
What is Kustomize?
Kustomize is a configuration management tool for Kubernetes that allows users to customize and manage deployments, services, and other Kubernetes objects using declarative configuration files. It enables you to create different versions of a Kubernetes application without duplicating YAML manifests or creating multiple copies of the same deployment.
With Kustomize, you can define a base configuration for a Kubernetes application and customize it with different overlays for different environments or use cases. Kustomize uses patches to modify the base configuration and apply the changes to create a customized application version.
Kustomize provides a flexible and efficient way to manage Kubernetes configurations and reduce duplication of configuration files, making it easier to maintain and manage Kubernetes applications across different environments.
How to use Kustomize
To use Kustomize, in the directory containing your YAML resource files (deployments, services, configmaps, etc.), you create a kustomization.yaml file.
For example:
~/helloWorldApp
├── deployment.yaml
├── kustomization.yaml
├── configMap.yaml
└── service.yaml
The kustomization.yaml file would declare the above resources and any customization to apply. For example, adding a common label as in the kustomization.yaml file below.
apiVersion: kustomize.config.k8s.io/v1beta1
kind: Kustomization
metadata:
  name: arbitrary
commonLabels:
  app: hello
resources:
- deployment.yaml
- service.yaml
- configMap.yaml
To apply this customization, you run the following command:
$ kubectl apply -k ~/helloWorldApp As mentioned earlier, Kustomize enables you to create and manage different Kubernetes applications in different environments without duplicating YAML manifests. To do so, you create an overlay directory for each environment.
For example, you could create an overlay/dev directory for the development environment to modify a base configuration.
Inside this directory, create a kustomization.yaml file and add a patch to modify the base configuration. The patch should only include the changes necessary for the specific environment. You would repeat this step for each overlay you need.
The file structure of your Kubernetes application will now be as below:
~/helloWorldApp
├── base
│   ├── deployment.yaml
│   ├── kustomization.yaml
│   ├── configMap.yaml
│   └── service.yaml
└── overlays
    ├── development
    │   ├── cpu_count.yaml
    │   ├── kustomization.yaml
    │   └── replica_count.yaml
    └── production
        ├── cpu_count.yaml
        ├── kustomization.yaml
        └── replica_count.yaml
To apply the overlay/dev, you run a command similar to the below:
$ kustomize build ~/helloWorldApp/overlays/dev | kubectl apply -f -What is the difference between Helm and Kustomize?
Helm and Kustomize are two popular tools in the Kubernetes ecosystem for managing and deploying Kubernetes applications. While both tools have similar goals, they approach the problem differently.
Helm and Kustomize differ mainly in how they manage Kubernetes manifests: Helm uses templating with values, while Kustomize applies patch-based customization.
Helm packages applications into versioned charts with templated YAML files and supports dependency management, release tracking, and rollbacks. It’s well-suited for deploying complex applications across environments using parameterized configurations.
Kustomize modifies raw YAML by layering patches or overlays without templates. This avoids logic in manifests and integrates directly with kubectl, making it simpler for declarative and GitOps workflows that require less dynamic input.
While Helm offers more flexibility and lifecycle features, Kustomize favors simplicity and native kubectl integration, without introducing a templating layer that could obscure manifest logic.
Both tools can be used in combination for advanced workflows, such as using Helm to package apps and Kustomize to modify deployments in CI/CD pipelines.
Here is the comparison table between Helm and Kustomize:
| Kustomize | Helm | |
| Tool type | Configuration overlay / patching tool | Package manager and templating engine |
| Native Kubernetes integration | Yes | No |
| Ease of use | Simple | Complex |
| Approach | Overlays | Templates |
| Declarative/imperative | Declarative | Declarative charts, imperative release lifecycle |
| Packaging | No | Yes |
| Version control/Rollbacks | No | Yes |
| Ecosystem & reuse | Reuses existing manifests and overlays | Large ecosystem of reusable charts for common apps |
| GitOps workflows | Very Git-native; great for environment overlays | First-class support via GitOps tools managing Helm releases |
| Best suited for | Customizing existing YAML and per-env configs | Installing/upgrading apps as versioned packages |
Integration in Kubernetes
Helm and Kustomize are both built for Kubernetes. Unlike Kustomize, Helm is not included in a standard Kubernetes installation, so you must install it from its binary releases, script, or via a package manager. The actual installation is simple. However, introducing a new system to your architecture brings security and complexity management concerns.
Kustomize, on the other hand, is built into kubectl, but it still carries a learning curve, and your team has to decide whether it solves a problem they actually have. If your team struggles to manage YAML configuration files across separate environments, Kustomize is the best solution. However, if your goal is to simplify the software installation lifecycle in Kubernetes or share your application easily with others, Helm is the best solution.
Today, Kustomize ships two ways: as a standalone binary, and built into kubectl via kubectl apply -k and kubectl kustomize.
A 2024 proposal (KEP-4706) suggested removing the built-in integration so the two tools could version independently, but Kubernetes maintainers shelved it in October 2024 because so many teams rely on the kubectl integration. Both paths are supported. If you want the newest Kustomize features, the standalone binary still moves faster than the version bundled with kubectl.
Kustomize and Helm aren’t really in a contest with each other, and they can be used together. You will learn how to use Kustomize with Helm toward the end of this article.
Complexity and security
As stated earlier, Helm introduces complexity to Kubernetes architecture. This is because Helm is a more complex tool than Kustomize, as it provides a full package management system with a templating language, dependency management, and versioning. Kustomize is a simpler tool that focuses on customizing existing manifests.
Regarding security, because Helm sits outside the original Kubernetes design, it brings its own surface to manage. Helm v2 relied on a server-side component called Tiller, which complicated the security model and raised questions about how Secrets were stored and how RBAC should be configured.
Helm v3 removed Tiller entirely and moved every operation client-side against the Kubernetes API, so Helm reuses Kubernetes-native authentication and authorization. Helm 4, released in November 2025 and now the stable line, builds on that model and defaults to server-side apply for new releases.
The old Tiller risk is gone, but you still own the external values Helm pulls in, so treat those as part of your attack surface.
Flexibility
Kustomize provides more flexibility than Helm in the customization of Kubernetes manifests. It allows you to apply patches to existing manifests and generate customized versions of those manifests for different environments.
Helm templates, on the other hand, are more rigid in structure and require a certain level of familiarity with the templating language to use effectively.
Read also: Helm vs. Terraform.
Using Helm and Kustomize together
Helm and Kustomize can help you manage your Kubernetes applications more efficiently. There are several scenarios where you might want to use Helm and Kustomize together, and there are:
- When you don’t own and control the Helm chart: It’s common to pull and use a Helm chart somebody else published in a Helm repository. What if you want to modify something in the manifests? Kustomize makes this easy.
- When creating Secret and ConfigMap resources: When working with Secrets and ConfigMaps, you obviously don’t want them baked into your Helm charts. With Kustomize, you can create the resources after Helm has inflated the charts.
- When you want to edit fields in multiple resources simultaneously: In certain instances, you may want to force all (or a subset of) resources to a namespace or apply a label to these resources. You wouldn’t normally want it in your Helm charts, but Kustomize can overlay this setting over your resources.
There are two main ways to use Helm and Kustomize together, and you generally pick one, not both at once.
- Using
helm templateto generate the manifests, and then Kustomize to do the patching. The downside is that Helm doesn’t manage any releases. - Using
helm install(orhelm upgrade --install) and having Kustomize modify the manifests before applying them in the cluster. With this method, you still benefit from Helm managing your releases and applications.
In practice, many teams use GitOps controllers like Argo CD or Flux to orchestrate both Helm and Kustomize. Argo CD can render apps using either Helm or Kustomize (or Kustomize with Helm enabled), while Flux exposes dedicated Kustomization and HelmRelease resources and even a Kustomize-compatible post-renderer for Helm. This makes it straightforward to, for example, deploy a third-party Helm chart and then apply Kustomize patches on top.
Key points
Kustomize and Helm are both powerful tools for managing Kubernetes applications. While both have similar goals, they approach the problem differently. These tools aren’t really in a contest with each other, and they can be used together
Spacelift manages your Kubernetes deployments through kubectl, so anything you can run with kubectl runs in a Spacelift stack, with Kustomize as the native path. You get a GitOps flow where pull requests preview exactly what will change before it hits the cluster, plus policies that enforce compliance on every run.
Helm fits in too. There’s no native Helm integration, but you run helm template in a before-plan hook to generate your manifests, and Spacelift applies them like any other Kubernetes resources.
You can mix Kubernetes stacks with Terraform, Pulumi, and CloudFormation, and have them feed one another: provision an EKS cluster with Terraform, then deploy onto it with Kubernetes, in one governed workflow.
Find out more about how Spacelift works with Kubernetes, and get started on your journey by creating a free trial account.
Solve your infrastructure challenges
Spacelift is an infrastructure orchestration platform built for IaC. It brings collaboration, automation, and governance into a single workflow, so your team can provision cloud infrastructure faster without losing control.
Frequently asked questions
Is Helm being deprecated?
No. Helm 4 is the current stable release, out since November 2025. Helm 3 still receives security fixes through February 2027.
Is Kustomize being removed from kubectl?
No. A 2024 proposal suggested it, but Kubernetes maintainers decided to keep the built-in integration because so many teams depend on it.
Can you use Helm and Kustomize together?
Yes. Render a chart with helm template and patch it with Kustomize, or let a GitOps controller like Argo CD or Flux apply Kustomize patches on top of a Helm release.
