
Kubernetes (K8s) is an open-source orchestrator for managing the deployment of containerized systems. It’s risen to prominence as the most popular way of running containers in production because it automates essential tasks such as lifecycle management, fault tolerance, and scaling.
Amazon Web Services (AWS) is a market-leading public cloud platform that offers a wide selection of products and services to power your cloud deployments. You can use AWS to run all your app’s infrastructure, including Kubernetes clusters.
Because the AWS catalog is so extensive, it can be difficult to decide how you’ll host Kubernetes on the platform. There are a few options available, which we’ll explore in this overview. You’ll learn three different ways to handle Kubernetes deployments on AWS, including their benefits and drawbacks.
We will cover:
Why Run Kubernetes on AWS?
AWS lets you reliably run Kubernetes in the cloud. You can locate your K8s cluster alongside your other AWS resources, avoiding the need to select an external Kubernetes service.
You can easily integrate your cluster with AWS networking and storage solutions, such as Elastic Load Balancers (ELB) and Elastic Block Store (EBS) volumes. Kubernetes becomes another resident in your cloud, able to share data and resources with your existing infrastructure components.
As we’ll see below, AWS also allows you to eliminate the complexity involved in manually provisioning and maintaining Kubernetes clusters. Elastic Kubernetes Service (EKS) can start a new cluster within minutes, leaving you to focus on your apps instead of infrastructure.
Some of the other benefits of Kubernetes on AWS include:
- Scalability – You can near infinitely scale your cluster with additional Nodes. AWS supports a dizzying array of different compute instance types, so you can tailor your cluster’s capacity to your exact requirements. Read more about scaling AWS infrastructure.
- Cost Efficiency – Running Kubernetes on AWS can be more cost-efficient than alternative solutions. You can use auto-scaling to dynamically resize your clusters for optimum resource utilization; additionally, the ability to directly integrate with other AWS features could reduce your setup, maintenance, and training costs over the life of your solution.
- High Availability and Uptime Guarantees – Using AWS ensures your cluster inherits the platform’s reliability and uptime guarantees. EKS offers an SLA of 99.95%, while EC2 is pegged at 99.99%.
Is Kubernetes Free on AWS?
AWS offers a comprehensive free tier of services that are either available free for life, or offer an extended free trial of up to 12 months. Unfortunately, it’s not possible to use free tier services to run a Kubernetes cluster.
The EKS managed Kubernetes engine isn’t included in the free tier. You’ll always be billed $0.10 per hour for each cluster you create, in addition to the EC2 or Fargate costs associated with your Nodes. The basic EKS charge only covers the cost of running your managed control plane.
Even if you don’t use EKS, you’ll still need to pay to run Kubernetes on AWS. The free tier gives you access to EC2 for 750 hours per month on a 12-month trial, but this is restricted to the t2.micro and t3.micro instance types. These only offer 1 GiB of RAM so they’re too small to run most Kubernetes distributions.
Read more about AWS Cost Optimization.
Ways to Run Kubernetes on AWS
Now you’ve decided to run Kubernetes on AWS, how do you actually get started? Let’s look at three different ways to create your cluster, beginning with the simplest option.
1. Use Amazon EKS
Amazon EKS is a fully managed Kubernetes engine. It lets you start a cluster without having to administer any physical hosts yourself.
The EKS service provides the Kubernetes control plane with performance and reliability guarantees. It also automates the process of provisioning worker Nodes and joining them to your cluster. You can run your Nodes on either EC2 or Fargate.
EKS has built-in support for auto-scaling, allowing your cluster to resize itself as utilization changes. It also includes a full graphical console for managing your cluster, as well as automated security patches to keep Kubernetes updated. There are direct integrations with other AWS services, including VPC and ELB networking, EBS storage, and IAM identity management.
Creating an EKS Cluster
To start a new Kubernetes cluster with EKS using the AWS console, first log in to your AWS account and open up the Web Console.
Creating IAM Roles
Begin by heading to the IAM Dashboard. You can find it using the search bar at the top of the page:

Click the “Roles” link in the left sidebar, followed by the blue “Create role” button on the Roles page:

Select “AWS service” as the “Trusted entity type” for your new role. Scroll down to the “Use case” section, choose “EKS” from the dropdown menu, and then use the radio button to select the “EKS – Cluster” use case. Scroll down the page and click the blue “Next” button.

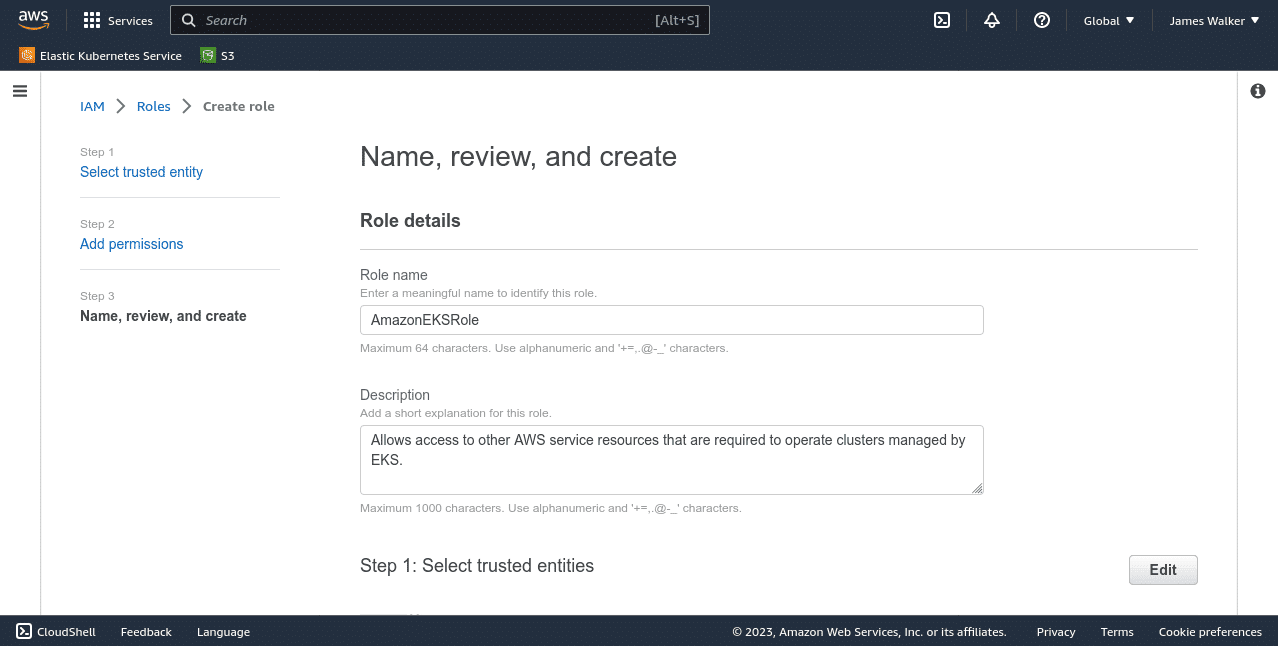
Click through the following pages without making any changes, until you reach the “Name, review, and create” screen. Name your role, then click the blue “Create role” button at the bottom of the screen. This IAM role will allow EKS to manage other resources in your AWS account on your behalf.
Next, repeat the steps listed above, but select the “EC2” use case when choosing the role’s entity type. On the following “Add permissions” page, use the “Filter policies” box to attach the extra AmazonEKSWorkerNodePolicy, AmazonEC2ContainerRegistryReadOnly, and AmazonEKS_CNI_Policy permissions to the role.
This role allows the Kubelet process on your worker nodes to interact with the EKS and AWS services it requires.

If you want to lear more about IAM Roles, check out AWS IAM Roles – Everything You Need to Know & Examples.
Creating Your Cluster
Next, switch to the EKS dashboard by searching in the search bar at the top of the page. The dashboard will show as “Elastic Kubernetes Service” under “Services” in the search results:

On the EKS landing page, click the “Add cluster” button, then “Create” in the dropdown menu that appears:

Enter a name for your cluster and select the Kubernetes version to deploy. Accept the default version unless you know you need an alternative because it’s usually the best-supported option.
Check that the cluster role you created above is selected in the “Cluster service role” dropdown, then scroll down the page and press the yellow “Next” button.

Accept the default configurations on the following four screens, as we’re only creating a basic cluster.
Click through the screens until you reach Step 6, “Review and create,” then press the yellow “Create” button at the bottom to provision your cluster.

You’ll be taken to your cluster’s dashboard. Wait while the creation process completes – the “Status” displayed under “Cluster info” will change from “Creating” to “Active” once it’s ready.

Adding Nodes
Next, switch to the “Compute” tab in the tab strip near the top of the page. Your cluster doesn’t have any Nodes yet, so it can’t run any workloads. Scroll down and click the “Add node group” button to begin provisioning your first Nodes as EC2 instances.

Give your Node group a name, then check the node IAM role you created earlier is selected in the dropdown.
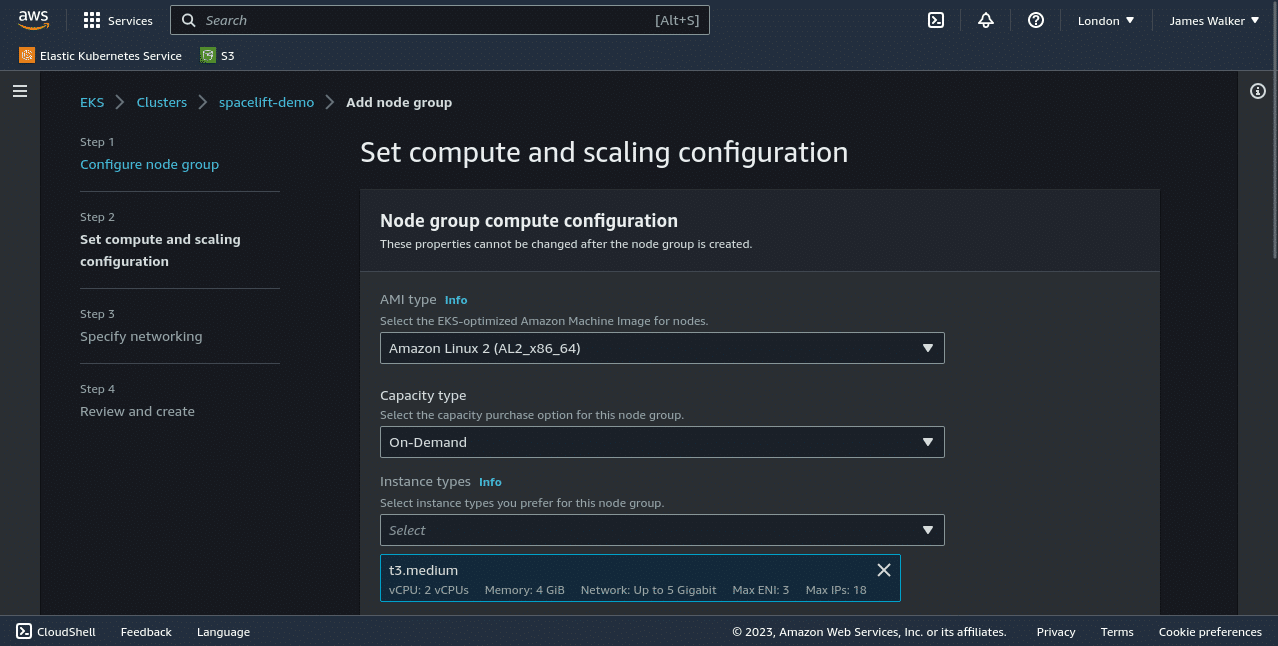
On the next page, configure the type of EC2 instance to provision for this Node group. The defaults are sufficient for this example.
Further down the page, choose the number of Nodes to provision. More Nodes will increase your cluster’s redundancy and capacity.

Step through the remaining pages to review and create your Node group, then wait while your Nodes are provisioned. This may take some time as new EC2 instances are created.

Connecting to Your Cluster
Your cluster will be ready to use once the Node group’s status changes to “Active.”
You now need to add the cluster’s Kubeconfig file to your ~/.kube directory so Kubectl can access it.
The easiest way to do this is through the AWS CLI. Follow the documentation to install and authenticate the CLI if needed, then run the following command to update your local Kubeconfig to include your EKS cluster:
$ aws eks update-kubeconfig --name <your-cluster-name>Now you can use Kubectl to interact with your cluster:
$ kubectl get nodes
NAME                                         STATUS   ROLES    AGE     VERSION
ip-172-31-39-83.eu-west-2.compute.internal   Ready    <none>   3m48s   v1.25.7-eks-a59e1f0
ip-172-31-7-11.eu-west-2.compute.internal    Ready    <none>   3m49s   v1.25.7-eks-a59e1f0
Read more about how to use kubectl get nodes.
Why Use EKS?
EKS is popular because it’s so simple to configure and maintain. You don’t need to understand the details of how Kubernetes works or how Nodes are joined to your cluster and secured. The EKS service automates cluster management procedures, leaving you free to focus on your workloads.
This simplicity can come at a cost, though: you could find EKS becomes in-flexible as you grow, and it might be challenging to migrate from if you switch to a different cloud provider. Actual EKS costs can swell as you add more clusters, too. The $0.10 per hour control plane fee sometimes becomes significant for smaller organizations that need to use multiple clusters.
2. Manually Deploy Your Own Cluster Using EC2 Compute Instances
Amazon EC2 provides virtual compute instances that you can use to manually deploy your own Kubernetes clusters. EC2 instances behave like regular virtual machines; to create your cluster, you’ll need multiple EC2 machines, one to act as the K8s master node that hosts the control plane, and the others configured in worker node roles.
Deploying directly to EC2 gives you full control over your cluster, including its control plane components. This can make it easier to configure Kubernetes in advanced situations.
Running a cluster directly on EC2 also gives you the choice of using any available Kubernetes distribution, such as Minikube, K3s, or standard Kubernetes as deployed by Kubeadm. You deploy your cluster directly on the operating system as if you were running it locally. This allows you to standardize on one distribution, such as K3s, across all the environments where you require Kubernetes – on your laptop, on AWS, and in the other clouds you use.
The drawbacks of direct deployment have directly led to the rise of managed alternatives like EKS, however. Manually administering Kubernetes increases your maintenance overheads and can be daunting to inexperienced operators. You’ll be responsible for applying cluster upgrades and preserving reliability. It’s also challenging to configure auto-scaling for non-managed compute instances, which can affect your cluster’s long-term suitability.
3. Automate Kubernetes Deployment to AWS Using Infrastructure as Code (IaC)
Neither of the methods shown above are ideal in environments where you require several clusters or need them to be provisioned in a consistent way by multiple people.
Automating Kubernetes deployments to AWS using an IaC provider such as Terraform allows you to take a hands-off approach to cluster administration. You can version your cluster configuration alongside your source code to easily track infrastructure changes. When you need to start a new cluster, you can reuse your configuration to quickly provision another instance.
Adopting IaC does mean you’ll be increasing your tool count and slightly increasing the learning curve for new team members. Having to run through an IaC workflow can also feel more clunky when creating a one-off or short-lived cluster for testing and experimentation.
However, the increased safety, consistency, and repeatability enabled by automation means it’s usually advantageous overall.
Using Terraform to Deploy Kubernetes on AWS
Terraform can be used to deploy Kubernetes using both standalone EC2 instances and EKS. You can see an example of how to use Terraform to deploy an EKS cluster in the official demo repository.
First, make sure you have the AWS CLI installed and connected to your AWS account.
Next, clone the Terraform sample repository to your machine:
$ git clone https://github.com/hashicorp/learn-terraform-provision-eks-cluster

$ cd learn-terraform-provision-eks-cluster
Next, open the terraform.tf file in the repository and remove the cloud block near the top.
This configures Terraform for local use, without a Terraform Cloud account.
# Remove this section
cloud {
	workspaces {
		name = "learn-terraform-eks"
	}
}
Now, run terraform init to initialize the configuration and install the correct Terraform providers:
$ terraform initNext, use terraform apply to apply the configuration and create the required resources in your AWS account.
The planned actions will be displayed in your terminal; type yes at the prompt to confirm the operation. It could take several minutes to complete.
$ terraform applyThis procedure automates the cluster deployment process, removing the need to manually click through AWS web console screens or manually make API requests.
You can edit the created resources and change your cluster’s configuration by altering the repository’s Terraform state files.
Learn more about managing Infrastructure as Code (IaC) with Terraform.
IaC Management With Spacelift
You can make automated deployments with Terraform and Kubernetes even more powerful using Spacelift’s IaC management platform. Spacelift integrates your IaC and CI/CD pipelines into your Git workflows, allowing you to automatically apply infrastructure changes when pull requests are created and merged.
Spacelift makes it easy to configure self-service infrastructure. Any team member can create a new on-demand EKS cluster for a pull request, for example, without having to move away from GitHub. Spacelift automates the entire workflow, eliminating the need for individual developers to understand or access Terraform and EKS configurations.
Spacelift also automatically discovers and fixes infrastructure drift to ensure your environments remain stable during long-term use. The platform includes comprehensive visualizations for your deployed resources, allowing you to check exactly what’s running at any time.
Key Points
Running Kubernetes on AWS can provide reliability, scalability, and efficiency benefits. You can position your Kubernetes cluster next to your other AWS infrastructure, allowing you to easily integrate with existing resources.
It’s simple to deploy Kubernetes to AWS: the fully managed EKS service provisions new clusters in just a few clicks, while EC2 gives you the tools to manually run the Kubernetes control plane and join your Nodes in situations where you require more control.
Both these approaches can be difficult to manage at scale, however. Avoid inconsistencies by using IaC and CI/CD pipelines to automate the creation of Kubernetes clusters in your AWS account, using tools such as Spacelift. Spacelift is an IaC management platform that facilitates self-service access to infrastructure with precise guardrails and drift prevention. Check out our separate tutorial to learn how to use Spacelift to deploy Kubernetes on Amazon EKS.
The most flexible management platform for Infrastructure as Code
Spacelift is a sophisticated SaaS product for Infrastructure as Code that helps DevOps develop and deploy new infrastructures or changes quickly and with confidence.
Amazon EKS User Guide. What is Amazon EKS?. Accessed: 22 October 2025
Amazon EKS User Guide. Creating the Amazon EKS node IAM role. Accessed: 22 October 2025
Amazon Elastic Compute Cloud User Guide. What is Amazon EC2?. Accessed: 22 October 2025
