
AWS holds the major share of the cloud computing market, exceeding the combined share of its two largest competitors, Microsoft Azure and Google Cloud. With millions of active users accessing AWS, the AWS Identity and Access Management (AWS IAM) service acts as the helm of the security by governing who is authenticated (signed in) and who is authorized (has permissions) to use the AWS resources.
In this article, we will learn about:
- Identities: Roles, Users and Federated Identities
- AWS IAM Roles
- Creating IAM Role
- Assuming IAM Roles
- Types of IAM Roles
- For How Long Can an Entity Assume a Role?
- Is It Possible for One Role to Assume Another? (Role Chaining)
- Can We Assume a Role in a Different Account? (Cross-account Access)
- IAM Roles and Resource-based Policies
- AWS IAM Roles Anywhere
- Benefits of Using IAM Roles
- Why Do We Need IAM?
Identities: Roles, Users and Federated Identities
Identities on AWS are the way to identify principals. A principal can be a person or an app that performs actions in the AWS account.
Identities can be classified into 3 major categories:
- AWS users
- Federated identities
- AWS roles

AWS users
AWS users are principals (persons or apps) with their own usernames and passwords to allow access to the AWS console.
We can also generate access keys that are tied to a particular user that can be used with the AWS CLI or SDKs.
Note: Notice that some of the users listed below are actually applications. As previously stated, an AWS user does not have to be a real person; it can also be an app with its own set of access keys.

Federated identities
These are users managed outside of AWS. Identity providers(IdP) can be used to grant these users access to use AWS resources without having to create users within the AWS account. AWS supports OIDC and SAML 2.0 compatible IdPs.

What are AWS IAM Roles?
IAM roles are entities that provide access to different AWS services based on the level of permissions they have, which makes them similar to AWS users. Roles do not have passwords or access keys associated with them. Instead, roles provide temporary security credentials to whomever has the ability to assume that role.
This is important because the identity of users with access to your AWS accounts can change over time, but the roles used to manage your AWS account seldom change. Roles eliminate the overhead of managing users and their long-lived credentials by generating temporary credentials whenever required.
Any of these entities can assume a role to use its permissions:
- AWS user from the same account
- AWS user from a different account
- AWS service
- Federated identity
If you would like to set up the ability to sign in to your Spacelift account using a SAML 2.0 integration with AWS IAM Identity Center (formerly known as AWS SSO), check out our AWS IAM Identity SAML Setup Guide.
Structure of an IAM role
From the above definition, it can be inferred that there are 2 essential aspects to an IAM role:
- Trust policy: Who can assume the IAM role
- Permission policy: What does the role allow once you assume it
Let us break them down to understand what makes up an IAM role.

Let us define these before we move on to creating our first AWS role.
Trust policy
These are policies that define and control which principals can assume the role based on the specified conditions. Trust policies are used to prevent the misuse of IAM roles by unauthorized or unintended entities
Permission policy
These policies define what the principals who assume the role are allowed to do once they assume it.
With the fundamentals of an IAM role established, we can proceed to create our first IAM role.
Creating IAM Role Example
Pre-requisite: An AWS account with an IAM admin user.
In this tutorial, we will create a custom IAM role with the trusted entity as the AWS user and the permission policy to allow admin access to AWS RDS.

-
Log in to the AWS account and open the IAM service.

2. Open the roles panel either from the dashboard or from the side nav on the left.
3. You might notice some pre-created roles in your account on the roles panel.
Ignore them for the time being; we will go over them in greater detail later in the article.

4. To create a new role, click on the “Create role” button.

5. As previously stated, a role has 2 core aspects, the trust policy and the permission policy. So the first thing that we have to specify is who can assume this role. We will begin by selecting the “Custom trust policy” and then proceed to the other options in the later section of the article.
6. Upon selection of the “Custom trust policy”, AWS automatically generates a JSON policy with an empty principal field. The principal field specifies who can assume this role. If we keep it empty then this policy cannot be assumed by any principal.

7. We will add the Amazon Resource Name (ARN) of the AWS IAM user who should be allowed to assume this role. The ARN can be obtained from the user details page in the IAM dashboard.
8. Copy the ARN and paste it as a key-value pair, with the key being “AWS” as shown below.
{
"Version": "2012-10-17",
"Statement": [
 {
  "Sid": "Statement1",
  "Effect": "Allow",
  "Principal": {
      "AWS": "arn:aws:iam::xxxxxxxxxxx:user/omkar"
  },
  "Action": "sts:AssumeRole"
 }
]
}
9. Once you have reviewed the trust policy, click on the next button to move on to the next page.
10. The next step, as you might expect, is to choose a permission policy for this role. We can either use an existing policy or create a new one. We will choose an existing managed policy by the name AmazonRDSFullAccess to grant our role full access to the AWS RDS service.
Remember that AWS denies everything by default. We are only granting the RDS access to this role by attaching this policy.
11. Leave all the other settings unchanged and click on next.
12. We have already taken care of the 2 essential aspects of a role. All that is left is to give the role a name and a description, and we are done.

13. Name the role as AWSIAMRoleForRDS and provide the description as “AWS IAM role for RDS”
14. Review all the details and click on the Create role button.
Congratulations! You have successfully created your first role.
Roles, as previously stated, do not have any long-lived credentials associated with them, but they can be assumed by identities via the console, CLI, or API. In the following section, we will learn how to assume an IAM role.
Security learning [Optional]: The user ARN in the trust policy is transformed into a unique principal ID when the policy is saved to prevent escalation of privilege by removing and recreating a different user with the same name. As a result, if we delete and recreate a user, the new user’s unique id is different, rendering the trust policy ineffective.
Assuming IAM Roles
There are multiple ways to assume IAM roles. We can assume a role using the console, the CLI or even the SDK. Let’s go through all of them one by one.
Switching to a role through the console
To switch to a role using the console, you have to be logged in as an IAM user allowed to assume that role.
- We can switch to a different role using the user information panel in the top right corner. When we click on it, the “Switch role” button appears next to the “Sign out” button.

2. Upon clicking on the “Switch role” button, we are greeted by a form requesting information about the role we wish to switch to.
If you are switching your role for the first time you would be greeted by a different screen explaining the details about switching a role. To proceed, click on the “Switch role” button.
3. Fill in the role details with the role we created in the previous tutorial and click on the “Switch role” button.

Upon switching to the IAM role, we arrive at the IAM dashboard again with the principal as the AWSIAMRoleForRDS@1234567890.

Congratulations! You have successfully assumed a role.
The interesting thing to note here is the big error message that pops up as soon as we switch to this role stating:
User: arn:aws:sts::1234567890:assumed-role/AWSIAMRoleForRDS/<username> is not authorized to perform: iam:ListRoles on resource: arm:aws:iam::123456789:role/ because no identity-based policy allows the iam:ListRoles actionDo you know why this error has appeared?
Remember that when creating the permission policy for our role, we only selected the AWS RDS access and nothing else. This means that the assumed role is only allowed access to AWS RDS and we are currently on the IAM dashboard.
Note: It is important to remember that when we assume a role we inherit the role’s permission but at the same time we end up setting aside the permissions assigned to our original user which we used to assume the role.
Let us take our newly created and assumed IAM role on a pilot run and try to create a database instance.
Using an IAM role to create resources
We granted our IAM role complete access to AWS RDS. This means that it has read, written as well as created permission for the RDS service. Before proceeding, please make sure that you have already assumed the AWSRDSIAMRole role
- Go to the AWS RDS service dashboard. If things are configured right, we would not see any unauthorized errors.
- Next, we will try to spin up a database instance. Please refer to this tutorial to create a database instance.
Note 1: Make sure to uncheck the performance insights checkbox to avoid creating a KMS key.
Note 2: A few unauthorized errors that may appear for the creation of resources required for monitoring, etc., are worth noting here, as the permissions of our role are only limited to RDS. However, because the majority of these steps are not mandatory for the creation of a database, it will continue without stopping.


3. Awesome, you successfully created your first resource using the assumed role.
To stop using a role (AWS Console)
To stop using the assumed role, simply click on the Switch back button in the user details panel in the top right corner.
Switching to an IAM role through the CLI
When using the CLI we can configure an AWS profile to assume a role. To be able to use AWS profiles, we will need AWS CLI installed with the default profile configured. Please follow this link to configure if it isn’t already configured for you.
Using profiles
- Open the AWS config file, which is used for configuring AWS profiles.
This file can be found at~/.aws/configpath in macOS or Linux and at the C:\Users\USERNAME\.aws\configpath in Windows. - Create a new profile with the name
rdsadmin. - When creating a profile for a role, two keys are required
– Role ARN: It can be found on the role details page
– Source profile: AWS CLI uses the credentials from this profile to assume the role. We will choose the default profile.
[profile rdsadmin]
   role_arn = arn:aws:iam::123456789012:role/AWSIAMRoleForRDS
source_profile = default- Once the config has been updated, we can use the
--profileflag with every CLI command to use the assumed role. For instance, we can use the following command to describe all database instances using the assumedrdsadminrole.
aws rds describe-db-instances --profile rdsadminTo stop using a role (Using profiles)
To stop using the assumed role and return to the original credentials, run the commands without the --profile flag. The AWS CLI defaults to using the credentials from your default profile if the --profile flag is not specified.
Using AWS Security Token Service
AWS Security Token Service (AWS STS) is a service that enables us to switch/assume a role by requesting temporary credentials.
Whenever we assume a role, AWS STS works under the hood and requests temporary credentials. This is the reason why all trust policies explicitly allow principals to perform sts:AssumeRole action to be able to request temporary credentials.
{
   "Version": "2012-10-17",
   "Statement": [
       {
           "Sid": "Statement1",
           "Effect": "Allow",
           "Principal": {
               "AWS": "arn:aws:iam::1234567890:user/spacelift-tutorial"
           },
           "Action": "sts:AssumeRole"
       }
   ]
}
Let us see how we can use AWS STS to assume the role through AWS CLI
- Run the following command to issue temporary credentials for a role you wish to assume. Running this command returns an AccessKeyId, SecretAccessKey and SessionToken.
$ aws sts assume-role --role-arn "arn:aws:iam::123456789012:role/example-role" --role-session-name AWSCLI-Session


//Output
{
   "Credentials": {
       "AccessKeyId": "RandomAccessKeyId",
       "SecretAccessKey": "RandomSecretAccessKey",
       "SessionToken": "RandomSessionToken",
       "Expiration": "2022-11-11T07:46:12+01:50"
   },
   "AssumedRoleUser": {
       "AssumedRoleId": "role-id",
       "Arn": "role-arn"
   }
}- Use the returned temporary credentials to assume the role by exporting the following environment variables.
export AWS_ACCESS_KEY_ID="<random-access-key-Id>"
export AWS_SECRET_ACCESS_KEY="<random-secret-access-key>"
export AWS_SESSION_TOKEN="<random-session-token>"
To stop using a role (Using STS)
Unset the set environment variables AWS_ACCESS_KEY_ID, AWS_SECRET_ACCESS_KEY and AWS_SESSION_TOKEN
Switching to an IAM role through the SDK
When working with services or apps, AWS SDKs come into play to interact with AWS using the APIs. For example, in a simple python program, we can assume an IAM Role to print all S3 bucket names.
import boto3

# create an STS service client
sts_client = boto3.client('sts')


# Request for temporary credentials through STS using the role ARN
assumed_role_object=sts_client.assume_role(
   RoleArn="arn:aws:iam::account-of-role-to-assume:role/name-of-role",
   RoleSessionName="AssumeRoleSession1"
)


# From the response that contains the assumed role, get the temporary
# credentials that can be used to make subsequent API calls
credentials=assumed_role_object['Credentials']


# Use the temporary credentials that AssumeRole returns to make a
# connection to Amazon S3
s3_resource=boto3.resource(
   's3',
   aws_access_key_id=credentials['AccessKeyId'],
   aws_secret_access_key=credentials['SecretAccessKey'],
   aws_session_token=credentials['SessionToken'],
)


# Use the Amazon S3 resource object that is now configured with the
# credentials to access your S3 buckets.
for bucket in s3_resource.buckets.all():
   print(bucket.name)
Now that we have already learned about all the ways to assume a role let us explore the types of IAM roles and their use cases.
Types of IAM Roles
AWS IAM roles can be classified into 5 major categories based on their trust policies:
- Service Role
- Service-Linked Role
- Web Identity role
- SAML 2.0 federation role
- Custom IAM role
Service role

As the name implies, the trusted entity type for these roles are AWS services. They are created to allow AWS services to perform actions on your behalf by inheriting the permissions assigned to the service role.
But why do AWS services need permission in the first place to access one another?
Remember, by default even AWS services do not have access to the resources in the AWS account. Service roles enable AWS services to access resources based on their requirements.
Where are service roles used?
Most AWS services rely on service roles to function properly. They allow AWS Cloudformation, for example, to create and delete resources on your behalf based on a YAML or JSON file.
Another well-known example of a special type of service role is the EC2 IAM role. You might know it from the name “EC2 instance profile”. Amazon EC2 uses an instance profile as a container for an IAM role. This role is assumed by the applications running inside the EC2 instance to perform actions allowed by the role.
To better understand IAM services roles, let us dip our toes in the water and create our first service role.
Creating and using a service role for AWS Cloudformation
In this tutorial, we will be creating a Cloudformation stack set to create a lambda function using a Cloudformation service role.
1. Just as we had done before, follow the same steps to open the roles panel in the IAM service and click on the “Create role” button.
2. This time, select the trust entity as “AWS Service”
3. Pick the Clouformation service from the drop-down and select it as the trusted entity and click on next.

4. Do not attach any permission policies for the time being and move to the next step.
5. Give the role a name as AWSCloudformationRole and the description would be pre-populated
6. Check the trust policy, notice that the principal now is a service instead of a user.
{
   "Version": "2012-10-17",
   "Statement": [
       {
           "Sid": "",
           "Effect": "Allow",
           "Principal": {
               "Service": "cloudformation.amazonaws.com"
           },
           "Action": "sts:AssumeRole"
       }
   ]
}
7. Click on create role once all the details are reviewed.
Once our service role for Cloudformation is ready. We will use this role to deploy a Cloudformation stack set.
Using the Cloudformation service role to deploy a lambda
- Open the Cloudformation service and click on the “Create stack” button.
- Choose the sub-option as “with new resources (standard)”
- Select the “Create template in Designer” option and then click on the “Create template in Designer” button.
- Select the template tab from the bottom left corner and choose template language as YAML
- Name the template as create-lambda-fn and replace the existing YAML with the following YAML template which will later create a lambda function and a lambda role.
AWSTemplateFormatVersion: '2010-09-09'
Description: Lambda function.
Resources:
 LambdaRole:
   Type: AWS::IAM::Role
   Properties:
     RoleName:
       Fn::Sub: lambda-role
     AssumeRolePolicyDocument:
       Statement:
         - Action:
           - sts:AssumeRole
           Effect: Allow
           Principal:
             Service:
             - lambda.amazonaws.com
       Version: 2012-10-17
     ManagedPolicyArns:
       - arn:aws:iam::aws:policy/AWSLambdaExecute
     Path: /
 LambdaFunction:
       Type: AWS::Lambda::Function
       Properties:
         FunctionName: lambda
         Handler: index.handler
         Role:
           Fn::GetAtt:
             - LambdaRole
             - Arn
         Runtime: nodejs16.x
         Code:
           ZipFile: |
               exports.handler = function(event, context, callback) {
                   console.log("Hello from AWS Lambda");
               };
6. Click on the “Create stack” button on the top left which has the upload icon.

7. Click on the “Next” button upon coming to the dashboard again.
8. Give the stack a name as lambda-stack and move to the next step.
9. Under the permissions tab, there would be an option to select the IAM role for CloudFormation to use for all operations performed on the stack.
Choose the Cloudformation role we previously created by the name AWSCloudformationRole. It’s interesting that AWS is smart enough to only display the relevant roles and not others.

Note: It should be noted that attaching the role is optional. This is because if we do not provide the stack with a role, Cloudformation by default creates a temporary session that it generates from the signed-in user’s credentials for performing the stack operations. This means that Cloudformation would only have the permissions attached to the user who creates it.
10. Keeping all the other settings unchanged, move to the next step.
11. After reviewing all the details click on the Submit button once you check the acknowledgement checkbox. This should trigger the creation of the stack set.
12. Click on the “refresh” button to track the progress of the stack.

13. We notice that the stack fails with an unauthorized error. This is because the attached role doesn’t have permission to get and create the lambda role. From this, it is evident that service roles can be used to manage access a service has.
14. Let us quickly fix the above problem by attaching the necessary permissions to the Cloudformation service role.
Modifying existing IAM roles
1. Open the roles panel in the IAM service and select the AWSCloudformationRole.
2. Click the “Add permissions” button to attach the required policies.
3. For the sake of ease, we will give our Cloudformation role a bit more open permissions than required, but in a real use case, we should only give the permissions that the role actually requires.
4. Find and attach the managed IAMFullAccess and AWSLambda_FullAccess policies to the role.

Re-creating the Cloudformation stack set with updated permissions for the service role
Repeat the same steps as before to re-create another stack with a different name, potentially lambda-stack-2 and try deploying the stack again. If things go well, the stack will be created successfully.

Congratulations! You have successfully deployed your first Cloudformation Stack using the Cloudformation service role.
Check the AWS Lambda service to see if the lambda was properly deployed.
Service-linked roles

A service-linked role is a unique type of IAM role that is directly linked to an AWS service. They are predefined by the service and include all of the permissions required for the service to function properly. The permissions could include calling other AWS services or performing any other necessary operations. A service might automatically create or delete the role. Most service-linked roles do not allow us to change the trust or permission policies.
Service-linked roles simplify the process of setting up a service because they automatically add all the required permissions for a service to perform actions on your behalf.
It is easy to identify service-linked roles from service roles in the IAM roles panel. Service-linked roles are annotated with the service-linked keyword under the trusted entities column.

Inspecting Service linked role for ECS
If we open the AWSServiceRoleForECS role and inspect the attached policy in detail, we will find that the policy covers actions that are critical to the proper working of the ECS service, without which the service may fail to deliver what it is supposed for. For example, ECSTaskManagement, AutoScaling, AutoScalingManagement, AutoScalingPlanManagement are all required for the ECS service to function properly.
{
   "Version": "2012-10-17",
   "Statement": [
       {
           "Sid": "ECSTaskManagement",
           "Effect": "Allow",
           "Action": [
               "ec2:AttachNetworkInterface",
               "ec2:CreateNetworkInterface",
               .
               .
               .
       },
       {
           "Sid": "AutoScaling",
           "Effect": "Allow",
           "Action": [
               "autoscaling:Describe*"
           ],
           "Resource": "*"
       },
       {
           "Sid": "AutoScalingManagement",
           "Effect": "Allow",
           "Action": [
               "autoscaling:DeletePolicy",
               "autoscaling:PutScalingPolicy",
               "autoscaling:SetInstanceProtection",
               "autoscaling:UpdateAutoScalingGroup"
           ],
           "Resource": "*",
           "Condition": {
               "Null": {
                   "autoscaling:ResourceTag/AmazonECSManaged": "false"
               }
           }
       },
       {
           "Sid": "AutoScalingPlanManagement",
           "Effect": "Allow",
           "Action": [
               "autoscaling-plans:CreateScalingPlan",
               "autoscaling-plans:DeleteScalingPlan",
               "autoscaling-plans:DescribeScalingPlans"
           ],
           "Resource": "*"
       },
       .
       .
       .
Web Identity roles

These are the roles that a user assumes when they login to AWS using any of the popular identity providers (IdPs) such as Amazon, Facebook, and others. These roles come in handy as users do not have an identity inside AWS itself but exchange an authentication token for temporary security credentials in AWS that map to an IAM role with permissions to use the resources in the AWS account
The following example trust policy is used to support users using Amazon Cognito to sign in. In this example, us-east:12345678-ffff-ffff-ffff-123456 represents the identity pool ID assigned by Amazon Cognito. Notice that the principal here is a federated identity i.e. Amazon Cognito.
{
   "Version": "2012-10-17",
   "Statement": {
       "Sid": "RoleForCognito",
       "Effect": "Allow",
       "Principal": {"Federated": "cognito-identity.amazonaws.com"},
       "Action": "sts:AssumeRoleWithWebIdentity",
       "Condition": {"StringEquals": {"cognito-identity.amazonaws.com:aud": "us-east:12345678-ffff-ffff-ffff-123456"}}
   }
}
SAML 2.0 federation roles

These are the roles assumed by users who are members of an external user directory, typically within organizations. This enables federated single sign-on (SSO), allowing organizations to grant users access to the AWS console and CLI without the need to create a separate IAM user for each person.
For example, an organization managing its employees in Microsoft Azure Active Directory can directly connect to AWS and grant its users access to the AWS console and CLI based on the permissions granted to the SAML 2.0 federation role.
The trust policy for SAML 2.0 federation roles would look something like the one below.
{
   "Version": "2012-10-17",
   "Statement": {
     "Effect": "Allow",
     "Action": "sts:AssumeRoleWithSAML",
     "Principal": {"Federated": "arn:aws:iam::account-id:saml-provider/PROVIDER-NAME"},
     "Condition": {"StringEquals": {"SAML:aud": "https://signin.aws.amazon.com/saml"}}
   }
 }
Custom IAM role

Custom IAM roles are those that do not fall into any of the above categories and support any scenario other than the ones listed above. We have already looked into and created our own custom IAM role before where we added the trusted entity as an IAM user.
We learnt that there are various types of roles and that different entities can assume them. But for how long can one assume a role? Is it possible for one role to assume another? Can we assume a role in a different account?
Let’s explore the answers to these questions.
For How Long Can an Entity Assume a Role?
The duration for which an entity can assume a role is governed by the session duration property of the IAM role.
Session duration refers to the duration of the time period for which the issued temporary credentials for a role remain valid.
For instance, if the session duration for a role is set to 12 hrs, then the temporary credentials will expire after 12 hrs starting from the time they are issued at.
When we assume the role using the assume-role* command it is possible to specify a value for the session duration using the duration-seconds flag. The value can range from 900 seconds (15 minutes) to the maximum session duration allowed for the role.
The session duration can be specified when the role is created. The default duration is one hour, and it can be set to a maximum of 12 hours. We can also change the session duration later by editing the role.
For example, the maximum session duration for the AWSIAMRoleForRDS role we created earlier is 1hr.
Is It Possible for One Role to Assume Another? (Role Chaining)
It is possible to assume another role given that the existing role has permission to assume it.
When we use an assumed role to assume another role, this is known as role chaining. For example, an AWS user named Alex uses her long-term credentials to assume Role A, and then uses Role A to assume another Role B using Role A’s short-term credentials.
Role chaining has a hard limit of 1 hour on the user session and doesn’t respect the maximum session duration field of a role.
Can We Assume a Role in a Different Account? (Cross-account Access)
When we use a principal in one account to access resources in another account is known as cross-account access.
IAM roles are a popular choice to enable cross-account access.
Application of cross-account access
Many organizations maintain multiple AWS accounts. This is often to segregate environments such as development, staging, test, UAT, production, etc. It is not uncommon to be allowing identities from one account permission to access resources in another account.
One such interesting scenario can be processing data in the production account and then anonymizing and copying it to the UAT account to maintain the same frequency and attributes of data in order to keep the UAT environment as close to the production environment as possible.
Let us consider an overly simplified example where we have an AWS lambda in production that consumes requests from the production Kinesis stream. After the processing is complete, the lambda then anonymizes and copies the data to the UAT kinesis stream. The role attached to this lambda would require cross-account access to the Kinesis stream in the UAT account to add the events on the UAT kinesis stream.

This can be accomplished by creating a role in the UAT account with the trust policy set to allow identities from the production account to assume it and granting it permission to add events to the Kinesis stream in the UAT account. The lambda role in the production account then can assume this role in the UAT account, for adding the anonymized data to the UAT Kinesis stream.
This is how IAM roles can be used to access resources in another account with ease. It is important to remember that cross-account access is also possible using resource-based policies. In the following section, we’ll look at how IAM roles differ from resource-based policies.
IAM Roles and Resource-based Policies
Before we address the question of how IAM roles differ from resource-based policies, it is crucial to understand what identity-based and resource-based policies are.
Identity and resource-based policies
Identity policies
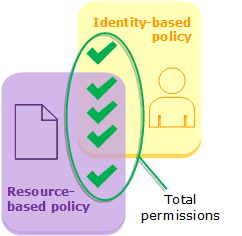
Identity-based policies are permission policies that are attached to an identity such as a user, role, or group. They specify which actions the identity can carry out and on which resources.
Resource-based policies
Resource-based policies are permission policies that are attached to a resource, such as S3, Amazon SQS queues, or VPC endpoints. They control who has access to the resource to which they are linked and what actions they can perform. Resource-based policies can only be inline and not managed.
Note: Not every resource supports a resource-based policy. Please check this list to learn more about which resources support resource-based policies.
Evaluation of identity and resource-based policies
In the presence of both identity and resource-based policies, AWS evaluates them together. An action is allowed if it is allowed in either the identity policy or the resource policy or in both. An explicit DENY in either of those policies overrides the ALLOW.
Both identity and resource-based policies can be used to restrict access to a resource.
Cross-account access using resource-based policy
It is possible to grant cross-account access using just the resources policy instead of using a role as a proxy. This can be accomplished by attaching a resource-based policy on the resource that we wish to share. This resource policy consists of all the principals that are allowed to access this resource as opposed to an identity-based policy which species what resources a principal has access to.
IAM role vs. resource-based policies
The use of a resource-based policy for cross-account access has advantages over using roles. This is due to the fact that when a user assumes a role, they give up their existing permissions in the trusted account in order to gain permissions in the trusting account (account with shared resources). In the case of a resource-based policy, the user retains their permissions in the trusted account while also gaining access to the shared resources in the trusting account.
Because the principal has simultaneous access to both accounts, this is useful in scenarios such as easily copying information to and from the shared resource to the other account.
AWS IAM Roles Anywhere
AWS IAM roles anywhere are a type of service role that allows on-prem machines or workloads outside AWS such as servers, containers, and applications to access resources on AWS by obtaining temporary security credentials.
This eliminates the hassle of managing long-term credentials entirely.

Workloads must have X.509 certificates issued by a certificate authority for this to work. To establish trust between the public-key infrastructure (PKI) and IAM Roles Anywhere, the certificate authority must be registered with IAM Roles Anywhere as a trust anchor.
The trust policy for IAM roles anywhere would look something like the one below:
{
   "Version": "2012-10-17",
   "Statement": [
       {
           "Sid": "",
           "Effect": "Allow",
           "Principal": {
               "Service": "rolesanywhere.amazonaws.com"
           },
           "Action": [
               "sts:AssumeRole",
               "sts:SetSourceIdentity",
               "sts:TagSession"
           ]
       }
   ]
}
This is relatively a new use case but it’s in the direction towards reducing the usage of long-term credentials.
Benefits of Using IAM Roles
- They eliminate the overhead to manage long-term security credentials.
- Support for Single sign-on (SSO) using SAML 2.0
- Support for web identity federation allowing users to log in via well-known external identity providers (IdPs), such as Amazon, Facebook, Google, etc.
- Improved security posture as there is no overhead associated with rotating and replacing short-term credentials as they already have an expiry associated with them.
- IAM roles support many use cases, including cross-account access, Identity federation, IAM roles anywhere, and many more.
Learn also how to create AWS IAM role using Terraform.
Why Do We Need IAM?
A newly created AWS account has a single sign-in identity with complete access to AWS services and resources. This identity is called the AWS account root user. A root user is allowed to do just about anything and everything on AWS, including changing the account settings, accessing billing, or even closing the account permanently.
Imagine using the unfettered root user to interact with over 200+ services on AWS on a regular basis. If you think that’s not a problem, imagine sharing this account with the entire organization for performing everyday tasks 🤯
Given that not everyone may have the necessary expertise to manage the account, it would only be a matter of time before something goes horribly wrong.
IAM addresses the aforementioned issue by allowing shared access to the AWS account via identities.
Following the security-first model, AWS restricts all actions for all identities by default, with the exception of the root user. This means that actions such as create, list, invoke, execute, etc., on any AWS resource are denied by default unless explicitly allowed.
This enables us to manage granular access for identities based on the principle of least privilege, i.e., we only grant the permissions required to carry out daily tasks.
Does your organization have extra compliance concerns? Here you can learn more about self-hosting Spacelift in AWS, to ensure your organization’s compliance, control ingress, egress, internal traffic, and certificates, and have the flexibility to run it within GovCloud. You can also see Spacelift integration with AWS with the Cloud Integrations section and update to support account-level AWS integrations.
Key Points
IAM roles are one of the fundamental pillars that support the IAM service and the entire authentication and authorization flow. Their value is not limited to their applications such as cross-account access, IAM roles anywhere, identity federation, and so on, but they are also critical in significantly improving any organization’s security posture. They can be extremely useful in Identity and Access Management when their full potential is realized.
The most flexible management platform for Infrastructure as Code
Spacelift is a sophisticated SaaS product for Infrastructure as Code that helps DevOps develop and deploy new infrastructures or changes quickly and with confidence.
Frequently asked questions
What is the difference between IAM roles and IAM policies?
IAM roles define who can assume temporary permissions, while IAM policies define what actions are allowed or denied. In practice, roles are assigned to entities, and policies are assigned to roles (or users/groups) to determine what those entities can do once the role is assumed.
What is the difference between an IAM user and a role?
An IAM user represents a specific identity with long-term credentials, while an IAM role is a temporary identity with permissions that can be assumed by trusted entities.
What is the difference between an IAM role and an SSO role?
An IAM role in AWS is an identity with specific permissions that can be assumed by trusted entities, while an SSO role is an IAM role specifically configured to be assumed by users authenticating through AWS IAM Identity Center (formerly AWS SSO).
