
An Amazon S3 bucket is a storage service offered by AWS for storing data lakes, websites, mobile applications, backups and restores, archives, and enterprise applications. The S3 stands for Simple Storage Service, which can be scaled based on individual or organization needs. In addition to providing storage, Amazon S3 also offers comprehensive access management, which can help you set up very granular permissions.
This blog post shows how to create and manage an AWS S3 bucket with Terraform using modern AWS provider patterns.
The main Terraform resources used in this guide are:
aws_s3_bucketaws_s3_objectaws_s3_bucket_public_access_blockaws_s3_bucket_ownership_controls
These resources let you create a bucket, upload objects, block public access, and manage bucket ownership behavior.
In this article, we will cover:
TL;DR
Create the bucket with the aws_s3_bucket resource after configuring the AWS provider. In modern Terraform, keep the bucket definition minimal and manage settings like versioning or encryption with separate resources when needed.
provider "aws" {
region = "us-east-1"
}
resource "aws_s3_bucket" "example" {
bucket = "my-unique-bucket-name-12345"
}
Then run terraform init, terraform plan, and terraform apply. The bucket name must be globally unique across AWS.
How to set up AWS authentication securely
Terraform needs valid AWS credentials to manage AWS resources, but these do not have to be long-lived access keys stored in code.
In practice, Terraform can authenticate to AWS through environment variables, shared AWS profiles, assumed roles, or short-lived credentials issued by systems such as Spacelift, Vault, or AWS STS. For most production workflows, temporary credentials are the safer option because they reduce the risk of exposing static secrets in configuration files, plan output, or state.
Here are three common ways to authenticate Terraform to AWS securely:
- Use the default AWS credential chain for local development, such as an AWS profile or environment variables.
- Use an IAM role or an AssumeRole pattern in CI/CD.
- Use dynamic credentials from platforms such as Spacelift or Vault for automated runs. Here is a comprehensive guide from Spacelift, which can help to integrate with AWS: AWS Integration Tutorial
Read more about Creating IAM Policies with Terraform.
For the examples in this article, we will keep the provider configuration simple and rely on the standard AWS credential chain:
variable "region" {
 type    = string
 default = "eu-central-1"
}

provider "aws" {
 region = var.region
}
This approach works well for local development when your AWS CLI or environment is already configured.
If you want to use an assumed IAM role, you can configure the AWS provider like this:
variable "region" {
 type    = string
 default = "eu-central-1"
}

variable "role_arn" {
 type = string
}

provider "aws" {
 region = var.region

 assume_role {
   role_arn     = var.role_arn
   session_name = "terraform-s3"
 }
}
This pattern is often a better fit for CI/CD pipelines and platform-driven runs because it uses temporary credentials instead of hard-coded secrets.
If you are using Spacelift, configure AWS access through an assumed role or dynamic credentials integration instead of embedding static keys in Terraform code. You can keep the S3 examples in this article exactly the same and let Spacelift inject the credentials at runtime.
How to create an S3 bucket using Terraform - Example
In this section, we will create a private S3 bucket using modern Terraform and AWS defaults.
Note: Older Terraform examples often use aws_s3_bucket_object, but this resource is now deprecated. The current resource for managing S3 objects is aws_s3_object, which is where new features and fixes are added.
1. Create an S3 bucket with aws_s3_bucket
We will create a bucket named spacelift-test1-s3.
Here are the main inputs and resources used in this example:
region— the AWS region where Terraform will run.bucket_name— the globally unique S3 bucket name.aws_s3_bucket— creates the bucket.aws_s3_bucket_public_access_block— blocks public ACLs and public bucket policies.aws_s3_bucket_ownership_controls— enforces bucket ownership and disables ACL-based access for a modern S3 setup.
Create a Terraform file named main.tf and use the following configuration:
variable "region" {
   type = string
   default = "eu-central-1"
}

variable "bucket_name" {
   type = string
   default = "spacelift-test1-s3"
}

provider "aws" {
   region = var.region
}

resource "aws_s3_bucket" "this" {
   bucket = var.bucket_name

   tags = {
      Name = var.bucket_name
   }
}w

resource "aws_s3_bucket_public_access_block" "this" {
   bucket = aws_s3_bucket.this.id

   block_public_acls = true
   block_public_policy = true
   ignore_public_acls = true
   restrict_public_buckets = true
}

resource "aws_s3_bucket_ownership_controls" "this" {
   bucket = aws_s3_bucket.this.id

   rule {
   object_ownership = "BucketOwnerEnforced"
   }
}
Next, create a versions.tf file to define the Terraform and provider versions used by this example:
terraform {

required_version = ">= 1.5.0"

required_providers {
   aws = {
     source  = "hashicorp/aws"
     version = "~> 6.0"
    }
  }
}
If you are going to use Hashicorp Vault instead of Spacelift, then you must also add the Hashicorp Vault version.
  vault = {
     source  = "hashicorp/vault"
     version = "2.17.0"
   }
 }
Apply the configuration with the standard Terraform workflow:
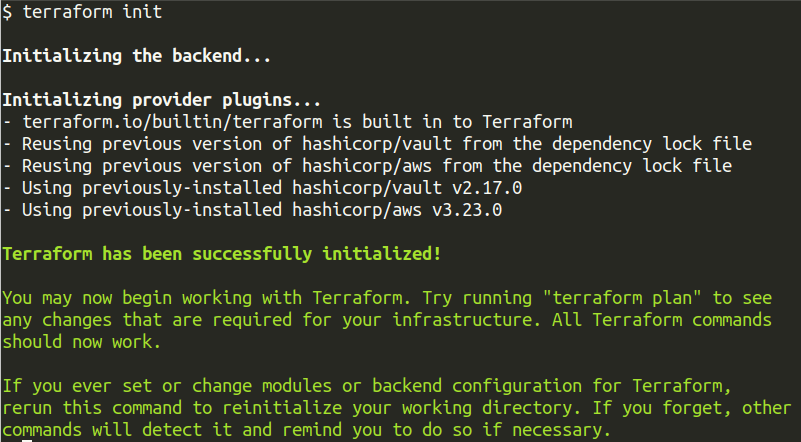
1. $ terraform init – This is the first command we are going to run. It initializes the working directory and downloads the AWS provider.
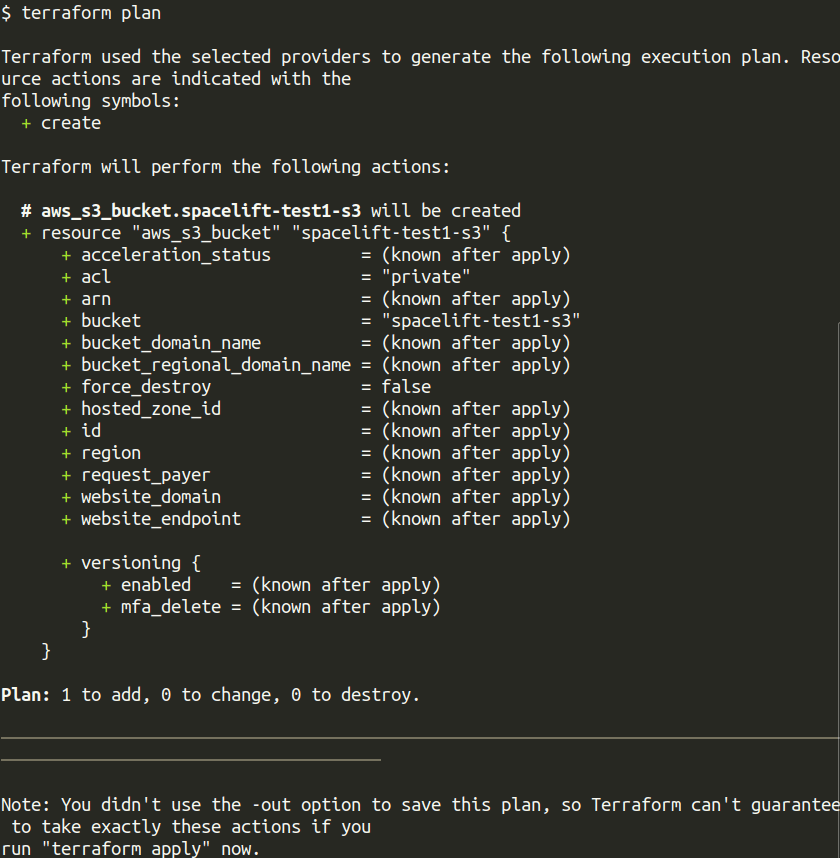
2. $ terraform plan – The second command would be to run a Terraform plan. This command shows the bucket, public access block, and ownership controls that Terraform is about to create.
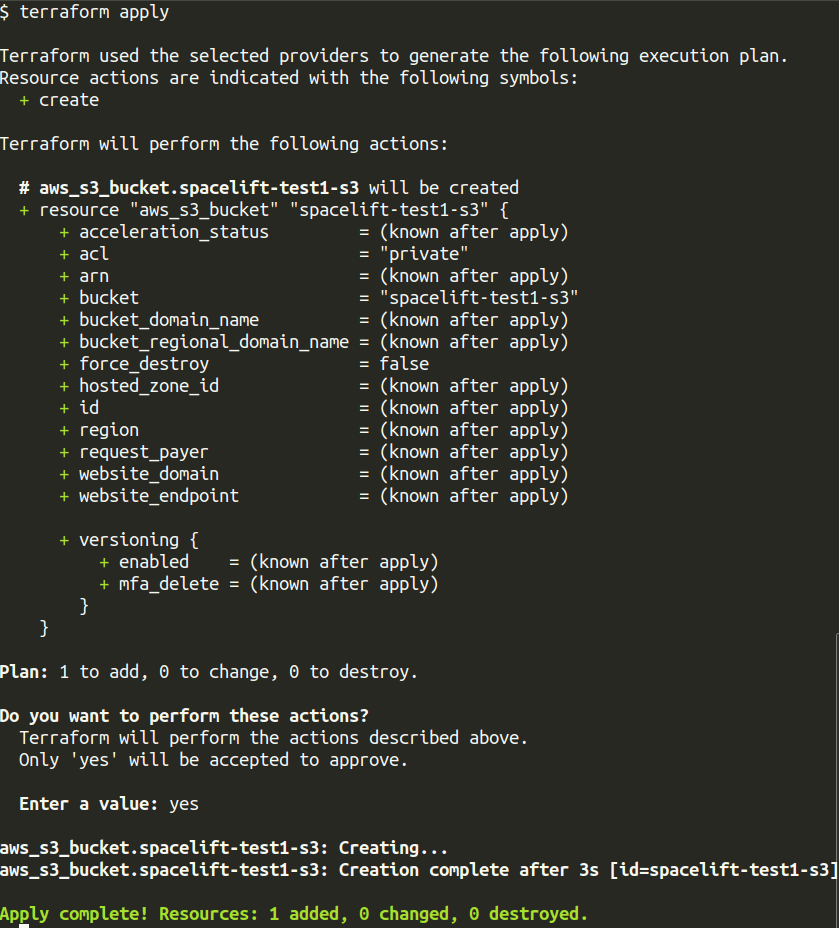
3. $ terraform apply – Apply the Terraform configuration using the terraform apply command, which will eventually create an S3 bucket in AWS.
Note: These screenshots reflect an earlier version of the example. The updated code in this article uses current Terraform AWS provider patterns, so resource names and plan/apply output may differ slightly.
After the apply completes, you should see a new S3 bucket named spacelift-test1-s3 in your AWS account.

2. Upload files to S3 bucket using aws_s3_bucket_object
In the previous step, we created an S3 bucket with Terraform. In this step, we will upload files to that bucket using the aws_s3_object resource.
If you are working from older examples, you may still see aws_s3_bucket_object, but that resource has been deprecated. The current resource for managing objects in S3 is aws_s3_object.
We will upload two sample text files:
test1.txttest2.txt
Here is a screenshot of our project structure for uploading files, including my main.tf along with test1.txt, test2.txt files.
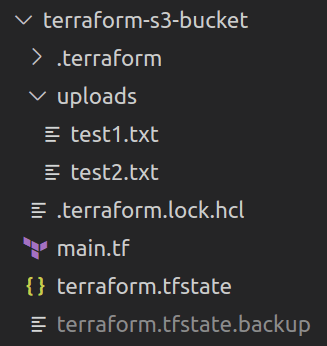
As you can see from the project structure, we have kept my test files in the uploads directory, so we need to specify the relative path in my Terraform file (main.tf).
Update main.tf to the following:
variable "region" {
   type = string
   default = "eu-central-1"
}

variable "bucket_name" {
   type = string
   default = "spacelift-test1-s3"
}

provider "aws" {
   region = var.region
}

resource "aws_s3_bucket" "this" {
   bucket = var.bucket_name
}

resource "aws_s3_bucket_public_access_block" "this" {
   bucket = aws_s3_bucket.this.id

   block_public_acls = true
   block_public_policy = true
   ignore_public_acls = true
   restrict_public_buckets = true
}

resource "aws_s3_bucket_ownership_controls" "this" {
   bucket = aws_s3_bucket.this.id

   rule {
   object_ownership = "BucketOwnerEnforced"
   }
}

resource "aws_s3_object" "files" {
   for_each = fileset("uploads/", "*")

   bucket = aws_s3_bucket.this.id
   key = each.value
   source = "uploads/${each.value}"
   etag = filemd5("uploads/${each.value}")
}
Here are a few important details about this configuration:
for_each = fileset("uploads/", "*")iterates over all files in theuploads/directory.bucket = aws_s3_bucket.this.idpoints each object to the bucket created earlier.key = each.valueuses the file name as the object key in S3.source = "uploads/${each.value}"reads each local file from disk.etag = filemd5("uploads/${each.value}")helps Terraform detect content changes and upload updated files when needed.
How to apply the new changes?
Because we are extending the same Terraform configuration, the next step is simply to run:
terraform plan— Terraform should show the new S3 objects that will be uploaded.terraform apply— uploads the files into the bucket.
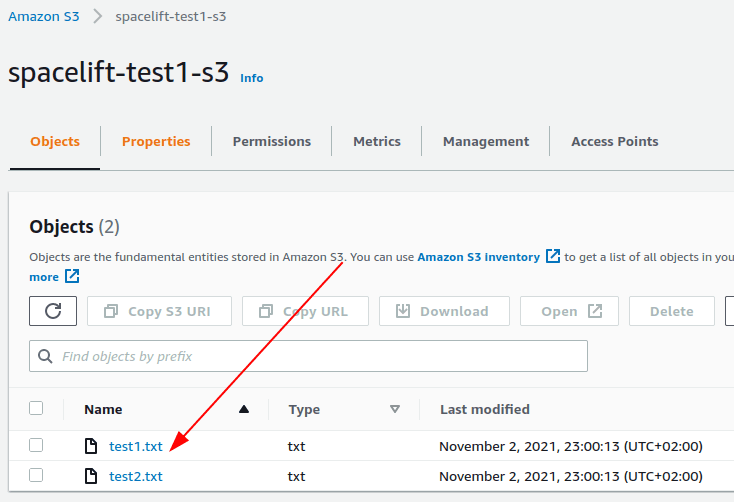
After the apply completes, the files should appear in the S3 bucket in the AWS console.
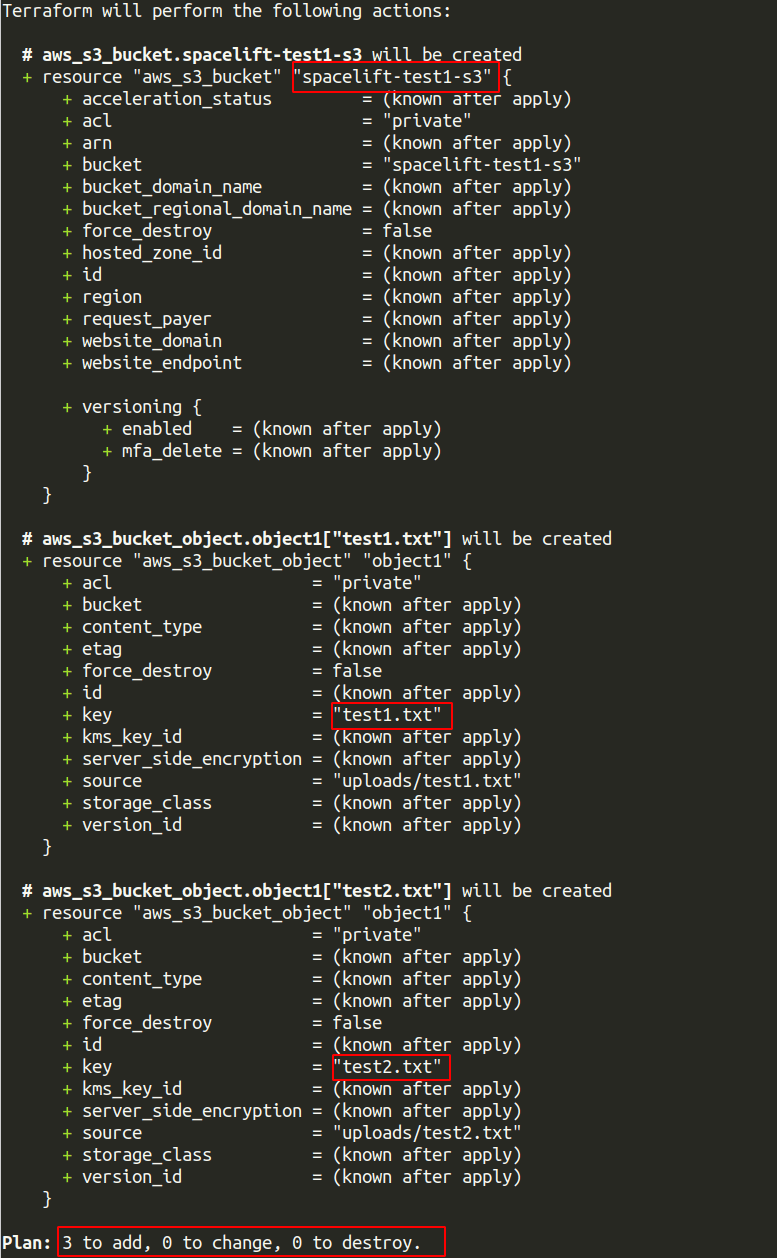
Note: This plan output comes from an earlier revision of the example. In the updated configuration, Terraform may also show additional S3 resources such as public access blocking and ownership controls.

Note: This apply screenshot is illustrative and may not exactly match the current code sample. The latest version of this guide uses a more modern S3 configuration, so the number of resources created may be different.
Here is the screenshot from the AWS console S3 bucket:
This approach works well when you want Terraform to manage a small number of supporting files along with the infrastructure itself. For very large numbers of files or frequent bulk uploads, use a data transfer or deployment tool rather than Terraform.
There are many more things that you can do with Terraform and the S3 Bucket. Here is a guide on how to rename an AWS S3 bucket in Terraform, which can help you rename your S3 bucket.
3. Block public access and enforce bucket ownership
Now that the bucket and objects are in place, the next step is to make sure the bucket follows the modern S3 access model.
Older Terraform examples often set acl = "private" on the bucket and then discuss ACLs as the main way to manage access. That is no longer the best default for new buckets. AWS now recommends disabling ACLs for most use cases and controlling access through policies and bucket ownership settings instead.
The following configuration shows the S3 resources we are using in this article:
resource "aws_s3_bucket" "this" {
 bucket = var.bucket_name
}

resource "aws_s3_bucket_public_access_block" "this" {
 bucket = aws_s3_bucket.this.id

 block_public_acls       = true
 block_public_policy     = true
 ignore_public_acls      = true
 restrict_public_buckets = true
}

resource "aws_s3_bucket_ownership_controls" "this" {
 bucket = aws_s3_bucket.this.id

 rule {
   object_ownership = "BucketOwnerEnforced"
 }
}
This configuration does three important things:
- Blocks public ACLs from being applied to the bucket.
- Blocks public bucket policies that would make the bucket publicly accessible.
- Ensures the bucket owner owns all uploaded objects and ACLs remain disabled.
For most private buckets, this is a better default than teaching ACL-based configuration.
With aws_s3_bucket_public_access_block and aws_s3_bucket_ownership_controls, you can create a private S3 bucket that follows AWS’s current recommended access model.
4. Delete S3 Bucket using Terraform
When you are done working with the bucket, Terraform can remove all of the resources it created by running terraform destroy.
Terraform will delete the managed S3 objects first and then delete the bucket itself. This ordering matters because S3 buckets must be empty before AWS allows them to be removed.
As always, review the destroy plan carefully before confirming the operation, especially if you are working in a shared or production AWS account.
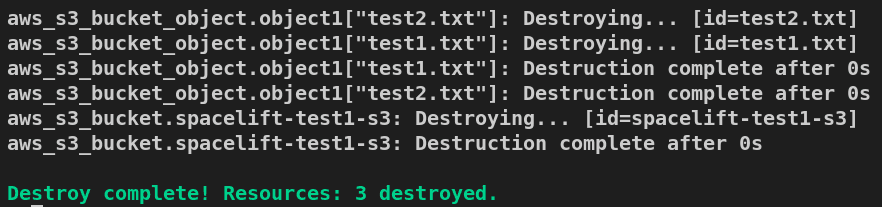
Note: The destroy output shown here was generated from an earlier version of the example. In the updated configuration, Terraform may also remove public access block and ownership control resources.
As you can see in the screenshot, Terraform has deleted the resources in reverse-chronological order, starting with test2.txt, then test2.txt, and finally the bucket spacelift-test1-s3.
How to manage Terraform resources with Spacelift
Terraform is really powerful, but to achieve an end-to-end secure GitOps approach, you need to use a product that can run your Terraform workflows. Spacelift takes managing Terraform to the next level by giving you access to a powerful CI/CD workflow and unlocking features such as:
- Policies (based on Open Policy Agent) – You can control how many approvals you need for runs, what kind of resources you can create, and what kind of parameters these resources can have, and you can also control the behavior when a pull request is open or merged.
- Multi-IaC workflows – Combine Terraform with Kubernetes, Ansible, and other infrastructure-as-code (IaC) tools such as OpenTofu, Pulumi, and CloudFormation, create dependencies among them, and share outputs
- Build self-service infrastructure – You can use Blueprints to build self-service infrastructure; simply complete a form to provision infrastructure based on Terraform and other supported tools.
- Integrations with any third-party tools – You can integrate with your favorite third-party tools and even build policies for them. For example, see how to integrate security tools in your workflows using Custom Inputs.
- Secure state management and locking – Because Terraform and OpenTofu state is shared, preventing concurrent writes is essential. With a Spacelift-managed state, Spacelift injects a backend configuration for each run using one-time credentials, restricts state access to active runs and tasks, and stores state encrypted in Amazon S3. You also get state history and a break-glass rollback for rare cases of state corruption, such as after provider upgrades.
Spacelift enables you to create private workers inside your infrastructure, which helps you execute Spacelift-related workflows on your end. Read the documentation for more information on configuring private workers.
If you are interested in learning more about Spacelift, create a free account today or book a demo with one of our engineers.
Key points
Using Terraform to create and manage an S3 bucket is straightforward when you use the current AWS provider patterns.
The main things to remember are:
- Use
aws_s3_objectinstead of the deprecatedaws_s3_bucket_objectresource. - Prefer public access blocking and ownership controls over ACL-first bucket configuration.
- Use short-lived credentials, profiles, or assumed roles instead of embedding static AWS keys in Terraform code.
- Terraform is a good fit for managing the bucket and a limited number of related objects, but it is not the right tool for large-scale bulk file transfer.
If you need help managing Terraform at scale, Spacelift can help you standardize workflows, manage credentials securely per run, and add guardrails such as policy as code and drift detection.
Note: New versions of Terraform are placed under the BUSL license, but everything created before version 1.5.x stays open-source. OpenTofu is an open-source version of Terraform that expands on Terraform’s existing concepts and offerings. It is a viable alternative to HashiCorp’s Terraform, being forked from Terraform version 1.5.6.
Manage Terraform better and faster
If you are struggling with Terraform automation and management, check out Spacelift. It helps you manage Terraform state, build more complex workflows, and adds several must-have capabilities for end-to-end infrastructure management.
Frequently asked questions
What is the Terraform resource for uploading files to S3?
Use aws_s3_object. Older examples often use aws_s3_bucket_object, but that resource is deprecated and will be removed in a future version of the AWS provider. Terraform recommends using aws_s3_object for new configurations instead.
How do I create a private S3 bucket with Terraform?
Use aws_s3_bucket to create the bucket, then lock it down with aws_s3_bucket_public_access_block. For new S3 buckets, AWS now defaults to Bucket owner enforced, which disables ACLs, so you usually do not need acl = “private” unless you are intentionally managing ACLs. Public access is best blocked with all four public-access settings enabled.
Can I create a bucket and upload files in the same Terraform configuration?
Yes. You can create the bucket with aws_s3_bucket and upload files with aws_s3_object in the same configuration. That is a common pattern when Terraform is managing both the infrastructure and a small number of related objects.
Why does Terraform want to recreate my S3 object after switching resources?
This usually happens when moving from aws_s3_bucket_object to aws_s3_object. The Terraform Registry notes that replacing the deprecated resource with the newer one can cause the object to be recreated on the next apply unless you import the existing object into aws_s3_object.
Can Terraform delete an S3 bucket that contains objects?
Terraform can remove S3 objects it manages and then delete the bucket, but S3 buckets must be empty before AWS allows them to be removed. That is why the order of managed resources matters in the configuration.
HashiCorp Developer | Terraform Docs. Backend Type: s3. Accessed: 21 October 2025
Terraform Registry. Resource: aws_s3_bucket. Accessed: 21 October 2025
Amazon Simple Storage Service User Guide. What is Amazon S3?. Accessed: 21 October 2025
Amazon Simple Storage Service User Guide. Getting started with Amazon S3. Accessed: 21 October 2025
