
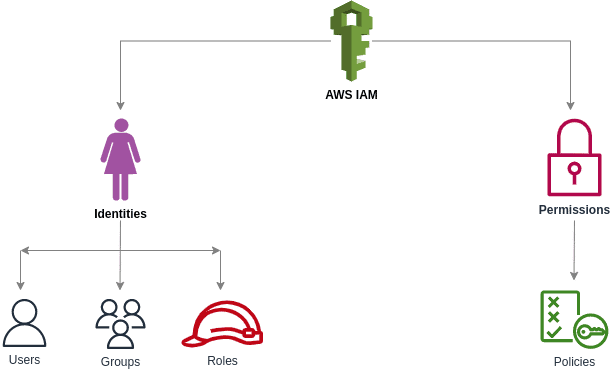
IAM policies lie at the heart of AWS access management. Essentially, they are a set of permissions that can be attached to an AWS identity or resource to manage its access.
Terraform allows you to define, create, and manage AWS IAM policies programmatically, ensuring consistency and automation across environments. In this tutorial, you’ll learn step-by-step how to create an AWS IAM policy using Terraform.
What we’ll cover:
- What are IAM policies?
- Different ways of representing IAM Policies in Terraform
- Prerequisites
- Creating identity-based IAM policies using Terraform
- Creating an inline policy using Terraform
- Creating standalone IAM policies using Terraform
- How to choose a way to represent an IAM policy in Terraform
- AWS-managed policies
- Creating resource-based policies using Terraform
- Best practices for managing IAM policies in Terraform
TL;DR
Terraform gives you four ways to define an AWS IAM policy: the HEREDOC syntax, the jsonencode() function, the file() function, and the aws_iam_policy_document data source. All four produce the same JSON document AWS expects, so the choice comes down to readability, validation, and IDE support.
What are IAM policies?
Policies determine what an identity or resource is allowed to do on AWS based on the permission set. They are primarily stored in JSON format and accessible through the AWS IAM console.
For more information about policies, check out our AWS IAM Policies guide.
A simple policy that allows only one action i.e rds:CreateDBInstance (the RDS instance creation action), looks like this:
{
   "Version": "2012-10-17",
   "Statement": [
       {
           "Action": [
               "rds:CreateDBInstance"
           ],
           "Resource": "*",
           "Effect": "Allow"
       }
   ]
}
Before we start with Terraform and create our own policies, let’s review the general structure of policies:
Structure of an AWS IAM policy
Although there are various types of AWS policies, they all share the same structure, which includes a policy version and a list of statements. Let’s look at the purpose of each key in a well-formed policy.
- Version: At the time of writing, the latest version is 2012–10–17.
- Statement: Each statement represents a permission and has all its details.
- Sid: An optional name for a statement
- Action: The AWS service actions the statement applies to, such as
s3:ListAllMyBucketsorrds:CreateDBInstance. The Effect element controls whether those actions are allowed or denied. - Effect: Indicates whether an action(s) is allowed or denied using the value “Allow” or “Deny”
- Principal: This represents the identity to which the policy applies. (It’s useful for resource-based policies and not required in IAM permission policies.)
- Resource: This represents the resources to which the actions apply. (It’s optional for resource-based policies.)
- Condition: This specifies a condition that must be fulfilled for the statement to apply.
AWS supports various policies, but as previously stated, the above structure applies to all of them.
IAM policy types
AWS supports seven types of policies:
- Identity-based policies
- Resource-based policies
- Permissions boundaries
- AWS Organizations service control policies (SCPs)
- AWS Organizations resource control policies (RCPs)
- Access control lists (ACLs)
- Session policies
This article will focus primarily on identity-based policies and how to create them using Terraform. These learnings can be extended to any other type of AWS-supported policy.
Learn also how to create an AWS IAM role with Terraform.
Different ways of representing IAM policies in Terraform
Terraform provides multiple ways to represent a policy in HCL. These are:
HEREDOCsyntaxjsonencodefunction to convert a policy into JSONfilefunction to load a policy from a JSON fileaws_iam_policy_documentdata resource
We will now explore all of them.
Note: It is important to remember that any of these methods can be used in place of the others without affecting the terraform plan.
Prerequisites
Here are the steps needed before we get started:
- An AWS admin user with the ability to create resources on AWS
- At least one S3 bucket that can be used to check whether a policy with the
S3:ListAllMyBucketaction is properly associated with a user - Configuring the AWS credentials to be used with Terraform
Once the prerequisites are complete, we will quickly review identity-based policies before creating one with Terraform.
Creating identity-based IAM policies using Terraform
Identity-based policies govern what actions an identity (User, Group, Role) can perform on which resources and under what conditions.
A simple identity-based policy, such as the one shown below, allows the identity to list all S3 buckets.
{
 "Version": "2012-10-17",
 "Statement": {
   "Effect": "Allow",
   "Action": "s3:ListAllMyBuckets",
   "Resource": "*"
 }
}
Now that we understand identity-based policies, we will start by creating a user who will be the subject of our hands-on exercises on creating and managing IAM policies using Terraform.
Step 1: Configure Terraform with the AWS provider
Let’s start by creating a file with the name main.tf in an empty folder.
Copy and paste the HCL code snippet below into this file. This code snippet creates an AWS user and outputs a randomly generated password that can be used to log in to AWS.
terraform {
  required_version = ">= 1.6"

  required_providers {
    aws = {
      source  = "hashicorp/aws"
      version = "~> 6.0"
    }
  }
}

provider "aws" {
 region = "us-east-1"
}

resource "aws_iam_user" "spacelift_user" {
 name = "spacelift-user"
}

resource "aws_iam_user_login_profile" "spacelift_user_login_profile" {
  user    = aws_iam_user.spacelift_user.name
  pgp_key = "keybase:your_keybase_username"
}

output "encrypted_password" {
  value = aws_iam_user_login_profile.spacelift_user_login_profile.encrypted_password
}
Security note: Omitting pgp_key causes Terraform to store the generated password in plaintext in your state file, which is a real risk if the state is shared or remotely stored. Always supply either a Keybase username (keybase:username) or a base-64 encoded PGP public key, and read the result from encrypted_password. The user can decrypt it with terraform output encrypted_password | base64 --decode | keybase pgp decrypt.
Step 2: Initialize the backend
Initialize the backend and the required provider plugins using the terraform init command.

Step 3: Run terraform plan
Verify the changes by running the terraform plan command.
Terraform will perform the following actions:

  # aws_iam_user.spacelift_user will be created
  + resource "aws_iam_user" "spacelift_user" {
      + arn           = (known after apply)
      + force_destroy = false
      + id            = (known after apply)
      + name          = "spacelift-user"
      + path          = "/"
      + tags_all      = (known after apply)
      + unique_id     = (known after apply)
    }


  # aws_iam_user_login_profile.spacelift_user_login_profile will be created
  + resource "aws_iam_user_login_profile" "spacelift_user_login_profile" {
      + encrypted_password      = (known after apply)
      + id                      = (known after apply)
      + key_fingerprint         = (known after apply)
      + password_length         = 20
      + password_reset_required = (known after apply)
      + pgp_key                 = "keybase:your_keybase_username"
      + user                    = "spacelift-user"
    }

Plan: 2 to add, 0 to change, 0 to destroy.

Changes to Outputs:
  + encrypted_password = (known after apply)
Step 4: Apply the changes
After you’ve verified the plan, use the terraform apply command to deploy the changes to AWS.
A successful run produces the output below. The password is PGP-encrypted and base64-encoded, so you need to decrypt it before using it to log into AWS:
terraform output -raw encrypted_password | base64 --decode | keybase pgp decryptaws_iam_user.spacelift_user: Creating...
aws_iam_user.spacelift_user: Creation complete after 1s [id=spacelift-user]
aws_iam_user_login_profile.spacelift_user_login_profile: Creating...
aws_iam_user_login_profile.spacelift_user_login_profile: Creation complete after 0s [id=spacelift-user]
Apply complete! Resources: 2 added, 0 changed, 0 destroyed.
Outputs:
encrypted_password = "wcBMA...<base64-encoded-PGP-message>...=="Step 5: Verify the AWS console
Decrypt the password using the command above, then log in to AWS with the username and the decrypted password and try to access the S3 dashboard.
username: spacelift-user
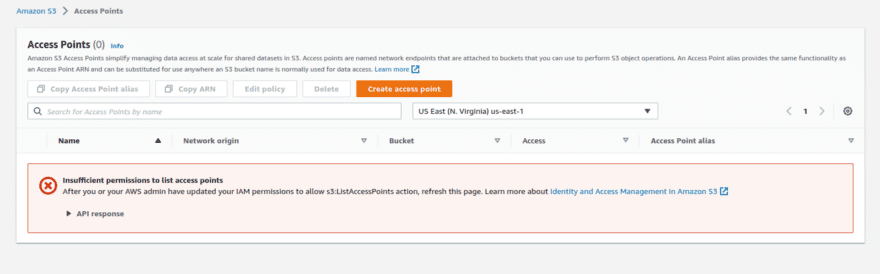
password: <decrypted password from `keybase pgp decrypt`>A new user with no policies attached has no access to anything: AWS denies by default, and spacelift-user has no permissions yet. The S3 console may not show a 403 outright, but it will show no buckets at all, which is the symptom of the missing permission.
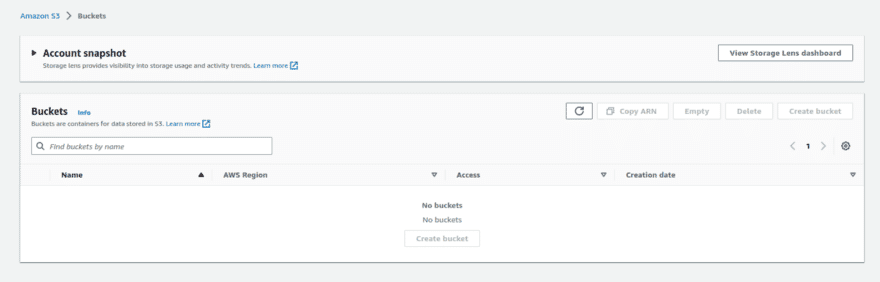
Try accessing any other resources on AWS and verify that the new user has no access.
Now that we’ve got everything in order, let’s create a policy that allows our newly created user to list all S3 buckets using Terraform.
Creating an inline IAM policy using Terraform
An inline policy is embedded in the identity and has no independent existence. When you delete the identity, you also delete the inline policy. Inline policies can be created and attached to a user using the aws_iam_user_policy resource.
Let’s get started: Create an aws_iam_user_policy resource inside the main.tf file, which attaches an inline policy to the spacelift-user.
resource "aws_iam_user_policy" "s3_list_only_policy" {
 name = "S3ListOnlyPolicy"
 user = aws_iam_user.spacelift_user.name

 policy = <<EOF
{
 "Version": "2012-10-17",
 "Statement": [{
   "Effect": "Allow",
   "Action": [
     "s3:ListAllMyBuckets"
   ],
   "Resource": "*"
 }]
}
 EOF
}
Note: Please keep in mind that we used the HEREDOC syntax here to represent the policy. This allows us to use the JSON policy directly in Terraform without any modifications.
Run the terraform plan command to verify the changes.
Terraform will perform the following actions:

 # aws_iam_user_policy.s3_list_only_policy will be created
 + resource "aws_iam_user_policy" "s3_list_only_policy" {
     + id     = (known after apply)
     + name   = "S3ListOnlyPolicy"
     + policy = jsonencode(
           {
             + Statement = [
                 + {
                     + Action   = [
                         + "s3:ListAllMyBuckets",
                       ]
                     + Effect   = "Allow"
                     + Resource = "*"
                   },
               ]
             + Version   = "2012-10-17"
           }
       )
     + user   = "spacelift-user"
   }

Plan: 1 to add, 0 to change, 0 to destroy.
It’s worth noting that, despite using the HEREDOC syntax to represent the policy, Terraform internally uses the jsonencode function, which is visible in the plan. In the following section, we will examine the jsonencode function in greater detail.
Finally, run the terraform apply command to deploy the changes which will attach an inline policy to the spacelift-user.
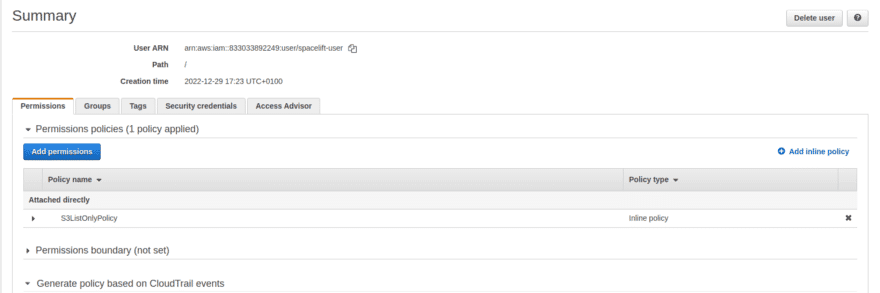
Great! Now, let’s log in again to AWS using the spacelift user and check the S3 console.
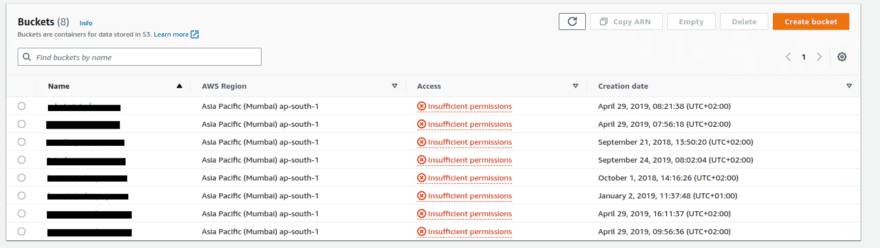
The policy took effect to grant the spacelift-user permission to use the S3:ListAllMyBuckets action.
In this example, we created an inline policy and represented it using the HEREDOC syntax. In the following section, we will look at all of the different ways to represent policies in Terraform.
Creating standalone IAM policies using Terraform
Before we jump into the hands-on tutorial, let’s explore standalone policies and why they are important.
Consider the following questions:
- How can we share the same inline policy with multiple other identities? Should we re-create the inline policy for each identity?
- How can we delete an identity without also deleting the policies associated with it?
This is where standalone policies come into the picture. They can exist independently of any identity or resource and can be attached to any number of identities without recreating them.
1. Using the Terraform jsonencode function
In the main.tf file, create an aws_iam_policy resource. This resource creates a standalone policy named S3ReadOnlyPolicy and uses the Terraform jsonencode function to represent it.
resource "aws_iam_policy" "s3_read_only_policy" {
 name = "S3ReadOnlyPolicy"

 policy = jsonencode({
   Version = "2012-10-17"
   Statement = [{
     Effect = "Allow"
     Action = [
       "s3:ListBucket",
       "s3:GetObject"
     ]
     Resource = "*"
   }]
 })
}
Run the terraform plan command to verify the changes.
Terraform will perform the following actions:

 # aws_iam_policy.s3_read_only_policy will be created
 + resource "aws_iam_policy" "s3_read_only_policy" {
     + arn       = (known after apply)
     + id        = (known after apply)
     + name      = "S3ReadOnlyPolicy"
     + path      = "/"
     + policy    = jsonencode(
           {
             + Statement = [
                 + {
                     + Action   = [
                         + "s3:ListBucket",
                         + "s3:GetObject",
                       ]
                     + Effect   = "Allow"
                     + Resource = "*"
                   },
               ]
             + Version   = "2012-10-17"
           }
       )
     + policy_id = (known after apply)
     + tags_all  = (known after apply)
   }

Plan: 1 to add, 0 to change, 0 to destroy.
Finally, run the terraform apply command to deploy the changes to AWS.
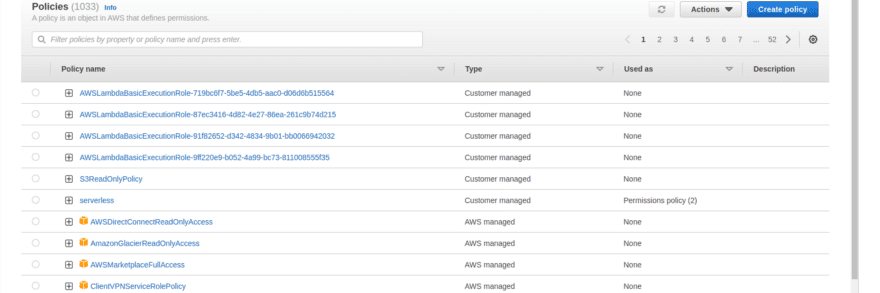
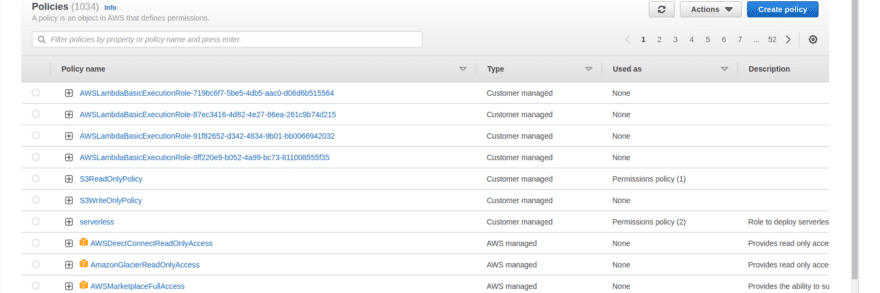
Check the IAM console to verify if the policy was created. Note that the policy is not yet associated with any identity.
How to attach the standalone IAM policy to a user in Terraform
A standalone policy can be attached to a user using the aws_iam_user_policy_attachment resource.
Remember this resource is exclusively for attaching a policy to a user, unlike the aws_iam_user_policy resource, which both creates and attaches an inline policy to a user.
Let’s proceed to attach the newly created policy to the spacelift-user user.
Create an aws_iam_user_policy_attachment resource, which has two attributes user and policy_arn. Set the user attribute as the name of the spacelift-user user and arn as the arn of the standalone policy we created.
resource "aws_iam_user_policy_attachment" "spacelift_user_attach_s3_read_only_policy" {
 user       = aws_iam_user.spacelift_user.name
 policy_arn = aws_iam_policy.s3_read_only_policy.arn
}
Run the terraform plan to verify the changes.
Terraform will perform the following actions:
# aws_iam_user_policy_attachment.spacelift_user_attach_s3_read_only_policy will be created
+ resource "aws_iam_user_policy_attachment" "spacelift_user_attach_s3_read_only_policy" {
+ id = (known after apply)
+ policy_arn = "arn:aws:iam::123456789:policy/S3ReadOnlyPolicy"
+ user = "spacelift-user"
}
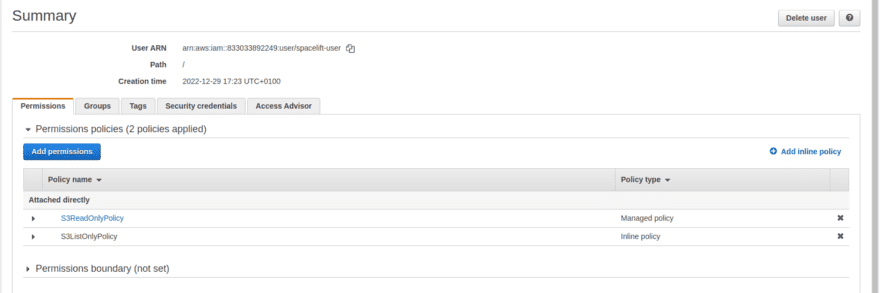
Plan: 1 to add, 0 to change, 0 to destroy.Run the terraform apply command and check if the policy was attached to the spacelift-user in the AWS IAM console.
How to attach a standalone IAM policy to a role in Terraform
In production, attaching policies to roles is preferred over attaching them to users. Use aws_iam_role_policy_attachment:
resource "aws_iam_role" "spacelift_role" {
  name = "spacelift-role"

  assume_role_policy = jsonencode({
    Version = "2012-10-17"
    Statement = [{
      Effect = "Allow"
      Principal = {
        Service = "ec2.amazonaws.com"
      }
      Action = "sts:AssumeRole"
    }]
  })
}

resource "aws_iam_role_policy_attachment" "spacelift_role_attach_s3_read_only_policy" {
  role       = aws_iam_role.spacelift_role.name
  policy_arn = aws_iam_policy.s3_read_only_policy.arn
}
The pattern is identical for groups via aws_iam_group_policy_attachment.
2. Using the Terraform file function
Create a JSON file and add the policy below to it.
{
   "Version": "2012-10-17",
   "Statement": [{
     "Effect": "Allow",
     "Action": [
       "s3:DeleteObject"
     ],
     "Resource": "*"
   }]
}
When creating the aws_iam_policy resource use the file function to load the policy from the json file.
resource "aws_iam_policy" "s3_delete_only_policy" {
 name = "S3DeleteOnlyPolicy"
 policy = file("filename.json")
}
The remaining steps are the same as those in the previous example of creating the policy using the jsonencode function.
3. Using a Terraform aws_iam_policy_document data resource
The aws_iam_policy_document data resource generates policies in JSON format that can be used with the aws_iam_policy resource or with any resource that expects a JSON policy.
Create an aws_iam_policy_document data resource in the main.tf file.
data "aws_iam_policy_document" "s3_write_only_policy_document" {
 statement {
   sid = "1"
   actions = [
     "s3:PutObject",
   ]
   resources = ["*"]
 }
}
Run the terraform plan command as usual.
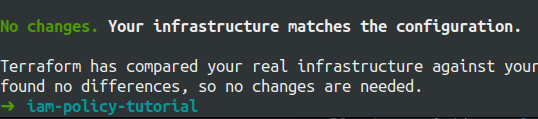
Take a moment to consider why no changes are being reflected 🤔
This is because aws_iam_policy_document is a data resource. Data resources read information and have no effect on the infrastructure. This implies that we must use this data resource as a reference somewhere in order to actually create the generated policy.
Create a new aws_iam_policy resource that refers to the data resource aws_iam_policy_document.
resource "aws_iam_policy" "s3_write_only_policy" {
 name   = "S3WriteOnlyPolicy"
 policy = data.aws_iam_policy_document.s3_write_only_policy_document.json
}
Again, run the terraform plan command. This time, you should see some changes that match the output below.
Terraform will perform the following actions:

 # aws_iam_policy.s3_write_only_policy will be created
 + resource "aws_iam_policy" "s3_write_only_policy" {
     + arn       = (known after apply)
     + id        = (known after apply)
     + name      = "S3WriteOnlyPolicy"
     + path      = "/"
     + policy    = jsonencode(
           {
             + Statement = [
                 + {
                     + Action   = "s3:PutObject"
                     + Effect   = "Allow"
                     + Resource = "*"
                     + Sid      = "1"
                   },
               ]
             + Version   = "2012-10-17"
           }
       )
     + policy_id = (known after apply)
     + tags_all  = (known after apply)
   }

Plan: 1 to add, 0 to change, 0 to destroy.
Finally, run the terraform apply command to create the S3WriteOnlyPolicy standalone policy.
We’ve seen various ways to represent policies using Terraform, but which one should we use and when?
How to choose a way to represent an IAM policy in Terraform
In general, you can represent policies in any way you like.
However, the aws_iam_policy_document data resource approach is recommended because it allows Terraform to validate any errors without having to apply the changes, which is not possible in other cases.
Let us see how this works in practice:
Below are two policies, one with the HEREDOC syntax and one with the jsonencode function. Both policies have a typo in the Action key, which reads MistakeInAction at the moment.
resource "aws_iam_user_policy" "s3_list_only_policy" {
 name = "S3ListOnlyPolicy"
 user = aws_iam_user.spacelift_user.name

 policy = <<EOF
{
 "Version": "2012-10-17",
 "Statement": [{
   "Effect": "Allow",
   "MistakeInAction": [
     "s3:ListAllMyBuckets"
   ],
   "Resource": "*"
 }]
}
 EOF
}

resource "aws_iam_policy" "s3_read_only_policy" {
 name = "S3ReadOnlyPolicy"

 policy = jsonencode({
   Version = "2012-10-17"
   Statement = [{
     Effect = "Allow"
     MistakeInAction = [
       "s3:ListBucket",
       "s3:GetObject"
     ]
     Resource = "*"
   }]
 })
}
Let’s see if Terraform can detect this error.
To validate the HCL file, use the terraform validate command.
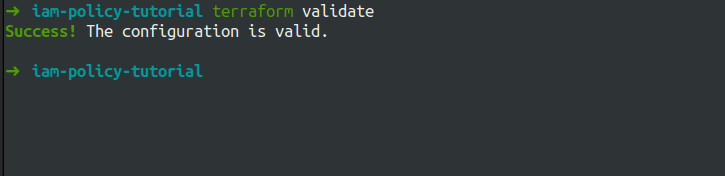
Terraform couldn’t detect any problems with either of the policies.
Let us now try the same thing with aws_iam_policy_document data resource.
data "aws_iam_policy_document" "s3_write_only_policy_document" {
 statement {
   sid = "1"
   MistakeInActions = [
     "s3:PutObject",
   ]
   resources = ["*"]
 }
}
Run the terraform validate command again and check if Terraform is able to find the typo.
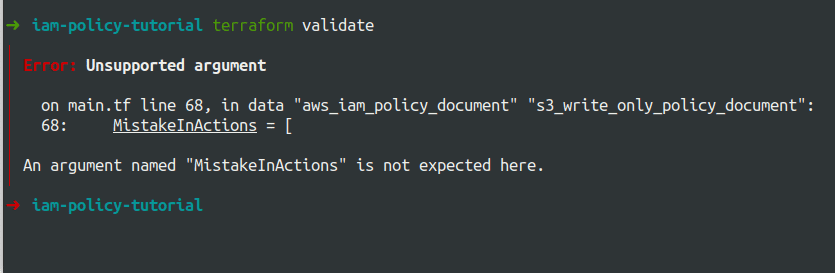
Terraform detected the typo, which is a huge benefit for developers.
In addition, when using the aws_iam_policy_document data resource, you can benefit from IDEs’ auto-completion feature, which leads to a better development experience.
This brings us to the final section of the exercise, where we will learn how to associate an AWS-managed policy with a user.
AWS-managed policies
AWS-managed policies are created and managed by AWS for the most common use cases.
Let’s look at how to attach an AWS-managed policy to a user.
Because AWS-managed policies are already present on AWS, we will read the policy from AWS using the data resource aws_iam_policy.
data "aws_iam_policy" "aws_rds_full_access_policy" {
 name = "AmazonRDSFullAccess"
}
Let’s attach this policy to the spacelift-user user as we did before using the reference to the data resource.
resource "aws_iam_user_policy_attachment" "spacelift_user_attach_aws_rds_full_access_policy" {
 user       = aws_iam_user.spacelift_user.name
 policy_arn = data.aws_iam_policy.aws_rds_full_access_policy.arn
}
Note that we can directly hardcode the arn of the policy as well instead of using the data resource.
Run the terraform plan command and verify the planned changes.
Terraform will perform the following actions:
# aws_iam_user_policy_attachment.spacelift_user_attach_aws_rds_full_access_policy will be created
+ resource "aws_iam_user_policy_attachment" "spacelift_user_attach_aws_rds_full_access_policy" {
+ id = (known after apply)
+ policy_arn = "arn:aws:iam::aws:policy/AmazonRDSFullAccess"
+ user = "spacelift-user"
}
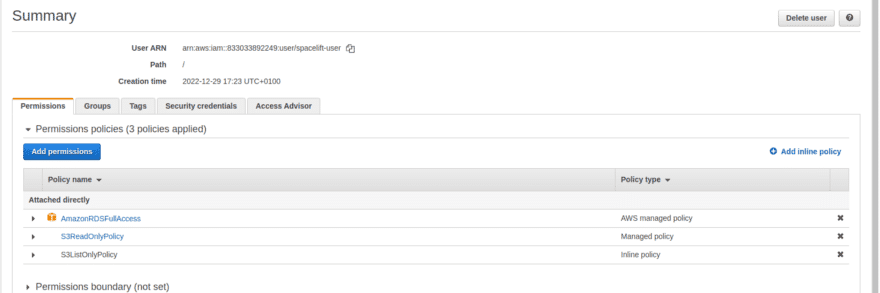
Plan: 1 to add, 0 to change, 0 to destroy.Run the terraform apply command to deploy the changes and verify them in the IAM console.
Congratulations! You’ve learned how to use Terraform to manage inline, standalone, and AWS-managed policies and numerous ways to represent them.
As previously stated, all of these learnings can be extended to any other AWS policy type. Below is an example of creating resource-based policies using Terraform.
Creating resource-based policies using Terraform
The method for creating policies remains the same as with identity-based policies; the only difference is the resource used to attach the policy to an entity.
resource "aws_s3_bucket" "user_access_logs" {
  bucket = "user-access-logs"
}

data "aws_iam_policy_document" "allow_access_from_uat_account_policy_document" {
  statement {
    principals {
      type        = "AWS"
      identifiers = ["123456789012"]
    }

    actions = [
      "s3:GetObject",
      "s3:PutObject",
      "s3:ListBucket",
    ]

    resources = [
      aws_s3_bucket.user_access_logs.arn,
      "${aws_s3_bucket.user_access_logs.arn}/*",
    ]
  }
}

resource "aws_s3_bucket_policy" "allow_access_from_uat_account_policy" {
  bucket = aws_s3_bucket.user_access_logs.id
  policy = data.aws_iam_policy_document.allow_access_from_uat_account_policy_document.json
}
Best practices for managing IAM policies in Terraform
Following these practices enhances security, simplifies policy management, and ensures compliance with organizational access control standards:
- Follow the principle of least privilege — Grant only the minimum permissions required to perform specific tasks, avoiding
"*"(wildcard) permissions whenever possible. - Use IAM roles instead of direct user attachments — Attach IAM policies to roles rather than users, enabling better access control and making it easier to manage permissions across multiple entities.
- Leverage JSON encoding (
jsonencode()) for policy definitions — Usingjsonencode()ensures cleaner, more maintainable Terraform code compared to hardcoded JSON strings. - Store policies in separate modules or files — To improve code organization and reusability, keep IAM policies modular by storing them in separate
.tffiles or Terraform modules. - Use AWS-managed policies when applicable — Favor AWS-managed policies for common use cases to reduce maintenance overhead and benefit from AWS security updates.
Learn more about AWS IAM best practices.
How to manage Terraform resources with Spacelift
Terraform is really powerful, but to achieve an end-to-end secure GitOps approach, you need a platform that can orchestrate your Terraform workflows. Spacelift is the infrastructure orchestration platform built for the AI-accelerated software era.
It manages the full lifecycle for both traditional infrastructure as code (IaC) and AI-provisioned infrastructure, giving you access to a powerful CI/CD workflow and unlocking features such as:
- Policies (based on Open Policy Agent) – You can control how many approvals you need for runs, what kind of resources you can create, and what kind of parameters these resources can have, and you can also control the behavior when a pull request is open or merged.
- Multi-IaC workflows – Combine Terraform with Kubernetes, Ansible, and other IaC tools such as OpenTofu, Pulumi, and CloudFormation, create dependencies among them, and share outputs.
- Build self-service infrastructure – You can use Templates and Blueprints to build self-service infrastructure; simply complete a form to provision infrastructure based on Terraform and other supported tools.
- AI-powered provisioning and diagnostics – Spacelift Intelligence adds an AI-powered layer for natural language provisioning, diagnostics, and operational insight across your infrastructure workflows.
- Integrations with any third-party tools – You can integrate with your favorite third-party tools and even build policies for them. For example, see how to integrate security tools in your workflows using Custom Inputs.
Spacelift enables you to create private workers inside your infrastructure, which helps you execute Spacelift-related workflows on your end. Read the documentation for more information on configuring private workers.
You can check it for free by creating a trial account or requesting a demo with one of our engineers.
Key points
In this article, we learned about IAM policies, the numerous ways to create and manage them using Terraform, and how to use them in practice.
AWS IAM policies lie at the heart of access management, so mastering them is critical to securing access control on AWS.
Note: New versions of Terraform are placed under the BUSL license, but everything created before version 1.5.x stays open-source. OpenTofu is an open-source version of Terraform that expands on Terraform’s existing concepts and offerings. It is a viable alternative to HashiCorp’s Terraform, being forked from Terraform version 1.5.6.
Orchestrate Terraform deployments with Spacelift
Orchestrate your Terraform workflows and build governed pipelines using policy as code, programmatic configuration, context sharing, drift detection, resource visualization, and many more.
Frequently asked questions
What's the difference between aws_iam_policy and aws_iam_policy_document in Terraform?
aws_iam_policy is a resource that creates a managed IAM policy in AWS, while aws_iam_policy_document is a data source that generates the JSON policy document used as input for that resource.
When should I use an inline IAM policy vs a managed policy in Terraform?
Use an inline policy (via aws_iam_role_policy or aws_iam_user_policy) when permissions are tightly bound to a single identity and shouldn’t be reused. Choose a managed policy (aws_iam_policy) when the same permissions need to be attached to multiple users, groups, or roles.
How do I attach the same IAM policy to multiple users or roles with Terraform?
Create the policy once with aws_iam_policy, then use aws_iam_policy_attachment or, more safely, multiple aws_iam_role_policy_attachment and aws_iam_user_policy_attachment resources combined with for_each to attach it to each target.
Can I use Condition blocks in a Terraform IAM policy?
Yes. Add a condition block inside a statement in aws_iam_policy_document, specifying test, variable, and values to enforce restrictions like source IP, MFA presence, or tag matching.
