
Many organizations fail to install adequate security measures, which are critical for protecting the cloud against breaches and attacks. Understanding security and installing the appropriate security measures minimizes threats and keeps the cloud secure.
Security is a shared responsibility between AWS and the customer, where AWS is responsible for the security of the cloud, and the customer is responsible for security in the cloud.
VPCs are one of the most important security features AWS provides. They let us create an isolated private cloud within the public cloud to protect resources from direct access.
In this article, we will explore:
- What is a Virtual Private Cloud (VPC)?
- What are AWS security groups?
- How to create an AWS security group
- How to manage security groups through Terraform
- How to use existing security groups with Terraform
- AWS security groups use cases
- What is the difference between NACLs and security groups?
- How to use aws_vpc_security_group_ingress_rule and aws_vpc_security_group_egress_rule
- Best practices for AWS security groups and compliance
TL;DR
Security groups are AWS’s per-resource firewall. With Terraform, define rules as standalone resources (not inline), always declare your egress rules explicitly, and use for_each when managing groups at scale.
What is a Virtual Private Cloud (VPC)?
Virtual Private Cloud (VPC) is one of AWS’s fundamental building blocks. VPCs are private virtual networks that resemble traditional networks and provide secure, isolated environments to host and protect AWS resources like EC2 instances. Security for the resources within the VPC can be configured using security groups and a network access control list (NACL).
Read more about how to build AWS VPC using Terraform and how to create an AWS EC2 instance using Terraform.
What are AWS security groups?
Security groups are among the most important pillars of VPC security. They are software-defined network firewalls defined inside a VPC that allow or deny traffic to resources based on the inbound and outbound rules. They support stateful Layer 3 (Network layer) and Layer 4 (Transport layer) filtering capabilities.
At the resource level, security groups control the traffic allowed to reach them and to leave. They serve as the final line of defense.
Although they are most commonly associated with EC2 instances, they have other applications. They are widely used with various other services, such as CodeBuild and EKS.
The figure below shows how security groups secure traffic flow to and from resources.

What makes up a security group?
A security group is composed of rules. A rule consists of the following components:
- Protocol
- Port range
- Source
- Destination
A security group has separate rule sets for incoming and outgoing traffic: An inbound rule consists of a protocol, a port(s), and a source.
An outbound rule consists of a protocol, a port(s), and a destination.
For example, the rule below allows all traffic to reach resources associated with the security group.

The rule below allows all traffic to leave resources associated with the security group:

Let’s inspect an existing security group to understand the rules better.
Exploring the default security group
Let us inspect the default security group to understand what the rules look like.
- Open the EC2 dashboard.

- Click on “Security Groups” in the left nav under “Networks and Security”.
- Explore the inbound and outbound rules for the default security group and other details.

Key observations
- The default security group is associated with a VPC. The VPC ID can be found under the “VPC ID” tab.
- By default, the security group has one inbound and one outbound rule.
- All traffic can reach the associated resources thanks to the inbound rule.
- The outbound rule allows all traffic destined for everywhere (denoted by 0.0.0.0) to leave the associated resources.
Important characteristics of security groups
When working with security groups, it is critical to be aware of a few key characteristics.
- There can only be “allow rules” in security groups, not “deny rules” – By default, AWS blocks all traffic to resources associated with security groups. The allow rules filter and allow relevant traffic.
- A resource can have multiple security groups attached to it – When multiple security groups are attached to a single resource, all rules are aggregated to form a single rule set that determines whether or not the traffic is allowed.
- Security groups are stateful – Being stateful means an outbound rule that allows traffic to flow out of the resource also allows the response to reach back, regardless of whether an inbound rule is present.
- You can only create 2500 security groups per region
- Security consideration – Keep the number of security groups to a minimum to avoid making mistakes when managing too many security groups.
How to create an AWS security group
We can always create new security groups with the rules we need. Follow the steps below to learn how to do so:
Step 1. Add a new security group
- Log in to your AWS account and navigate to the “Security groups” panel.
- Click the “Create security group” button to create a new security group.
- Give the security group a name as
web-server-sgand a description as Allow SSH to the web server.
Note: The name of the security group has to be unique within the VPC and cannot exceed 255 characters. Another thing to keep in mind is that the security group’s name cannot start with sg-.

- For the time being, do not add any inbound rules and proceed with the suggested outbound rule, which allows all traffic to flow everywhere (0.0.0.0).
- Finally, click on the “Create security group” button.

Congratulations! You have created your first security group 🎉
Security groups are only effective when attached to an AWS resource. Next, we will attach it to an EC2 instance to see it in action.
Step 2. Attach the security group to AWS resources
In this tutorial, we will create an EC2 instance and attach the newly created security group to it. We will then try to connect to this instance via SSH.
Attaching a security group to an EC2 instance
- Navigate to the EC2 dashboard and click on the “Launch instances” button.
- Assign the instance a name as
web-server. - Choose any Amazon Machine Image (AMI) and architecture.

- Select the instance type as
t2.nano. - Create a new key and name it
web-server-key. The key will be downloaded automatically. We will use it later to SSH into our instance. - Make sure to select the default VPC and a public subnet under “Network settings”
- Enable the “Auto-assign public IP” option.

- Under the “Firewall (security groups)” tab, choose the “Select existing security group” option and select the previously-created security group named
web-server-sg.

- Leave all other options unchanged and launch the instance.
With the security group now attached to our EC2 instance, let us try to connect to it via SSH.
Step 3. Connect to the EC2 instance via SSH
Open the details of the newly created EC2 instance and copy the public IP address.

- Open a terminal and use the command below to modify the permissions for the
web-server-key.pemfile we downloaded earlier to give the owner read and write permissions.
$ chmod 600 web-server-key.pem- Next, let us try to connect to the EC2 instance with our
pemkey using the below command.
$ ssh -i web-server-key.pem ec2-user@44.211.190.174
# The username might changed based on the OS that you have chosen for your instance
The SSH request eventually times out with the following error.

This is expected as our request is being blocked by the security group that we have attached to the EC2 resource. Remember that the security group we created does not have any inbound rules yet.
We can resolve this issue by configuring an inbound rule to allow incoming traffic on port 22 (SSH) from our IP address.
Step 4. Add rules to the existing security group
- Open the security groups panel and select the security group attached to our EC2 instance named
web-server-sg. - Under the “Inbound rules” tab, click the “Edit inbound rules” button, followed by the “Add rule” button.

- Choose SSH as the protocol and My IP as the source (allowing SSH through your IP only). Optionally, add the description as Allow SSH from my network.
Security consideration: Protocols such as SSH and RDP should only allow specific IP addresses. Specifying 0.0.0.0 opens access to everyone, which is a security risk.
It should be noted that the source and destination do not have to be IP addresses. Other security groups or prefixes can also be used.

- Save the rule and attempt to reconnect to the EC2 instance via SSH.
Step 5. Reconnect to the EC2 instance via SSH
We’ll use the same SSH command as before to see if we can connect after adding the inbound rule to the security group.
$ ssh -i web-server-key.pem ec2-user@44.211.190.174
We successfully connected when we added an inbound rule for SSH.
You can also try switching to a different network to confirm that the security group is blocking the traffic.
In the following sections, we’ll review some of the key characteristics of security groups, as well as how to manage security groups with Terraform.
How to manage security groups through Terraform
Handling infrastructure at scale manually is extremely difficult. Terraform and other IaC tools make it much easier for us to create and manage infrastructure at scale thanks to their declarative approach and state management.
Let’s look at how we can easily create and manage security groups with Terraform.
To follow this tutorial, you will need to have Terraform installed on your machine and your AWS credentials configured in the shell.
Note: We will keep using the same main.tf file and make changes to it.
You can also explore how platforms like Spacelift can help you and your organization fully manage cloud resources within minutes. Spacelift is an infrastructure orchestration platform that supports tools like Terraform, OpenTofu, Pulumi, Kubernetes, Ansible, and more.
For example, it enables policy-as-code, which lets you define policies and rules that govern your infrastructure automatically. You can even invite your security and compliance teams to collaborate on and approve certain workflows and policies for parts that require a more manual approach.
Create a security group
We’ll set up a security group with an inbound rule that allows only HTTPS traffic and an outbound rule that allows all traffic.
Create a file with the name as main.tf and copy the below HCL code snippet to this file.
terraform {
 required_providers {
   aws = {
     source  = "hashicorp/aws"
     version = "~> 5.0"
   }
 }
}

provider "aws" {
 region = "us-east-1"
}

data "aws_vpc" "default" {
 default = true
}

resource "aws_security_group" "web_server_sg_tf" {
 name        = "web-server-sg-tf"
 description = "Allow HTTPS to web server"
 vpc_id      = data.aws_vpc.default.id

ingress {
   description = "HTTPS ingress"
   from_port   = 443
   to_port     = 443
   protocol    = "tcp"
   cidr_blocks = ["0.0.0.0/0"]
 }

egress {
   from_port   = 0
   to_port     = 0
   protocol    = "-1"
   cidr_blocks = ["0.0.0.0/0"]
 }
}- Run the
terraform plancommand in the terminal where the file resides. The plan should look something like the one below:
Terraform will perform the following actions:
# aws_security_group.web_server_sg_tf will be created
 + resource "aws_security_group" "web_server_sg_tf" {
     + arn                    = (known after apply)
     + description            = "Allow HTTPS to web server"
     + egress                 = [
         + {
             + cidr_blocks      = [
                 + "0.0.0.0/0",
               ]
             + description      = ""
             + from_port        = 0
             + ipv6_cidr_blocks = []
             + prefix_list_ids  = []
             + protocol         = "-1"
             + security_groups  = []
             + self             = false
             + to_port          = 0
           },
       ]
     + id                     = (known after apply)
     + ingress                = [
         + {
             + cidr_blocks      = [
                 + "0.0.0.0/0",
               ]
             + description      = "HTTPS ingress"
             + from_port        = 443
             + ipv6_cidr_blocks = []
             + prefix_list_ids  = []
             + protocol         = "tcp"
             + security_groups  = []
             + self             = false
             + to_port          = 443
           },
       ]
     + name                   = "web-server-sg-tf"
     + name_prefix            = (known after apply)
     + owner_id               = (known after apply)
     + revoke_rules_on_delete = false
     + tags_all               = (known after apply)
     + vpc_id                 = "vpc-60f8391a"
   }
Plan: 1 to add, 0 to change, 0 to destroy.- Run
terraform applyto deploy the security group once the plan has been verified.

We have successfully deployed a new security group through Terraform 🎉
Add rules to security groups
There are two ways to add rules to a security group in Terraform:
- Inline rules: Rules defined with the
aws_security_groupterraform resource - Standalone rules: Rules defined separately using the
aws_security_group_ruleterraform resource
Note: Keep in mind that these are the two ways to add rules to a security group through Terraform, which ultimately correspond to the same thing on AWS.
Terraform advises that inline rules should not be used in conjunction with standalone rules. Using both of them together can cause conflicts.

We’ll use standalone rules as we’ve already seen inline rules when creating a security group. Before adding any new rules, we will first convert the existing inline rules to standalone rules in the same file.
Convert inline security group rules to standalone rules
- Set the ingress and egress attribute to an empty array.
Note: Terraform doesn’t detect any changes if we completely remove ingress and egress attributes fromaws_security_group. This issue can be tracked here. The workaround is to set the ingress and egress attributes to[].
resource "aws_security_group" "web_server_sg_tf" {
 name        = "web-server-sg-tf"
 description = "Allow HTTPS to web server"
 vpc_id      = data.aws_vpc.default.id
 ingress = []
 egress  = []
}- Run the
terraform plancommand and then theterraform applycommand to remove the existing rules before adding any standalone rules to avoid any conflicts. - Add standalone security group rules for HTTP ingress and all egress. To avoid conflicts, remove the inline ingress and egress attributes from the
aws_security_groupresource.
data "aws_vpc" "default" {
 default = true
}

resource "aws_security_group" "web_server_sg_tf" {
 name        = "web-server-sg-tf"
 description = "Allow HTTPS to web server"
 vpc_id      = data.aws_vpc.default.id
}

resource "aws_security_group_rule" "allow_https" {
 type              = "ingress"
 description       = "HTTPS ingress"
 from_port         = 443
 to_port           = 443
 protocol          = "tcp"
 cidr_blocks       = ["0.0.0.0/0"]
 security_group_id = aws_security_group.web_server_sg_tf.id
}

resource "aws_security_group_rule" "allow_all" {
 type              = "ingress"
 description       = "allow all"
 from_port         = 0
 to_port           = 0
 protocol          = "-1"
 cidr_blocks       = ["0.0.0.0/0"]
 security_group_id = aws_security_group.web_server_sg_tf.id
}- Run
terraform planagain. The changes should reflect the two rules being added.
Terraform will perform the following actions:
# aws_security_group_rule.allow_all will be created
 + resource "aws_security_group_rule" "allow_all" {
     + cidr_blocks              = [
         + "0.0.0.0/0",
       ]
     + description              = "allow all"
     + from_port                = 0
     + id                       = (known after apply)
     + protocol                 = "-1"
     + security_group_id        = "sg-03207db609c0bc470"
     + security_group_rule_id   = (known after apply)
     + self                     = false
     + source_security_group_id = (known after apply)
     + to_port                  = 0
     + type                     = "ingress"
   }
# aws_security_group_rule.allow_https will be created
 + resource "aws_security_group_rule" "allow_https" {
     + cidr_blocks              = [
         + "0.0.0.0/0",
       ]
     + description              = "HTTPS ingress"
     + from_port                = 443
     + id                       = (known after apply)
     + protocol                 = "tcp"
     + security_group_id        = "sg-03207db609c0bc470"
     + security_group_rule_id   = (known after apply)
     + self                     = false
     + source_security_group_id = (known after apply)
     + to_port                  = 443
     + type                     = "ingress"
   }
Plan: 2 to add, 0 to change, 0 to destroy.- Finally, run the
terraform applycommand to deploy the changes.
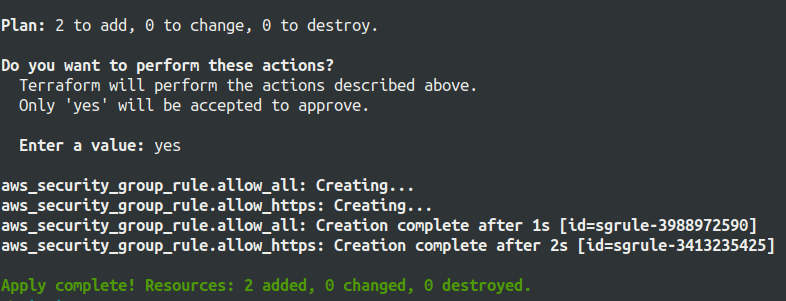
We have successfully added standalone rules to our security group.
Attach a security group to an EC2 resource
Now we will learn how to attach a security group to an EC2 instance.
- Add Terraform resource to spin up an EC2 instance.
resource "aws_instance" "web_server" {
 ami                         = "ami-09d56f8956ab235b3"
 instance_type               = "t2.nano"
 key_name                    = "web-server-key"
 associate_public_ip_address = true
 root_block_device {
   volume_type           = "gp2"
   volume_size           = "8"
   delete_on_termination = true
 }
}
Note: We do need to create the web-server-key again as we had previously created it through the console.
- Add key
vpc_security_group_idswith the value as[aws_security_group.web_server_sg_tf.id]to attach the previously created security group to this EC2 instance.
resource "aws_instance" "web_server" {
 ami                         = "ami-09d56f8956ab235b3"
 instance_type               = "t2.nano"
 key_name                    = "web-server-key"
 vpc_security_group_ids      = [aws_security_group.web_server_sg_tf.id]
 associate_public_ip_address = true
 root_block_device {
   volume_type           = "gp2"
   volume_size           = "8"
   delete_on_termination = true
 }
}- Run the
terraform plancommand and review the changes before running theterraform applycommand. - Check the AWS console to verify if the security group was attached successfully.
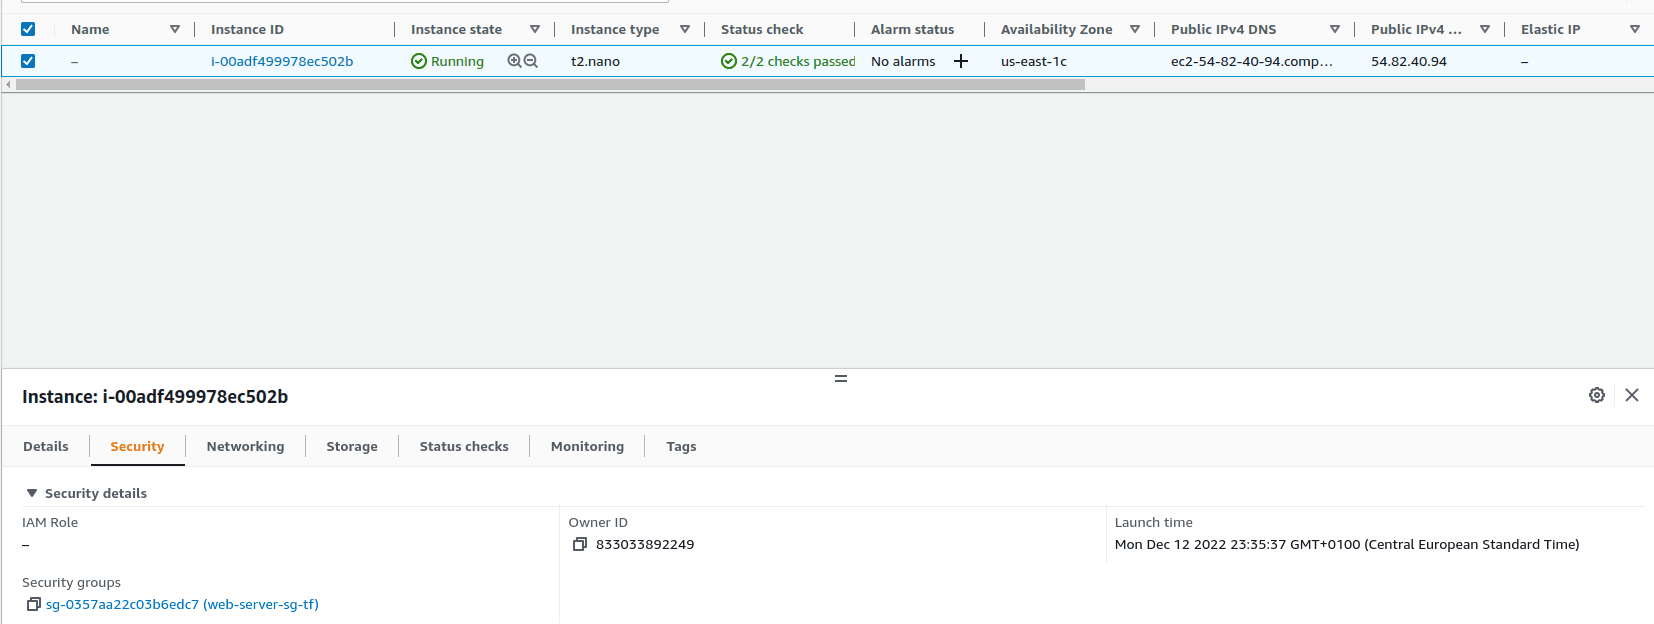
Our security group is attached to our EC2 instance as expected.
How to use existing security groups with Terraform
In this part of our tutorial, we will learn how to refer to a security group created outside of Terraform using a Terraform data resource.
We will first create a security group outside of Terraform and then add an inbound SSH rule to it using Terraform.
Referring to a single security group
- Create a security group with the name
security-group-managed-outside-terraform.
{
 "managed-by" = "aws-console"
}
- To refer to the
security-group-managed-outside-terraformsecurity group, use theaws_security_groupdata resource and provide the security group ID in themain.tffile.
Relevant changes are shown below.:
variable "security_group_id" {
 type    = string
 default = "sg-0d7749dea35961abc"
}

data "aws_security_group" "selected" {
 id = var.security_group_id
}- Add an inbound rule to this security group that allows SSH from the default VPC.
Note: We are using an ID from the data resource, which is kind of redundant as we already knew the ID and used it to fetch the security group. But in real-world scenarios, this can be useful to get other crucial information, such as the associated VPC ID.
resource "aws_security_group_rule" "allow_ssh_from_vpc" {
 type              = "ingress"
 description       = "Allow SSH from VPC"
 from_port         = 22
 to_port           = 22
 protocol          = "tcp"
 cidr_blocks       = [data.aws_vpc.default.cidr_block]
security_group_id = data.aws_security_group.selected.id- Run the
terraform plancommand. Notice that Terraform finds the correct security group and plans to add an inbound rule to it.
Terraform will perform the following actions:

  # aws_security_group_rule.allow_ssh_from_vpc will be created
  + resource "aws_security_group_rule" "allow_ssh_from_vpc" {
      + cidr_blocks              = [
          + "172.31.0.0/16",
        ]
      + description              = "Allow SSH from VPC"
      + from_port                = 22
      + id                       = (known after apply)
      + protocol                 = "tcp"
      + security_group_id        = "sg-0d7749dea35961abc"
      + security_group_rule_id   = (known after apply)
      + self                     = false
      + source_security_group_id = (known after apply)
      + to_port                  = 22
      + type                     = "ingress"
    }

Plan: 1 to add, 0 to change, 0 to destroy.- Run the
terraform applycommand to deploy the changes.
Managing multiple security groups with for_each
- Let us create another security group called
security-group-managed-outside-terraform-2using the AWS console with the tag shown below.
{
 "managed-by" = "aws-console"
}
- Instead of referring to each of these security groups individually, we can use the aws_security_groups data resource and provide the tag value to refer to all of them at once.
Note: Previously, we used aws_security_group data source to refer to a single security group and now we are using aws_security_group(s) data source to refer to multiple security groups.
data "aws_security_groups" "security_groups_managed_by_aws_console" {
 tags = {
   "managed-by" = "aws-console"
 }
}data "aws_security_groups" "security_groups_managed_by_aws_console" {
tags = {
"managed-by" = "aws-console"
}
}
resource "aws_security_group_rule" "allow_ssh_from_vpc" {
for_each = toset(data.aws_security_groups.security_groups_managed_by_aws_console.ids)
type = "ingress"
description = "Allow SSH from VPC"
from_port = 22
to_port = 22
protocol = "tcp"
cidr_blocks = [data.aws_vpc.default.cidr_block]
security_group_id = each.value
}
output "security_group_ids" {
value = data.aws_security_groups.security_groups_managed_by_aws_console.ids
}- As always, run the
terraform plancommand and review the changes. The plan should reflect the deletion of the previous rule and the creation of two new rules along with the outputsecurity_group_ids.
Terraform will perform the following actions:
# aws_security_group_rule.allow_ssh_from_vpc will be destroyed
 # (because resource uses count or for_each)
 - resource "aws_security_group_rule" "allow_ssh_from_vpc" {
     - cidr_blocks            = [
         - "172.31.0.0/16",
       ] -> null
     - description            = "Allow SSH from VPC" -> null
     - from_port              = 22 -> null
     - id                     = "sgrule-2807208966" -> null
     - protocol               = "tcp" -> null
     - security_group_id      = "sg-0d7749dea35961abc" -> null
     - security_group_rule_id = "sgr-05e047df70ca6e3e2" -> null
     - self                   = false -> null
     - to_port                = 22 -> null
     - type                   = "ingress" -> null
   }
# aws_security_group_rule.allow_ssh_from_vpc["sg-0438324f09abb192e"] will be created
 + resource "aws_security_group_rule" "allow_ssh_from_vpc" {
     + cidr_blocks              = [
         + "172.31.0.0/16",
       ]
     + description              = "Allow SSH from VPC"
     + from_port                = 22
     + id                       = (known after apply)
     + protocol                 = "tcp"
     + security_group_id        = "sg-0438324f09abb192e"
     + security_group_rule_id   = (known after apply)
     + self                     = false
     + source_security_group_id = (known after apply)
     + to_port                  = 22
     + type                     = "ingress"
   }
# aws_security_group_rule.allow_ssh_from_vpc["sg-0d7749dea35961abc"] will be created
 + resource "aws_security_group_rule" "allow_ssh_from_vpc" {
     + cidr_blocks              = [
         + "172.31.0.0/16",
       ]
     + description              = "Allow SSH from VPC"
     + from_port                = 22
     + id                       = (known after apply)
     + protocol                 = "tcp"
     + security_group_id        = "sg-0d7749dea35961abc"
     + security_group_rule_id   = (known after apply)
     + self                     = false
     + source_security_group_id = (known after apply)
     + to_port                  = 22
     + type                     = "ingress"
   }
Plan: 2 to add, 0 to change, 1 to destroy.
Changes to Outputs:
 + security_group_ids = [
     + "sg-0047037cef35cecd3",
     + "sg-0d7749dea35961abc",
]- Finally, run the
terraform applycommand to deploy the changes to all relevant security groups.
Managing multiple security groups with Terraform modules
The most straightforward way to manage multiple security groups using a Terraform module is to build your own module using for_each. Let’s look at a simple example.
resource "aws_security_group" "this" {
 for_each    = var.security_groups
 name        = each.key
 description = each.value.description
 vpc_id      = each.value.vpc_id

 tags = merge({
   Name = each.key
 }, each.value.tags)
}
The main.tf file above creates multiple security groups using the var.security_groups, variable. Let’s now look at the variable declaration:
variable "security_groups" {
 description = "Map of security groups with their configurations"
 type = map(object({
   description = string
   vpc_id      = string
   tags        = optional(map(string), {})
 }))
}
We are using a map(object) variable, in which we have two required parameters: description and vpc_id, and an optional one for the tags. Based on how we built the configuration, every security group will automatically have a tag based on the security group name, which is inherited from the variable key.
An output that maps the SG names to their IDs is also defined for all of the security groups:
output "security_group_ids" {
 description = "Map of security group names to their IDs"
 value       = { for k, sg in aws_security_group.this : k => sg.id }
}
To test this, we have built an example that creates three security groups, and we’ve also defined an output:
locals {
 vpc_id = "vpc-123456789"
}

module "security_groups" {
 source = "../"

 security_groups = {
   web-sg = {
     description = "Web servers sg"
     vpc_id      = local.vpc_id
     tags        = { env = "prod" }
   }
   db-sg = {
     description = "DB sg"
     vpc_id      = local.vpc_id
     tags        = { env = "prod" }
   }
   cache-sg = {
     description = "Cache sg"
     vpc_id      = local.vpc_id
     tags        = { env = "prod" }
   }
 }
}

output "security_group_ids" {
 value = module.security_groups.security_group_ids
}
It is fairly easy to create another security group. You just need to add another object to the security groups map(object) variable:
security_groups = {
   web-sg = {
     description = "Web servers sg"
     vpc_id      = local.vpc_id
     tags        = { env = "prod" }
   }
   db-sg = {
     description = "DB sg"
     vpc_id      = local.vpc_id
     tags        = { env = "prod" }
   }
   cache-sg = {
     description = "Cache sg"
     vpc_id      = local.vpc_id
     tags        = { env = "prod" }
   }
   another-sg = {
     description = "another sg"
     vpc_id      = local.vpc_id
     tags        = { env = "prod" }
   }
 }
This is the most straightforward way to create a simplistic module that creates multiple security groups, but if you want to spend some time learning how the most popular security group module works, you can check it out here.
Next, we will learn to import security groups existing outside Terraform into Terraform.
Importing existing security groups under Terraform
When migrating an existing resource to Terraform, it is not always feasible to delete and recreate it. In such cases, we can import resources directly into Terraform. Let us look at how we can easily bring existing security groups from outside of Terraform into Terraform.
We will import one of the resources we created earlier into Terraform. To learn more, see our Importing Existing Infrastructure into Terraform tutorial.
- Declare the resource you want to import in the
main.tffile and add as many details as possible.
resource "aws_security_group" "imported_sg_tf" {
 name        = "security-group-managed-outside-terraform-2"
 description = "Security group managed outside terraform"
 vpc_id      = data.aws_vpc.default.id
 tags = {
   "managed-by" = "aws-console"
 }
}- Run the command below with the ID of the security group you want to import.
terraform import aws_security_group.imported_sg_tf sg-0047037cef35cecd3
# Replace the security group id before running command

- Run the
terraform plancommand to ensure that no changes are reflected.

This signifies that the resource was imported successfully with no conflicts.
At this point, we’ve learned how to create and manage security groups using both the console and Terraform. Let’s examine some popular applications and how they can help improve a resource’s or application’s security posture.
Updating existing security group rules using Terraform
The process for updating existing security group rules using Terraform can be fairly simple if you’ve already created the rules using Terraform, or it can be a little more complicated if the resources were created outside of your Terraform process. Let’s take a look at both these cases.
If you created your rules using Terraform, you may have either:
- Created the rules as standalone resources
- Created the rules inside the security group
1. Standalone resource for security group rule
We have a simple rule that allows HTTP from anywhere already created:
resource "aws_security_group_rule" "allow_http" {
 security_group_id = "my_sg"
 type              = "ingress"
 from_port         = 80
 to_port           = 80
 protocol          = "tcp"
 cidr_blocks       = ["0.0.0.0/0"]
}
You need to change it to allow HTTP only from your internal infrastructure from this cidr_block (10.0.1.0/24). You will need to modify the code like this:
resource "aws_security_group_rule" "allow_http" {
 security_group_id = "my_sg"
 type              = "ingress"
 from_port         = 80
 to_port           = 80
 protocol          = "tcp"
 cidr_blocks       = ["10.0.1.0/24"]
}
Now you can run the code and see that the security group rule has changed. This is what the process looks like:
- terraform init
- terraform apply
2. Rule created inside the security group resource
resource "aws_security_group" "mysg" {
 name        = "mysg"
 description = "My security group"
 vpc_id      = "vpc-123456789"

 ingress {
   from_port   = 80
   to_port     = 80
   protocol    = "tcp"
   cidr_blocks = ["0.0.0.0/0"]
 }

 tags = {
   Name = "my-sg"
 }
}
Let’s make the change above and modify the ingress block:
…
ingress {
   from_port   = 80
   to_port     = 80
   protocol    = "tcp"
   cidr_blocks = ["10.0.1.0/24"]
}
…
Importing and changing an existing rule
The import process for an existing rule is more complicated than importing a far simpler resource, such as the security group itself, but let’s examine how this can be done.
Suppose you have already created the security group with Terraform, and someone manually created a rule that you want to import and then modify. We will take the example above, in which the rule is an ingress rule that opens TCP traffic for everyone on port 80, and your plan is to modify the CIDR block.
To import the rule, you will first need to identify the security group it is a part of, and more specifically, the security group ID. Let’s suppose this is: sg-123456789.
Next, we will need to find out some other details about the rule:
- Rule type (ingress or egress)
- Protocol
- From_port
- To_port
- Source (cidr_blocks)
This section explains how to build the import ID depending on your use case.
On a high level, this is how a rule will look: securityGroupId_ruleType_protocol_fromPort_toPort_Source
In our case, this will be: sg-123456789_ingress_tcp_80_80_0.0.0.0/0
Let’s import this to a security group rule called HTTP:
terraform import aws_security_group_rule.http sg-123456789_ingress_tcp_80_80_0.0.0.0/0Next, let’s prepare the configuration for it (you can also use terraform show to see what the rule looks like in the state):
resource "aws_security_group_rule" "http" {
 security_group_id = "sg-123456789"
 type              = "ingress"
 from_port         = 80
 to_port           = 80
 protocol          = "tcp"
 cidr_blocks       = ["0.0.0.0/0"]
}
Now, modify the rule as you normally would and reapply the code:
resource "aws_security_group_rule" "http" {
 security_group_id = "sg-123456789"
 type              = "ingress"
 from_port         = 80
 to_port           = 80
 protocol          = "tcp"
 cidr_blocks       = ["10.0.1.0/24"]
}
AWS security groups use cases
Security groups are a key element of AWS resource security. They are required in multiple use cases, such as:
- Managing HTTPS(443) or HTTP(80) traffic to a web server
- Configuring access to RDS instances (Learn how to create an AWS RDS instance using Terraform.)
- Permitting traffic only from specific address ranges to the corporate network
- Limiting SSH access to compute instances
- Managing traffic to and from Lambda functions and more
Their usage extends to NAT Gateways, ECS, EKS, Code Build, and more.
It is already evident that security groups are crucial for network security. As mentioned earlier, security groups are one of two security features available to control traffic in your VPC. NACLs are the other type. To better configure network security, it is important to understand how security groups are different from NACLs and when to use what.
What is the difference between NACLs and security groups?
Before we get into how security groups differ from NACLs, let us explain quickly what NACLs are.
What is a Network Access Control List (NACL)?
NACLs, like security groups, are firewalls that allow you to control incoming and outgoing traffic. The main distinction between NACLs and security groups is that NACLs operate at the subnet level, whereas security groups operate at the resource level. They can be used as a secondary control to define high-level guardrails for filtering traffic at the subnet level.
NACLs can help improve a VPC’s security posture by filtering traffic regardless of whether a security group is associated with resources.

AWS security groups vs NACL
Although both security groups and NACLs are used to improve a VPC’s security posture, they have significant differences.
AWS Security Groups act as virtual firewalls for EC2 instances, controlling inbound and outbound traffic at the instance level with stateful rules (responses to allowed traffic are automatically permitted). On the other hand, NACLs operate at the subnet level, providing an additional layer of security with stateless rules, meaning both inbound and outbound rules must be explicitly defined.
The main points are as follows:
| Security groups | NACLs |
| Work at the instance level | Work at the subnet level |
| Only accept “Allow” rules | Accept both “Allow” and “Deny” rules |
| Stateful | Stateless |
| The primary defense
|
A secondary defense and considered optional
|
| Rules do not have a priority | Rules have priority based on which they are evaluated |
Security groups and NACLs can be used in tandem to implement the defense-in-depth strategy. NACLs supplement security groups and serve as an additional layer of protection.
This article would be incomplete without covering the best practices and basics of compliance for security groups in AWS. Let’s jump into it right away.
How to use aws_vpc_security_group_ingress_rule and aws_vpc_security_group_egress_rule
Since AWS provider v5, the recommended way to define security group rules is with the dedicated aws_vpc_security_group_ingress_rule and aws_vpc_security_group_egress_rule resources, rather than inline ingress/egress blocks or the older aws_security_group_rule resource.
The key difference is that each resource manages exactly one rule with one source or destination, giving every rule a unique ID. This makes rules individually taggable, easier to update without replacing the whole security group, and avoids the drift issues associated with the older approaches.
Note: Do not mix these resources with inline rules or aws_security_group_rule on the same security group. Doing so causes rule conflicts and perpetual differences in your plan output.
Here’s the equivalent of the HTTPS example from earlier, rewritten using the current best practice:
resource "aws_security_group" "web_server_sg_tf" {
  name        = "web-server-sg-tf"
  description = "Allow HTTPS to web server"
  vpc_id      = data.aws_vpc.default.id

  tags = {
    Name = "web-server-sg-tf"
  }
}

resource "aws_vpc_security_group_ingress_rule" "allow_https" {
  security_group_id = aws_security_group.web_server_sg_tf.id
  description       = "HTTPS ingress"
  cidr_ipv4         = "0.0.0.0/0"
  from_port         = 443
  to_port           = 443
  ip_protocol       = "tcp"
}

resource "aws_vpc_security_group_egress_rule" "allow_all_outbound" {
  security_group_id = aws_security_group.web_server_sg_tf.id
  cidr_ipv4         = "0.0.0.0/0"
  ip_protocol       = "-1" # all protocols, all ports
}
Notice that the aws_security_group resource itself no longer contains any rule definitions — it only manages the group. The rules are entirely separate resources, which also means you can add, remove, or modify individual rules without touching the security group itself.
When ip_protocol is -1, from_port and to_port must be omitted entirely. Setting them to 0 will fail the plan.
To allow traffic from a specific security group rather than a CIDR range, use referenced_security_group_id instead of cidr_ipv4:
resource "aws_vpc_security_group_ingress_rule" "app_from_alb" {
  security_group_id            = aws_security_group.app.id
  description                  = "Allow traffic from ALB"
  referenced_security_group_id = aws_security_group.alb.id
  from_port                    = 8080
  to_port                      = 8080
  ip_protocol                  = "tcp"
}
This pattern is preferred over CIDR-based rules for internal service-to-service communication, as it automatically covers any instance or ENI attached to the referenced group, with no manual CIDR management required.
Best practices for AWS security groups and compliance
Network security is one of the most important aspects to address to improve security posture. This becomes more difficult as the number of resources and accounts in an organization grows.
With many AWS accounts within an organization, how do we know:
- Are any of the security groups are over-permissive?
- Are there redundant or unused security groups?
- Are the security groups compliant?
- If someone changes an aspect of the existing security groups to make them less secure?
Furthermore, how do we make sure we are always compliant with the standard security benchmarks?
This is where AWS Firewall Manager and Security Hub come into the picture.
Using AWS Firewall Manager for security groups
AWS Firewall Manager solves all the above problems for us. It can track, audit, and even remediate issues with your security groups across all accounts. It provides centralized visibility across all accounts to continuously monitor and manage violations and noncompliance.
The picture below depicts how the AWS Firewall manager automatically tracks the security groups’ noncompliance.

AWS Firewall accomplishes this with security group policies, which act as guardrails for creating new security groups or remediating issues with existing ones.
There are three types of security group policies:
- Common security groups
- Auditing and enforcement of security group rules
- Auditing and cleanup of unused and redundant security groups

- Common security groups policy helps us provision common or baseline security groups required in all accounts. For example, it allows SSH from only the corporate IP addresses.
- Security group audits assist us in identifying any security groups that do not adhere to the standard that we have created. These can be security groups with overly permissive or risky rules. It is also possible to automatically remediate non-compliant security groups.
- An audit usage policy assists in detecting and removing unused security groups and in detecting and merging redundant security groups.
AWS Firewall Manager can send issues and alerts to AWS Security Hub for centralized compliance management.
Using AWS Security Hub for security groups
AWS Security Hub is a service that performs security checks. It aggregates all security alerts and issues in one place and enables us to visualize an organization’s security posture. It supports standards like:
- Center for Internet Security (CIS) AWS Foundations Benchmark
- AWS Foundational Security
- Payment Card Industry Data Security Standard (PCI DSS)
These standards include many security best practices for security groups, such as:
- CIS AWS Foundations 3.10: Ensure a log metric filter and alarm exist for security group changes
- PCI.EC2.5: Security groups should not allow ingress from 0.0.0.0/0 to port 22
- CIS AWS Foundations 4.2: Ensure no security groups allow ingress from 0.0.0.0/0 to port 3389
- PCI.EC2.2: VPC default security group should prohibit inbound and outbound traffic
Any violations are automatically detected and aggregated. It enables us to configure automatic remediation to ensure that our security groups remain secure and compliant at all times.
Managing Terraform with Spacelift
Terraform is really powerful, but to achieve an end-to-end secure GitOps approach, you need a platform that can orchestrate your Terraform workflows. Spacelift is the infrastructure orchestration platform built for the AI-accelerated software era.
It manages the full lifecycle for both traditional infrastructure as code (IaC) and AI-provisioned infrastructure, giving you access to a powerful CI/CD workflow and unlocking features such as:
- Policies (based on Open Policy Agent) – You can control how many approvals you need for runs, what kind of resources you can create, and what kind of parameters these resources can have, and you can also control the behavior when a pull request is open or merged.
- Multi-IaC workflows – Combine Terraform with Kubernetes, Ansible, and other IaC tools such as OpenTofu, Pulumi, and CloudFormation, create dependencies among them, and share outputs.
- Build self-service infrastructure – You can use Templates and Blueprints to build self-service infrastructure; simply complete a form to provision infrastructure based on Terraform and other supported tools.
- AI-powered provisioning and diagnostics – Spacelift Intelligence adds an AI-powered layer for natural language provisioning, diagnostics, and operational insight across your infrastructure workflows.
- Integrations with any third-party tools – You can integrate with your favorite third-party tools and even build policies for them. For example, see how to integrate security tools in your workflows using Custom Inputs.
Spacelift enables you to create private workers inside your infrastructure, which helps you execute Spacelift-related workflows on your end. Read the documentation for more information on configuring private workers.
You can check it for free by creating a trial account or requesting a demo with one of our engineers.
Key points
Security groups are among the most important security features for network security. They are simple yet powerful and thus find use across a wide variety of AWS services wherever networks are involved. When used correctly, they can significantly reduce attack vectors to network resources and improve the overall security posture.
However, they are not a silver bullet for network security. Other defense mechanisms, such as NACLs, AWS Security Hub, AWS Firewall, etc., must also be in place for optimum security.
Note: New versions of Terraform are placed under the BUSL license, but everything created before version 1.5.x stays open-source. OpenTofu is an open-source version of Terraform that expands on Terraform’s existing concepts and offerings. It is a viable alternative to HashiCorp’s Terraform, being forked from Terraform version 1.5.6.
Orchestrate Terraform deployments with Spacelift
Orchestrate your Terraform workflows and build governed pipelines using policy as code, programmatic configuration, context sharing, drift detection, resource visualization, and many more.
Frequently asked questions
What is the difference between inline rules and standalone rules in Terraform?
Inline rules are defined directly inside the aws_security_group resource using ingress/egress blocks, while standalone rules are separate resources (aws_vpc_security_group_ingress_rule or aws_security_group_rule). The two approaches must never be mixed on the same security group, as doing so causes rule conflicts and perpetual drift.
Does Terraform remove the default AWS egress "allow all" rule?
Yes — when Terraform creates a security group inside a VPC, it removes the default ALLOW ALL egress rule that AWS adds automatically, so you must explicitly define any outbound rules you need. To restore allow-all egress, add an aws_vpc_security_group_egress_rule with ip_protocol = “-1” and cidr_ipv4 = “0.0.0.0/0”.
What happens if I try to rename a security group in Terraform?
Changing name, description, name_prefix, or vpc_id forces Terraform to destroy and recreate the security group, since AWS does not support in-place updates to these fields. Use the create_before_destroy lifecycle argument to avoid downtime during the replacement.
How do I reference another security group as a traffic source instead of a CIDR block?
Use the referenced_security_group_id argument in aws_vpc_security_group_ingress_rule to allow traffic only from resources associated with a specific security group. This is the recommended pattern for internal service-to-service communication, such as allowing your app servers to accept traffic only from your load balancer’s security group.
Why does my terraform destroy hang when deleting a security group?
AWS blocks deletion of a security group that is still associated with another resource, so Terraform waits (up to the 15-minute default timeout) for dependencies to clear. Setting revoke_rules_on_delete = true on the security group resource force-revokes all rules before deletion, which helps break cyclic dependency chains.
