Most teams adopt Terraform with infrastructure already running. This tutorial shows you how to bring those resources under Terraform management without recreating them, using the import command, import blocks, and Terraform search.
TL;DR
- Create or generate configuration for the resource (a matching resource block, or use something like
terraform plan -generate-config-out=...where supported). - Import the real object into state (either
terraform import ...or the HCLimport { ... }block +terraform applyin newer Terraform). - Run
terraform planand iterate on the config until the plan is clean (or only shows intentional changes). This is where you reconcile drift and missing/computed attributes. - Commit and continue with the normal workflow (plan/apply in CI, etc.).
What we will cover:
- What is Terraform import command?
- Why use the import command?
- Terraform import use cases
- How to use Terraform import for resources?
- How to import Terraform modules?
- Terraform import example – importing a file
- Importing IAM roles using Terraform for_each
- How to use the Terraform import block [Terraform 1.5 import]
- How to import multiple resources in Terraform?
- Best practices for Terraform import
What is the Terraform import command?
Terraform import is a Terraform CLI command used to read real-world infrastructure and update its state so that future updates to the same set of infrastructure can be applied via Infrastructure as Code (IaC). It imports the pre-existing cloud resources into the Terraform state.
The classic terraform import CLI only updates the state locally – it doesn’t generate configuration. Starting in Terraform 1.5, you can also use declarative import blocks and optionally generate configuration with terraform plan -generate-config-out=.... We cover this workflow later in the article.
Terraform import syntax and parameters
The terraform import command takes the following arguments:
- ADDR – the address of the resource in terraform (e.g. aws_instance.instance_name)
- ID – the resource ID in the cloud provider/k8s/database service/vcs service/etc
An example terraform import would look like this:
terraform import aws_iam_role.role_name my_roleWhy use the import command?
Even though Terraform is now a mature and widely adopted IaC tool, many organizations still have years of “ClickOps” and manually provisioned infrastructure behind them. The lack of human resources and the steep learning curve involved in using Terraform effectively causes teams to start using cloud infrastructure directly via their respective web consoles.
For that matter, any kind of IaC method (CloudFormation, Azure ARM templates, Pulumi, etc.) requires some training and real-time scenario handling experience. Things get especially complicated when dealing with concepts like states and remote backends. In a worst-case scenario, you can lose the terraform.tfstate file. Luckily, you can use the import functionality to rebuild it.
Short on time? Watch the video instead:

Terraform import use cases
Terraform import is used to add existing infrastructure components into Terraform management. Here are a couple of use cases in which terraform import can be a lifesaver:
- Bringing unmanaged resources under Terraform management – your company may have started its infrastructure adventure by doing ClickOps or by using some custom scripts. Now, to bring everything under Terraform, terraform import will be the solution.
- Migrating between Terraform states –
terraform importcan help a lot if you want to split up your state file into multiple files, as managing a lot of things under a single file can be cumbersome. - Disaster recovery – if your state file gets corrupted or you don’t have access to it anymore for whatever reason, you can use
terraform importto rebuild it. (See also: How to Implement Terraform Disaster Recovery)
- Adopting Terraform in phases – with
terraform importyou can start by importing a couple of resources, helping you start small with Terraform.
How to use Terraform import for resources?
Now that we understand why we need to import cloud resources into the Terraform state, let’s begin by importing a simple resource – an EC2 instance in AWS.
We assume the Terraform installation and the configuration of AWS credentials in the AWS CLI are already complete locally. We will not go into the details of that in this tutorial.
To import a simple resource into Terraform, follow the step-by-step guide below.
1. Prepare the EC2 instance
Assuming the Terraform installation and configuration of AWS credentials in AWS CLI is already done locally, begin by importing a simple resource — an EC2 instance in AWS. For the sake of this tutorial, we will create an EC2 resource manually to be imported. This could be optional if you already have a target resource to be imported.
Terraform: Create an EC2 instance in the existing VPC
Go ahead and provision an EC2 instance in your AWS account. Here are the example details of the EC2 instance thus created:
Name: MyVM
Instance ID: i-0b9be609418aa0609
Type: t2.micro
VPC ID: vpc-1827ff72
…
2. Create main.tf and set provider configuration
The aim of this step is to import this EC2 instance into our Terraform configuration. Create main.tf in your desired path and configure the AWS provider. The file should look like below.
Importing EC2 instance into Terraform configuration: Example
// Provider configuration
terraform {
 required_providers {
   aws = {
     source  = "hashicorp/aws"
     version = "~> 6.0"
   }
 }
}

provider "aws" {
 region = "eu-central-1"
}
Run terraform init. Terraform downloads the AWS provider and writes a .terraform.lock.hcl file recording the exact version it selected. Commit that lock file so every run uses the same provider.
3. Write config for the resource to be imported
As discussed earlier, Terraform import does not generate the configuration files by itself. Thus, you need to create the corresponding configuration for the EC2 instance manually. This doesn’t need many arguments, as we will have to add or modify them when we import the EC2 instance into our state file.
However, if you don’t mind not seeing colorful output on CLI, you can begin adding all the arguments you know. But this is not a foolproof approach because normally, the infrastructure you may have to import will not have been created by you. So, it is best to skip a few arguments anyway.
In a moment, we will take a look at how to adjust our configuration to reflect the exact resource. For now, append the main.tf file with EC2 config. For example, we have used the below config. The only reason I have included ami and instance_type attribute, is that they are the required arguments for aws_instance resource block.
resource "aws_instance" "myvm" {
 ami           = "unknown"
 instance_type = "unknown"
}
4. Run the import command
Think of it as if the cloud resource (EC2 instance) and its corresponding configuration were available in our files. All that’s left to do is to map the two into our state file. We do that by running the import command as follows.
terraform import aws_instance.myvm <Instance ID>A successful output should look like this:
aws_instance.myvm: Importing from ID "i-0b9be609418aa0609"...
aws_instance.myvm: Import prepared!
  Prepared aws_instance for import
aws_instance.myvm: Refreshing state... [id=i-0b9be609418aa0609]

Import successful!

The resources that were imported are shown above. These resources are now in
your Terraform state and will henceforth be managed by Terraform.
The above command maps the aws_instance.myvm configuration to the EC2 instance using the ID. By mapping, we mean that the state file now “knows” the existence of the EC2 instance with the given ID. The state file also contains information about each attribute of this EC2 instance, as it has fetched the same using the import command.
5. Observe state files and plan output
Please note that the directory now also contains the terraform.tfstate file. This file was generated after the import command was successfully run. Take a moment to review its contents.
Right now our configuration does not reflect all the attributes. The plan will not fail, which is the dangerous part. It will succeed and propose destroying the instance and building a new one, because Terraform reads “unknown” as the value you want. Run terraform plan and look at what it proposes.
.
.
.
          } -> (known after apply)
          ~ throughput            = 0 -> (known after apply)
          ~ volume_id             = "vol-0fa93084426be508a" -> (known after apply)
          ~ volume_size           = 8 -> (known after apply)
          ~ volume_type           = "gp2" -> (known after apply)
        }

      - timeouts {}
    }

Plan: 1 to add, 0 to change, 1 to destroy.

───────────────────────────────────────────────────────────────────────────────────────────────────────────────────────────────────────────────────

Note: You didn't use the -out option to save this plan, so Terraform can't guarantee to take exactly these actions if you run "terraform apply"
now.
The plan indicates that it would attempt to replace the EC2 instance. But this goes completely against our purpose. We could do it anyway by simply not caring about the existing resources, and creating new resources using configuration.
The good news is that Terraform has noted the existence of an EC2 instance associated with its state.
6. Improve config to avoid replacement
At this point, it is important to understand that the terraform.tfstate file is a vital piece of reference for Terraform. All of its future operations are performed with consideration for this state file. You need to investigate the state file and update your configuration accordingly so there is a minimum difference between them.
The use of the word “minimum” is intentional here. Right now, you need to focus on not replacing the given EC2 instance but rather aligning the configuration so that the replacement can be avoided. Eventually, you would achieve a state of 0 difference.
Observe the plan output and find all those attributes that cause the replacement. The plan output will highlight the same. In our example, the only attribute that causes replacement is the AMI ID. Closing this gap should avoid the replacement of the EC2 instance.
Change the value of ami from “unknown” to what is highlighted in the plan output, and run terraform plan again. Notice the output.
Terraform used the selected providers to generate the following execution plan. Resource actions are indicated with the following symbols:
  ~ update in-place

Terraform will perform the following actions:

  # aws_instance.myvm will be updated in-place
  ~ resource "aws_instance" "myvm" {
        id                                   = "i-0b9be609418aa0609"
      ~ instance_type                        = "t2.micro" -> "unknown"
      ~ tags                                 = {
          - "Name" = "MyVM" -> null
        }
      ~ tags_all                             = {
          - "Name" = "MyVM"
        } -> (known after apply)
        # (27 unchanged attributes hidden)


        # (6 unchanged blocks hidden)
    }

Plan: 0 to add, 1 to change, 0 to destroy.
This time, the plan does not indicate the replacement of the EC2 instance. If you get the same output, you are successful in partially importing our cloud resource. You are currently in a state of lowered risk—if we apply the configuration now, the resource will not be replaced, but a few attributes would change.
7. Improve config to avoid changes
If we want to achieve a state of 0 difference, you need to align your resource block even more. The plan output highlights the attribute changes using ~ sign. It also indicates the difference in the values. For example, it highlights the change in the instance_type value from “t2.micro” to “unknown”.
In other words, if the value of instance_type had been “t2.micro”, Terraform would NOT have asked for a change. Similarly, you can see there are changes to the tags highlighted as well. Let’s change the configuration accordingly so that we can close these gaps. The final aws_instance resource block should look as follows:
resource "aws_instance" "myvm" {
 ami           = "ami-00f22f6155d6d92c5"
 instance_type = "t2.micro"

 tags = {
     "Name": "MyVM"
 }
}
Run terraform plan again, and observe the output.
aws_instance.myvm: Refreshing state... [id=i-0b9be609418aa0609]

No changes. Your infrastructure matches the configuration.

Terraform has compared your real infrastructure against your configuration and found no differences, so no changes are needed.
If you have the same output, congratulations, as you have successfully imported a cloud resource into your Terraform config. It is now possible to manage this configuration directly via Terraform, without any surprises.
How to import Terraform modules?
Importing an existing resource into a module instance is not very different from importing an existing resource into a Terraform resource. The only difference is related to the address of the resource in Terraform, as it will be prefixed with the “module.module_instance_name”.
This means that an example import for a Terraform module will look like this:
terraform import module.iam_roles.aws_iam_role.role_name my_roleTerraform import AWS VPC module example
In this section, you will learn how to import resources into the modules. For reference, we use the AWS VPC module. A typical call creates dozens of resources, and the exact count depends on the module version and the options you enable, so check your own plan output rather than relying on a number here.
Move the terraform.tfstate file to another location so that Terraform becomes unaware of the existing resources.
This poses the challenge of importing the AWS VPC module into your configuration. Modules wrap multiple AWS resources into a single package that can be reused in various projects. You should expect a large codebase and many resources to be part of the module.
The process of importing resources created using a module is very similar to what we have discussed thus far, with a little difference in running the command. Go through the .tf files included in the module’s source, and identify the resources to be imported.
For example, the AWS VPC module creates a VPC resource. To import this resource, run the command as below.
This command imports the target VPC resource in AWS to our module’s configuration.
terraform import 'module.vpc.aws_vpc.this[0]' <VPC ID>Running the plan command indicates how many resources will be created. In other words, how many resources are yet to be imported?
      + "Name"        = "my-vpc"
          + "Terraform"   = "true"
        }
      + tags_all        = {
          + "Environment" = "dev"
          + "Name"        = "my-vpc"
          + "Terraform"   = "true"
        }
      + vpc_id          = "vpc-0127895db175d45ff"
    }

Plan: 28 to add, 0 to change, 0 to destroy.

───────────────────────────────────────────────────────────────────────────────────────────────────────────────────────────────────────────────────

Note: You didn't use the -out option to save this plan, so Terraform can't guarantee to take exactly these actions if you run "terraform apply"
now.
The above output indicates 28 more resources to be imported to (re)build a perfectly consistent terraform.tfstate file. One less as we have successfully imported the VPC resource. Referring to the plan output, identify the resources in AWS and repeat the process for import.
Terraform import example - importing a file
Suppose you want to manage the lifecycle of a file using Terraform. The problem is that you decided to do this after the file was created. To solve this issue, we will need to import it.
We have defined a file called my_file with this content:
Hey, this is a file!Now, let’s define the Terraform configuration for it:
resource "local_file" "my_file"{
 content  = "different content"
 filename = "./my_file"
}
Next, import the file:
terraform import local_file.my_file ./my_file
This resource does not support import. Please contact the provider developer for additional information.
As you can see, running import doesn’t help us because this resource does not support import. What we can do, however, is read the content directly from our file and recreate it like this:
resource "local_file" "my_file"{
 content  = file("./my_file")
 filename = "./my_file_terraform"
}
terraform apply
local_file.my_file: Creating...
local_file.my_file: Creation complete after 0s [id=6d2d3b974083c41cf0f19e9ecf86435092167de9]The only issue with this is the fact that if you are using the file function, the old file must exist for reading the content. This can be overcome by adding the content directly in the content parameter.
Importing IAM roles using Terraform for_each
Suppose you want to manage multiple IAM roles with Terraform that already exist. In this example, I created two roles in my AWS account that I want to import using for_each.
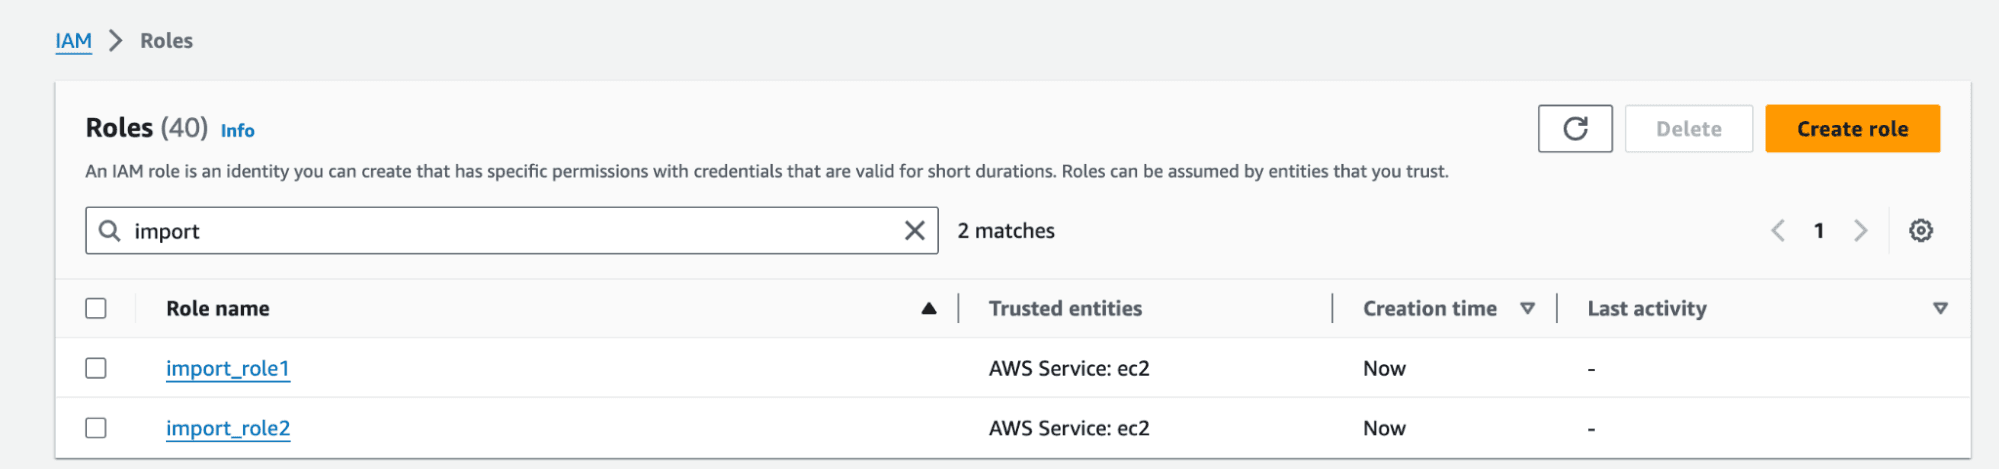
Now, let’s define the Terraform configuration for the roles:
provider "aws" {
 region = "eu-west-1"
}

locals {
 roles = ["import_role1", "import_role2"]
}

resource "aws_iam_role" "import_roles" {
 for_each = toset(local.roles)
 name     = each.value
 assume_role_policy = jsonencode(
   {
     Statement = [
       {
         Action = "sts:AssumeRole"
         Principal = {
           Service = "ec2.amazonaws.com"
         }
         Effect = "Allow"
       },
     ]
     Version = "2012-10-17"
 })
 description = "Allows EC2 instances to call AWS services on your behalf."
}
We have to ensure we use the same role policy we have used inside our AWS account and the same description.
Now that we have the configuration in place, let’s run a plan first to see that resources are not yet in the state:
terraform plan

Terraform used the selected providers to generate the following execution plan. Resource actions are indicated with the following symbols:
  + create

Terraform will perform the following actions:

  # aws_iam_role.import_roles["import_role1"] will be created
…
    }

  # aws_iam_role.import_roles["import_role2"] will be created
  + resource "aws_iam_role" "import_roles" {
…
}

Plan: 2 to add, 0 to change, 0 to destroy.
Now we can import the resources:
terraform import "aws_iam_role.import_roles[\"import_role1\"]" import_role1
aws_iam_role.import_roles["import_role1"]: Importing from ID "import_role1"...
aws_iam_role.import_roles["import_role1"]: Import prepared!
  Prepared aws_iam_role for import
aws_iam_role.import_roles["import_role1"]: Refreshing state... [id=import_role1]

Import successful!

The resources that were imported are shown above. These resources are now in
your Terraform state and will henceforth be managed by Terraform.

terraform import "aws_iam_role.import_roles[\"import_role2\"]" import_role2
aws_iam_role.import_roles["import_role2"]: Importing from ID "import_role2"...
aws_iam_role.import_roles["import_role2"]: Import prepared!
  Prepared aws_iam_role for import
aws_iam_role.import_roles["import_role2"]: Refreshing state... [id=import_role2]

Import successful!

The resources that were imported are shown above. These resources are now in
your Terraform state and will henceforth be managed by Terraform.
Ensure you escape the quotation marks when you specify the role key while doing the import.
Now, let’s run another plan:
terraform plan
aws_iam_role.import_roles["import_role1"]: Refreshing state... [id=import_role1]
aws_iam_role.import_roles["import_role2"]: Refreshing state... [id=import_role2]

No changes. Your infrastructure matches the configuration.

Terraform has compared your real infrastructure against your configuration and found no differences, so no changes are needed.
As you can see, the resources have been imported successfully.
How to use the Terraform import block [Terraform 1.5 import]
In Terraform 1.5, a new import mechanism is available. A new top-level import block can be defined in your code to allow import operations. As this Terraform import block is added in the code, importing will not be a state operation. From now on, as for every other resource, it becomes a plannable operation.
Example: Terraform import S3 bucket
Let’s use a concrete example to see the new import in action.
1. Create the import block
For this, we have created two S3 buckets manually, and we want to import them in our state:
- import-bucket-tf15
- import-bucket-tf15-2
provider "aws" {
 region = "eu-west-1"
}

import {
 # ID of the cloud resource
 # Check provider documentation for importable resources and format
 id = "import-bucket-tf15"
 # Resource address
 to = aws_s3_bucket.this
}

import {
 # ID of the cloud resource
 # Check provider documentation for importable resources and format
 id = "import-bucket-tf15-2"
 # Resource address
 to = aws_s3_bucket.this2
}
The Terraform import block, as you can see above, takes two parameters:
- id → The id of the resource used in your cloud provider
- to → The resource address that will be used in Terraform
2. Generate the configuration
Next, if you want to generate the configuration automatically, you can run the following command:
terraform plan -generate-config-out=generated_resources.tfThis will result in:
aws_s3_bucket.this: Preparing import... [id=import-bucket-tf15]
aws_s3_bucket.this2: Preparing import... [id=import-bucket-tf15-2]
aws_s3_bucket.this2: Refreshing state... [id=import-bucket-tf15-2]
aws_s3_bucket.this: Refreshing state... [id=import-bucket-tf15]

Terraform will perform the following actions:

  # aws_s3_bucket.this will be imported
  # (config will be generated)
    resource "aws_s3_bucket" "this" {
       ommited
        }
    }

  # aws_s3_bucket.this2 will be imported
  # (config will be generated)
    resource "aws_s3_bucket" "this2" {
        ommited
    }

Plan: 2 to import, 0 to add, 0 to change, 0 to destroy.
╷
│ Warning: Config generation is experimental
│
│ Generating configuration during import is currently experimental, and the generated configuration format may change in future versions.
╵

─────────────────────────────────────────────────────────────────────────────────────────────────────────────────────────────────────────────────────────────────────────

Terraform has generated configuration and written it to generated_resources.tf. Please review the configuration and edit it as necessary before adding it to version
control.

Note: You didn't use the -out option to save this plan, so Terraform can't guarantee to take exactly these actions if you run "terraform apply" now.
As you can see, config generation is still experimental at the moment of writing this article, so you should review it carefully before making any changes to your Terraform configuration.
3. Review the output
The resulting file will be similar to this:
# __generated__ by Terraform
# Please review these resources and move them into your main configuration files.

# __generated__ by Terraform from "import-bucket-tf15"
resource "aws_s3_bucket" "this" {
 bucket              = "import-bucket-tf15"
 bucket_prefix       = null
 force_destroy       = null
 object_lock_enabled = false
 tags                = {}
 tags_all            = {}
}

# __generated__ by Terraform from "import-bucket-tf15-2"
resource "aws_s3_bucket" "this2" {
 bucket              = "import-bucket-tf15-2"
 bucket_prefix       = null
 force_destroy       = null
 object_lock_enabled = false
 tags                = {}
 tags_all            = {}
}
4. Run terraform plan
Now, if you run the terraform plan, this is the output you are going to see:
Plan: 2 to import, 0 to add, 0 to change, 0 to destroy.5. Run terraform apply
After you are done with all the changes, you can simply run the terraform apply to add these resources to the state:
Apply complete! Resources: 2 imported, 0 added, 0 changed, 0 destroyed.Learn more: Using Terraform Import Block to Import Resources
How to import multiple resources in Terraform?
As you can see, the process of importing simple resources is pretty straightforward. The key here is to understand how Terraform state works. However, things can get quite tedious when importing complex deployments.
In the case of complex deployments, the team should clearly identify the resources they want to manage using Terraform. A diagram representing the entire landscape helps plan and get the parts of the deployment under Terraform’s management.
Planning output is key. If it is well-formatted, you will build a perfectly consistent state file. Prioritize and mitigate configurations that replace target resources, followed by configurations that cause changes. Import the resources as they are to satisfy the state file until there are no gaps. Once you achieve 0 gaps, any enhancement or code restructuring can be focused on and implemented.
How do I find and import resources in bulk?
Everything so far assumes you already know what you want to import and what its ID is. Usually you do not. That is what Terraform search is for.
Terraform 1.14 added list blocks and a terraform query command. You describe what to look for, Terraform goes and finds it, and it can write the import configuration for you.
1. Write a query
Query files use a .tfquery.hcl extension and sit outside the normal plan and apply graph, so a query never touches your infrastructure. They do need a companion .tf file in the same directory with a required_providers block, and you must run terraform init before querying.
# search.tfquery.hcl
list "aws_instance" "unmanaged" {
  provider = aws
  limit    = 50

  config {
    region = "us-east-2"

    filter {
      name   = "tag:ManagedBy"
      values = ["unmanaged"]
    }

    filter {
      name   = "instance-state-name"
      values = ["running"]
    }
  }
}
2. Run the query
terraform queryTerraform prints each match with its resource identity, up to the limit you set (100 by default). Add include_resource = true to pull full resource attributes instead of identities alone, at some cost to performance.
3. Generate the import configuration
terraform query -generate-config-out=generated.tfThe generated file contains both resource and import blocks, including resource identities. Copy them into your main configuration, review them, and run terraform apply.
Terraform errors if generated.tf already exists, so delete the old file before rerunning.
What you need?
Terraform 1.14 or newer, since that is when list blocks and terraform query shipped. The provider also has to implement a list resource for the type you want. The AWS provider now ships over 200 of them, up from four at launch and eight when 1.14 went GA, but coverage is uneven and moving fast, so check the provider documentation before you plan around it. If a type is unsupported you get an Invalid list resource error.
What is the difference between terraform import and terraform state mv?
Both have declarative equivalents now, and for anything going through code review you want those instead.
The moved block handles renames and moving a resource under a different module. It is the reviewable version of terraform state mv.
The removed block, added in Terraform 1.7 and OpenTofu 1.7, drops a resource from state without destroying the real object. It is the exact inverse of import. OpenTofu 1.12 also added a destroy = false lifecycle option that forgets an object instead of destroying it.
Import, moved, and removed are three operations on the same state file: bring an object in, change where it sits, take it out. Once you think of them that way, most state surgery stops being scary.
Using OpenTofu import
OpenTofu is an open-source fork of Terraform 1.5.6 that continues to evolve independently. It supports both the classic tofu import CLI and declarative import blocks, with similar semantics to Terraform.
The main differences for this tutorial are:
- You’ll run
tofuinstead ofterraform. - Import blocks and config generation (
tofu plan -generate-config-out=...) behave like Terraform with some implementation differences.
Everything else in this article applies equally to OpenTofu.
Best practices for Terraform import
There are a couple of things you should consider before using terraform import:
- Understand your existing infrastructure and see how it would fit your Terraform configuration.
- Create your Terraform configuration first – before importing your resources, it will be really helpful to create your HCL code and ensure it actually reflects the settings and properties that have been set up for your IaC resources.
- Use version control – before doing imports, ensure your state file is managed remotely and also that you have versioning enabled for it. This also applies to your code configuration as well.
- Run a plan after import – it is very important to understand if the import worked properly and if the code configuration you’ve built really reflects the resource you have imported.
Why use Spacelift to manage Terraform?
If you need any help managing your Terraform infrastructure, building more complex workflows based on Terraform, and managing AWS credentials per run, instead of using a static pair on your local machine, Spacelift is a fantastic tool for this. It supports Git workflows, policy as code, programmatic configuration, context sharing, drift detection, and resource visibility right out of the box.
Spacelift also gives you:
- Policies (based on Open Policy Agent) – You can control how many approvals you need for runs, what kind of resources you can create, and what kind of parameters these resources can have, and you can also control the behavior when a pull request is open or merged.
- Multi-IaC workflows – Combine Terraform with Kubernetes, Ansible, and other infrastructure-as-code (IaC) tools such as OpenTofu, Pulumi, and CloudFormation, create dependencies among them, and share outputs
- Build self-service infrastructure — You can use Blueprints and Templates to build self-service infrastructure; complete a form to provision infrastructure based on Terraform and other supported tools.
- AI-powered provisioning and diagnostics — Spacelift Intelligence adds natural language provisioning, diagnostics, and operational insight across both traditional and AI-driven workflows, helping you deliver secure, compliant infrastructure at scale.
- Integrations with any third-party tools – You can integrate with your favorite third-party tools and even build policies for them. For example, see how to integrate security tools in your workflows using Custom Inputs.
Spacelift also enables you to create private workers inside your infrastructure, which helps you execute Spacelift-related workflows on your end. The documentation provides more information on configuring private workers.

Since AI-driven commercial property risk platform Archipelago started working with Spacelift, they have eliminated manual processes around direct Terraform applications and streamlined change coordination among their engineers.
Create a trial account or book a demo with one of our engineers to explore how Spacelift makes it easy to work with Terraform.
Key points
Import is a state operation, not an infrastructure operation. Nothing you run here changes the resource itself, right up until the moment you apply a configuration that does not match it. That is the whole risk, and a clean plan is the whole defense. Write the configuration, import, plan, and keep editing until the plan is empty. For anything larger than a handful of resources, let terraform query do the finding.
Note: Terraform moved to the BUSL license starting with version 1.6, so version 1.5.x and earlier remains open source under MPL 2.0. OpenTofu is an open-source fork of Terraform, created from version 1.5.6, that expands on Terraform’s existing concepts. It is a viable alternative to HashiCorp’s Terraform.
Manage Terraform better with Spacelift
– Manage Terraform and OpenTofu state and complex workflows effectively.
– Identify and remediate drift.
– Collaborate efficiently with context sharing, policy as code, Spacelift Templates, resource visualization, and more.
Frequently asked questions
Does running terraform import change anything?
Running terraform import won’t make any actual changes to your infrastructure; rather, it will just import that infrastructure resource to your Terraform state. Of course, if you then run an apply without defining the configuration for the imported resource, Terraform will have to destroy that resource because its configuration is not present.
Does terraform import generate code?
The terraform import CLI command does not. it only writes to state. Import blocks do. Run terraform plan -generate-config-out=<file>, or terraform query -generate-config-out=<file> for bulk imports, though generation is still experimental and does not work with for_each.
What are the disadvantages of running Terraform import?
Terraform import solves a real problem, with tradeoffs:
- You need to write the resource code after you import it.
- Without defining the exact configuration of the resource as the one you have done when creating it manually will result in infrastructure drift.
- Older Terraform made you import one resource per command. Import blocks with for_each handle batches from 1.7, and terraform query handles bulk discovery from 1.14, but bulk import still depends on your provider supporting it.
What is the difference between using Terraform data sources and importing a resource?
Terraform data sources are used to list details about existing resources. You can’t make changes to an existing resource with a data source. By importing it to Terraform, you can handle its entire lifecycle.
What is the difference between using terraform import and Terraformer?
terraform import command will import only one resource that you will have to specify explicitly. Terraformer can import multiple types of resources with a single command and also generate code for these resources.
Can only pre-existing objects be imported into Terraform?
Yes, only pre-existing objects can be imported into Terraform.
How do I import resources created with count/for_each safely?
Terraform import targets must match the exact instance address, including the count index or for_each key. Use stable keys, import into resource.name[“key”] for for_each and resource.name[0] for count, then immediately run terraform plan to confirm no drift. Prefer for_each with explicit map keys over count, since list reordering can silently change indexes.
What should I run right after import to prevent drift?
Run terraform plan. Import already pulls the remote object’s attributes into state, so a separate refresh adds nothing. What matters is what the plan proposes. Anything under a ~ is an attribute your configuration gets wrong; anything marked for replacement is an attribute you must fix before you apply. Keep editing the HCL and re-planning until the plan is clean, then apply.
Can I import multiple resources at once?
Yes, in two ways. If you know the IDs, one import block with for_each brings in every instance at once. If you don’t, terraform query (Terraform 1.14+, not in OpenTofu) discovers them and generates the import config — for providers that support list resources. OpenTofu users generate config with tofu plan -generate-config-out and discover via a tool like aztfexport.