
Security is one of Spacelift’s biggest priorities, and apart from the state-of-the-art security solutions that are embedded inside the product like Policy as Code, Encryption, Single Sign On (SSO), Private Worker Pools, and others, in some organizations, there are tools that engineers were accustomed to and want to have the possibility to integrate them.
When it comes to integrating security tools in your workflows, Spacelift has you covered with the Custom Inputs feature.
The way this works, in a nutshell, is:
- Install the security tool either directly on the Runner Image or as part of your before_init hook.
- Run the security tool as part of a before_init hook or any other hook that makes sense for your use case and save its output to a json file in the <key>.custom.spacelift.json format (case-sensitive, and <key> can be whatever you want).
- Access the data in a plan policy under input.third_party_metadata.custom.<key> and manipulate it to accomplish what you want.
Only three steps have to be defined in order to accomplish an integration with any tool, so let’s see the most common ones in action:
Terraform sample code
In this repository, there is some dummy Terraform code, that will create two EC2 instances. Due to the fact that it just uses an ami id and an instance type the code will be marked as vulnerable by many security tools we are going to use.
You can replicate this repository and create a stack based on it in order to follow through with this setup.

Tfsec integration
Tfsec is an awesome open-source static analysis security scanner for Terraform code. It checks Terraform code for potential security issues and provides clear and actionable feedback to help developers secure their Infrastructure as Code deployments.
As mentioned above, in order to integrate a tool with Spacelift, we must first install it as part of the runner image or as a before_init hook.
I am going to show you easy it is to install as part of a before_init hook.
Installing and configuring tfsec as a before_init hook
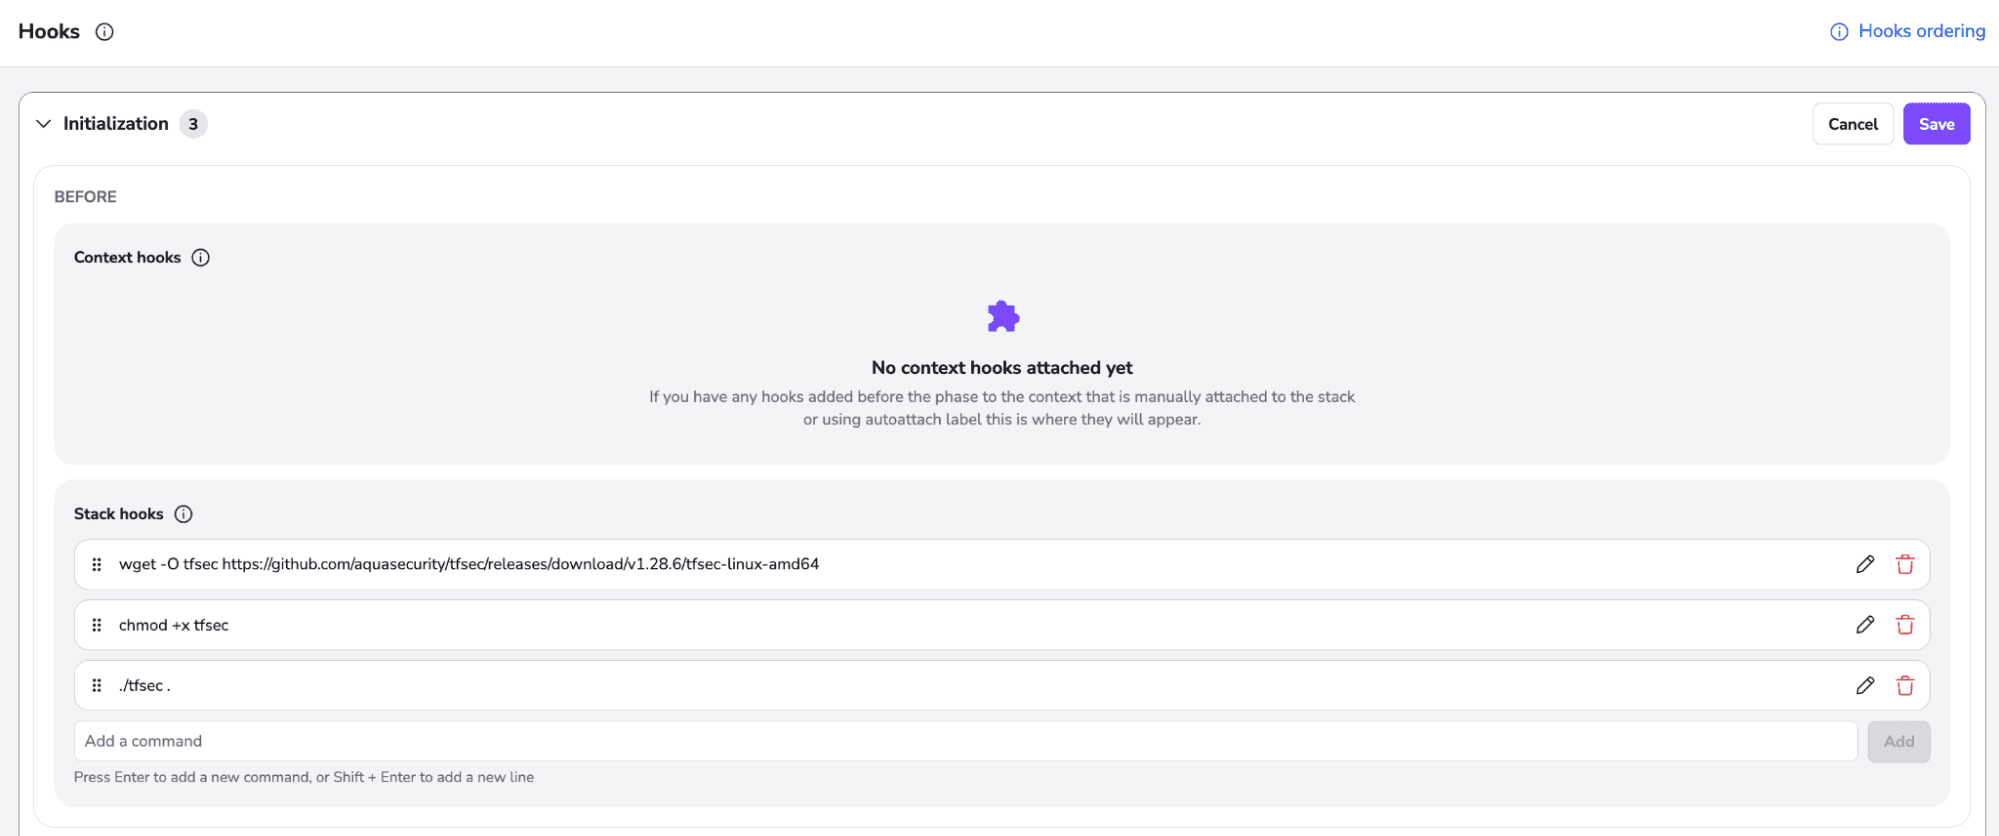
Navigate in the Spacelift UI to your Stack → Hooks and add the following command before the Initialization Phase.
wget -O tfsec https://github.com/aquasecurity/tfsec/releases/download/v1.28.1/tfsec-linux-amd64

chmod +x tfsec

./tfsec .
You can drag and drop the commands to place them before the Initialization Phase, and in the end, this should look similar to this.
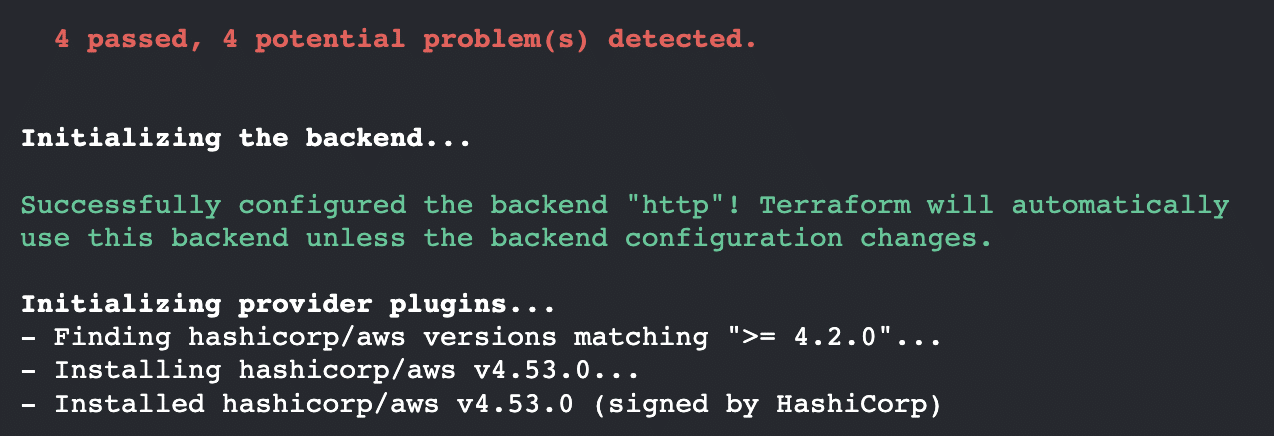
If you are using the GitHub repository from above and you trigger a run, this code will not even pass the before_init phase due to the fact that it’s going to return some High vulnerabilities:
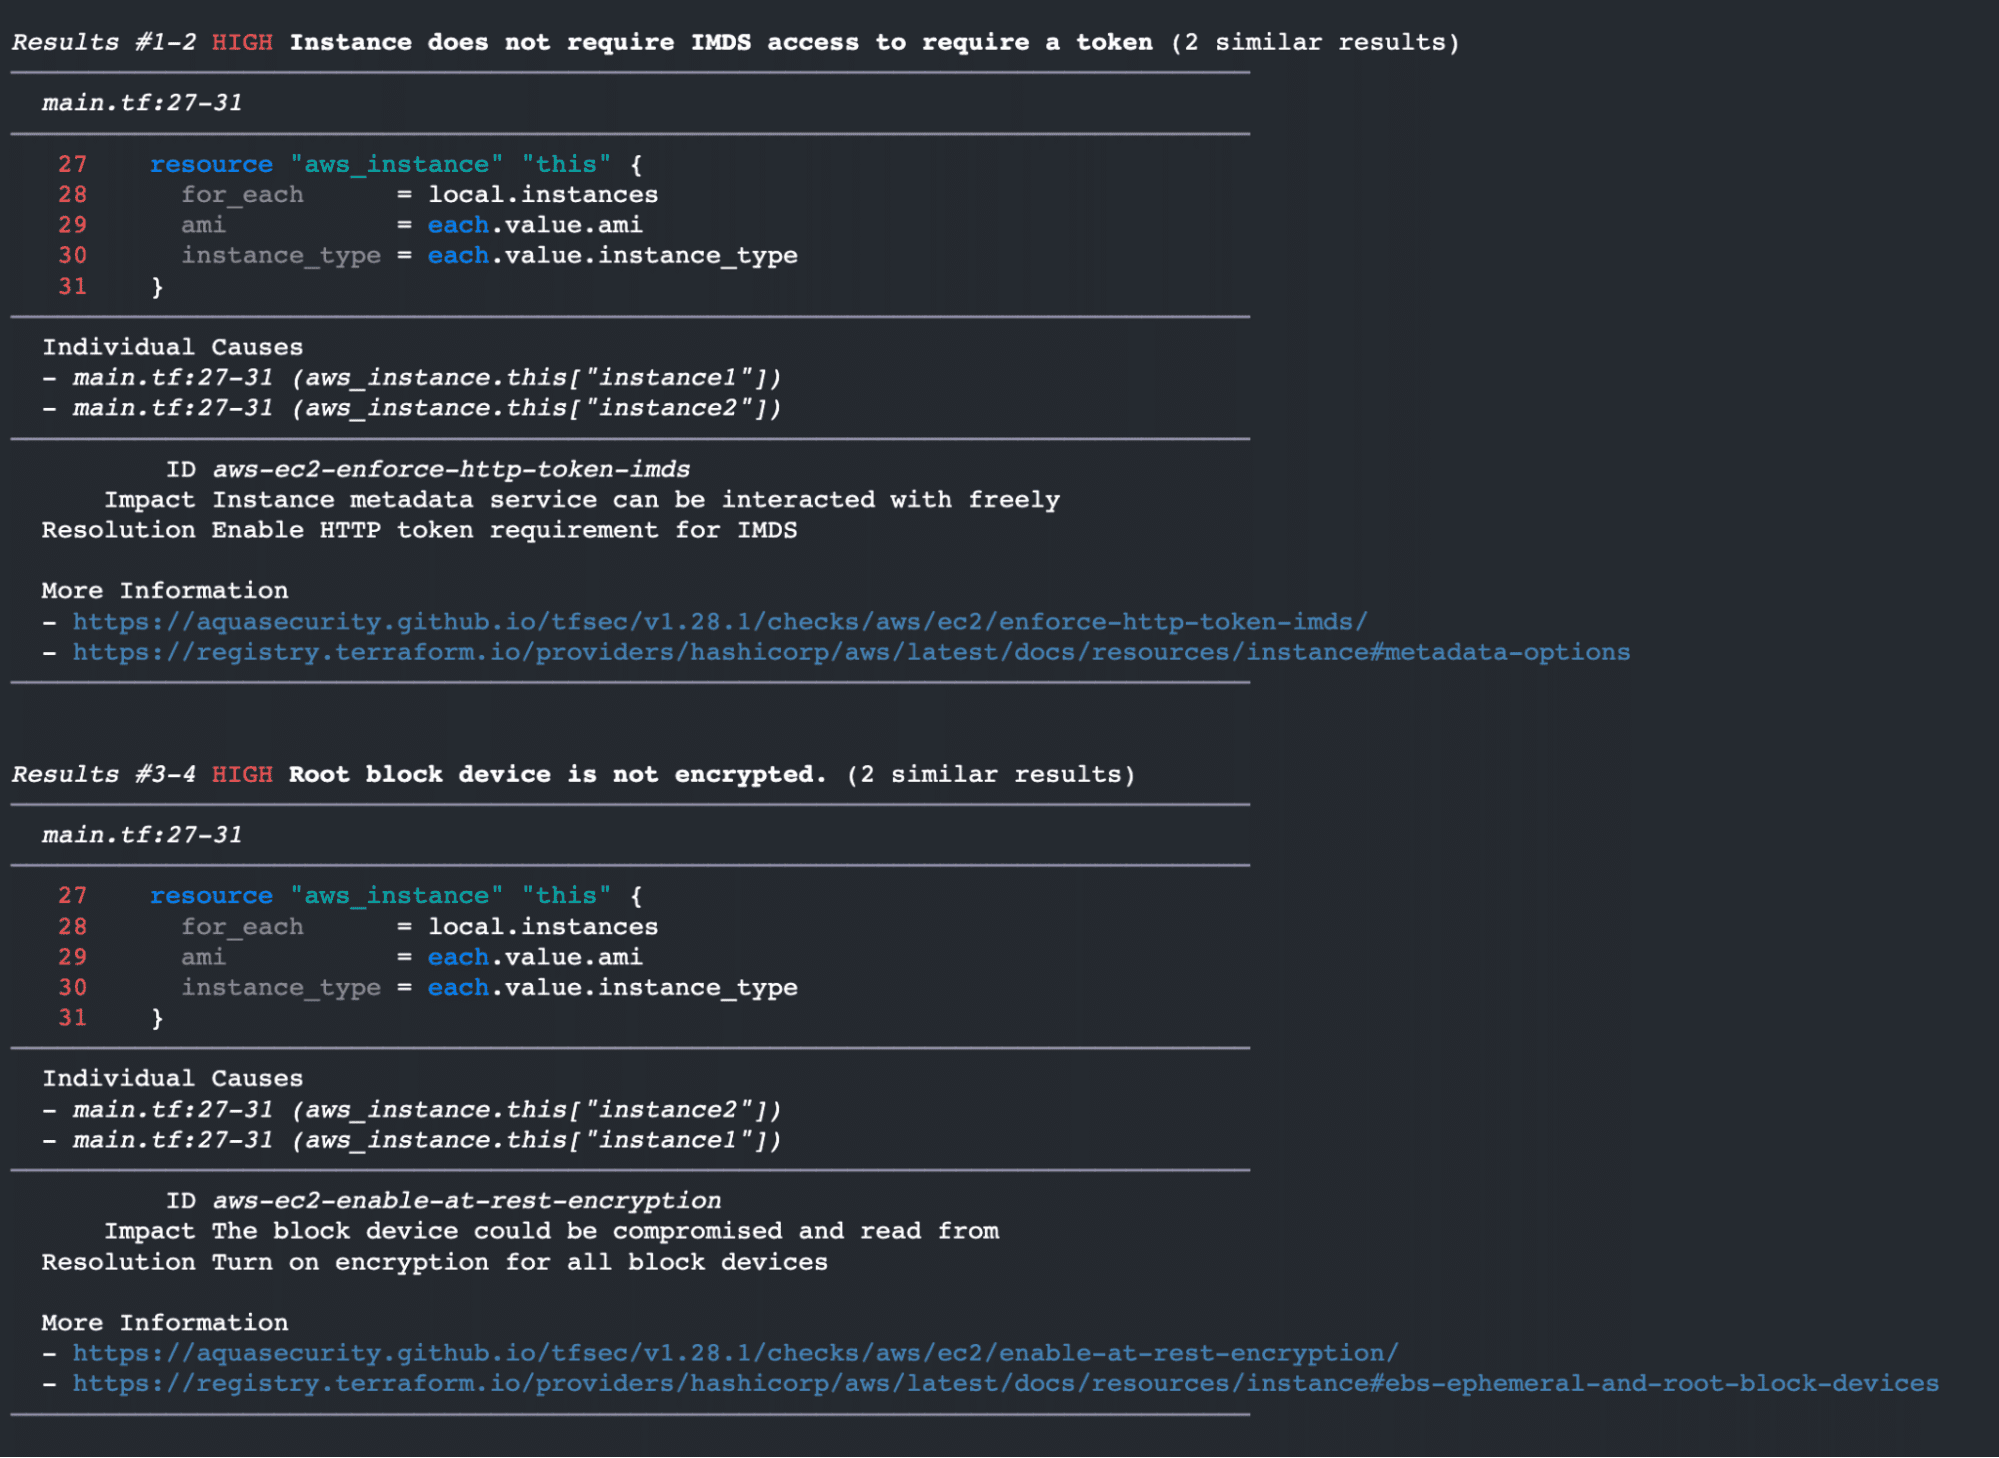

This is not very useful because we are going to be limited to what Tfsec is offering, and maybe some of these high vulnerabilities are not such a big deal for us. The before_init phase is not passing due to the fact that by default, Tfsec will return an exit code different than 0 on a Linux based system, whenever it finds an issue that is High or Critical.
But don’t worry, we will easily overcome this. Let’s go back to the Initializations and change the last command that we are running:
./tfsec -s .Great, now if we are going to retrigger a run, we are going to see that we arrived at the Initialization Phase:
That’s good, but we want to make sure that we are controlling vulnerabilities through our plan policies. So, as mentioned before, we have to save the json plan in a <key>.custom.spacelift.json file.
Let’s go back to the Initialization Phase and change the tfsec command run as follows:
It should look like this:
./tfsec -s --format=json . > tfsec.custom.spacelift.json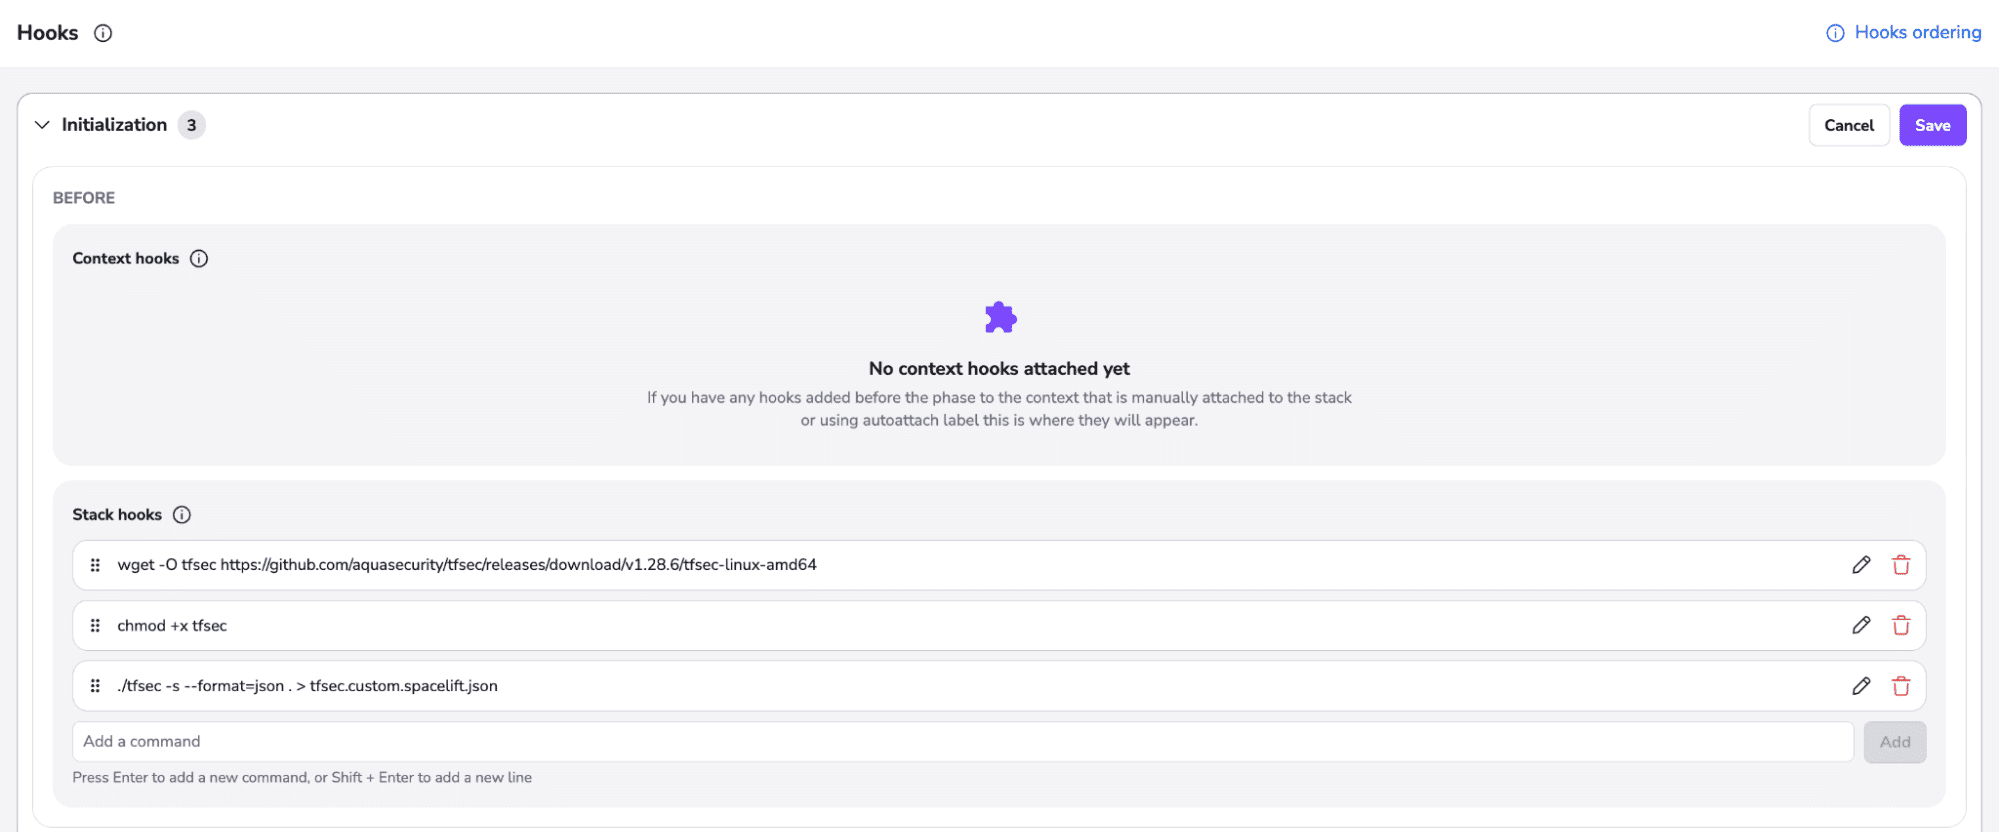
Tfsec plan policy
Due to the fact that we’ve added tfsec as the value for <key>, this means that we can access the data in our plan policy by using input.third_party_metadata.custom.tfsec.
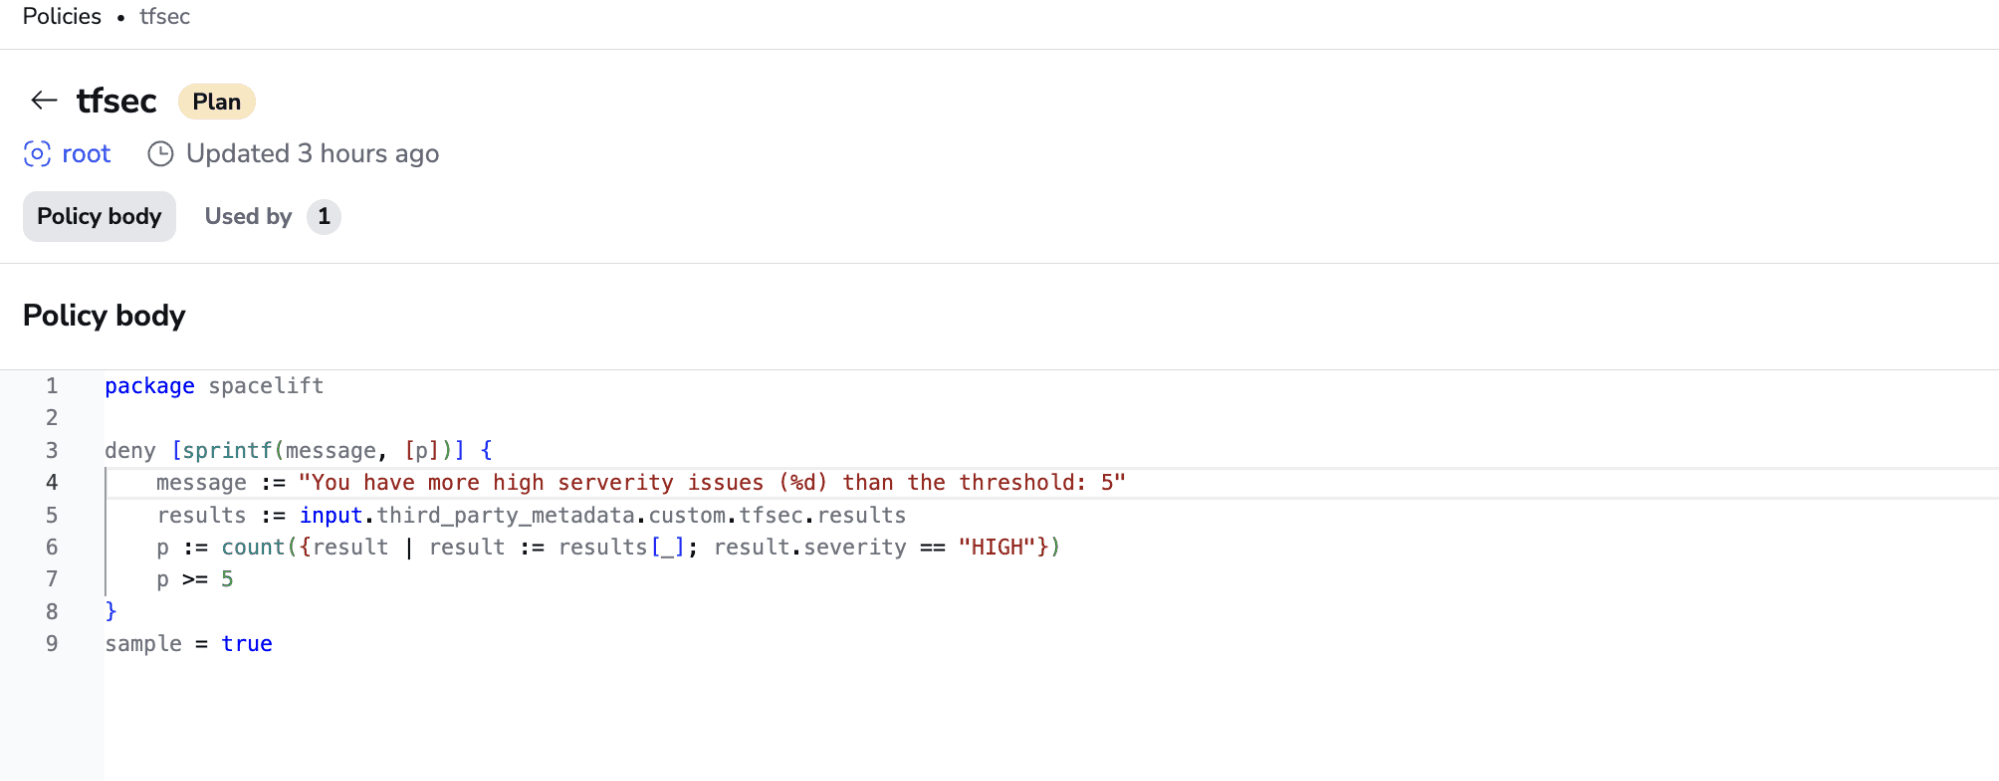
Let’s see a simple plan policy in action that uses this input:
package spacelift

deny [sprintf(message, [p])] {
	message := "You have a couple of high serverity issues: %d"
	results := input.third_party_metadata.custom.tfsec.results
    p := count({result | result := results[_]; result.severity == "HIGH"})
    p >= 5
}
sample = true
This policy checks the number of high-severity issues and denies the run if their number is greater or equal to five. Of course, you can create whatever policy you want. This is just a simple example.
To create the Policy, go to Policies → Add Policy:
- Add a name to your policy
- Select Plan Policy
- Select the Space in which your stack resides
- Paste the code inside of it
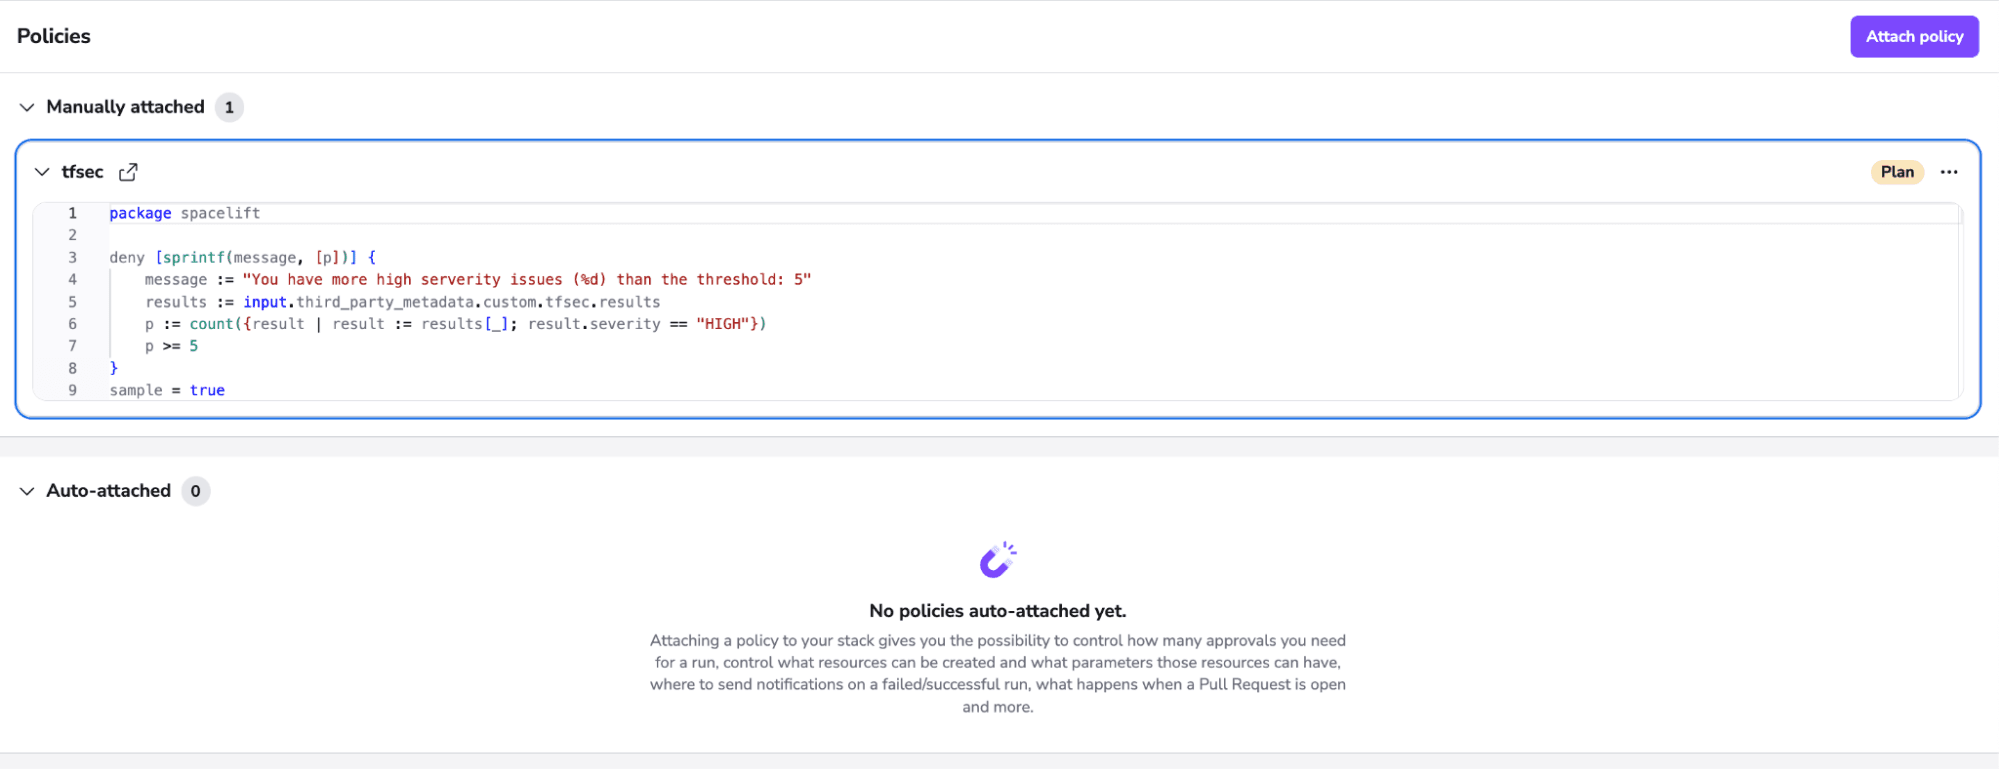
After you save, it should look like this:
To attach the policy, go to Stack → Policies and select the newly created policy.
As we know, we will receive four high-severity issues for the sample code. This means, that this policy will allow us to run the code.

If you want to deny the run, you could easily change the threshold to greater or equal to 4, or simply add more resources to increase the number of vulnerabilities.
And that’s it, you can customize the policies however you want based on the tfsec input.
Would you like to see this in action? Check out the video below:
Trivy integration
Trivy is one of the most popular open-source security scanners that can help with identifying vulnerabilities.
Installing and configuring Trivy in a before_init hook
Similar to the other tools that we have configured, we need to first download the binary containing Trivy, and run a Trivy command that saves the output in a trivy.custom.spacelift.json file. All of these should happen in the before init phase:
wget -O trivy.tar.gz https://github.com/aquasecurity/trivy/releases/download/v0.53.0/trivy_0.53.0_Linux-64bit.tar.gz
tar -zxf trivy.tar.gz
./trivy config --format json --output trivy.custom.spacelift.json --exit-code 0 .
In Spacelift, it should look similar to this:
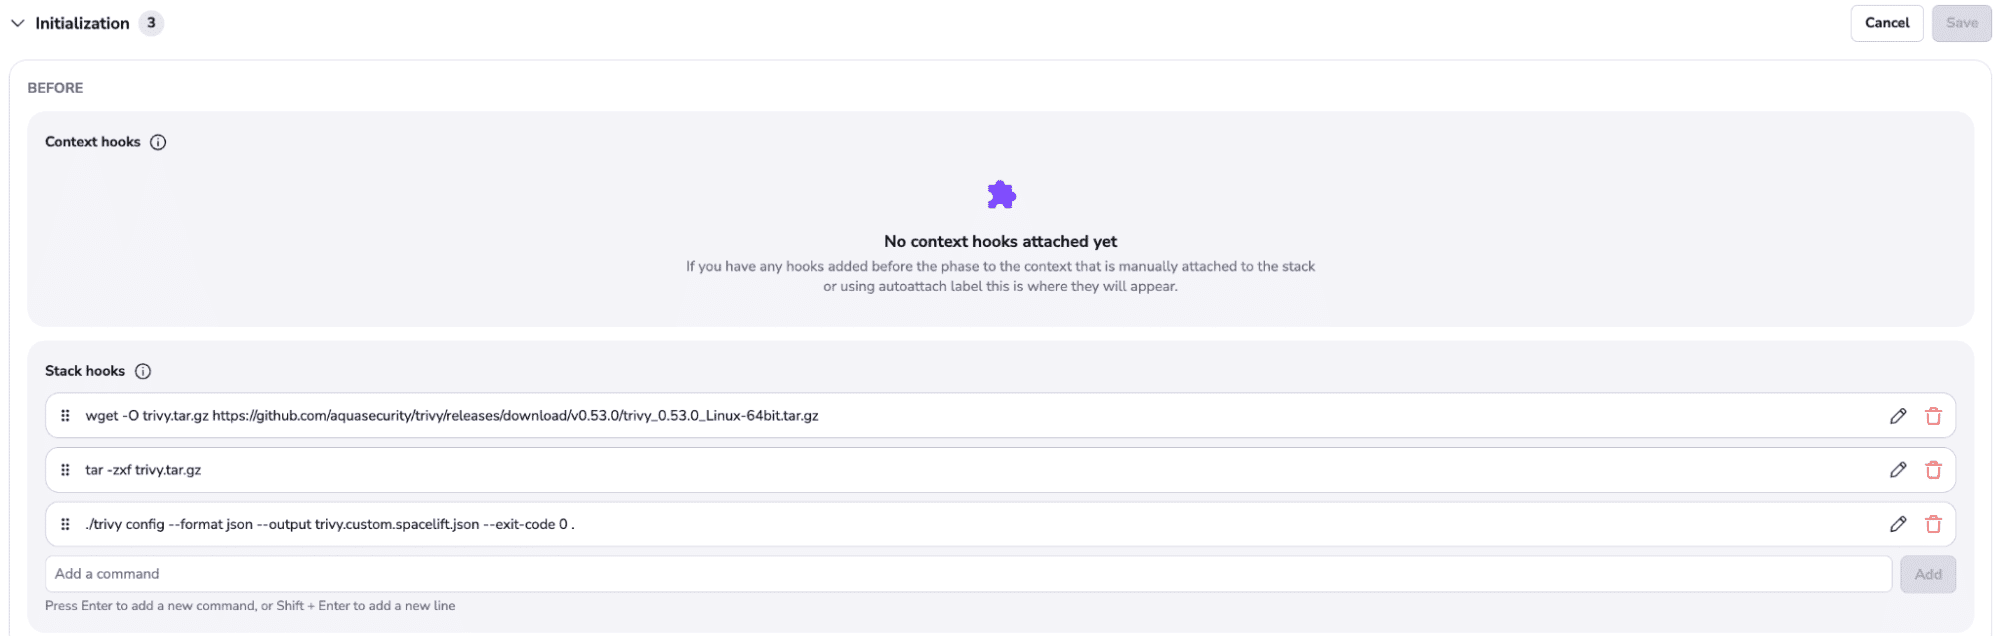
You can force Trivy to return a 0 exit code for soft scanning and that’s exactly what we’ve done to be able to parse the output and create a policy for it.
Trivy plan policy
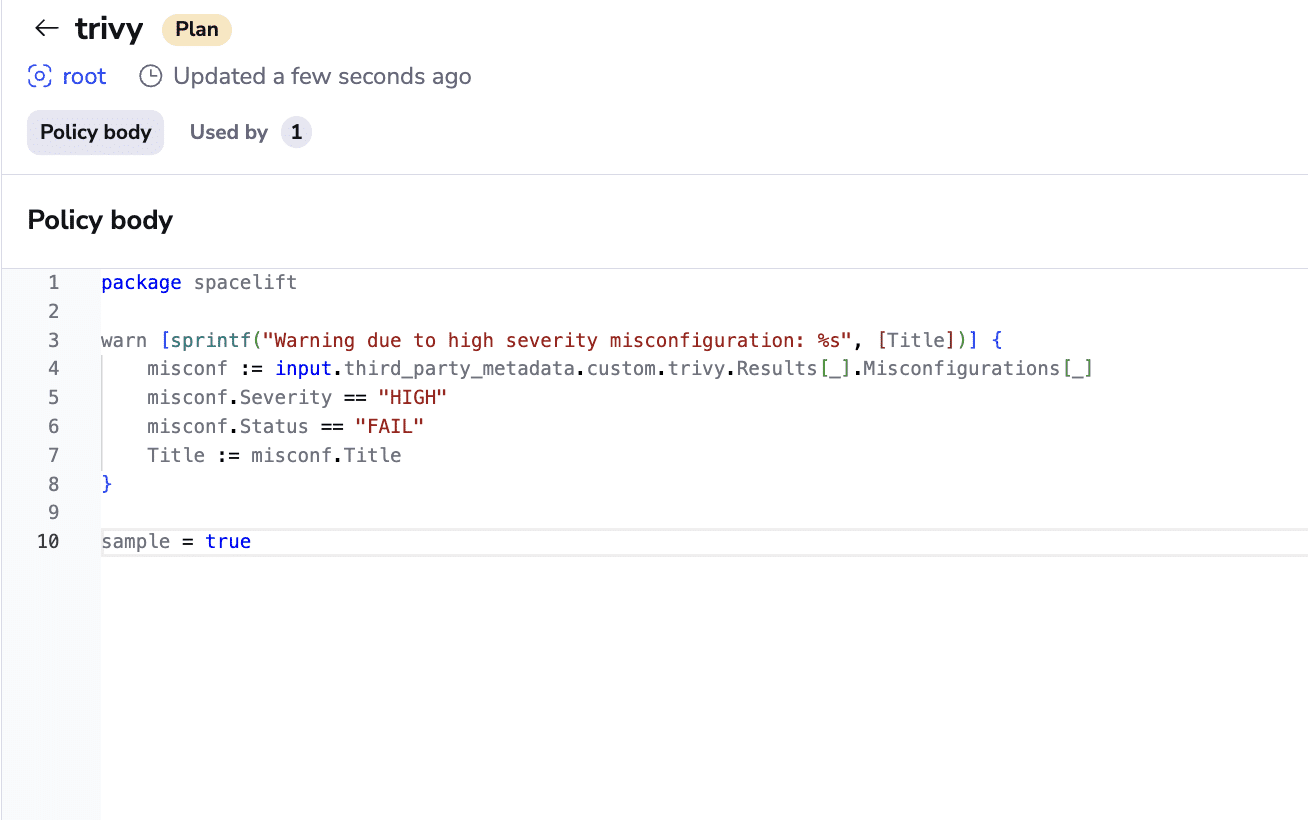
We will define a plan policy based on the Trivy output that shows a warning if we have more than 1 high severity alert:
package spacelift


warn [sprintf("Warning due to high severity misconfiguration: %s", [Title])] {
   misconf := input.third_party_metadata.custom.trivy.Results[_].Misconfigurations[_]
   misconf.Severity == "HIGH"
   misconf.Status == "FAIL"
   Title := misconf.Title
}


sample = true
In Spacelift, this would look like this:
Attach the policy to the stack, and now trigger a run on it:
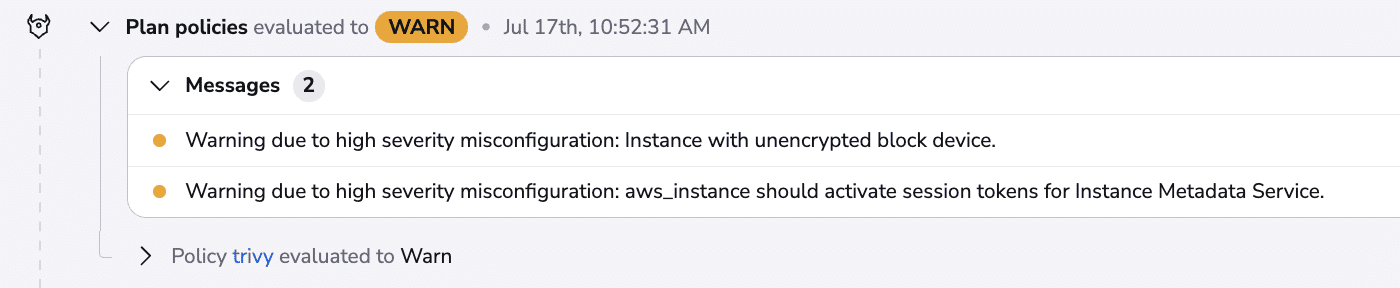
As you can see, the policy will return a warning due to high-severity misconfigurations, if we want, we can easily change the warn to a deny, to deny runs when these vulnerabilities are present.
Checkov integration
Checkov is a static code analysis tool that is used to validate Terraform code for security and best practices. It scans Terraform code for potential security issues and recommends changes to improve the security and reliability of the infrastructure.
Installing and configuring checkov in before_init hook
As before, go to Stack → Hooks and add the following command before the Initialization Phase.
curl -O https://bootstrap.pypa.io/get-pip.py
python get-pip.py --break-system-packages
python -m pip install packaging==21.3.0 --break-system-packages
python -m pip install checkov --break-system-packages
export PATH=$PATH:/home/spacelift/.local/bin
checkov -s -o json --directory . --framework terraform > checkov.custom.spacelift.json
It should look similar to this:
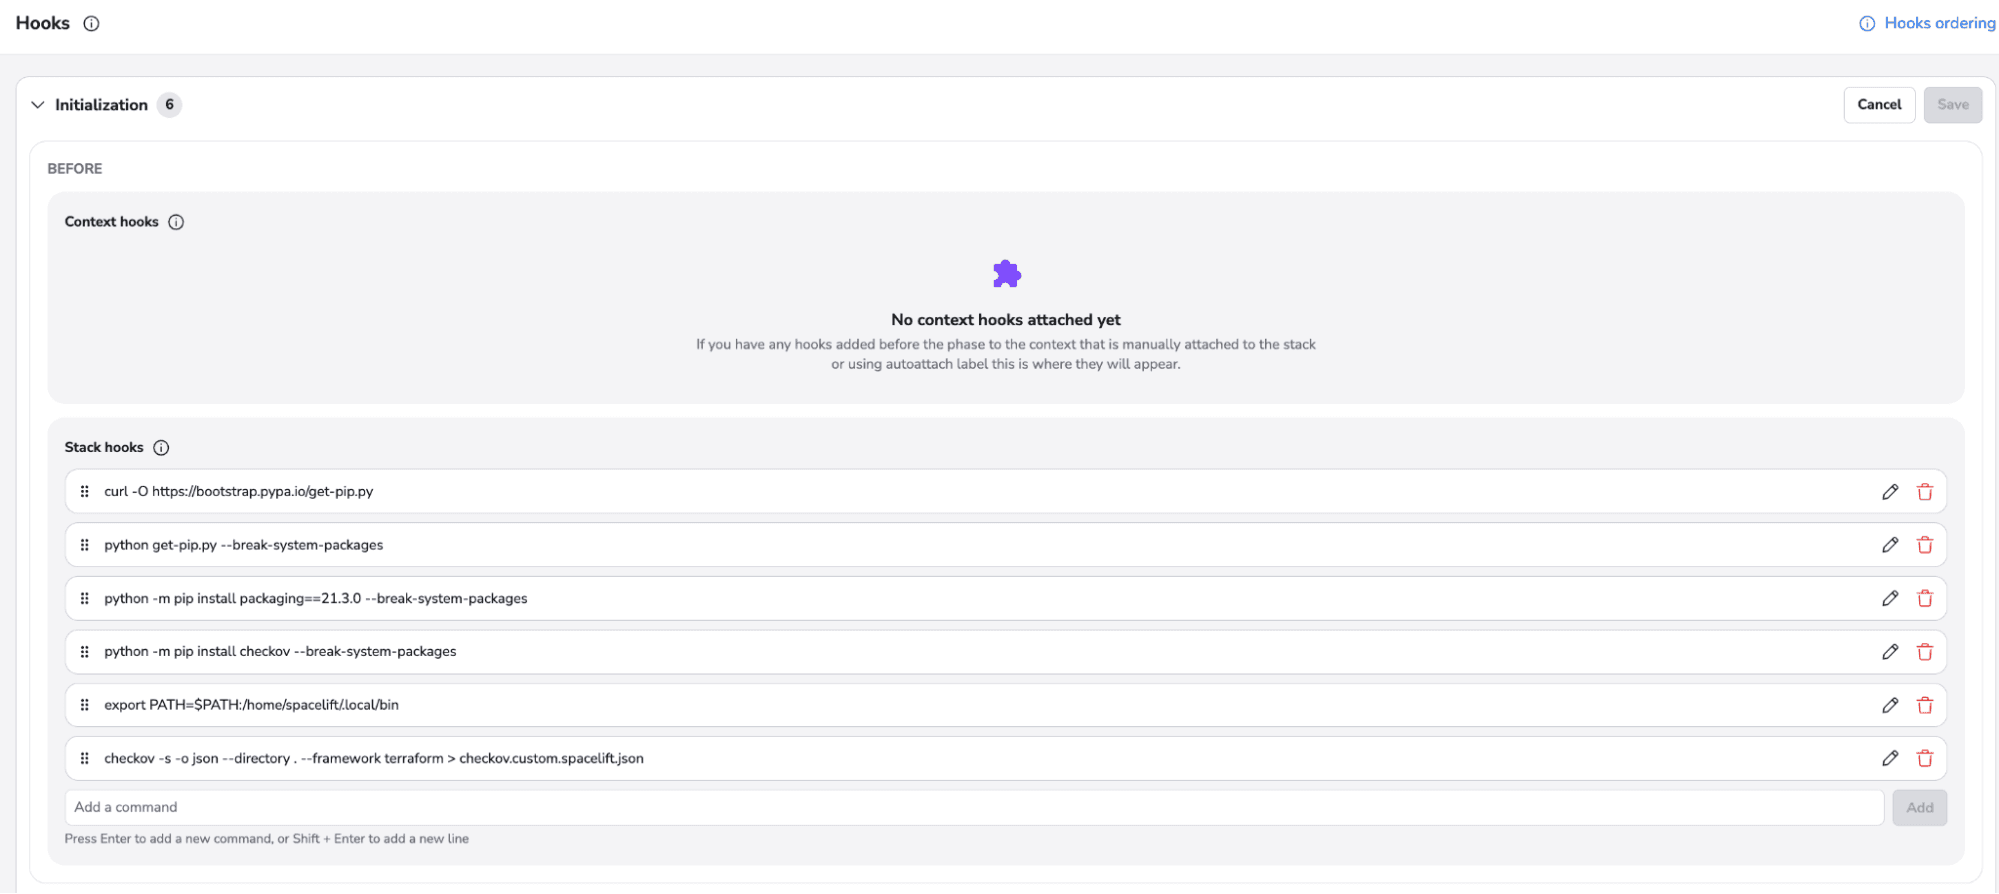
We are using the -s option as we don’t want the command to fail if our code has any vulnerabilities. We want to manipulate these vulnerabilities in our plan policies using custom inputs.
Checkov plan policy
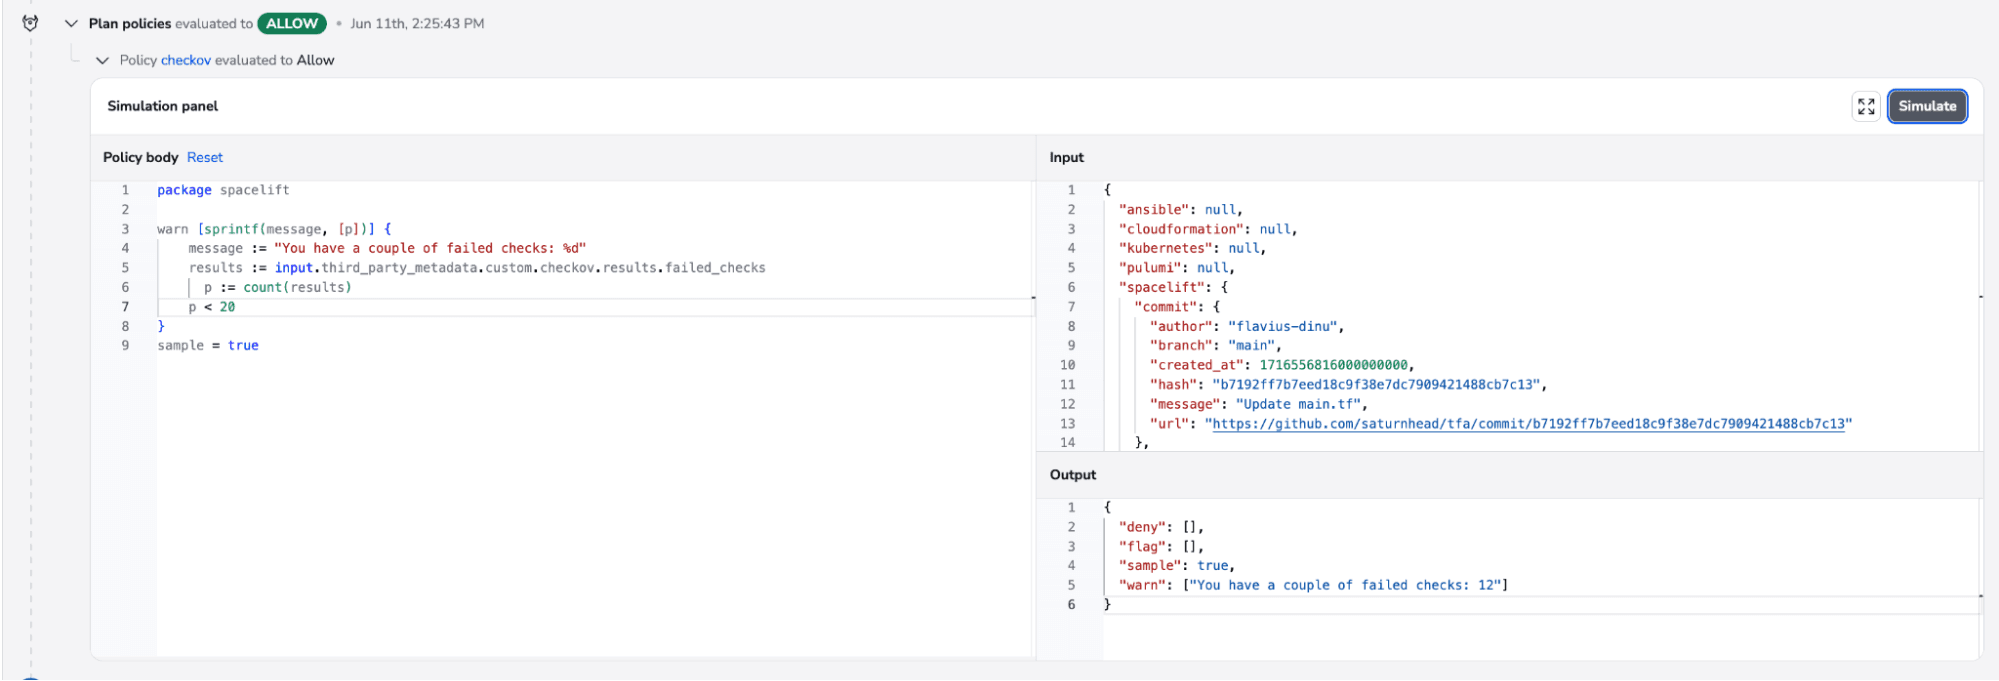
We’ve now used checkov as the key for our file, so we will be able to access the result of this run in input.third_party_metadata.custom.checkov.
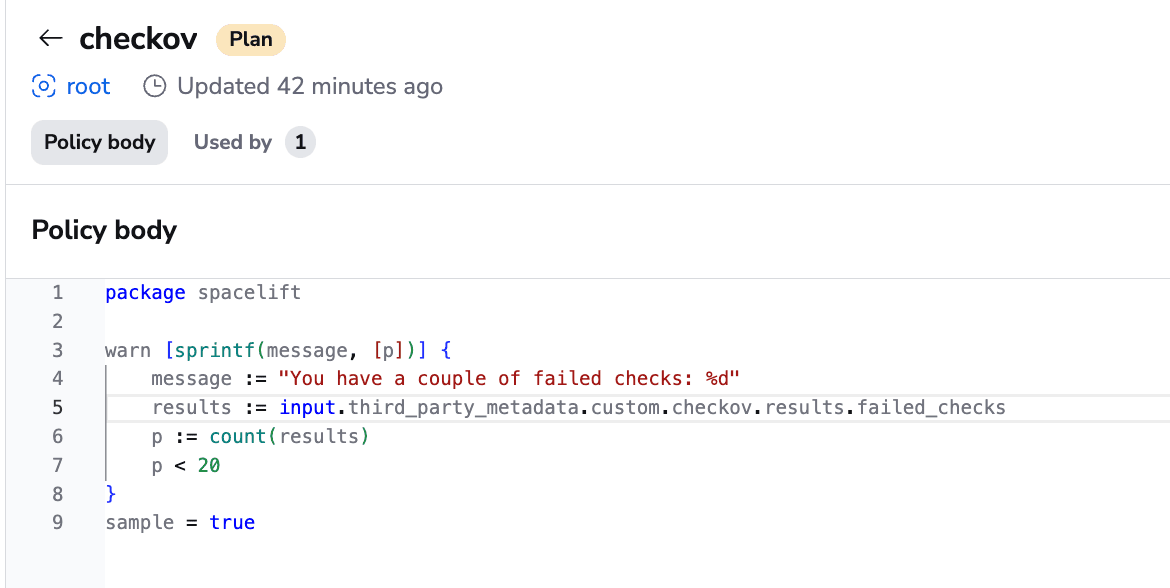
Let’s define a simple plan policy that counts the number of failed checks:
package spacelift

warn [sprintf(message, [p])] {
	message := "You have a couple of failed checks: %d"
	results := input.third_party_metadata.custom.checkov.results.failed_checks
      p := count(results)
	p < 20
}
sample = true
This policy will warn you if your failed checks are less than 20, but will not fail your run. You can change warn to deny and change the condition however you please and the run will not happen.
Attach the policy to the stack, and now trigger a run to see it in action.

By having the sample set to true, you can even see what’s going to happen in real time, exactly like you would do in the Rego Playground.
Terrascan
Terrascan is another static code analysis tool that checks for security vulnerabilities.
Installing and configuring Terrascan in a before_init hook
As we’ve done for the other tools, go to Stack → Hooks and add the following command before the Initialization Phase:
wget -O terrascan.tar.gz https://github.com/tenable/terrascan/releases/download/v1.17.1/terrascan_1.17.1_Linux_x86_64.tar.gz
tar -zxf terrascan.tar.gz
./terrascan scan -o json > terrascan.custom.spacelift.json || true
It should look similar to this:
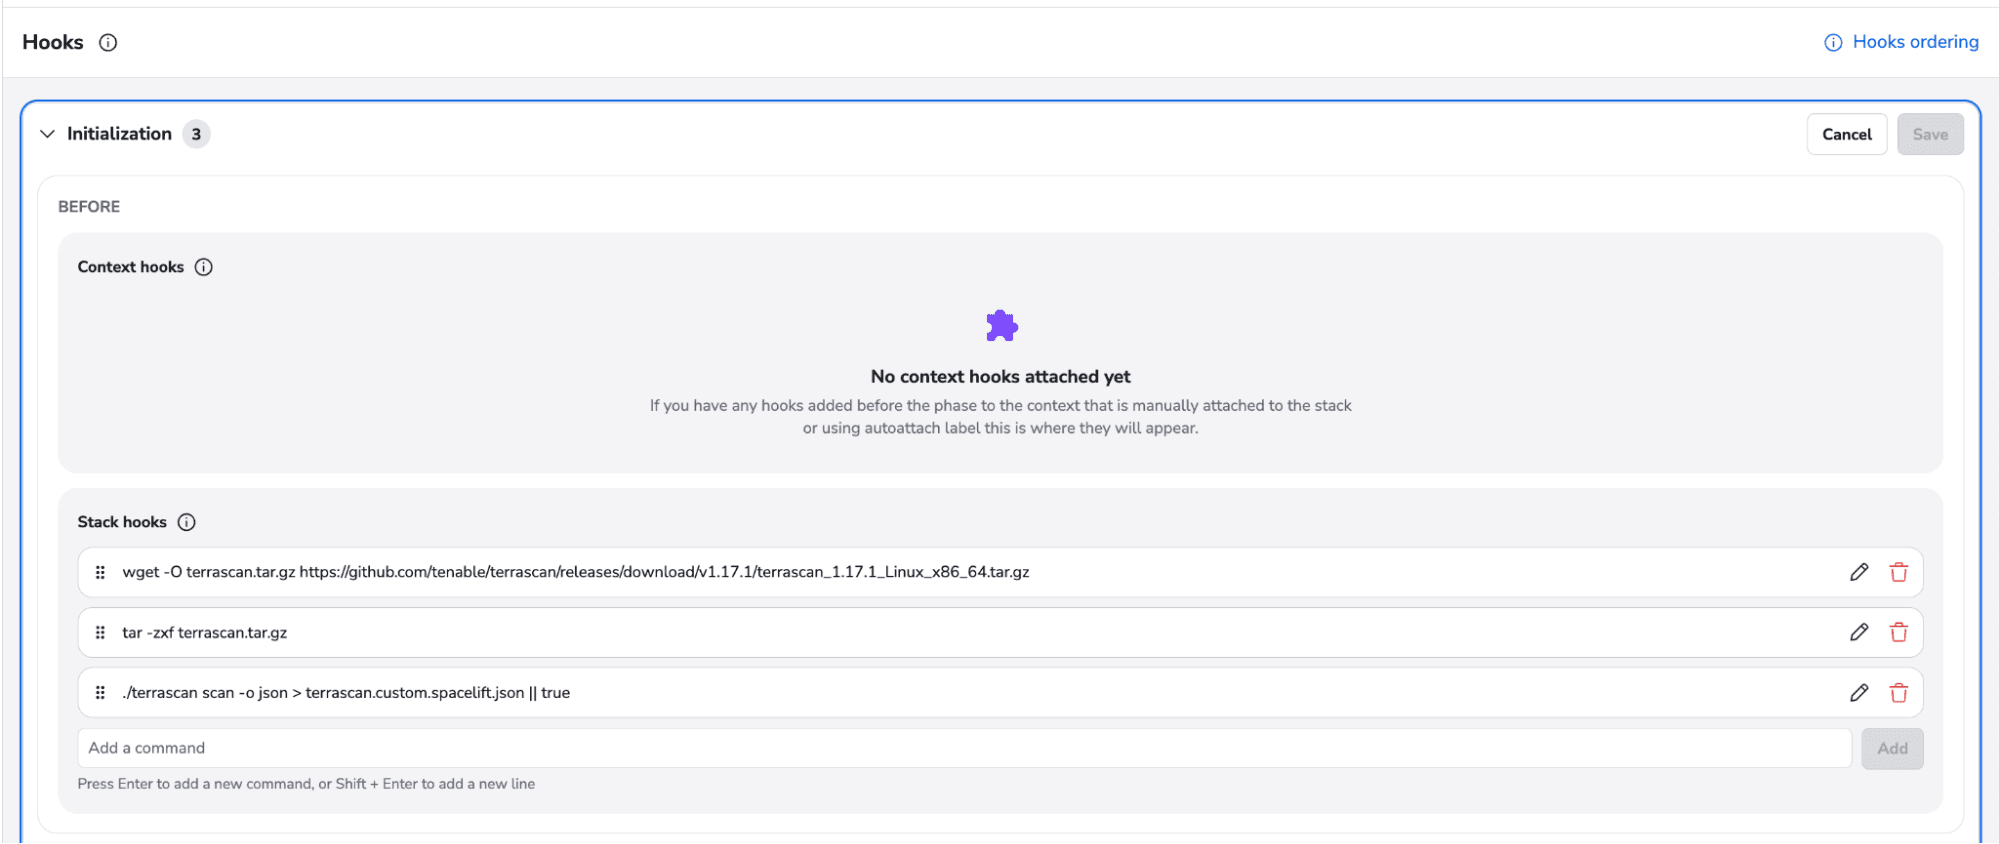
As Terrascan doesn’t have any soft check implemented and the command will return a non 0 exit code, even for the smallest vulnerabilities it finds, we have used the “|| true” option to force a 0 exit code to be able to use output inside a plan policy.
Terrascan plan policy
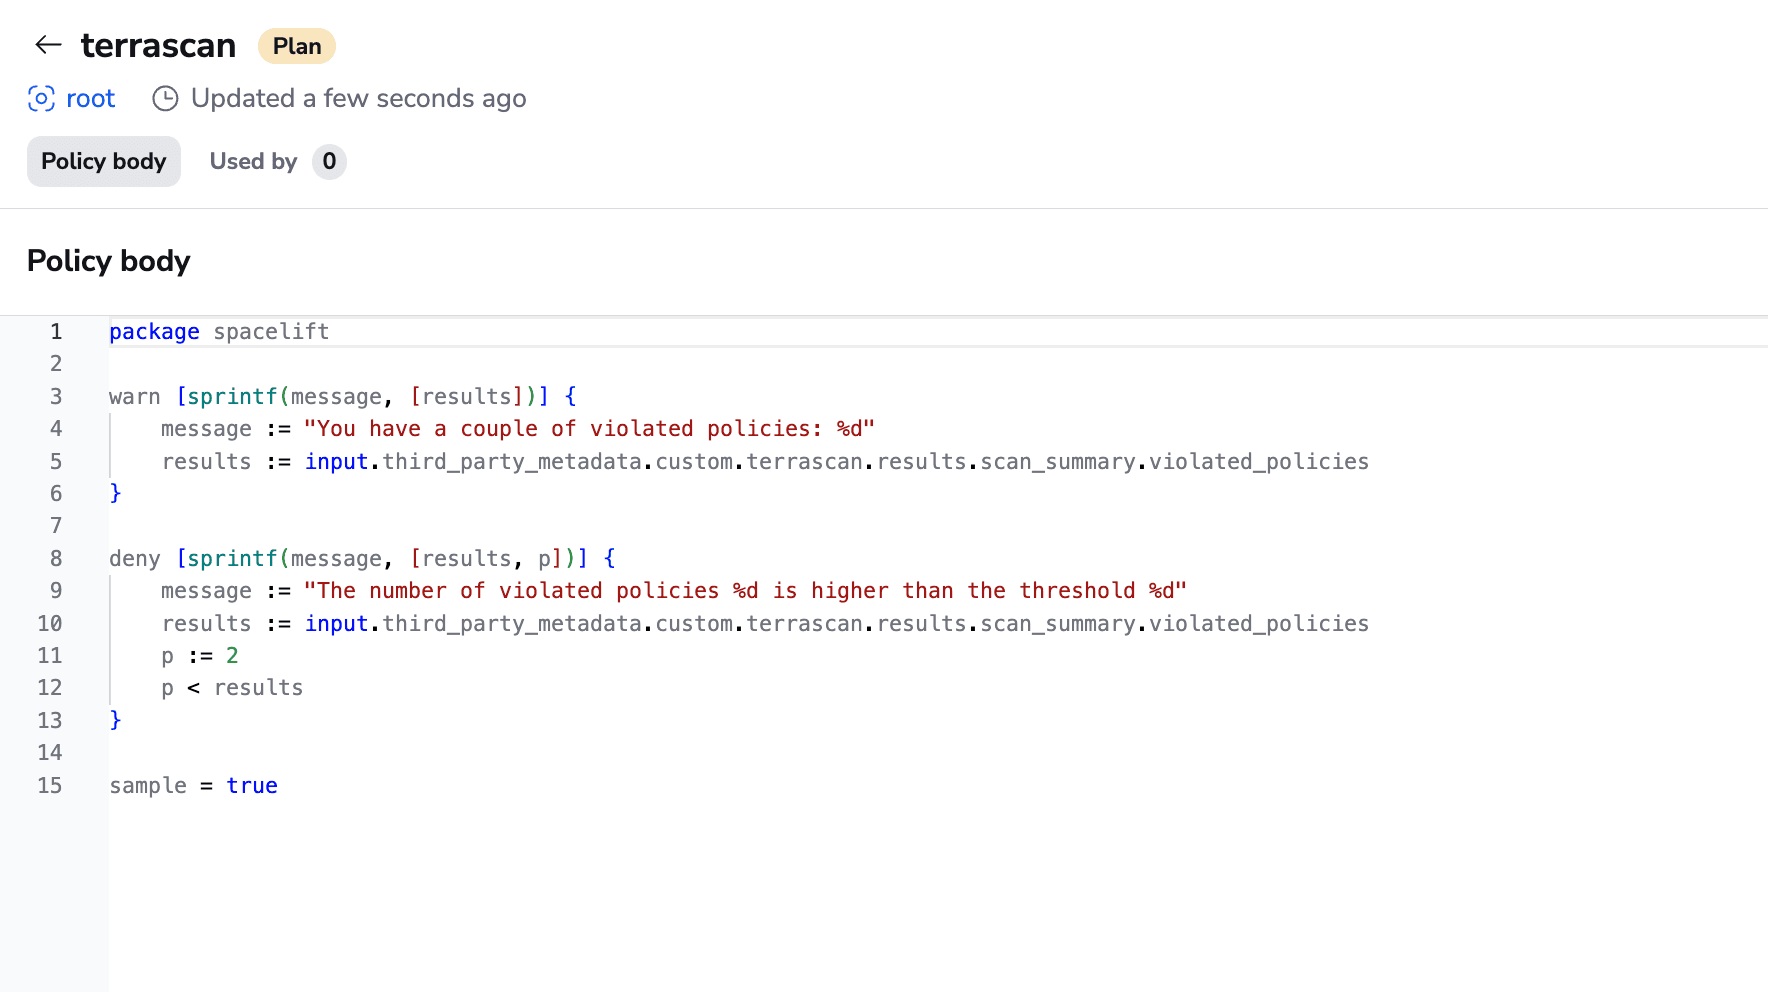
As we’ve used terrascan as the key for our file, we will be able to manipulate the output from the terrascan run in the plan policy using input.third_party_metadata.custom.terrascan.
Let’s define a plan policy that checks the number of violated policies and shows a warning with the number of them, also, if the number of violated policies is greater than 2, let’s deny the run.
package spacelift

warn [sprintf(message, [results])] {
	message := "You have a couple of violated policies: %d"
	results := input.third_party_metadata.custom.terrascan.results.scan_summary.violated_policies
}

deny [sprintf(message, [results, p])] {
	message := "The number of violated policies %d is higher than the threshold %d"
	results := input.third_party_metadata.custom.terrascan.results.scan_summary.violated_policies
    p := 2
    p < results
}

sample = true
It should look similar to this:
Attach the policy to the stack, and now trigger a run to see it in action.
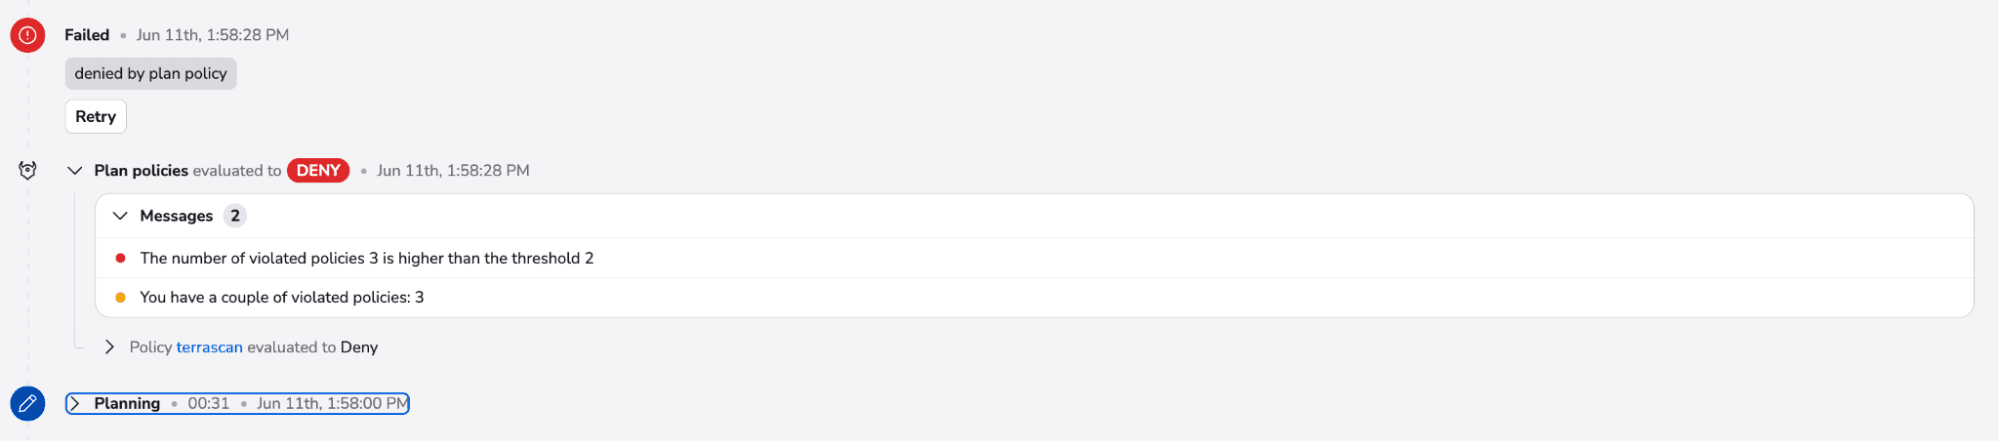
You can see the number of violated policies as a warning first and due to the fact that is greater than 2, you will get an error and the run will fail.
Checkmarx Kics
Checkmarx Keeping Infrastructure as Code Secure (KICS), is in charge of finding vulnerabilities, compliance issues, and infrastructure misconfiguration early in the development cycle. This tool is also open-source, like the others, and it’s getting some traction.
Installing and configuring Kics using a runner image
To spice things up, we will now configure a docker image with Kics and use it as a runner in Spacelift.
Example DockerFile:
FROM golang:1.20-alpine3.16 as builder

ARG TARGETOS
ARG TARGETARCH
ARG VERSION="development"
ARG COMMIT="NOCOMMIT"
ARG SENTRY_DSN=""
ARG DESCRIPTIONS_URL=""

WORKDIR /tmp

RUN apk add git build-base musl-dev glib-static libstdc++ binutils-gold \
    && git clone https://github.com/Checkmarx/kics.git \
    && cd kics \
    && pwd \
    && go mod vendor \
    && CGO_ENABLED=0 GOOS=${TARGETOS} GOARCH=${TARGETARCH} go build \
    -ldflags "-s -w -X github.com/Checkmarx/kics/internal/constants.Version=${VERSION} -X github.com/Checkmarx/kics/internal/constants.SCMCommit=${COMMIT} -X github.com/Checkmarx/kics/internal/constants.SentryDSN=${SENTRY_DSN} -X github.com/Checkmarx/kics/internal/constants.BaseURL=${DESCRIPTIONS_URL}" \
    -a -installsuffix cgo \
    -o bin/kics cmd/console/main.go


FROM public.ecr.aws/spacelift/runner-terraform:latest as spacelift
COPY --from=builder /tmp/kics/bin/kics /bin/kics
COPY --from=builder /tmp/kics/assets/queries /bin/assets/queries
COPY --from=builder /tmp/kics/assets/libraries/* /bin/assets/libraries/
You can build the image and push it to one of the supported registries for public runners. A list is available here.
If you don’t want to use your own, the image is already available here.
After you have the image name, you can easily add it to the runner image section on the stack level. To do that, you will need to go to Stack → Settings → Behavior → Runner Image and add the image name here.
Similar to this:

After that, you are good to go.
We will need to generate a json file in the same way we were doing for the other tools. For that, we will use a before_init hook.
kics scan -p . --report-formats json -o res > /dev/null || true
mv res/results.json kics.custom.spacelift.json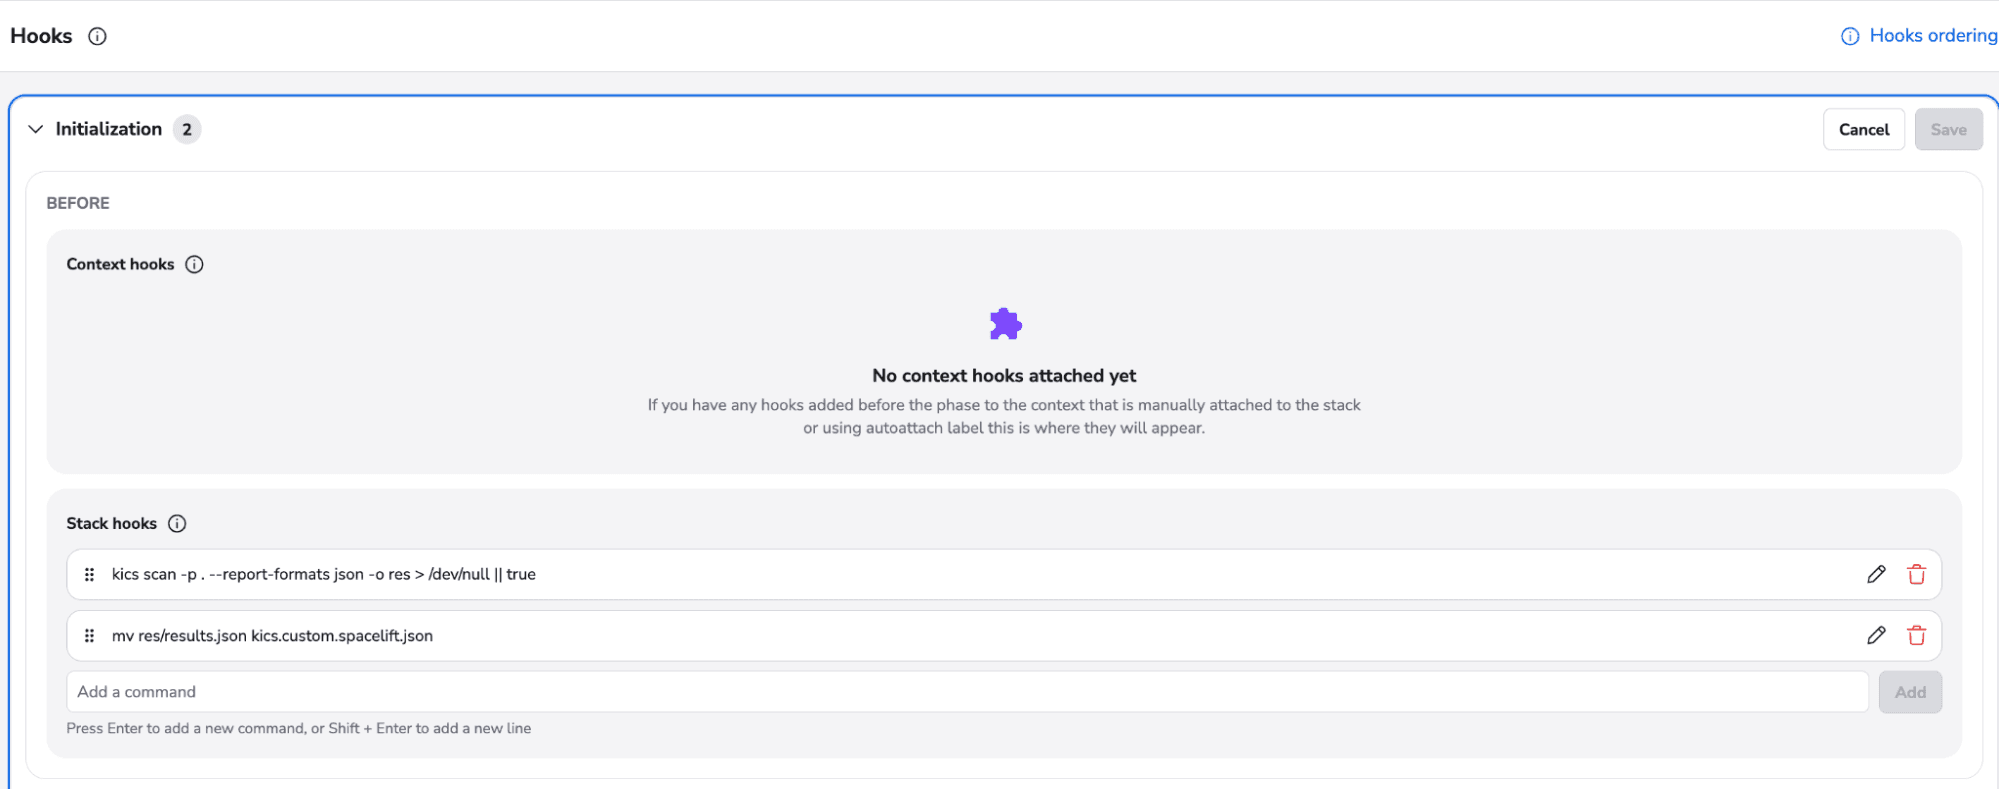
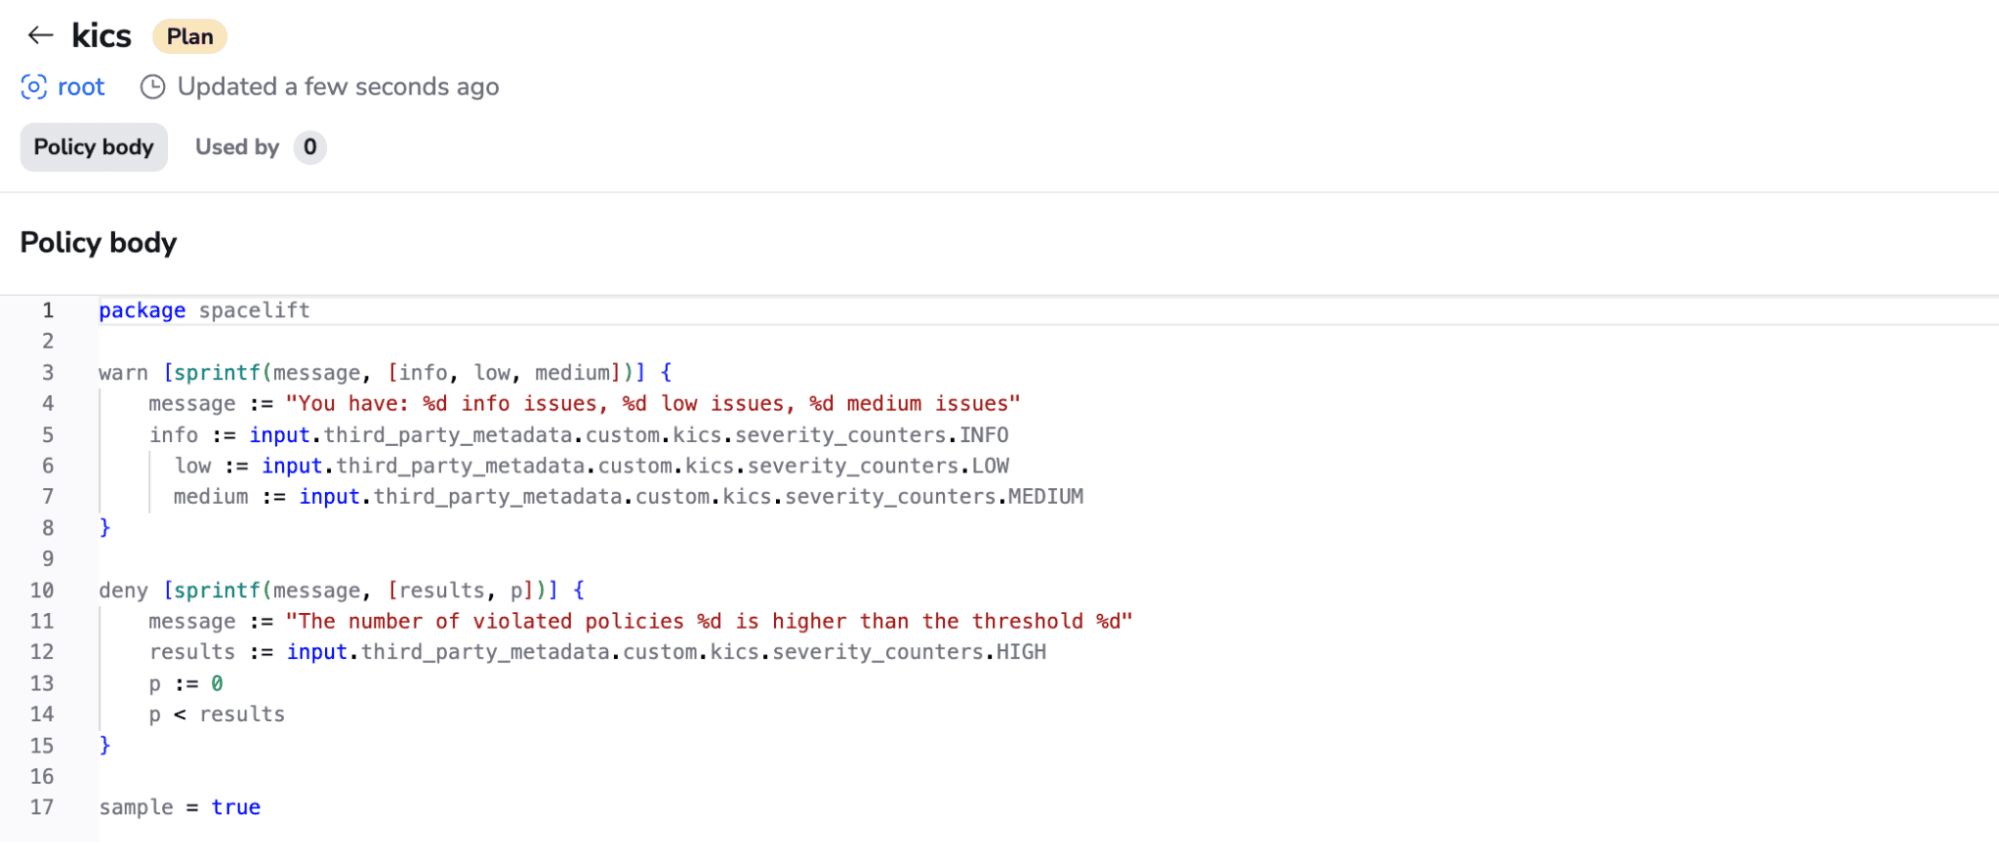
Now we are ready to define a policy for this.
package spacelift

warn [sprintf(message, [info, low, medium])] {
	message := "You have: %d info issues, %d low issues, %d medium issues"
	info := input.third_party_metadata.custom.kics.severity_counters.INFO
      low := input.third_party_metadata.custom.kics.severity_counters.LOW
      medium := input.third_party_metadata.custom.kics.severity_counters.MEDIUM
}

deny [sprintf(message, [results, p])] {
	message := "The number of violated policies %d is higher than the threshold %d"
	results := input.third_party_metadata.custom.kics.severity_counters.HIGH
    p := 0
    p < results
}

sample = true
This policy will give you a warning with all the info, low and medium issues number and deny any run that has a high severity issue.
It should be similar to this:
After this, let’s attach it to our stack and trigger a run to see the policy in action.

We will see a warning with all the info, low and medium severity issues, and due to the fact that we have two high-severity issues, our run will be denied.
Key points
Custom inputs are a very powerful feature that can integrate with any json file. This means that the possibilities of what tools you can integrate into your plan policies is endless. Also, keep in mind that all policies defined inside of this post are just examples. You can create those however you want to accommodate your use case. Using the sample = true option will give you the possibility of seeing all the input that can be passed to your policy, and it makes it easy to write powerful policies.
At Spacelift, we care about your needs, and we understand that sometimes you want to go deep when it comes to security, so having this feature will improve your overall workflow.
The Most Flexible CI/CD Automation Tool
Spacelift is an alternative to using homegrown solutions on top of a generic CI. It helps overcome common state management issues and adds several must-have capabilities for infrastructure management.
