
While Terraform is one of the dominant technologies in Infrastructure as Code (IaC), there is still room for improvement. One such opportunity is its SecOps aspect.
In this post, we will explore how tfsec – an open-source tool by Aqua Security – helps in identifying infrastructure security shortcomings
We will cover:
What is tfsec?
Tfsec is a static analysis tool used to scan Terraform code to identify and highlight gaps from the security aspect from an infrastructure and IaC perspective. It can run locally or integrate seamlessly into our CI pipelines, offering developer-friendly output and a comprehensive range of checks.
By leveraging static analysis techniques, tfsec is specifically designed to analyze Terraform code and identify potential misconfigurations that may pose security risks. Regardless of the cloud provider, tfsec scans our code against hundreds of predefined checks included in its extensive library of built-in rules.
To streamline the security review process, tfsec seamlessly integrates into our development workflow – both locally and into our CI pipelines. Its developer-friendly output provides clear and concise information about the security issues it discovers, allowing for efficient remediation. With tfsec, we can catch and address security concerns before they impact our infrastructure, saving valuable time and resources.
Tfsec is deeply integrated with the official HashiCorp Configuration Language (HCL) parser, improving the accuracy of tfsec scans of our Terraform templates. This proactive approach empowers developers to address potential security risks during the development phase, leading to a more secure infrastructure.
Tfsec features
Let’s look at some of the top features that tfsec can use in our IaC workflows.
1. Comprehensive scanning of IaC
Tfsec can perform a thorough scan of the Terraform code, identifying potential vulnerabilities and misconfigurations before they are deployed into production. It supports multiple cloud providers, including AWS, Azure, and GCP, ensuring that our IaC is secure regardless of the platform we choose. Thus we can use a single tool to scan our entire infrastructure and streamline our security processes.
2. Scanning modules and variables
Tfsec not only scans our main Terraform files but also examines modules (both local and remote) and variables. This feature provides a comprehensive view of our infrastructure’s security posture and ensures that our entire IaC is analyzed. Tfsec evaluates HCL expressions, allowing it to detect potential issues that may not be apparent when examining static values.
3. Detailed reporting and recommendations
Tfsec provides developers with detailed reports and recommendations for fixing detected issues, making it easy to understand and remediate potential vulnerabilities in developer-friendly output. Various output formats are available, allowing developers to choose the one that best suits their needs. Tfsec also includes links to relevant documentation from AWS, Azure, GCP, and Terraform, ensuring that developers have all the information they need to fix issues and adhere to best practices.
4. Integration with CI/CD pipelines
Tfsec is designed to integrate seamlessly with various CI/CD pipelines and IDEs, making it an important part of our development workflow. It can be easily integrated with popular CI/CD tools like GitHub Actions, GitLab CI, and Azure DevOps, allowing us to incorporate automated security scanning into your build and deployment processes.
5. Policy customization and extensibility
Tfsec offers the flexibility to define our custom policies and checks, ensuring that our IaC adheres to our organization’s specific security requirements. It is possible to create custom checks in tfsec using JSON or YAML. Tfsec allows us to exclude or include specific policies during the scanning process so that we can focus on specific security aspects or when we want to ignore certain policies that may not apply to our infrastructure.
There are many more handy features related to compatibility with CDK, functions, and expressions evaluation – all of them are listed in the Github repo here.
Tfsec benefits
The list below highlights some of the compelling benefits and reasons why we should use tfsec.
1. Static analysis
As mentioned earlier, tfsec performs static analysis on Terraform configuration. Because of this static analysis, there is no need to even initialize the Terraform project or run the plan and apply commands. Tfsec checks for misconfigurations in the directory where all the Terraform config files exist.
2. Built-in checks
Tfsec supports major cloud providers like AWS, Azure, GCP, and other cloud platforms. It also includes checks for widely used solutions like Kubernetes, Github, and OpenStack. If you have never used any kind of checks on your Terraform project, then these exhaustive checks are a great place to begin as they readily highlight the security shortcomings in current configuration. This offsets the efforts required to learn the lessons and then implement security best practices.
3. Ease of use
Installing and getting started with tfsec locally is quite easy. It also supports DevOps pipeline tasks for GitHub Actions, Azure DevOps, and others. If we implement custom checks, they are automatically verified in any automation or CI workflow.
The tfsec CLI output displays all the misconfigurations in a well-formatted manner, along with their severity. It also offers the output to be stored in a file in multiple user-friendly formats as build artifacts.
4. Strong community support
The built-in checks are essential contributions made globally by the users of all the organizations. It is the cumulative experience of the community of implementing best practices condensed in tfsec that helps make our infrastructure management via Terraform more secure.
4. Module scanning
We use modules to save time when developing our infrastructure and often trust the module developer as far as internal working and security are concerned. In this scenario, tfsec also scans the modules, making sure they meet the security best practices.
How to use tfsec?
Step 1: Install tfsec
To begin using tfsec, we start by installing it on your local machine. Tfsec is available for different platforms, including Windows, macOS, and Linux. We can either download the binary from the official GitHub repository or use a package manager like Homebrew (for macOS) or Chocolatey (for Windows). Once installed, we need to ensure that the tfsec command is accessible from your command line.
Step 2: Run the tfsec command
Navigate to the directory containing our Terraform code and execute the tfsec command followed by the appropriate flags. By default, tfsec scans all .tf and .tfvars files in the current directory and its subdirectories. It analyzes our Terraform configuration files and provides security-related feedback and recommendations.
Step 3: Customize the output
We can customize the tfsec behavior by using flags such as --exclude to exclude certain directories or files, or --severity to filter results by severity level. The output is displayed in our terminal, and we can review the issues reported by tfsec to identify potential security vulnerabilities in our Terraform code.
Step 4: Use custom inputs
Then using the Custom Inputs feature, we can integrate tfsec (or Checkov, Terrascan, Kics, and others) in our workflows with Spacelift. Security is one of Spacelift’s biggest priorities, so there are also state-of-the-art security solutions that are embedded inside the product, like Policy as Code, Encryption, Single Sign On (SSO), and Private Worker Pools.
Read more about integrating security tools with Spacelift.
Using TFsec to Secure Terraform Code
How to install tfsec?
In this section, we’ll go over the installation process for tfsec on various platforms like Linux, MacOS, and Windows.
How to install tfsec on Linux
Download the tfsec binary by running the command below.
curl -L "$(curl -s https://api.github.com/repos/tfsec/tfsec/releases/latest | grep -o -E "https://.+tfsec-linux-amd64")" -o tfsecChange the permissions of the downloaded file to execute the same.
chmod +x tfsecMove this file under the bin directory, making sure the path to the bin directory is added to the PATH environment variable.
sudo mv tfsec /usr/local/binAlternatively, run a single command below, which effectively performs all the tasks above.
curl -s https://raw.githubusercontent.com/aquasecurity/tfsec/master/scripts/install_linux.sh | bashHow to install tfsec on macOS
Tfsec can be installed using Homebrew on macOS-based systems. To install, run the command below in a terminal.
brew install tfsecHow to install tfsec on Windows
Tfsec can be installed on Windows-based systems using the Chocolatey package manager.
choco install tfsecHow to install tfsec using go
If go is installed on any system, then the package managers above are not needed. It is also possible to install tfsec using go, by running the command below. This installs the latest version of tfsec.
go install github.com/aquasecurity/tfsec/cmd/tfsec@latestHow to install tfsec using Docker image
Alternatively, if Docker is installed on our system, and if we do not want to go through the installation process, we can run a quick scan using the official tfsec Docker image as shown in the example below.
docker run --rm -it -v "$(pwd):/src" aquasec/tfsec /srcHere, the /src directory is where all the Terraform files and sub-directories exist.
Working with tfsec locally
Let’s begin by installing and using tfsec locally in one of our Terraform projects.
Once installed, we can create a Terraform project directory and add a main.tf file in it. We will attempt to create a VPC using the minimum required configuration and run tfsec in-built checks against it.
The code below shows the minimal configuration required to create a VPC in AWS using Terraform.
resource "aws_vpc" "main" {
  cidr_block = var.vpc_cidr
  enable_dns_hostnames = true
  tags = {
    name = "main"
  }
}
At this point, the code is capable of creating the VPC with no problems.
However, to be sure about security practices being followed, let us run the tfsec scan in this directory. Open the terminal and navigate to this project directory. Run the command below.
tfsec .Understanding the tfsec output
The output should look similar to the one below.
Result #1 MEDIUM VPC Flow Logs is not enabled for VPC
────────────────────────────────────────────────────────────────────────────────────────────────────────
  main.tf:1-7
────────────────────────────────────────────────────────────────────────────────────────────────────────
    1    resource "aws_vpc" "main" {
    2      cidr_block           = var.vpc_cidr
    3      enable_dns_hostnames = true
    4      tags = {
    5        name = "main"
    6      }
    7    }
────────────────────────────────────────────────────────────────────────────────────────────────────────
          ID aws-ec2-require-vpc-flow-logs-for-all-vpcs
      Impact Without VPC flow logs, you risk not having enough information about network traffic flow to investigate incidents or identify security issues.
  Resolution Enable flow logs for VPC

  More Information
  - https://aquasecurity.github.io/tfsec/v1.28.1/checks/aws/ec2/require-vpc-flow-logs-for-all-vpcs/
────────────────────────────────────────────────────────────────────────────────────────────────────────


  timings
  ──────────────────────────────────────────
  disk i/o             61.375µs
  parsing              177.375µs
  adaptation           70.834µs
  checks               3.057291ms
  total                3.366875ms

  counts
  ──────────────────────────────────────────
  modules downloaded   0
  modules processed    1
  blocks processed     7
  files read           3

  results
  ──────────────────────────────────────────
  passed               2
  ignored              0
  critical             0
  high                 0
  medium               1
  low                  0

  2 passed, 1 potential problem(s) detected.
Instead of reading from the top, let us read the output from bottom to up, as all the result details are summarized at the end.
The last line indicates how many checks have passed – two in this case and the number of potential problems detected by tfsec – one in this case.
The section above this line summarizes the results by providing various counts. The meaning of the count is explained below.
- Passed – This is the number of checks that were passed by tfsec, and no action is required to close these gaps.
- Ignored – tfsec ignores some checks due to several reasons. It is possible to skip a certain check explicitly, which we will cover in the next section.
- Critical, high, medium, low – each tfsec check is associated with a level of severity or impact. Any failed check is counted against the respective severity. In our example, we have encountered a medium severity check.
Note: tfsec does not prevent Terraform from applying these changes. It is still perfectly fine to provision infrastructure without addressing the problems identified by tfsec. However, it is highly encouraged to resolve them for more secure infrastructure.
The next section above “results” is “counts”. These counts indicate the “code coverage” of the Terraform configuration. The counts are explained below.
- Modules downloaded – if our configuration reuses any externally downloaded modules, then all those modules are counted here.
- Modules processed – tfsec treats the Terraform configuration included in the current directory as a module being scanned. Thus, this count value is calculated as the sum of all the externally downloaded modules + 1.
- Blocks processed – number Terraform blocks processed by tfsec. Currently, in my Terraform configuration, apart from the VPC block, there are additional blocks for variables and providers. Thus the count is 7.
- Files read – all the configuration blocks are spread across three files – namely “main.tf”, “provider.tf”, and “variables.tf”.
The timings section above “counts” represents the system stats used by tfsec to perform these checks. Tfsec is quite fast, so it usually does not cause any drastic performance impact.
The next sections above “timings” describe each problem in detail. The details of each problem are described with the information listed below.
- The severity of the problem detected
- Short description
- Location of the resource block where the problem exists.
- ID of the check, which can be used to refer to the associated documentation.
- Description of the impact to help us decide next actions
- Resolution suggestion
- More information with links to appropriate documentation
Ignoring tfsec checks
Let’s pretend that the problem highlighted by tfsec is not that important to us and that it would be okay to ignore it. We can inform it to tfsec by adding a comment at the top of the resource block where this problem exists.
The format in which the comment needs to be added is shown below.
#tfsec:ignore:<check-id>Our modified code should look like the one below. We have picked up the ID from the previous tfsec terminal output.
#tfsec:ignore:aws-ec2-require-vpc-flow-logs-for-all-vpcs
resource "aws_vpc" "main" {
  cidr_block = var.vpc_cidr
  enable_dns_hostnames = true
  tags = {
    name = "main"
  }
}
Run the tfsec command again and observe the output below.
 timings
  ──────────────────────────────────────────
  disk i/o             410.167µs
  parsing              318.376µs
  adaptation           1.701375ms
  checks               3.9175ms
  total                6.347418ms

  counts
  ──────────────────────────────────────────
  modules downloaded   0
  modules processed    1
  blocks processed     7
  files read           3

  results
  ──────────────────────────────────────────
  passed               2
  ignored              1
  critical             0
  high                 0
  medium               0
  low                  0


No problems detected!
Since we had only one problem detected by tfsec, and we have chosen to ignore it, tfsec now highlights “No problems detected!”.
Note how the ignored count is incremented by one in the counts section of the output.
Addressing tfsec problems
Now, re-enable the check and let tfsec highlight the problem once again. This time, instead of ignoring the problem, we will address and resolve it, adhering to the suggested best practices.
The tfsec CLI output suggests the resolution of enabling flow logs for VPC. This is indeed important since, in the absence of flow logs, it would not be easily possible to debug any incoming and outgoing traffic – both internally and externally. Thus flow logs help us in capturing this information.
To associate our VPC with flow logs, we first need to create the flow log resource in our Terraform config. Additionally, we also have to create a CloudWatch log group to store our logs. This is followed by creating an appropriate IAM role, policy, and policy document, as shown in the updated main.tf file below.
resource "aws_vpc" "main" {
  cidr_block = var.vpc_cidr
  enable_dns_hostnames = true
  tags = {
    name = "main"
  }
}

resource "aws_flow_log" "vpc_flow_log" {
  iam_role_arn = aws_iam_role.example.arn
  log_destination = aws_cloudwatch_log_group.example.arn
  traffic_type = "ALL"
  vpc_id = aws_vpc.main.id
}

resource "aws_cloudwatch_log_group" "example" {
  name = "example"
}

data "aws_iam_policy_document" "assume_role" {
  statement {
    effect = "Allow"

    principals {
      type = "Service"
      identifiers = ["vpc-flow-logs.amazonaws.com"]
    }

    actions = ["sts:AssumeRole"]
  }
}

resource "aws_iam_role" "example" {
  name = "example"
  assume_role_policy = data.aws_iam_policy_document.assume_role.json
}

data "aws_iam_policy_document" "example" {
  statement {
    effect = "Allow"

    actions = [
      "logs:CreateLogGroup",
      "logs:CreateLogStream",
      "logs:PutLogEvents",
      "logs:DescribeLogGroups",
      "logs:DescribeLogStreams",
    ]

    resources = ["*"]
  }
}
The first impression is that the number of LOC has drastically increased. This may not always be the case, as some problems highlighted by tfsec can be resolved by adding one attribute to the existing resources.
However, this also highlights the fact that it is easy to skip such measures for the sake of convenience and ease.
If we perform the tfsec scan now, the tfsec will also identify potential problems in all the additional resources we have included to resolve the problem with VPC. It is possible that tfsec will highlight more problems.
Run the tfsec command and observe the output below.
Result #1 LOW Log group is not encrypted.
────────────────────────────────────────────────────────────────────────────────────────────────────────
  main.tf:16-18
────────────────────────────────────────────────────────────────────────────────────────────────────────
   16    resource "aws_cloudwatch_log_group" "example" {
   17      name = "example"
   18    }
────────────────────────────────────────────────────────────────────────────────────────────────────────
          ID aws-cloudwatch-log-group-customer-key
      Impact Log data may be leaked if the logs are compromised. No auditing of who have viewed the logs.
  Resolution Enable CMK encryption of CloudWatch Log Groups

  More Information
  - https://aquasecurity.github.io/tfsec/v1.28.1/checks/aws/cloudwatch/log-group-customer-key/
  - https://registry.terraform.io/providers/hashicorp/aws/latest/docs/resources/cloudwatch_log_group#kms_key_id
────────────────────────────────────────────────────────────────────────────────────────────────────────


  timings
  ──────────────────────────────────────────
  disk i/o             67.708µs
  parsing              394.125µs
  adaptation           79.375µs
  checks               4.804958ms
  total                5.346166ms

  counts
  ──────────────────────────────────────────
  modules downloaded   0
  modules processed    1
  blocks processed     12
  files read           3

  results
  ──────────────────────────────────────────
  passed               3
  ignored              0
  critical             0
  high                 0
  medium               0
  low                  1

  3 passed, 1 potential problem(s) detected.
This time, tfsec has checked four policies, ignored none – since we removed the ignore comment for the VPC resource, and detected a potential problem with low severity. This problem has nothing to do with VPC, as the result details do not indicate the same. We have been successful in addressing the medium-severity issue with VPC!
However, the new problem that has cropped up is related to the CloudWatch log group.
As a best practice, it is recommended to enable encryption on the log group. It is a fairly straightforward problem to resolve. This time, the resolution does not involve the need to add more resource blocks, but simply add an attribute to aws_cloudwatch_log_group resource block, as shown below.
resource "aws_cloudwatch_log_group" "example" {
  name = "example"
  kms_key_id = "mykmskey"
}
Run the tfsec scan again and observe the stats.
timings
  ──────────────────────────────────────────
  disk i/o             72.71µs
  parsing              420.666µs
  adaptation           95.167µs
  checks               2.012208ms
  total                2.600751ms

  counts
  ──────────────────────────────────────────
  modules downloaded   0
  modules processed    1
  blocks processed     12
  files read           3

  results
  ──────────────────────────────────────────
  passed               4
  ignored              0
  critical             0
  high                 0
  medium               0
  low                  0


No problems detected!
We have now resolved all the issues highlighted by tfsec, which has resulted in a safer VPC configuration. Note that we have not even initialized our Terraform project.
However, if we had used any external modules, initialization would have required downloading the Terraform configuration specific to those modules.
Tfsec in SecOps pipeline
Until now, we have used tfsec to test our Terraform configuration locally. This time, we are going to use this in the DevOps pipeline.
The ability of the tfsec to perform these checks before applying the infrastructure changes is a great asset as it prevents unsafe misconfigurations from affecting the environment.
Using tfsec with GitHub action
Both GitHub Actions and Azure DevOps support tfsec tasks, which perform similar scans to the ones we did in the previous section, before promoting the changes to higher environments.
For this example, I have pushed my code to a GitHub repository and created a sample GitHub action. Searching for “tfsec” in the marketplace provides us with several options, as shown below. Select the first action.

Using the default values, the pipeline job should have a task as seen below.

This task performs a tfsec scan on the Terraform configuration files included in the repository. If no problems are detected, the pipeline proceeds to the next step else it fails the pipeline.
Tfsec custom checks
We may come across situations where the inbuilt checks offered/contributed by the community do not satisfy the security requirements laid out by the organizations. In such cases, it is also possible to define custom checks for tfsec.
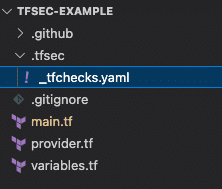
In this section, we create a custom check in tfsec, making it mandatory to implement the “Environment” tag in all the AWS resources.
To begin implementing a custom check, create a subdirectory named “.tfsec”, and a YAML file named “_tfchecks.YAML” within this directory. The directory structure should look like the one below.
It is also possible to define custom checks in JSON format. However, we will stick to YAML for this example.
Add the below contents to the _tfchecks.YAML file, and then we will go through the explanations in detail.
---
checks:
- code: MYCUSTOMCHECK_TAGS
  description: Custom check to ensure the Environment tag is applied to All resources
  impact: By not having Environment we can't keep track of billing
  resolution: Add the Environment tag
  requiredTypes:
  - resource
  requiredLabels:
  - aws_*
  severity: CRITICAL
  matchSpec:
    name: tags
    action: contains
    value: Environment
  errorMessage: The required Environment tag was missing
  relatedLinks:
  - http://example-org/docs/sec/tagging.html
At first glance, the information contained in this YAML file looks very similar to the CLI output for all the detected problems by tfsec.
This is where we define all those attributes that tfsec depends on to generate highly informative output. This can also be understood as a “test case” for our Terraform configuration.
The contents of this file are explained in more detail below.
- checks – At the very top level, the “checks:” keyword indicates that the lines below define custom checks. All the custom check definitions come under this.
- code – Every check needs to have a code associated with it. There are a couple of uses for having a well-defined code format. First, it helps to ignore this check wherever required in the Terraform configuration. The URL to the documentation may incorporate this code for better organization.
- description – Describes the issue that needs to be addressed, to resolve this check.
- impact – Describes the impact of this if it is not resolved.
- resolution – Suggestions/solution to resolve.
- requiredTypes – This specifics which types of Terraform blocks this particular check applies to.
- requiredLabels – Here we can have granular control over the application of checks. We can specify a particular resource like “aws_vpc”, or “aws_instance”, to apply this check only to these types of resources. However, wildcards are also supported here. Since we want this check to be applied to all the AWS resources, we have expressed the same as “aws_*”.
- severity – This is where we define the severity of this problem. This attribute is counted as “critical” in results since we have mentioned it to be a CRITICAL issue here.
- matchSpec – This is where we actually define the enforcement of this check. It is defined with the help of name, action, and value attributes. The name defines the property to be checked against the value supplied. To execute this comparison, we make use of the action attribute. In this case, we have used “Environment” to make sure the Environment attribute is used in Tags. For all the available actions, refer to this document.
- errorMessage – Error message to display in case this check fails.
- relatedLinks – URLs to the relevant documentation for more information or resolution.
Having this custom check saved, let’s run the tfsec scan. We don’t need to explicitly supply any argument here, since tfsec automatically incorporates this custom check in its scan. We also know that none of our Terraform resources implement the Environment tags, so we can already expect some errors.
Run tfsec, and observe the output.
Result #4 CRITICAL Custom check failed for resource aws_flow_log.vpc_flow_log. The required Environment tag was missing
────────────────────────────────────────────────────────────────────────────────────────────────────────
  main.tf:9-14
────────────────────────────────────────────────────────────────────────────────────────────────────────
    9    resource "aws_flow_log" "vpc_flow_log" {
   10      iam_role_arn    = aws_iam_role.example.arn
   11      log_destination = aws_cloudwatch_log_group.example.arn
   12      traffic_type    = "ALL"
   13      vpc_id          = aws_vpc.main.id
   14    }
────────────────────────────────────────────────────────────────────────────────────────────────────────
          ID custom-custom-mycustomcheck_tags
      Impact By not having Environment we can't keep track of billing
  Resolution Add the Environment tag

  More Information
  - http://example-org/docs/sec/tagging.html
────────────────────────────────────────────────────────────────────────────────────────────────────────


  timings
  ──────────────────────────────────────────
  disk i/o             1.189543ms
  parsing              409.291µs
  adaptation           88.083µs
  checks               4.0085ms
  total                5.695417ms

  counts
  ──────────────────────────────────────────
  modules downloaded   0
  modules processed    1
  blocks processed     12
  files read           3

  results
  ──────────────────────────────────────────
  passed               4
  ignored              0
  critical             4
  high                 0
  medium               0
  low                  0

  4 passed, 4 potential problem(s) detected.
As expected, tfsec has detected four problems. Note that there are 12 blocks, and only four are expecting Environment tags to be present. The classification of these blocks is as follows:
- Variable blocks – 3
- Provider related blocks – 3
- Data sources – 2
Since our custom check specifies “requiredTypes” to be “resource”, this check is not applied to the above list.
We can resolve this issue by adding the environment tags to all four resource blocks and running the tfsec again. Optionally, we can also choose to ignore these checks by adding appropriate comments, as discussed before.
In the code below, we have ignored the custom Tag check for “aws_flow_log” and “aws_iam_role” resources.
resource "aws_vpc" "main" {
  cidr_block = var.vpc_cidr
  enable_dns_hostnames = true
  tags = {
    name = "main"
    Environment = "dev"
  }
}

#tfsec:ignore:MYCUSTOMCHECK_TAGS
resource "aws_flow_log" "vpc_flow_log" {
  iam_role_arn = aws_iam_role.example.arn
  log_destination = aws_cloudwatch_log_group.example.arn
  traffic_type = "ALL"
  vpc_id = aws_vpc.main.id
}

resource "aws_cloudwatch_log_group" "example" {
  name = "example"
  kms_key_id = "mykmskey"
  tags = {
    Environment = "dev"
  }
}

#tfsec:ignore:MYCUSTOMCHECK_TAGS
resource "aws_iam_role" "example" {
  name = "example"
  assume_role_policy = data.aws_iam_policy_document.assume_role.json
}
If we run tfsec now, no problems should be detected. We have successfully implemented custom checks using tfsec.
Tfsec alternatives
Here are some of the tfsec alternatives.
1. Checkov
Checkov is another popular open-source static analysis tool specifically designed for IaC security. It supports multiple IaC frameworks like Terraform, CloudFormation, Kubernetes, and more.
Checkov provides a wide range of pre-defined checks covering security, compliance, and best practices. It also offers integration with CI/CD pipelines and can be customized with custom policies. Checkov’s active community and regular updates make it a reliable alternative to tfsec.
2. Terrascan
Terrascan is an open-source IaC security tool focused on scanning Terraform configurations. It uses a policy-as-code approach to evaluate Terraform code against a set of rules, including security best practices, compliance standards, and cloud provider-specific guidelines.
Terrascan supports multiple cloud providers, offers comprehensive documentation, and can be integrated into CI/CD workflows. Its extensibility, flexibility, and community support make it a strong contender in the IaC security space.
3. Cloudrail
Cloudrail is a security-as-code platform that covers various aspects of cloud security, including IaC security. It supports multiple cloud providers and IaC frameworks such as Terraform, AWS CloudFormation, Azure Resource Manager, and Google Cloud Deployment Manager.
Cloudrail automatically scans and analyzes IaC templates to identify security risks, compliance violations, and misconfigurations. It provides actionable remediation suggestions and integrates with popular CI/CD tools, making it a comprehensive solution for IaC security.
4. Bridgecrew
Bridgecrew is an IaC security platform that offers automated security scanning and compliance checks for popular IaC frameworks like Terraform, CloudFormation, and Kubernetes. It provides a wide range of built-in checks, including security best practices, compliance standards, and regulatory frameworks.
Bridgecrew integrates seamlessly into CI/CD pipelines, offers collaboration features, and provides detailed reports and remediation guidance. Its user-friendly interface and focus on DevSecOps make it a robust alternative to tfsec.
Key points
In this post, we have explored tfsec and implemented the same in creating a Terraform configuration for VPC. tfsec is a powerful and fast tool that highlights the security gaps solely by reading the configuration files and the relationships between the resources. It is quite intelligent in analyzing deeper aspects of Terraform configuration language (HCL).
Leveraging tfsec provides a very precious offset to teams, which otherwise are the hard-learned lessons from security perspectives. We also implemented custom checks, and took an overview of other alternatives to tfsec.
We encourage you also to explore how Spacelift makes it easy to work with Terraform. If you need any help managing your Terraform infrastructure, building more complex workflows based on Terraform, and managing AWS credentials per run, instead of using a static pair on your local machine, Spacelift is a fantastic tool for this. It supports Git workflows, policy as code, programmatic configuration, context sharing, drift detection, and many more great features right out of the box.
Note: New versions of Terraform will be placed under the BUSL license, but everything created before version 1.5.x stays open-source. OpenTofu is an open-source version of Terraform that will expand on Terraform’s existing concepts and offerings. It is a viable alternative to HashiCorp’s Terraform, being forked from Terraform version 1.5.6. OpenTofu retained all the features and functionalities that had made Terraform popular among developers while also introducing improvements and enhancements. OpenTofu is not going to have its own providers and modules, but it is going to use its own registry for them.
The most flexible management platform for Infrastructure as Code
Spacelift allows you to automate, audit, secure, and continuously deliver your infrastructure. It helps overcome common state management issues and adds several must-have features for infrastructure management.
Frequently asked questions
What does tfsec do?
tfsec scans Terraform configuration files to detect security issues and misconfigurations before deployment. It checks for risks like overly permissive security groups, missing encryption, or disabled logging. Commonly integrated into CI/CD pipelines, tfsec helps enforce security and compliance standards in Terraform projects.
Is tfsec deprecated?
tfsec is not officially deprecated, but its development is no longer the main focus. Aqua Security has merged its functionality into Trivy, which now provides Terraform security scanning along with broader IaC and container checks. While tfsec still works, new features and updates are directed toward Trivy.
What is the difference between Terrascan and tfsec?
Terrascan scans multiple IaC frameworks such as Terraform, Kubernetes, Helm, and CloudFormation, offering broad policy-as-code enforcement. tfsec is limited to Terraform and performs static analysis tailored to its configurations. Terrascan is suited for heterogeneous environments, while tfsec provides deeper, Terraform-focused security insights.
