
In this article, we will check out Checkov and answer all the questions you want to ask! What is Checkov? Why should we use it, and how do you set it up? We will look at how to set it up using all our favorite subjects on this blog, with Terraform, Kubernetes, Helm, and Kustomize, and use it in an Azure DevOps pipeline.
We will cover:
What is Checkov?
Checkov is a static code analysis tool that scans for security vulnerabilities. It was originally developed by Bridgecrew.io, but it is now owned by Prisma Cloud. With Checkov, you can easily find vulnerabilities before the code deploys the infrastructure. For all the tools that Checkov supports, it has a set of built-in policies that your code will be checked against that are defined as or considered best practices. Custom policies can also be written in Python or YAML.
Checkov supports the following IaC tools:
- Terraform (for AWS, GCP, Azure, and OCI) – the policies cover various aspects, including encryption, access control, and general security practices, applicable to multiple cloud providers and services
- CloudFormation – focuses on AWS-specific resource configurations, ensuring secure and efficient setup of services, encryption standards, and access controls
- Azure Resource Manager (ARM) – targets Azure-specific resources, focusing on security, network configurations, and compliance with Azure best practices (Learn more: What are Azure ARM templates?)
- Serverless framework – Checks cover function-level security practices, API gateway configurations, and environment variable management.
- Helm charts – emphasizes secure default values, container specifications, and resource management configurations in Helm chart definitions.
- Kubernetes – the policies cover a wide range of best practices, including ensuring containers don’t run as root, setting appropriate CPU limits, and many other important security and performance aspects
- Docker – Policies ensure best practices in Dockerfile configurations, such as avoiding privileged users, using official base images, and minimizing the attack surface of containers
What is Checkov used for
Using Checkov helps improve the security, reliability, and compliance of infrastructure deployments by detecting misconfigurations and vulnerabilities early in the development lifecycle.
It is a valuable tool for organizations embracing Infrastructure as Code to manage their infrastructure resources.
1. Checks against security best practices
Checkov provides a wide range of built-in checks that evaluate the configuration files against security best practices and compliance standards, such as the Center for Internet Security (CIS), National Institute of Standards and Technology (NIST) benchmarks, Health Insurance Portability and Accountability Act (HIPAA), General Data Protection Regulation (GDPR), and AWS Well-Architected Framework benchmarks. It helps ensure that the infrastructure deployments follow industry standards and meet the required security and compliance requirements.
2. Checks against potential misconfigurations
Potential misconfigurations can be detected in Infrastructure as Code, such as overly permissive security group rules, weak encryption settings, public exposure of sensitive information, or any other configuration that may introduce vulnerabilities.
3. Checks in the CI/CD pipelines
As per the example later in this article showing how to use Checkov in an Azure DevOps pipeline, Checkov can be integrated into CI/CD pipelines.
4. Custom checks
Users can define custom checks based on their specific requirements. This flexibility enables organizations to enforce internal policies and best practices beyond the built-in checks or exclude certain checks as required.
Check out also how Checkov can be integrated into Spacelift using custom inputs.
Checkov features
As well as the features detailed above, one of the main features of Checkov is its multi-framework support.
Checkov covers the most popular IaC frameworks, Terraform, CloudFormation, Kubernetes YAML files, and Serverless Frameworks. It understands the syntax and structure of these frameworks and provides specific checks tailored to their requirements. This allows you to perform comprehensive analysis and checks on your infrastructure code, regardless of the IaC framework you are using.
Another key feature of Checkov is its ability to support multiple reporting and output formats, enabling compatibility with your preferred reporting and analysis workflows and making it easy to integrate with existing tools or generate custom reports. Checkov provides various output formats, including JSON, JUnit XML, and SARIF (Static Analysis Results Interchange Format).
Here is a list of the main Checkov features:
- Multi-cloud support Infrastructure as Code scanning
- Extensive rule coverage
- Customizable rules
- CI/CD integration
- Multi-framework support
- Supports multiple reporting and output formats, including JSON and JUnit
- Easy to use CLI
- Pre-commit hooks
- Integration with IDEs and editors
- Active community and rule contributions
How to run a Checkov scan
To run a Checkov scan, you first need to install Checkov and then configure an input folder containing your files or a single file for Checkov to target.
This can also be a Terraform plan file in JSON format.
Installing Checkov
- To install Checkov from PyPI using Pip run in the terminal:
pip install checkov- To nstall Checkov on Python run:
pip3 install checkov- To install using homebrew (MacOS), run the command below in the terminal:
brew install checkovFor more ways to install Checkov, check the official docs page.
Now, you can go ahead and start running Checkov scans.
Using Checkov
To configure a scan with Checkov, you need to tell it which files to target.
To view the full list of options you can use with Checkov, run checkov --help.
Example 1: Scan a folder
To configure a folder, run:
checkov --directory /user/path/to/iac/codeExample 2: Scan a specific file
To configure a specific file, run:
checkov --file /user/tf/example.tfExample 3: Scan multiple specific files
To configure multiple specific files, run:
checkov -f /user/cloudformation/example1.yml -f /user/cloudformation/example2.ymlExample 4: Scan a Terraform plan file in JSON
To configure a Terraform plan file in JSON, run:
terraform init
terraform plan -out tf.plan
terraform show -json tf.plan  > tf.json
checkov -f tf.json
Note the plan file must be in JSON format, you can use the terraform show command as shown above to accomplish this.
Checkov use cases
As mentioned previously, if you have code that is supported by Checkov, you can use it anywhere you want to perform checks to assess the security and compliance of your infrastructure against best practice frameworks.
Let’s take a look at some specific examples:
Running Checkov with Terraform
Terraform analysis can be run in two places, against the configuration files and the Terraform plan.
In the first example, I have a Terraform file from a module to create an Azure container registry.
main.tf
/**
  * ## Descriptions
  *
  * Terraform module for the creation of an Azure Container Registry.
  *
  *
  */

resource "azurerm_container_registry" "acr" {
  name                          = var.container_registry_name
  resource_group_name           = var.resource_group_name
  location                      = var.location
  sku                           = var.sku_tier
  admin_enabled                 = var.admin_enabled
  tags                          = var.tags
  public_network_access_enabled = var.public_network_access_enabled
  quarantine_policy_enabled     = var.quarantine_policy_enabled
  zone_redundancy_enabled       = var.zone_redundancy_enabled
  anonymous_pull_enabled        = var.anonymous_pull_enabled
  data_endpoint_enabled         = var.data_endpoint_enabled
  network_rule_bypass_option    = var.network_rule_bypass_option

  dynamic "georeplications" {
    for_each = var.georeplications
    content {
      location                = georeplications.value.location
      zone_redundancy_enabled = georeplications.value.zone_redundancy_enabled
      tags                    = georeplications.value.tags
    }
  }

  dynamic "network_rule_set" {
    for_each = (var.network_rule_set != null && (var.sku_tier == "Premium")) ? [var.network_rule_set] : []
    content {
      default_action = lookup(network_rule_set.value, "default_action", "Deny")

      dynamic "ip_rule" {
        for_each = network_rule_set.value.ip_rule != null ? network_rule_set.value.ip_rule : []
        content {
          action   = ip_rule.value.action
          ip_range = ip_rule.value.ip_range
        }
      }

      dynamic "virtual_network" {
        for_each = network_rule_set.value.virtual_network != null ? network_rule_set.value.virtual_network : []
        content {
          action    = virtual_network.value.action
          subnet_id = virtual_network.value.subnet_id
        }
      }
    }
  }

  dynamic "identity" {
    for_each = var.identity != null ? [var.identity] : []
    iterator = i

    content {
      type         = i.value.type
      identity_ids = i.value.identity_ids
    }
  }

  dynamic "retention_policy" {
    for_each = (var.retention_policy != null && (var.sku_tier == "Premium")) ? [var.retention_policy] : []
    content {
      days    = lookup(retention_policy.value, "days", 7)
      enabled = lookup(retention_policy.value, "enabled", true)
    }
  }

  dynamic "encryption" {
    for_each = (var.encryption != null) ? [var.encryption] : []
    content {
      enabled            = true
      key_vault_key_id   = encryption.value.key_vault_key_id
      identity_client_id = encryption.value.identity_client_id
    }
  }

  dynamic "trust_policy" {
    for_each = (var.trust_policy != null && (var.sku_tier == "Premium")) ? [var.trust_policy] : []
    content {
      enabled = lookup(trust_policy.value, "enabled", true)
    }
  }
}
I run Checkov against the file:
checkov --file main.tfAnd I see the following recommendations in the console, showing one check passing and two failing:
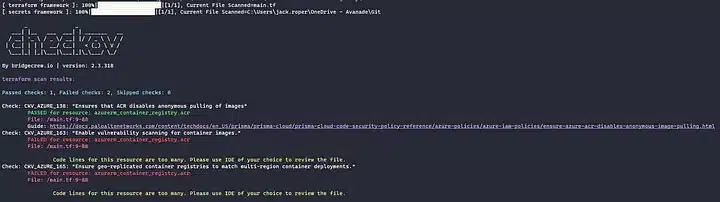
By bridgecrew.io | version: 2.3.318

terraform scan results:

Passed checks: 1, Failed checks: 2, Skipped checks: 0

Check: CKV_AZURE_138: "Ensures that ACR disables anonymous pulling of images"
        PASSED for resource: azurerm_container_registry.acr
        File: /main.tf:9-88
        Guide: https://docs.paloaltonetworks.com/content/techdocs/en_US/prisma/prisma-cloud/prisma-cloud-code-security-policy-reference/azure-policies/azure-iam-policies/ensure-azure-acr-disables-anonymous-image-pulling.html
Check: CKV_AZURE_163: "Enable vulnerability scanning for container images."
        FAILED for resource: azurerm_container_registry.acr
        File: /main.tf:9-88

                Code lines for this resource are too many. Please use IDE of your choice to review the file.
Check: CKV_AZURE_165: "Ensure geo-replicated container registries to match multi-region container deployments."
        FAILED for resource: azurerm_container_registry.acr
        File: /main.tf:9-88

                Code lines for this resource are too many. Please use IDE of your choice to review the file.
I can then go back to the code, remediate the problems and run Checkov again to check they have been resolved.
Let’s look at an example of using Checkov against Terraform with an Azure DevOps pipeline. When an update is committed to the main branch of your code, for example, you can have Checkov run to flag any policy violations in a CI/CD pipeline.
It should also verify the modules we are using in the configuration. Terraform can be initialized first, and then Checkov can run an analysis against the code in the modules too.
The file below is our YAML pipeline-as-code definition for Azure DevOps:
pipeline.yaml (Source)
# Azure DevOps pipeline for Azure deployment

variables:
- group: terraform-tuesdays

trigger:
  branches:
    include:
    - main
  paths:
    include:
    - 2021-06-22-ADO/vnet

stages:
- stage: Validate
  displayName: Validate
  jobs:
  - job: validate
    pool:
      vmImage: ubuntu-latest
    steps:
    # Install Checkov
    - bash: pip3 install checkov
      displayName: 'Install checkov'
      name: 'install_checkov'

    # Azure Key Vault
    # Download Azure Key Vault secrets
    - task: AzureKeyVault@1
      inputs:
        ConnectedServiceName: $(service_name)
        keyVaultName: $(key_vault_name)
        secretsFilter: '*'
        runAsPreJob: false # Azure DevOps Services only

    # Init
    - task: TerraformCLI@0
      displayName: Initialize Terraform
      env:
        ARM_SAS_TOKEN: $(sas-token)
      inputs:
        command: 'init'
        workingDirectory: '$(System.DefaultWorkingDirectory)/2021-06-22-ADO/vnet'
        commandOptions: '-backend-config=storage_account_name=$(storageaccount) -backend-config=container_name=$(container-name) -backend-config=key=$(key)'
        backendType: 'selfConfigured'

  # Validate
    - task: TerraformCLI@0
      displayName: Validate Config
      inputs:
        command: 'validate'
        workingDirectory: '$(System.DefaultWorkingDirectory)/2021-06-22-ADO/vnet'

  # Verify module files with Checkov
    - bash: checkov --directory $(System.DefaultWorkingDirectory)/2021-06-22-ADO/vnet/.terraform --skip-check CKV_DOCKER_* -o junitxml > $(System.DefaultWorkingDirectory)/Checkov-Module-Report.xml
      displayName: 'Verify modules with Checkov'
      name: 'checkov_module_check'

  # Publish test results for modules
  # Shout out to Adin Ermie for this one! https://adinermie.com/publishing-checkov-terraform-quality-checks-to-azure-devops-pipelines/
    - task: PublishTestResults@2
      displayName: Publish Checkov Module Test Results
      condition: succeededOrFailed()
      inputs:
        testResultsFormat: 'JUnit'
        testResultsFiles: '**/*Checkov-Module-Report.xml'
        searchFolder: '$(System.DefaultWorkingDirectory)'
        mergeTestResults: false
        testRunTitle: Checkov Module Scan
        failTaskOnFailedTests: false
        publishRunAttachments: true

  # Verify main files with Checkov
    - bash: checkov --directory $(System.DefaultWorkingDirectory)/2021-06-22-ADO/vnet -o junitxml > $(System.DefaultWorkingDirectory)/Checkov-Root-Report.xml
      displayName: 'Verify root module with Checkov'
      name: 'checkov_root_check'

  # Publish test results for root module
    - task: PublishTestResults@2
      displayName: Publish Checkov Root Test Results
      condition: succeededOrFailed()
      inputs:
        testResultsFormat: 'JUnit'
        testResultsFiles: '**/*Checkov-Root-Report.xml'
        searchFolder: '$(System.DefaultWorkingDirectory)'
        mergeTestResults: false
        testRunTitle: Checkov Root Scan
        failTaskOnFailedTests: false
        publishRunAttachments: true

- stage: Plan
  displayName: Plan
  jobs:
  - job: plan
    pool:
      vmImage: ubuntu-latest
    steps:
    # Install Checkov
    - bash: pip3 install checkov
      displayName: 'Install checkov'
      name: 'install_checkov'

    # Azure Key Vault
    # Download Azure Key Vault secrets
    - task: AzureKeyVault@1
      inputs:
        ConnectedServiceName: $(service_name)
        keyVaultName: $(key_vault_name)
        secretsFilter: '*'
        runAsPreJob: false # Azure DevOps Services only

    # Init
    - task: TerraformCLI@0
      displayName: Initialize Terraform
      env:
        ARM_SAS_TOKEN: $(sas-token)
      inputs:
        command: 'init'
        workingDirectory: '$(System.DefaultWorkingDirectory)/2021-06-22-ADO/vnet'
        commandOptions: '-backend-config=storage_account_name=$(storageaccount) -backend-config=container_name=$(container-name) -backend-config=key=$(key)'
        backendType: 'selfConfigured'

  # Plan
    - task: TerraformCLI@0
      displayName: Plan Terraform Deployment
      env:
        ARM_SAS_TOKEN: $(sas-token)
        ARM_CLIENT_ID: $(az-client-id)
        ARM_CLIENT_SECRET: $(az-client-secret)
        ARM_SUBSCRIPTION_ID: $(az-subscription)
        ARM_TENANT_ID: $(az-tenant)
      inputs:
        command: 'plan'
        workingDirectory: '$(System.DefaultWorkingDirectory)/2021-06-22-ADO/vnet'
        commandOptions: '-out=$(System.DefaultWorkingDirectory)/2021-06-22-ADO/vnet/main.tfplan'
        publishPlanResults: 'Terraform Plan'

  # Verify plan with Checkov
    - bash: |
        cd $(System.DefaultWorkingDirectory)/2021-06-22-ADO/vnet
        ls
        terraform show -json main.tfplan > $(System.DefaultWorkingDirectory)/main.json
        checkov -f $(System.DefaultWorkingDirectory)/main.json -o junitxml > $(System.DefaultWorkingDirectory)/Checkov-Plan-Report.xml
      displayName: 'Verify plan with Checkov'
      name: 'checkov_plan_check'
      env:
        ARM_SAS_TOKEN: $(sas-token)
        ARM_CLIENT_ID: $(az-client-id)
        ARM_CLIENT_SECRET: $(az-client-secret)
        ARM_SUBSCRIPTION_ID: $(az-subscription)
        ARM_TENANT_ID: $(az-tenant)

  # Publish test results for plan
    - task: PublishTestResults@2
      displayName: Publish Checkov Plan Test Results
      condition: succeededOrFailed()
      inputs:
        testResultsFormat: 'JUnit'
        testResultsFiles: '**/*Checkov-Plan-Report.xml'
        searchFolder: '$(System.DefaultWorkingDirectory)'
        mergeTestResults: false
        testRunTitle: Checkov Plan Scan
        failTaskOnFailedTests: false
        publishRunAttachments: true

# Approve
- stage: Approve
  displayName: Approve
  jobs:
  - job: approve
    displayName: Wait for approval
    pool: server
    steps:
    - task: ManualValidation@0
      timeoutInMinutes: 60
      inputs:
        notifyUsers: 'ned@nedinthecloud.com'
        instructions: 'Review the plan in the next hour'

- stage: Apply
  displayName: Apply
  jobs:
  - job: apply
    pool:
      vmImage: ubuntu-latest
    steps:

    # Azure Key Vault
    # Download Azure Key Vault secrets
    - task: AzureKeyVault@1
      inputs:
        ConnectedServiceName: $(service_name)
        keyVaultName: $(key_vault_name)
        secretsFilter: '*'
        runAsPreJob: false # Azure DevOps Services only

  # Init
    - task: TerraformCLI@0
      displayName: Initialize Terraform
      env:
        ARM_SAS_TOKEN: $(sas-token)
      inputs:
        command: 'init'
        workingDirectory: '$(System.DefaultWorkingDirectory)/2021-06-22-ADO/vnet'
        commandOptions: '-backend-config=storage_account_name=$(storageaccount) -backend-config=container_name=$(container-name) -backend-config=key=$(key)'
        backendType: 'selfConfigured'

  # Apply
    - task: TerraformCLI@0
      displayName: Apply Terraform Deployment
      env:
        ARM_SAS_TOKEN: $(sas-token)
        ARM_CLIENT_ID: $(az-client-id)
        ARM_CLIENT_SECRET: $(az-client-secret)
        ARM_SUBSCRIPTION_ID: $(az-subscription)
        ARM_TENANT_ID: $(az-tenant)
      inputs:
        command: 'apply'
        workingDirectory: '$(System.DefaultWorkingDirectory)/2021-06-22-ADO/vnet'
        commandOptions: '-auto-approve'
Let’s explain each section of the pipeline:
- The trigger section defines that the pipeline should be run when new code is committed to the main branch and the paths to include.
- The first stage runs the
terraform validatecommand to validate the syntax and install Checkov on the build agent using thepippackage manager for Python. - Terraform is then initialized first so the module code can also be downloaded and analyzed, as well as the code in the configuration files.
- The module files are then scanned with Checkov first in the ‘Verify module files with Checkov’ stage. The
--directoryflag specifies the.terraformfolder as the location to scan, which is where the modules will get downloaded by default after Terraform is initialized. - To prevent Checkov from scanning Dockerfiles and other non-Terraform files in the directory, specify the flag
--framework terraformto only run the Terraform rule set, or as in the example, you can skip specific checks by using the--skip-checkflag. The output is put into an JUnit XML file and passed to the test results stage. - Once the module files have been scanned and checked, it is the turn of the configuration files to be checked with Checkov, and the results are again published.
- In the plan stage, when we run the plan, the command options specify that we will output the plan to a
.tfplanfile, which can then be used with Checkov to verify the plan. - In the verify stage, we convert the
.tfplanto JSON, and then run Checkov again against the JSON filemain.jsonand output that to the JUnit XML file. - The apply stage includes manual approval so that the user can review the pipeline output from Checkov and then confirm they want to continue with the run.
- If the Checkov tests fail, then the pipeline will fail and stop. If they pass, the pipeline will continue.
Note you can also integrate Checkov with other tools, such as Spacelift. Check out the Spacelift documentation for guidance on that.
Running Checkov with Kubernetes
To use Checkov with a Kubernetes YAML file, simply point Checkov to the file.
Here, I have a simple manifest to configure a CronJob:
cronjob.yaml
apiVersion: batch/v1
kind: CronJob
metadata:
  name: hello
spec:
  schedule: "* * * * *"
  jobTemplate:
    spec:
      template:
        spec:
          containers:
          - name: hello
            image: busybox:1.28
            imagePullPolicy: IfNotPresent
            command:
            - /bin/sh
            - -c
            - date; echo Hello from the Kubernetes cluster
          restartPolicy: OnFailure
Let’s run Checkov against the file:
checkov --file cronjob.yaml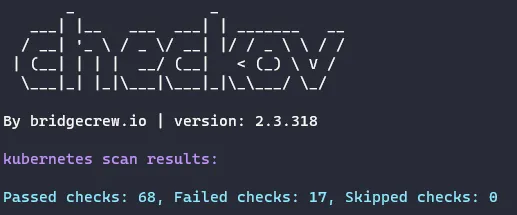
17 failed checks! I need to go back and improve my config!
Running Checkov with Helm
I can create an empty Helm chart template using the below commands to test with Checkov:
helm create myappThen run Checkov:
checkov -d \myapp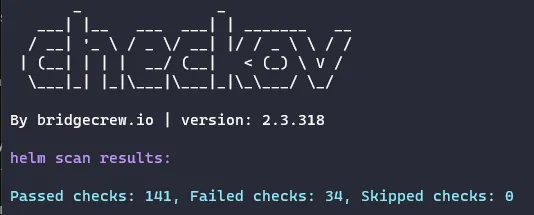
Running Checkov with Kustomize
Checkov is able to autodetect kustomizations by the presence of a
Kustomization.yamlfile, if found, the the Kustomize framework will automatically be used to template out the referenced kustomization against referenced bases into resulting Kubernetes manifests, which will then be scanned by all Checkovs’ Kubernetes policies.
Let’s look into a simple example of how to run Checkov on a Kustomize configuration.
In this example configuration, we have two folders, base and overlay.
- In the base directory, we will define a simple Nginx deployment and a service for it, with a kustomization file that includes those two files.
- In the overlay, we have created a folder called dev, that includes a patch to change something in the deployment (number of replicas) and the kustomization file to include the base and this patch.
You can see the structure below:
├── base
│   ├── deployment.yaml
│   ├── kustomization.yaml
│   └── service.yaml
└── overlay
    └── dev
        ├── kustomization.yaml
        └── patch.yaml
├── base
│ ├── deployment.yaml
apiVersion: apps/v1
kind: Deployment
metadata:
name: nginx-deployment
spec:
selector:
matchLabels:
app: nginx
replicas: 2
template:
metadata:
labels:
app: nginx
spec:
containers:
- name: nginx
image: nginx:1.14.2
ports:
- containerPort: 80
│ ├── kustomization.yaml
resources:
- deployment.yaml
- service.yaml
│ └── service.yaml
apiVersion: v1
kind: Service
metadata:
name: nginx-service
spec:
selector:
app: nginx
ports:
- protocol: TCP
port: 80
targetPort: 80
└── overlay
└── dev
├── kustomization.yaml
resources:
- ../../base
patchesStrategicMerge:
- patch.yaml
└── patch.yaml
apiVersion: apps/v1
kind: Deployment
metadata:
name: nginx-deployment
spec:
replicas: 3The dev overlay will reuse the base example, and the only thing that changes is the number of replicas. To use Checkov on this configuration, we can run:
checkov -d . --framework kustomize --quiet --compact The result of this simple example is terrifying, as there are over 40 checks that are failing:
kustomize scan results:

Passed checks: 136, Failed checks: 40, Skipped checks: 0

Check: CKV_K8S_37: "Minimize the admission of containers with capabilities assigned"
        FAILED for resource: overlay:overlay/dev:Deployment.default.nginx-deployment
        File: /overlay/dev/kustomization.yaml:2-20
        Guide: https://docs.prismacloud.io/en/enterprise-edition/policy-reference/kubernetes-policies/kubernetes-policy-index/bc-k8s-34
Check: CKV_K8S_31: "Ensure that the seccomp profile is set to docker/default or runtime/default"
        FAILED for resource: overlay:overlay/dev:Deployment.default.nginx-deployment
        File: /overlay/dev/kustomization.yaml:2-20
        Guide: https://docs.prismacloud.io/en/enterprise-edition/policy-reference/kubernetes-policies/kubernetes-policy-index/bc-k8s-29
Check: CKV_K8S_8: "Liveness Probe Should be Configured"
        FAILED for resource: overlay:overlay/dev:Deployment.default.nginx-deployment
        File: /overlay/dev/kustomization.yaml:2-20
        Guide: https://docs.prismacloud.io/en/enterprise-edition/policy-reference/kubernetes-policies/kubernetes-policy-index/bc-k8s-7
Check: CKV_K8S_12: "Memory requests should be set"
        FAILED for resource: overlay:overlay/dev:Deployment.default.nginx-deployment
        File: /overlay/dev/kustomization.yaml:2-20
        Guide: https://docs.prismacloud.io/en/enterprise-edition/policy-reference/kubernetes-policies/kubernetes-policy-index/bc-k8s-11
Check: CKV_K8S_20: "Containers should not run with allowPrivilegeEscalation"
        FAILED for resource: overlay:overlay/dev:Deployment.default.nginx-deployment
        File: /overlay/dev/kustomization.yaml:2-20
        Guide: https://docs.prismacloud.io/en/enterprise-edition/policy-reference/kubernetes-policies/kubernetes-policy-index/bc-k8s-19
Check: CKV_K8S_15: "Image Pull Policy should be Always"
        FAILED for resource: overlay:overlay/dev:Deployment.default.nginx-deployment
        File: /overlay/dev/kustomization.yaml:2-20
        Guide: https://docs.prismacloud.io/en/enterprise-edition/policy-reference/kubernetes-policies/kubernetes-policy-index/bc-k8s-14
…
How to create Checkov Custom Policies - Example
To create a custom policy, start by creating a new policy file in the Checkov policies directory.
By default, custom policies are stored in the policies directory.
For this example, we will create a file called k8slabel.yaml in the policies directory that checks if a specific label is present on Kubernetes deployments.
k8slabel.yaml
# policies/k8slabel.yaml

metadata:
  name: EnsureAppLabelPresent
  category: Kubernetes
  severity: MEDIUM
  description: Ensure the app label is present on Kubernetes deployments.
  supported_resources:
    - KubernetesDeployment
  check_function: >
    def ensure_app_label_present(checkpoint, entity, entity_name, entity_type):
        metadata = entity.get("metadata")
        if metadata and "labels" in metadata and "app" in metadata["labels"]:
            return checkpoint.passed()
        else:
            return checkpoint.failed()
  check_id: CKV_K8S_CUSTOM_001
  fix_function: null
In this policy definition, we specify the metadata, name, category, severity, description, supported resources, check function, check ID, and fix function (which is set to null as this is just an example, and there is no fix function defined).
After defining the custom policy, run Checkov and specify the path to your custom policy file using the -p or --policy option.
checkov --file cronjob.yaml . -p policies/k8slabel.yamlWhen I run this against my cronjob.yaml file from the earlier example, I see the check fails because my deployment does not have the ‘app’ label applied.
Key points
Checkov is a versatile and powerful tool for identifying security issues, misconfigurations, and compliance violations in your infrastructure code, providing greater assurance in the security and reliability of your infrastructure deployments.
The Most Flexible CI/CD Automation Tool
Spacelift is an alternative to using homegrown solutions on top of a generic CI. It helps overcome common state management issues and adds several must-have capabilities for infrastructure management.
Frequently asked questions
Can Checkov scan Kubernetes files?
Yes, Checkov can scan Kubernetes files. It supports both YAML and JSON manifests and checks for common misconfigurations such as privileged containers, missing resource limits, and insecure network policies. This helps enforce security and compliance standards before deployment.
