
There are several occasions where we have to create multiple resources with similar configurations. It does not make sense to just copy and paste the Terraform resource blocks with minor tweaks in each block. Doing this only affects the readability and unnecessarily lengthens the IaC configuration files.
In this post, we will explore Terraform’s for_each meta arguments and address the challenge described above. Additionally, we will also take a look at other advantages and use cases along with appropriate examples.
We will cover:
- What is Terraform for each?
- How to use for each in Terraform
- Example 1: Using for_each with set of strings
- Example 2: Using for_each with map
- Example 3: Using for_each with modules
- Example 4: Using for_each with list of objects
- Example 5: Using for_each with Terraform data sources
- Example 6: Using for_each with nested maps
- Example 7: Using for_each in a dynamic block
- Example 8: Using for_each with ephemeral resources
- What is the difference between for each and count?
- How does for_each handle resource destruction
- Creating resources conditionally with for_each
- Resource chaining
- Importing resources that use for_each
- Terraform for each indexing issues
- Benefits of using for_each meta-argument
TL;DR
Use Terraform’s for_each to create multiple instances of a resource, module, or data source from a map or a set of strings. Each instance is addressed by a stable key (each.key) and can access its value via each.value.
Choose for_each when you need named instances (e.g., per environment/user) and stable addressing. Use count when you only need N identical copies.
What is Terraform for_each?
Terraform for_eachis a meta argument that helps create multiple instances of a defined resource. It also provides flexibility to dynamically set attributes of each instance based on the values used to generate them. for_each is commonly used to simplify infrastructure definitions and reduce duplication in large-scale deployments.
for_each accepts a map or a set (usually of strings), and each key becomes the instance key. The values can be simple strings or more complex objects (like map(object)) when you need richer configuration per instance.
For example, when provisioning multiple subnets, each can be assigned a distinct CIDR block using the same aws_subnet resource definition.
When for_each is used, a special each object becomes available inside the resource block. This object provides access to either the value from the set or the key-value pair from the map, enabling instance-specific configurations.
How to use for each in Terraform
A general syntax of using for_each meta argument is expressed below.
resource "<resource type>" "<resource name>" {
  for_each = var.instances
  // Other attributes

  tags = {
    Name = each.<value/key>
  }
}
The <resource type> is the type of Terraform resources, for example “aws_vpc”.
<resource name> is a user-defined name for this resource, which is used to reference elsewhere in the Terraform configuration. for_each attribute is assigned a variable value in the form of “var.instances”. “var.instances” may be of list or map type.
Depending on the length of this set or map, the number of resources of “<resource type>” will be created.
Finally, the each object is used to assign a Name tag for each resource instance created by this. If the “var.instances” is of set type, then “each.value” is the only available property. Otherwise, in the case of a map, it is possible to retrieve both key and value by using each.key and each.value.
There are advanced use cases where it is also possible to use map of objects (map(object)) with for_each meta-argument. We will cover this later in this post.
Note: The terminal outputs presented in this blog post only display the terraform plan command output to prove the usage of for_each. You are encouraged to run the “apply” commands by yourself. Also, in production, fetch AMIs dynamically with a data source (for example data “aws_ami”), and choose current generation instance types such as t3.micro or t4g.micro.
Example 1: Using for_each with set of strings
Let’s assume we have to create a specific number of EC2 instances in AWS.
The exact number of instances to be created depends on the input provided.
If the input is an “array of strings”, so in Terraform, if the input is set(string), then the Terraform configuration for it is as shown below:
variable "instance_set" {
  type = set(string)
  default = ["Instance A", "Instance B"]
}

resource "aws_instance" "by_set" {
  for_each = var.instance_set
  ami = "ami-0b08bfc6ff7069aff"
  instance_type = "t2.micro"

  tags = {
    Name = each.value
  }
}
Here, we have declared an input variable of type set(string). The default value of this variable is a couple of strings. This set is two strings long, and we would expect our resource block for “aws_instance” to create two EC2 instances.
The very first attribute of the aws_instance resource block is for_each, which is assigned the “instance_set” variable value of type set(string). The ami and instance_type attributes are hardcoded since they are not relevant to the topic of this blog post.
Further, the Name tag uses the each object to refer to the value of each string included in the instance_set variable.
When this Terraform configuration is executed, it creates two EC2 instances, “Instance A” and “Instance B.”
The output can be verified with the plan command:
+ tenancy                              = (known after apply)
      + user_data                            = (known after apply)
      + user_data_base64                     = (known after apply)
      + user_data_replace_on_change          = false
      + vpc_security_group_ids               = (known after apply)
    }

Plan: 2 to add, 0 to change, 0 to destroy.

─────────────────────────────────────────────────────────────────────────────────────────────────────────────────────────────────────────────────────────────────────────────────────────────────────────────────────

Note: You didn't use the -out option to save this plan, so Terraform can't guarantee to take exactly these actions if you run "terraform apply" now.
Terraform for_each with a list of strings
To use for_each with a list of strings in Terraform, you must first convert the list into a set or map, because for_each requires either a map or a set of strings. A plain list cannot be used directly. You can use the to_set() function to achieve this.
The config changes for using list(string) are simple and shown below.
variable "instance_set" {
  type = list(string)
  default = ["Instance A", "Instance B"]
}
resource "aws_instance" "by_set" {
  for_each = toset(var.instance_set)
  ami = "ami-0b08bfc6ff7069aff"
  instance_type = "t2.micro"

  tags = {
    Name = each.value
  }
}
This approach is commonly used for provisioning identical resources for a list of unique identifiers, such as creating multiple S3 buckets, users, or placeholder resources.
Example 2: Using for_each with a map
The map type provides a “set” of key-value pairs, offering more customization options for more complex recurring resources to be provisioned.
In this case, the number of instances to be created is equal to the length of the map object. However, in addition to the each.value, we can also leverage the string value stored in each.key.
This is the next step where instead of one, there are two attributes to be set dynamically using the same Terraform resource block.
variable "instance_map" {
  type = map(string)
  default = {
    "inst_a" = "Instance A",
    "inst_b" = "Instance B"
  }
}
The instance_map variable above has a default value of two key-value pairs.
We use this variable in the for_each meta-argument to create two EC2 instances, as shown in the configuration block below.
resource "aws_instance" "by_map" {
  for_each = var.instance_map
  ami = "ami-0b08bfc6ff7069aff"
  instance_type = "t2.micro"

  tags = {
    Name = each.value
    ID = each.key
  }
}
The for_each meta-argument in the above code snippet is responsible for creating two EC2 instances.
Additionally, the Name and ID tags refer to the value and key strings set in the instance_map variable’s default value.
The plan command output confirms the same.
.
.
.
}
      + tags_all                             = {
          + "ID"   = "inst_b"
          + "Name" = "Instance B"
        }
      + tenancy                              = (known after apply)
      + user_data                            = (known after apply)
      + user_data_base64                     = (known after apply)
      + user_data_replace_on_change          = false
      + vpc_security_group_ids               = (known after apply)
    }

Plan: 2 to add, 0 to change, 0 to destroy.
Example 3: Using for_each with modules
Terraform modules explicitly expose some input variables that must be supplied when using them. Modules help us package the IaC to provision a predefined set of infrastructure. Sometimes, it is desired to provision the resources included in modules multiple times. This is where the for_each meta-argument is also used with modules.
In the example below, we use a module from the Terraform registry to create Security Groups in AWS.
This module is responsible for creating a security group and the ingress rules, which is a basic requirement for the Terraform security group. If we have to create multiple security groups with different ingress CIDR blocks and different names to identify them, we can follow the approach given below.
- Define a variable of type
map(string), where the key in the key-value pair represents the name of the security group, and the value represents the CIDR in string format. - Include the module resource block and initialize it.
- Use
for_eachto create multiple security groups and substitutenameandingress_cidr_blocksinput with appropriate values using each object.
See the Terraform code below:
variable "sg_map" {
  type = map(string)
  default = {
    "SG 1" = "10.10.1.0/24",
    "SG 2" = "10.10.2.0/24"
  }
}
module "web_server_sg" {
  for_each = var.sg_map
  source = "terraform-aws-modules/security-group/aws//modules/http-80"

  name = each.key
  vpc_id = aws_vpc.example_vpc.id

  ingress_cidr_blocks = [each.value]
}
When we run the terraform plan command, it proposes to create two security groups along with the ingress blocks for each of them, as shown below.
# module.web_server_sg["SG 1"].module.sg.aws_security_group.this_name_prefix[0] will be created
  + resource "aws_security_group" "this_name_prefix" {
      + arn                    = (known after apply)
      + description            = "Security Group managed by Terraform"
      + egress                 = (known after apply)
      + id                     = (known after apply)
      + ingress                = (known after apply)
      + name                   = (known after apply)
      + name_prefix            = "SG 1-"
      + owner_id               = (known after apply)
      + revoke_rules_on_delete = false
      + tags                   = {
          + "Name" = "SG 1"
        }
      + tags_all               = {
          + "Name" = "SG 1"
        }
      + vpc_id                 = (known after apply)

      + timeouts {
          + create = "10m"
          + delete = "15m"
        }
    }
.
.
.
# module.web_server_sg["SG 1"].module.sg.aws_security_group_rule.ingress_rules[0] will be created
  + resource "aws_security_group_rule" "ingress_rules" {
      + cidr_blocks              = [
          + "10.10.1.0/24",
        ]
      + description              = "HTTP"
      + from_port                = 80
      + id                       = (known after apply)
      + ipv6_cidr_blocks         = []
      + prefix_list_ids          = []
      + protocol                 = "tcp"
      + security_group_id        = (known after apply)
      + self                     = false
      + source_security_group_id = (known after apply)
      + to_port                  = 80
      + type                     = "ingress"
    }
.
.
.
# module.web_server_sg["SG 2"].module.sg.aws_security_group.this_name_prefix[0] will be created
  + resource "aws_security_group" "this_name_prefix" {
      + arn                    = (known after apply)
      + description            = "Security Group managed by Terraform"
      + egress                 = (known after apply)
      + id                     = (known after apply)
      + ingress                = (known after apply)
      + name                   = (known after apply)
      + name_prefix            = "SG 2-"
      + owner_id               = (known after apply)
      + revoke_rules_on_delete = false
      + tags                   = {
          + "Name" = "SG 2"
        }
      + tags_all               = {
          + "Name" = "SG 2"
        }
      + vpc_id                 = (known after apply)

      + timeouts {
          + create = "10m"
          + delete = "15m"
        }
    }
.
.
.
# module.web_server_sg["SG 2"].module.sg.aws_security_group_rule.ingress_rules[0] will be created
  + resource "aws_security_group_rule" "ingress_rules" {
      + cidr_blocks              = [
          + "10.10.2.0/24",
        ]
      + description              = "HTTP"
      + from_port                = 80
      + id                       = (known after apply)
      + ipv6_cidr_blocks         = []
      + prefix_list_ids          = []
      + protocol                 = "tcp"
      + security_group_id        = (known after apply)
      + self                     = false
      + source_security_group_id = (known after apply)
      + to_port                  = 80
      + type                     = "ingress"
    }
.
.
.
Plan: 9 to add, 0 to change, 0 to destroy.Example 4: Using for_each with list of objects
In Terraform, the for_each meta-argument can only be used with maps or sets of strings. This creates a limitation when working with list(object), a structure commonly returned by external data sources such as APIs, modules, or data blocks. Since for_each does not accept a list of objects directly, you must transform the list into a supported type, typically a map.
To perform this transformation, you can use a for expression to build a map(object) from the list(object). This map must use unique keys (usually derived from object attributes like id or name) and retain the full object as the value. This enables iteration with for_each while maintaining full access to each object’s properties.
This transformation is essential when working with external data sources where the input structure is fixed. It also enables more expressive and maintainable configurations.
While map(string) can be used in some scenarios, it becomes restrictive when multiple object attributes are needed within a resource block. If you control the data format, it’s ideal to use a map(object) from the start.
However, when dealing with list(object), converting it into a map(object) using a for expression is the standard workaround to leverage for_each.
In the example below, we declare a variable of type (list(object)) to create two EC2 instances.
variable "instance_object" {
  type = list(object({
    name = string
    enabled = bool
    instance_type = string
    env = string
  }))
  default = [
  {
    name = "instance A"
    enabled = true
    instance_type = "t2.micro"
    env = "dev"
  },
  {
    name = "instance B"
    enabled = false
    instance_type = "t2.micro"
    env = "prod"
  },
  ]
}
The instance object holds some attributes:
name– To assign a name tag to the EC2 instanceenabled– a boolean value that decides whether to provision the EC2 instance or not. More on this in the next sectioninstance_type– AWS instance typeenv– To assign an environment tag to the EC2 instance
As seen here, the number of EC2 instances created from this object will differ with respect to the multiple attributes provided in the default values.
The code below uses the for_each meta-argument to create two EC2 instances, as provided in the default value of the above object.
resource "aws_instance" "by_object" {
  for_each = { for inst in var.instance_object : inst.name => inst }
  ami = "ami-0b08bfc6ff7069aff"
  instance_type = each.value.instance_type

  tags = {
    Name = each.key
    Env = each.value.env
  }
}
Here we have used the instance_type, name, and env properties provided by the instance_object variable to set the appropriate attributes of aws_instance resource using “each.value.<property>” syntax.
Note that the Terraform for loop used to set the for_each meta-argument selects the name property from the instance_object input variable. Since two objects are defined as the default value, two EC2 instances will be created.
This also results in Terraform setting the “key” of the “each” object as the name property. This each.key is used in setting the Name tag. Optionally, it is also valid to use “each.value.name” to achieve the same result.
This is apparent from the plan output, as shown below.
.
.
.
      + security_groups                      = (known after apply)
      + source_dest_check                    = true
      + subnet_id                            = (known after apply)
      + tags                                 = {
          + "Env"  = "prod"
          + "Name" = "instance B"
        }
      + tags_all                             = {
          + "Env"  = "prod"
          + "Name" = "instance B"
        }
      + tenancy                              = (known after apply)
      + user_data                            = (known after apply)
      + user_data_base64                     = (known after apply)
      + user_data_replace_on_change          = false
      + vpc_security_group_ids               = (known after apply)
    }

Plan: 2 to add, 0 to change, 0 to destroy.
Note that it is much better to use map(object) instead of list(object) as it is a much cleaner way to use for_each meta-argument since it is easier to retrieve the key and value strings. We will cover an example on map(object) in the “Chaining” section further in the post.
Example 5: Using for_each with Terraform data sources
Assuming we want to use information related to multiple resources of a specific kind in AWS, which are provisioned and managed via a different route, perhaps a different Terraform repo? In such cases, you can use for_each.
For example, there are several EC2 instances provisioned in one of the AWS regions, and we want to use the information related to them in our Terraform configuration. The variable of type list(string) holds the list of EC2 instance IDs.
variable "instance_ids" {
  description = "List of EC2 instance IDs"
  type = list(string)
  default = ["i-1abcd234", "i-2efgh345", "i-3ijkl456", "i-4mnop567", "i-5qrst678"]
}
To access the information related to these EC2 instances, we use the aws_instance data source as shown below.
We use for_each meta-argument to read the values of each instance mentioned in the list above.
data "aws_instance" "ec2_instances" {
  for_each = toset(var.instance_ids)

  instance_id = each.value
}
Later, we can use this Terraform data source to configure more resources based on these EC2 instances.
In the code below, we use this data source to print several attributes of these instances via an output variable.
output "instance_info" {
  value = {
    for instance_id, instance in data.aws_instance.ec2_instances :
      instance_id => {
      id = instance.id
      public_ip = instance.public_ip
      private_ip = instance.private_ip
      instance_type = instance.instance_type
      # more attributes as needed
    }
  }
}
Example 6: Using for_each with nested maps
As mentioned above, Terraform for_each requires a map or set of strings where each element has a distinct key. Nested maps, such as map(map(string)), need to be flattened into a structure where each nested item is accessible with a unique composite key. This is typically done using for expressions to transform the nested map.
For example, let’s consider a variable like:
variable "nested_map" {
  default = {
    group1 = {
      item1 = "value1"
      item2 = "value2"
    }
    group2 = {
      item3 = "value3"
    }
  }
}
You can flatten it as:
locals {
  flat_map = {
    for group, items in var.nested_map :
    for item_key, item_value in items :
    "${group}.${item_key}" => item_value
  }
}
Then, this flat_map can then be used with for_each:
resource "example_resource" "this" {
  for_each = local.flat_map

  name  = each.key
  value = each.value
}
Example 7: Using for_each in a dynamic block
The dynamic block in Terraform is used to generate repeated nested blocks within a resource or module programmatically. It is particularly useful when the number or structure of nested blocks is determined dynamically, such as from a variable or a complex object.
Unlike top-level for_each (which duplicates an entire resource or module), dynamic is used within a resource to generate multiple instances of a nested block, such as multiple ingress rules in a security group.
The dynamic block requires two arguments:
for_each: The collection to iterate over.content: The block body template for each item.
For example:
resource "aws_security_group" "example" {
  name = "example"

  dynamic "ingress" {
    for_each = var.ingress_rules
    content {
      from_port   = ingress.value.from_port
      to_port     = ingress.value.to_port
      protocol    = ingress.value.protocol
      cidr_blocks = ingress.value.cidr_blocks
    }
  }
}
In this example:
ingressis the block being generated.ingress.valueaccesses the current item from the collectionvar.ingress_rules.
This differs from using for_each on a resource, which duplicates the entire resource rather than just a block inside it. Use dynamic when dealing with nested repeatable blocks that Terraform does not allow to be expressed via for_each directly.
Note: A dynamic block can generate only the provider-defined nested blocks for that resource, not root-level meta-arguments such as lifecycle, provisioner, or count.
Example 8: Using for_each with ephemeral resources
Modern Terraform (v1.10+) and OpenTofu (v1.11+) introduce ephemeral resources, which exist only during plan/apply and are never written to state. You can combine for_each with ephemeral blocks to generate short-lived values such as passwords or certificates for multiple targets at once.
For example, to generate a temporary SSH key per environment:
locals {
  environments = {
    dev  = "dev"
    prod = "prod"
  }
}

ephemeral "tls_private_key" "env" {
  for_each  = local.environments
  algorithm = "RSA"
  rsa_bits  = 4096
}

# Each ephemeral key can be stored in a write-only secret per environment
resource "aws_secretsmanager_secret" "ssh_key" {
  for_each = local.environments
  name     = "env-${each.key}-ssh-key"
}

resource "aws_secretsmanager_secret_version" "ssh_key" {
  for_each = local.environments

  secret_id               = aws_secretsmanager_secret.ssh_key[each.key].id
  secret_string_wo        = ephemeral.tls_private_key.env[each.key].private_key_pem
  secret_string_wo_version = 1
}
Here, for_each lets you fan out ephemeral secrets per environment without persisting them in state.
What is the difference between for_each and count?
The count meta-argument also helps in creating multiple instances of a given Terraform resource.
However, there are a couple of major differences:
- Index-based vs key-based tracking:
countindexes resources numerically ([0],[1], …). Increasing or decreasingcountor changing the order of the source list can shift indices and cause Terraform to replace some instances.for_eachtracks resources by stable keys, so adding or removing items only affects the corresponding keys and leaves the others untouched. - Resource instance attribute customization: An apparent limitation of the
countmeta-argument is that it is not possible to tweak attributes per resource instance being created. For example, when subnets are created usingcount, all of them would be assigned the same CIDR range. In this case,for_eachmeta-argument is used to provide that kind of variation.
Read more about the comparison between Terraform for each and count meta-argument.
How does for_each handle resource destruction in Terraform
for_each handles resource destruction deterministically based on changes to the keys in the map or set used for iteration. When a key is removed from the for_each input, the corresponding resource is destroyed in the next apply.
The for_each meta-argument binds resources to specific keys, so Terraform tracks each instance by its key. If the input map or set changes (such as removing or renaming a key), Terraform recognizes that the resource tied to the removed key is no longer needed and marks it for destruction.
On the other hand, new keys result in the creation of new resources. This differs from count, which ties resources to positional indices that can shift and cause unintended replacements.
For example, changing for_each = toset(["a", "b", "c"]) to toset(["a", "c"]) causes only the "b" instance to be destroyed while "a" and "c" are preserved.
Creating resources conditionally with for_each
Continuing with the same example from the Using for_each with list of objects section, we created a property named “enabled” in our list(object) variable instance_object. When we have to conditionally create these instances, we can simply toggle the value of this attribute.
This value is then interpreted using the Terraform if condition included in the for loop, as shown below.
resource "aws_instance" "by_object" {
  for_each = { for inst in var.instance_object : inst.name => inst if inst.enabled }
  ami = "ami-0b08bfc6ff7069aff"
  instance_type = each.value.instance_type

  tags = {
    Name = each.key
    Env = each.value.env
  }
}
Since we have “enabled” instance A to be created only, running the terraform plan command should propose creating a single instance, as shown in the terminal output below.
.
.
.
      + public_dns                           = (known after apply)
      + public_ip                            = (known after apply)
      + secondary_private_ips                = (known after apply)
      + security_groups                      = (known after apply)
      + source_dest_check                    = true
      + subnet_id                            = (known after apply)
      + tags                                 = {
          + "Env"  = "dev"
          + "Name" = "instance A"
        }
      + tags_all                             = {
          + "Env"  = "dev"
          + "Name" = "instance A"
        }
      + tenancy                              = (known after apply)
      + user_data                            = (known after apply)
      + user_data_base64                     = (known after apply)
      + user_data_replace_on_change          = false
      + vpc_security_group_ids               = (known after apply)
    }

Plan: 1 to add, 0 to change, 0 to destroy.
Read more about Terraform conditional expressions.
Resource chaining
We have discussed and implemented the for_each meta-argument in multiple ways till now. In this section, we will see how other resources, which further depend on these individual instances created by a single resource block using for_each, are configured.
Let’s understand this with an example.
The hierarchy involved in implementing a VPC, then the subnets as part of VPC, and then the EC2 instances to be placed in those subnets:
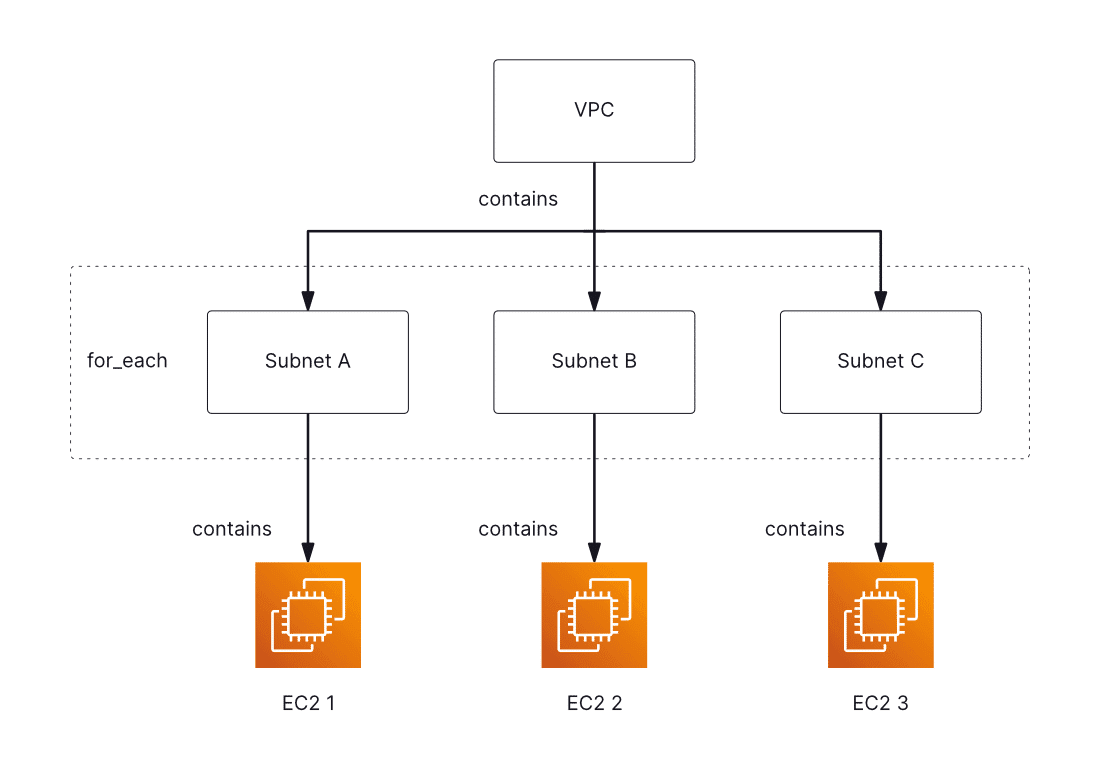
As depicted in the image above, multiple subnets are created using for_each meta-arguments, and they all belong to the same VPC. Now, using Terraform IaC, we would want to place an EC2 instance in each of these subnets.
To create multiple EC2 instances, we again use the for_each meta-argument. This time, instead of supplying any input variable, we “chain” the other resource block (subnet) created using the for_each meta-argument. We use the each object to chain the EC2 instance resource with subnets.
The each object here represents all the attributes available as output in the subnet resource. The way to retrieve a specific attribute of a subnet is by referring to the attribute on each.value.<attribute>.
We will see the same in action below.
variable "subnet_object" {
  type = map(object({
    name = string,
    cidr = string
  }))
  default = {
    "subnet_a" = {
      name = "Subnet A",
      cidr = "10.10.1.0/24"
    },
    "subnet_b" = {
      name = "Subnet B",
      cidr = "10.10.2.0/24"
    },
    "subnet_c" = {
      name = "Subnet C",
      cidr = "10.10.3.0/24"
    }
  }
}
Next, we create the VPC and three subnets using for_each meta-argument as we would normally do.
We have used the input variable subnet_object to define subnet attributes like CIDR block and Name tag.
# Create VPC
resource "aws_vpc" "example_vpc" {
  cidr_block = "10.10.0.0/16"
  enable_dns_hostnames = true
  enable_dns_support = true

  tags = {
    Name = "Example VPC"
  }
}

# Create public subnets
resource "aws_subnet" "example_subnets" {
  for_each = var.subnet_object
  vpc_id = aws_vpc.example_vpc.id
  cidr_block = each.value.cidr
  tags = {
    Name = each.value.name
  }
}
Finally, we create EC2 instances and place them in the subnets provisioned by aws_subnet resource. The for_each meta-argument takes the aws_subnet resource block as input.
Note how the “each” subnet is associated with “each” EC2 instance that will be created.
resource "aws_instance" "by_chaining" {
  for_each = aws_subnet.example_subnets
  ami = "ami-0b08bfc6ff7069aff"
  instance_type = "t2.micro"
  subnet_id = each.value.id

  tags = {
    Name = "${each.value.id} instance"
  }
}
The number of EC2 instances to be created depends on the number of subnets being created. And the number of subnets being created depend on the input variable.
Applying this Terraform configuration should create seven resources in total, and as per the diagram above – one VPC, three Subnets, and three EC2 instances.
The plan command output looks like below.
.
.
.
      + ipv6_cidr_block_network_border_group = (known after apply)
      + main_route_table_id                  = (known after apply)
      + owner_id                             = (known after apply)
      + tags                                 = {
          + "Name" = "Example VPC"
        }
      + tags_all                             = {
          + "Name" = "Example VPC"
        }
    }

Plan: 7 to add, 0 to change, 0 to destroy.
Read more about how to build AWS VPC using Terraform.
Importing resources that use for_each
To use terraform import with a resource that uses for_each, you must import each instance individually using its corresponding key. Terraform cannot bulk import resources defined with for_each because each instance is uniquely identified by a map or set element.
When a resource uses for_each, Terraform internally treats each item as a separate instance with a unique key, like aws_instance.example["web"]. To import such resources, you need to specify both the full resource address and the external ID.
Suppose you have the following resource:
resource "aws_s3_bucket" "example" {
  for_each = {
    logs  = "logs-bucket"
    media = "media-bucket"
  }

  bucket = each.value
}
To import these buckets, you would run:
terraform import aws_s3_bucket.example["logs"] logs-bucket
terraform import aws_s3_bucket.example["media"] media-bucket
Each terraform import command targets a specific key in the for_each map and maps it to the actual resource ID in the provider.
Before importing, ensure the for_each keys and values in your configuration exactly match the identifiers you are importing. The keys in your configuration (logs, media) must match exactly with how you plan to reference the resource. If there is a mismatch between your current configuration and what’s being imported (e.g., the key is missing or different), Terraform might plan to destroy and recreate the resource.
After import, run terraform plan to confirm the imported resources are fully in sync with your configuration.
Terraform for each indexing issues
Terraform’s for_each meta-argument is a powerful tool for dynamically managing resources. It allows us to iterate over a map or set of values.
However, it’s important to be cautious of potential indexing issues that can arise when using for_each.
Unlike the traditional count approach, where resources are indexed numerically, for_each relies on unique keys. This can lead to challenges in scenarios where precise indexing is required. Instances created using for_each are referenced by their keys, making it less straightforward to perform sequential operations or handle specific ordering requirements.
Additionally, modifications to the map or set used with for_each can trigger resource re-creation, which might lead to unexpected changes in the infrastructure.
While for_each offers flexibility and scalability, it’s crucial to be mindful of these indexing nuances and to design configurations that accommodate the unique characteristics of this approach.
Benefits of using for_each meta-argument
The Terraform for_each meta-argument offers several benefits:
- Dynamic instance creation: Instead of manually repeating resource or module blocks, we can use
for_eachto dynamically create instances based on the elements of a map or set. This makes our configuration more concise and maintainable, especially when dealing with a variable number of similar resources. - Enhanced readability: Instead of duplicating resource blocks with minor differences, we can maintain a single resource block with
for_eachmeta-argument, making our configuration more readable and reducing the potential for errors due to copy-pasting. - Consistency: When creating similar instances,
for_eachhelps maintain consistency in the configuration. This is particularly important in environments where standardization is crucial. - Simplified data source iteration: In addition to resources and modules,
for_eachcan also be used with data sources to dynamically iterate over data for various use cases, such as creating dynamic security groups based on an external source of IP addresses. - Managing dynamic workloads: For scenarios where our infrastructure’s size and shape may vary based on factors like the number of users or projects,
for_eachprovides a more scalable and adaptable approach compared to hardcoding resource counts.
In newer Terraform versions, for_each also works with ephemeral and action blocks, so you can fan-out one-off operations (like running an action per environment) without extra glue code.
How to manage Terraform resources with Spacelift
Terraform is really powerful, but to achieve an end-to-end secure GitOps approach, you need a platform that can orchestrate your Terraform workflows. Spacelift is the infrastructure orchestration platform built for the AI-accelerated software era.
It manages the full lifecycle for both traditional infrastructure as code (IaC) and AI-provisioned infrastructure, giving you access to a powerful CI/CD workflow and unlocking features such as:
- Policies (based on Open Policy Agent) – You can control how many approvals you need for runs, what kind of resources you can create, and what kind of parameters these resources can have, and you can also control the behavior when a pull request is open or merged.
- Multi-IaC workflows – Combine Terraform with Kubernetes, Ansible, and other IaC tools such as OpenTofu, Pulumi, and CloudFormation, create dependencies among them, and share outputs.
- Build self-service infrastructure – You can use Templates and Blueprints to build self-service infrastructure; simply complete a form to provision infrastructure based on Terraform and other supported tools.
- AI-powered provisioning and diagnostics – Spacelift Intelligence adds an AI-powered layer for natural language provisioning, diagnostics, and operational insight across your infrastructure workflows.
- Integrations with any third-party tools – You can integrate with your favorite third-party tools and even build policies for them. For example, see how to integrate security tools in your workflows using Custom Inputs.
Before Affinity migrated to Spacelift in February 2023, the infrastructure team struggled to get Terraform to work as they wanted. Their IaC provider’s approach to representation did not map well to the way Affinity’s developers think about infrastructure and the various environments they work with, and the overall experience was frustrating. Since Affinity adopted the Spacelift platform, however, even developers who are not Terraform fans have been enthusing about the smoothness of the experience.
Spacelift enables you to create private workers inside your infrastructure, which helps you execute Spacelift-related workflows on your end. Read the documentation for more information on configuring private workers.
You can check it for free by creating a trial account or requesting a demo with one of our engineers.
Key points
In this post, we have explored various ways of using for_each meta-argument to create multiple resource instances using the same resource block. Using input variables like set(string) and maps, we were able to tweak the differences in each resource created. We also explored advanced topics like using conditional creation and chaining to refer to the parent resource attributes created using for_each, in the resources that depend on them. Implementing for_each over count meta-argument improves the readability and makes the Terraform code more manageable.
The patterns in this post work the same for other providers (Azure, GCP, Kubernetes, etc.). Just replace the resource types and attributes.
Note: New versions of Terraform are placed under the BUSL license, but everything created before version 1.5.x stays open-source. OpenTofu is an open-source version of Terraform that expands on Terraform’s existing concepts and offerings. It is a viable alternative to HashiCorp’s Terraform, being forked from Terraform version 1.5.6.
Automate Terraform deployments with Spacelift
Automate your infrastructure provisioning and build more complex workflows based on Terraform using policy as code, programmatic configuration, context sharing, drift detection, resource visualization, and more.
Frequently asked questions
What is for_each in Terraform?
for_each is a meta-argument that creates one instance per element in a map or set of strings. Each instance is addressed by a stable key via each.key (and each.value for maps).
When should I use for_each vs count?
Use for_each when each instance needs a stable, meaningful identifier (e.g., “prod”, “staging”, usernames, subnet names). Use count when you truly have a simple list and order/index changes won’t matter.
Can for_each iterate over a list?
Not directly (unless you convert it). for_each expects a map or a set of strings.
What are each.key and each.value in Terraform?
Inside a resource, module or data block using Terraform for_each:
- each.key is the instance key (map key or set element)
- each.value is the map value (for maps); for sets, it’s the same as each.key
How do I refactor from count to for_each without recreating everything?
Use Terraform refactoring features (like moved blocks) to map old addresses (index-based) to new addresses (key-based). This prevents destroy/recreate when the underlying remote objects are the same.
