In this post, we will provide an overview of resources and the resource block in Terraform, covering syntax, types, available arguments, meta-arguments, and step-by-step guidance for creating a resource, along with examples and best practices.
What we will cover in this article:
- What are Terraform resources?
- How to use Terraform resources documentation
- Terraform resource types and arguments
- Terraform resources behavior
- Accessing resource attributes
- Resource dependencies
- Meta-arguments
- Local-only resources in Terraform
- How do you create a Terraform resource
- How to list all Terraform resources
- Terraform resources custom condition checks
- Terraform resources operation timeouts
- Terraform resources best practices
TL;DR
Terraform resources are the core building blocks of infrastructure as code (IaC). Each resource block defines and manages one infrastructure object, such as a VM, bucket, or DNS record, through a provider.
You configure resources with arguments from the provider documentation, connect them using references or depends_on, and control their behavior with five meta-arguments: count, for_each, provider, depends_on, and lifecycle.
What are Terraform resources?
Terraform resources are the fundamental building blocks used to define infrastructure components in a Terraform configuration. Each resource block represents a specific infrastructure object, such as a virtual machine, load balancer, or DNS record, managed through a provider.
Terraform resource syntax
Resources are declared using the resource keyword, followed by the resource type and a unique name.
The syntax for defining a resource block in Terraform typically follows this pattern:
resource "resource_type" "resource_name" {
  # Configuration settings for the resource
  attribute1 = value1
  attribute2 = value2
  # ...
}resource: This keyword is used to declare a resource block."resource_type": This is the type of resource you want to create. For example, if you’re creating an AWS EC2 instance with Terraform, the resource type would be"aws_instance"."resource_name": This is a user-defined name for the resource block. It must be unique within your Terraform configuration and is used as a reference to the resource elsewhere in your configuration.{}: The opening and closing curly braces enclose the resource’s configuration settings. Inside the block, you define the resource’s attributes and values.attribute1 = value1,attribute2 = value2: These lines define the attributes of the resource and their corresponding values. Attributes are specific properties or settings for the resource. The values can be literals, references to other resources or variables, expressions, or function calls. You can look up the available attributes for your chosen resource on the Terraform resource documentation pages.
For example, an Azure resource group might look like the following:
resource "azurerm_resource_group" "jacks-rg" {
  name     = "jacks-rg"
  location = "UK South"
}
Resources support arguments and attributes to customize their configuration, and they can be referenced by other resources using interpolation syntax, enabling dependency management.
What is the difference between Terraform modules and resources?
Terraform modules are reusable containers for multiple resources that abstract and organize infrastructure components, while resources are the basic building blocks that define individual infrastructure elements like AWS instances or GCP buckets.
For example, a module might manage an entire VPC setup, and inside it are resources for subnets, gateways, and routing tables.
Read more: Terraform Modules vs. Resources at Scale
How to use Terraform resources documentation
Using Terraform’s resource documentation is essential when working with Terraform to understand the available resource types and their attributes and how to configure them.
The official documentation is organized by providers, and each provider contains information about their resources.
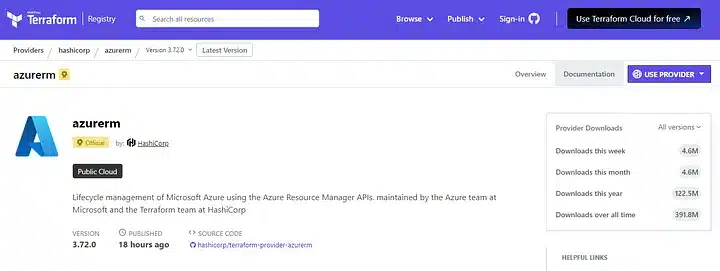
1. Select a provider
Select the provider you are interested in, such as Azure, and click the documentation link at the top right.
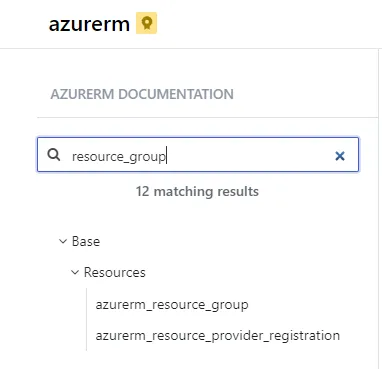
2. Browse the resource list
You will be presented with a list of resources you can use with Terraform, and you can search for the one you are interested in.
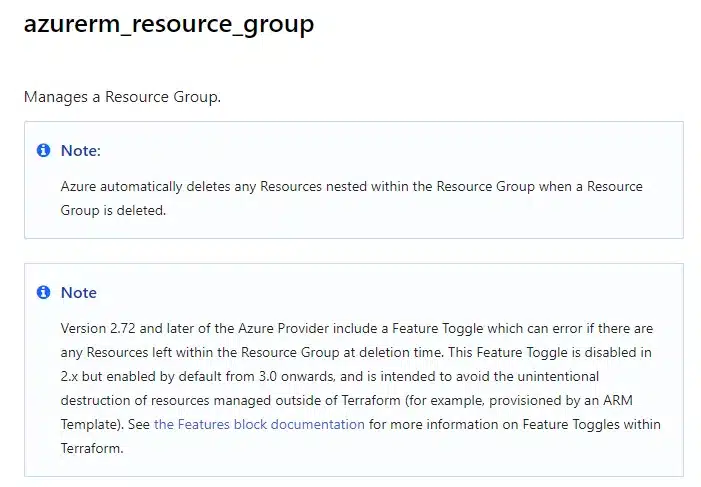
3. Select a resource
When you select a resource, the resource page will show the available arguments you can use with it, along with argument references (values that are exported after you create the resource and can be referenced from other parts of your code).
Most pages also include an example configuration for the resource, a timeouts section, and an example of how to import an already existing resource of that type into your Terraform state. Additional information will also be presented here, such as notes of interest and warnings about the deprecation of particular arguments in certain Terraform versions.
Terraform resource types and arguments
As mentioned previously, Terraform resource types and their corresponding arguments vary depending on the provider being used, as Terraform supports a wide range of cloud and infrastructure providers.
A few examples are shown below, with a truncated list of available arguments for each.
Resource Type: aws_s3_bucket (Amazon S3 Bucket)
bucket(string): The name of the S3 bucket.bucket\_prefix(string): Creates a unique bucket name beginning with the specified prefix.force\_destroy(bool): Whether all objects should be deleted when destroying the bucket.tags(map): A map of tags to assign to the bucket.
Note: In AWS provider v4 and later, settings such as ACLs and versioning are no longer configured inline on aws_s3_bucket. Use the standalone aws_s3_bucket_acl and aws_s3_bucket_versioning resources instead.
Resource Type: azurerm_storage_account (Azure Storage Account)
name(string): The name of the storage account.resource_group_name(string): The name of the resource group in which to create the storage account.account_tier(string): The performance tier of the storage account (e.g., “Standard” or “Premium”).account_replication_type(string): The replication type for the storage account (e.g., “LRS” or “GRS”).
Resource Type: google_storage_bucket (Google Cloud Storage Bucket)
name(string): The name of the storage bucket.location(string): The location (region) of the bucket.storage_class(string): The storage class of the bucket (e.g., “STANDARD” or “COLDLINE”).
Terraform resources behavior
Terraform resources have specific behaviors and characteristics that define how they work within a Terraform configuration. Awareness of the key features of Terraform will help you to understand how Terraform resources behave.
Key characteristics of Terraform resources include:
- Terraform resources are designed to be idempotent, meaning that applying the same configuration multiple times should not have unintended side effects.
- Resources can depend on each other. Terraform automatically determines the order in which resources should be created or modified based on these dependencies.
- Terraform uses a declarative syntax, which means you specify what you want the infrastructure to look like, not how to achieve that state.
- When you apply a Terraform configuration, it creates or modifies resources to match the desired state. Conversely, when you remove a resource definition from your configuration and apply it, Terraform will destroy that resource (if it exists) to match the new desired state.
- Terraform maintains a state file that tracks the current state of your infrastructure.
- Terraform is designed to be highly parallelized. It can create, modify, or destroy multiple resources simultaneously when possible, speeding up the provisioning process.
- Terraform can detect and report any differences between the current state of your infrastructure and the desired state defined in your configuration.
- Terraform supports locking to prevent concurrent modifications to the same infrastructure.
Accessing resources attributes
To access resource attributes from other places in your code, you can reference them directly.
For example, the Azure resource_group resource shows the following arguments and attributes references on the docs page:
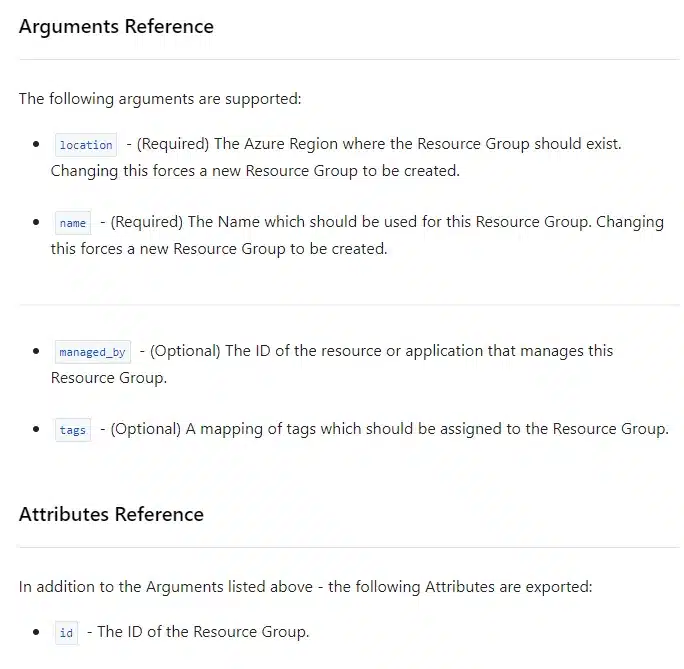
Our resource group configuration looks like the following:
resource "azurerm_resource_group" "jacks-rg" {
  name     = "jacks-rg"
  location = "UK South"
}
We can reference the attributes directly in other resources, for example, an Azure virtual network resource:
resource "azurerm_virtual_network" "jacks-vnet" {
  name                = "jacks-vnet"
  address_space       = ["10.0.0.0/16"]
  location            = azurerm_resource_group.jacks-rg.location
  resource_group_name = azurerm_resource_group.jacks-rg.name
}
You can also create output blocks in your Terraform configuration to expose specific attributes of resources for easy access. Output blocks define what attributes to expose and give them friendly names.
For example, to show the address space of the VNET:
output "address_space" {
  value = azurerm_virtual_network.jacks-vnet.address_space
}
You can then use terraform output to retrieve this value.
Resource dependencies in Terraform
Resource dependencies refer to the relationships between different resources within your configuration. By default, Terraform automatically determines resource dependencies based on references in your configuration. When one resource references attributes of another resource, Terraform creates an implicit dependency.
In some cases, you may need to specify explicit dependencies using the Terraform depends_on argument within a resource block. This is useful when there are no direct attribute references but still a logical order of creation or modification.
For example, you could explicitly add the depends_on argument to our azurerm_virtual_network resource to instruct Terraform to make sure the resource group exists first — in this case, this is not necessary, as Terraform will create an implicit dependency anyway.
As a best practice, avoid creating unnecessary explicit dependencies and allow Terraform to manage them wherever possible.
resource "azurerm_virtual_network" "jacks-vnet" {
  name                = "jacks-vnet"
  address_space       = ["10.0.0.0/16"]
  location            = azurerm_resource_group.jacks-rg.location
  resource_group_name = azurerm_resource_group.jacks-rg.name
  depends_on          = [azurerm_resource_group.jacks-rg]
}
Terraform meta-arguments
Meta-arguments are special configuration settings that can be applied to resource blocks, data blocks, and modules. Terraform has five: depends_on, count, for_each, provider, and lifecycle. Let’s examine each one in turn with an example.
1. Depends_on
- Syntax:
depends_on = [resource1, resource2, ...] - Usage: Specifies explicit dependencies between resources. Terraform will ensure that the listed resources are created or modified before the current resource is processed.
- Example: See the example above.
2. Count
- Syntax:
count = n - Usage: Allows you to create multiple instances of a resource or module based on the specified count. This is useful when you want to create multiple similar resources, such as multiple EC2 instances or database replicas.
- Example:
resource "aws_instance" "example" {
  count = 3
  # Other configuration settings...
}
3. For_each
- Syntax:
for_each = { key1 = value1, key2 = value2, ... } - Usage: Similar to
count,for_eachallows you to create multiple instances of a resource or module, but instead of using an index, it uses a map where each key-value pair represents a unique instance. This is useful when you want to create resources with distinct attributes or names. (Read more about Terraform for_each.) - Example:
resource "aws_instance" "example" {
  for_each = {
    web1 = "t2.micro"
    web2 = "t2.micro"
    db   = "db.m3.medium"
  }
  instance_type = each.value
  # Other configuration settings...
}
4. Provider
- Syntax:
provider = aws - Usage: Allows you to specify which provider configuration should be used for a particular resource. This is helpful when you have multiple provider configurations defined in your Terraform configuration.
- Example:
resource "aws_instance" "example" {
  provider = aws.us-west-1
  # Other configuration settings...
}
5. Lifecycle
The lifecycle block customizes how Terraform creates, updates, and destroys a resource. The main rules are:
create_before_destroy: creates the replacement before destroying the old resource, avoiding downtime.prevent_destroy: blocks any plan that would destroy the resource.ignore_changes: ignores changes to specific attributes after creation.replace_triggered_by: replaces the resource when a referenced resource or attribute changes.action_trigger: invokes provider-defined actions (e.g. running a Lambda or invalidating a CDN cache) on specified lifecycle events — available in Terraform 1.14 and later.
resource "aws_instance" "example" {
  # Configuration settings...

  lifecycle {
    create_before_destroy = true
    ignore_changes        = [tags]
    replace_triggered_by  = [aws_ecs_service.svc.id]
  }
Provisioners
It’s recommended that provisioners only be used as a last resort. They add an implicit dependency on tools present on the machine running Terraform, and their results aren’t tracked in state. Where a provider resource or cloud-init can do the job, prefer that.
Terraform provisioners are used to execute scripts or commands on a remote resource (such as a virtual machine or cloud instance) after it has been created or updated. Provisioners help you perform tasks like configuring software, initializing databases, setting up networking, or any other custom operations needed to prepare a resource for use. There are three provisioners you can use:
file— Copies files or directories from the machine running Terraform to the newly created resource.local-exec— Run scripts or commands on the machine where you’re running Terraform. Typically used to initialize local services.
resource "aws_instance" "example" {
  ami           = "ami-0123456789abcdef0"
  instance_type = "t2.micro"

  provisioner "local-exec" {
    command = "echo 'Resource provisioned!'"
  }
}remote-exec— Run scripts or commands on a remote resource over SSH. Typically used to configure and customize resources like virtual machines, instances, or containers. The example below shows how to use it to run a PowerShell command on the provisioned Windows AWS instance:
resource "aws_instance" "example" {
  ami           = "ami-0123456789abcdef0"
  instance_type = "t2.micro"

  connection {
    type     = "winrm"
    user     = "Administrator"
    password = var.admin_password
    host     = self.public_ip
  }

  provisioner "remote-exec" {
    inline = [
      "powershell.exe -ExecutionPolicy Bypass -Command \"Write-Host 'Running PowerShell remotely'\"",
      "powershell.exe -ExecutionPolicy Bypass -Command \"Get-Process | Select-Object -First 5\""
    ]
Local-only resources in Terraform
Local-only resources exist only in Terraform state and don’t map to any real infrastructure. They’re useful for running provisioners or forcing an action on each apply. For new configurations on Terraform 1.4 or later, use the built-in terraform_data resource. It needs no external provider, and its triggers_replace argument accepts any value type.
resource "terraform_data" "example" {
  # Changing this value recreates the resource on each apply
  triggers_replace = timestamp()
}
Before Terraform 1.4, this pattern used the null_resource type from the hashicorp/null provider. It still works, but terraform_data is the recommended replacement for new code:
resource "null_resource" "example" {
  triggers = {
    always_run = timestamp()
  }
}
To migrate existing null_resource blocks, use a moved block (requires Terraform 1.9 or later), renaming triggers to triggers_replace.
How to list all Terraform resources
To list all resources in a Terraform configuration, use the terraform state list command.
This command displays all resources currently tracked in the Terraform state file, including their full resource addresses. It reflects only resources that have been successfully applied and managed by Terraform, not those merely defined in the configuration files.
Let’s see an example. Assuming you have applied a configuration with resources like an Azure Resource Group and a Virtual Network, running:
terraform state listMight return:
azurerm_resource_group.main
azurerm_virtual_network.vnet
azurerm_subnet.subnet1
azurerm_network_interface.nic1
azurerm_linux_virtual_machine.vm1
Each entry represents a managed Azure resource in the current Terraform state, using the format TYPE.NAME. To get detailed information on a specific resource, use:
terraform state show azurerm_virtual_network.vnetFor configurations that have not been applied yet (i.e., no state file exists), Terraform cannot list resources since they are not part of the state. To inspect all planned resources before applying, use terraform plan.
How do you create a Terraform resource?
For the purpose of this article, we’re going to use the Azure provider.
Step 1: Configure the provider
Configure the Azure provider in your configuration file. This enables you to specify the Azure authentication details either through the Azure CLI or using a Service Principal.
provider "azurerm" {
  features {}
  subscription_id = var.subscription_id  # or via ARM_SUBSCRIPTION_ID
}
Step 2: Find the documentation page for your resource
Find the Terraform docs page for the resource you want to create. In our example, we will create a resource group.
Step 3: Add the resource code block in the configuration file
Add the resource code block in your configuration file as per the example on the Terraform docs page, changing values where required and adding in any additional attributes from the attributes reference section:
resource "azurerm_resource_group" "example" {
  name     = "example"
  location = "West Europe"
  tags = {
      environment = "dev"
   }
}
Step 4: Initialize and apply the configuration
Initialize and apply the configuration, accepting the planned changes when prompted:
terraform init
terraform apply
Step 5: Verify the configuration
Verify the resource group has been created successfully. You could run an Azure CLI command to do this:
az group list --output tableConditionally creating resources
Custom condition checks within your configuration can be used to conditionally create or configure resources based on specific criteria or conditions.
count— Using the count argument with a conditional expression that evaluates to 1 or 0, you can control whether a resource is created. In the example below, if the value ofvar.create_instanceis true (1), then the resource is created, if false (0), it is not.
resource "aws_instance" "example" {
  count = var.create_instance ? 1 : 0

  ami           = "ami-0123456789abcdef0"
  instance_type = "t2.micro"
}
condition ? true_val : false_valcan be used to set resource attributes conditionally. In this example, theamiattribute is set based on the value of theuse_custom_amivariable.
resource "aws_instance" "example" {
  ami           = var.use_custom_ami ? "ami-abcdef12345" : "ami-0123456789abcdef0"
  instance_type = "t2.micro"
}
Custom condition checks (preconditions and postconditions)
Custom conditions let you validate assumptions and guarantees directly in your configuration. Preconditions run before Terraform provisions a block; postconditions run after. Both live inside a lifecycle block and are available in Terraform 1.2 and later.
Use a precondition to stop a run before it starts when an input is invalid:
resource "aws_instance" "example" {
  ami           = var.ami_id
  instance_type = var.instance_type

  lifecycle {
    precondition {
      condition     = contains(["t3.micro", "t3.small"], var.instance_type)
      error_message = "Allowed instance types are t3.micro and t3.small."
    }
  }
}
Use a postcondition to confirm the result after creation, referencing the resource with self:
resource "aws_instance" "example" {
  ami           = var.ami_id
  instance_type = "t3.micro"

  lifecycle {
    postcondition {
      condition     = self.public_ip != ""
      error_message = "The instance must be assigned a public IP."
    }
  }
}
Terraform resources operation timeouts
Operation timeouts refer to the maximum amount of time Terraform will wait for a specific resource operation (e.g., creation, modification, or deletion of a resource) to complete before considering it a failure.
The available timeouts for each resource are shown on its Terraform docs page.
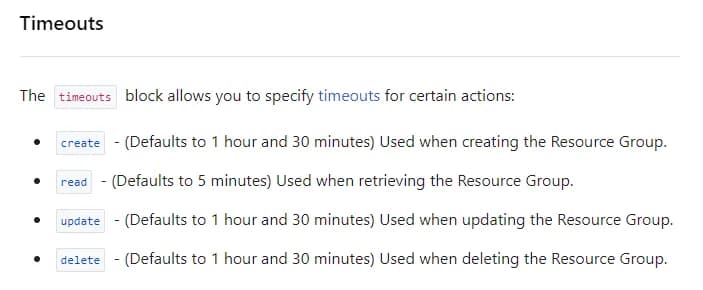
For example, below we set the timeouts for our resource group:
resource "azurerm_resource_group" "example" {
  name     = "example"
  location = "West Europe"
  tags = {
    name = "rg1"
  }

  timeouts {
    create = "10m"
    read   = "6m"
    delete = "10m"
  }
}
Terraform periodically checks the status of resource operations based on a polling interval, which is usually a few seconds. This polling interval is not configurable by users. Terraform continues checking the resource’s status until it either succeeds, reaches the specified timeout, or encounters an error.
Terraform resources best practices
Here are a few best practices you might want to consider when creating your resources:
- Organize your Terraform code into reusable modules to promote code reusability and maintainability. Modules will contain one or more resources.
- Avoid hardcoding values in your resource blocks. Instead, use variables and data sources to fetch dynamic information, such as AMI IDs or IP addresses.
- Limit the use of conditional logic in your configurations. It can make the code harder to understand and maintain. I prefer to use module input variables for flexibility.
- Follow a consistent naming convention for resources, making it easier to identify and manage resources, especially in large deployments.
- Periodically review your infrastructure for unused or deprecated resources. Remove or de-provision resources that are no longer needed.
Deploying Terraform resources with Spacelift
Managing Terraform resources by hand stops scaling the moment you have more than a few stacks, static cloud keys sitting on local machines, and state files no one wants to own. Spacelift takes that operational weight off your team. It runs your Terraform workflows through a GitOps flow, issues short-lived cloud credentials per run instead of static keys, and can manage your state with a backend synced to the rest of the platform.
Spacelift is the infrastructure orchestration platform that manages the full lifecycle for both traditional infrastructure as code (IaC) and AI-provisioned infrastructure, giving you access to a powerful CI/CD workflow and unlocking features such as:
- Policies (based on Open Policy Agent) – You can control how many approvals you need for runs, what kind of resources you can create, and what kind of parameters these resources can have, and you can also control the behavior when a pull request is open or merged.
- Multi-IaC workflows – Combine Terraform with Kubernetes, Ansible, and other IaC tools such as OpenTofu, Pulumi, and CloudFormation, create dependencies among them, and share outputs.
- Build self-service infrastructure – You can use Templates and Blueprints to build self-service infrastructure; simply complete a form to provision infrastructure based on Terraform and other supported tools.
- AI-powered provisioning and diagnostics – Spacelift Intelligence adds an AI-powered layer for natural language provisioning, diagnostics, and operational insight across your infrastructure workflows.
- Integrations with any third-party tools – You can integrate with your favorite third-party tools and even build policies for them. For example, see how to integrate security tools in your workflows using Custom Inputs.
Spacelift enables you to create private workers inside your infrastructure, which helps you execute Spacelift-related workflows on your end. Read the documentation for more information on configuring private workers.
You can check it for free by creating a trial account or requesting a demo with one of our engineers.
Key points
In this article, we showed how to create a resource in Terraform and use its arguments and meta-arguments to configure it. Understanding how to use each part of the resource documentation is key to using Terraform, and knowing which meta-arguments are available for use can power up your deployments!
Note: New versions of Terraform are placed under the BUSL license, but everything created before version 1.5.x stays open-source. OpenTofu is an open-source version of Terraform that expands on Terraform’s existing concepts and offerings. It is a viable alternative to HashiCorp’s Terraform, being forked from Terraform version 1.5.6.
Manage Terraform better with Spacelift
Build more complex workflows based on Terraform using policy as code, programmatic configuration, context sharing, drift detection, resource visualization and many more.
Frequently asked questions
What's the difference between a resource and a data source?
A resource creates, updates, and destroys real infrastructure. A data source only reads information that already exists, so Terraform can reference it without managing its lifecycle. Use a resource when you own the object, and a data source when you need details about something managed elsewhere.
Can I rename or move a Terraform resource without destroying it?
Yes. Add a moved block that points from the old address to the new one, then run terraform plan to confirm no destroy is planned. This preserves state history, so Terraform updates its records instead of recreating the resource.
How do I bring an existing resource under Terraform management?
Use an import block (Terraform 1.5 and later) with the resource address and the object’s ID, then run terraform plan to generate the matching configuration. This is safer than the older terraform import command because the change is reviewable before you apply it.
HashiCorp Developer | Terraform Docs. Create and manage resources overview. Accessed: 13 July 2026
HashiCorp Developer | Terraform Docs. resource block reference. Accessed: 13 July 2026
HashiCorp Developer | Terraform Docs. Manage resources in Terraform state. Accessed: 13 July 2026