
Almost every software application has some secret data. This can range from database credentials to TLS certificates or access tokens to establish secure connections.
The platform you build your application on should provide a secure means for managing this secret data. This is why Kubernetes provides an object called a Secret to store sensitive data you might otherwise put in a Pod specification or your application container image.
In this article, you will learn what a Kubernetes Secret is; its built-in types; ways to create, view, decode, and edit them; and how to use them in Pods. It concludes with the best practices for using Secrets.
What we will cover:
- What are Kubernetes Secrets?
- Are Kubernetes Secrets secure?
- Types of Kubernetes Secrets
- Encoding and decoding data for Kubernetes Secrets
- Ways to create Kubernetes Secrets
- How to manage Kubernetes Secrets
- How are Kubernetes Secrets used by a Pod
- How to use Kubernetes External Secrets operator
- Best practices to follow when using Kubernetes Secrets
What are secrets in Kubernetes?
Kubernetes Secrets are objects used to store and manage sensitive information such as passwords, OAuth tokens, SSH keys, and API keys. The primary purpose of Secrets is to reduce the risk of exposing sensitive data while deploying applications on Kubernetes.
Instead of embedding sensitive data directly within Pods or configuration files, which could expose it to a wider audience than intended, Secrets allow Kubernetes to store and use sensitive data in a more secure and manageable way.
Are Kubernetes secrets secure?
While Kubernetes Secrets offer better security than storing sensitive data in ConfigMaps, they are not inherently highly secure by default. Kubernetes Secrets are base64-encoded and can be accessed through RBAC controls, mounted as volumes, or exposed as environment variables.
However, their biggest vulnerability is that they are stored in plaintext within etcd by default. To mitigate this risk, you must enable encryption at rest in the kube-apiserver. Additionally, improper RBAC configurations can lead to secret leaks, potentially causing downtime, performance degradation, and customer dissatisfaction.
For enhanced security, consider using an external secrets management service like HashiCorp Vault or AWS Secrets Manager. These solutions offer features such as automated secret rotation and stronger encryption, reducing the risk of exposure.
What is the difference between Docker secrets and Kubernetes Secrets?
Docker secrets work with either Docker Compose or Docker Swarm, while Kubernetes Secrets work with Kubernetes. Their purpose is the same, and the biggest difference between them is that Docker secrets are encrypted at rest by default, while for K8s Secrets, you will need to encrypt them manually.
Learn more about Docker secrets.
Types of Kubernetes Secrets
Kubernetes supports several types of secrets:
- Opaque Secrets: Opaque Secrets are used to store arbitrary user-defined data. Opaque is the default Secret type, meaning that when you don’t specify any type when creating a Secret, the secret will be considered Opaque.
- Service account token Secrets: This Secret type stores a token credential that identifies a service account. It is important to note that when using this Secret type, you must ensure that the
kubernetes.io/service-account.nameannotation is set to an existing service account name. - Docker config Secrets: Docker config secret stores the credentials for accessing a container image registry. You use Docker config secret with one of the following type values:
kubernetes.io/dockercfgkubernetes.io/dockerconfigjson
- Basic authentication Secret: Basic authentication type stores credentials needed for basic authentication. When using this type of Secret, the data field must contain at least one of the following keys:
username: the user name for authenticationpassword: the password or token for authentication
- SSH authentication secrets: This Secret type stores data used in SSH authentication. When using an SSH authentication, you must specify a ssh-privatekey key-value pair in the data (or stringData) field as the SSH credential to use.
- TLS Secrets: You use this Secret type to store a certificate and its associated key typically used for TLS. When using a TLS secret, you must provide the tls.key and the tls.crt key in the configuration’s data (or stringData) field.
- Bootstrap token Secrets: You use this Secret type to store bootstrap token data during the node bootstrap process. You typically create a bootstrap token Secret in the kube-system namespace and named it in the form
bootstrap-token-<token-id>.
To learn more about these Secret types, check out their documentation.
Service account token Secrets vs. projected tokens
Historically, Kubernetes created long-lived service account tokens as Secret objects and mounted them into every Pod that used that service account. This has a few downsides:
- The token is a regular Secret stored in etcd (so it’s accessible to anyone with get secrets on that namespace).
- Tokens are long-lived and not bound to a specific Pod or lifetime.
- Revoking them cleanly can be tricky.
Newer clusters instead use bound service account tokens, which are short-lived, audience-scoped tokens projected directly into the Pod as a volume, rather than stored as Secret objects:
- Tokens are time-bound and automatically rotated by the kubelet.
- Tokens are bound to a specific Pod and a specific audience (for example, the Kubernetes API server).
- There’s no persistent Secret object in etcd for each token.
From a security perspective, you generally want to:
- Prefer bound service account tokens (this is the default on modern clusters).
- Set automountServiceAccountToken: false on Pods that don’t need to talk to the Kubernetes API.
- Use tightly scoped service accounts instead of sharing a single “god” service account across many workloads.
This reduces the number of long-lived credentials in your cluster and limits the blast radius if a Pod is compromised.
Encoding and decoding data for Kubernetes Secrets
Let’s add the following secret to our Kubernetes cluster: “my-awesome-password”. We’ve defined a K8s manifest for creating this secret:
apiVersion: v1
kind: Secret
metadata:
 name: my-secret
type: Opaque
data:
 password: my-awesome-password
kubectl apply -f secret.yaml
Error from server (BadRequest): error when creating "secret.yaml": Secret in version "v1" cannot be handled as a Secret: illegal base64 data at input byte 2As you can see, we cannot create the secret in our cluster directly, as we need to first base64 encode it. Let’s do that before adding the password there. I will show you how to do it for Linux and MacOS:
echo -n "my-awesome-password" | base64
bXktYXdlc29tZS1wYXNzd29yZA==
Now, we will replace the text in our Secret with its base64 option:
apiVersion: v1
kind: Secret
metadata:
 name: my-secret
type: Opaque
data:
 password: bXktYXdlc29tZS1wYXNzd29yZA==
kubectl apply -f secret.yaml
secret/my-secret createdWe can get the Secret from Kubernetes by running the following command:
kubectl get secret my-secret -o jsonpath='{.data.password}'
bXktYXdlc29tZS1wYXNzd29yZA==%
To decode the Secret, we can easily use base64 again:
kubectl get secret my-secret -o jsonpath='{.data.password}' | base64 --decode
my-awesome-password%
If you don’t want to encode the data manually as shown before, you have an alternative, by creating the secret imperatively:
kubectl create secret generic my-other-secret --from-literal=password=secret
secret/my-other-secret created
To get the base64 encoded value, we can run:
kubectl get secret my-other-secret -o jsonpath='{.data.password}'
c2VjcmV0%
Also, to get the decoded value, we can run:
kubectl get secret my-other-secret -o jsonpath='{.data.password}' | base64 --decode
secret%
Ways to create Kubernetes Secrets
To create Kubernetes Secrets, you can use one of the following methods:
- Use kubectl
- Use a manifest file
- Use a generator like Kustomize
The following are key points about creating Kubernetes Secrets:
- You create Secrets outside of pods — you create a Secret before any pod can use it.
- When you create a Secret, it is stored inside the Kubernetes data store (i.e., an etcd database) on the Kubernetes control plane.
- When creating a Secret, you specify the data and/or stringData fields. The values for all the data field keys must be base64-encoded strings. Suppose you don’t want to convert to base64. In that case, you can choose to specify the stringData field instead, which accepts arbitrary strings as values.
- When creating Secrets, you are limited to 1MB per Secret. This is to discourage the creation of very large Secrets that could exhaust the kube-apiserver and kubelet memory.
- Also, when creating Secrets, you can mark them as immutable with immutable: true. Preventing changes to the Secret data after creation. Marking a Secret as immutable protects from accidental or unwanted updates that could cause application outages.
- After creating a Secret, you inject it into a Pod either by mounting it as data volumes, exposing it as environment variables, or as imagePullSecrets. You will learn more about this later in this article. Kubernetes imagePullPolicy contains more information.
Prerequisites
Before you learn how to use each of the above methods, ensure you have the following prerequisites:
- A Kubernetes cluster: The demos in this article were done using minikube — a single Node Kubernetes cluster.
- The kubectl command-line tool configured to communicate with the cluster.
For demo purposes, the Secrets you will create below will store hypothetical credentials (username — admin and password — password) required by Pods to access a database.
Also, create a namespace to store the demo resources for easy cleanup:
$ kubectl create namespace secrets-demo1. Create Kubernetes Secrets using kubectl
kubectl create secret is a command used to generate Kubernetes Secret objects that store sensitive data such as passwords, tokens, or keys. It allows administrators to securely inject confidential information into containers without hardcoding it in configurations or images.
This method ensures sensitive data is stored base64-encoded in etcd and accessible to pods via environment variables or mounted volumes. Proper RBAC and encryption policies should be in place to safeguard access.
There are two ways of providing the Secret data to kubectl when creating Secrets using Kubectl, and there are:
- Providing the secret data through a file using the
--from-file=<filename>tag or - Providing the literal secret data using the
--from-literal=<key>=<value>tag
This article will use the file method.
It is important to note that when providing the secret data --from-literal=<key>=<value> tag, special characters such as $, \, *, =, and ! require escaping. However, you can easily escape in most shells with single quotes (‘).
To start creating a Secret with kubectl providing the Secret data from a file in any directory of your choice. Create files to store the hypothetical user credentials with the following command:
$ echo -n 'admin' > username.txt
$ echo -n 'password' > password.txt
The -n flag in the above command ensures that no newline character is added at the end of the text. This is crucial since kubectl will encode the extra newline character if present when it reads the file and turns the content into a base64 string.
After running the above commands, you can verify that the password and username were written to the file with the cat command, as in the image below.

Now, create the Kubernetes Secret with the files using the kubectl command below:
$ kubectl create secret generic database-credentials \
    --from-file=username.txt \
    --from-file=password.txt \
    --namespace=secrets-demo
The generic subcommand tells kubectl to create the Secret with Opaque type. The above command will output the following:

Note: When using the above command, the key of your secret data will be the filename (username.txt and password.txt) by default. To provide keys for the Secret data, use the following syntax --from-file=[key=]source, for example:
kubectl create secret generic database-credentials \
--from-file=username=username.txt \
--from-file=password=password.txt \
--namespace=secrets-demo
To verify the Secret creation, run the following command:
$ kubectl -n secrets-demo get secretsThe above command will show an output similar to the image below.

2. Create Kubernetes Secrets from a YAML manifest file
Before you create a Secret using a manifest file, you must first decide how you want to add the Secret data using the data field and/or the stringData field.
Using the data field, you must encode the secret data using base64. To convert the username and password to base64, run the following command:
echo -n 'admin' | base64
echo -n 'password' | base64
After running the above command, you will get an output similar to the image below. Copy the base64 values and store them to put in your manifest file.

Now create a demo-secret.yaml manifest file using your preferred method (text editor, vim or nano, etc.) and add the following configuration.
apiVersion: v1
kind: Secret
metadata:
  name: demo-secret
type: Opaque
data:
  username: YWRtaW4=
  password: cGFzc3dvcmQ=
In the above manifest file, the username and password values in the data field are the base64 encoded values of the original credentials.
When using the stringData field, the manifest file will be:
apiVersion: v1
kind: Secret
metadata:
  name: demo-secret
type: Opaque
stringData:
  username: admin
  password: password
To create the Secret, run the following command:
$ kubectl -n secrets-demo apply -f demo-secret.yamlAfter running the above command, you should get an output similar to the image below.

3. Create Kubernetes Secrets with a generator like Kustomize
Using a resource Generator like Kustomize can help you create Kubernetes Secrets quickly.
To create a Secret using Kustomize, first create a kustomization.yaml file. In that file, define a secretGenerator to reference one of the following:
- Files that store the secret data,
- The unencrypted literal version of the secret data values,
- Environment variable (.env) files.
You don’t need to base64 encode the values with all these methods.
When referencing Secret data files, you define the secretGenerator like this:
secretGenerator:
- name: database-credentials
  files:
  - username.txt
  - password.txt
When using the literal version of the data values, you define the secretGenerator like this:
secretGenerator:
- name: database-credentials
  literals:
  - username=admin
  - password=password
When using .env files, you define the secretGenerator like:
secretGenerator:
- name: database-credentials
  envs:
  - .env.secret
Create the kustomization.yaml file, and paste either of the first two options.
Then in the same directory as the file, generate the Secret with the following kubectl command:
$ kubectl -n secrets-demo apply -k .After running the above command, you should see an output similar to the image below.

So far, you’ve learned what Kubernetes secrets are, its built-in types, and the methods you can use to create them. Next, you will learn how to describe a Secret, decode a Secret, edit Secret values, and finally, how to use a Secret in Pods.
Check out our Kustomize vs. Helm comparison.
How to manage Kubernetes Secrets
Here’s an overview of the main actions you can perform with Kubernetes Secrets.
List existing Kubernetes Secrets
To list Secrets we can simply run the following command:
kubectl get secrets
NAME              TYPE     DATA   AGE
my-other-secret   Opaque   1      2m23s
my-secret         Opaque   1      5m39s
To get more details about the Secrets, we can use the describe option for kubectl:
kubectl describe secrets
Name:         my-other-secret
Namespace:    default
Labels:       <none>
Annotations:  <none>

Type:  Opaque

Data
====
password:  6 bytes


Name:         my-secret
Namespace:    default
Labels:       <none>
Annotations:  <none>

Type:  Opaque

Data
====
password:  19 bytes
Secrets are namespaced resources, so you can use the -n option to get the Secrets from a specific namespace, or you can use –all-namespaces to get the secrets from all the namespaces. By default, the default namespace will be used.
kubectl get secrets -n space
NAME             TYPE     DATA   AGE
awesome-secret   Opaque   1      26s

kubectl get secrets --all-namespaces
NAMESPACE   NAME              TYPE     DATA   AGE
default     my-other-secret   Opaque   1      5m22s
default     my-secret         Opaque   1      8m38s
space       awesome-secret    Opaque   1      32s
View a Kubernetes Secret value with kubectl describe
Using the kubectl describe, you can view some basic information about Kubernetes objects. To use it to view the description of one of the Secrets you’ve created in the article, run:
$ kubectl -n secrets-demo describe secrets/database-credentialsAfter running the above command, you will get an output similar to the image below.
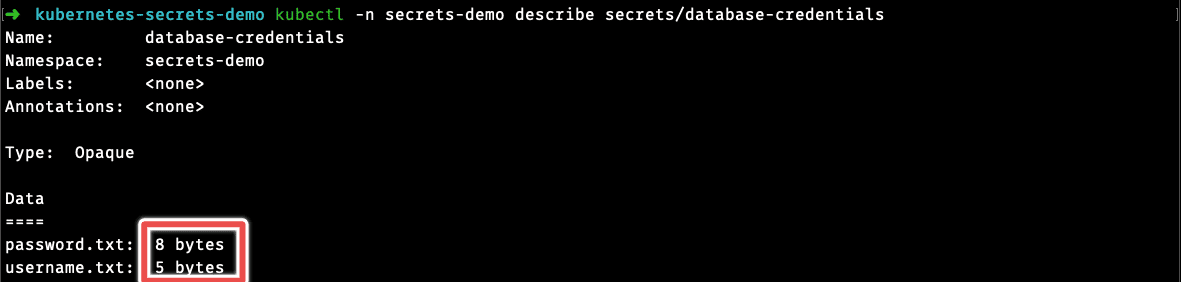
As you can see, the above output doesn’t show the Secret’s contents. This is to protect the Secret from being exposed or logged in the terminal.
To view the Secret data, you will need to decode the secret.
Decode a Kubernetes Secret
To view the data of the Secret you created, run the following command:
$ kubectl -n secrets-demo get secret database-credentials -o jsonpath='{.data}'After running the above commands, it will output the encoded key-value pairs of the secret data as in the image below.

To decode the encoded strings, you can use the following command:
$ echo 'YWRtaW4=' | base64 --decode
$ echo 'cGFzc3dvcmQ=' | base64 --decode
After running the above commands you should see an output similar to the image below.

Note: If you do the above, you could store the Secret data in your shell history. To avoid that, combine the previous two steps into one command like the one below.
$ kubectl get secret database-credentials -o jsonpath='{.data.password}' | base64 --decodeEdit a Kubernetes Secret
To edit the content of the Secret you created, run the following kubectl command:
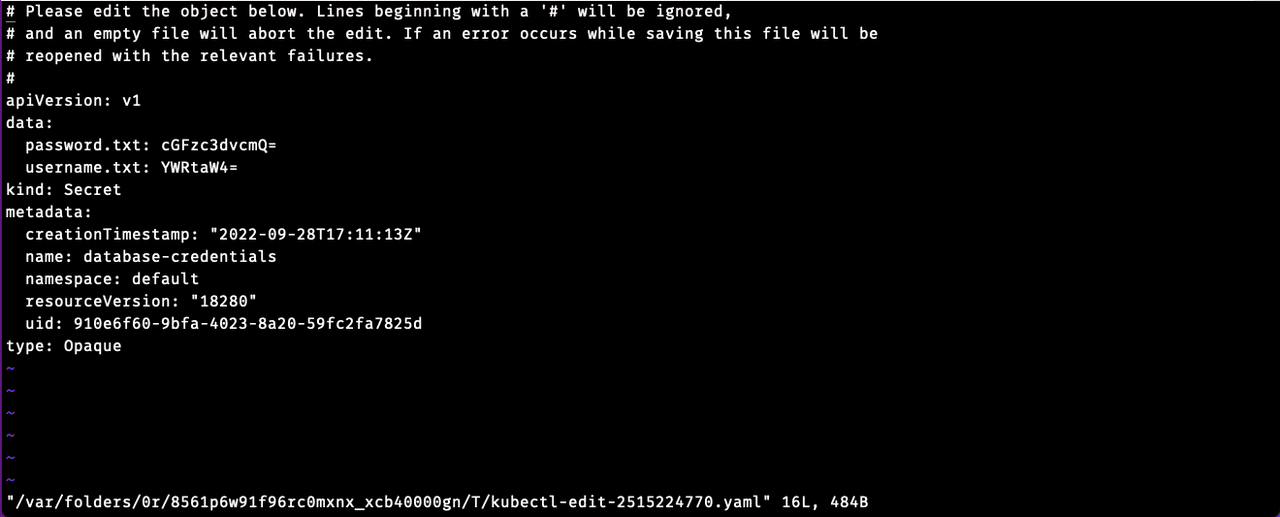
$ kubectl -n secrets-demo edit secrets database-credentialsThe above command will open your terminal’s default editor to allow you to update the base64 encoded Secret data in the data field as in the image below.
Note: It is important to note that when you set a Secret as immutable upon creation, you can’t edit it. Nonetheless, you can edit any existing mutable Secret to make it immutable by adding immutable: true in the manifest file like the following:
apiVersion: v1
kind: Secret
metadata:
  ...
data:
  ...
immutable: true
Delete a Kubernetes Secret
Clean up the entire setup by deleting the namespace, which deletes all the secrets and Pods you created with the following command:
kubectl delete secret <secret-name> -n <namespace>How are Kubernetes Secrets used by a Pod
The following are the three main ways a Pod can use a Secret:
- As container environment variables
- As files in a volume mounted on one or more of its containers.
- By the kubelet when pulling images for the Pod — imagePullSecrets.
Using Secret data as container environment variables
For demo purposes, below is a Pod manifest with the Kubernetes Secret data you created exposed as environment variables. Create a secret-test-env-pod.yaml and paste the configuration in it.
apiVersion: v1
kind: Pod
metadata:
  name: env-pod
spec:
  containers:
    - name: secret-test
      image: nginx
      command: ['sh', '-c', 'echo "Username: $USER" "Password: $PASSWORD"']
      env:
        - name: USER
          valueFrom:
            secretKeyRef:
              name: database-credentials
              key: username.txt
        - name: PASSWORD
          valueFrom:
            secretKeyRef:
              name: database-credentials
              key: password.txt
Create the Pod using the following kubectl command:
$ kubectl -n secrets-demo apply -f secret-test-evn-pod.yamlTo verify that Kubernetes mounted the Secret on the Pod, describe the Pod with the following command:
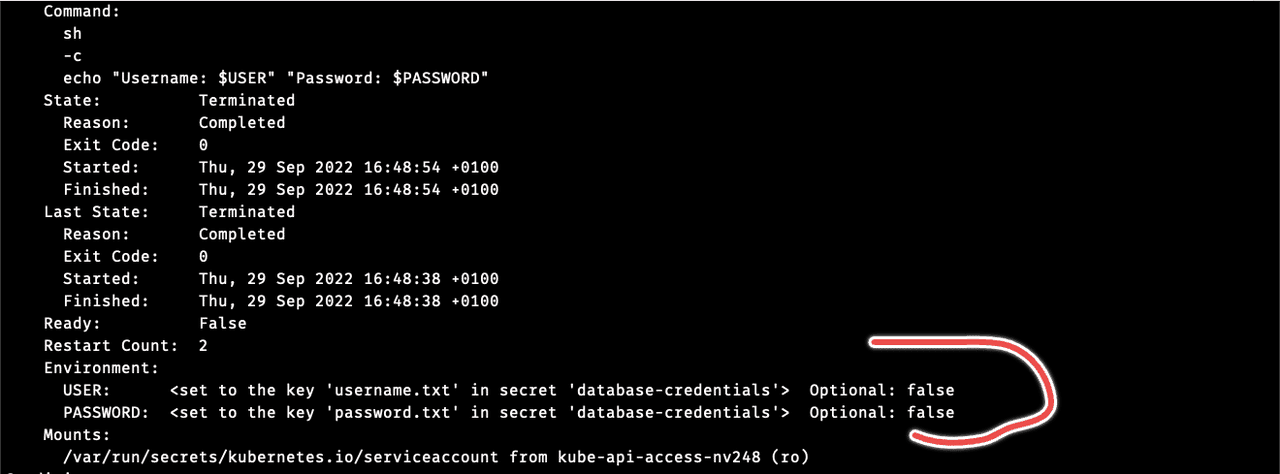
# "env-pod" is the Pod name as in the above manifest file
$ kubectl -n secrets-demo describe pod env-pod
After running the above command, you should see an output similar to the image below.
Also, seeing the echo command in the Pod manifest file, you can verify by checking the logs of the Pod with:
$ kubectl -n secrets-demo logs env-podThe above command will output the Secret data as in the image below.

Using Secret data as files in a volume mounted on a Pod’s container(s)
For demo purposes, below is a Pod manifest with the Kubernetes Secret data you created as files in a volume mounted on the Pod’s containers.
Create a secret-test-volume-pod.yaml and paste the configuration in it.
apiVersion: v1
kind: Pod
metadata:
  name: volume-test-pod
spec:
  containers:
  - name: secret-test
    image: nginx
    volumeMounts:
    - name: secret-volume
      mountPath: /etc/config/secret
  volumes:
  - name: secret-volume
    secret:
      secretName: database-credentials
Create the Pod using the following kubectl command:
$ kubectl -n secrets-demo apply -f secret-test-volume-pod.yamlTo verify that the Pod can access the Secret data, connect to the container and run the following commands in the volume directory:
$ kubectl -n secrets-demo exec volume-test-pod -- cat /etc/config/secret/username.txt

$ kubectl -n secrets-demo exec volume-test-pod -- cat /etc/config/secret/password.txt

$ kubectl -n secrets-demo exec volume-test-pod -- ls /etc/config/secret
The above commands will have an output similar to the image below.

kubelet using Secret data when pulling images for a Pod
You use this way when you want to fetch container images from a private repository. These secrets are configured at the Pod level.
To use this method, you configure the Secret data in the imagePullSecrets field of your Pod manifest file. The kubelet on each node will authenticate to that repository.
apiVersion: v1
kind: Pod
metadata:
  ...
spec:
  containers:
    ...
  imagePullSecrets:
    - name: <your-registry-key>
To learn more about using Secret data when pulling images for a Pod and how to specify imagePullSecrets, check out this documentation.
How to use Kubernetes External Secrets operator
With the Kubernetes External Secrets Operator (ESO) you can integrate secrets management tools such as AWS Secrets Manager, or Vault with Kubernetes. This will let you manage secrets outside your K8s cluster.
For this example, we will integrate ESO with OpenBao (HashiCorp Vault open-source alternative).
Step 1 – Install ESO
The easiest way to install ESO is by using Helm:
helm repo add external-secrets https://charts.external-secrets.io
helm repo update
helm install external-secrets external-secrets/external-secrets
"external-secrets" has been added to your repositories
Hang tight while we grab the latest from your chart repositories...
...Successfully got an update from the "external-secrets" chart repository
Update Complete. ⎈Happy Helming!⎈
NAME: external-secrets
LAST DEPLOYED: Fri Feb 14 11:45:49 2025
NAMESPACE: default
STATUS: deployed
REVISION: 1
TEST SUITE: None
NOTES:
external-secrets has been deployed successfully in namespace default!
In order to begin using ExternalSecrets, you will need to set up a SecretStore
or ClusterSecretStore resource (for example, by creating a 'vault' SecretStore).
More information on the different types of SecretStores and how to configure them
can be found in our Github: https://github.com/external-secrets/external-secretsWe can verify the installation by running the get pods command and filtering for external-secrets:
kubectl get pods | grep -i external-secrets
external-secrets-55dbcddd4-qzmwm                    1/1     Running   0             91s
external-secrets-cert-controller-86859999ff-4zklh   1/1     Running   0             91s
external-secrets-webhook-56f4f9b965-dfsdp           1/1     Running   0             91s
Step 2 – Install OpenBao
We will install OpenBao in our kind cluster using Helm:
helm repo add openbao https://openbao.github.io/openbao-helm

"openbao" has been added to your repositories
helm repo update
Hang tight while we grab the latest from your chart repositories...
...Successfully got an update from the "openbao" chart repository
...Successfully got an update from the "external-secrets" chart repository
Update Complete. ⎈Happy Helming!⎈kubectl create namespace openbao
namespace/openbao createdhelm install openbao openbao/openbao --namespace openbao --set server.dev.enabled=true
NAME: openbao
LAST DEPLOYED: Fri Feb 14 11:56:09 2025
NAMESPACE: openbao
STATUS: deployed
REVISION: 1
NOTES:
Thank you for installing OpenBao!
Now that you have deployed OpenBao, you should look over the docs on using
OpenBao with Kubernetes available here:
https://openbao.org/docs/
Your release is named openbao. To learn more about the release, try:
$ helm status openbao
$ helm get manifest openbaoVerify the installation:
kubectl get pods -n openbao
NAME                                      READY   STATUS    RESTARTS   AGE
openbao-0                                 1/1     Running   0          57s
openbao-agent-injector-5778f8b977-6gr7p   1/1     Running   0          57s
Step 3 – Configure OpenBao
We will first need to port-forward our OpenBao container to ensure we can access it.
kubectl -n openbao port-forward svc/openbao 8200:8200 &Make sure you have the OpenBao CLI installed. This guide provides more details on how to do that.
Now let’s export our VAULT_TOKEN. By default, the value will be always root because we are using OpenBao in dev mode:
export VAULT_TOKEN='root'Next, let’s verify that our connection is working:
bao status


Handling connection for 8200
Key             Value
---             -----
Seal Type       shamir
Initialized     true
Sealed          false
Total Shares    1
Threshold       1
Version         2.1.1
Build Date      2025-01-21T21:25:50Z
Storage Type    inmem
Cluster Name    vault-cluster-f00256f1
Cluster ID      9cb6f6e8-824b-88e4-0291-991ab589a624
HA Enabled      false
The connection is working fine, so let’s create a secret:
bao kv put secret/demo-secret username="demo-user" password="demo-pass"


Handling connection for 8200
===== Secret Path =====
secret/data/demo-secret


======= Metadata =======
Key                Value
---                -----
created_time       2025-02-14T10:01:59.006791209Z
custom_metadata    <nil>
deletion_time      n/a
destroyed          false
version            1
The Secret was created successfully, so let’s verify it by getting its value:
bao kv get secret/demo-secret

Handling connection for 8200
===== Secret Path =====
secret/data/demo-secret

======= Metadata =======
Key                Value
---                -----
created_time       2025-02-14T10:01:59.006791209Z
custom_metadata    <nil>
deletion_time      n/a
destroyed          false
version            1

====== Data ======
Key         Value
---         -----
password    demo-pass
username    demo-user
Step 4 – Configure ESO with OpenBao
To configure ESO with OpenBao we will use a ClusterSecretsStore, and a Secret containing the token:
apiVersion: external-secrets.io/v1beta1
kind: ClusterSecretStore
metadata:
 name: openbao-backend
spec:
 provider:
   vault:
     server: "http://openbao.openbao:8200"
     path: "secret"
     version: "v2"
     auth:
       tokenSecretRef:
         name: openbao-token
         key: token
---
apiVersion: v1
kind: Secret
metadata:
 name: openbao-token
type: Opaque
stringData:
 token: "root"
For this to work, the port-forwarding should still be enabled for OpenBao.
Let’s create these with kubectl:
kubectl apply -f secretstore.yaml

clustersecretstore.external-secrets.io/openbao-backend created
secret/openbao-token created
Step 5 – Create an external secret by using the OpenBao configuration
We will use the following configuration for the external secret:
apiVersion: external-secrets.io/v1beta1
kind: ExternalSecret
metadata:
 name: demo-secret
spec:
 refreshInterval: "15s"
 secretStoreRef:
   name: openbao-backend
   kind: ClusterSecretStore
 target:
   name: demo-secret
 data:
   - secretKey: username
     remoteRef:
       key: demo-secret
       property: username
   - secretKey: password
     remoteRef:
       key: demo-secret
       property: password
The spec shows we have a secretStoreRef that is pointing to our openbao-backend ClusterSecretStore. In the Secret date, we are using a remoteRef to specify the key from OpenBao and its properties.
To clarify this configuration, we will create another secret in OpenBao that has a longer keypath:
bao kv put secret/dev/db-secret username="db-user" password="db-pass"
Handling connection for 8200
====== Secret Path ======
secret/data/dev/db-secret


======= Metadata =======
Key                Value
---                -----
created_time       2025-02-14T10:15:00.85375496Z
custom_metadata    <nil>
deletion_time      n/a
destroyed          false
version            1
Now, let’s create another external secret based on this new secret:
apiVersion: external-secrets.io/v1beta1
kind: ExternalSecret
metadata:
 name: db-secret
spec:
 refreshInterval: "15s"
 secretStoreRef:
   name: openbao-backend
   kind: ClusterSecretStore
 target:
   name: dev
 data:
   - secretKey: username
     remoteRef:
       key: dev/db-secret
       property: username
   - secretKey: password
     remoteRef:
       key: dev/db-secret
       property: password
Let’s use kubectl apply to create it:
kubectl apply -f dbextsecret.yaml
externalsecret.external-secrets.io/db-secret created
Step 6 – Verify the secrets value
Let’s see all the Secrets we have created in our k8s cluster:
kubectl get secret
NAME                                     TYPE                 DATA   AGE
demo-secret                              Opaque               2      9m5s
dev                                      Opaque               2      27s
external-secrets-webhook                 Opaque               4      32m
my-other-secret                          Opaque               1      40m
my-secret                                Opaque               1      44m
openbao-token                            Opaque               1      9m38s
sh.helm.release.v1.external-secrets.v1   helm.sh/release.v1   1      32m
As you can see, “demo-secret” and “dev’ are the Secrets we have created based on the OpenBao values:
We can now get information about them:
kubectl get secret demo-secret -o jsonpath='{.data.username}' | base64 -d
demo-user%

kubectl get secret demo-secret -o jsonpath='{.data.password}' | base64 -d
demo-pass%

kubectl get secret dev -o jsonpath='{.data.username}' | base64 -d
db-user%

kubectl get secret dev -o jsonpath='{.data.password}' | base64 -d
db-pass%
Best practices to follow when using Kubernetes Secrets
By default, Kubernetes stores Secrets unencrypted in the etcd data store. To safely use them, take the following steps, at minimum:
- Enable Encryption at Rest for Secrets.
- Set least-privilege access to Secrets as the default setting with RBAC rules.
- Only allow certain containers to have access to a certain Secret.
- Use third-party Secret store providers, if possible.
- Mark long-lived, rarely changed Secrets as immutable: true to reduce accidental changes and improve kube-apiserver performance.
You should also investigate how Spacelift helps you manage the complexities and compliance challenges of using Kubernetes. It brings with it a GitOps flow, so your Kubernetes Deployments are synced with your Kubernetes Stacks, and pull requests show you a preview of what they’re planning to change.
With Kubernetes Stacks in Spacelift, you can keep your Secret manifests, deployments, and policies in one GitOps workflow, with previews and approvals for every change.
To take this one step further, you could add custom policies to reinforce the security and reliability of your configurations and deployments. Spacelift provides different types of policies and workflows that are easily customizable to fit every use case. For instance, you could add plan policies to restrict or warn about security or compliance violations or approval policies to add an approval step during deployments.
Find out more about how Spacelift works with Kubernetes, and get started by creating a free trial account or booking a demo with one of our engineers.
Key points
In this article, you learned what a Kubernetes Secret is; its built-in types; ways to create, view, decode, and edit them; and how to use them in Pods. You also learned the best practices to follow when using Secrets.
To learn more about Kubernetes Secrets, check out its API reference and learn how to manage Kubernetes Secrets with Terraform.
Manage Kubernetes Easier and Faster
Spacelift allows you to automate, audit, secure, and continuously deliver your infrastructure. It helps overcome common state management issues and adds several must-have features for infrastructure management.
