
In this article, we will take a look at namespaces in Kubernetes, explain what they are and how to create them on the command line and in a configuration file, with some quick reference command examples using kubectl. Let’s see an overview of Kubernetes namespaces!
What we will cover:
What is a namespace in Kubernetes?
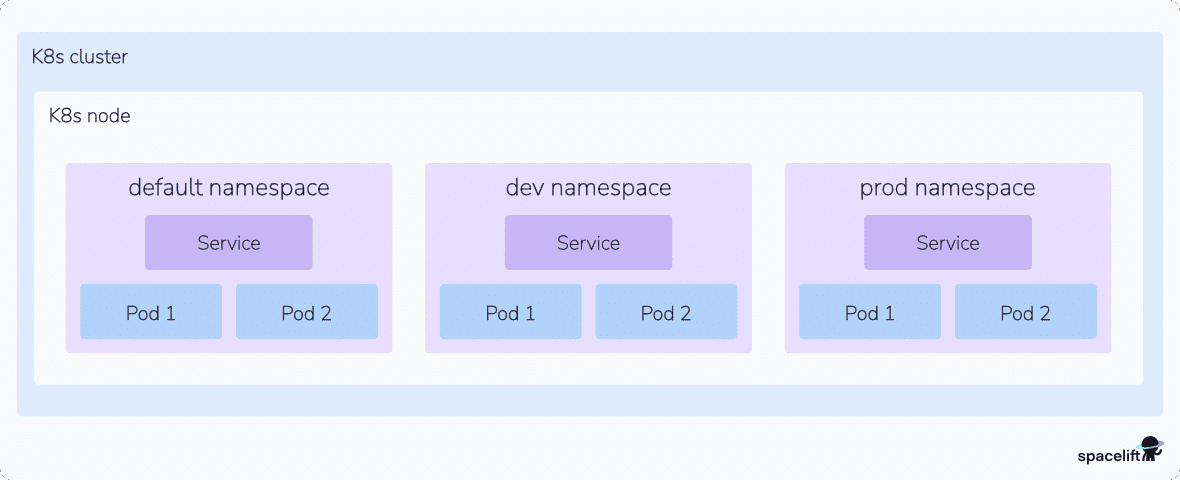
Kubernetes namespaces provide a way to partition and organize resources within a Kubernetes cluster. They allow the separation and logical organization of groups of resources within a cluster, making cluster management more streamlined. Namespaces can be created using the command line tool kubectl or a YAML configuration file.
Namespaces can be used for logical groupings, for example, to denote multiple environments like dev, qa, or prod, or for grouping objects that make up an application. Commonly a combination of both the above examples is used. If an application is called blog, then it could be segmented using namespaces blog-dev, blog-qa, and blog-prod.
If a resource is namespaced, that means it cannot be created without a namespace.
Default namespace types in Kubernetes
By default, when you are creating a new Kubernetes cluster using a managed service, the following types of namespaces are created:
kubectl get namespaces
- default – the default Kubernetes namespace is used for resources that don’t have a specific namespace specified when created
- kube-node-lease – helps determine the availability of the nodes
- kube-public – used for resources that need to be readable by all users
- kube-system – contains the system processes such as DNS, dashboard, logging, and monitoring, among others
What is the difference between Kubernetes cluster and namespaces?
A Kubernetes cluster is spread among multiple compute nodes and contains multiple namespaces in which k8s resources are deployed. Not all resources in Kubernetes are namespaced, meaning that some of them can be created globally.
What is the difference between pods and namespaces?
Pods are the most fundamental resources you can use inside your Kubernetes cluster for your workloads. They are namespaced, meaning they are always created inside a Kubernetes namespace.
When to use a Kubernetes namespace?
Kubernetes namespaces are critical for your Kubernetes workloads. Use a Kubernetes namespace to organize and manage resources within a cluster, especially when dealing with multiple teams or projects. Namespaces offer isolation, allowing different environments (such as development, staging, and production) to coexist without resource conflicts. They also help with managing resource quotas, controlling access, and simplifying administration.
When to use multiple namespaces?
Kubernetes does not impose a hard limit on the number of namespaces you can create and there are multiple scenarios in which you will need to use multiple Kubernetes namespaces:
- Multi-tenant environments
Namespaces provide a way to isolate resources, ensuring that only team members with enough permissions can access them. By using namespaces in multi-tenant environments you can also take advantage of resource quotas and limits, making sure that no teams are overwhelming the cluster with their consumption. Read more: Kubernetes Multi-Tenancy: Considerations & Approaches
- Environment separation
Usually, when developing an application, it is best practice to have multiple environments to ensure that all changes are applied safely. With K8s namespaces, you can create one namespace per environment and deploy your application while ensuring that each environment can be managed independently. This is also helpful for credentials management as configmaps and secrets are namespaced resources, and you will most likely have different configurations based on the environment.
- Implementing role-based access control
Roles and Role Bindings are namespaced resources that allow you to define permissions within the scope of a namespace.
- Testing
Creating a separate namespace and deploying your application will help developers test their application while removing any risk associated with direct production changes.
How to create a Kubernetes namespace?
You could create a namespace imperatively (using kubectl) or declaratively (using a YAML file).
Creating a namespace using a YAML file
To create a Kubernetes namespace using the YAML file, let’s write a manifest that creates a that namespace:
# namespace.yaml
apiVersion: v1
kind: Namespace
metadata:
  name: jacks-blog
Now we can create it by running:
# Apply the namespace.yaml file
kubectl apply -f namespace.yml
Creating a namespace using kubectl
To create a Kubernetes namespace imperatively with kubectl, you can simply run this command:
kubectl create namespace my-namespace-imperative
namespace/my-namespace-imperative createdTutorial: How to use Kubernetes namespaces
Note that on the command line, if a namespace is not specified for a given kubectl command, then objects from the default namespace are shown.
1. View existing namespaces
To see objects within a specific namespace, the name of the namespace must be specified. Creating objects in the default namespace is considered a bad practice as it makes it harder to implement NetworkPolicies, use RBAC, and segregate objects. (Read more in our Kubernetes best practices article.)
To list all the namespaces currently active in your Kubernetes cluster, you can use the following kubectl command:
# View existing namespaces
kubectl get namespaces
Here we have a namespace listed called ingress-nginx.
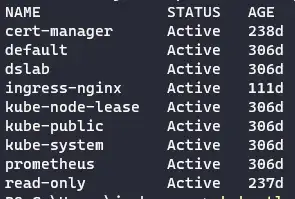
Note that we also see the list of four Kubernetes namespaces that come out of the box:
- default — The default namespace set by the system.
- kube-system — This namespace is assigned to resources that are created by the Kubernetes system.
- kube-public — This namespace is created by the system and is visible to all users, even users that aren’t authenticated.
- kube-node-lease — This namespace holds lease objects associated with each node. These leases allow the kubelet to send heartbeats so that you can determine node availability.
2. List the pods contained in a namespace
To view the pods within the namespace:
# List the pods contained in a namespace
kubectl get pods --namespace ingress-nginx

# Note the short format for namespace can be used (-n)
kubectl get pods -n ingress-nginx
3. List pods in the default namespace
To view pods in the default namespace (no namespace specified):
# List pods in the default namespace
kubectl get pods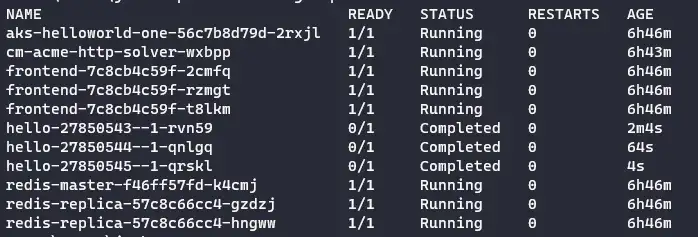
Note that my three pods in the ingress-nginx namespace are not displayed here.
4. Create a new namespace
To create a new namespace:
# Create a new namespace called jacks-blog
kubectl create namespace jacks-blog
The namespace’s name can be created with a maximum length of 63 characters using only alphanumeric characters and hyphens. Names cannot start with a hyphen, and the alpha characters can only be lowercase.
5. Delete a namespace
And to delete a namespace:
# Delete a namespace called jacks-blog
kubectl delete namespace jacks-blog
If you need to delete multiple namespaces, you can list them in a single command separated by spaces:
kubectl delete namespace namespace1 namespace2 namespace3Deleting a namespace will also delete all resources within that namespace, including pods, services, deployments, etc. Make sure to back up any important data before proceeding.
Read more about the kubectl delete deployment command.
6. See details about a namespace
To see details about a namespace:
# Describe a namespace
kubectl describe namespace nginx-ingress
7. Show resource usage of pods in a namespace
To see the resource usage (CPU / Memory) of pods in a particular namespace:
# Show resource usage of pods in ingress-nginx namespace
kubectl top pod --namespace=ingress-nginx
See also How to Restart Kubernetes Pods With Kubectl.
8. Rename a namespace
While you cannot directly rename your namespace, what you can do is:
- Save the configuration of it to a file.
kubectl get namespace my-namespace-declarative -o yaml > new_namespace.yaml- Modify the name in the yaml file.
- Create the new namespace.
kubectl apply -f new_namespace.yaml
namespace/my-namespace-declarative-modified created- Repeat the above three steps for all the resources inside your namespace (you will need to modify the namespace parameter and not the name of the resource).
- Delete the old namespace.
kubectl delete namespace my-namespace-declarative
namespace "my-namespace-declarative" deleted
9. Set the default namespace for kubectl commands
By default, kubectl uses the default namespace unless otherwise specified with -n or --namespace. Setting a default namespace modifies the current context configuration so that all future kubectl commands use the specified namespace automatically.
To set the default namespace for kubectl commands, use the kubectl config set-context command with the --namespace flag.
kubectl config set-context --current --namespace=<your-namespace>For example:
kubectl config set-context --current --namespace=devAfter this, commands like kubectl get pods will act as if -n dev was specified.
This affects only the current kubeconfig context and can be reversed by setting another namespace or resetting the context.
Kubernetes namespaces best practices
Namespaces are an important piece for your K8s cluster. They help with the overall separation, governance, and compliance of your Kubernetes resources.
Here are some of the best practices you should take advantage of:
1. Use meaningful names for your namespaces
Create namespaces for specific use cases, such as environment separation, multi-tenant RBAC, testing, and others. By looking at a namespace name, you should be able to identify its purpose easily.
At the same time, you should avoid creating namespaces with the prefix kube-, as this prefix is reserved for Kubernetes system namespaces. Creating custom namespaces with this prefix can lead to conflicts and unintended consequences within the Kubernetes environment.
2. Implement resource quotas and limits
On the namespace level, you should ensure that resources have limits for CPU and memory to avoid overloading the cluster. Also, using persistent volume claims for your storage helps maintain cluster performance.
3. Implementing role-based access control
Using the least privilege access method is a best practice for every IT tool or product, and K8s makes no difference. You need to create roles and role bindings to your namespaces and ensure that only authorized users have access to them. (To learn more, check out Guide to Kubernetes RBAC)
4. Implement network policies
Network policies are similar to security group / network access control list rules. With them, you can control pod communication and restrict connection between services that don’t need to interact.
5. Take advantage of monitoring and logging
Configure monitoring and logging as part of your cluster and set up alerts based on namespace-specific metrics. This can help in overseeing the cluster’s well-being and detect anomalies, while giving you the option to promptly address these issues.
6. Use multiple namespaces
Don’t create all your resources in a single Kubernetes namespace because, in that way, it will be impossible to implement all the best practices mentioned above. You should find a namespace split that works for your organization (application/environment/team), and put it to the test.
Kubernetes + Spacelift
If you need any assistance with managing your Kubernetes projects, take a look at Spacelift. It brings with it a GitOps flow, so your Kubernetes Deployments are synced with your Kubernetes Stacks, and pull requests show you a preview of what they’re planning to change.
To take this one step further, you could add custom policies to harden the security and reliability of your configurations and deployments. Spacelift provides different types of policies and workflows easily customizable to fit every use case. For instance, you could add plan policies to restrict or warn about security or compliance violations or approval policies to add an approval step during deployments.
You can try it for free by creating a trial account or booking a demo with one of our engineers.
Key points
Namespaces are easy to work with in Kubernetes and can be manipulated using the kubectl command line tool, or declared in YAML configuration files. They allow objects to be grouped. Effective use of namespaces can make cluster management more streamlined.
Manage Kubernetes Faster and More Easily
Spacelift allows you to automate, audit, secure, and continuously deliver your infrastructure. It helps overcome common state management issues and adds several must-have features for infrastructure management.
