
In this article, we explore the Ingress object in Kubernetes (K8S), and look at how it can be used with some examples. We will then walk step-by-step through setting up an NGINX Ingress controller with Azure Kubernetes Service (AKS).
What we will cover:
- What is Ingress in Kubernetes?
- Ingress vs. LoadBalancer vs. NodePort
- Ingress vs. Gateway API
- Ingress Controllers
- Setting up Ingress with NGINX – step by step
- Setting up NGINX Ingress Controller on local Minikube cluster
Note: The community Ingress NGINX controller is now in best-effort maintenance and is scheduled for retirement in March 2026. After this date, it will no longer receive new releases, bug fixes, or security patches. We still use Ingress NGINX in the examples below because it remains widely deployed, but for any new or long-term production workloads, you should plan a migration to Gateway API or a fully supported controller from your cloud provider or vendor.
What is Ingress in Kubernetes?
In Kubernetes, Ingress is a resource type similar to Service, that allows you to easily route HTTP and HTTPS traffic entering the cluster through a single entry point to different services inside the cluster. Traffic routing is defined by rules specified on the Ingress resource.
Ingress objects refer to allowing HTTP or HTTPS traffic through to your cluster services. They do not expose other ports or protocols to the wider world. For this, you should use a service type such as LoadBalancer or NodePort. A service is an external interface to a logical set of Pods. Services use a ‘virtual IP address’ local to the cluster. External services could not access these IP addresses without an Ingress.
When to use Kubernetes Ingress?
There are many different use cases for Ingress:
- Exposing multiple services through a single entry point simplifying traffic routing through URIs, paths, headers, or other methods.
- SSL/TLS termination – simplify certificate management and reduce overhead on your services.
- Authentication and authorization – implement secure access to your services.
- Load balancing – even though Ingress and the load balancer service have a lot in common, ingress is internal to the cluster and allows you to route to different services, while the load balancer component is external to the cluster, letting you route traffic to a single service.
What is the difference between Ingress and Egress?
In networking, ingress refers to the traffic that comes inside your network, while egress refers to the traffic that goes outside of it:
- VM → World (Egress)
- World → VM (Ingress)
In K8s it is the same and does the management of network traffic that enters and leaves the K8s cluster.
Apart from the direction of traffic, another difference would be their focus. Ingress focuses on load balancing and SSL termination, while Egress focuses on preventing unauthorized access to external resources.
Ingress vs. LoadBalancer vs. NodePort
Ingress, LoadBalancer, and NodePort are all ways of exposing services within your K8S cluster for external consumption.
NodePort and LoadBalancer let you expose a service by specifying that value in the service’s type.
With a NodePort, K8S allocates a specific port on each node to the service specified. Any request received on the port by the cluster simply gets forwarded to the service.
With a LoadBalancer, there needs to be an external service outside of the K8S cluster to provide the public IP address. In Azure, this would be an Azure Application Gateway in front of your Azure Kubernetes Service (AKS) cluster. In AWS, this would be an Application Load Balancer (ALB) in front of your Elastic Kubernetes Service (EKS), and in Google cloud, this would be a Network Load Balancer in front of your Google Kubernetes Engine (GKE) cluster.
Each time a new service is exposed, a new LoadBalancer needs to be created to get a public IP address. Conveniently, the Load balancer provisioning happens automatically for you because of the way the Cloud providers plugin to Kubernetes, so that doesn’t have to be done separately.
Ingress is a completely independent resource to your service. As well as enabling routing rules to be consolidated in one place (the Ingress object), this has the advantage of being a separate, decoupled entity that can be created and destroyed separately from any services.
Ingress vs. Gateway API
Gateway API is the newer, more expressive way to manage traffic into Kubernetes clusters. It introduces role-oriented resources such as Gateway and HTTPRoute, supports more advanced matching and traffic-splitting scenarios, and is actively developed by SIG Network as the long-term evolution of Kubernetes traffic management.
You can think of it as the next step beyond Ingress: the Ingress API remains stable and supported, but most new features and innovations are happening around Gateway API. For greenfield projects, many teams now start directly with Gateway API and keep using Ingress primarily where they need compatibility with existing controllers, manifests, and tooling.
Ingress Controllers
An ingress controller acts as a reverse proxy and load balancer inside the Kubernetes cluster. It provides an entry point for external traffic based on the defined Ingress rules. Without the Ingress Controller, Ingress resources won’t work.
The Ingress Controller doesn’t run automatically with a Kubernetes cluster, so you will need to configure your own. An ingress controller is typically a reverse web proxy server implementation in the cluster.
Examples of Ingress Controllers
There are many available Ingress controllers, all of which have different features. The official documentation lists the available Ingress controllers. A few commonly used ones include:
- AKS Application Gateway Ingress Controller is an ingress controller that configures the Azure Application Gateway.
- GKE Ingress Controller for Google Cloud
- AWS Application Load Balancer Ingress Controller
- HAProxy Ingress is an ingress controller for HAProxy.
- Istio Ingress is an Istio based ingress controller.
- The NGINX Ingress Controller for Kubernetes works with the NGINX webserver (as a proxy).
- The Traefik Kubernetes Ingress provider is an ingress controller for the Traefik proxy.
You can have multiple ingress controllers in a cluster mapped to multiple load balancers should you wish!
Learnk8s has a fantastic feature comparison of all the available ingress controllers to help you make your choice. Note the limitations of the Azure application gateway ingress controller. For many years, the NGINX Ingress Controller was the most popular choice for general-purpose Ingress. Today, cloud-native teams increasingly adopt managed cloud controllers or Gateway API solutions for new deployments, though NGINX Ingress remains widely used in production.
Setting up Ingress with NGINX - step by step
NGINX is a widely used Ingress controller, we will run through how to set this up with Azure Kubernetes Service. We will set up two simple web services and use the NGINX Ingress to route the traffic accordingly.
1. Connect to the AKS cluster
First, we need to fire up your AKS cluster and connect to it. To do this, browse to the AKS cluster resource in the Azure Portal and click on connect. The commands needed to connect via your shell using the Azure CLI will be shown.
2. Install the NGINX Ingress controller
It will install the controller in the ingress-nginx namespace, creating that namespace if it doesn’t already exist.
kubectl apply -f https://raw.githubusercontent.com/kubernetes/ingress-nginx/controller-v1.3.0/deploy/static/provider/cloud/deploy.yaml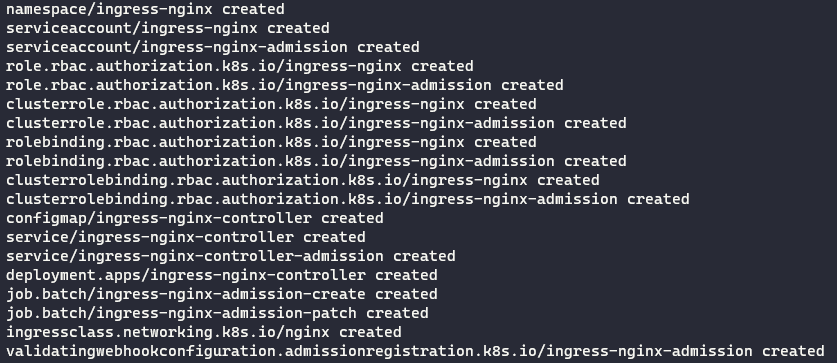
Note you can also use Helm to install if you have it installed (you don’t need to run this if you have already installed using the previous command):
helm upgrade --install ingress-nginx ingress-nginx --repo https://kubernetes.github.io/ingress-nginx --namespace ingress-nginx --create-namespace3. Check the Ingress controller pod is running
To check if the Ingress controller pod is running correctly, use the following command:
kubectl get pods --namespace ingress-nginx
4. Check the NGINX Ingress controller has been assigned a public IP address
The command below will let you check if the NGINX Ingress controller has a public IP address already assigned to it.
kubectl get service ingress-nginx-controller --namespace=ingress-nginxNote the service type is LoadBalancer:
Browsing to this IP address will show you the NGINX 404 page. This is because we have not set up any routing rules for our services yet.

5. Set up a basic web app for testing
First, we need to set up a DNS record pointing to the External IP address we discovered in the previous step. Once that is set, run the following command to set up a demo (replace the [DNS_NAME] with your record, e.g. www.jackwesleyroper.io).
Note that you must set up a DNS record, this step will not work with an IP address. This command comes from the NGINX documentation, we will look at declarative approaches later in this article.
kubectl create ingress demo --class=nginx --rule [DNS_NAME]/=demo:806. Browse to the web address
You will see ‘It works!’ displayed, confirming that the Ingress controller is correctly routing traffic to the demo app.
7. Set up two more web apps
Now we will set up two more web apps, and route traffic between them using NGINX.
We will create two YAML files using the demo apps from the official Azure documentation.
aks-helloworld-one.yaml
apiVersion: apps/v1
kind: Deployment
metadata:
name: aks-helloworld-one
spec:
replicas: 1
selector:
matchLabels:
app: aks-helloworld-one
template:
metadata:
labels:
app: aks-helloworld-one
spec:
containers:
- name: aks-helloworld-one
image: mcr.microsoft.com/azuredocs/aks-helloworld:v1
ports:
- containerPort: 80
env:
- name: TITLE
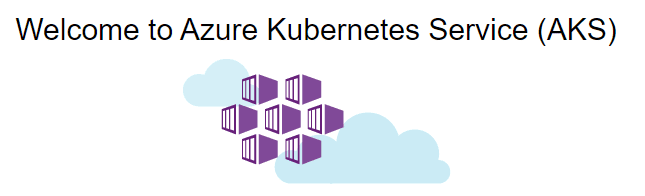
value: "Welcome to Azure Kubernetes Service (AKS)"
---
apiVersion: v1
kind: Service
metadata:
name: aks-helloworld-one
spec:
type: ClusterIP
ports:
- port: 80
selector:
app: aks-helloworld-oneaks-helloworld-two.yaml
apiVersion: apps/v1
kind: Deployment
metadata:
name: aks-helloworld-two
spec:
replicas: 1
selector:
matchLabels:
app: aks-helloworld-two
template:
metadata:
labels:
app: aks-helloworld-two
spec:
containers:
- name: aks-helloworld-two
image: mcr.microsoft.com/azuredocs/aks-helloworld:v1
ports:
- containerPort: 80
env:
- name: TITLE
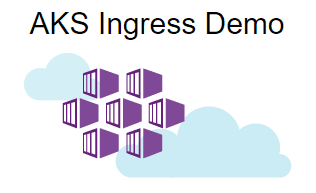
value: "AKS Ingress Demo"
---
apiVersion: v1
kind: Service
metadata:
name: aks-helloworld-two
spec:
type: ClusterIP
ports:
- port: 80
selector:
app: aks-helloworld-twoApply the two configuration files to setup the apps:
kubectl apply -f aks-helloworld-one.yaml --namespace ingress-nginx
kubectl apply -f aks-helloworld-two.yaml --namespace ingress-nginx
Check the new pods are running (you should see two aks-helloworld pods running):
kubectl get pods --namespace ingress-nginx
8. Setup the Ingress to route traffic between the two apps
We will set up path-based routing to direct traffic to the appropriate web apps based on the URL the user enters. EXTERNAL_IP/hello-world-one is routed to the service named aks-helloworld-one. Traffic to EXTERNAL_IP/hello-world-two is routed to the aks-helloworld-two service. Where the path is not specified by the user (EXTERNAL_IP/), the traffic is routed to aks-helloworld-one.
Create a file named hello-world-ingress.yaml.
apiVersion: networking.k8s.io/v1
kind: Ingress
metadata:
  name: hello-world-ingress
  annotations:
    nginx.ingress.kubernetes.io/ssl-redirect: "false"
    nginx.ingress.kubernetes.io/use-regex: "true"
    nginx.ingress.kubernetes.io/rewrite-target: /$2
spec:
  ingressClassName: nginx
  rules:
  - http:
      paths:
      - path: /hello-world-one(/|$)(.*)
        pathType: Prefix
        backend:
          service:
            name: aks-helloworld-one
            port:
              number: 80
      - path: /hello-world-two(/|$)(.*)
        pathType: Prefix
        backend:
          service:
            name: aks-helloworld-two
            port:
              number: 80
      - path: /(.*)
        pathType: Prefix
        backend:
          service:
            name: aks-helloworld-one
            port:
              number: 80
Create the ingress
kubectl apply -f hello-world-ingress.yaml --namespace ingress-nginx9. Browse to the EXTERNAL_IP/hello-world-one
When you open the EXTERNAL_IP/hello-world-one you should see the screen below:
And EXTERNAL_IP/hello-world-two:
Keep all of your kubectl commands in one place with our Kubernetes Cheat Sheet.
Setting up NGINX Ingress Controller on local Minikube cluster
To set up an NGINX Ingress Controller on a local Minikube cluster, we need first to ensure that we have Docker running. We could run a Docker command to verify that:
docker ps
Cannot connect to the Docker daemon at unix:///var/run/docker.sock. Is the docker daemon running?
As we can see, Docker is not running. To start it we could:
- MacOS:
open -a Docker - Linux:
sudo service docker start
Now, Docker is running:
docker ps
CONTAINER ID   IMAGE                  COMMAND                  CREATED         STATUS              PORTS                       NAMES
Let’s install minikube and start a cluster:
minikube start
😄  minikube v1.28.0 on Darwin 14.2.1 (arm64)
✨  Automatically selected the docker driver
📌  Using Docker Desktop driver with root privileges
👍  Starting control plane node minikube in cluster minikube
🚜  Pulling base image ...
🔥  Creating docker container (CPUs=2, Memory=2200MB) ...
🐳  Preparing Kubernetes v1.25.3 on Docker 20.10.20 ...
    ▪ Generating certificates and keys ...
    ▪ Booting up control plane ...
    ▪ Configuring RBAC rules ...
🔎  Verifying Kubernetes components...
    ▪ Using image gcr.io/k8s-minikube/storage-provisioner:v5
🌟  Enabled addons: default-storageclass, storage-provisioner

❗  /usr/local/bin/kubectl is version 1.28.2, which may have incompatibilities with Kubernetes 1.25.3.
    ▪ Want kubectl v1.25.3? Try 'minikube kubectl -- get pods -A'
🏄  Done! kubectl is now configured to use "minikube" cluster and "default" namespace by default
Now that we have minikube up and running, let’s enable the Ingress controller:
minikube addons enable ingress

💡  ingress is an addon maintained by Kubernetes. For any concerns contact minikube on GitHub.
You can view the list of minikube maintainers at: https://github.com/kubernetes/minikube/blob/master/OWNERS
💡  After the addon is enabled, please run "minikube tunnel" and your ingress resources would be available at "127.0.0.1"
    ▪ Using image k8s.gcr.io/ingress-nginx/kube-webhook-certgen:v1.1.1
    ▪ Using image k8s.gcr.io/ingress-nginx/controller:v1.2.1
    ▪ Using image k8s.gcr.io/ingress-nginx/kube-webhook-certgen:v1.1.1
🔎  Verifying ingress addon...
🌟  The 'ingress' addon is enabled
Let’s verify if the ingress-nginx controller is running:
kubectl get pods -n ingress-nginx
NAME                                        READY   STATUS      RESTARTS   AGE
ingress-nginx-admission-create-jbmg4        0/1     Completed   0          3m40s
ingress-nginx-admission-patch-hv5s2         0/1     Completed   0          3m40s
ingress-nginx-controller-5959f988fd-fqsm7   1/1     Running     0          3m40s
Everything is working fine, so we are ready to see it in action.
For that, we will create a simple deployment and service for nginx:
apiVersion: apps/v1
kind: Deployment
metadata:
 name: nginx
spec:
 replicas: 1
 selector:
   matchLabels:
     app: nginx
 template:
   metadata:
     labels:
       app: nginx
   spec:
     containers:
     - name: nginx
       image: nginx
       ports:
       - containerPort: 80
---
apiVersion: v1
kind: Service
metadata:
 name: nginx
spec:
 type: NodePort
 selector:
   app: nginx
 ports:
   - port: 80
     targetPort: 80
Now, let’s apply this configuration:
kubectl apply -f deployment.yaml
deployment.apps/nginx created
service/nginx created
Let’s also prepare the ingress configuration:
apiVersion: networking.k8s.io/v1
kind: Ingress
metadata:
 name: example-ingress
spec:
 rules:
 - host: nginx-hello.info
   http:
     paths:
     - pathType: Prefix
       path: "/"
       backend:
         service:
           name: nginx
           port:
             number: 80
Now, we need to add an entry in /etc/hosts for nginx-hello.info to the minikube ip. To do that, we need to first find out the minikube ip:
minikube ip
192.168.49.2
Next, let’s add the /etc/hosts entry:
192.168.49.2 nginx-hello.infoWe are ready to test the ingress:
curl nginx-hello.info
<!DOCTYPE html>
<html>
<head>
<title>Welcome to nginx!</title>
<style>
html { color-scheme: light dark; }
body { width: 35em; margin: 0 auto;
font-family: Tahoma, Verdana, Arial, sans-serif; }
</style>
</head>
<body>
<h1>Welcome to nginx!</h1>
<p>If you see this page, the nginx web server is successfully installed and
working. Further configuration is required.</p>

<p>For online documentation and support please refer to
<a href="http://nginx.org/">nginx.org</a>.<br/>
Commercial support is available at
<a href="http://nginx.com/">nginx.com</a>.</p>

<p><em>Thank you for using nginx.</em></p>
</body>
</html>
Key points
An Ingress in K8S is a robust way to expose services within your K8S cluster to the outside world. It allows you to consolidate routing rules in one place. There are many available Ingress controllers available for use, in this article, we configured an NGINX Ingress on AKS and used it to route traffic between two demo apps.
If you need any assistance with managing your Kubernetes projects, take a look at Spacelift. It brings with it a GitOps flow, so your Kubernetes Deployments are synced with your Kubernetes Stacks, and pull requests show you a preview of what they’re planning to change. It also has an extensive selection of policies, which lets you automate compliance checks and build complex multi-stack workflows. You can check it for free by creating a trial account.
Manage Kubernetes Faster and More Easily
Spacelift allows you to automate, audit, secure, and continuously deliver your infrastructure. It helps overcome common state management issues and adds several must-have features for infrastructure management.
Frequently asked questions
What are the benefits of using Ingress?
Using Ingress in Kubernetes provides centralized, flexible routing for external traffic to services within a cluster.
What is the primary purpose of a Kubernetes Ingress?
The primary purpose of a Kubernetes Ingress is to manage external access to services within a cluster, typically HTTP and HTTPS traffic. It acts as an entry point that routes client requests to the appropriate service based on defined rules.
Does Ingress require a load balancer?
While not mandatory, a load balancer is the standard mechanism for routing external traffic to an Ingress controller in most real-world deployments.
What is the difference between Ingress and Egress in Kubernetes?
Ingress refers to external traffic entering the cluster, while Egress refers to traffic leaving the cluster to reach external services.
What is the difference between Ingress and Service in Kubernetes?
A Service exposes a set of Pods to internal or external traffic, while an Ingress manages external access to Services, typically via HTTP/HTTPS with routing rules.
