
Multi-tenancy is a type of software architecture where multiple users share a single infrastructure resource. A multi-tenant Kubernetes cluster serves several customers, teams, or apps, improving cost efficiency and ease of management.
Correctly configuring Kubernetes for multiple tenants can be challenging. You must isolate your tenants properly, set correct resource constraints to maintain performance, and enable monitoring systems to track tenant activity.
This guide explores these requirements and explains how built-in features and external tools help you build an effective multi-tenant Kubernetes environment.
What we’ll cover:
What is Kubernetes multi-tenancy?
Kubernetes multi-tenancy is the practice of using one Kubernetes cluster to operate workloads belonging to several independent customers, projects, or environments. The workloads share the same physical cluster but are separated from each other to guarantee stable performance, security, and governance.
In a multi-tenant setup, each tenant may have its own namespace, resource quotas, and access controls to prevent interference with others. Administrators often implement network policies, role-based access control (RBAC), and separate storage to enhance tenant isolation.
Common multi-tenant Kubernetes use cases include:
- Hosting individual instances of an app for different customers
- Running multiple app environments, such as qa, staging, and production
- Reusing existing infrastructure to serve several different apps
- Providing development teams with private virtual clusters to deploy to, such as backend and frontend
- Mitigating Kubernetes management overheads at scale
- Reducing resource wastage and Kubernetes infrastructure costs when many environments are needed
All these scenarios improve your Kubernetes operating efficiency. Implementing a multi-tenant architecture increases container density, a key way to optimize overall resource utilization.
What is the difference between single-tenant and multi-tenant Kubernetes?
Single-tenant Kubernetes uses separate clusters for each user or application, whereas multi-tenant Kubernetes allows multiple tenants to share the same Kubernetes cluster.
In a single-tenant setup, each tenant gets its own Kubernetes control plane and worker nodes, ensuring complete isolation, separate failure domains, and independent upgrades.
In a multi-tenant cluster, namespaces, RBAC policies, network policies, and resource quotas enforce isolation between tenants on a shared control plane and node infrastructure, reducing operational overhead but increasing complexity around security and resource management.
Compared with provisioning a new cluster for each tenant, a single multi-tenant cluster saves costs by eliminating infrastructure duplication. It also reduces management overheads because your DevOps team has just one cluster to update and maintain.
Approaches to multi-tenancy in Kubernetes clusters
There are three main strategies for achieving multi-tenancy with Kubernetes. In each case, tenants get their own slice of the cluster’s data plane. They can privately deploy objects such as Pods and Services without affecting other tenants.
However, the degree of control plane separation varies in each strategy, so it’s important to consider what cluster-level access your tenants will require.
Here are the options you can use:
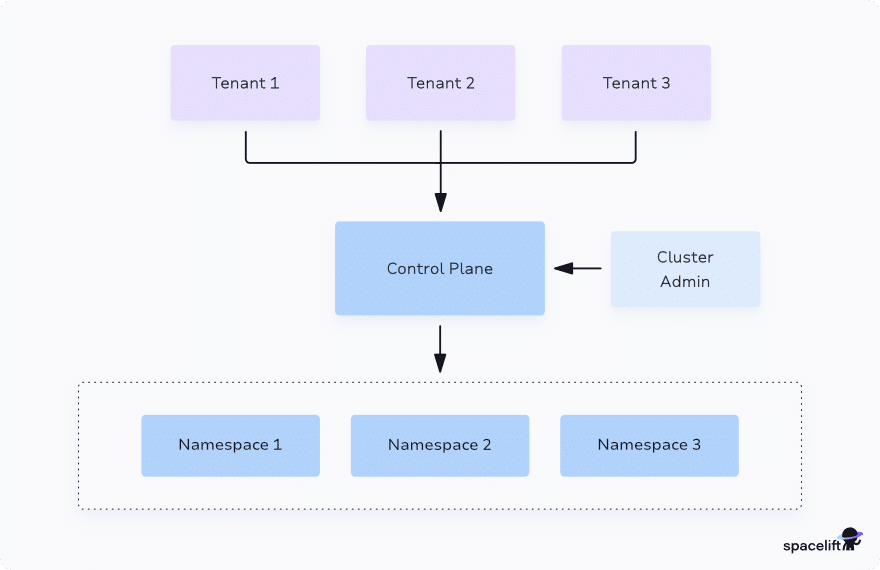
- Single cluster shared between multiple tenants: This is the option we’ve described above, where one cluster is used for every tenant. The cluster’s control plane is shared between multiple tenants, but each tenant has its own space within the data plane. Tenant isolation is implemented using Kubernetes features like namespaces, RBAC, and Network Policies. Because the control plane remains shared, cluster-level objects like CRDs apply across all tenants.
- Single cluster, with control plane virtualization: This is similar to the previous option, but external tooling is used to create a virtual control plane for each tenant. There’s still only one physical cluster, but individual tenants get a complete virtual cluster inside it. This allows each tenant to install its own CRDs and other cluster-level resources.
- Multiple clusters, one for each tenant: Some environments with the most stringent data protection requirements may demand a dedicated cluster for each tenant. This guarantees strict isolation between tenants, but increases costs and management complexity at scale.
For the rest of this article, we’ll focus on the first two approaches. If you need to run a dedicated cluster for each tenant, try using an IaC platform like Spacelift to simplify your management processes and ensure consistent configuration for each cluster.

When you shift to treating infrastructure like a software project, you need all of the same components that a software project would have. That means having a CI/CD platform in place, and most aren’t suited to the demands of IaC. Insurtech company Kin discovered that Spacelift was purpose-built to fill that gap.
How to implement Kubernetes multi-tenancy?
Building a robust multi-tenant Kubernetes architecture depends on the following core processes and controls:
- Tenant object isolation: Ensuring each tenant’s objects are grouped together and kept private from other tenants
- Access control: Using Kubernetes RBAC capabilities to prevent tenants from interacting with their neighbors
- Network isolation: Blocking Pods that belong to one tenant from interacting with Pods owned by other tenants
- Performance and resource management: Sharing cluster resources between tenants fairly and predictably to prevent slowdowns caused by resource contention
- Cluster control plane virtualization: If you want tenants to have completely independent private clusters, then you’ll need a virtual cluster solution to create nested control planes.
Let’s look at how built-in Kubernetes features and external tools allow you to implement these requirements.
Namespaces
Namespaces are the most basic part of a Kubernetes multi-tenancy strategy. They allow you to partition your cluster by grouping related objects together.
Creating a Namespace for each tenant gives them their own space to store their resources. Object names are scoped to Namespaces so tenants can freely name their resources without experiencing conflicts. A Service called web in the backend-team namespace won’t conflict with an existing web Service in the frontend-team namespace, for example.
The following Kubernetes YAML manifest provides a simple Namespace definition for a tenant called frontend-team:
apiVersion: v1
kind: Namespace
metadata:
  name: frontend-team
While Namespaces let you organize objects by tenant, they don’t provide any isolation on their own. The other controls discussed below must be used to enforce access control constraints and prevent unsafe inter-Namespace Pod communications.
RBAC
Role-Based Access Control (RBAC) is a mechanism for specifying which actions specific users can perform in a software system. The RBAC implementation included with Kubernetes lets you assign actions to users precisely on a per-resource basis, such as create pods or list deployments.
RBAC is one of the fundamental ways to enforce proper security for multi-tenant clusters. Configuring correct RBAC roles for each of your tenants lets you scope the tenant’s access to just their specific namespace. This is achieved using Role and RoleBinding resources:
apiVersion: rbac.authorization.k8s.io/v1
kind: Role
metadata:
  namespace: frontend-team
  name: frontend-team-role
rules:
  - apiGroups: [""]
    resources: ["*"]
    verbs: ["*"]

---

apiVersion: rbac.authorization.k8s.io/v1
kind: RoleBinding
metadata:
  namespace: frontend-team
  name: frontend-team-role-binding
roleRef:
  apiGroup: rbac.authorization.k8s.io
  kind: Role
  name: frontend-team-role
subjects:
  - kind: User
    name: demo-user
In the example above, the frontend-team-role specifies that its holders can perform any action (verbs: [“*”]) on any supported Kubernetes resource type (resources: [“*”]), but only within the frontend-team Namespace. Roles are always scoped to a specific Namespace and only allow access to the resources in that Namespace. This prevents tenants from accessing resources that belong to their neighbors.
Note: The separate ClusterRole resource is used to set up cluster-level roles that take effect across all Namespaces. These aren’t normally used for tenant-level access requirements.
The example RoleBinding object grants the frontend-team-role Role to the demo-user user. This permits the user to perform the configured actions in the frontend-team Namespace, but they’ll see errors if they try to interact with other Namespaces.
Network policies
Kubernetes Network Policies let you control the Pod traffic flows allowed in your cluster. They play a crucial role in multi-tenant management by preventing Pods that belong to different tenants from communicating with each other.
Each Network Policy targets a set of Pods in a Namespace, then specifies the Ingress and Egress traffic that’s permitted for those Pods. The following example demonstrates a Network Policy that specifies Pods labelled app: app-1 can only communicate with other Pods that are also labelled app: app-1:
apiVersion: networking.k8s.io/v1
kind: NetworkPolicy
metadata:
  name: demo-network-policy
  namespace: app-1
spec:
  podSelector:
    matchLabels:
      app: app-1
  policyTypes:
    - Ingress
    - Egress
  ingress:
    - from:
      - podSelector:
          matchLabels:
            app: app-1
  egress:
    - to:
       - podSelector:
          matchLabels:
            app: app-1
Correctly configuring Network Policies ensures workloads running in Pods can’t interact with a neighboring tenant’s Pods. The Kubernetes Service model means Pods can normally connect to any other Pod or Service in the cluster, even if they’re in different namespaces, but Network Policies prevent these potentially unsafe data flows from occurring.
Resource requests and limits
Kubernetes resource requests and limits specify the amount of CPU and memory that your containers can use. They prevent individual containers from utilizing all the resources in your cluster, which could cause slowdowns or out-of-memory terminations for other Pods.
Requests guarantee that containers can access the requested amount of the resource. They’re considered during Pod scheduling — Pods won’t schedule onto Nodes that can’t provide the requested resources.
Limits allow containers to use more resources than they’ve requested when spare capacity is available in the cluster. If the limit is exceeded, then the container will be throttled (for CPU limits) or terminated (for memory limits).
Resource requests and limits are configured by the spec.resources field in Kubernetes Pod manifests:
apiVersion: v1
kind: Pod
metadata:
  name: demo-pod
spec:
  containers:
    - name: nginx
      image: nginx:latest
      resources:
        requests:
          cpu: 0.5
          memory: 100Mi
        limits:
          cpu: 1.0
          memory: 250Mi
The Pod defined above will have the following behavior:
- The Pod always has access to a relative CPU share equivalent to 0.5 of a core.
- The Pod can use a relative CPU share up to 1.0 of a core, but it will be throttled beyond this.
- The Pod can always access 100 Mi of memory and may use up to 250 Mi when capacity is available.
- The Pod will be terminated if its memory use exceeds 250 Mi, or if it exceeds 100 Mi and there are other Pods in the cluster that need more memory.
Requiring tenants to set correct resource requests and limits on their Pods lets you maintain consistent performance in a multi-tenant cluster. The constraints ensure that a usage spike in one tenant won’t impact on Pods belonging to any other tenants. However, individual requests and limits must be combined with other controls to ensure fair distribution of resources between your tenants.
Resource quotas and limit ranges
Resource quotas supplement Pod resource requests and limits. They define the total amount of a resource that all the Pods in a specific Namespace can use. Resource quotas also enforce that new Pods actually have CPU and memory resource requests or limits defined, based on the constraints you specify in your quota.
Here’s a simple resource quota that prevents the Pods in the customer-a Namespace from requesting more than 4 CPU cores, or 4 Gi of memory:
apiVersion: v1
kind: ResourceQuota
metadata:
  namespace: customer-a
  name: customer-a-quota
spec:
  hard:
    requests.cpu: 4
    requests.memory: 4Gi
    limits.memory: 4Gi
Note: Quotas can also control Persistent Volume sizes and cap the number of objects of a given type that can exist in a Namespace, preventing tenants from creating a large number of Pods, CronJobs, or other resources.
The tenant will see an error from the Kubernetes control plane if they try to create a Pod with a CPU or memory request that’s too high. They’ll also see an error when adding a Pod that doesn’t include a request at all:
$ kubectl run demo --image nginx:latest -n customer-a
Error from server (Forbidden): pods "demo" is forbidden: failed quota: customer-a-quota: must specify limits.memory for: demo; requests.cpu for: demo; requests.memory for: demo
Configuring resource quotas for your multi-tenant Namespaces lets you apportion your cluster’s resources between your tenants. This prevents some tenants from consuming an unfair share. Each tenant will be prevented from creating Pods with resource requests or limits that would exceed their namespace’s quota.
Because resource quotas apply at the Namespace level, tenants could consume their entire quota with a few misconfigured objects. You can use Limit Ranges to prevent this scenario from occurring. A Limit Range sets maximum, minimum, and default resource limits on a per-Pod basis, helping to distribute the resource quota across the tenant’s objects properly.
The Limit Range below requires Pods in the customer-a Namespace to have a memory limit between 50 Mi and 1 Gi. A default limit of 100 Mi is applied if a Pod is created without specifying a limit.
apiVersion: v1
kind: LimitRange
metadata:
  namespace: customer-a
  name: customer-a-limit-range
spec:
  limits:
    - type: Container
      default:
        memory: 100Mi
      max:
        memory: 1Gi
      min:
        memory: 50Mi
Dedicated virtual cluster tools
The Kubernetes features described above allow you to implement multi-tenancy within your clusters. They let you isolate tenanted resources, enforce access control requirements, and maintain stable performance.
However, tenants can still only use their designated namespaces within the cluster, meaning they can’t install CRDs or make other cluster-level configuration changes. This limitation becomes restrictive in scenarios where tenants actually require their own private clusters.
External virtual cluster tools can enable this use case.
What is vCluster?
Loft’s vCluster is the most popular solution. Creating virtual clusters within your existing physical cluster gives each tenant a complete Kubernetes environment. Operating costs stay low because you’re still only running one real cluster, but you gain improved isolation and a simplified tenant onboarding experience.
vClusters are fully-functioning Kubernetes installations nested within an existing cluster. Each vCluster has its own Kubernetes API server and control plane, which are ready for the tenant to use. Resources within the vCluster are isolated from the host cluster. The vCluster uses an abstraction layer to interface with the real cluster for Pod scheduling and networking operations.
Cluster administrators can use regular Kubernetes controls, including Resource Quotas and Pod Security Admission rules, to govern activity within vClusters. vClusters also support two-way sync of resource types between host and virtual clusters, enabling cluster-level objects like Storage Classes to be shared between all vClusters.
You don’t necessarily need cluster virtualization if your Kubernetes “tenants” are actually different apps or environments all being managed by the same team. In this case, you can use Namespaces, RBAC, Resource Quotas, and Network Policies to isolate each deployment safely. Virtual clusters improve flexibility, convenience, and governance when you’re providing Kubernetes-as-a-Service to several independent user groups.
What are the main challenges of implementing multi-tenancy in Kubernetes?
Implementing multi-tenancy in Kubernetes introduces challenges mainly related to security isolation, resource management, and operational complexity:
- Security and isolation: Kubernetes namespaces offer basic separation but do not fully isolate tenants at the operating system or network level. Additional policies (e.g., PodSecurityPolicies, NetworkPolicies) and runtime security (e.g., gVisor, Kata Containers) are often needed.
- Resource quotas and fairness: Preventing one tenant from consuming disproportionate cluster resources requires careful configuration of quotas, limits, and scheduling priorities.
- Authentication and authorization: Integrating tenant-specific identity management with Kubernetes RBAC is complex, especially when scaling across hundreds of tenants.
- Networking isolation: Achieving strict network segmentation typically requires advanced CNI plugins or service meshes like Istio with strong multi-tenancy support.
- Operational overhead: Maintaining tenant-specific configurations (secrets, ingress, policies) leads to significant operational complexity, which automation tools (e.g., Crossplane, Cluster API) try to mitigate.
Kubernetes multi-tenancy best practices
Here are some key best practices that will set you up for success if you are looking for quick pointers on how to operate multi-tenant Kubernetes clusters
1. Isolate tenanted resources with Namespaces, RBAC, and Network Policies
Strong isolation is the most basic requirement of multi-tenant environments. It’s crucial that resources belonging to one tenant aren’t exposed to the other tenants in your cluster. Use Namespaces, RBAC, and Network Policies to group tenanted objects together and prevent cross-tenant access.
Correctly configured RBAC Roles and Role Bindings prevent tenants from interacting with neighboring Namespaces, while Network Policies stop Pods in one tenant’s Namespace from handling traffic that originated in other Namespaces.
2. Configure resource requests, limits, and quotas to prevent “noisy neighbor” issues
Dealing with noisy neighbor problems is one of the most common multi-tenant management challenges.
One busy tenant could consume an unfair share of your cluster’s resources, causing neighboring tenants to experience poor performance. You must configure correct Resource Requests, Limits, and Quotas for each tenant to ensure available resources are always shared predictably, even during times of high demand.
3. Enable centralized tenant activity logging and reporting
Multi-tenant Kubernetes requires strict isolation at the tenant level, but DevOps teams still need clear visibility into overall cluster activity across different tenants.
Use observability solutions like Prometheus, Grafana, and Loki to scrape cluster logs and metrics for central analysis. This makes it easier to pinpoint the sources of errors and performance issues that occur in tenanted apps.
4. Secure cluster resources to stop individual tenants accessing them
Individual tenants should be prevented from altering cluster-level resources such as Nodes, Ingress Classes, and Storage Classes. Modifications to these objects affect every tenant, so changes need to be carefully applied by cluster administrators.
You can either use RBAC roles to prevent tenanted users from interacting with the objects altogether or use vCluster to let tenants manage their own private control plane within a virtual cluster environment.
5. Implement custom admission controllers to enforce correct resource configuration
Kubernetes admission controllers are plugins that run when you add or update objects in your cluster. Building custom admission controllers can help you enforce correct configuration in multi-tenant environments.
For example, you could reject objects that lack a tenant-name label, have missing resource constraints, or target an unauthorized namespace. This ensures that resources created by tenant users meet your operational policies.
6. Use cost monitoring and alerting tools to enable tenant chargebacks
Tenants often need to be billed for using your multi-tenant Kubernetes cluster. Whether your tenants are different teams in your organization or they’re external customers, implementing a chargeback model allows you to attribute costs to each tenant fairly.
Using a dedicated cost monitoring solution like Kubecost lets you precisely track the costs accrued by different tenant namespaces so you can raise accurate bills. You can also set alerts to stay informed of unexpected tenant activity that could affect your budget.
7. Enforce robust security protections for tenanted workloads
You should implement standard Kubernetes best practices to enforce good security hygiene for your tenanted workloads. Vulnerabilities in container images, runtimes, the control plane, or your Node’s operating systems could allow tenanted data to leak in insecure environments.
For example, you can combine Pod Security Standards, security context settings, and admission controllers to keep each tenant’s containers tightly sandboxed.
Managing Kubernetes with Spacelift
If you need help managing your Kubernetes projects, consider Spacelift. It brings with it a GitOps flow, so your Kubernetes Deployments are synced with your Kubernetes Stacks, and pull requests show you a preview of what they’re planning to change.
With Spacelift, you get:
- Policies to control what kind of resources engineers can create, what parameters they can have, how many approvals you need for a run, what kind of task you execute, what happens when a pull request is open, and where to send your notifications
- Stack dependencies to build multi-infrastructure automation workflows with dependencies, having the ability to build a workflow that can combine Terraform with Kubernetes, Ansible, and other infrastructure-as-code (IaC) tools such as OpenTofu, Pulumi, and CloudFormation.
- Self-service infrastructure via Blueprints, enabling your developers to do what matters – developing application code while not sacrificing control
- Creature comforts such as contexts (reusable containers for your environment variables, files, and hooks), and the ability to run arbitrary code
- Drift detection and optional remediation
If you want to learn more about Spacelift, create a free account today or book a demo with one of our engineers.
Key points
Multi-tenant Kubernetes improves DevOps operational efficiency by letting you serve several customers, apps, or environments using one Kubernetes cluster. Features such as Namespaces, RBAC, Network Policies, and Resource Quotas allow you to separate tenanted objects in your cluster, while virtualization tools like vCluster enable cluster-in-cluster hierarchies.
It’s crucial to note that Kubernetes doesn’t come preconfigured for safe multi-tenancy. Running multiple workloads in one cluster is a potential security issue, but implementing the approaches we’ve discussed mitigates the risk. These core concepts allow you to improve resource utilization, eliminate waste, and cut costs without putting tenanted data at risk.
Finally, don’t forget to automate your cluster provisioning and management processes with IaC. Configuring clusters as code via tools like Terraform and Pulumi makes Kubernetes infrastructure management simpler and more scalable, whether you’re operating one cluster or many. Use Spacelift to unify your IaC tools and build dependable provisioning, configuration, and governance workflows.
Manage Kubernetes easier and faster
Spacelift allows you to automate, audit, secure, and continuously deliver your infrastructure. It helps overcome common state management issues and adds several must-have features for infrastructure management.
