
In this article, we will examine the anatomy of the Kubernetes Deployment YAML file (commonly also known as configuration files or manifests). We will explain what a deployment is in Kubernetes and why and how you would use it, with some useful examples.
We will cover:
What is a Kubernetes Deployment?
A Kubernetes Deployment is a higher-level API resource used to manage stateless applications by defining the desired state for a set of identical pods. It ensures the specified number of replicas are running and automatically replaces failed pods. Deployments also support rolling updates and rollbacks, making them ideal for controlled application updates and version management.
You describe a desired state in a Deployment, and the Deployment Controller changes the actual state to the desired state at a controlled rate.
Deployments are designed for stateless applications. For stateful workloads requiring stable network identity and persistent storage, consider using StatefulSets instead.
Common scenarios where deployments are used include the following:
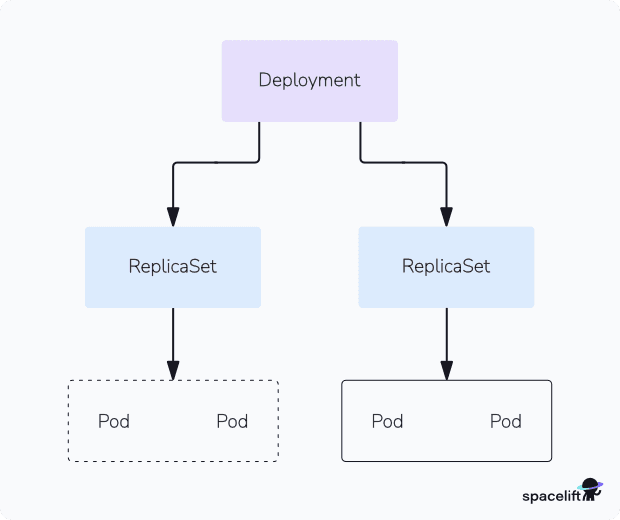
- Create a Deployment to roll out a ReplicaSet – A Deployment manages a Replica Set, which, in turn, ensures that a specified number of pod replicas (instances) are running and healthy at all times. It allows you to scale your application by adjusting the desired number of replicas.
- Declare the new state of the Pods – Deployments are configured using declarative YAML or JSON files, which specify the desired state of the application. Kubernetes continually works to ensure that the actual state of the application matches this desired state.
- Scale up the Deployment to facilitate more load – You can easily scale the number of replicas up or down based on the desired workload. Deployments can automatically adjust the number of replicas to match the specified number.
- Pause the rollout of a Deployment – Deployments support rolling updates, allowing you to make changes to your application without causing downtime. During an update, new pods are gradually created, and old pods are scaled down, ensuring a smooth transition from one version to another.
- Rollback to an earlier Deployment revision – If a rolling update fails or results in issues, Kubernetes deployments provide automated rollback mechanisms to revert to the previous stable version of the application.
- Use the status of the Deployment – If a pod fails or becomes unresponsive, the Deployment will automatically replace it with a new pod, maintaining the desired number of replicas.
- Cleaning up old ReplicaSets automatically
What is a Kubernetes Deployment YAML file?
A Kubernetes Deployment YAML file defines the desired state for deploying and managing a set of identical pods in a Kubernetes cluster.
This YAML file specifies configurations such as the number of replicas, the container image to use, labels, update strategy, and resource limits. The Deployment controller ensures the current cluster state matches this desired state by creating or updating ReplicaSets and managing rolling updates.
What are the essential components of a Kubernetes deployment YAML file?
A Kubernetes deployment YAML file must include key components to define how an application is deployed and managed. The essential elements are:
apiVersion: Specifies the API version, typicallyapps/v1for deployments.- kind: Defines the resource type, set to
Deployment. metadata: Contains identifying information likenameand optionallabels.- spec: Outlines the desired state of the deployment, including:
replicas: Number of pod instances.selector: Match criteria to link the deployment with its pods.template: Pod template specification containing:metadata: Pod labels.spec: Container details such ascontainers, each withname,image,ports, and possiblyenv,volumeMounts, etc.
For example, without selector, the deployment will fail, and missing containers details will prevent pod creation. These components ensure the deployment controller can manage pod lifecycle and scaling effectively.
How do I create a YAML file for a Kubernetes Deployment?
Create a new file and give it the extension .yaml (e.g., deployment.yaml). In that file, define the apiVersion, kind, metadata, and spec fields. The spec includes the number of replicas, selector labels, and pod template with containers and images.
You can also create or apply a YAML file using the kubectl apply -f <filename.yaml> command, which will create the Deployment in your Kubernetes cluster according to the specifications defined in the YAML file.
Similarly, you can use YAML files to update or delete Deployments, depending on the changes you want to make to the cluster’s desired state.
Example of a basic YAML file for Kubernetes deployment
The example below will create a Kubernetes Deployment named “example-deployment” with three replicas, each running a pod based on the specified container image and port configuration. The pods will be labeled with “app: example,” and they will be managed by the Deployment.
apiVersion: apps/v1
kind: Deployment
metadata:
  name: example-deployment
spec:
  replicas: 3
  selector:
    matchLabels:
      app: example
  template:
    metadata:
      labels:
        app: example
    spec:
      containers:
      - name: example-container
        image: example-image
        ports:
        - containerPort: 80
Let’s break each line down:
apiVersion: Specifies the Kubernetes API version. In this case, it’s using the “apps/v1” API version, which is appropriate for Deployments.kind: Specifies the type of Kubernetes resource. Here, it’s “Deployment,” indicating that this configuration file is defining a Deployment.spec: This section defines the desired state of the Deployment.replicas: 3: Specifies that you want to run three replicas of your application.selector: Describes the selector to match pods managed by this Deployment.matchLabels: Specifies the labels that the Replica Set created by the Deployment should use to select the pods it manages. In this case, pods with the labelapp: exampleare selected.template: Defines the pod template used for creating new pods.metadata: Contains the labels to apply to the pods created from this template. In this case, the pods will have the labelapp: example.spec: Describes the specification of the pods.containers: This section specifies the containers to run in the pod.name: example-container: Assigns a name to the container.image: example-image: Specifies the Docker image to use for this container.ports: Defines the ports to open in the container.containerPort: 80: Indicates that the container will listen on port 80.
Kubernetes deployment YAML - Examples
Let’s look at some examples of Kubernetes Deployment YAML files.
Example 1: Run NGINX Containers using a YAML File
In this example, we will create a deployment running three NGINX pods.
nginx-deployment.yaml
apiVersion: apps/v1
kind: Deployment
metadata:
  name: nginx-deployment
spec:
  replicas: 3
  selector:
    matchLabels:
      app: nginx
  template:
    metadata:
      labels:
        app: nginx
    spec:
      containers:
      - name: nginx-container
        image: nginx:latest
        ports:
        - containerPort: 80
Best practice: In production, avoid :latest. Pin a specific NGINX version (e.g. nginx:1.28 or nginx:1.28.0-alpine) so rollouts are predictable and you control when upgrades happen.
Example 2: Pass environment variables in Kubernetes deployment YAML (and why not to do that!)
You can pass environment variables to containers in a Kubernetes Deployment YAML to configure application settings, provide secrets, or customize the behavior of your application.
Environment variables in Kubernetes are often used to decouple configuration from the container image, making it more flexible and easier to manage. To define environment variables in a Deployment YAML file, you can use the env field under the containers section.
env-deployment.yaml
apiVersion: apps/v1
kind: Deployment
metadata:
  name: my-app-deployment
spec:
  replicas: 3
  template:
    spec:
      containers:
      - name: my-app-container
        image: my-app-image
        ports:
        - containerPort: 80
        env:
        - name: DATABASE_HOST
          value: db.example.com
        - name: API_KEY
          valueFrom:
            secretKeyRef:
              name: my-secret
              key: api-key
The above example shows how to use environment variables in your deployment.
However, it’s important to consider when and why you should not use environment variables.
Avoid using environment variables for sensitive information like passwords, API keys, or access tokens. Environment variables can be viewed by anyone with access to the pod, which poses a security risk. Instead, use Kubernetes Secrets to store and securely mount sensitive data into containers.
If your application configuration becomes too complex or has multiple layers of settings, managing all of them through environment variables may become unwieldy. In such cases, consider using configuration files, ConfigMaps, or Custom Resource Definitions (CRDs) to manage more structured and extensive configurations.
When you need to update the configuration without restarting the application, environment variables might not be the best choice, as you typically need to redeploy the pod to apply changes. Consider using external configuration management tools, like Consul, etcd, or a configuration management system like Helm, to achieve dynamic updates.
If you have a large number of environment variables, it can be challenging to manage them in a readable and maintainable way within a YAML file. In such cases, you might prefer other methods like ConfigMaps or configuration files.
Example 3: Kubernetes deployment YAML with multiple replicas
To create a Kubernetes Deployment YAML with multiple replicas, set the replicas field under spec. This controls how many pod instances are deployed. For example, to deploy 10 replicas, simply set replicas: 10 in the same YAML structure.
apiVersion: apps/v1
kind: Deployment
metadata:
  name: example-deployment
spec:
  replicas: 10
  selector:
    matchLabels:
      app: example
  template:
    metadata:
      labels:
        app: example
    spec:
      containers:
      - name: example-container
        image: nginx:latest
        ports:
        - containerPort: 80
Example 4: Kubernetes deployment YAML with resource limits
Setting resource limits helps Kubernetes manage the resources allocated to each container, ensuring that they do not exceed the specified limits and can be scheduled on appropriate nodes.
Building on our previous Example 1 for an NGINX deployment, we can add the resources section:
nginx-deployment-with-resource-limits.yaml
apiVersion: apps/v1
kind: Deployment
metadata:
  name: nginx-deployment
spec:
  replicas: 3
  selector:
    matchLabels:
      app: nginx
  template:
    metadata:
      labels:
        app: nginx
    spec:
      containers:
      - name: nginx
        image: nginx:latest
        ports:
        - containerPort: 80
        resources:
          limits:
            memory: "256Mi"  # Maximum memory allowed
            cpu: "200m"       # Maximum CPU allowed (200 milliCPU)
          requests:
            memory: "128Mi"  # Initial memory request
cpu: "100m" # Initial CPU requestresources: This section is used to define resource requests and limits for the container.limits: Specifies the maximum amount of CPU and memory that the container is allowed to use. In this example, the container is limited to a maximum of 256 MiB of memory and 200 milliCPU (0.2 CPU cores).requests: Specifies the initial amount of CPU and memory that the container requests when it starts. In this example, the container initially requests 128 MiB of memory and 100 milliCPU (0.1 CPU cores).
You can find more on limits and requests on the official documentation pages.
Example 5: Kubernetes deployment YAML with health checks
To create a Kubernetes deployment YAML with health checks, include livenessProbe and readinessProbe under the container spec. These define how Kubernetes checks if the app is alive and ready to receive traffic.
Again, building on Example 1, we can add some health checks to our deployment YAML:
nginx-deployment-with-health-checks.yaml
apiVersion: apps/v1
kind: Deployment
metadata:
  name: nginx-deployment
spec:
  replicas: 3
  selector:
    matchLabels:
      app: nginx
  template:
    metadata:
      labels:
        app: nginx
    spec:
      containers:
      - name: nginx
        image: nginx:latest
        ports:
        - containerPort: 80
        livenessProbe:
          httpGet:
            path: /                # The path to check for the liveness probe
            port: 80               # The port to check on
          initialDelaySeconds: 15  # Wait this many seconds before starting the probe
          periodSeconds: 10        # Check the probe every 10 seconds
        readinessProbe:
          httpGet:
            path: /                # The path to check for the readiness probe
            port: 80               # The port to check on
          initialDelaySeconds: 5   # Wait this many seconds before starting the probe
periodSeconds: 5 # Check the probe every 5 secondslivenessProbe: The liveness probe checks whether the container is still alive. It uses an HTTP GET request to the/path on port 80 of the container. If the probe fails, K8s will restart the container.readinessProbe: The readiness probe checks whether the container is ready to serve traffic. It also uses an HTTP GET request to the/path on port 80 of the container. If the probe fails, the container is marked as not ready, and K8s won’t send traffic to it.
Many other configurations can be applied using health checks.
Example 6: Kubernetes deployment YAML with persistent volumes
To create a Kubernetes deployment with a persistent volume, you need to add three key components to your YAML:
- A PersistentVolume (PV) for the actual storage
- A PersistentVolumeClaim (PVC) that your pod uses to request storage
- A Deployment that mounts the PVC into the pod
Building on Example 1, we can modify the deployment YAML to add a volumes section, in which we define a Kubernetes PVC.
nginx-deployment-with-pvc.yaml
apiVersion: apps/v1
kind: Deployment
metadata:
  name: nginx-deployment
spec:
  replicas: 3
  selector:
    matchLabels:
      app: nginx
  template:
    metadata:
      labels:
        app: nginx
    spec:
      containers:
      - name: nginx
        image: nginx:latest
        ports:
        - containerPort: 80
      volumes:
      - name: data
        persistentVolumeClaim:
          claimName: my-pvc  # Name of the Persistent Volume Claim
A PVC is defined using persistentVolumeClaim. In this case, it’s referenced by the name my-pvc.
The my-pvc PVC must be defined separately in another YAML file. The Deployment’s container can then mount the volume specified by the name: data in the volumes section.
mypvc.yaml
apiVersion: v1
kind: PersistentVolumeClaim
metadata:
  name: my-pvc
spec:
  accessModes:
    - ReadWriteOnce
  resources:
    requests:
storage: 1Gi # Request 1 Gigabyte of storageaccessModesspecifies the access mode for the volume. It’s set toReadWriteOnce, indicating that it can be mounted in read-write mode by a single node at a time.resources.requests.storagespecifies the amount of storage requested. In this example, it requests 1 gigabyte of storage.
Don’t forget to apply both files in this case using the kubectl -f apply commands.
kubectl apply -f mypvc.yaml
kubectl apply -f nginx-deployment-with-pvc.yaml
Example 7: Kubernetes deployment YAML with affinity settings
To specify affinity settings in our YAML deployment file, you can add the affinity section under spec. Here, we can specify node affinity and pod anti-affinity settings.
nginx-deployment-with-affinity.yaml
apiVersion: apps/v1
kind: Deployment
metadata:
  name: nginx-deployment
spec:
  replicas: 3
  selector:
    matchLabels:
      app: nginx
  template:
    metadata:
      labels:
        app: nginx
    spec:
      affinity:
        nodeAffinity:
          requiredDuringSchedulingIgnoredDuringExecution:
            nodeSelectorTerms:
            - matchExpressions:
              - key: node-type
                operator: In
                values:
                - nginx-node
        podAntiAffinity:
          requiredDuringSchedulingIgnoredDuringExecution:
          - labelSelector:
              matchExpressions:
              - key: app
                operator: In
                values:
                - nginx
            topologyKey: "kubernetes.io/hostname"
      containers:
      - name: nginx-container
        image: nginx:latest
        ports:
        - containerPort: 80
With these affinity settings, Kubernetes will attempt to schedule the NGINX Pods on nodes labeled as nginx-node and ensure that no two NGINX Pods with the label app: nginx run on the same node, promoting fault tolerance and reliability in your NGINX deployment.
nodeAffinityis used to ensure that the Pods are scheduled only on nodes with a specific label. Pods will be required to be scheduled on nodes with the labelnode-type: nginx-node.podAntiAffinityensures that no two NGINX Pods with the labelapp: nginxare scheduled on the same node. ThetopologyKeyspecifies that the scheduling is based on the nodes’ hostnames.
Customizing labels and selectors in deployment YAML
Labels are key-value pairs you assign to pods or other resources. In your deployment spec, you define spec.template.metadata.labels to assign labels to pods, and spec.selector.matchLabels to tell the deployment which pods it manages. These must match exactly.
This setup allows you to organize, filter, and target groups of pods for services, monitoring, or updates.
For example:
selector:
  matchLabels:
    app: my-app
    tier: backend
template:
  metadata:
    labels:
      app: my-app
      tier: backend
Customizing these fields improves clarity and control over resource targeting and management.
Managing Kubernetes with Spacelift
If you need help managing your Kubernetes projects, consider Spacelift. It brings with it a GitOps flow, so your Kubernetes Deployments are synced with your Kubernetes Stacks, and pull requests show you a preview of what they’re planning to change.
Spacelift is the infrastructure orchestration platform built for the AI-accelerated software era. It manages the full lifecycle for both traditional infrastructure as code and AI-provisioned infrastructure, helping you deliver secure, compliant Kubernetes workflows at scale.
With Spacelift, you get:
- Policies to control what kind of resources engineers can create, what parameters they can have, how many approvals you need for a run, what kind of task you execute, what happens when a pull request is open, and where to send your notifications
- Stack dependencies to build multi-infrastructure automation workflows with dependencies, having the ability to build a workflow that can combine Terraform with Kubernetes, Ansible, and other infrastructure-as-code (IaC) tools such as OpenTofu, Pulumi, and CloudFormation.
- Self-service infrastructure via Templates and Blueprints, enabling your developers to do what matters – developing application code without sacrificing control
- Spacelift Intelligence for natural language provisioning, diagnostics, and operational insight across your Kubernetes stacks
- Creature comforts such as contexts (reusable containers for your environment variables, files, and hooks), and the ability to run arbitrary code
- Drift detection and optional remediation

Fast-growing Brace wanted to streamline its infrastructure processes as its needs evolved. They chose Spacelift for its powerful and growing feature set. As a result, the company has accelerated its deployment processes while auditing–critically important in the financial services world–is now much more straightforward. Spacelift has helped Brace achieve a level of simplicity that makes life much easier for DevOps and developer teams alike.
If you want to learn more about Spacelift, create a free account today or book a demo with one of our engineers.
Key points
A Kubernetes Deployment YAML file is a configuration file written in YAML (YAML Ain’t Markup Language) that defines the desired state of a Kubernetes Deployment.
Knowing the basic syntax of a deployment file and the various options available to specify resource limits, add storage, add health checks, or set affinity settings will set you on the road to success. In your environment, carefully plan which combination of these will add resilience to your cluster.
Manage Kubernetes with confidence
Spacelift is the infrastructure orchestration platform built for the AI-accelerated software era. Automate, audit, secure, and continuously deliver your Kubernetes infrastructure with GitOps workflows, policy as code, and governance that scales.
Frequently asked questions
What’s the difference between a Deployment YAML and a Pod YAML?
A Pod YAML defines a single pod, which is the smallest deployable unit in Kubernetes, including its containers and basic settings. A Deployment YAML, by contrast, manages the lifecycle of multiple pod replicas, ensuring high availability, rolling updates, and self-healing if pods fail.
Can I use the same Deployment YAML on different clusters (dev/stage/prod)?
You can use the same Deployment YAML across dev, stage, and prod clusters if the core configuration remains consistent. However, it’s common to externalize environment-specific values (like replicas, image tags, resource limits, or environment variables) using tools like Kustomize, Helm, or CI/CD templating.
How do I roll back a bad Deployment from YAML?
To roll back a bad Deployment defined in YAML, use kubectl rollout undo with the Deployment name: kubectl rollout undo deployment <deployment-name>
This reverts to the previous ReplicaSet. If the YAML has changed since then, the rollback reflects the prior applied state, not the current YAML.
