In this article, we will explore load balancing in Kubernetes and show how to configure the various types with example configuration files. We will then discuss various load-balancing strategies and when to use them, along with general best practices for load balancing in K8s.
We will cover:
TL;DR
- A Kubernetes load balancer spreads traffic across your application’s pods to keep it available and scalable.
- The
LoadBalancerService type gives you Layer 4 exposure that your cloud provider provisions automatically, while an ingress controller handles Layer 7 routing and TLS across multiple services. - Load balancers can be external or internal, configured with cloud-specific annotations for AWS, GCP, and Azure.
What is a Kubernetes load balancer?
A Kubernetes load balancer service is a component that distributes network traffic across multiple instances of an application running in a K8S cluster. It acts as a traffic manager, ensuring that incoming requests are evenly distributed among the available instances to optimize performance and prevent overload on any single instance, providing high availability and scalability.
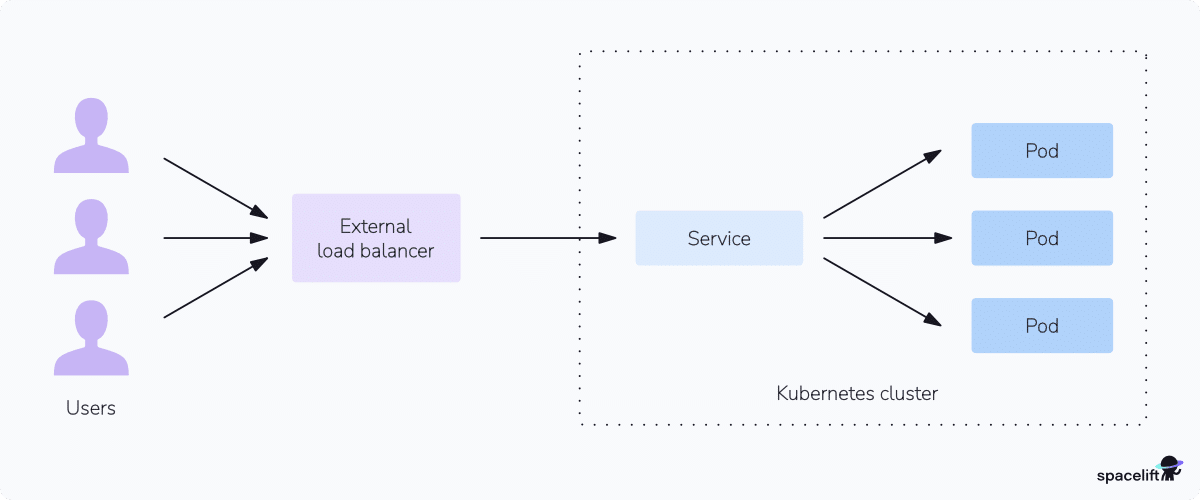
Load balancers in K8S can be implemented using a cloud provider–specific load balancer such as an Azure Load Balancer, AWS Network Load Balancer (NLB), or Elastic Load Balancer (ELB) that operates at Network Layer 4 of the OSI model.
For Layer 7 routing, you use an application-layer load balancer such as Azure Application Gateway or an AWS Application Load Balancer (ALB). In Kubernetes, these are provisioned through an ingress controller, which you must install on the cluster, because one is not included out of the box.
You can also choose from a range of different ingress controllers that can be installed in the K8S cluster. Each provides different features and can be configured to perform different load-balancing distribution strategies, such as round-robin, least connection, session affinity, source IP hash, or even custom strategies depending on the application’s specific requirements.
Popular ingress controllers include NGINX, HAProxy, Istio Ingress, and Traefik. The official docs page lists the available ingress controllers.
This article will largely focus on layer 4 load balancing.
Types of load balancers available in Kubernetes
Each type of load balancer serves a specific purpose and functions at different layers of the networking stack. The internal load balancer routes traffic only within the cluster and does not allow any external traffic, whereas the external load balancer exposes the application to external users or services outside the cluster.
Below are the main types of load balancers available in Kubernetes:
| Load balancer type | Layer | External or internal | Use case |
| LoadBalancer | Layer 4 | External | Expose services to the external network using cloud provider’s LB |
| NodePort | Layer 4 | External | Expose services on node’s IP addresses and static ports |
| ClusterIP | Internal | Internal | Default internal load balancing within the cluster |
| Ingress Controller | Layer 7 | External | HTTP/HTTPS routing with SSL and path-based routing |
| IPVS | Layer 4 | Internal | Advanced load balancing algorithms for internal cluster traffic |
| MetalLB | Layer 2/4 | External | External load balancing for bare-metal Kubernetes environments |
| Custom (Envoy, NGINX) | Layer 4/7 | External/Internal | Custom traffic routing or advanced load balancing |
Note that this table spans two categories: the built-in Service types (ClusterIP, NodePort, LoadBalancer) that you set in a manifest, and common implementations or add-ons (MetalLB, IPVS, Envoy) that provide load balancing in specific environments.”
How to configure a load balancer in Kubernetes
To set up a Kubernetes load balancer, we first need a deployment to place the load balancer in front of.
The example manifest below configures a simple deployment with five replicas that we will load balance traffic between.
Notice each replica is labeled with app: webapp.
apiVersion: apps/v1
kind: Deployment
metadata:
  name: webapp-deployment
spec:
  replicas: 5
  selector:
    matchLabels:
      app: webapp
  template:
    metadata:
      labels:
        app: webapp
    spec:
      containers:
      - name: webapp-container
        image: webapp-image:latest
        ports:
        - containerPort: 8080
We can add our load balancer configuration:
apiVersion: v1
kind: Service
metadata:
  name: webapp-service
spec:
  type: LoadBalancer
  selector:
    app: webapp
  ports:
  - protocol: TCP
    port: 80
    targetPort: 8080
Notice the selector matches the deployment labels app:webapp — this is how K8S links the load balancer to the deployment. The load balancer will listen on port 80 and target the container port on 8080.
To view the IP address of the load balancer, you can use the kubectl get services command. The load balancer will be provisioned automatically by the cloud environment (for example, Azure load balancer if you are running in Azure Kubernetes Service). However, for a local or on-premises cluster, you may need to set up a separate load balancer infrastructure or use an ingress controller.
To create an internal load balancer that routes traffic only within the cluster and does not allow any external traffic, we need to amend the configuration file:
apiVersion: v1
kind: Service
metadata:
  name: webapp-service
  annotations:
    service.beta.kubernetes.io/aws-load-balancer-type: "external"
    service.beta.kubernetes.io/aws-load-balancer-scheme: "internal"
spec:
  type: LoadBalancer
  selector:
    app: webapp
  ports:
  - protocol: TCP
    port: 80
    targetPort: 8080
Internal load balancer on AWS cloud
With the AWS Load Balancer Controller (the current recommended approach), set the scheme to internal:
annotations:
    service.beta.kubernetes.io/aws-load-balancer-type: "external"
    service.beta.kubernetes.io/aws-load-balancer-scheme: "internal"
The older service.beta.kubernetes.io/aws-load-balancer-internal: "true" annotation still works but is deprecated in favor of aws-load-balancer-scheme.
Internal load balancer on Google Cloud (GCP)
To create an internal load balancer on Google Cloud (GCP), use the GCP-specific annotation for the internal load balancer instead and remove the externalTrafficPolicy line:
annotations:
    networking.gke.io/load-balancer-type: "Internal"
Internal load balancer on Azure
The example below shows a configuration file for an internal load balancer on Azure, which sets the internal IP with the azure-load-balancer-ipv4 annotation (the loadBalancerIP field is deprecated as of Kubernetes 1.24) and restricts access with loadBalancerSourceRanges, the internal IP ranges allowed to reach the load balancer.
apiVersion: v1
kind: Service
metadata:
  name: webapp-service
  annotations:
    service.beta.kubernetes.io/azure-load-balancer-internal: "true"
    service.beta.kubernetes.io/azure-load-balancer-ipv4: 192.168.1.1
spec:
  type: LoadBalancer
  loadBalancerSourceRanges:
  - 192.168.2.0/24
  selector:
    app: webapp
  ports:
  - protocol: TCP
    port: 80
    targetPort: 8080
Note that you can also generate a load balancer using kubectl on the command line.
kubectl create service loadbalancer NAME [--tcp=port:targetPort] [--dry-run=server|client|none] [options]To generate the YAML required for your configurations, you can use the --dry-run=client -o yaml options and modify it from there.
How the LoadBalancer Service works
A LoadBalancer Service does not act as the load balancer itself but instead asks your cloud provider to provision one for you. You tell Kubernetes you want external traffic reaching your Pods, and Kubernetes asks your cloud provider to provision the load balancer for you.
The Service types build on each other
The three main Service types are layered rather than separate.
- A ClusterIP Service gives your Pods one stable virtual IP inside the cluster.
- A NodePort Service opens a port on every node, on top of that ClusterIP.
- A LoadBalancer Service puts an external cloud load balancer in front of those node ports.
So a LoadBalancer Service normally has a ClusterIP and a node port underneath it. That describes the API rather than the data path, because a packet arriving on a node port goes straight to a Pod IP without passing through the ClusterIP.
What happens when you apply the manifest
The cloud controller manager calls your provider’s API to provision a load balancer, registers your nodes as the backends, and writes the assigned external IP back into the Service. That address is what you see under EXTERNAL-IP in kubectl get service.
On a cluster with no cloud provider, such as bare metal, nothing answers the request, so the external IP stays <pending> until you install an implementation like MetalLB.
The path a packet takes
A packet travels from client to container in four steps.
- A client connects to the load balancer’s external IP.
- The load balancer forwards the connection to a node on the Service’s node port.
- The service proxy on that node, usually kube-proxy in iptables or nftables mode, picks a healthy Pod and rewrites the traffic to it.
- That Pod can run on the node that received the traffic or on a different one.
The final step drives an important configuration choice.
The externalTrafficPolicy tradeoff
The externalTrafficPolicy field controls what a node does with the traffic it receives.
Cluster is the default and lets any node forward traffic to a Pod on any other node. Load spreads evenly, but the node rewrites the source address of anything arriving on the node port, so your Pod sees the node’s IP rather than the real client IP.
Local sends traffic only to Pods on the same node. It preserves the client IP and avoids the extra hop, but load can become uneven when Pods are not spread evenly. The load balancer uses a health check on the healthCheckNodePort to skip nodes that have no ready Pod.
apiVersion: v1
kind: Service
metadata:
  name: webapp-service
spec:
  type: LoadBalancer
  externalTrafficPolicy: Local   # preserve the client source IP
  selector:
    app: webapp
  ports:
  - protocol: TCP
    port: 80
    targetPort: 8080
Choose Local when you need the real client IP at layer 4, for IP allow-lists, geolocation, or access logs. Choose Cluster when even load spreading matters more.
Targeting Pods directly
Newer integrations skip the node-port hop.
The AWS Load Balancer Controller in IP target mode, and GKE with network endpoint groups, register Pod IPs directly as backends. That drops a hop, preserves the client IP without Local mode, and balances per Pod rather than per node. Setting allocateLoadBalancerNodePorts to false, stable since Kubernetes 1.24, stops node-port allocation when nothing needs it.
Load balancer traffic distribution strategies
Before discussing load-balancing strategies, remember that their availability and features may depend on the underlying infrastructure and the type of load balancer being used, whether it’s a cloud provider load balancer or an ingress controller.
The table below summarizes common load balancer traffic distribution strategies.
| Strategy | Key feature | Best use case |
| Round Robin | Sequential request distribution | Similar server capacities |
| Least Connections | Directs to the server with the fewest connections | Uneven traffic loads |
| IP Hash | Consistent server for the same client IP | Session persistence |
| Weighted Round Robin | Balances load based on server weights | Different server capabilities |
| Random | Random selection of servers | Simple setups |
| Geographic Routing | Directs traffic based on client location | Lowering latency in global systems |
| URL Path-Based | Traffic routed based on URL patterns | Microservices or content separation |
| Session Persistence | Keeps clients on the same server | Web applications needing session |
| Failover | Backup servers used when primary fails | High availability |
| Priority-Based | Routes to high-priority servers first | Resource prioritization |
| Cloud-Native | Dynamic auto-scaling based on load | Cloud-hosted applications |
| Service Mesh | Load balancing at microservice level | Microservices architectures |
| Anycast Routing | Same IP used for multiple distributed servers | Reducing latency for global requests |
Example: Traffic distribution strategies for cloud provider load balancers
AWS, GCP, and Azure load balancers will all support different features depending on the type used. Again note these are layer 4 only and do not provide application layer 7 capability.
For example, Azure load balancer supports:
- Round Robin: Distributes traffic in a round-robin fashion across the healthy pods in the AKS cluster. Each new request is forwarded to the next available pod.
- Source IP Affinity: Also known as client IP affinity, sticky sessions, or session affinity, this is used when you need to ensure that requests from the same client IP are routed to the same pod, maintaining session state if necessary. Also referred to as ‘Source IP Hash’, where the routing is based on a hash of the source IP address.
- Session Persistence: Building on source IP affinity, a timeout value can be configured to ensure that the same client IP is routed to the same pod for a specified duration only.
- Port-Based Load Balancing: Used to distribute traffic when services require traffic on different ports.
AWS Network Load Balancer (NLB) also allows you to utilize Target Group-Level Load Balancing to define target groups that group multiple pods together.
Best practices for handling a Kubernetes load balancer
Let’s look at some of the best practices for handling Kubernetes load balancers:
- Carefully consider your requirements. Is a layer 4 load balancer sufficient for your needs, or do you require the option for application layer 7 routing or more advanced features such as SSL termination? Is session affinity required, and if so, which mechanism is best for your application?
- Utilize your cloud provider to provision a load balancer automatically using the
type: LoadBalancerin the Service manifest. - Implement readiness and liveness probes to check the health of your pods, enabling the load balancer to distribute traffic only to healthy instances.
- Consult cloud provider documentation, as Load Balancer Annotations will be different for each specific option used. For example, specific annotations may be available to utilize features like session affinity and timeouts.
- Enable connection draining where supported. Connection draining ensures that existing connections are gracefully handled when a pod or instance is being terminated or scaled down.
- Configure Kubernetes Horizontal Pod Autoscaling (HPA) to automatically scale the number of pods based on resource utilization or custom metrics.
- Regularly monitor and analyze load balancer metrics, such as request rates, latency, error rates, and backend server health. Prometheus and Grafana are popular choices for this.
- Apply security best practices, such as enabling SSL/TLS termination on the load balancer, and ensure proper access controls (IAM) are in place to prevent unauthorized access to the load balancer or backend services.
- Simulating failure scenarios and thoroughly testing your configuration can help validate the load balancer behavior. Testing can help you spot flaws in your configuration and give you pointers on where to add more resilience.
Kubernetes ingress vs load balancer
Kubernetes Ingress provides centralized L7 routing (e.g., path or domain-based) for multiple services via a single IP, with features like SSL termination. LoadBalancer offers L4 access with a dedicated IP per service, supporting basic traffic routing. Ingress can be used for advanced, cost-effective routing, and LoadBalancer for simple, direct service exposure.
| Ingress | LoadBalancer | |
| Layer | Application layer (L7, HTTP/HTTPS) | Network layer (L4, TCP/UDP) |
| Use case | Centralized routing for multiple services | Direct exposure for individual services |
| External IPs | Shares a single external IP | Allocates a unique external IP per service |
| Features | Advanced routing, SSL termination | Basic load balancing |
| Cost | More cost-effective (shared IP) | Can be expensive for many services |
How to manage Kubernetes with Spacelift?
If you need help managing your Kubernetes projects, consider Spacelift. It brings with it a GitOps flow, so your Kubernetes Deployments are synced with your Kubernetes Stacks, and pull requests show you a preview of what they’re planning to change.
With Spacelift, you get:
- Policies to control what kind of resources engineers can create, what parameters they can have, how many approvals you need for a run, what happens when a pull request is opened, and where to send your notifications
- Stack dependencies to build multi-infrastructure automation workflows, combining Terraform with Kubernetes, Ansible, and other infrastructure-as-code (IaC) tools such as OpenTofu, Pulumi, and CloudFormation
- Self-service infrastructure via Templates, so developers deploy what they need from a simple form while every deployment stays pinned to a version your platform team reviewed and published
- Spacelift Intelligence, including Intent and the Infra Assistant, so your team can design, deploy, and govern infrastructure in plain language under the same policies as everything else
- Creature comforts such as contexts (reusable containers for your environment variables, files, and hooks), and the ability to run arbitrary code
- Drift detection and optional remediation
If you want to learn more about Spacelift, create a free account today or book a demo with one of our engineers.
Key takeaways
Load balancer services in K8S are linked to a deployment using labels. They specify the port the load balancer will listen on, and the port they will target. A K8S load balancer can be internal only to the cluster or allow external traffic into the cluster. Load balancers operate at the network layer (layer 4) of the OSI model.
For more advanced DNS-based routing, use a Layer 7 device such as an application gateway on Azure, or an ingress controller, such as NGINX.
Load balancing in Kubernetes is flexible. Depending on your platform, you can implement many load-balancing strategies and use various types of load balancers or ingress controllers based on your requirements.
Solve your infrastructure challenges
Spacelift is an infrastructure orchestration platform built for IaC. It brings collaboration, automation, and governance into a single workflow, so your team can provision cloud infrastructure faster without losing control.
Kubernetes Documentation. Services, Load Balancing, and Networking. Accessed: 4 August 2026
Kubernetes Documentation. Ingress. Accessed: 4 August 2026