
Kubernetes makes it easy to deploy multiple replicas of your app’s components, and then adjust their scaling in response to utilization changes. This allows you to achieve high availability for your workloads and maintain consistent performance.
Horizontal Pod Autoscaling (HPA) is one of the main ways to handle scaling in a Kubernetes cluster. In this article, we’ll explore the use cases for HPA, explain how it works, and walk through setting it up for your own cluster workloads.
What we will cover:
What is Kubernetes Horizontal Pod Autoscaler (HPA)?
Horizontal Pod Autoscaler (HPA) is a Kubernetes feature that automatically adjusts the replica counts of your Deployments and StatefulSets to match user demand. When demand peaks, the HPA starts new Pod replicas to ensure the additional traffic can be served reliably. Once the load decreases, the HPA scales the workload back again so cluster resources aren’t allocated unnecessarily.
HPA is horizontal because it handles scaling by deploying new Pods. Additional replicas increase your workload’s capacity.
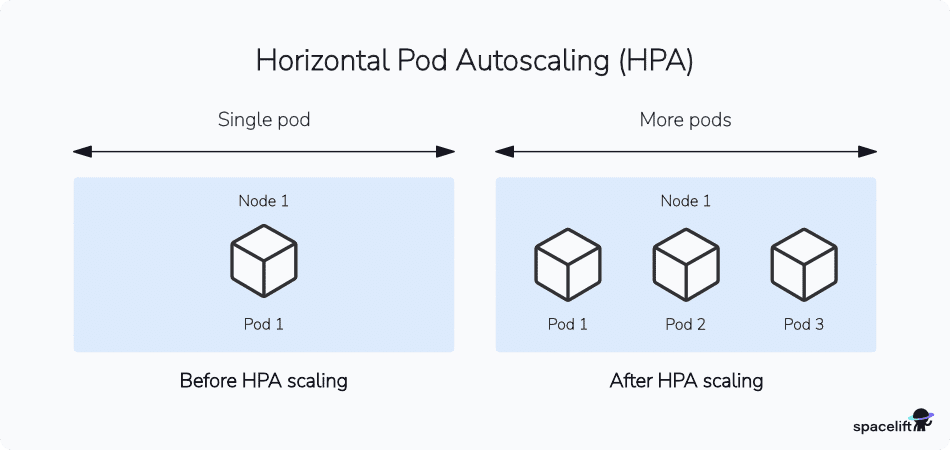
Horizontal scaling is an appropriate form of high availability for most applications, where demand growth is a function of the number of users to serve.
When you enable HPA for a workload, Kubernetes will automatically scale its replicas up and down based on the limits you define. The correct configuration will ensure there are always enough Pods to serve your traffic, provided your cluster has sufficient Node capacity to schedule those Pods.
Some of the alternatives to default Kubernetes HPA include the Prometheus Adapter, KEDA Autoscaler, and MAPE Autoscaler.
What is the difference between HPA and VPA in Kubernetes?
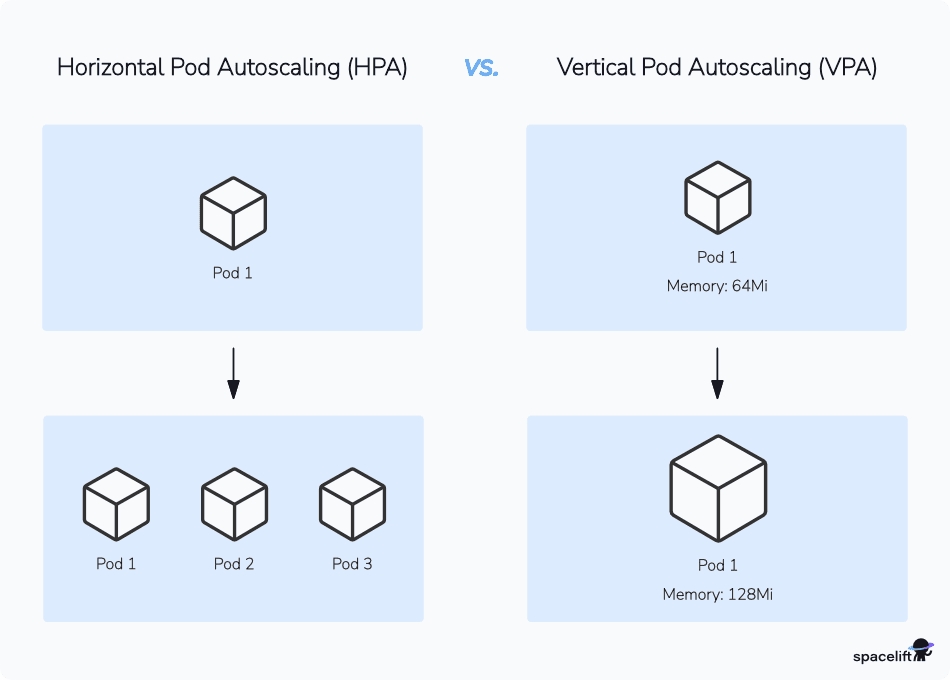
Horizontal Pod Autoscaling (HPA) and Vertical Pod Autoscaling (VPA) are both mechanisms to automatically scale workloads, but they address scaling in different dimensions. HPA automatically scales the number of pod replicas horizontally based on observed metrics like CPU utilization, whereas VPA automatically adjusts the CPU and memory resources of existing Pods.
HPA is useful for handling fluctuations in traffic or workload by adding or removing pod replicas, whereas VPA optimizes resource allocation by right-sizing the resources for each pod.
Kubernetes can also support cluster-level Node scaling, where your cluster’s overall capacity is increased by provisioning new compute Nodes from your cloud provider.
Vertical scaling can be a better fit for some applications, while cluster auto-scaling should be used with HPA to expand cluster capacity on the fly. This will give you the most resilient Kubernetes deployment experience.
Kubernetes HPA use cases
HPA is a strategy for improving the reliability, availability, and operational efficiency of your Kubernetes workloads. Here are some examples of the main use cases it enables:
- Increase your resilience to demand spikes by ensuring new Pods are created to serve excess traffic without requiring manual intervention.
- Scale your workloads based on complex conditions, including metrics generated by external sources such as load balancer traffic volume.
- Reduce utilization during quiet times by auto-scaling your Pods back again when demand subsides, preventing unnecessary resource allocation.
- Increase overall efficiency with workloads that always run enough replicas to support the service level required.
Why do we need HPA?
HPA ensures stable performance for production workloads with fluctuating traffic, automatically adjusting resources to meet demand. This guarantees reliable app access while optimizing resource use, thus minimizing costs and inefficiencies.
Without HPA, apps risk over-provisioning, underperformance, or downtime during traffic spikes or fluctuations, leading to inefficiency and potential outages.
How does HPA work?
These key steps explain how HPA operates and manages scaling based on resource usage and custom metrics:
- Configuration: You can configure HPA as a Kubernetes resource in a YAML file or through the
kubectl autoscalecommand. This configuration includes defining the scaling rules and which metrics (like CPU, memory, or custom ones) to monitor.
You can configure minimum and maximum pod limits within the HPA configuration to ensure your application never scales below a certain number of pods or exceeds a predefined maximum (even if resource demands would normally cause scaling outside this range).
- Metric collection: By default, HPA gathers metrics through the Kubernetes Metrics API, which collects data (CPU, memory) from the Metrics Server. You can also integrate external monitoring tools like Prometheus for custom metrics.
- Target metric definition: In your HPA configuration, you set the target metric values (e.g., CPU utilization at 70%). The HPA controller regularly checks the actual metric values against these targets.
- HPA controller: The controller, part of Kubernetes’ control plane, continuously monitors the metrics and compares them with the target values. It uses this data to make scaling decisions.
- Scaling decision: Based on the collected data:
-
- Scale up: If the current resource usage exceeds the target, HPA increases the number of running pods.
- Scale down: If the usage is below the target, HPA reduces the number of pods to save resources.
- Pod scaling: Depending on the workload type, HPA interacts with Deployment, ReplicaSet, or StatefulSet to adjust the number of pods running. Scaling is not instant; Kubernetes will start or stop the appropriate number of pods based on the scaling decision.
To fully understand how HPA operates, you also need to understand custom metrics, stabilization periods, and event-driven autoscaling. These factors help fine-tune HPA behavior and can be critical for certain use cases.
How is Kubernetes HPA calculated?
Horizontal Pod autoscaling in Kubernetes works by querying a metrics source to determine the current resource usage of your Pods. From this information, HPA calculates the ideal number of Pod replicas based on the Pod resource requests and limits you’ve defined. It then modifies the actual number of replicas in your cluster by adding and removing Pods as needed.
Each time this loop completes, a new iteration begins. HPA runs continually, so your workload’s replica count will always match the correct number of Pods for the currently observed usage. There will be a small delay between changing usage and HPA altering the replica count, but this is usually small — Kubernetes defaults to checking your metrics source every 15 seconds.
HPA Metrics
Kubernetes HPA uses various metrics, such as average CPU and memory utilization, to determine when to scale a workload up or down. Because HPA needs to know the real-time CPU and memory usage of your Pods, you must have the Kubernetes Metrics Server installed in your cluster first.
However, it’s also possible to use custom metrics API to apply scaling changes based on arbitrary values relevant to your application. Once you have a metrics source available, you can configure HPA for your application by creating a HorizontalPodAutoscaler manifest.
We’ll see how it works below.
Example: How to set up Kubernetes HPA
Let’s walk through setting up HPA for a simple demo application. We’ll assume you’ve already got Kubectl and Helm installed and configured with a connection to a Kubernetes cluster.
1. Create your app
First, create a simple Deployment and Service to represent your workload:
apiVersion: apps/v1
kind: Deployment
metadata:
  name: demo
spec:
  selector:
    matchLabels:
      app: demo
  template:
    metadata:
      labels:
        app: demo
    spec:
      containers:
        - name: demo
          image: registry.k8s.io/hpa-example:latest
          ports:
            - containerPort: 80
          resources:
            requests:
cpu: 500mapiVersion: v1
kind: Service
metadata:
name: demo
spec:
ports:
- port: 80
selector:
app: demoThe Kubernetes hpa-example image used here is designed to cause high CPU usage each time a request is made. This will help us easily test our auto-scaling behavior in the following steps.
Copy the YAML manifest, and save it to app.yaml. Use Kubectl to add the Deployment and Service to your cluster:
$ kubectl apply -f app.yaml
deployment.apps/demo created
services/demo created
2. Install metrics server
As mentioned above, you need a Metrics Server installed to get started with HPA. The official YAML manifest is the easiest way to add it to your cluster:
$ kubectl apply -f https://github.com/kubernetes-sigs/metrics-server/releases/latest/download/components.yamlUsing Minikube? Run minikube addons enable metrics-server instead.
3. Create your HorizontalPodAutoscaler
You’re now ready to create your HorizontalPodAutoscaler object. Kubernetes will use the rules you specify to configure the horizontal auto-scaling behavior for your Deployment’s Pods.
Kubernetes HPA behavior example
The following sample manifest specifies that Kubernetes should scale the Deployment between three and nine Pods as required, in order to maintain average CPU utilization of 50%:
apiVersion: autoscaling/v2
kind: HorizontalPodAutoscaler
metadata:
  name: demo
spec:
  scaleTargetRef:
    apiVersion: apps/v1
    kind: Deployment
    name: demo
  minReplicas: 3
  maxReplicas: 9
  metrics:
    - type: Resource
      resource:
        name: cpu
        target:
          type: Utilization
          averageUtilization: 50
Save the manifest as hpa.yaml, then apply it to your cluster:
$ kubectl apply -f hpa.yaml
horizontalpodautoscaler.autoscaling/demo created
Now use Kubectl’s get deployments command to check your Deployment’s status:
$ kubectl get deployments
NAME    READY   UP-TO-DATE   AVAILABLE   AGE
demo     3/3    3            3           32m
You can see the Deployment has scaled up to three replicas automatically. This is the minimum replica count specified in the HorizontalPodAutoscaler manifest.
You can use the get hpa command to view the HorizontalPodAutoscaler object:
$ kubectl get hpa
NAME    REFERENCE          TARGETS   MINPODS   MAXPODS   REPLICAS   AGE
demo    Deployment/demo    0%/50%    3         9         3          29m
The TARGETS column shows the live and target CPU usage of the Pods governed by the autoscaler. The REPLICAS column provides the count of Pod replicas that are currently running.
4. Generate test traffic
Let’s see what happens when traffic to your application increases. One way to simulate load is to start a new Pod that continually makes HTTP requests to the Service you created. Try running the following command in a new terminal window:
$ kubectl run -it --rm load-test --image=busybox:1.28 --restart=Never -- /bin/sh -c "while sleep 0.01; do wget -q -O- http://demo; done"Wait a minute to give the HPA controller time to notice the increased load, then repeat the kubectl get hpa command:
$ kubectl get hpa
NAME   REFERENCE         TARGETS   MINPODS   MAXPODS   REPLICAS   AGE
demo   Deployment/demo   45%/50%   3         9         4          33m
This time, the CPU usage is up to 45%, compared to the 50% target. However, the REPLICAS column shows the CPU usage has only been held below the target by starting a new replica. Four Pods are now running for the Deployment:
$ kubectl get deployment
NAME   READY   UP-TO-DATE   AVAILABLE   AGE
demo   4/4     4            4           37m
We’ve successfully used HPA to autoscale our application! As a final test, press Ctrl+C in the terminal that’s running the load generator command. After a few seconds, you should see the HPA scale the Deployment back down to match the reduced CPU utilization.
$ kubectl get hpa
NAME   REFERENCE         TARGETS   MINPODS   MAXPODS   REPLICAS   AGE
demo   Deployment/demo   0%/50%    3         9         3          3
HPA limitations and gotchas
HPA is a powerful mechanism for scaling your workloads, but it has some common issues:
| HPA cannot be used with DaemonSets | DaemonSets start a Pod on each of the Nodes in your cluster. Unlike Deployments and StatefulSets, they can’t be used with HPA because they can’t be assigned a replica count. |
| Correct HPA behavior depends on appropriate Pod resource requests and limits | Using HPA with Pods that lack proper CPU and memory constraints can cause too many or not enough replicas to be created, affecting performance and efficiency. |
| HPA defaults to only considering Pod-level resource utilization | Unused resources associated with specific containers in a Pod won’t be detected, potentially causing wastage. Since Kubernetes v1.27, it’s possible to configure HPA to check container utilization using the containerResource manifest field. |
| HPA will not automatically add new Nodes | Scaling a workload’s replica count might not be possible if there’s insufficient cluster capacity to schedule the new Pods. HPA won’t automatically create new Nodes, so it should be used in conjunction with a cluster auto-scaler. |
HPA isn’t compatible with manually set spec.replicas fields on your workload objects |
If you set spec.replicas on your Deployment or StatefulSet, then each time you update the object its replica count will be reverted to that value. It’s recommended you do not manually set spec.replicas and instead use HPA to manage all scaling operations. |
You should plan how to address these limitations before using HPA. Otherwise, your implementation may not behave as you expect.
Kubernetes HPA best practices
Here’s a quick recap of some best practices to follow when using Kubernetes HPA:
- Install Metrics Server — Kubernetes HPA depends on the metrics APIs being available in your cluster. This provides the information that HPA uses to make scaling decisions.
- Set correct Pod requests and limits — HPA uses your requests and limits to determine which scaling changes to make.
- Don’t mix HPA and VPA — HPA can’t be used with Vertical Pod Autoscaler (VPA) for the same set of Pods. However, it can be helpful to trial VPA before you deploy HPA, as this can indicate the correct Pod requests and limits to assign.
- Configure cluster auto-scaling alongside HPA — To achieve maximum resilience, HPA depends on cluster auto-scaling being enabled too. This allows Nodes to be added to your cluster to fulfill any extra capacity required when HPA creates new Pod replicas.
Following these pointers will enable your HPA implementation to perform at its best.
Kubernetes + Spacelift
If you need any assistance with managing your Kubernetes projects, take a look at Spacelift. It brings with it a GitOps flow, so your Kubernetes Deployments are synced with your Kubernetes Stacks, and pull requests show you a preview of what they’re planning to change.
To take this one step further, you could add custom policies to harden the security and reliability of your configurations and deployments. Spacelift provides different types of policies and workflows easily customizable to fit every use case. For instance, you could add plan policies to restrict or warn about security or compliance violations or approval policies to add an approval step during deployments.
You can try it for free by creating a trial account or booking a demo with one of our engineers.
Key points
Kubernetes Horizontal Pod Autoscaler (HPA) allows you to automatically scale the replica counts of your workloads to match real-time resource utilization changes. HPA allows you to achieve high availability for your Kubernetes workloads, improving performance and reliability.
Manage Kubernetes Faster and More Easily
Spacelift allows you to automate, audit, secure, and continuously deliver your infrastructure. It helps overcome common state management issues and adds several must-have features for infrastructure management.
Kubernetes Autoscaler Docs. Vertical Pod Autoscaler Quick Start. Accessed: 22 October 2025
Kubernetes Autoscaler Docs. Cluster Autoscaler. Accessed: 22 October 2025
Kubernetes Documentation. Horizontal Pod Autoscaling. Accessed: 22 October 2025
Kubernetes SIGs Docs. Kubernetes Metrics Server. Accessed: 22 October 2025
