
Managing Terraform configurations across multiple environments, regions, and cloud accounts can be challenging, which is why various tools exist to address this issue.
In HashiCorp Cloud Platform (HCP) Terraform (formerly Terraform Cloud), workspaces were used to organize configurations, with one workspace representing a configuration and state file. These workspaces formed complete architectures and were replicated for different environments (e.g., development, staging, production).
Now, Terraform stacks simplify the management of larger infrastructures across multiple environments. This post will explore Terraform stacks and how to use them on HCP Terraform.
What we’ll cover:
- What are Terraform stacks?
- Working with Terraform stacks
- Benefits of using Terraform stacks
- Use cases for Terraform stacks
- Alternatives to Terraform stacks
Before we move on to discuss Terraform stacks, note the following details:
- Terraform stacks are currently in public preview, and it is likely that some of the details discussed in this blog post will change before they are generally available.
- Terraform stacks are only available through HCP Terraform.
- During the preview, Terraform stacks require an alpha-release of Terraform 1.10 or later
What are Terraform stacks?
A Terraform stack refers to a collection of infrastructure resources that are managed together as a single unit using Terraform. Each stack typically represents a specific environment, such as development, staging, or production.
Stacks are made up of infrastructure components that are provisioned through deployments. You build your Terraform stack from one or more components (e.g., network component, compute component, etc.), and you provision them in one or more copies that are called deployments (e.g., dev, stage, and prod).
You configure your stack components in files using the .tfstack.hcl file extension, and you configure your stack deployments in files using the .tfdeploy.hcl file extension. The stack configuration language is not part of the regular Terraform language, so this is why stacks do not use the .tf file ending.
You can specify dependencies between components declaratively, just as you have been specifying dependencies between resources in Terraform. You can also orchestrate certain actions related to your deployments using declarative means.
Terraform stacks come with a new type of behavior where Terraform understands certain dependencies between your infrastructure components that require multiple plan and apply operations to complete.
Working with Terraform stacks
A Terraform stack consists of two main pieces: components and deployments. Components make up the infrastructure of an environment. A deployment is the concretization of an environment.
How to define stack components
A component is an abstraction around a Terraform module.
Stack components are defined in files using the .tfstack.hcl file extension. Each component is defined using a component block, which has a single label for the component name.
Below is a pseudo-example of a component named network:
component "network" {
  module = "<local or external module reference>"

  inputs = {
    variable1 = var.variable1_value
    # … other variables omitted
  }

  providers = {
    provider1 = provider.provider1.instance
    # … other providers omitted
  }
}
Each component specifies a source module. The module can be a local module in a subdirectory of the current Terraform stack project, or it could be a module from a public or private Terraform registry (i.e., an external module).
You configure inputs to the module in the inputs argument. These inputs are the module variables. Most input values reference variables that you define together with your stack components in .tfstack.hcl files.
How to define stack deployments
A deployment is an instance of all your components, which is configured using the deployment block in files using the .tdeploy.hcl file extension. The deployment block has a label for the deployment name.
Below is a pseudo-example of a deployment named production:
deployment "production" {
  inputs = {
    variable1 = "value1"
    # … other inputs omitted
  }
}
You configure input values for the deployment using the inputs argument. The inputs argument should provide concrete values for all variables that are defined for your components in the .tfstack.hcl files.
There are a few different common things you would use deployments for:
- Application environments:
development,staging, andproduction. - Cloud regions:
europe,us,asia,africa. - Cloud accounts:
account-a,account-b,account-c.
How to orchestrate stack operations
Apart from components and deployments, there is one more important concept in the Terraform stacks extension to the Terraform language.
You can use orchestrate blocks to configure automation around your stack deployments. The orchestrate block has two labels, one for the type of orchestration and one for the name of the orchestration.
Below is a pseudo-example of an orchestrate block named dev of type auto_approve:
orchestrate "auto_approve" "dev" {
  check {
    condition = <expression>
    reason    = "Reason why the check fails"
  }
}
The above example is for an auto-approval orchestration. There is also a replan orchestration type.
In the demo later in this blog post, we will see an example of the auto-approval orchestration.
How to deploy a stack on HCP Terraform
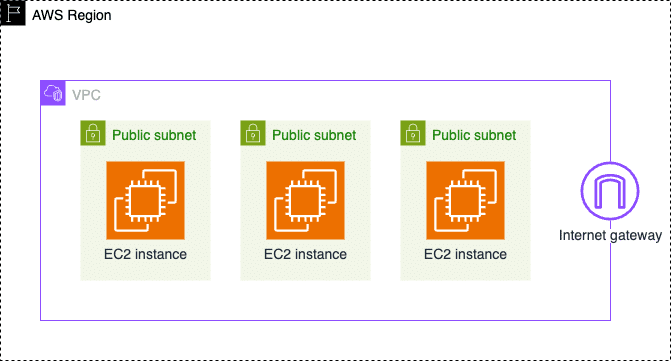
We will use a simple example to get a sense for how Terraform stacks work in practice. The following figure shows a schematic view of the infrastructure that we will provision on AWS.
Step 1: Design the stack
We will split the AWS infrastructure into two Terraform modules. In terms of Terraform stacks, these modules will be our two stack components. These components are:
- Network component: a component for an AWS VPC with public subnets in each region availability zone. There is also an internet gateway attached to the VPC and a route table attached to the subnets.
- Compute component: a component for AWS EC2 instances deployed to the VPC. One EC2 instance is provisioned to each subnet of the VPC.
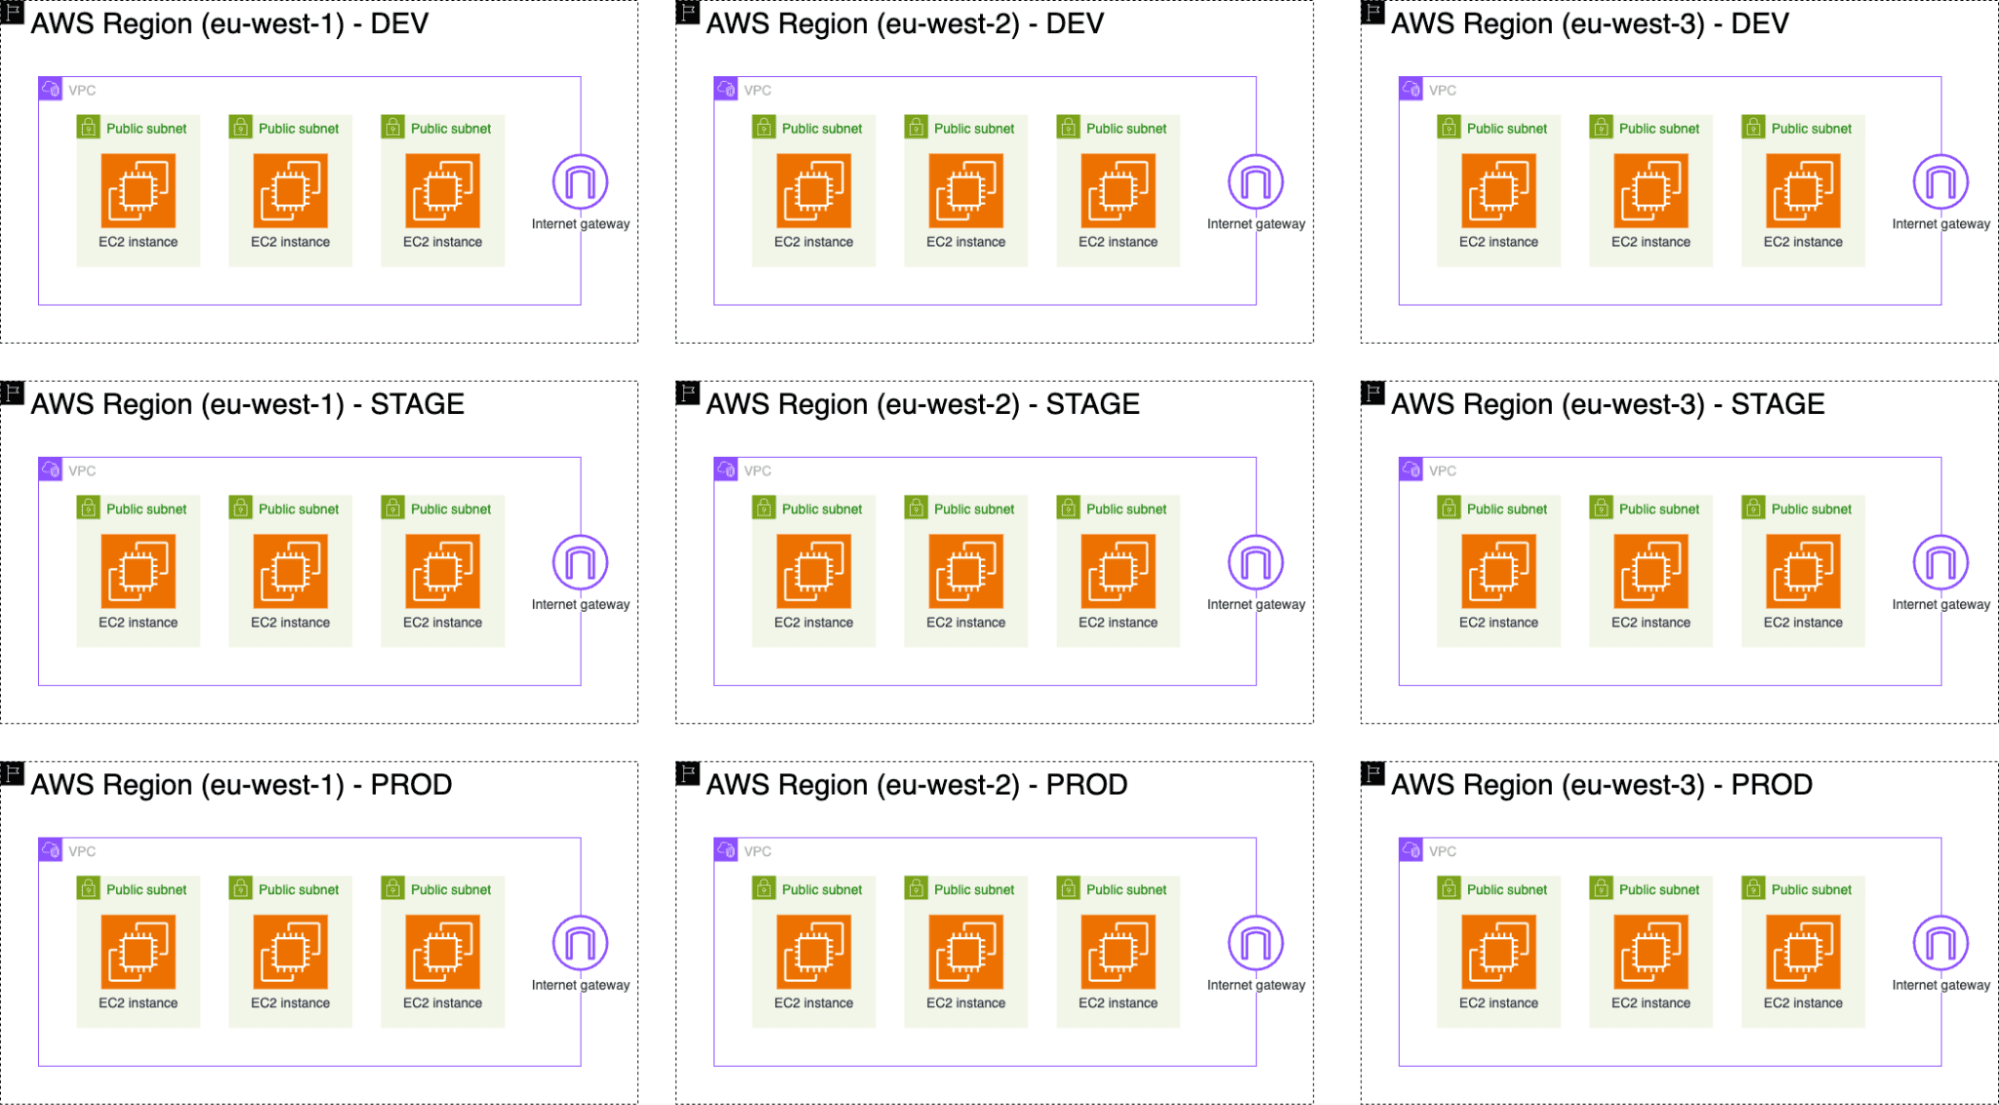
We will provision this sample infrastructure across multiple AWS regions and for multiple environments.
To limit ourselves for this demo we will use the following three AWS regions:
- Ireland (eu-west-1)
- London (eu-west-2)
- Paris (eu-west-3)
We will use the following three application environments:
- Development (shortened to dev)
- Staging (stage)
- Production (prod)
These application environments will be our stack deployments.
Putting it all together means there will be nine infrastructure copies. These deployments are illustrated in the following figure.
Terraform stacks working directory
Before we cover the details of how to configure the stack components and deployments, the following is an overview of the directory structure of this Terraform stacks project with all files in place:
$ tree .
.
├── components.tfstack.hcl
├── deployments.tfdeploy.hcl
├── modules
│   ├── compute
│   │   ├── main.tf
│   │   ├── providers.tf
│   │   └── variables.tf
│   └── network
│       ├── main.tf
│       ├── outputs.tf
│       ├── providers.tf
│       └── variables.tf
├── orchestration.tfdeploy.hcl
├── providers.tfstack.hcl
└── variables.tfstack.hcl
If you want to see the finished demo code, it is available with instructions at GitHub.
Step 2: Configure the stack components
Components are abstractions on top of Terraform modules. In this demo, we will use local Terraform modules located as subdirectories of the Terraform stacks working directory.
Our components will require some input. These are declared like normal Terraform variables, but in a file named variables.tfstack.hcl.
This demo stack has three variables:
variable "configurations" {
  description = "Map of AWS region name to its configuration"
  type = map(object({
    cidr_block = string
  }))
}

variable "identity_token" {
  description = "Token for authorization to AWS"
  type        = string
  ephemeral   = true
}

variable "role_arn" {
  description = "Role ARN for authorization to AWS"
  type        = string
}
The first variable (named configurations) is a map where the map key will be an AWS region name. The map value is currently a simple object with one attribute (cidr_block).
The following two variables (identity_token and role_arn) are related to authenticating to AWS. We will return to these in a later section.
Note that the identity_token variable is declared ephemeral. This means that the value passed to it will not be persisted in any state file.
The network component is configured as follows:
component "network" {
  for_each = var.configurations

  source = "./modules/network"

  inputs = {
    aws_region     = each.key
    vpc_cidr_block = each.value.cidr_block
  }

  providers = {
    aws = provider.aws.all[each.key]
  }
}
Note of the following details:
- The
for_eachmeta argument creates one copy of the network component for each of the AWS region configurations from theconfigurationsvariable. - A component accepts a
providersargument where we specify which provider to use for the given instance of the component. Note that the providers are indexed (i.e. we select a provider using theeach.keyreference). We will return to how providers are configured in the next section.
The compute component is configured in a similar manner:
component "compute" {
  for_each = var.configurations

  source = "./modules/compute"

  inputs = {
    subnet_ids = component.network[each.key].subnet_ids
  }

  providers = {
    aws = provider.aws.all[each.key]
  }
}
We reference output from the network component as part of the input to the compute component using the component.<component name>.<output name> syntax. This creates a dependency between the two components.
Step 3: Configure providers and authentication
Providers are configured differently in Terraform stacks compared to regular Terraform configurations.
First of all, we specify what the required providers are for our Terraform stack in a root-level required_providers block. We do this in a file named providers.tfstack.hcl:
required_providers {
  aws = {
    source  = "hashicorp/aws"
    version = ">= 5.89.0"
  }
}
Note that there is no terraform block surrounding the required_providers block. Apart from that, the required providers are configured as with a normal Terraform configuration.
Next, the provider blocks in Terraform stacks have two labels: one for the provider type and one for a unique provider name. This is in contrast to normal Terraform configurations, where the provider block only has a single label.
We configure the AWS provider with the following provider block:
provider "aws" "all" {
  for_each = var.configurations

  config {
    region = each.key

    assume_role_with_web_identity {
      role_arn           = var.role_arn
      web_identity_token = var.identity_token
    }
  }
}
Note the following details:
- The
providerblock has a second label ("all"in the code above). This construct removes the need to use aliases like we would do in normal Terraform configurations when configuring two or more instances of the same Terraform provider. - The
providerblock supports thefor_eachmeta argument, which allows us to easily create multiple provider configurations. This is not supported in a normal Terraform configuration. - The actual provider configuration goes into a nested
configblock. Inside theconfigblock are the usual provider configuration arguments that are unique for the provider you are configuring (in this case, they are unique for the AWS provider). - We configure the AWS provider to use the
role_arnandidentity_tokenvariables we configured earlier invariables.tfstack.hcl.
The authentication from HCP Terraform to AWS builds on a pre-configured trust relationship that we need to set up as a prerequisite. The details of how to do this are beyond the scope of this blog post. See the Terraform stacks documentation for an example of how to do this for AWS. In essence, it consists of creating an AWS IAM role configured to trust HCP Terraform.
Once the trust relationship has been set up, you can generate an identity token to use in the authentication process. Add the following identity_token block to a file named deployments.tfdeploy.hcl:
identity_token "aws" {
  audience = ["aws.workload.identity"]
}
This is also a new block in the Terraform stacks language. We will use the output from the identity_token block when we configure the stack deployments.
Step 4: Configure the stack deployments
For this demo, we will add all stack deployments to the file deployments.tfdeploy.hcl that we added the identity_token block to earlier.
We can also define local values in our deployment files. We add one local value for an AWS IAM role ARN that we will reference in each of our deployments:
locals {
  role_arn = "arn:aws:iam::123456789012:role/spacelift-demo"
}
This is the IAM role that is the base for the trust relationship between AWS and HCP Terraform described earlier.
Next, we add the deployment for the dev environment:
deployment "dev" {
  inputs = {
    configurations = {
      "eu-west-1" = {
        cidr_block = "10.0.0.0/20"
      }
      "eu-west-2" = {
        cidr_block = "10.0.16.0/20"
      }
      "eu-west-3" = {
        cidr_block = "10.0.32.0/20"
      }
    }
    identity_token = identity_token.aws.jwt
    role_arn       = local.role_arn
  }
}
The deployment block takes one argument called inputs, where we configure actual values for all stack variables we defined earlier in variables.tfstack.hcl.
In this example, we provide a map named configurations specifying our three AWS regions and CIDR block values for the VPCs in each region.
We also reference the output of the identity_token block as input to the identity_token variable. Finally, we also use the local value for the role_arn that is used in the authentication to AWS.
The deployment blocks for the stage and prod environments will look more or less identical to the dev deployment. The sole difference is that we use different CIDR block values for the VPCs. These deployment blocks are omitted for brevity.
Step 5: Configure orchestration rules
We would like to fully automate stack operations for the dev environment, while leaving the stage and prod environments to require manual approvals for now.
To achieve this automation, we add one orchestrate block that checks the deployment context object available to Terraform stacks during each run. If a specified condition is fulfilled, we auto-approve the operation.
In this specific case, we add the following orchestrate block:
orchestrate "auto_approve" "dev" {
  check {
    condition = context.plan.deployment == deployment.dev
    reason    = "Dev deployments are auto approved"
  }
}
Currently, there is no possibility to orchestrate approvals across deployments (e.g., to approve the stage deployment if the dev deployment was successful).
The deployment context object contains much more information on which to base automation decisions. For instance, we could check if any resources will be deleted as part of the Terraform run and, if so, require explicit manual approval.
Step 6: Prepare the stack for HCP Terraform
Before we create the Terraform stack on HCP Terraform, we must download the Terraform stacks CLI (see instructions in the documentation) and initialize the stack (similar to how we run terraform init for a normal Terraform configuration):
$ tfstacks init
Success! Configuration has been initialized and more commands can now be executed.
We must also generate a file containing the version number of Terraform we are currently using. This is a requirement during the public preview of Terraform stacks because the stack functionality is only available in alpha releases of Terraform.
To generate this file, run a command similar to the following (requires the jq utility):
$ terraform version -json | jq -r .terraform_version > .terraform-versionThe important piece is that the file is named .terraform-version, and the content is the version number of Terraform. In our example, the file looks like the following:
$ cat .terraform-version
1.12.0-alpha20250213
Run a validation command to make sure that all the requirements are in place for Terraform stacks:
$ tfstacks validate
Success! Terraform Stacks configuration is valid and ready for use within HCP Terraform.
The Terraform stacks CLI tool has additional commands that allow you to perform some actions on stacks from your local workstation. Use tfstacks --help to see the available commands.
Step 7: Create the stack on HCP Terraform
You can programmatically create the required resources on HCP Terraform using the HCP Terraform provider. However, in the following walkthrough, we will see how this works in the HCP Terraform portal.
There are two prerequisites that you must complete to follow along in the steps below:
- You must have your Terraform stack code in a git repository.
- You must add the version control system (VCS) provider of your choice to HCP Terraform. The steps for how to do this are outside the scope of this blog post, but you can find details on how this works in the documentation.
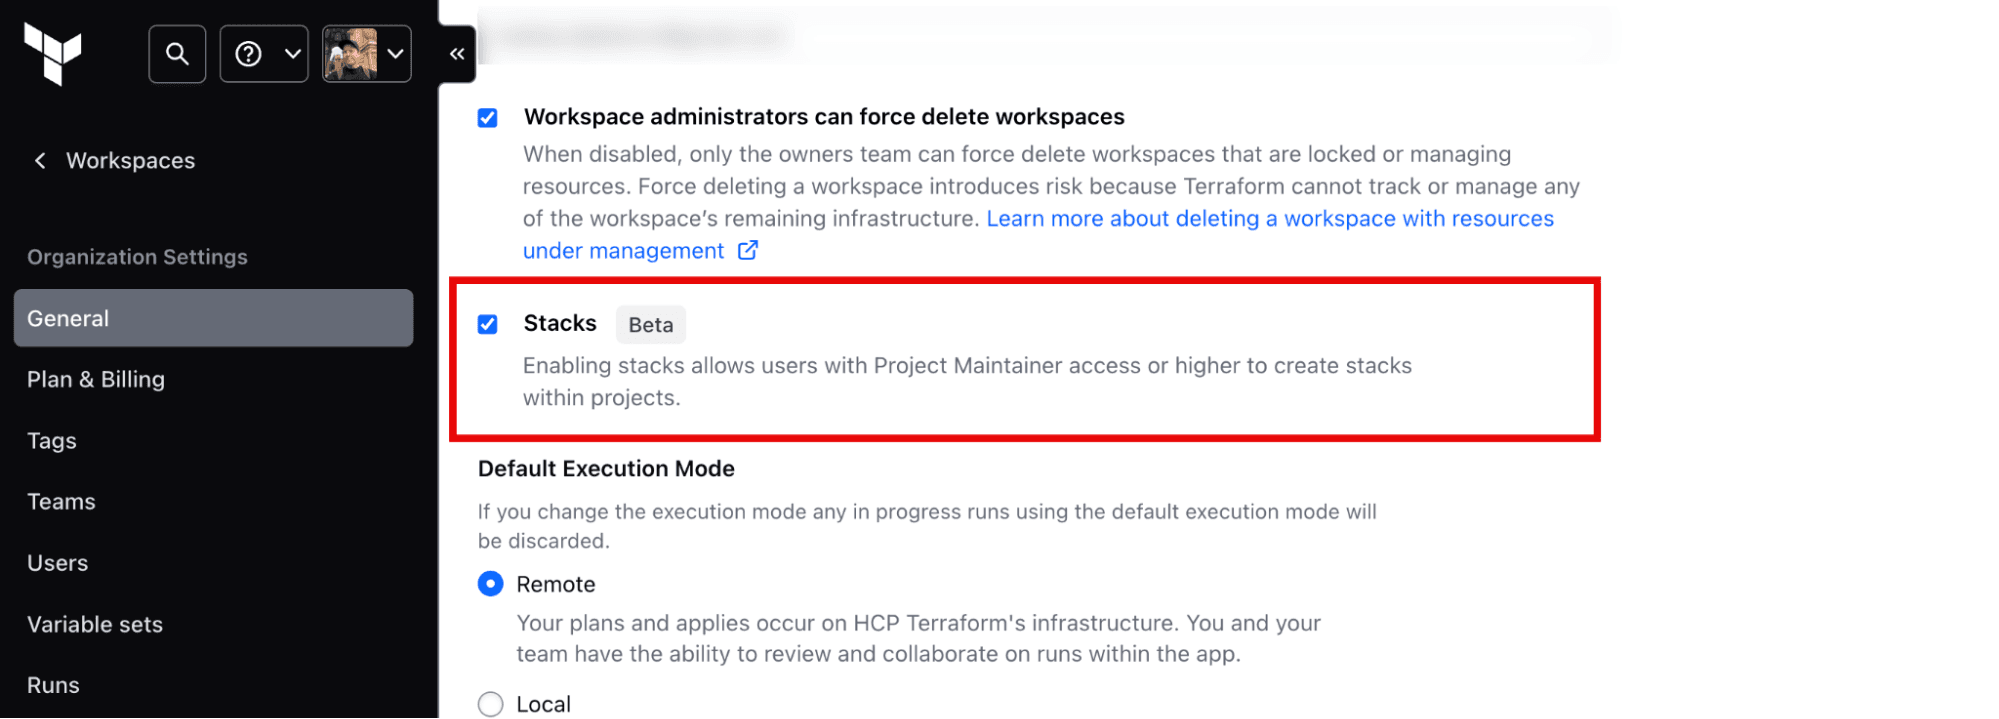
Since Terraform stacks are in public preview, you need to enable this feature for your HCP Terraform organization explicitly. Go to the organization settings and make sure the Stacks feature is enabled (see the following figure).
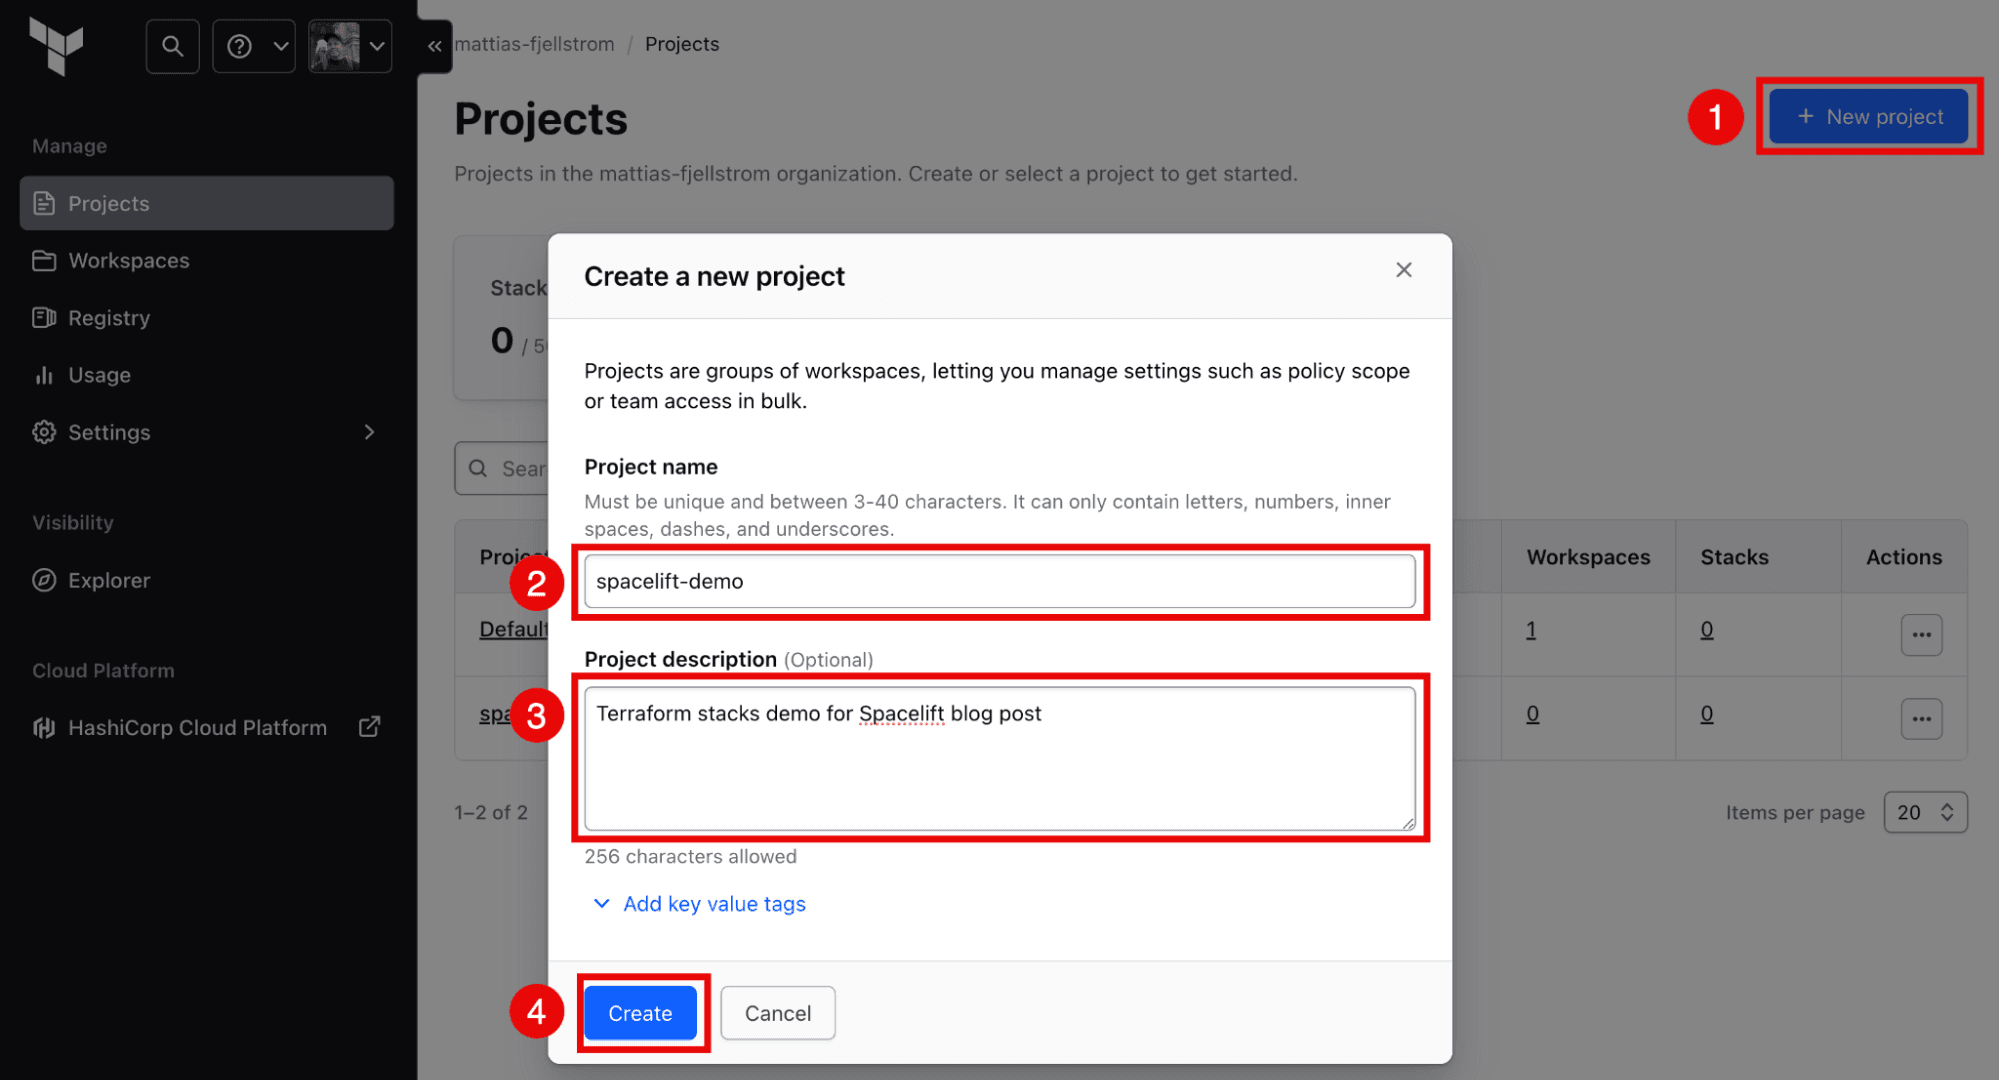
Create a new project on HCP Terraform following the steps outlined in the following figure. You could also use an existing project if you wish.
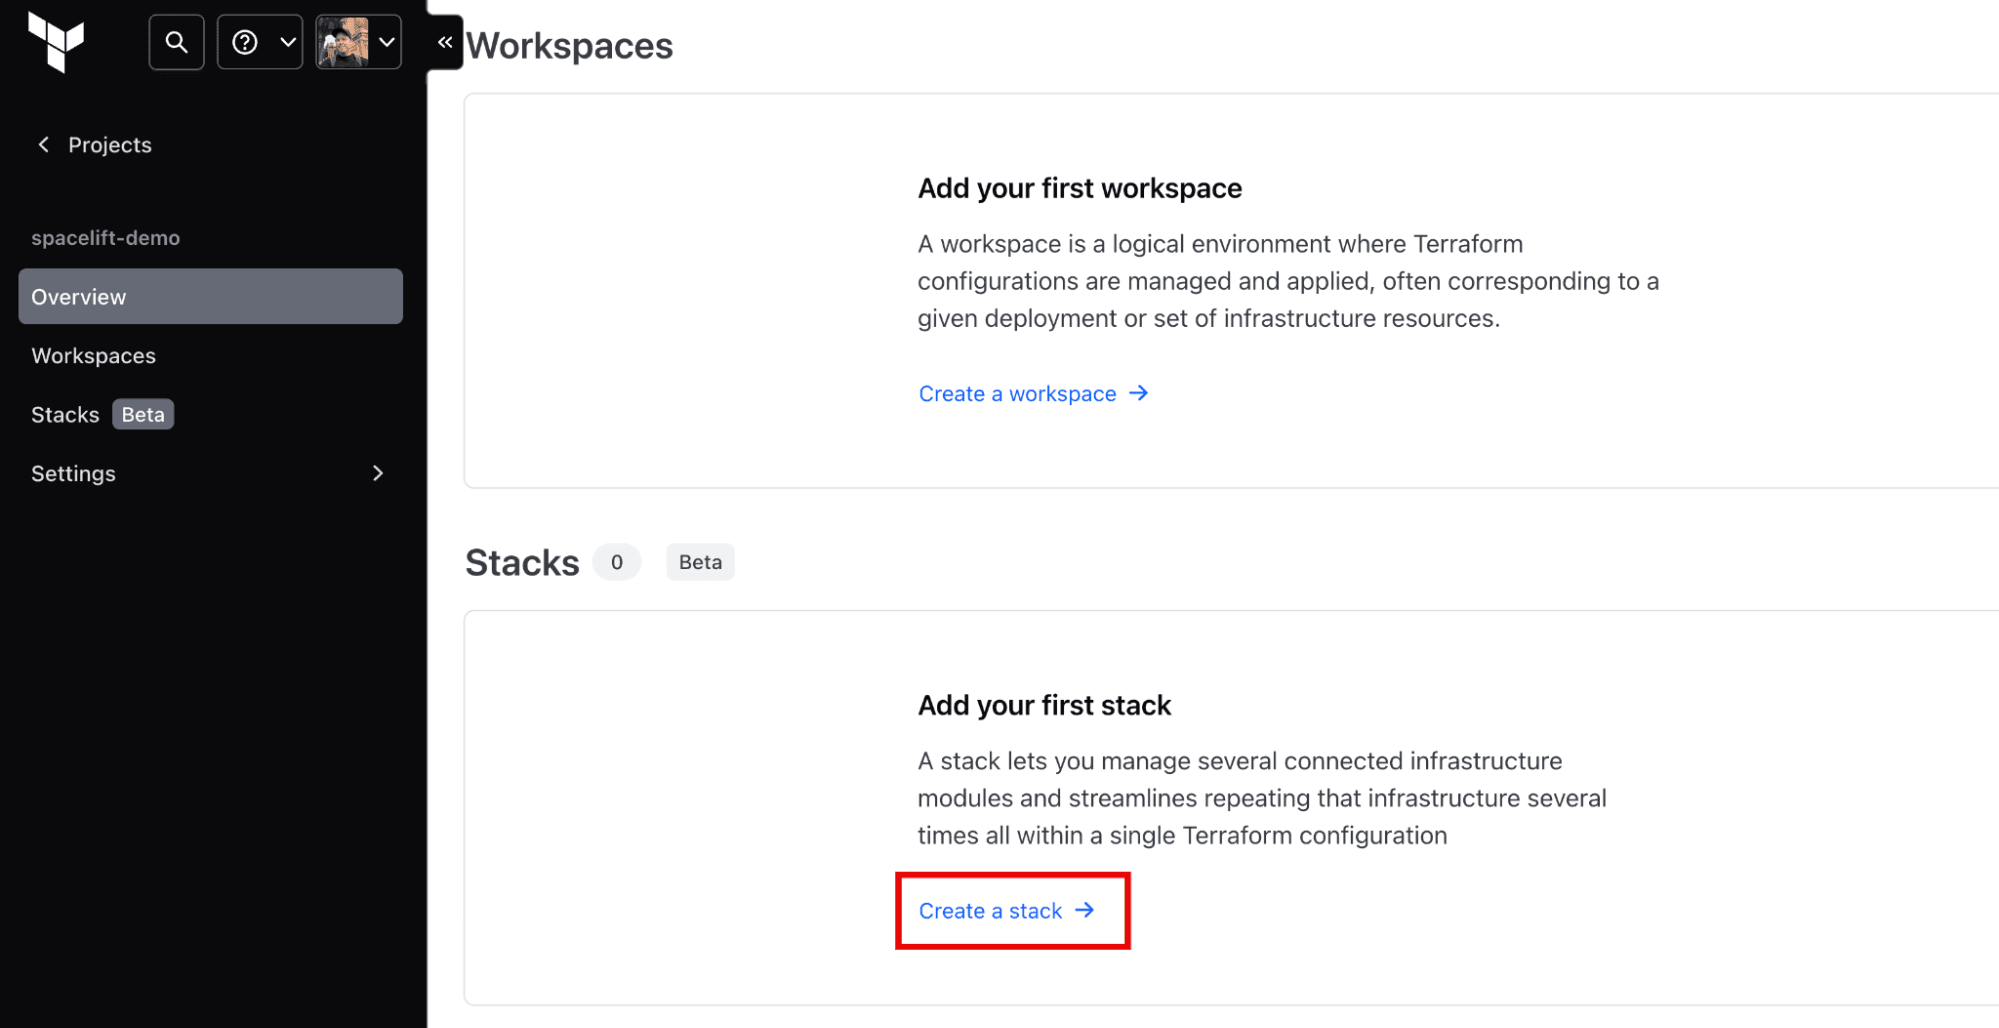
From the project landing page, click on Create a stack to start creating a new Terraform stack (see the following figure).
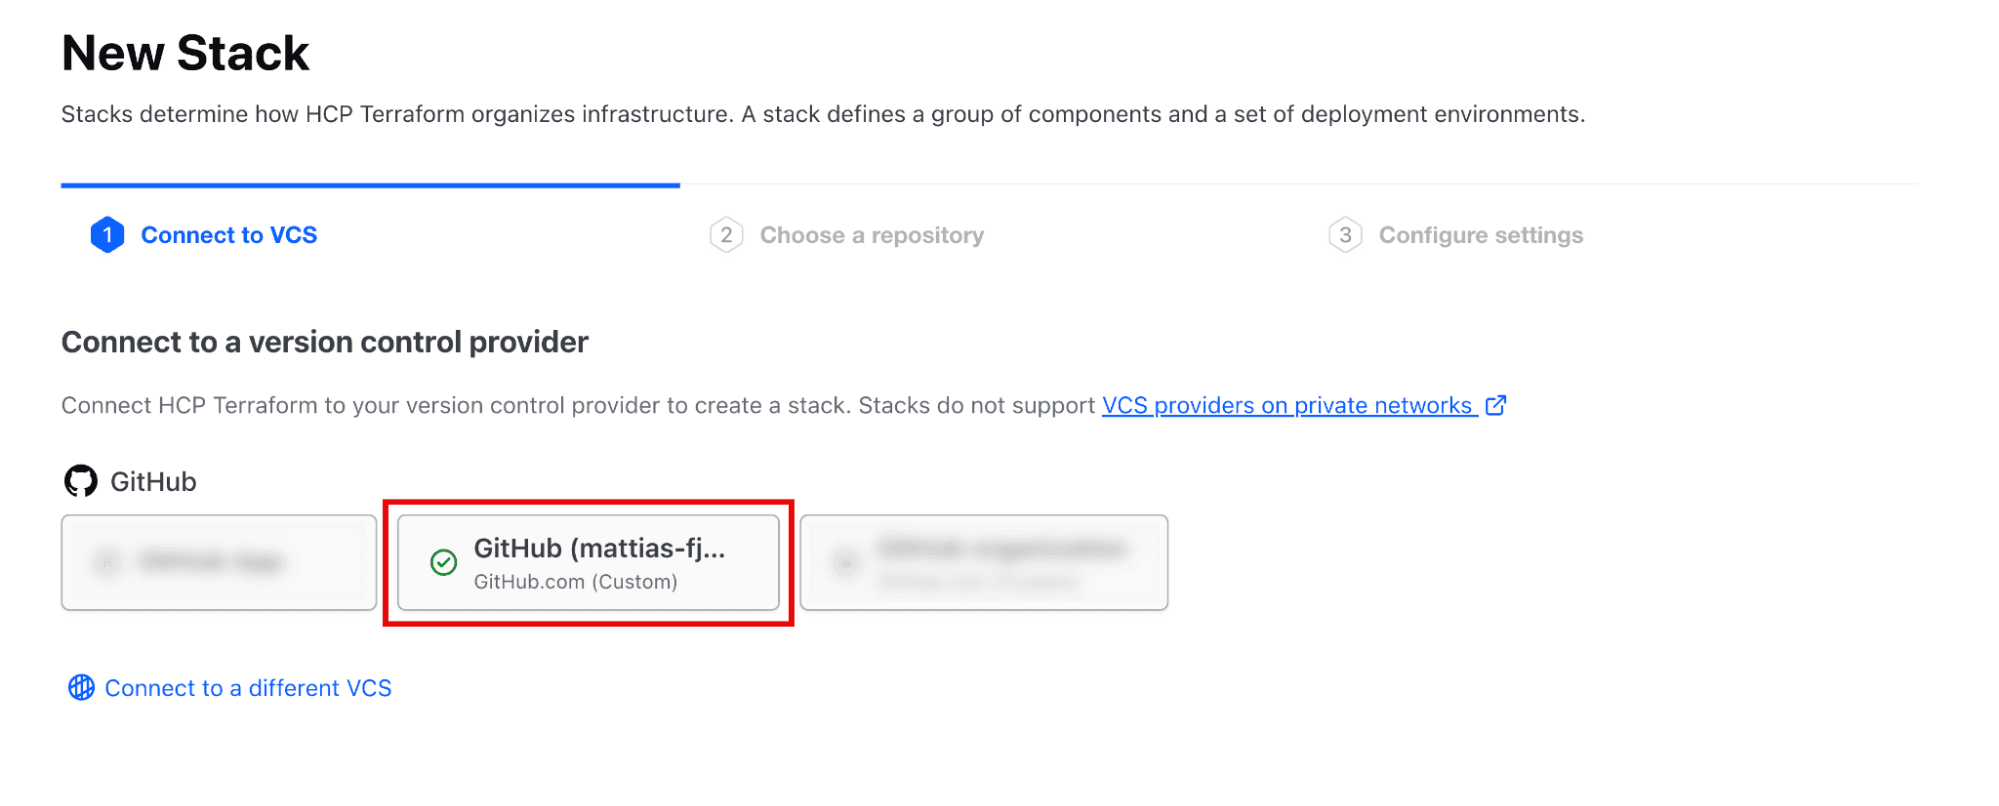
Select the VCS provider where your Terraform stacks repository is located (see the following figure).
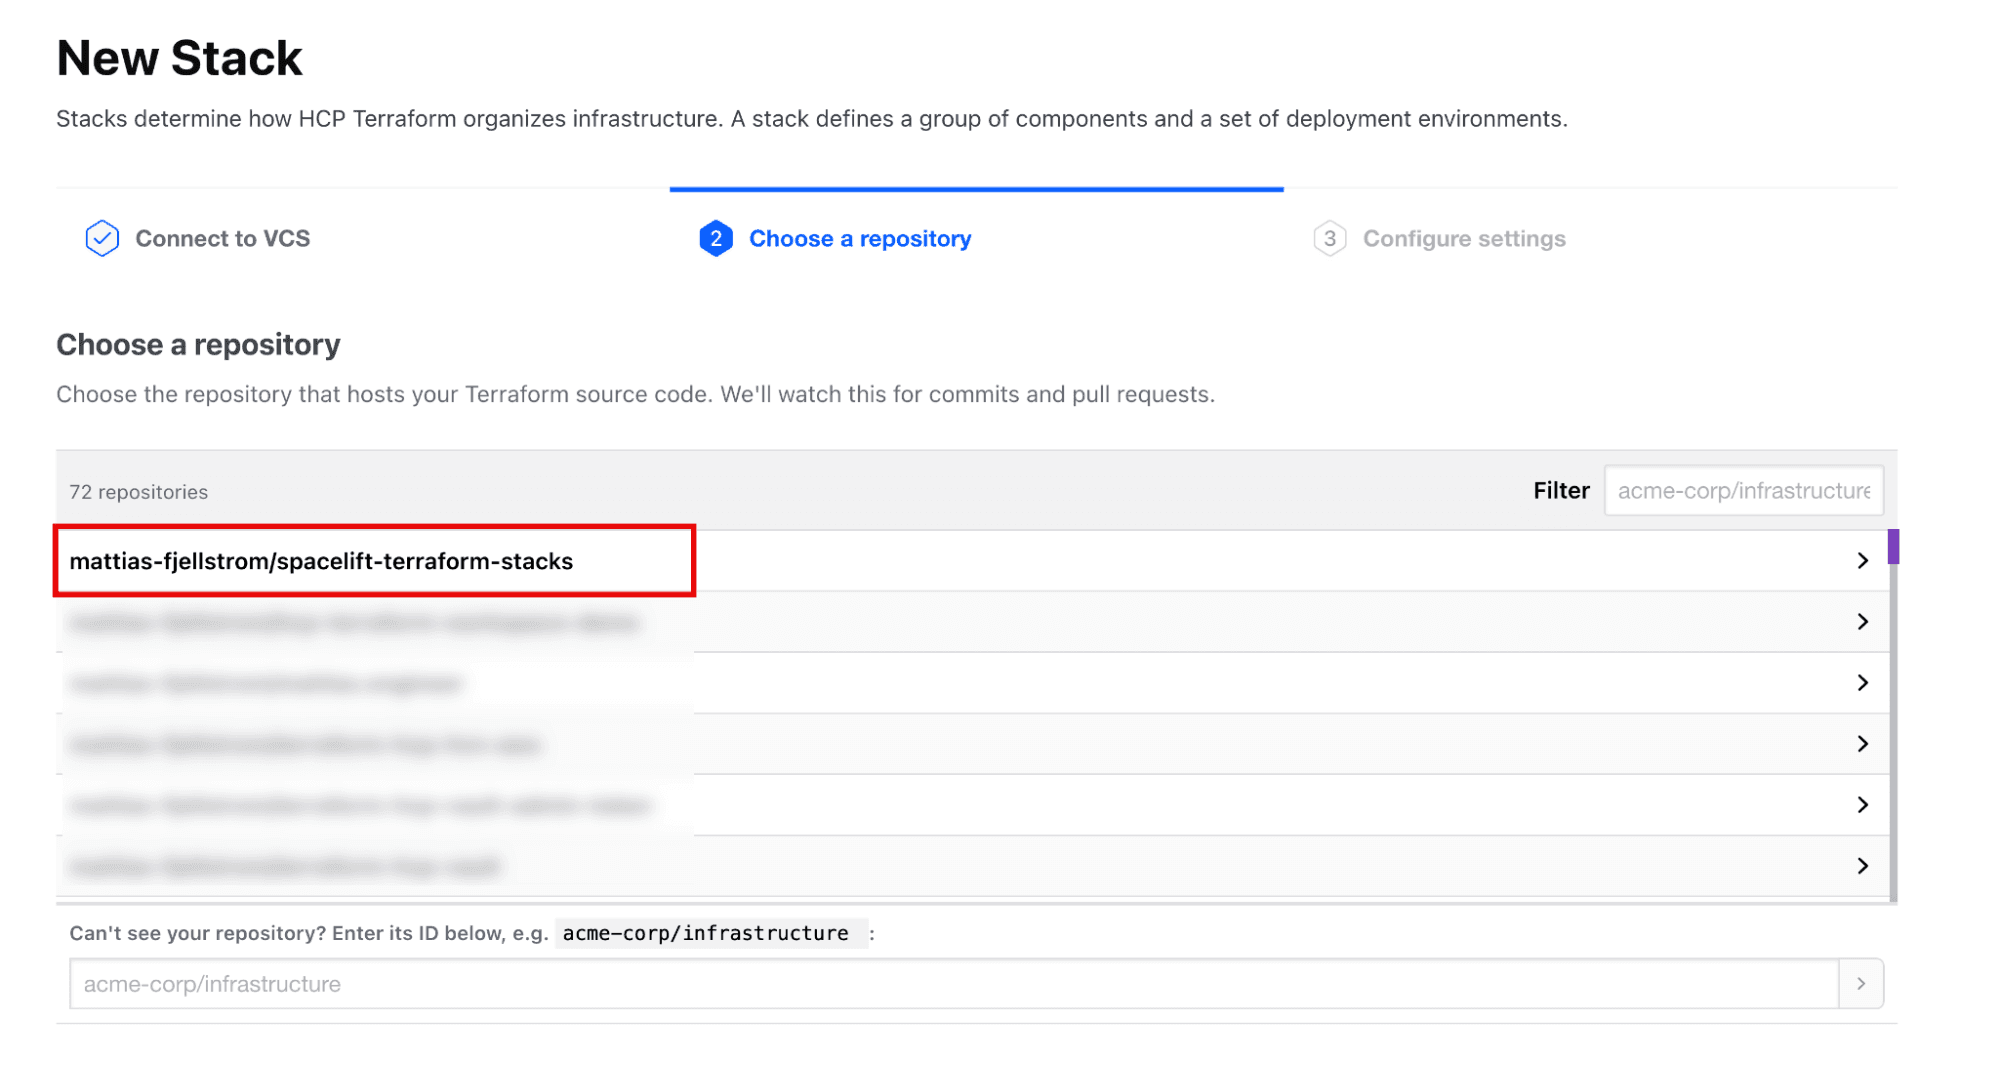
Next, select the repository from the list of available repositories in the selected VCS provider (see the following figure).
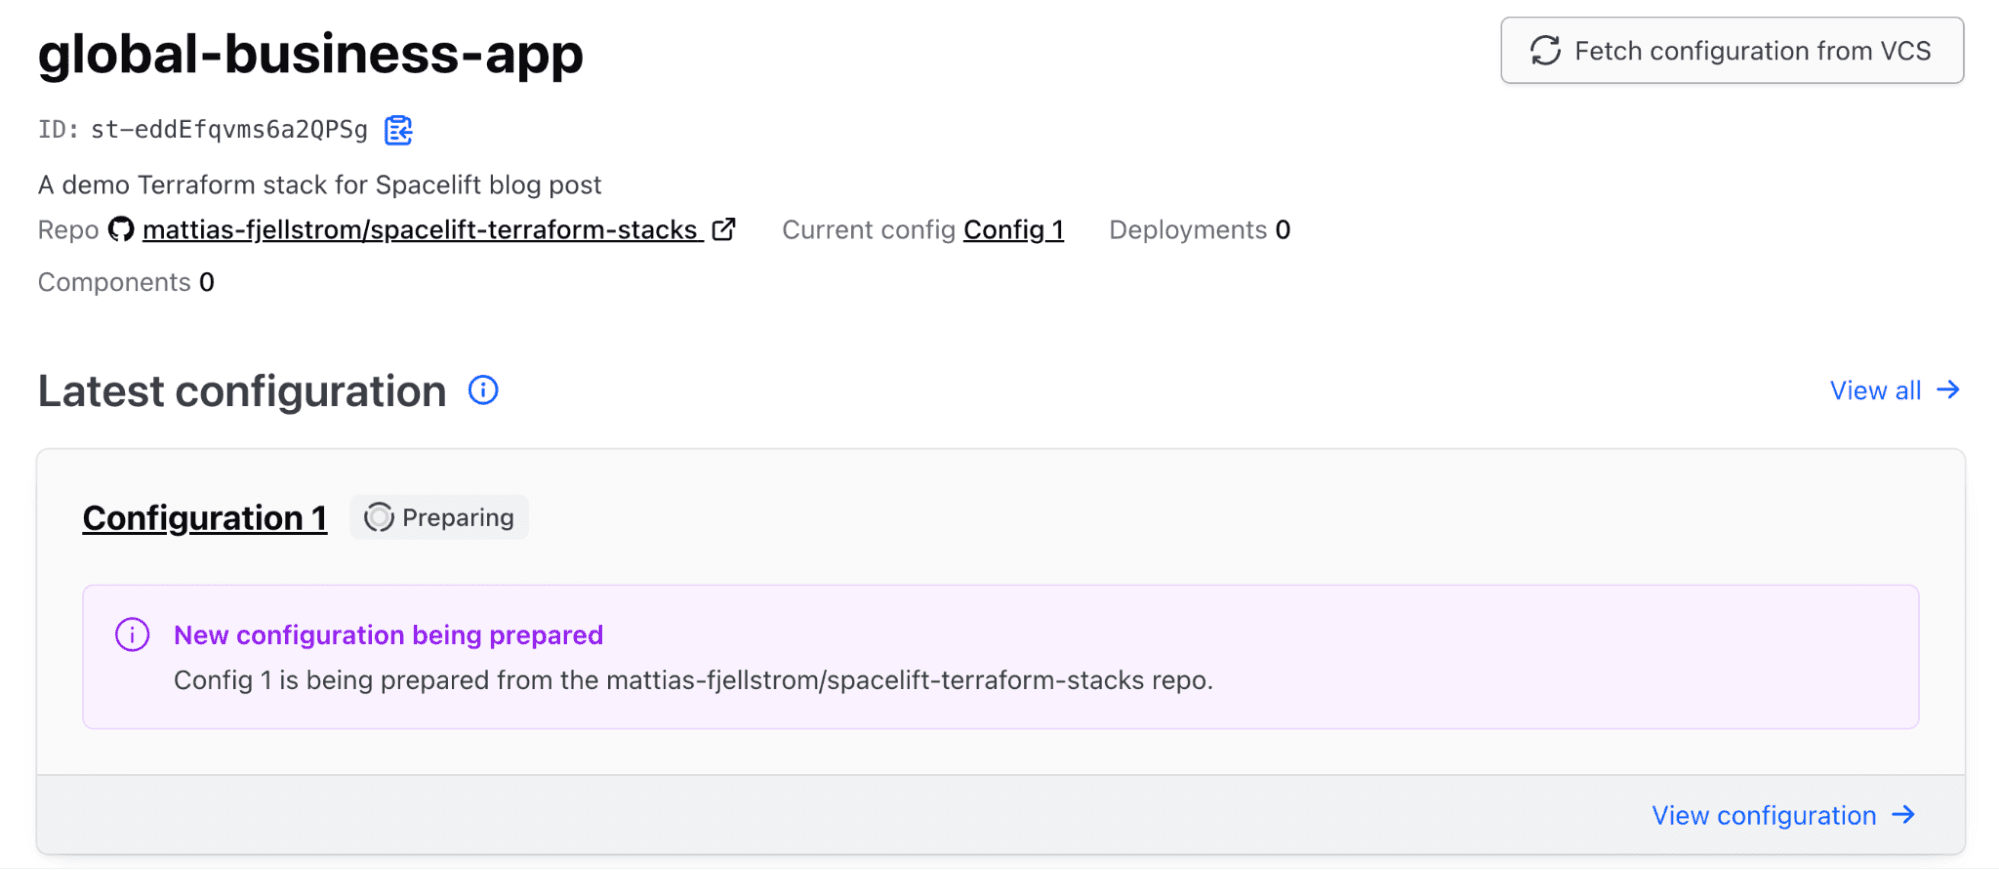
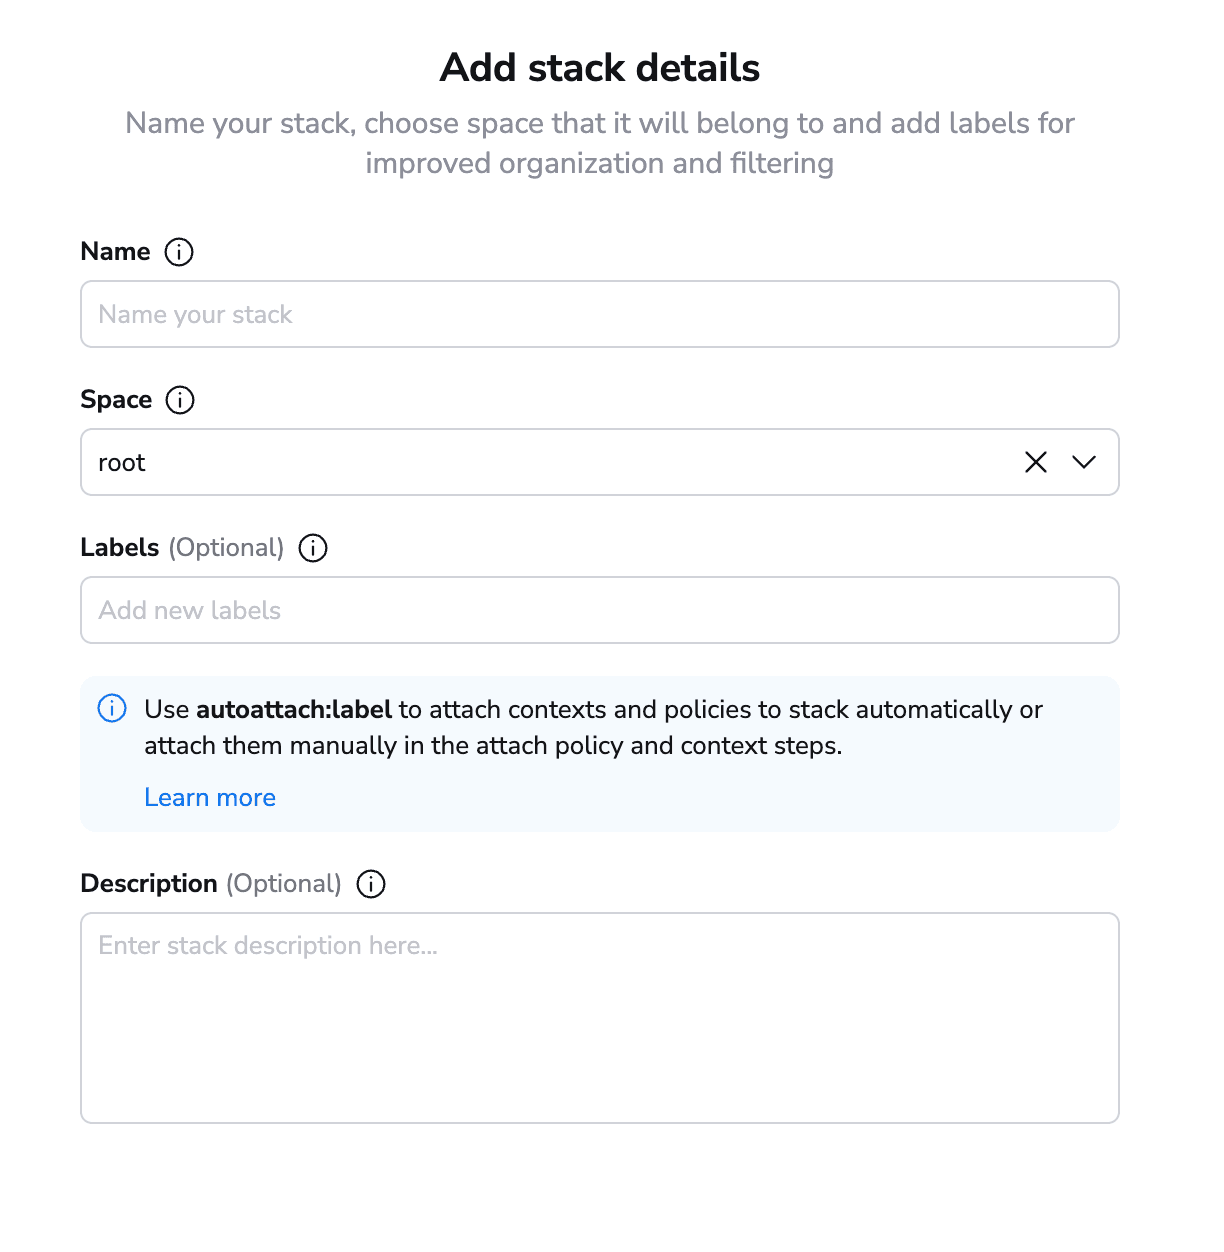
Configure the new stack with a name and an optional description. Leave the default setting telling HCP Terraform to fetch the configuration from the VCS repository once the stack is created (see the following figure).
Note that the stack’s name must match the trust relationship you previously set up between AWS and HCP Terraform.
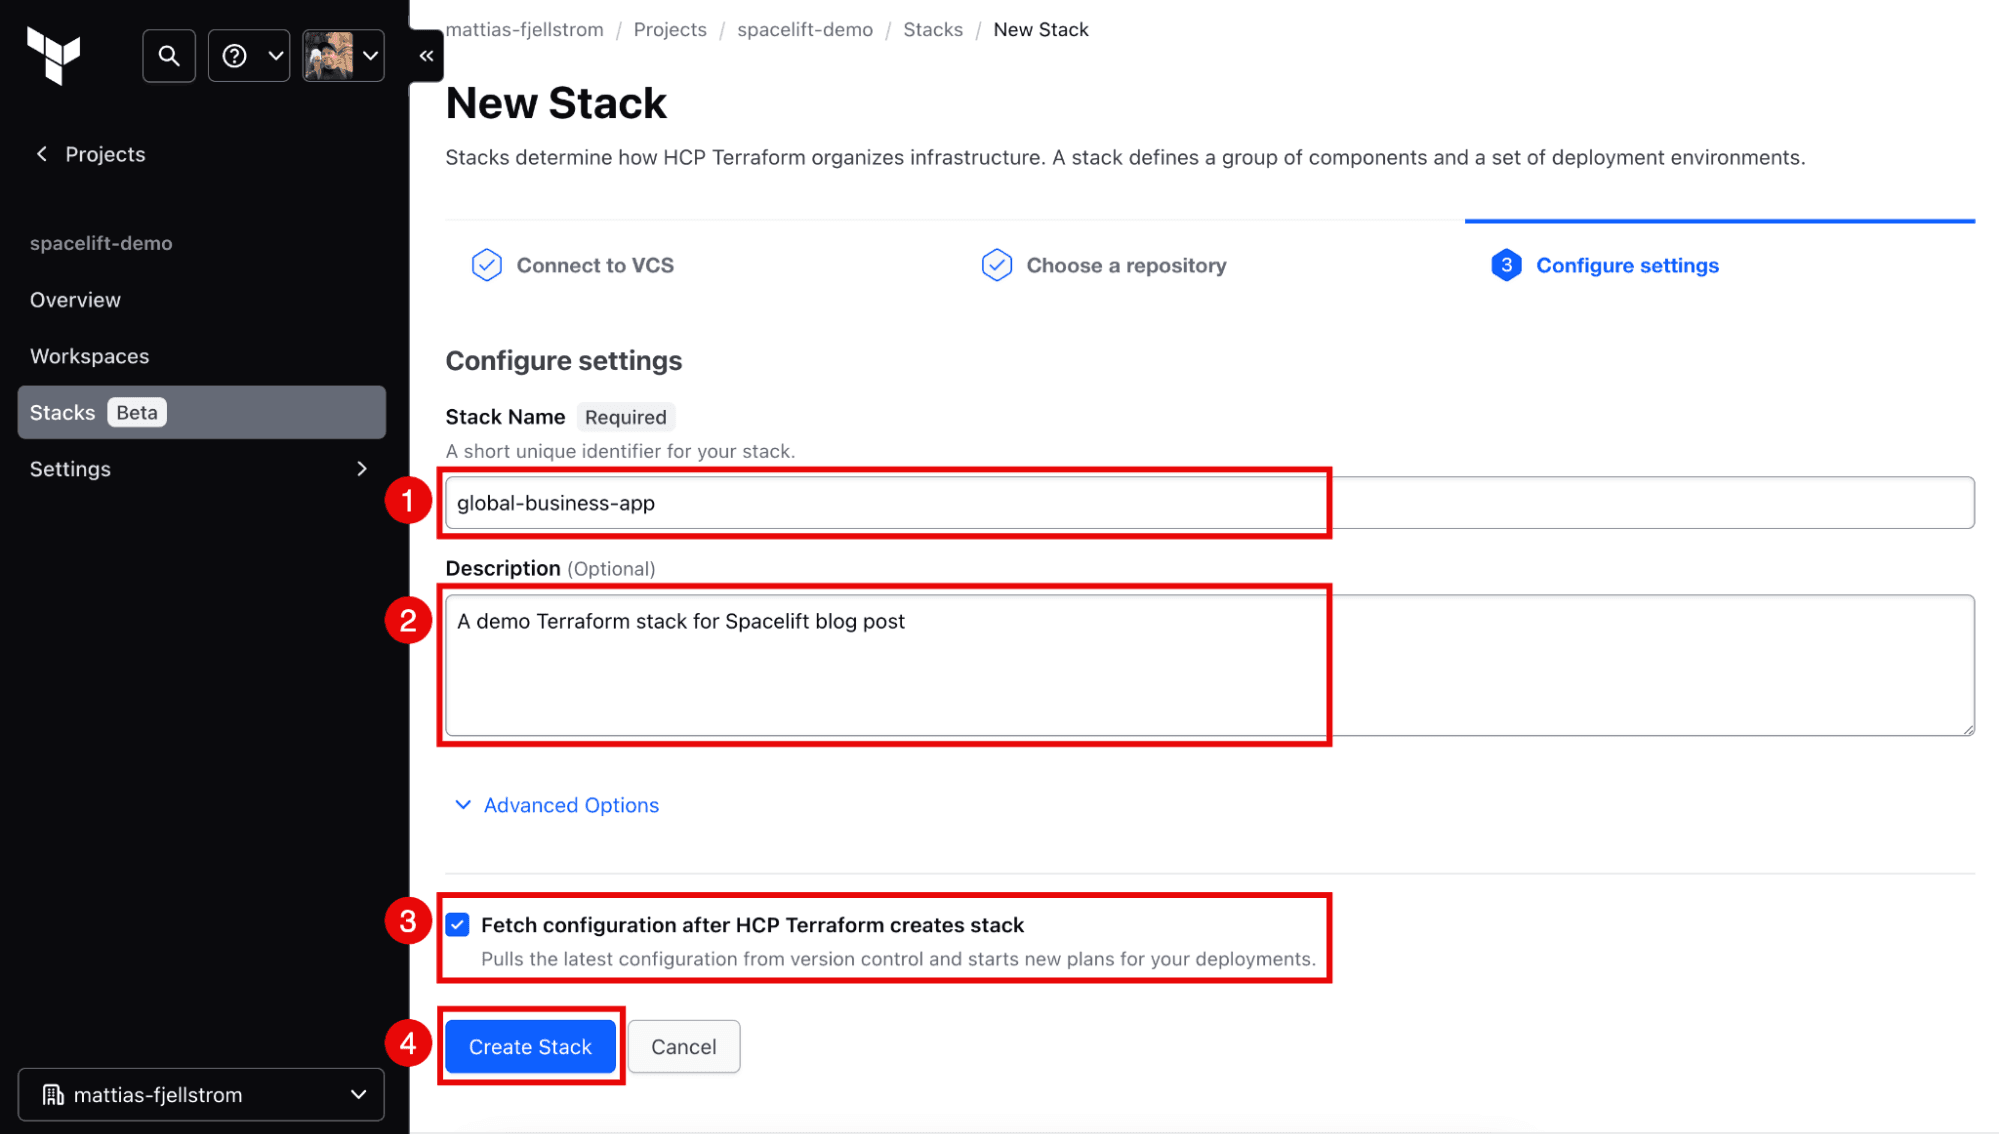
Once you click Create Stack, the stack will be created. The stack configuration will be fetched from your VCS repo, and the first provisioning phase will start.
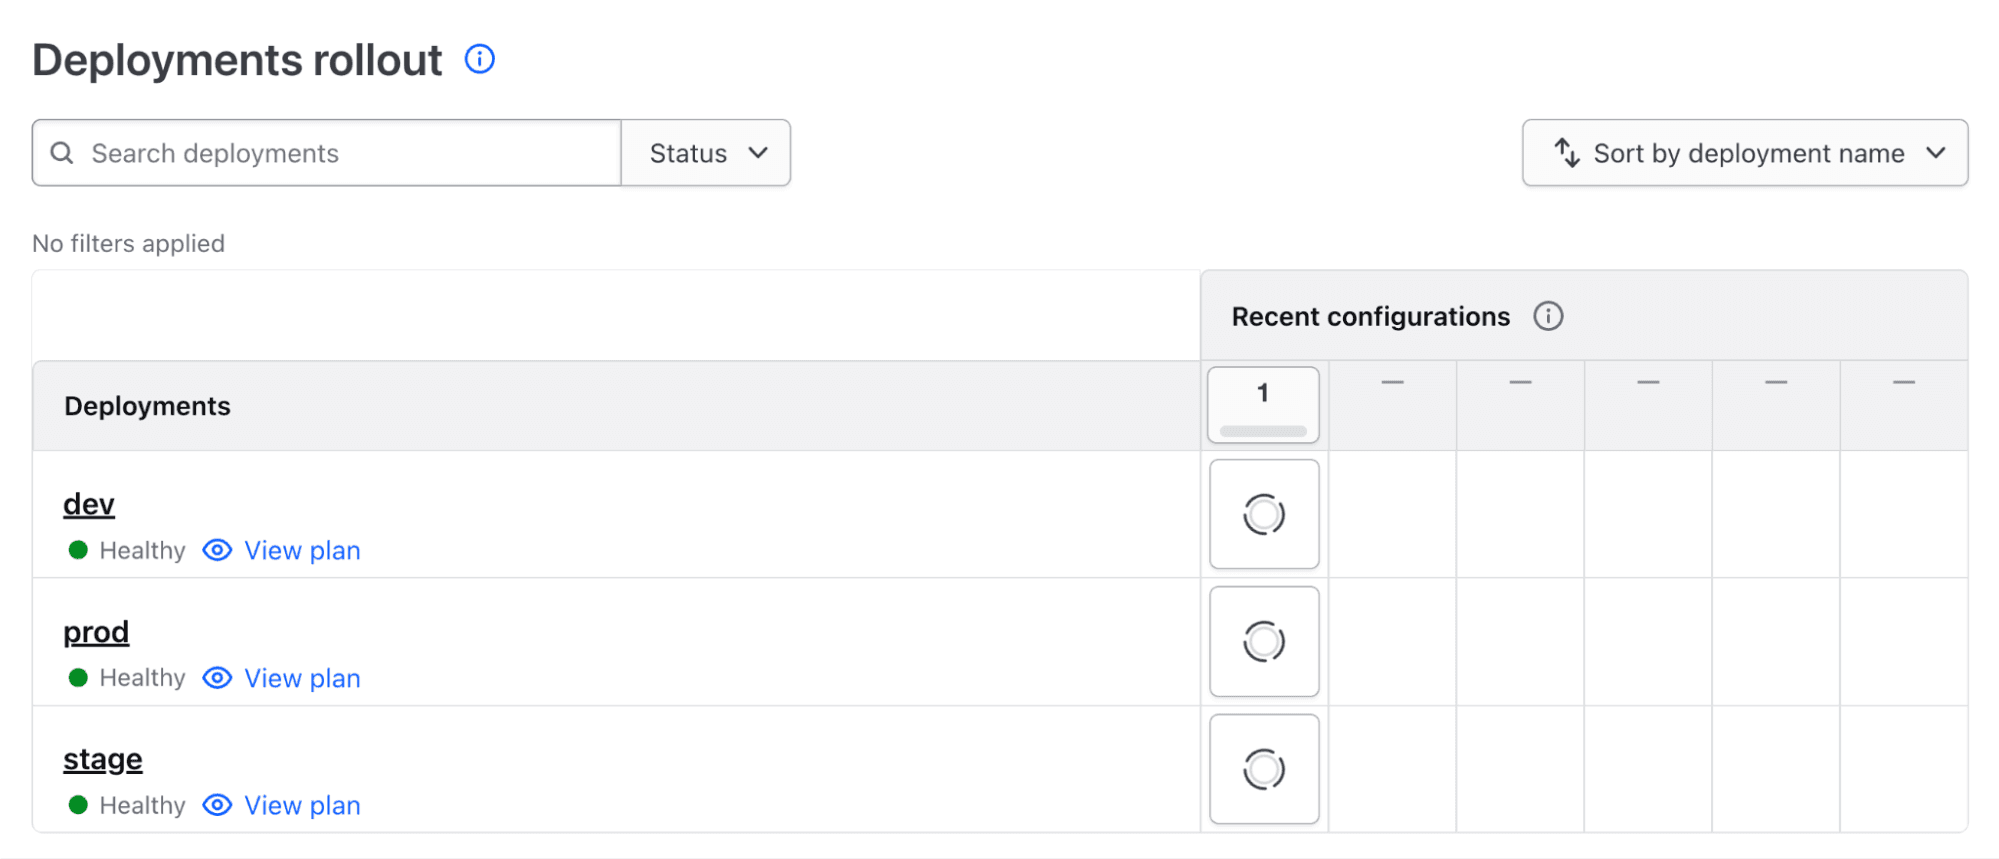
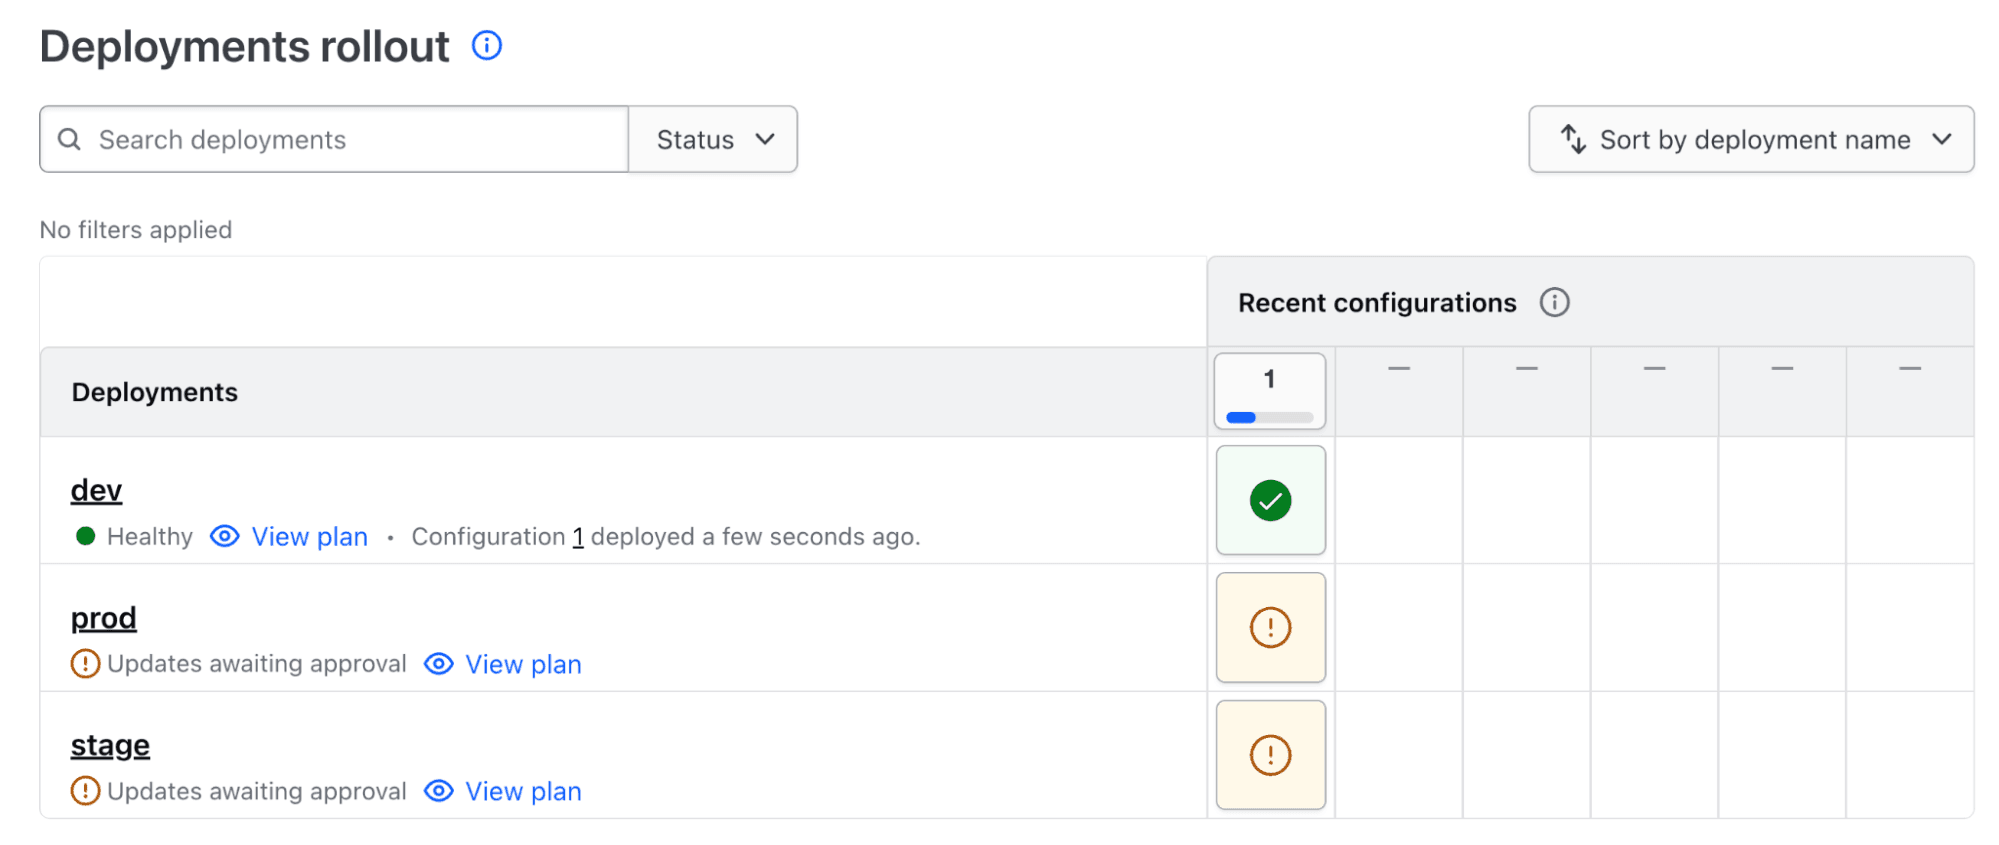
On the stack overview page, scroll down to the Deployment rollout section to see the three deployments we have configured in our stack (see the following figure).
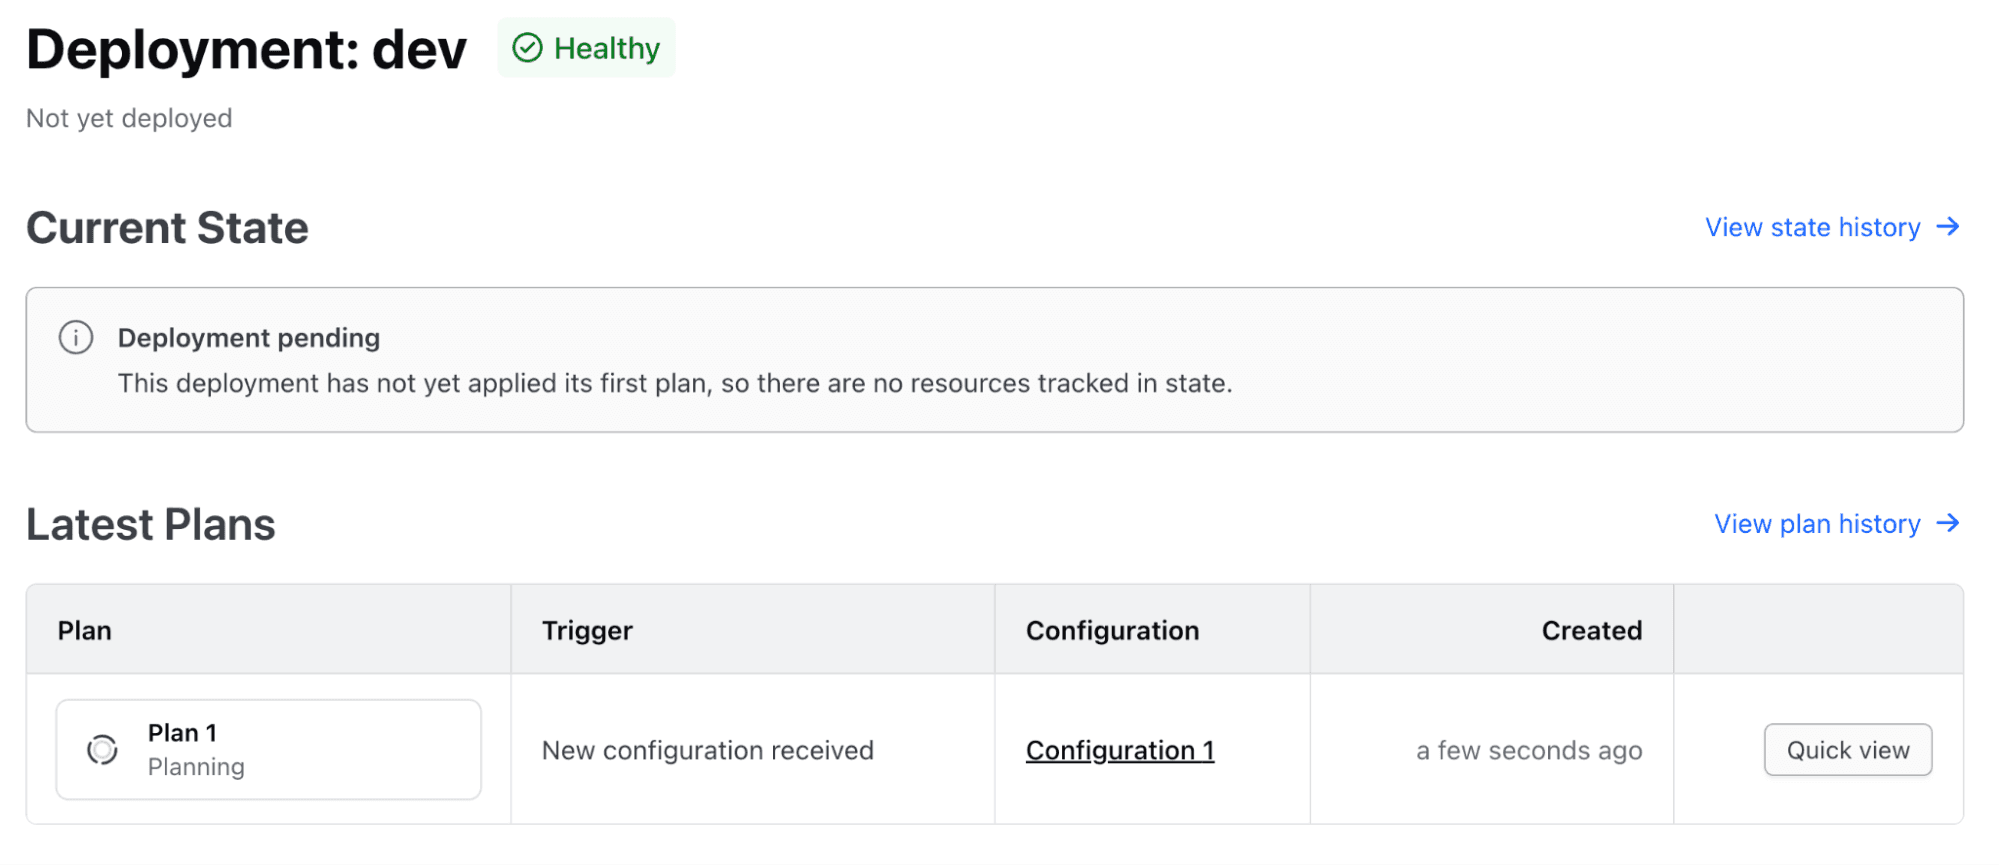
Click on the dev deployment to explore the details further (see the following figure). From here, we can see all the plan and apply operations taking place for this stack deployment (currently, there is only a single plan operation).
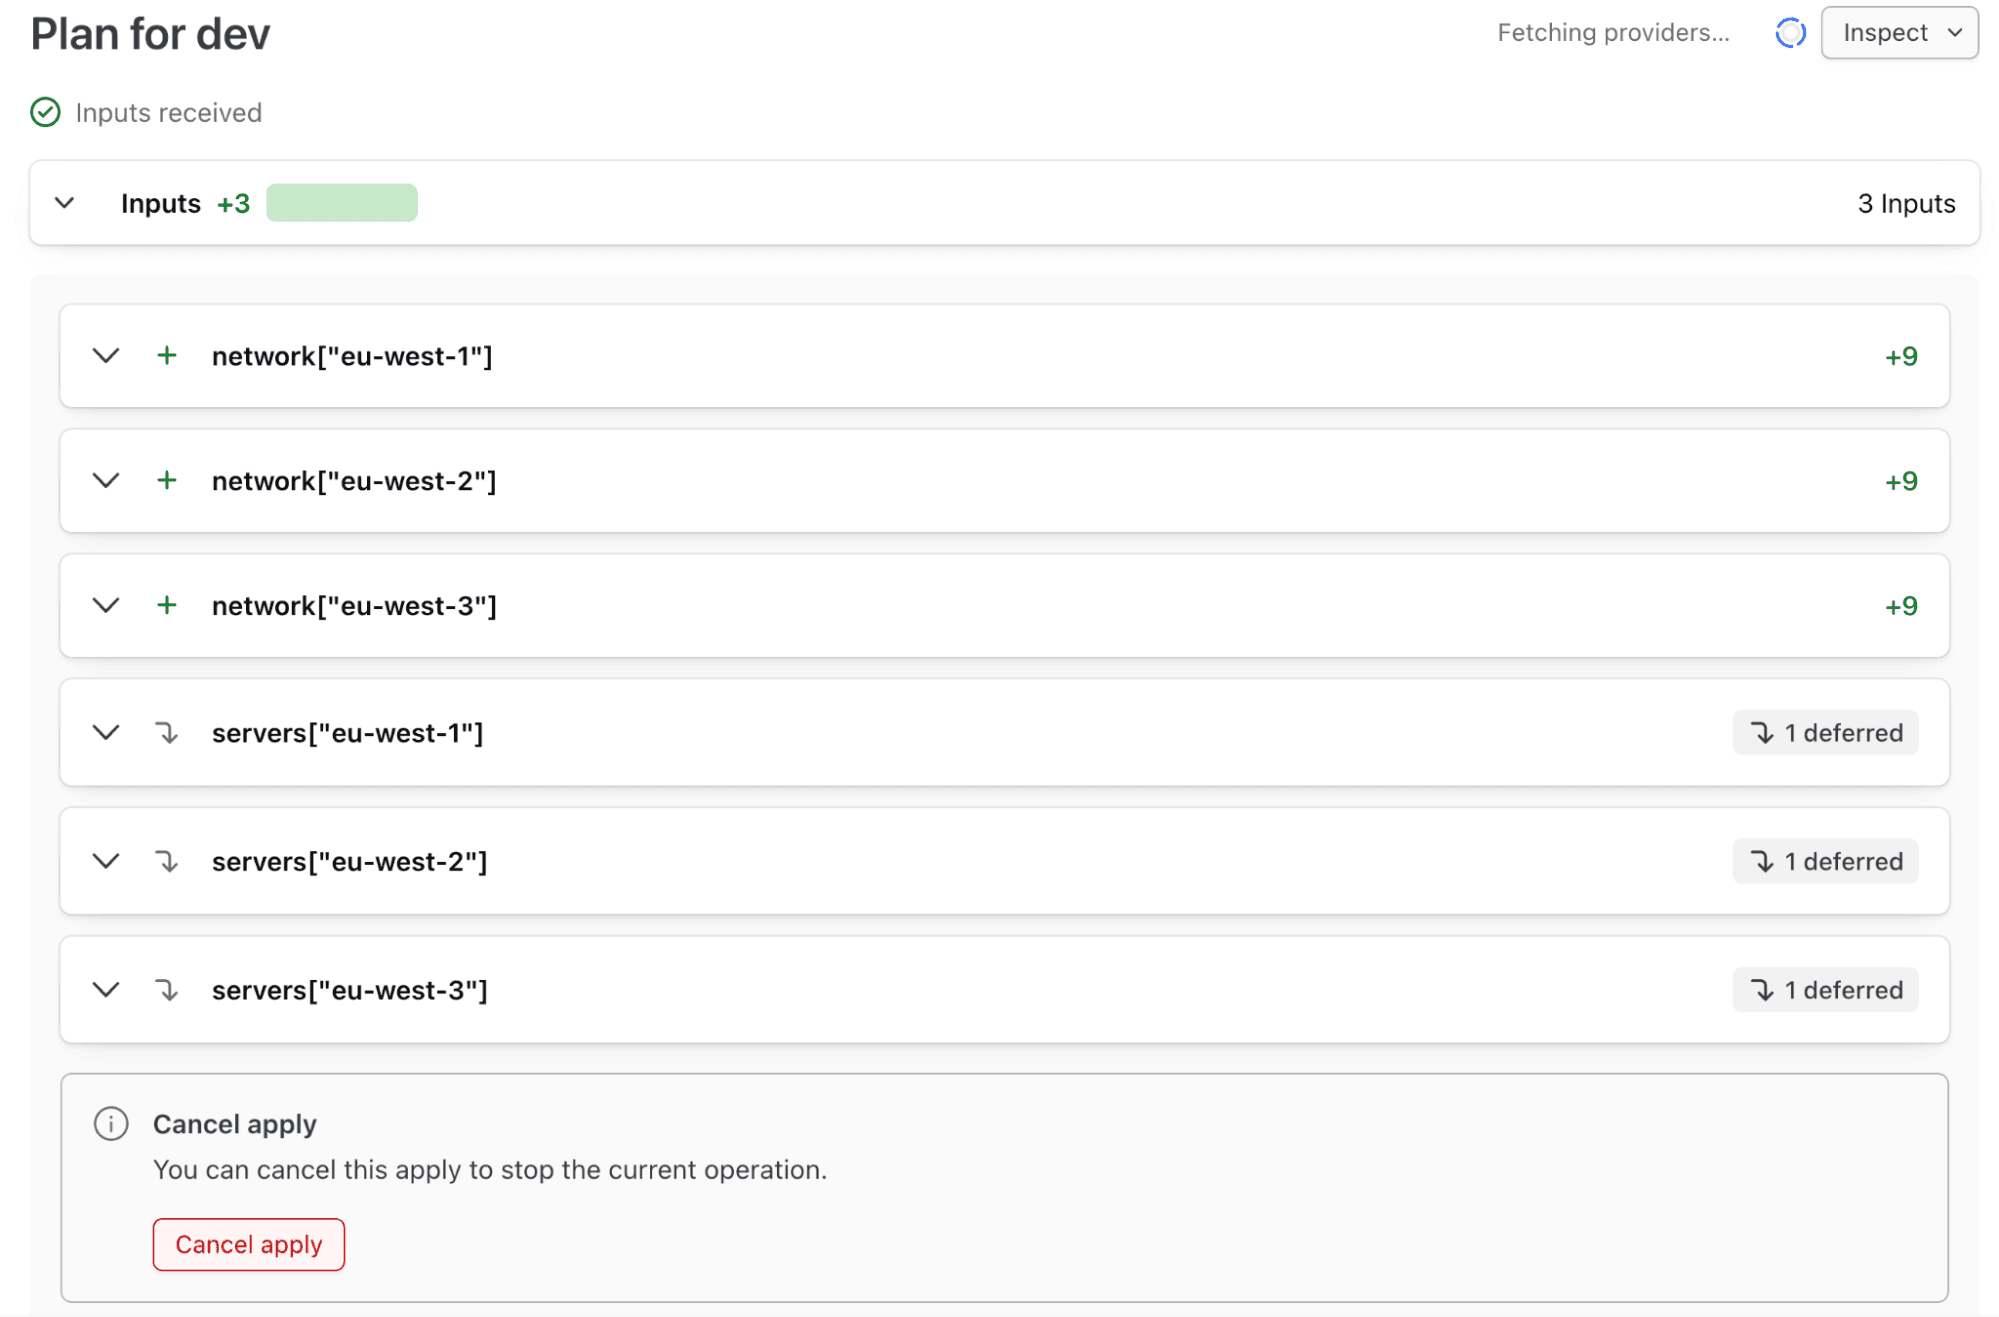
If we dig down even further by clicking on Plan 1 we can see details of the resources that will be provisioned as part of this deployment (see the following figure).
The dev deployment will automatically progress until it is complete. Once it is completed, going back to the stack landing page, we can see that the dev deployment is OK while the stage and prod deployments are waiting for manual approval (see the following figure).
We can click on the stage and prod deployments to approve them if we want to.
We end the demo here for brevity. You can explore the Terraform stacks UI to learn more about the different insights you get into your provisioned stacks.
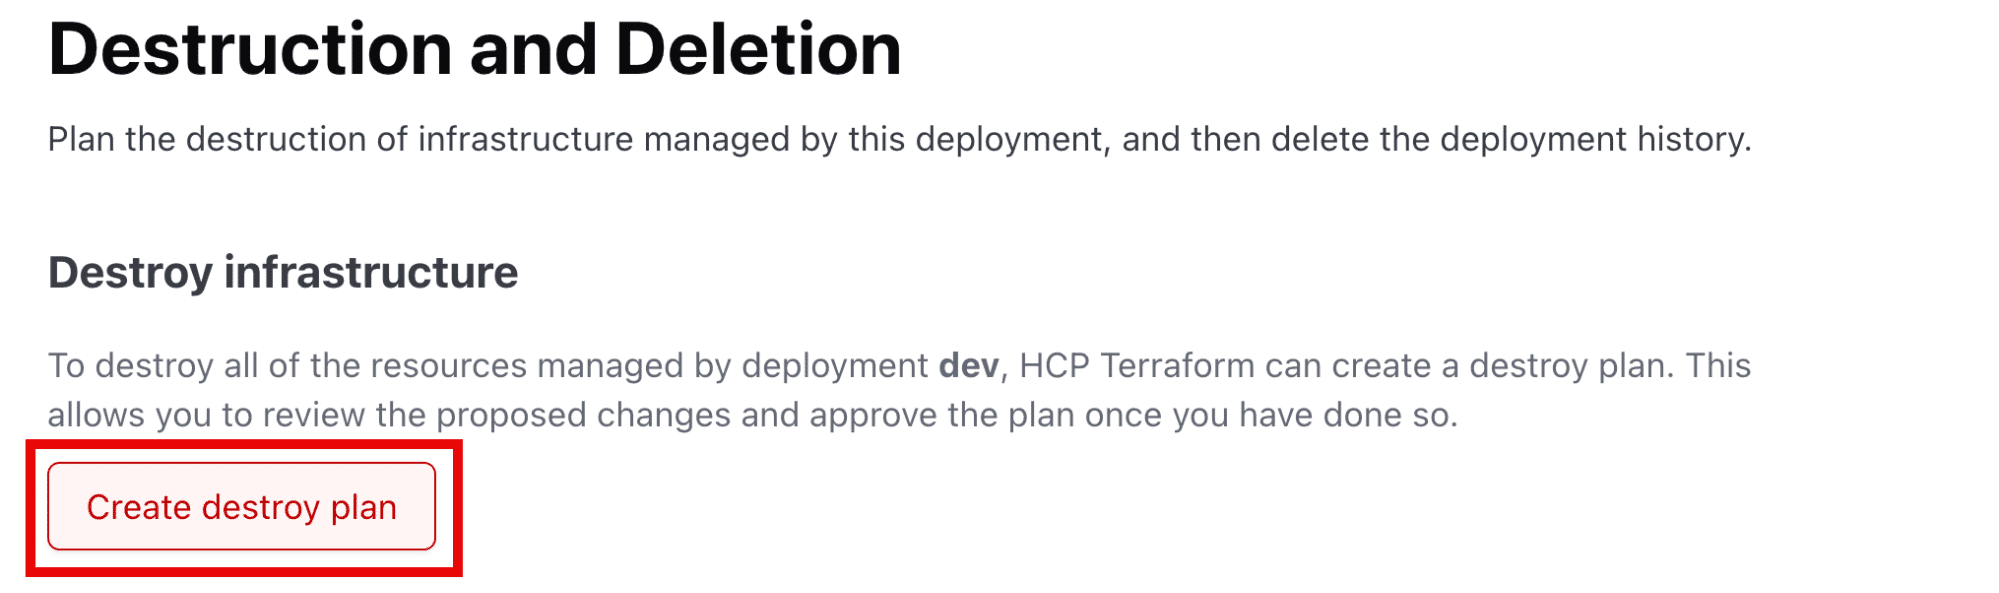
To clean up the provisioned stack deployments, you must trigger destroy plans for each deployment. From the deployment landing page, select Destruction and deletion in the menu and then click on Create destroy plan (see the following figure).
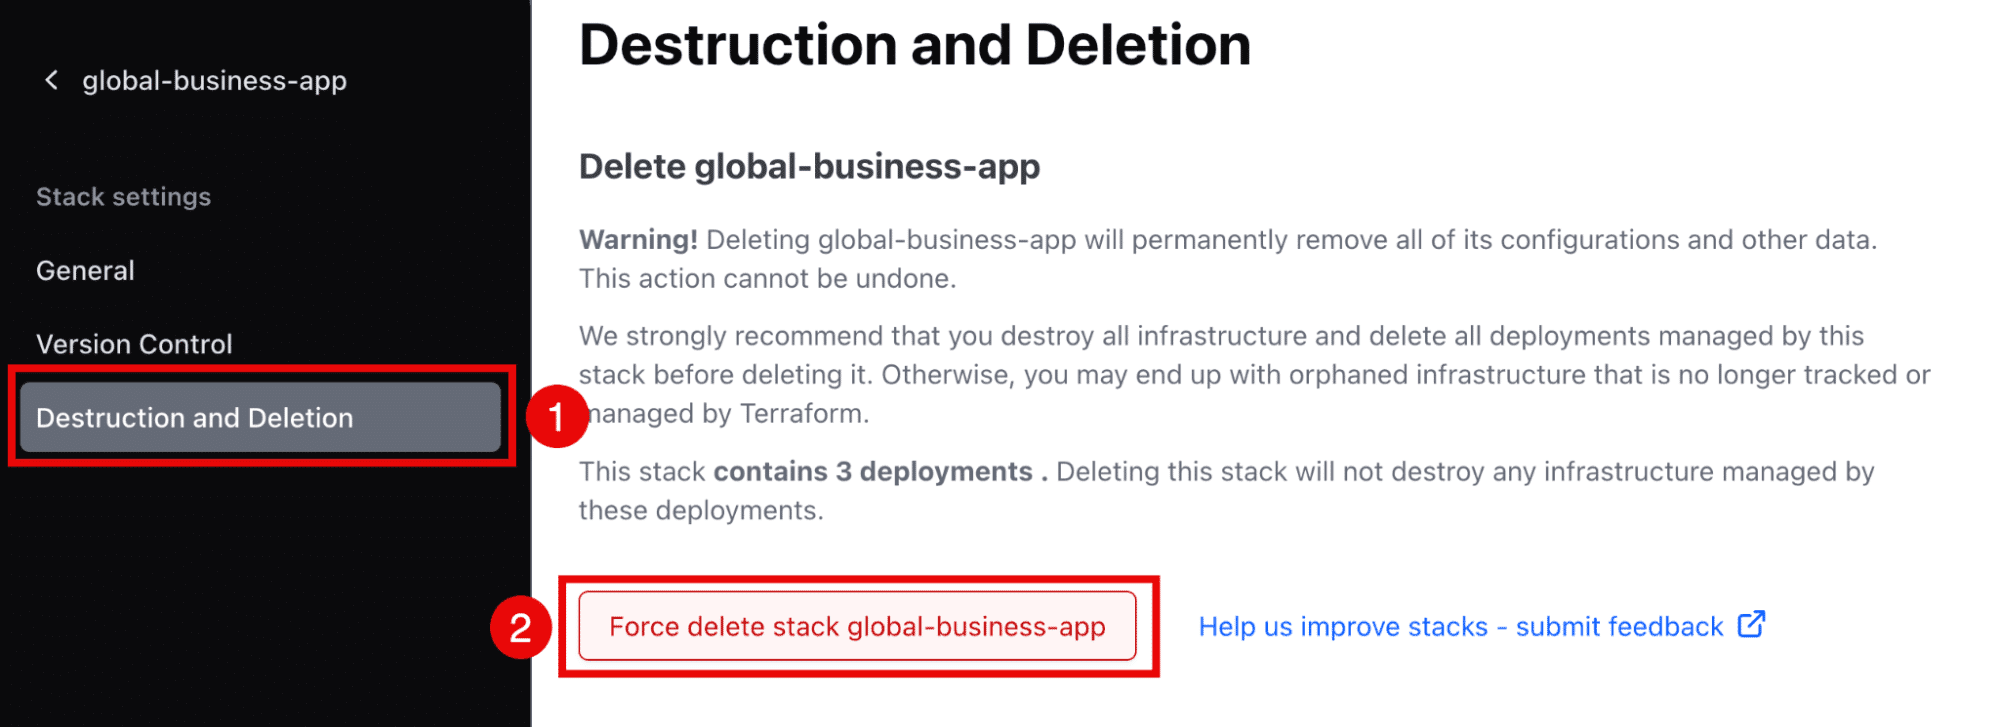
Once all deployments and all their resources have been destroyed, you can delete the stack. In the stack settings, click on Destruction and deletion, and then click on Force delete stack <stack name> (see the following figure).
This was a brief look at how it works with Terraform stacks. There are more nuances to cover, but this is beyond the scope of this blog post.
Benefits of using Terraform stacks
The main benefit of using Terraform stacks is that they simplify provisioning infrastructure on a large scale. A few other benefits are:
- Declarative module management: It allows you to declaratively manage your Terraform modules and their relationships in a scalable way.
- Simplified infrastructure environment management: It allows you to move away from managing infrastructure environments using either git branches, different directories in your git repository, or even different repositories.
- Reduced workspace management overhead: It decreases the management overhead of using multiple HCP Terraform workspaces to achieve the same result. In the demo shown above, we used one Terraform stack that would correspond to at least nine HCP Terraform workspaces (possibly 18 workspaces, depending on how we designed our workspaces).
- Declarative orchestration of Terraform operations: Stacks allow for simple declarative orchestration of plan and apply operations using the
orchestrateblocks.
Use cases for Terraform stacks
There are a few reasons why you would want to use Terraform stacks:
- It simplifies managing related infrastructure with a common lifecycle.
- It simplifies provisioning multiple copies of the same infrastructure across many cloud regions (eu-west-1, eu-west-2, us-east-1, etc) or across different cloud accounts (e.g., AWS accounts, Azure subscriptions, GCP projects).
- It automates dependency management where stack components depend on resources and data that are not available before or after an initial apply operation. This utilizes the deferred evaluation feature of Terraform stacks (however, this was not covered in detail in this blog post). The prominent use case here is deployment of Kubernetes cluster together with custom-resource definitions (CRDs) and instances of these CRDs in one and the same Terraform stack without complicated orchestration.
Alternatives to Terraform stacks
There are several alternatives to Terraform stacks that you may want to consider, including:
- Terraform binary with CI/CD tools: If you want a scaled-down solution (but with some management overhead), you could achieve most of what Terraform stacks do using the Terraform binary together with an orchestrator such as GitHub Actions or Azure DevOps. Read more: Why You Shouldn’t Manage Terraform with Generic CI/CD Tools
- HCP Terraform workspaces: You could use HCP Terraform workspaces together with run triggers. A run trigger specifies a relationship between two workspaces so that a successful apply in one workspace triggers a plan and apply in a different workspace.
- Spacelift stacks: You can use Spacelift stacks (not to be confused with Terraform stacks) and set up stack dependencies to orchestrate how different stacks fit together and in what order they should be applied.
Why use Spacelift to manage Terraform?
Spacelift is an infrastructure orchestration platform for Terraform, OpenTofu, Terragrunt, Pulumi, CloudFormation, Kubernetes, and Ansible. The platform’s pricing is predictable and based on concurrency, allowing you to correctly appreciate how your bill would look at the end of the month.
Spacelift takes managing Terraform to the next level by giving you access to a powerful CI/CD workflow and unlocking features such as:
- Policies (based on Open Policy Agent) – You can control how many approvals you need for runs, what kind of resources you can create, and what kind of parameters these resources can have, and you can also control the behavior when a pull request is open or merged.
- Multi-IaC workflows – Combine Terraform with Kubernetes, Ansible, and other IaC tools such as OpenTofu, Pulumi, and CloudFormation, create dependencies among them, and share outputs.
- Build self-service infrastructure – You can use Blueprints to build self-service infrastructure; simply complete a form to provision infrastructure based on Terraform and other supported tools.
- Integrations with any third-party tools – You can integrate with your favorite third-party tools and even build policies for them. For example, see how to integrate security tools in your workflows using Custom Inputs.
If you are already on Terraform Cloud/Enterprise and want to migrate away, Spacelift has got you covered with the Migration kit.
How to use Spacelift stacks and stack dependencies
At a high level, Spacelift stacks are similar to Terraform Cloud/Enterprise workspaces in that they also combine source code, a git branch, a tool you are using, and a directory.
To create a Spacelift stack, go to Stacks and select Create Stack. On the left-hand side, you will see all the options that can be configured:
- Stack details
- Integrate VCS
- Choose vendor
- Define behavior (Optional)
- Add hooks (Optional)
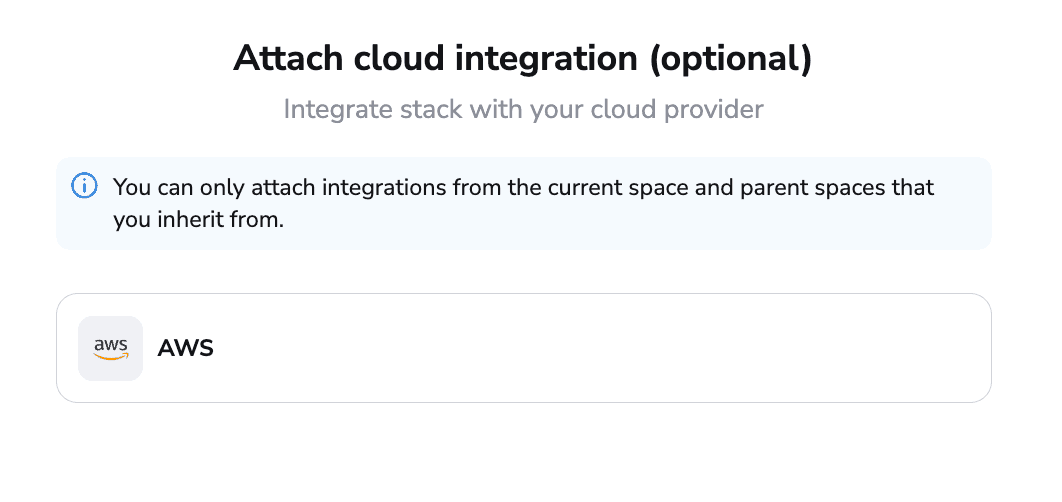
- Attach cloud integrations (Optional)
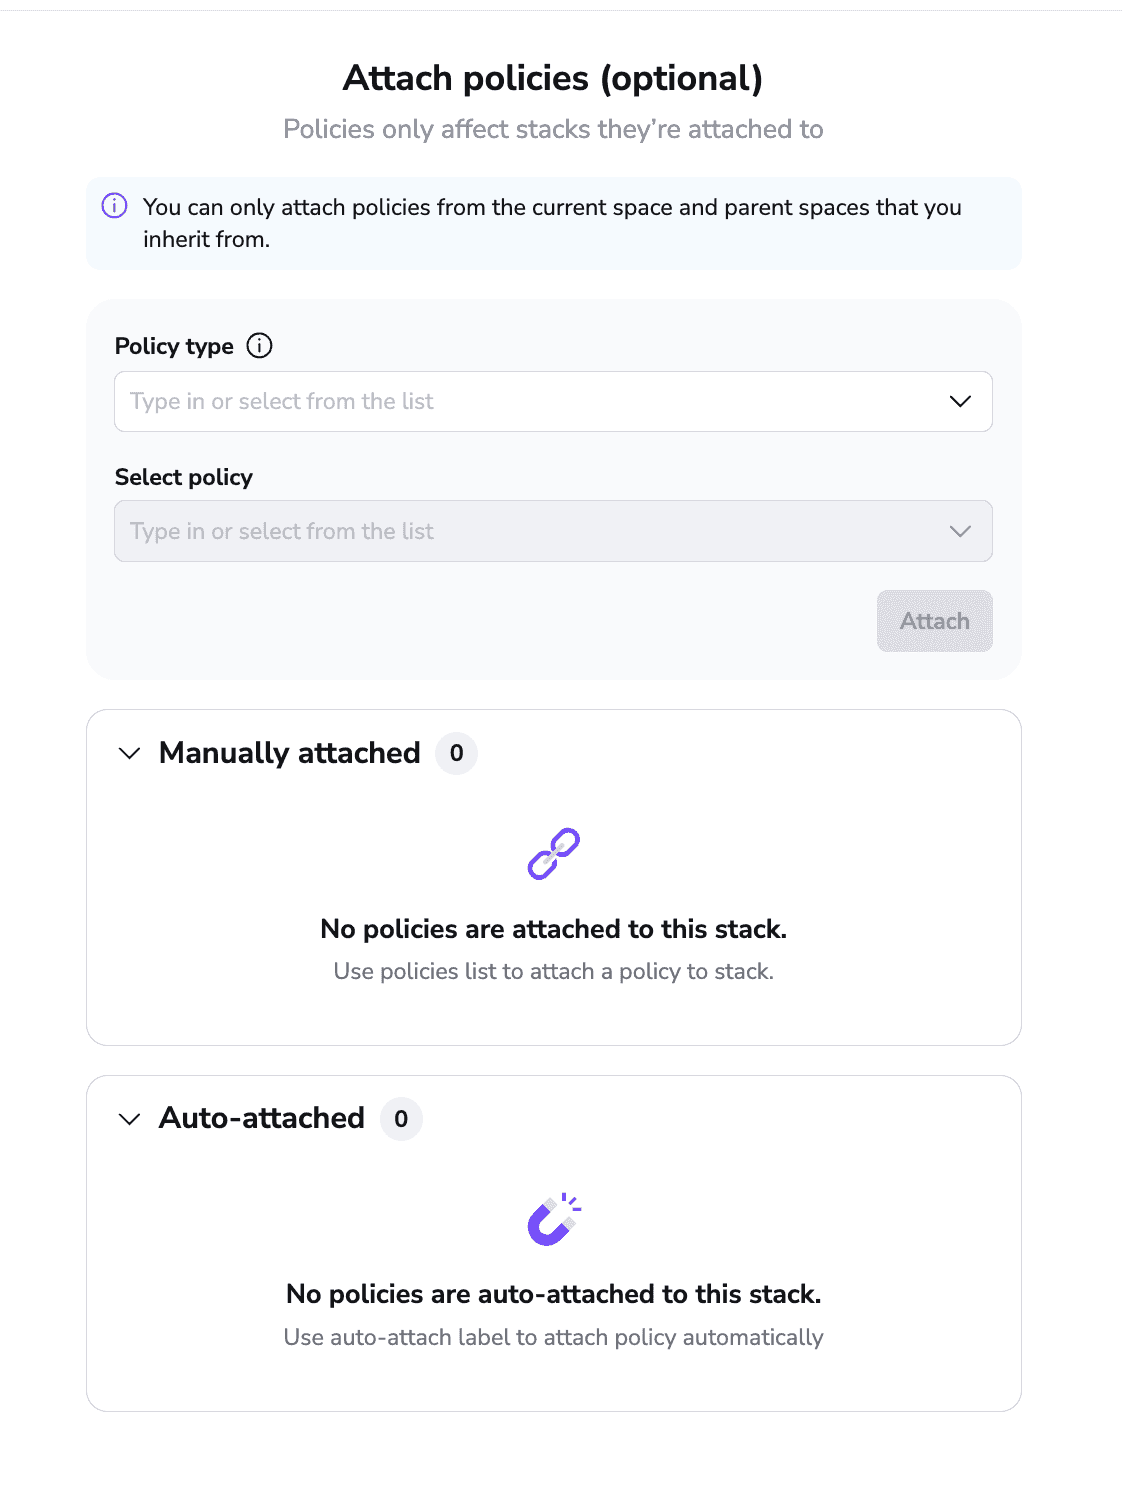
- Attach policies (Optional)
- Attach context (Optional)
- Summary
First, define a name for your stack, the space in which it resides, and an optional description and optional labels. Labels’ basic capability is to help users filter their stacks, but they can do far more than this. By using special labels, you can view plans directly on pull requests, and you can even auto-attach policies and contexts.
After you have added all the details related to your stack, the next step is to select your VCS repository.
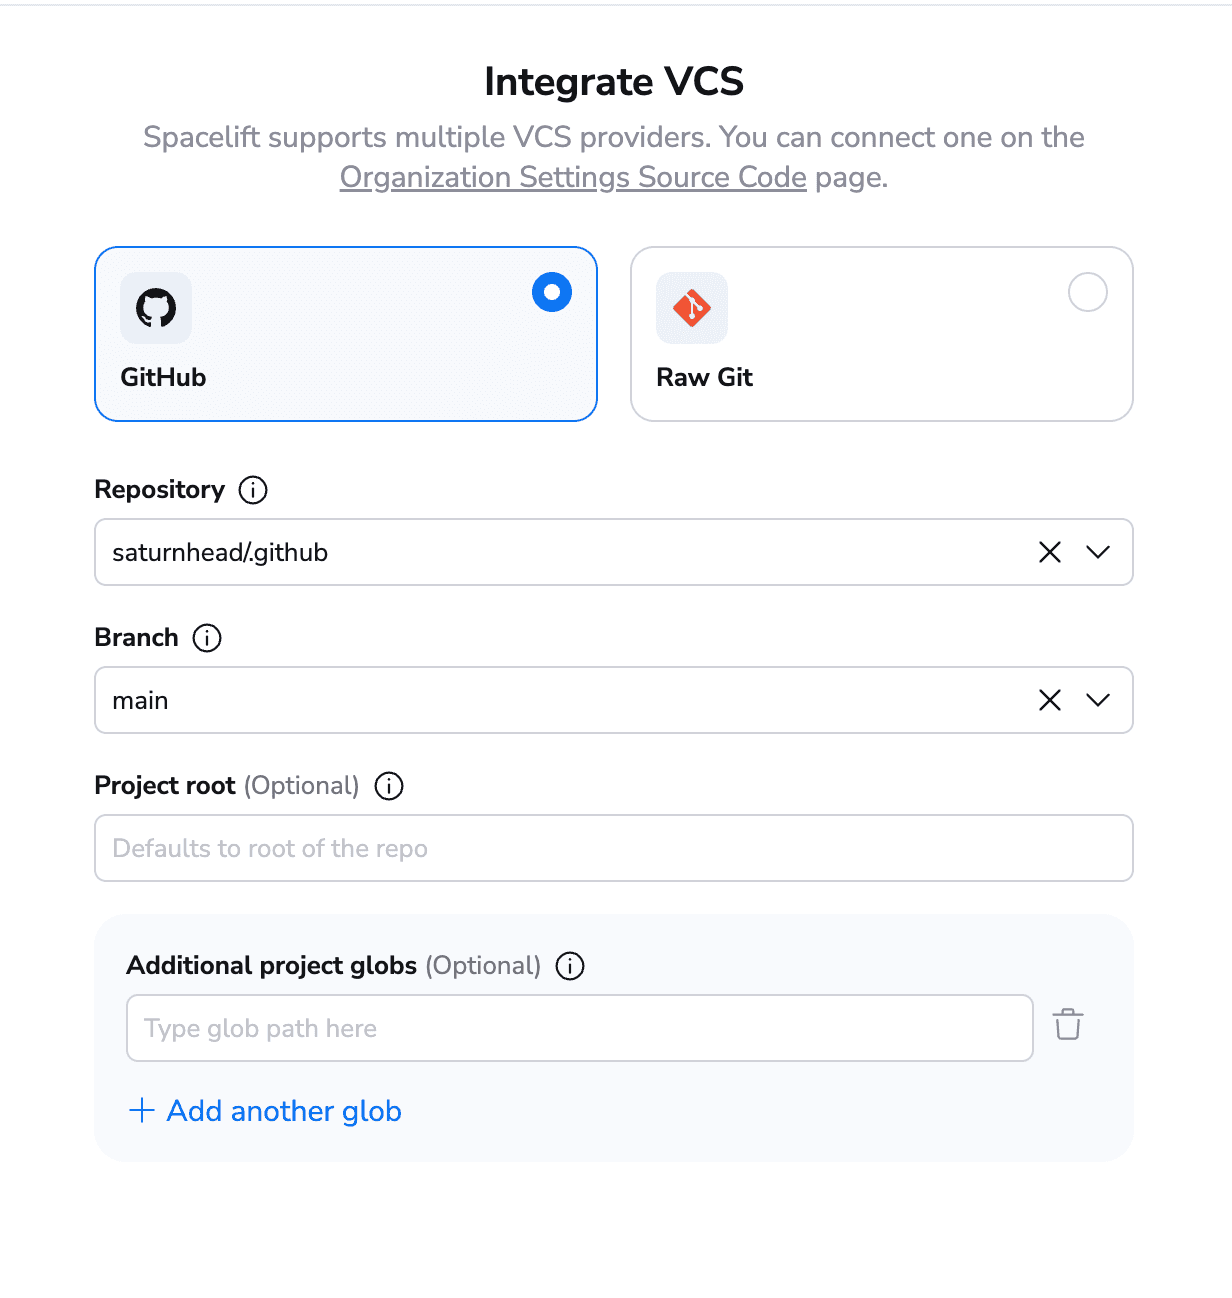
In our account, we have configured only GitHub, but Spacelift also supports Gitlab, BitBucket, and Azure DevOps, as well as using a Raw Git repository that you don’t even have to own.
Apart from specifying the working directory, you can also select project globs, so whenever there is a change to another directory, this could trigger runs for you.
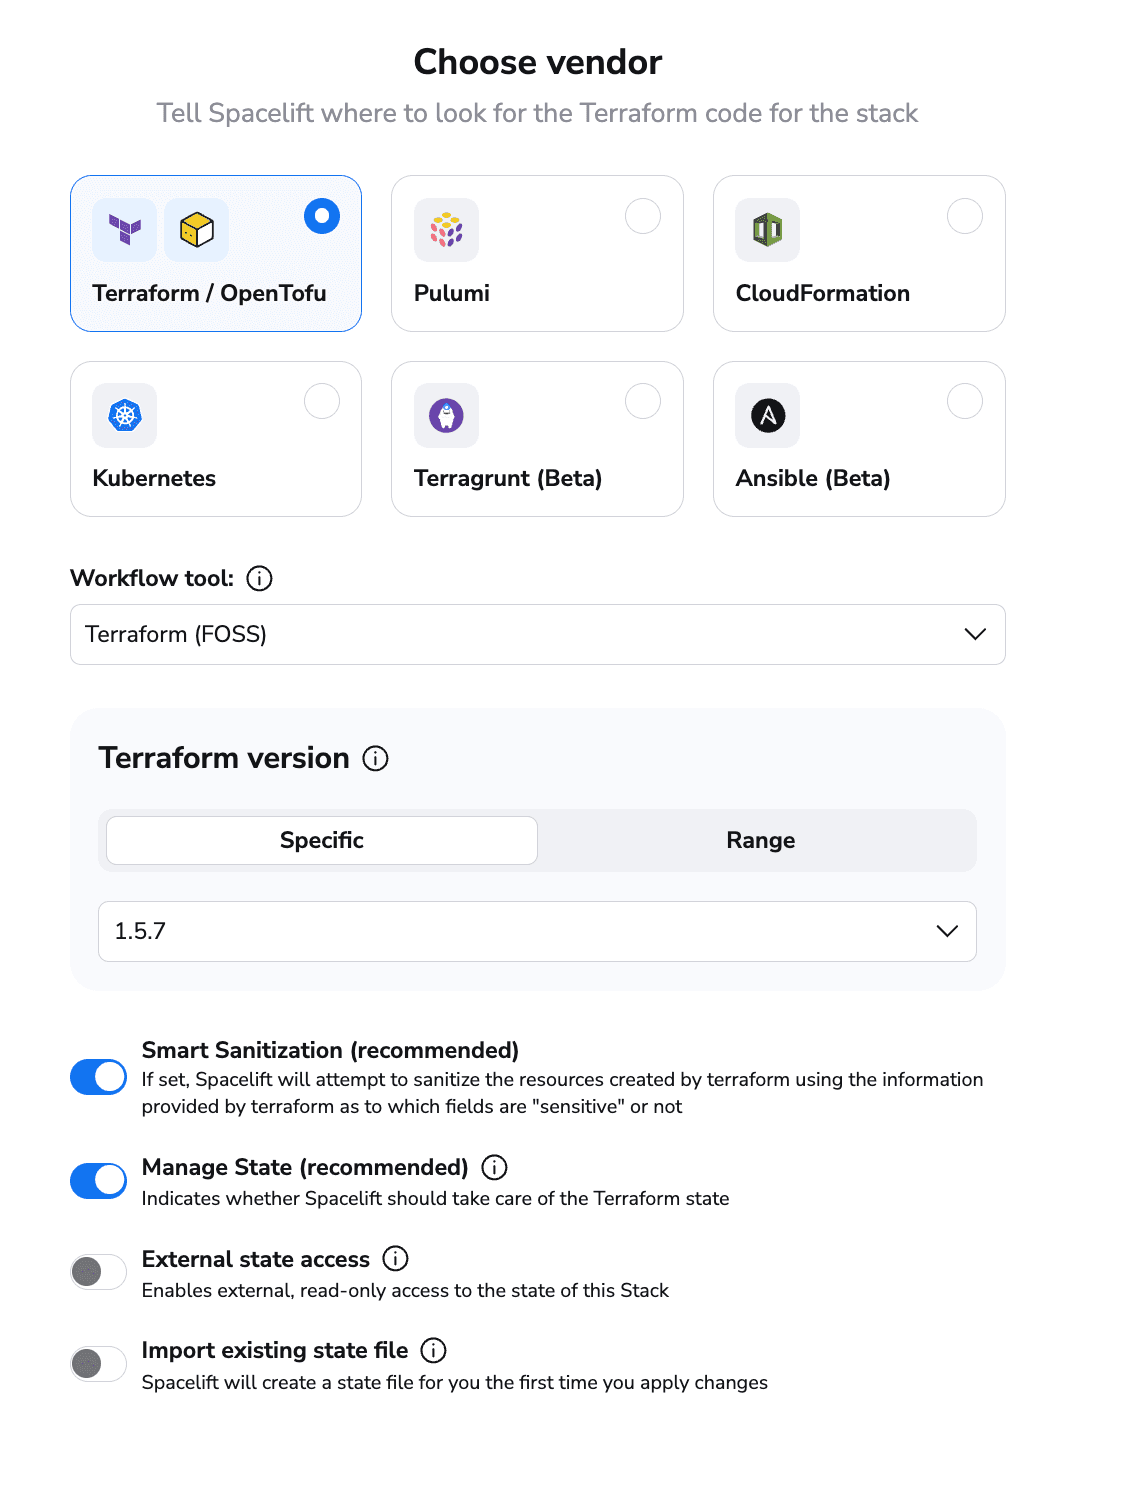
After you select a tool and have completed the required configurations, click create and continue. Then, you can choose to either select the parts you want to configure or proceed through all the steps.

We will walk you through all the steps that can be configured:
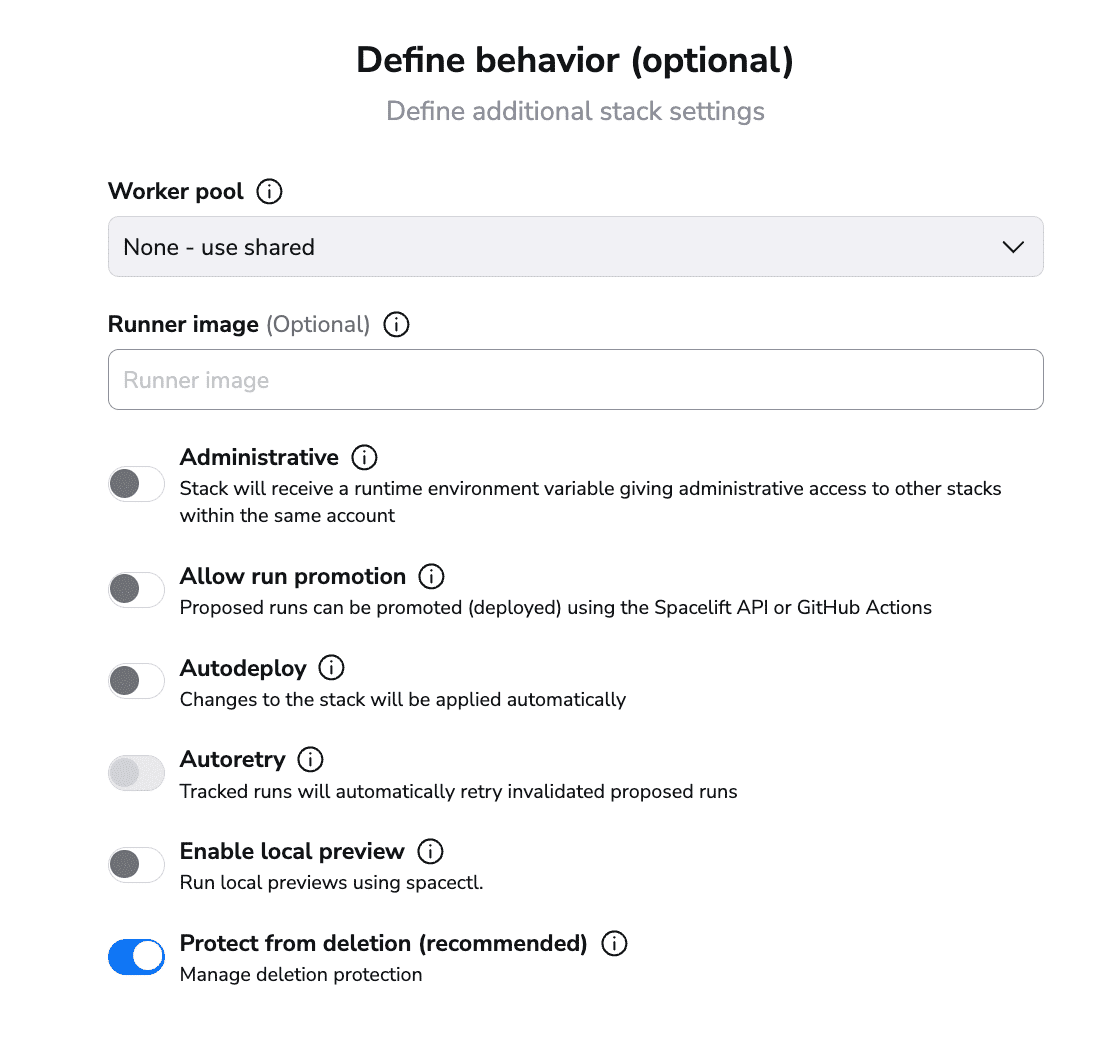
In this section, you can select:
- Whether you want your stack to use the public worker pool or a private one that you configure
- Whether you want to use your own runner image
- Whether the stack should be administrative — Spacelift has its own Terraform/OpenTofu provider. This option allows you to manage Spacelift with Spacelift without having to provide credentials.
- Whether you want to allow run promotion
- Whether you want to do auto-deploy and auto-retry
- Whether you want to see local previews using Spacelift’s CLI called spacectl
- Whether you want to protect the stack from deletion
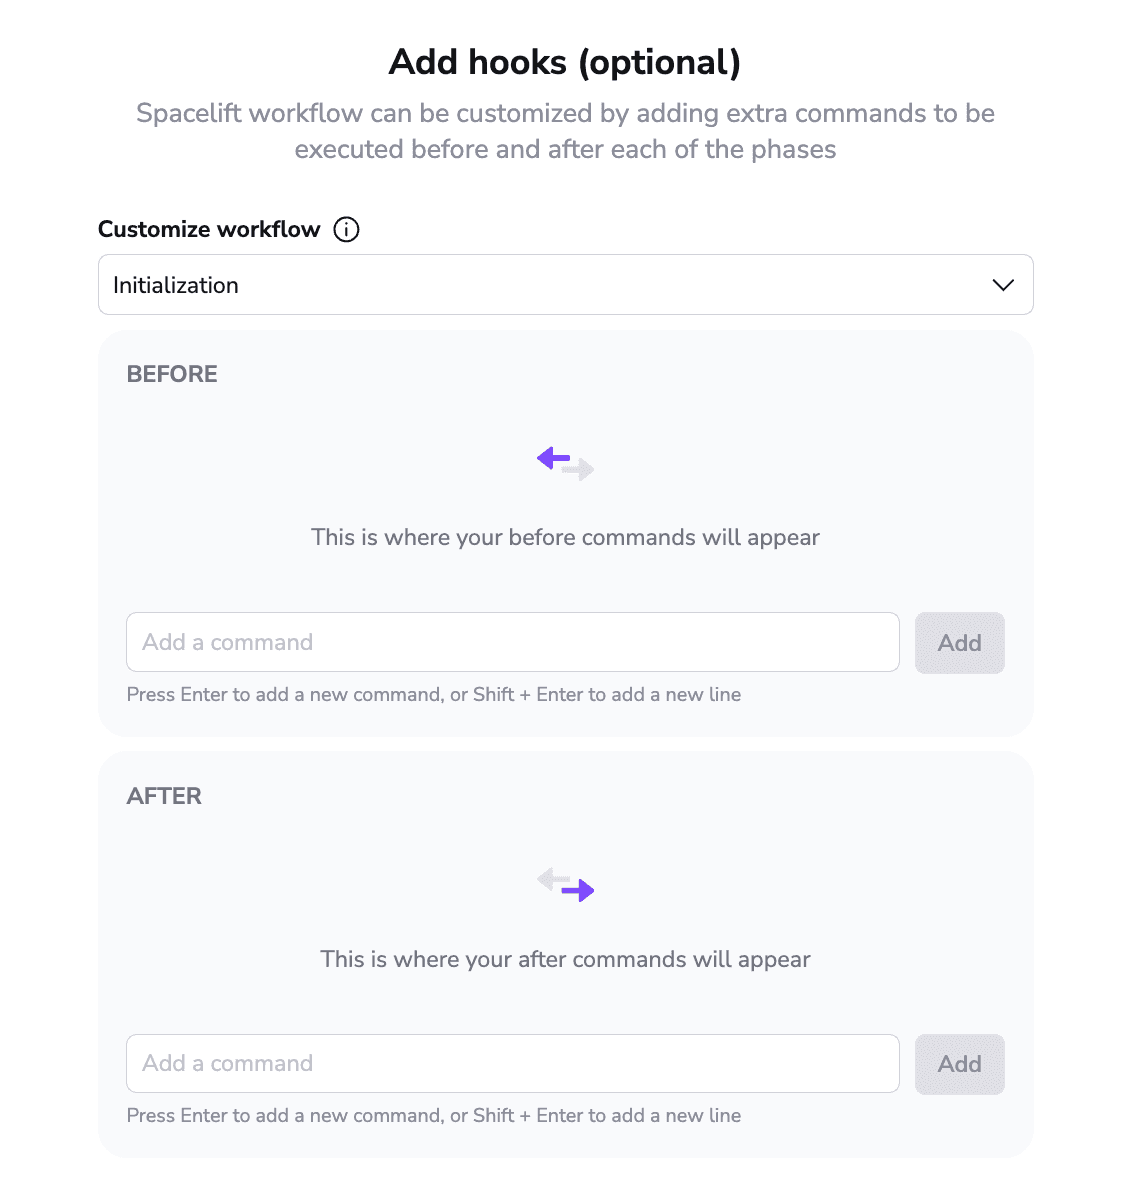
As the above screen shows, you can customize what happens before and after every runner phase. This enables you to install, configure, and run any tools you want without being limited to a single run task. This functionality is also available from the free tier.
In the next section, you can attach a cloud integration for dynamic credentials. Although you can choose from AWS, Azure, and Google Cloud, we have only configured sets of AWS credentials in my account, so that’s why only this option is visible.
Spacelift supports multiple policy types, not only plan and approval. You unlock the plan and approval ones from the free tier, and you can attach as many policies as you can to a stack.
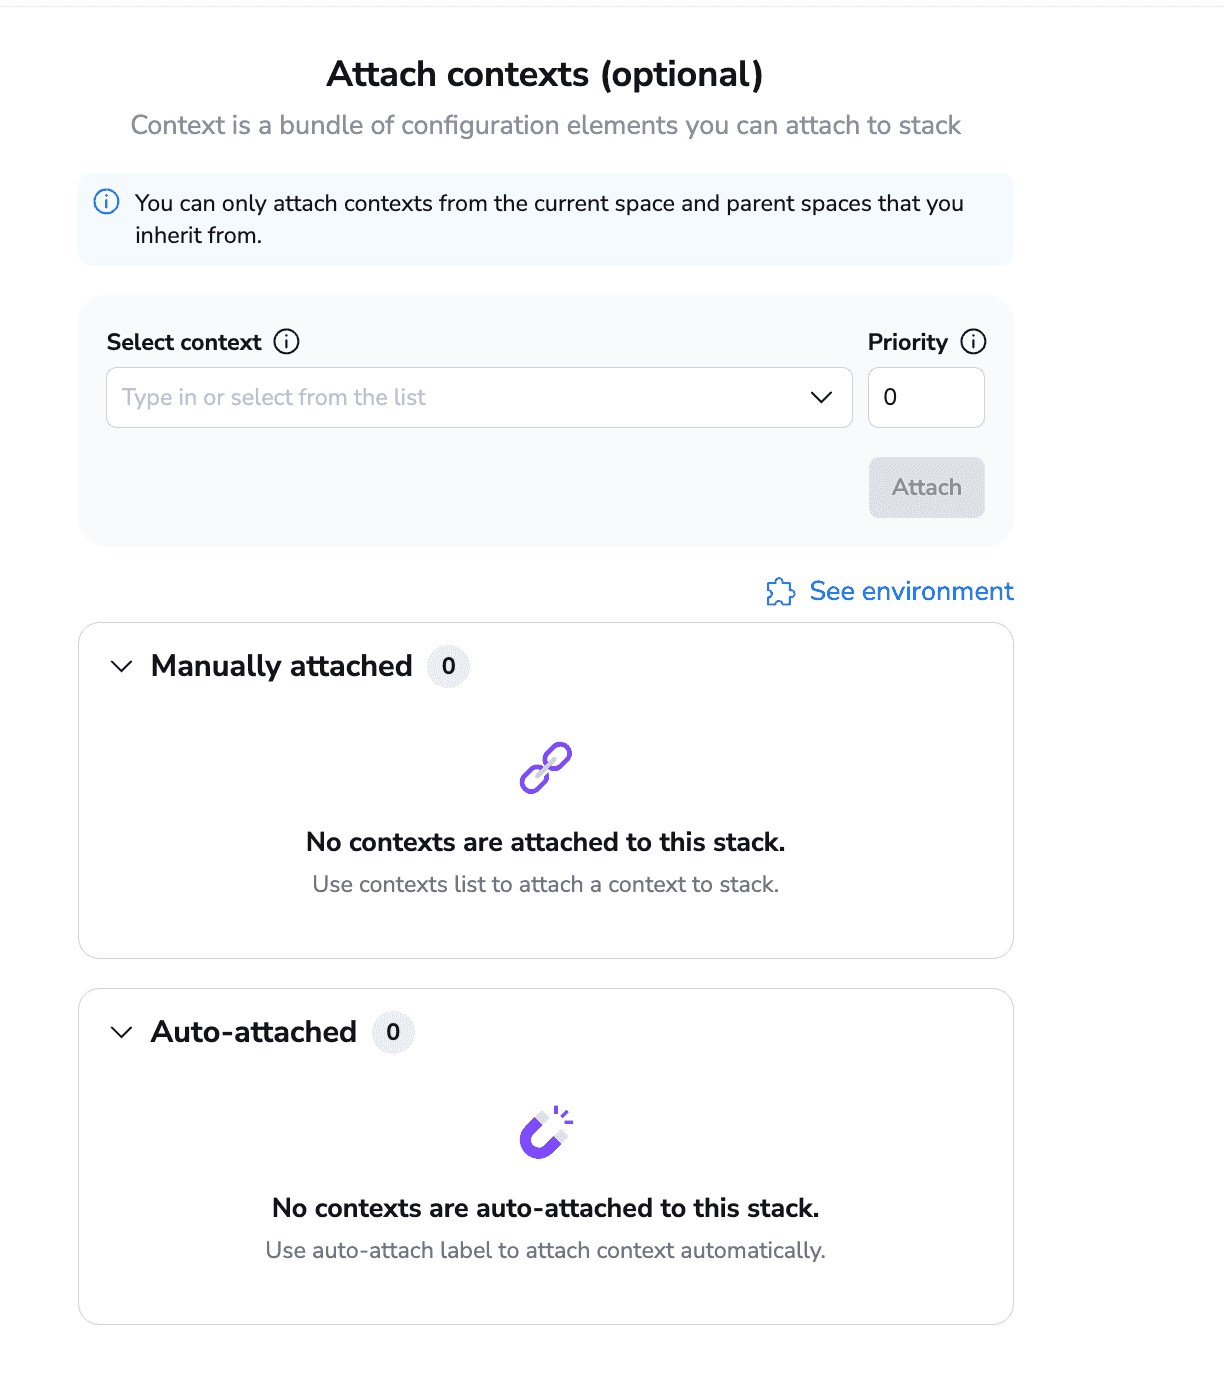
You can also attach contexts to your stack. Contexts are a bundle of environment variables, mounted files, and hooks that can be reused as you wish, with no limits.
You can even set priorities to contexts, so if you attach two contexts that reference the same environment variable, you can determine which one is selected based on priorities.
After you finish with contexts, you can view your stack:
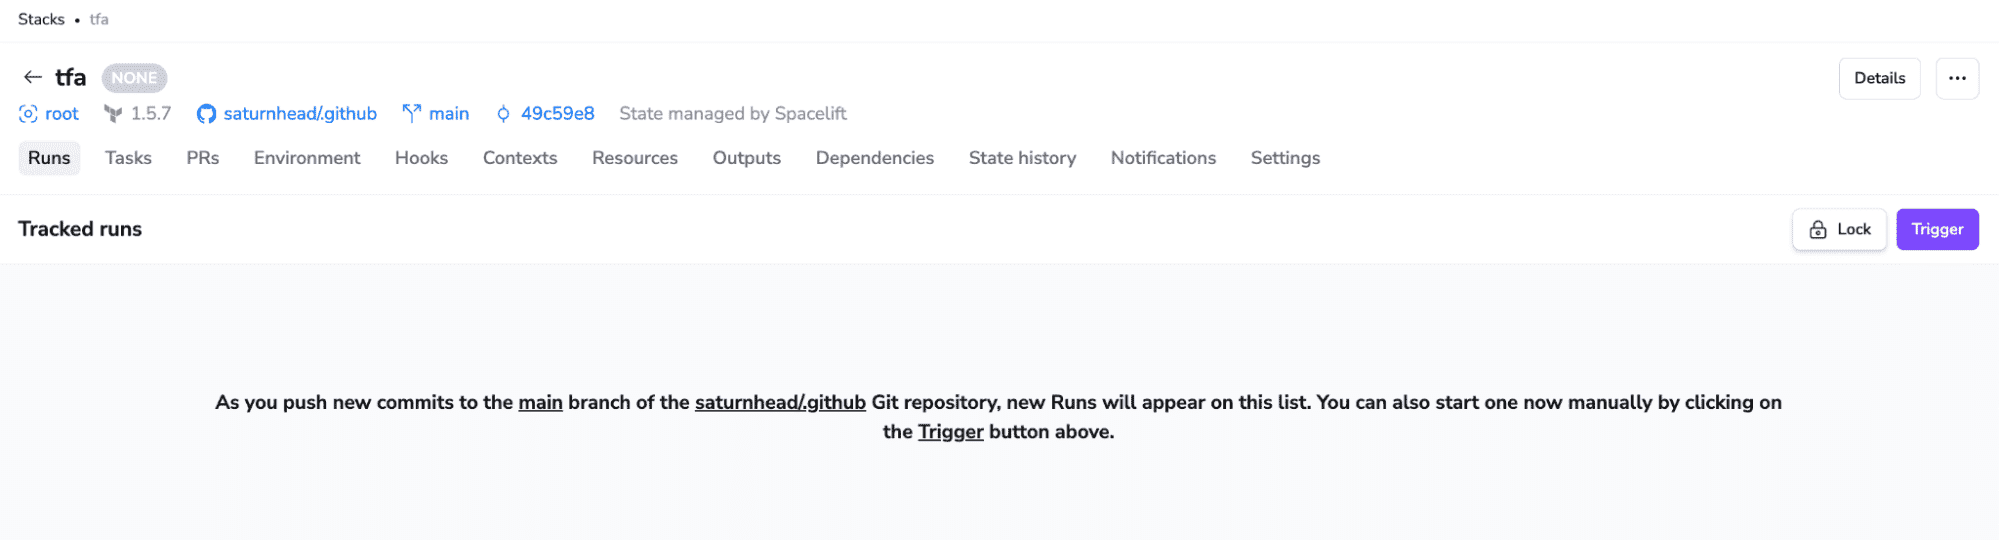
At the stack level, you can see all the runs that happened; run arbitrary tasks; see all open PRs against the tracked branch; and see the environment variables and mounted files, hooks defined, contexts attached, resources deployed, outputs, dependencies between stacks, state history, notifications, and all the stack settings.
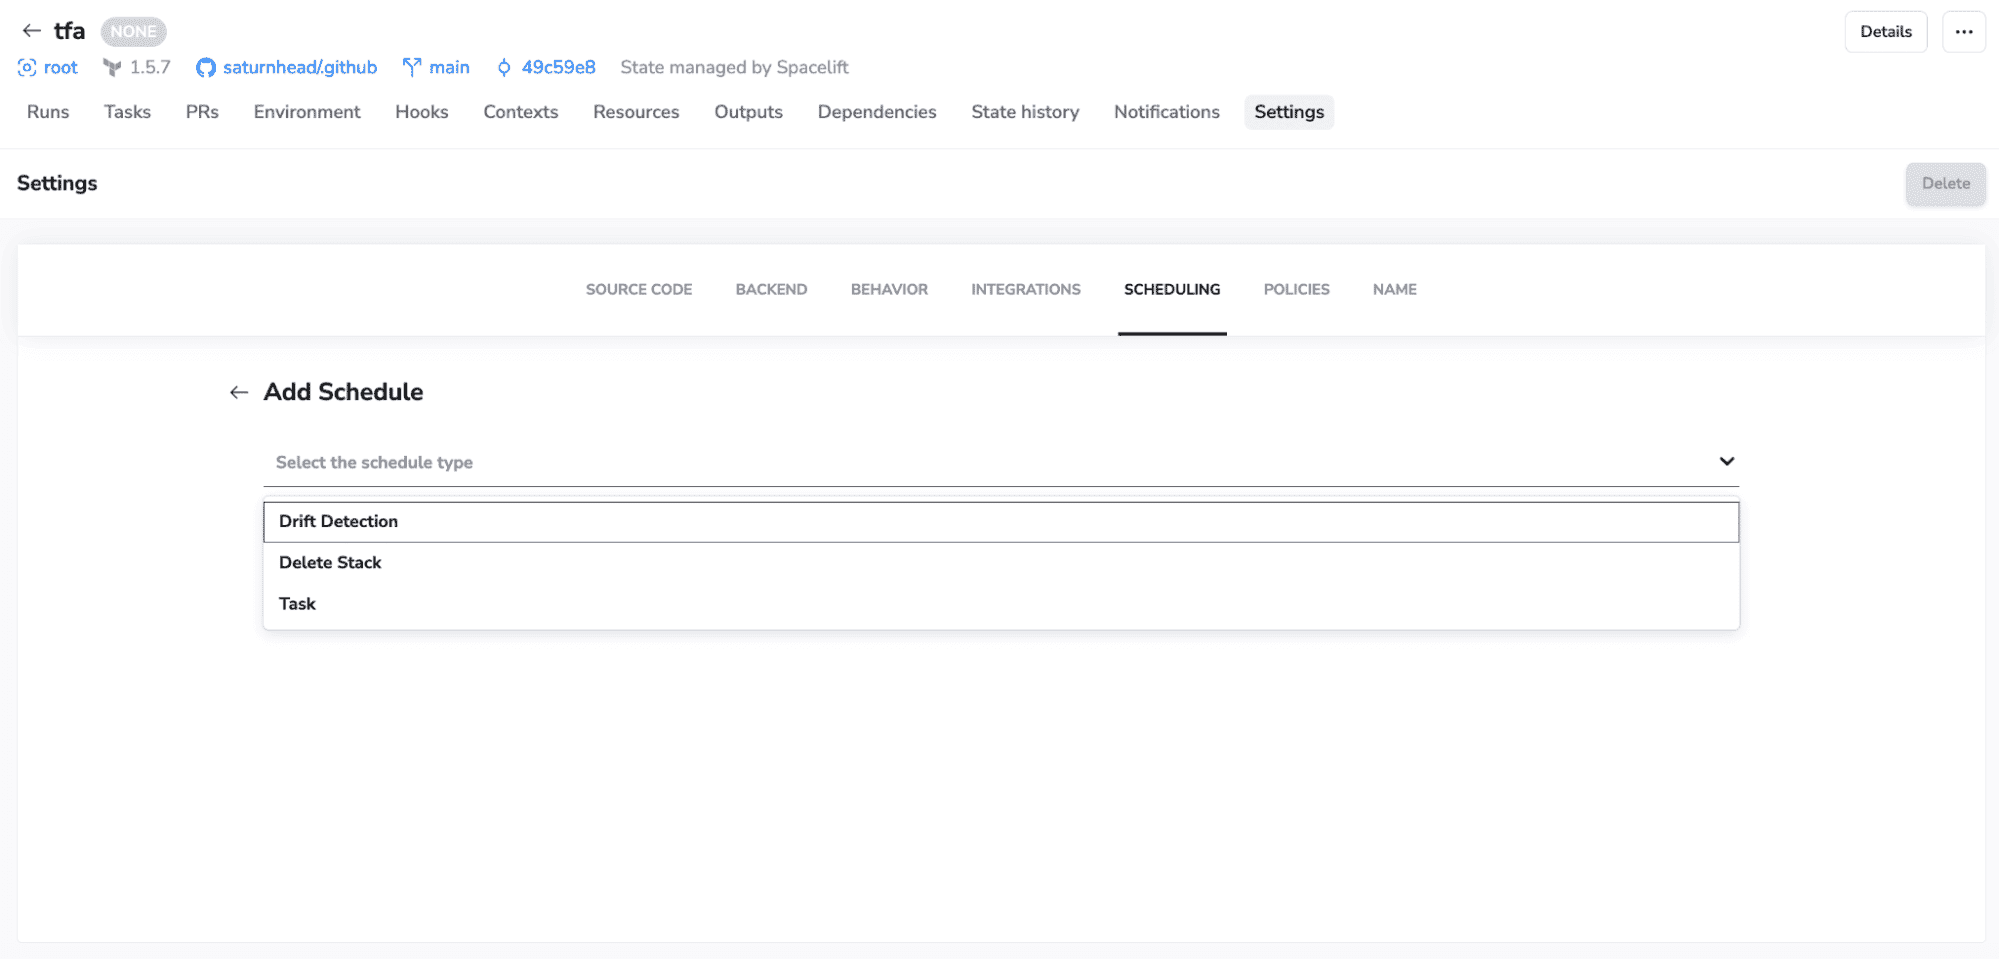
On the settings side, you also unlock scheduling capabilities, allowing you to configure drift detection and remediation, run arbitrary tasks, or schedule stack deletion:
Spacelift stack dependencies v2 is a game changer when it comes to deploying multiple configurations in the correct order, without having to do manual interventions.
Stack dependencies are Directed Acyclic Graphs (DAG) of dependencies that can nest on how many levels you want. This allows you to create powerful end-to-end workflows that can even combine multiple IaC tools such as Terraform, OpenTofu, Ansible, CloudFormation, Kubernetes, Terragrunt, or even Pulumi.
Supply chain management platform Logixboard was a Terraform Cloud customer seeking a more reliable Terraform experience. By migrating from Terraform Cloud to Spacelift, they have slashed the time they spend troubleshooting deployments, freeing them for more productive work.
Key takeaways
In this blog post, we explored the features of Terraform stacks on HCP Terraform, including key concepts like components and deployments for managing infrastructure configurations. Key takeaways include the ability to declaratively orchestrate automation with the new orchestrate block and the use of the Terraform stacks CLI tool for initializing and validating stack configurations.
If you want to learn more about Spacelift, book a demo with one of our engineers or start a free trial.
Cost-effective Terraform Cloud alternative
Spacelift is a highly cost-effective Terraform Cloud alternative that works with Terraform, Terragrunt, and many other IaC frameworks. It supports self-hosted on-prem workers, workflow customization, drift detection, and much more.
