
TL;DR
You can migrate from Terraform Cloud (HCP Terraform) to Spacelift using the Spacelift Migration Kit (spacemk) to export workspaces, generate equivalent Terraform/OpenTofu config for Spacelift, and migrate state.
When it comes to changing products, the biggest obstacle is often migration. Yes, the product looks amazing, but once you start thinking about all the work involved in migrating from the old to the new, you abandon the idea.
A painless migration would stop you from missing out. Think of how Apple enables painless device upgrades: You simply keep your old phone next to your new one for less than an hour, and everything migrates.
Terraform Cloud (TFC), now integrated into HashiCorp Cloud Platform (HCP) as HCP Terraform, switched to a RUM (Resources Under Management) pricing model. But this model is unsustainable for many customers, as it will be tough to predict what their bill will look like at the end of the month. You can read more about the changes here.
Migrating from Terraform Cloud is easier than enduring their new pricing model, so at Spacelift, we developed a way to speed up the migration process: the Spacelift Migration Kit.
What we will cover:
Why migrate from Terraform Cloud?
There are several reasons why you would want to migrate from Terraform Cloud:
1. Pricing
Terraform Cloud’s RUM pricing is unpredictable and will cost you a lot. Even if you sign a yearly deal for several resources, you will still end up paying for things TFC doesn’t manage.
2. Terraform-only management
With TFC, you can only manage Terraform and, to some extent, Terragrunt. You can’t customize the binary, nor can you use other tools such as Pulumi, CloudFormation, or OpenTofu. This means that you will need other products to manage other parts of your infrastructure.
3. No dependencies workflow
With TFC, you can’t create dependencies between your workspaces, nor can you natively share outputs between them, making environment promotion impossible to implement.
4. Limits for policies and run tasks in lower tiers
In the lower pricing tiers, you can create one policy set with five policies in it, and only one of these policies can be mandatory. Similarly, you can integrate only one run task for 10 workspaces.
This is highly limiting, and you won’t be able to do the job with these kinds of limits, forcing you to switch to the next tier.
5. Don’t have full control over your workflow or over the tools you are integrating
With TFC, you can’t fully control what happens between all runner phases, and you are limited to integrating only the third-party tools that are supported by run tasks.
6. No-code provisioning is limited to modules
No-code provisioning is a really helpful feature for achieving self-service infrastructure. However, TFC limits the self-service aspect only to your modules, which makes the whole aspect kind of limiting.
Usually, in your automations, you use multiple modules in a single configuration, which means you work around this issue by creating a “module” of modules, which in Terraform isn’t a best practice.
This will also force you to push the “module” of modules to your registry, making things even more complicated and confusing, especially for new people in your organization.
7. HashiCorp support
Many people are complaining about the level of support they receive from HashiCorp whenever they encounter issues. You can read more about their support issues in this Reddit thread.
8. HashiCorp license changes
HashiCorp’s move to BSL, followed by its acquisition by IBM, has also increased uncertainty around Terraform Cloud (TFC).
If HashiCorp’s license change is part of why you are leaving, the move is also a good moment to switch from Terraform to OpenTofu, the open-source fork.
The Migration Kit generates Terraform or OpenTofu code, and you pick the workflow tool when you create the stack, so switching does not add a separate migration. Spacelift runs OpenTofu natively, so there is no penalty for making the change. See our OpenTofu page for the details.
Read more: Why You Should Migrate From Terraform Cloud/Enterprise
Overview of Spacelift features
Spacelift is the infrastructure orchestration platform for the AI-accelerated software era, supporting Terraform, OpenTofu, Terragrunt, Pulumi, CloudFormation, Kubernetes, and Ansible. The platform’s pricing is predictable and based on concurrency, allowing you to correctly appreciate how your bill would look at the end of the month.
Being a multi-infrastructure orchestration platform allows you to integrate multiple tools into the same workflow by creating dependencies and sharing outputs between configuration stacks, making it easy to achieve environment promotion and making each configuration item small to easily isolate where issues are actually coming from.
Spacelift uses OPA for policy as code and lets you define policies to control various aspects of the platform, from what resources you can create, what parameters those resources may have, how many approvals you need for a run, where to send notifications, what happens when a PR is open, and more.
For self-service infrastructure, Spacelift offers Templates and Blueprints, which can configure every aspect of your stack, starting from what repo to use, which integrations to attach (cloud/policies/contexts) to defining input variables that will be available in a form for people to add when they are running the template or blueprint.
Beyond traditional infrastructure-as-code workflows, Spacelift Intelligence adds an AI-powered layer for natural-language provisioning, diagnostics, and operational insights, helping teams move faster without sacrificing governance or visibility.
Supply chain management platform Logixboard was a Terraform Cloud customer seeking a more reliable Terraform experience. By migrating from Terraform Cloud to Spacelift, they have slashed the time they spend troubleshooting deployments, freeing them for more productive work.
How to use Spacelift Migration Kit
To migrate from Terraform Cloud and move your workspaces in bulk, take the following steps:
- Install Python 3.13.1 or newer and Poetry 2.0.1 or newer
- Clone the Spacelift Migration Kit.
- Install other dependencies and the spacemk command in a Python virtual environment
- Create your config.yml
- [Optional] Audit your current setup
- Export the configuration
- Generate the Terraform/OpenTofu configuration
- Create a repository based on the generated code
- Create a stack based on the repository
- Import the state
- [Optional] Set sensitive variable values
- [Optional] Set Terraform variables with invalid names
- [Optional] Create module versions
- [Optional] Customization
Let’s cover these steps in detail.
How to migrate from Terraform Cloud
1. Install prerequisites
We need to ensure that Python 3.13.1 or newer is installed, along with Poetry 2.0.1 or newer.
Installing Poetry on macOS using pipx
brew install pipx
pipx install poetry
pipx ensurepath
To install it on any other operating system, check out this tutorial.
2. Clone the Spacelift migration kit
Cloning the repository is a fairly simple process. Simply go to Spacelift Migration Kit, select either the SSH or HTTP links, and run git clone.
git clone git@github.com:spacelift-io/spacelift-migration-kit.git3. Install spacemk
Go to the Spacelift migration kit directory, and run the following:
poetry install
Creating virtualenv spacemk-liMdtQjr-py3.12 in /Users/flaviuscdinu/Library/Caches/pypoetry/virtualenvs
Installing dependencies from lock file
Now that spacemk is installed, activate the virtual environment:
poetry shell4. Create your config.yml
Inside the repository, there is a config.yml.example file, containing the values you need to configure for the migration:
# These are all the possible properties for the configuration files.
# The values included in this file are the default values for the property they are associated with.
exporter:
 name: # Valid values: terraform
 settings:
   # Specific to the Terraform exporter (exporter.name: terraform)
   api_endpoint: https://app.terraform.io
   api_token:
   include:
     workspaces: ^example-.*$


generator:
 extra_vars:
   foo: bar # "{{ extra_vars.foo }}" in a template will be replaced by "bar"


github:
 api_token:
 endpoint: https://api.github.com


spacelift:
 api:
   api_key_endpoint: https://<ACCOUNT NAME>.app.spacelift.io/graphql
   api_key_id:
   api_key_secret:
Rename this file, or create a new one that should be called “config.yml”.
In this file, you must add the login details to your Terraform Cloud account and your Spacelift account. You can also use environment variables inside this file, to avoid using credentials inside the file (these variables should be prefixed with the “$” sign).
Here is an example that uses environment variables:
# These are all the possible properties for the configuration files.
# The values included in this file are the default values for the property they are associated with.
exporter:
 name: terraform
 settings:
   # Specific to the Terraform exporter (exporter.name: terraform)
   api_endpoint: https://app.terraform.io
   api_token: $TFC_TOKEN


generator:
 extra_vars:
   foo: bar # "{{ extra_vars.foo }}" in a template will be replaced by "bar"


github:
 api_token: $GITHUB_TOKEN
 endpoint: https://api.github.com


spacelift:
 api:
   api_key_endpoint: https://saturnhead.app.spacelift.io/graphql
   api_key_id: $SPACELIFT_API_KEY_ID
   api_key_secret: $SPACELIFT_API_KEY_SECRET
You will need to export these values inside your terminal (e.g.):
export TFC_TOKEN=tfctokenBased on the values above, we will include all workspaces in the migration.
If you don’t already have a Spacelift API key, you can go to Settings → API keys and generate one:
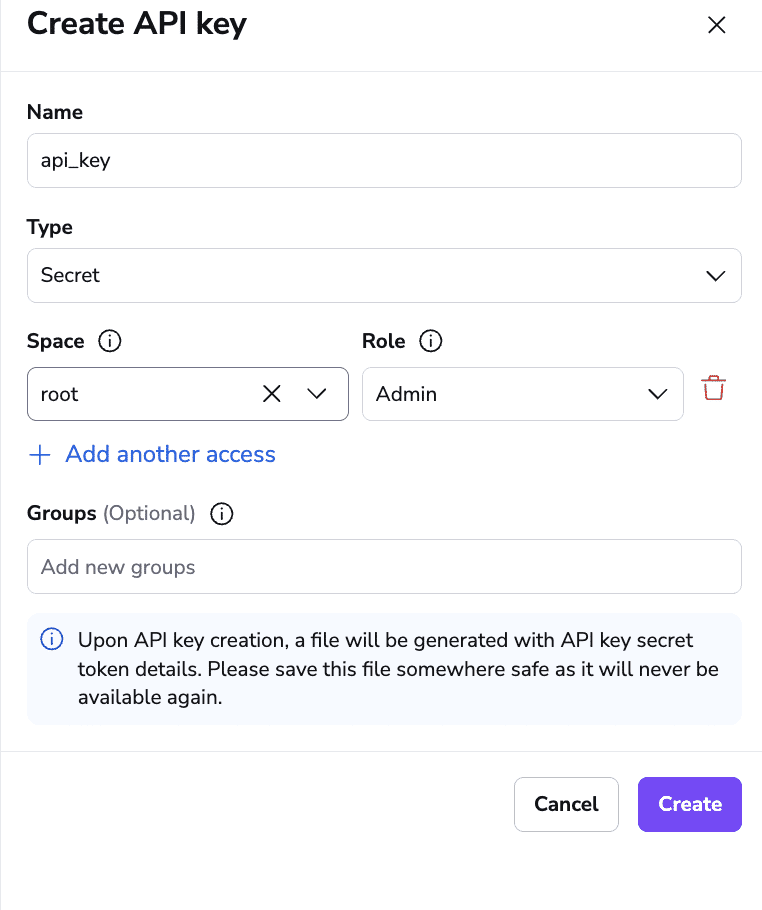
After you click Add Key, a file will be downloaded that contains the API key secret. The API Key ID can be found in the previous screen.
To create an API key for Terraform Cloud, check this tutorial, and to create a GitHub token, check this tutorial.
5. [Optional] Audit your current setup
To audit your current setup, you can simply run the spacemk audit command:
Agent Pools: 1 (including 1 with warnings)
Modules: 1
Organizations: 1
Policies: 1 (including 1 with warnings)
Policy Sets: 1
Projects: 4
Providers: 0
Tasks: 0
Teams: 601
Variable Set Variables: 0
Variable Sets: 0
Workspace Variables: 0
Workspaces: 1
This gives you all the information about your Terraform Cloud account and everything that can be exported.
It also writes an Excel report of every entity to be migrated to tmp/report.xlsx, and flags entities that may need to be handled manually.
6. Export your configuration
To export your configuration, simply run spacemk export. This command generates a JSON file at tmp/data.json.
In this file, you will see information about everything that will be migrated and how they are mapping out to Spacelift resources.
{
 "context_variables": [],
 "contexts": [],
 "modules": [
   {
     "_migration_id": "aks",
     "_relationships": {
       "space": {
         "_migration_id": "saturnhead",
         "_source_id": "saturnhead",
         "name": "saturnhead",
         "requires_terraform_workflow_tool": false
       }
     },
     "_source_id": "...",
     "name": "aks",
     "status": "setup_complete",
     "terraform_provider": "az",
     "vcs": {
       "branch": "main",
       "namespace": "flavius-dinu",
       "provider": "github_custom",
       "repository": "terraform-az-aks"
     },
     "visibility": "private"
   }
 ],
 "spaces": [
   {
     "_migration_id": "saturnhead",
     "_relationships": {},
     "_source_id": "saturnhead",
     "name": "saturnhead",
     "requires_terraform_workflow_tool": false
   },
   {
     "_migration_id": "default_project",
     "_relationships": {},
     "_source_id": "...",
     "name": "Default Project",
     "requires_terraform_workflow_tool": false
   },
   …
   {
     "_migration_id": "sdsd",
     "_relationships": {},
     "_source_id": "...",
     "name": "sdsd",
     "requires_terraform_workflow_tool": false
   }
 ],
 "stack_variables": [],
 "stacks": [
   {
     "_migration_id": "blog_examples",
     "_relationships": {
       "space": {
         "_migration_id": "default_project",
         "_source_id": "...",
         "name": "Default Project",
         "requires_terraform_workflow_tool": false
       }
     },
     "_source_id": "...",
     "autodeploy": false,
     "description": null,
     "has_secret_variables_with_invalid_name": false,
     "has_variables_with_invalid_name": false,
     "name": "blog-examples",
     "slug": "blog-examples",
     "terraform": {
       "version": "1.5.5",
       "workflow_tool": "TERRAFORM_FOSS"
     },
     "vcs": {
       "branch": "main",
       "namespace": "flavius-dinu",
       "project_root": "migration",
       "provider": "github_custom",
       "repository": "blog-examples"
     }
   }
 ]
}
This file can be reviewed and modified to accommodate your needs.
7. Generate the Terraform/OpenTofu configuration
To generate the Terraform/OpenTofu configuration, you will need to use the spacemk generate command.
terraform {
 required_providers {
   spacelift = {
     source  = "spacelift-io/spacelift"
     version = "~> 1.0"
   }
 }
}


resource "spacelift_space" "saturnhead" {
 inherit_entities = true
 name             = "saturnhead"
 parent_space_id  = "root"
}


resource "spacelift_stack" "default_project_blog_examples" {
 branch            = "main"
 manage_state      = false
 name              = "blog-examples"
 project_root      = "migration"
 repository        = "blog-examples"
 space_id          = spacelift_space.default_project.id
 terraform_version = "1.5.5"


 github_enterprise {
   namespace = "flavius-dinu"
 }
}


…


resource "spacelift_module" "saturnhead_aks" {
 branch             = "main"
 name               = "aks"
 repository         = "terraform-az-aks"
 space_id           = spacelift_space.saturnhead.id
 terraform_provider = "az"


 github_enterprise {
   namespace = "flavius-dinu"
 }
}
The generated code is written to tmp/code/main.tf. Again, the code can be modified to accommodate your needs.
If you are not using the default VCS integration, you will also need to specify the id property in the vcs block (in my case, I will add an id to the github_enterprise block):
github_enterprise {
namespace = "flavius-dinu"
id = "flavius-dinu"
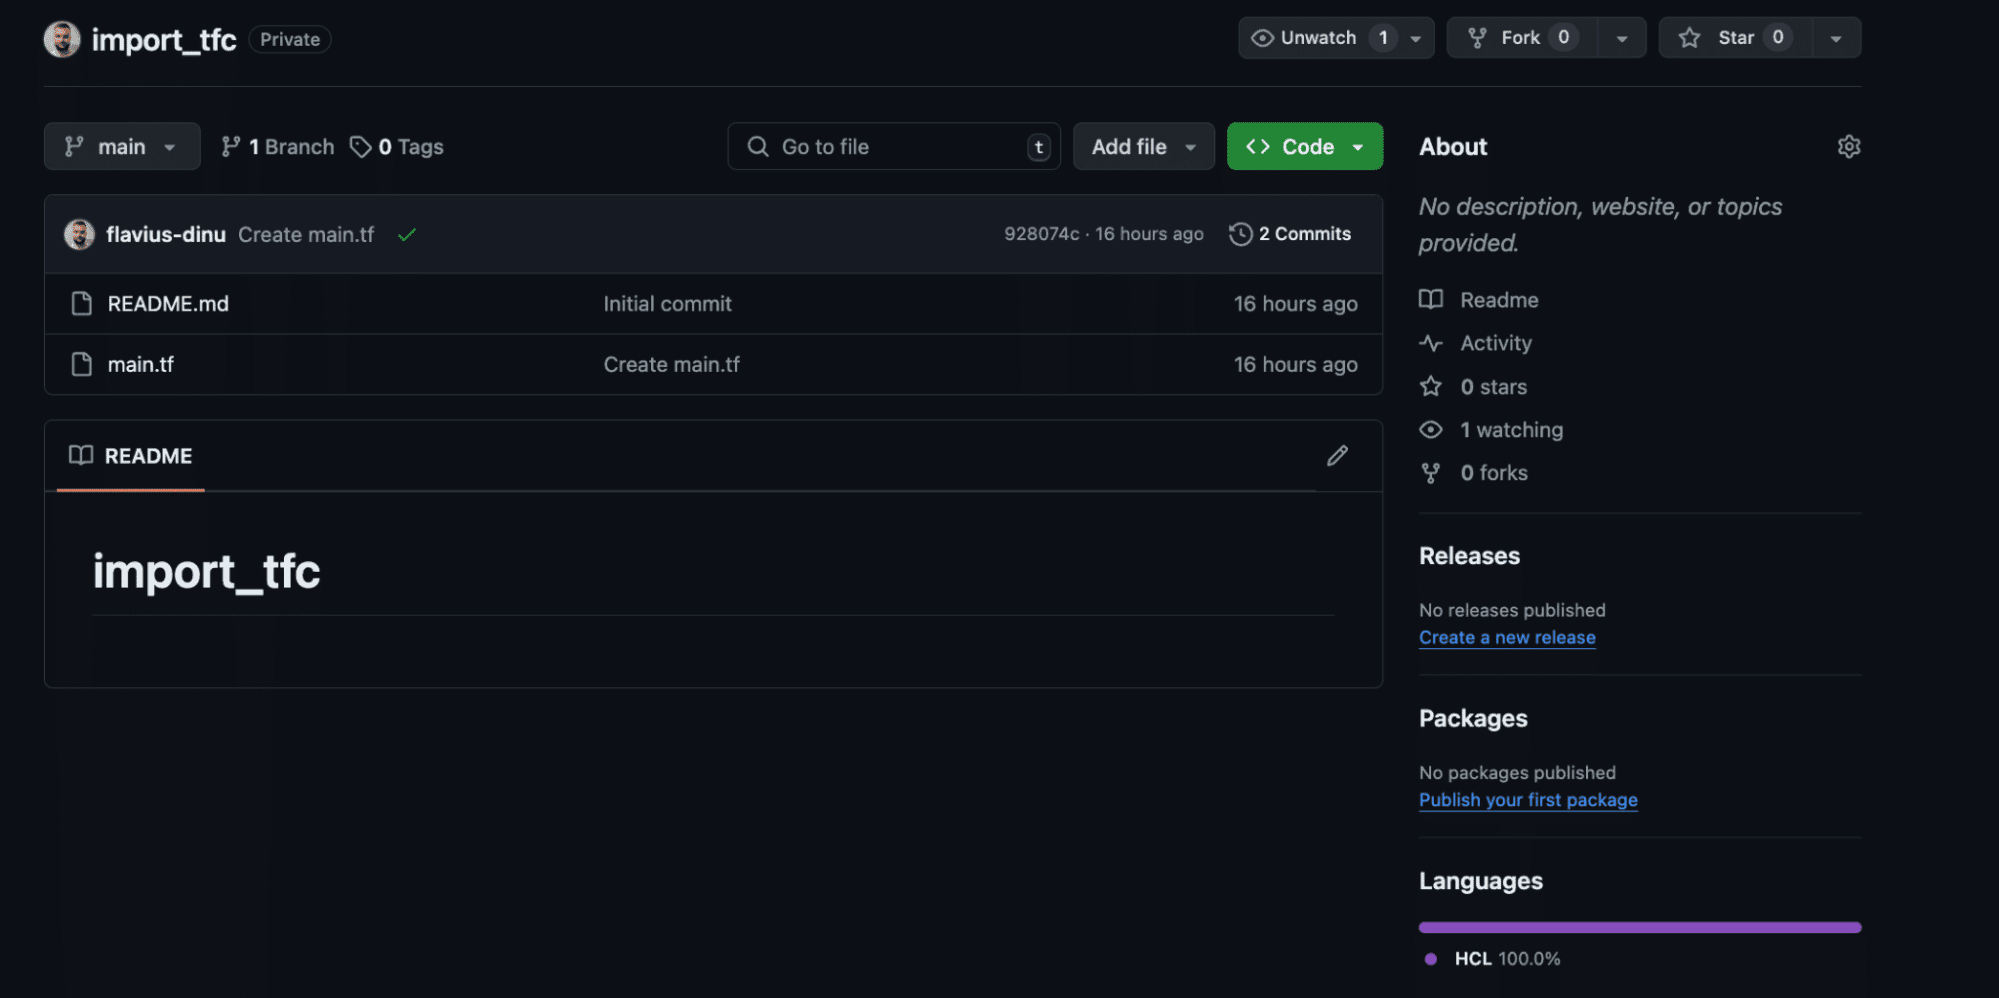
}8. Create a repository based on this code
In your VCS, simply create a repository with the exported code. Ensure the VCS provider you are using is configured in Spacelift, and the code repositories you’ve exported from TFC are available in this VCS provider.
To configure a new VCS provider inside your Spacelift provider, follow the steps from this tutorial for your VCS.
Create the repo with the exported code. This is how it looks like for my GitHub configuration:
9. Create a stack based on the repository
Go to your Spacelift account, select Stacks, and the Create Stack option:
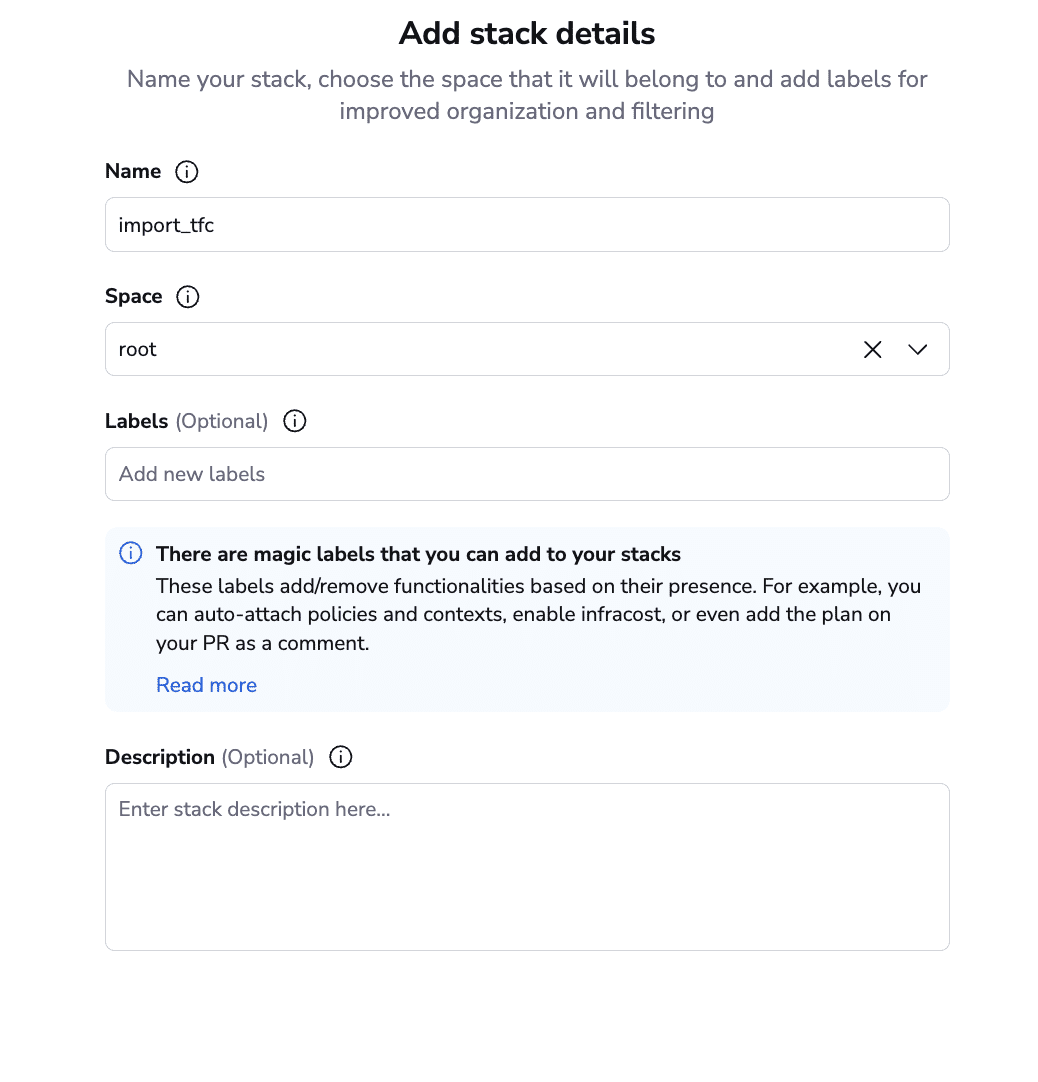
Add a name to your stack, select a space, and add optional labels and description.
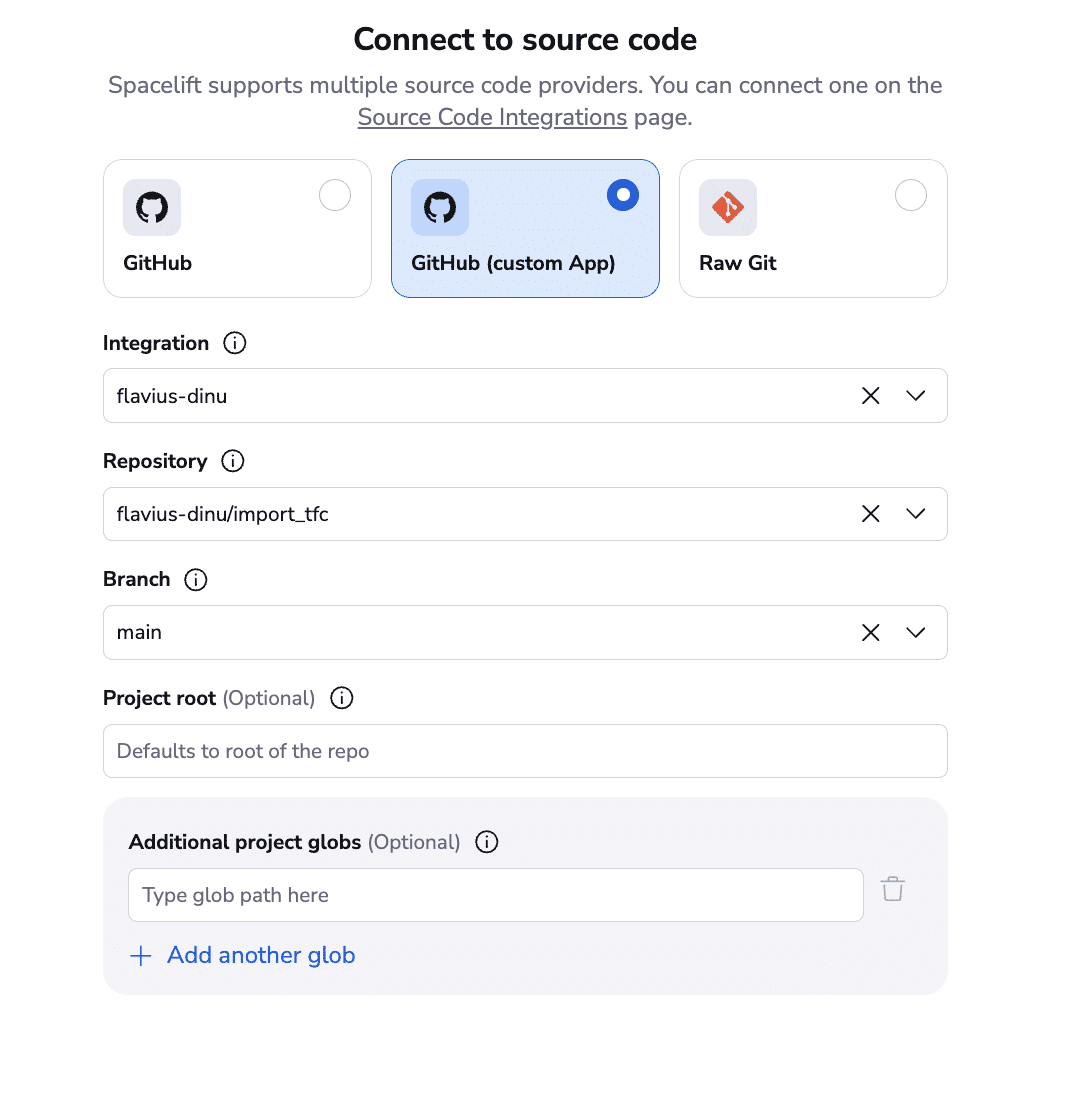
In the next step, select the repository containing your migration code as shown above, and specify the branch you want to use.
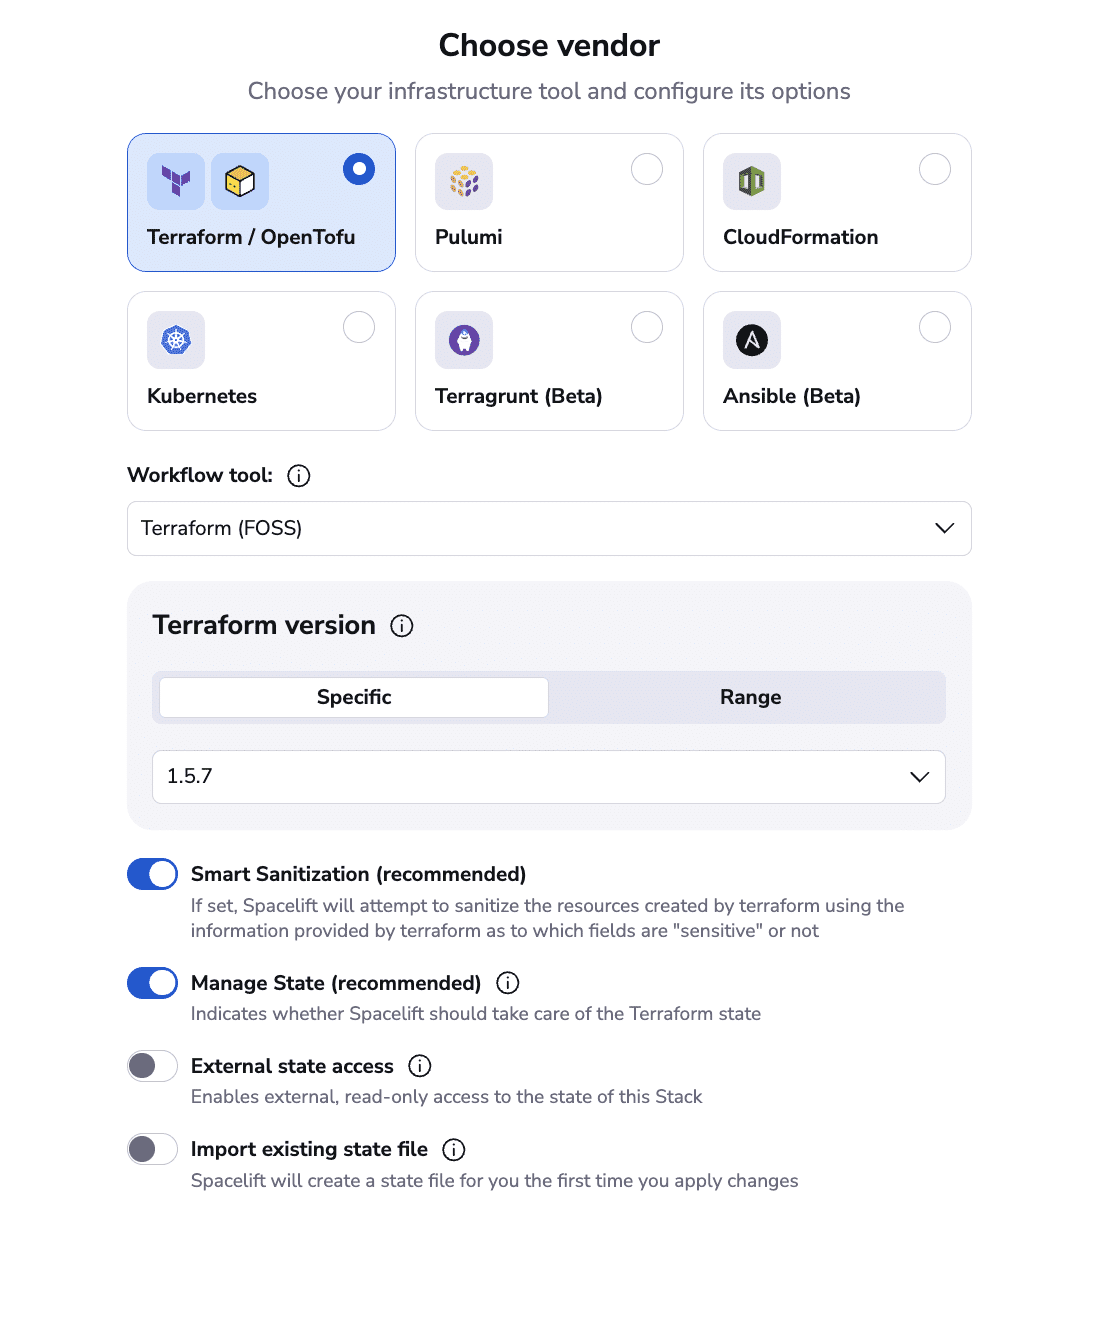
Next, you can choose your vendor; it can be either Terraform or OpenTofu, so I will accept the default Terraform FOSS workflow.
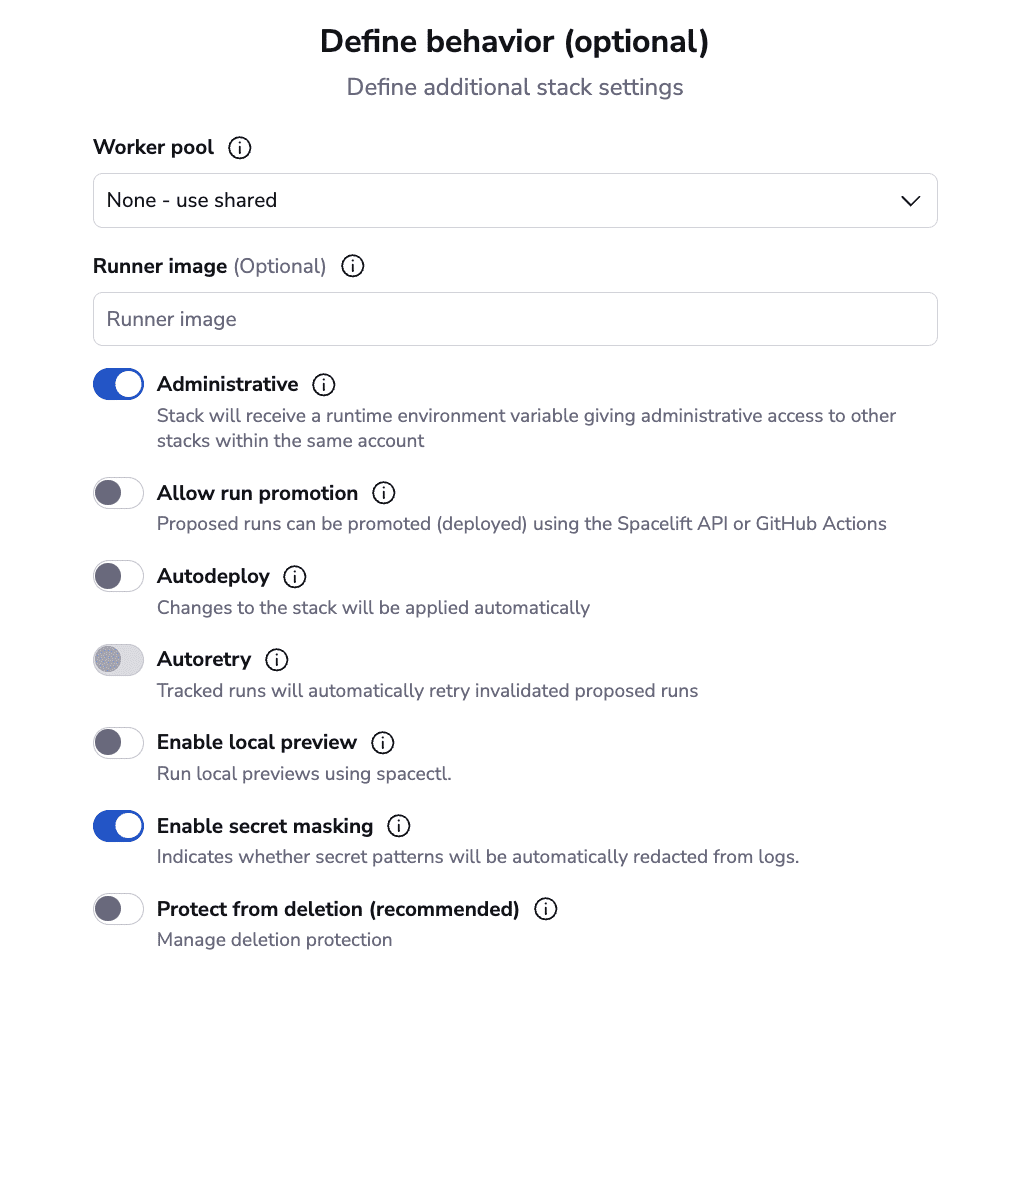
Give the manager stack the administrative permissions it needs to create Spacelift entities. In the current docs, this is done by attaching a Space admin role to the stack. Accept all other defaults to create the stack.
After the stack is created, trigger a run:
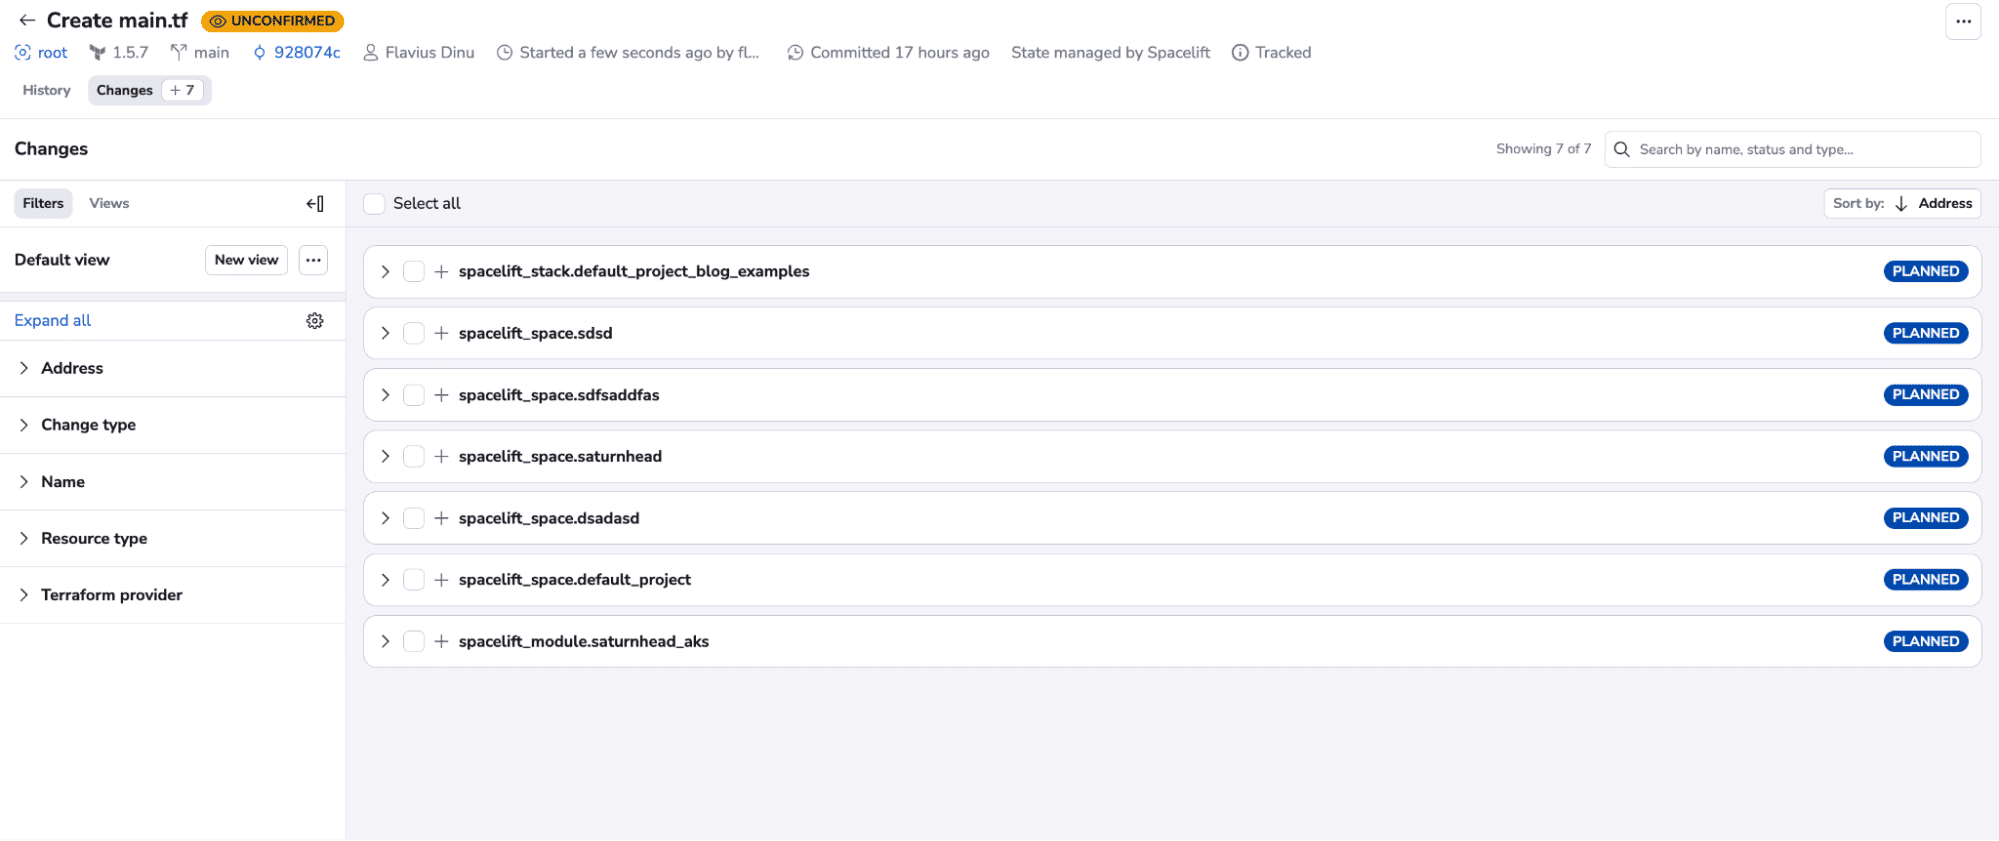
After reaching the unconfirmed state, you will see all the resources that it will create. In my case, there are five spaces, one stack, and one module.
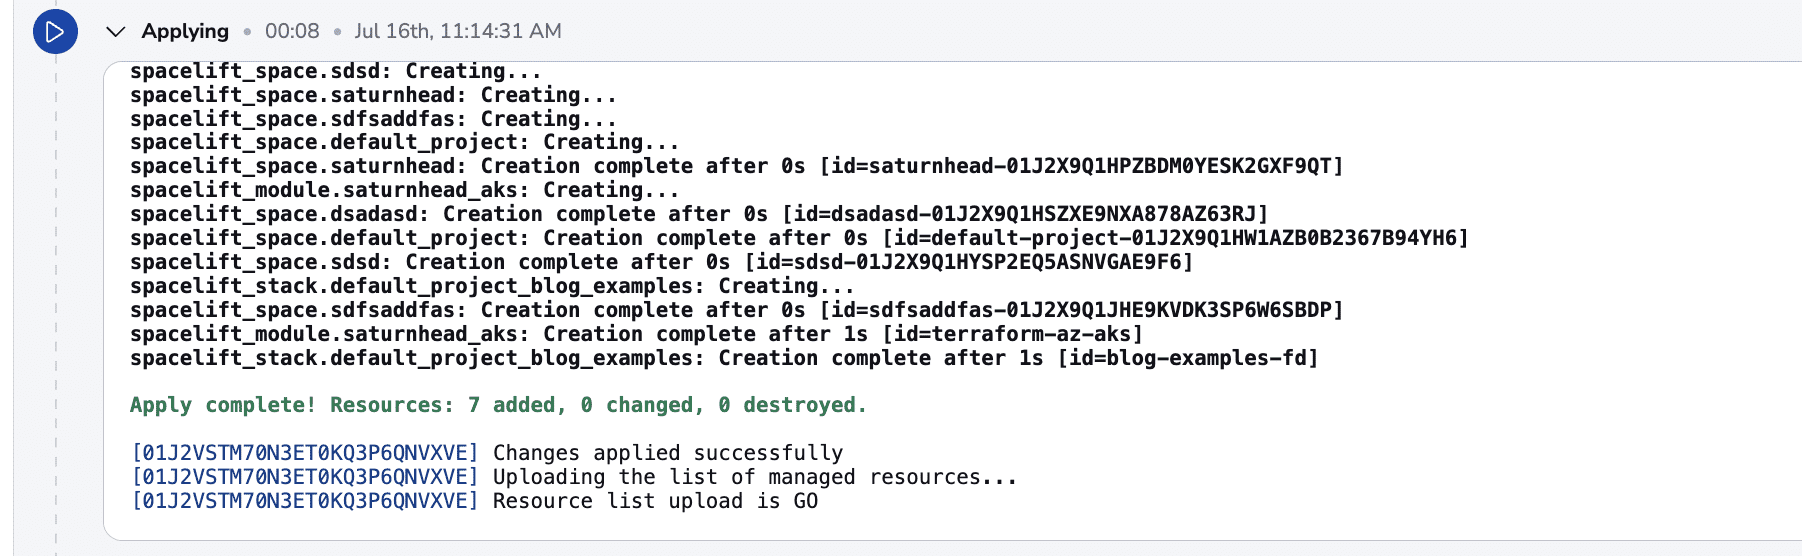
You can easily see that all resources have been migrated successfully.
10. Import the state
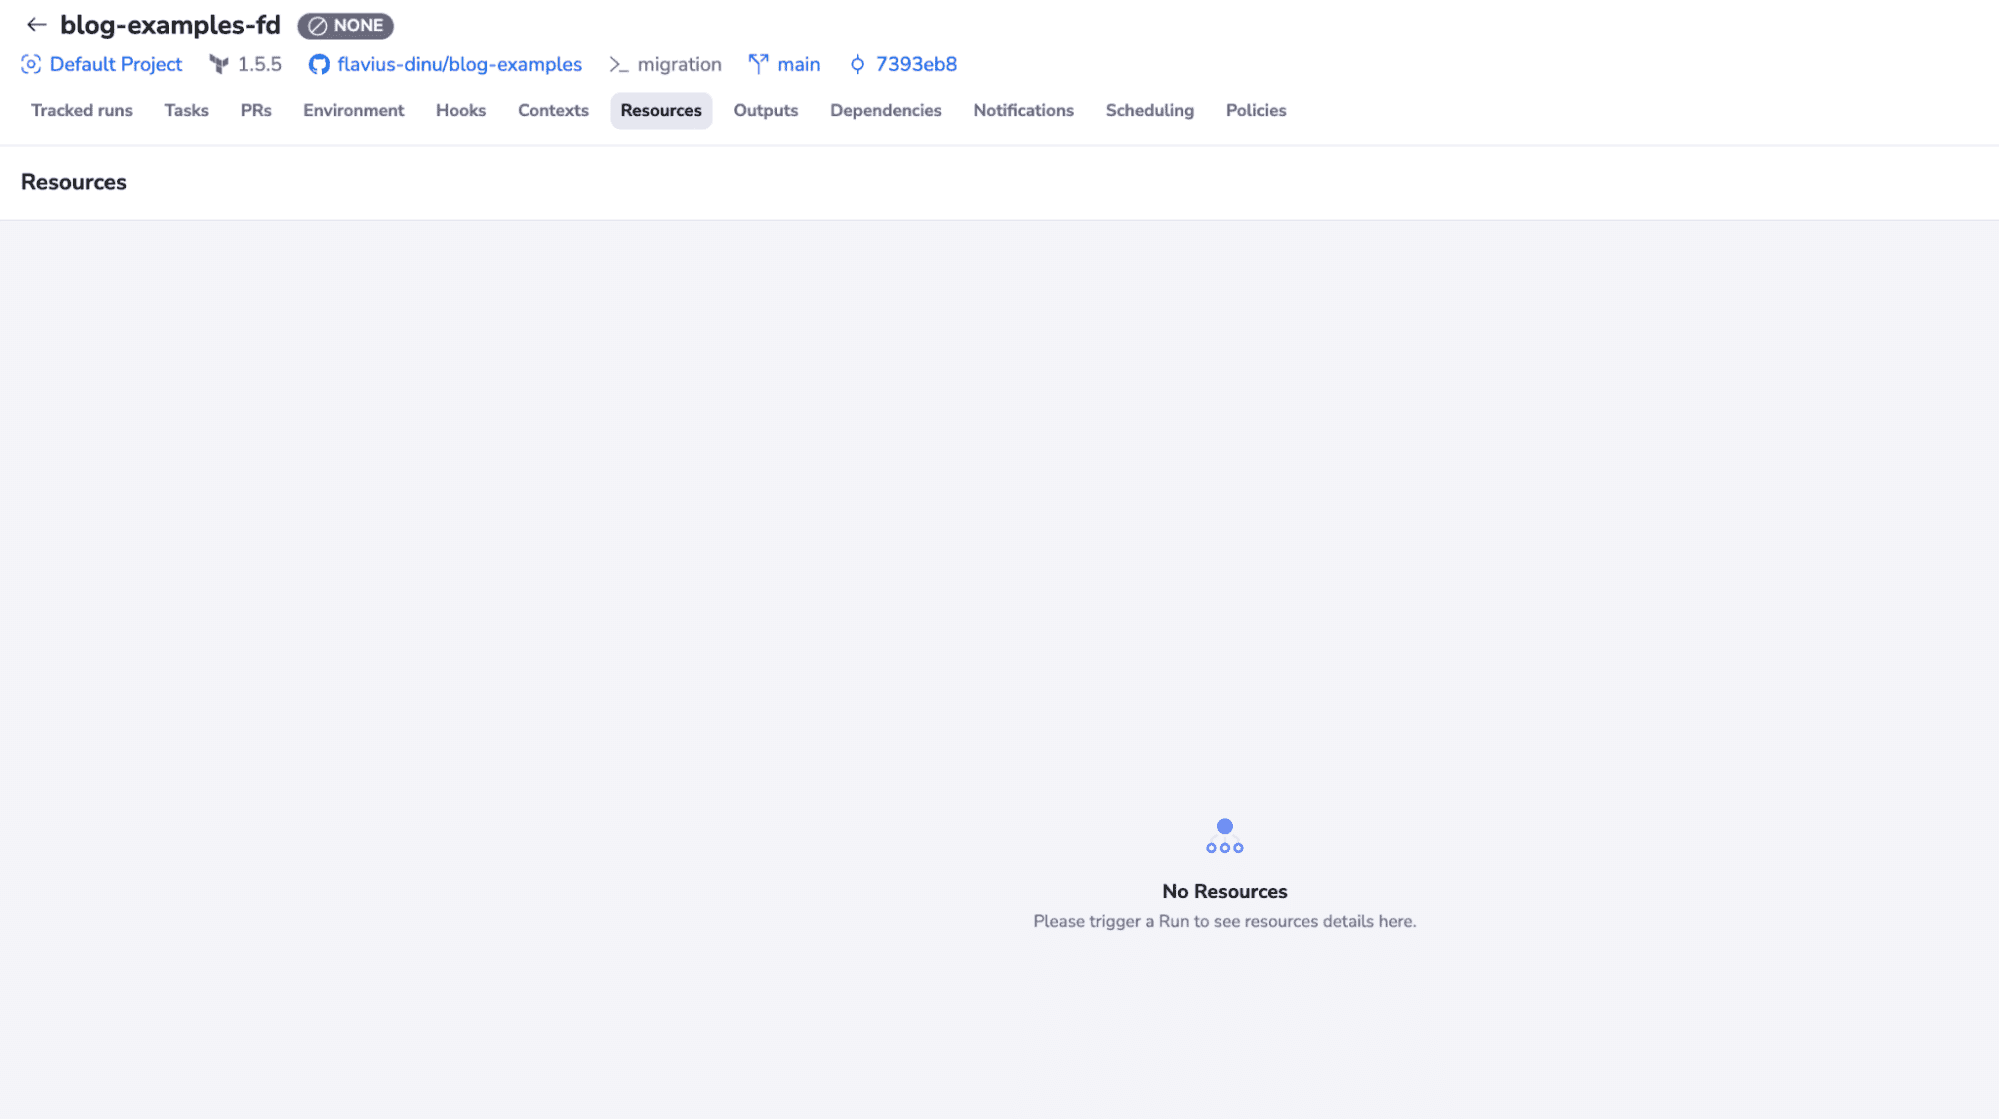
If we go to our stack and select resources, we will see that there are no resources in the state:
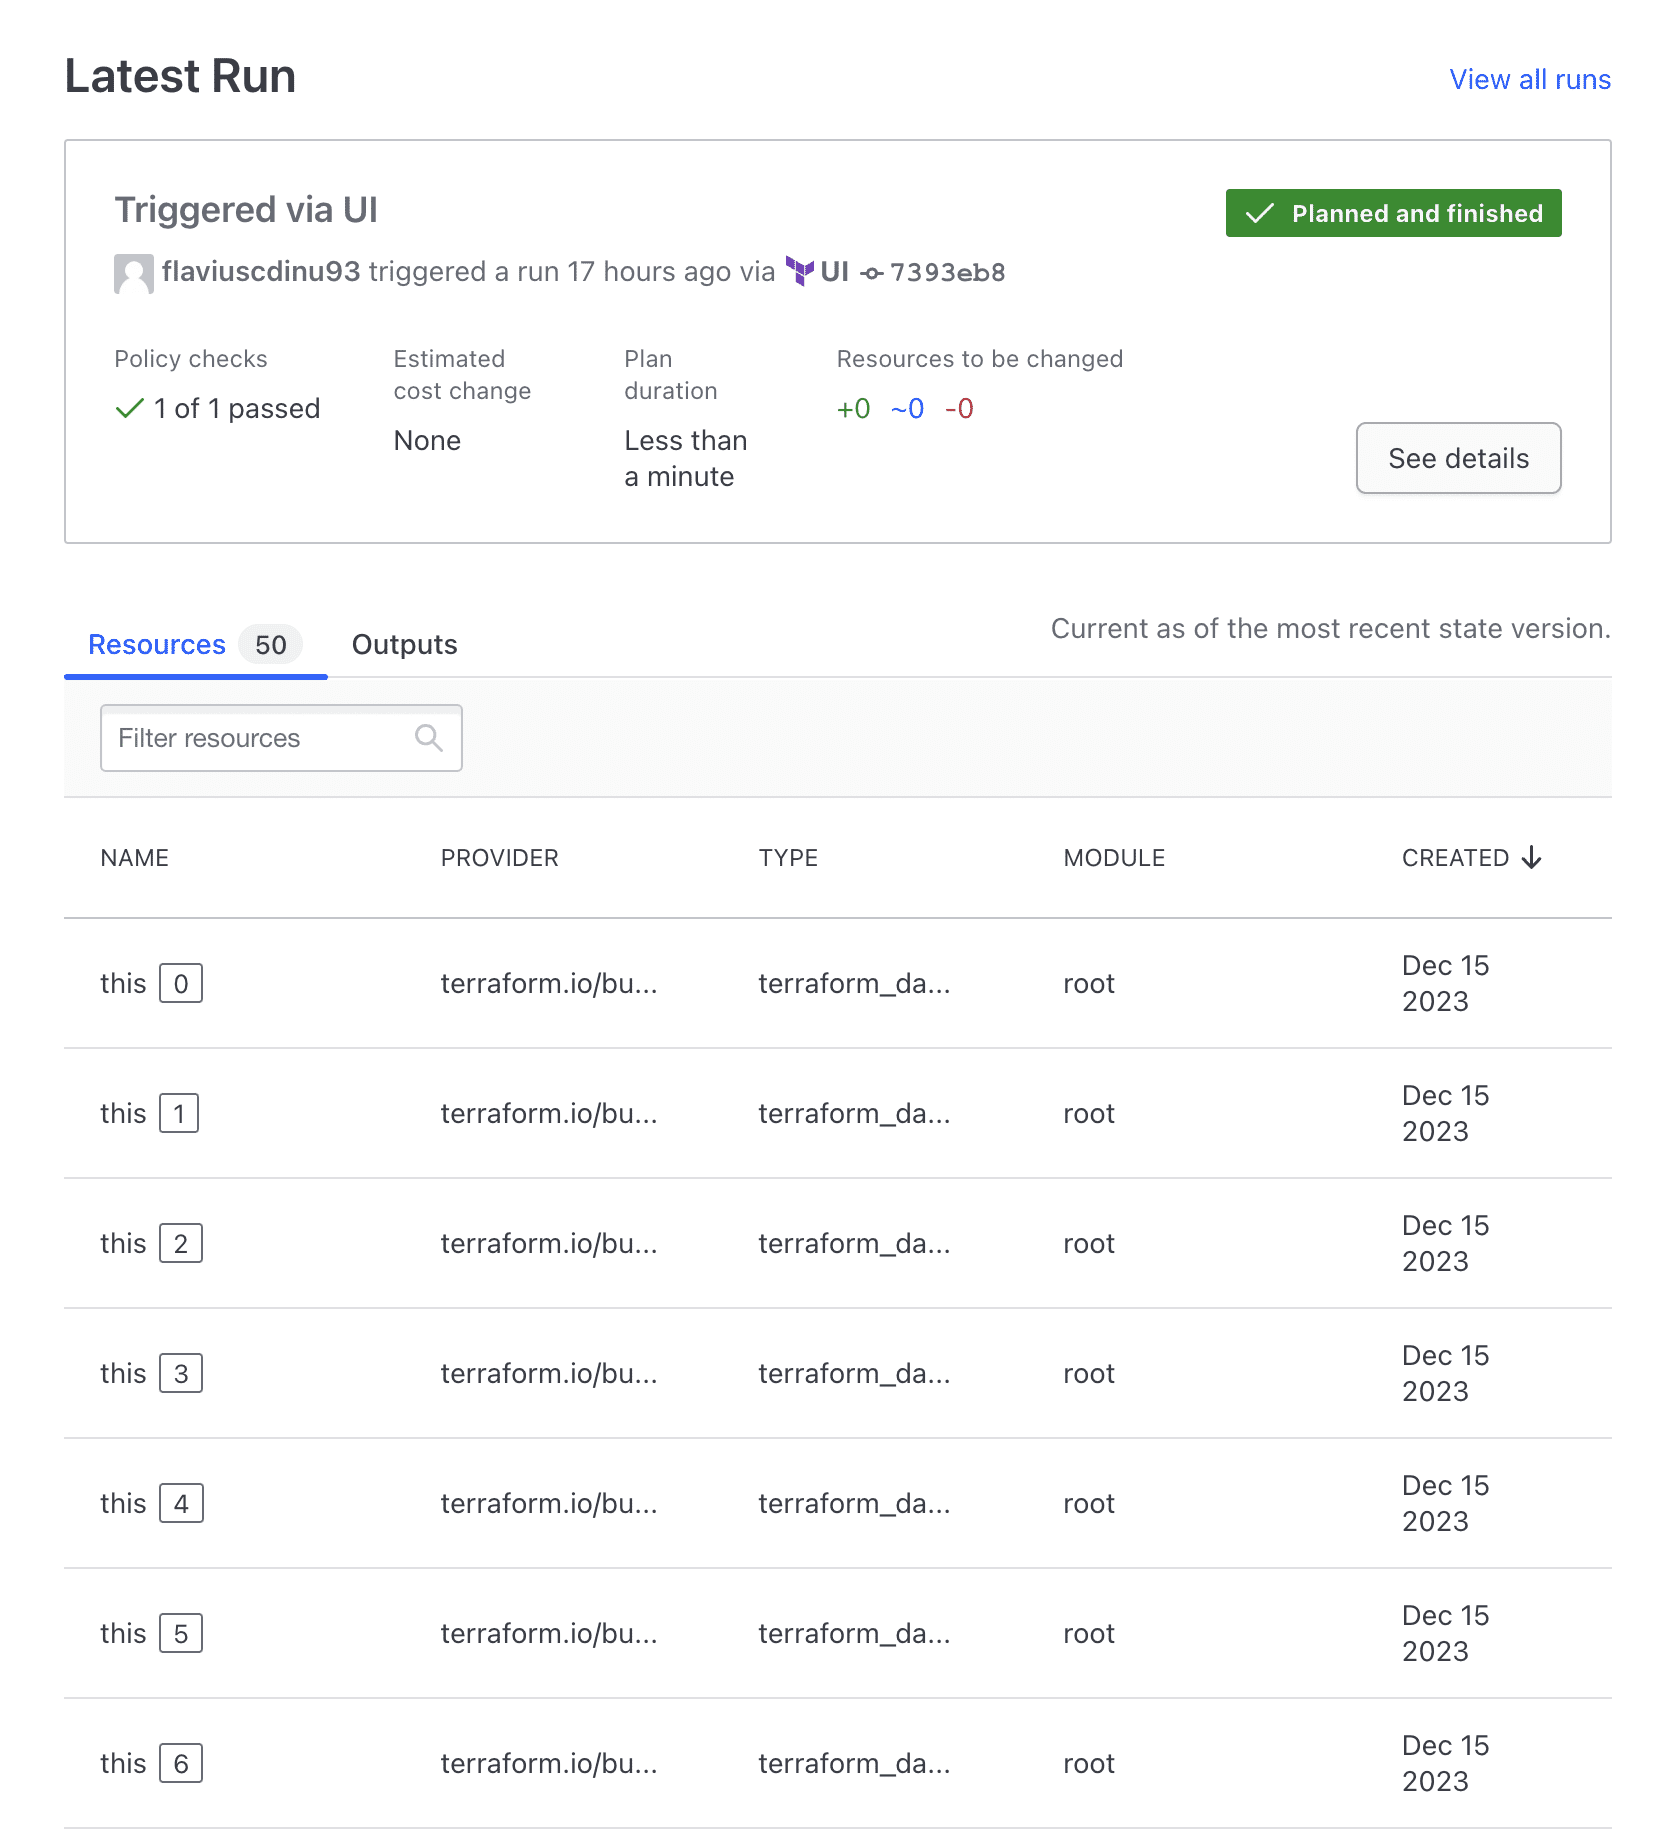
In TFC, however, we have a couple of resources created:
To bring that state into Spacelift, run:
spacemk import-state-files-to-spaceliftDespite the command name, this does not upload the state files from your local tmp directory. It connects directly to TFC/TFE, creates a context in Spacelift with your TFC/TFE credentials, attaches that context to the newly created stacks, and triggers a task that imports the state from TFC.
Because of this, your config.yml must contain valid credentials for both TFC/TFE and Spacelift at this step.
Note: if you have changed the name of the stack in your Terraform configuration, you will also need to modify the data.json file to reflect the stack name when importing the state.
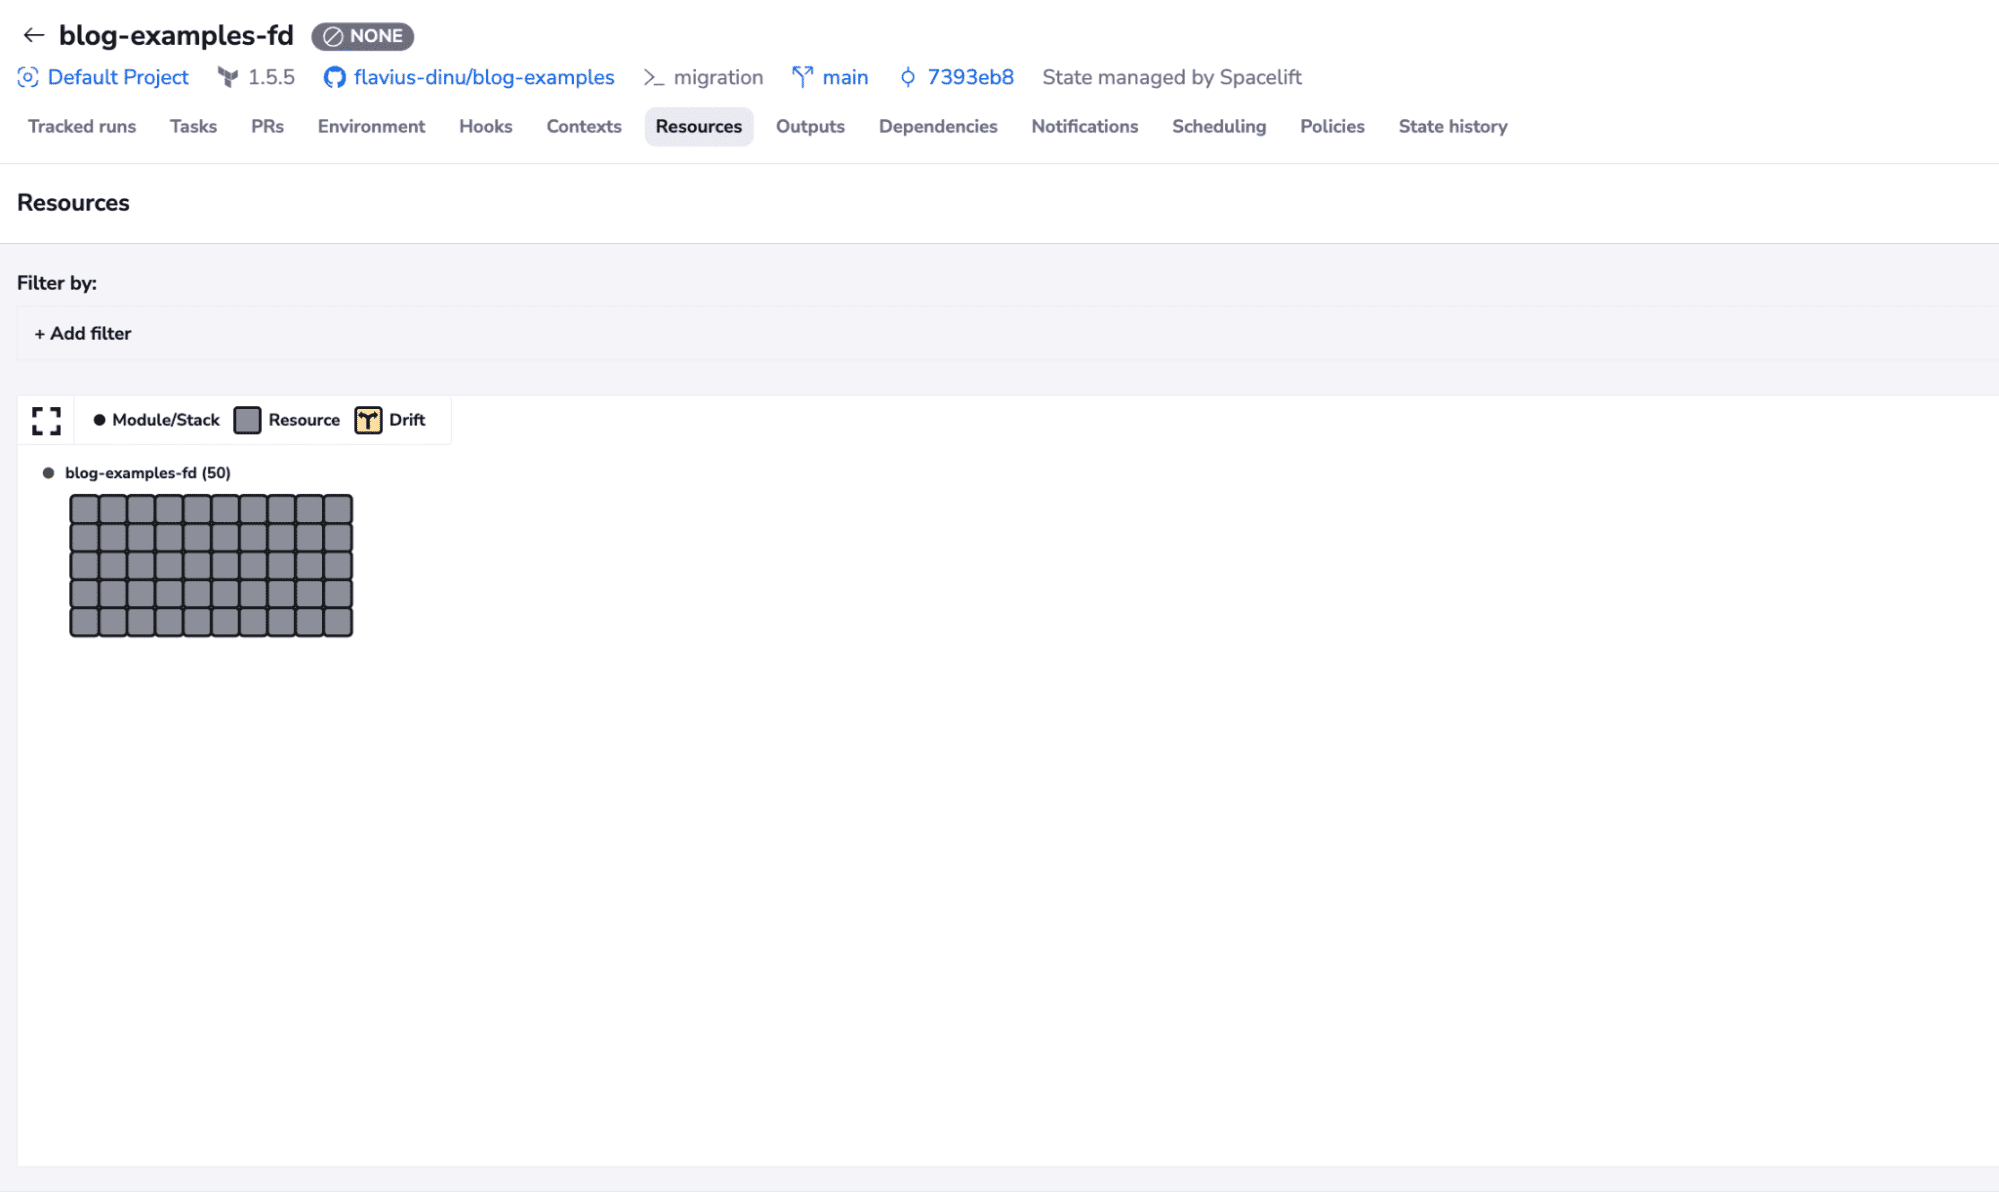
After running the command, if we go back to our stack, we can see the state has been migrated successfully:
11. [Optional] Set sensitive variable values
The generate command does not write sensitive variable values into the Terraform code or state, so sensitive variables come across empty. Once your stacks exist, fill in the spacelift section of config.yml and run:
spacemk set-sensitive-env-varsSkip this step if you have no sensitive variables.
12. [Optional] Set Terraform variables with invalid names
Spacelift passes Terraform variables as TF_VAR_ environment variables, but Terraform allows characters in variable names (such as -) that are not valid in environment variable names. The Migration Kit stores these in a tf_vars_with_invalid_name.auto.tfvars file.
To set their values, run:
spacemk set-tf-vars-with-invalid-nameSkip this step if none of your Terraform variables have invalid names.
13. [Optional] Create module versions
If you migrated modules, re-create their existing versions. Fill in the github section of config.yml and run:
spacemk create-module-versionsSkip this step if you have no modules.
14. [Optional] Customization
While the Migration Kit does a great job when it comes to migrating to Spacelift, we understand that every migration is different and you may need to customize the functionality of the automation. To do that, you can easily implement your own commands and even your own exporter. More details about this can be found here.
Terraform Cloud to Spacelift concept mapping
Most of what you have in Terraform Cloud has a direct equivalent in Spacelift, and the Migration Kit maps the bulk of it for you. If you are mapping things by hand, or you just want to know where each piece lands, use the table below.
| Terraform Cloud (HCP Terraform) | Spacelift | Notes |
| Organization | Account (with a root Space) | Top-level container. Spacelift nests Spaces beneath it. |
| Project | Space | Spaces form a tree and inherit resources from parent to child, unlike flat TFC projects. |
| Workspace | Stack | A stack ties together a repo, branch, directory, and tool, and can run Terraform, OpenTofu, Pulumi, CloudFormation, Kubernetes, or Ansible. |
| Workspace variables | Stack environment | Set as environment variables, TF_VAR_ variables, or mounted files on the stack. |
| Variable sets | Contexts | Reusable collections of variables and files you attach to many stacks. |
| Sentinel or OPA policy sets | OPA policies | Written in Rego and applied across the lifecycle: login, access, push, plan, approval, and notifications. |
| Run triggers | Stack dependencies | Create dependencies between stacks and share outputs between them, which makes environment promotion straightforward. |
| Run tasks | Workflow hooks | The closest equivalent. Control what runs before and after each phase, and bring your own runner image. |
| No-code provisioning | Blueprints and Templates | Self-service forms that provision governed infrastructure without writing Terraform. |
| Private module registry | Module registry | Publish and version modules for your teams. |
| Agents and agent pools | Worker pools | Use Spacelift-managed workers, or self-hosted workers in your own account, including on-premises or air-gapped setups. |
| Teams and permissions | Spaces with RBAC roles | Combine Spaces with role bindings, plus login and access policies, to control who can do what. |
| Remote state | Managed state | Spacelift stores and manages the Terraform state for each stack. |
A few of these are not one-to-one. Run tasks become workflow hooks, which give you more control over each phase than run tasks do. And sensitive variable values cannot be read back out of Terraform Cloud, so you set those in Spacelift after the stacks exist (see step 11).
Key points
This automation makes it easier to migrate from one vendor to Spacelift by getting the existing configuration and state and mapping it to Spacelift resources. We know that Terraform Cloud’s new pricing model is causing problems, so we really wanted to build something that will make it quicker for you to migrate to a product that offers more for less.
To learn more about the advantages of migrating from Terraform Cloud to Spacelift, check out our Terraform Cloud alternative page.
This is not a one-size-fits-all solution. You will probably need to tweak it to adapt it to your requirements. Nonetheless, it saves considerable time and makes the overall process leaner.
The best Terraform Cloud alternative
Spacelift is a Terraform Cloud alternative that works with Terraform, OpenTofu, Terragrunt, and many other infrastructure-as-code frameworks. It offers predictable pricing and supports self-hosted on-premises workers, workflow customization, drift detection, and much more.
Frequently asked questions
How do you migrate from Terraform Cloud (HCP Terraform) to Spacelift?
Use the Spacelift Migration Kit (spacemk) to (1) export Terraform Cloud configuration, (2) generate equivalent Terraform/OpenTofu config for Spacelift, and (3) import the Terraform state into Spacelift.
What is the Spacelift Migration Kit and what does it do?
Spacelift Migration Kit is a utility (spacemk) that automates migration by exporting your existing setup and mapping it into Spacelift resources via generated Terraform/OpenTofu code.
What IaC tools can Spacelift run after migration?
Spacelift supports Terraform, OpenTofu, Terragrunt, and more (plus policy-as-code with OPA), so you can consolidate workflows rather than splitting across multiple products.
Does migrating from Terraform Cloud move my state?
Yes. The spacemk import-state-files-to-spacelift command connects to TFC/TFE, creates a context with your credentials, and triggers a task that imports the state into your new Spacelift stacks.
Will my workspaces and variables transfer to Spacelift?
Workspaces are mapped to Spacelift stacks during generation. Non-sensitive variables come across automatically; sensitive variables and variables with invalid names are set in separate, optional steps.
Is my Terraform Cloud setup affected during the migration?
No. The Migration Kit leaves your source setup untouched. You can delete it once you have verified the migration was successful.
