
TL;DR
A Terraform Cloud (HCP Terraform) workspace is the core unit for running Terraform remotely. It scopes remote state, variables and credentials, and a history of runs and state versions. A workspace can be VCS-backed (linked to a repo/branch and working directory) or CLI/API-driven (configuration uploaded per run).
A Spacelift stack is a similar unit of work, combining source code, state, and configuration, but designed to orchestrate Terraform/OpenTofu and other IaC tools with customizable workflows, policy guardrails, and centralized visibility and governance across deployments.
Terraform Automation and COllaboration Software (TACOS) are becoming an industry standard for managing Terraform codebases at scale. Two of the most popular tools in this space are Spacelift and Terraform Cloud/Enterprise.
Note: Terraform Cloud is now integrated into HashiCorp Cloud Platform (HCP) as HCP Terraform.
In this post, we will compare how their core building blocks work and what you can achieve with them.
What is a Terraform Cloud workspace?
A Terraform Cloud (TFC) Workspace is a combination of the source code, a git branch, the tool you are using, and a specified path. They include the Terraform configuration, variable values, state, and credentials, which are stored in different ways compared to local Terraform.
For instance, configurations are stored in version control repositories or uploaded via API/CLI, and variable values and credentials, and secrets are stored within the workspace itself. Furthermore, Terraform Cloud retains a history of state versions and runs activities for each workspace, providing a comprehensive record of infrastructure management over time.
Terraform Cloud vs. Terraform CLI workspaces
If you are using Terraform from the CLI, you are probably familiar with the solution they propose for reusing a Terraform configuration — workspaces. In contrast with Terraform Cloud/Enterprise workspaces, Terraform CLI workspaces manage separate state instances within a single directory, appropriate for deploying similar infrastructures with minor variations but not suitable for complex deployments requiring distinct access controls.
While Terraform Cloud workspaces facilitate executing runs, storing, and versioning state files in a shared, cloud-based environment, CLI workspaces offer a simpler approach for managing different states of infrastructure in less complex scenarios.
Terraform Cloud projects vs. workspaces
Projects in Terraform Cloud/Enterprise are a higher-level organizational tool, used to group and manage related workspaces. They provide an additional layer of structure, helping larger companies organize their workspaces according to specific criteria, such as department, application, or environment type.
Essentially, while workspaces are used for managing specific collections of infrastructure resources, projects are used to organize and manage these workspaces themselves, allowing for more streamlined operations and governance across larger and more complex Terraform implementations.
Working with Terraform Cloud workspaces - example
Let’s see how to create and delete Terraform Cloud/Enterprise workspaces.
How to create a Terraform Cloud Workspace
First, you will need to log in to Terraform Cloud/Enterprise. The next step is to go to Project & Workspaces and select New. You will be redirected to the following screen:
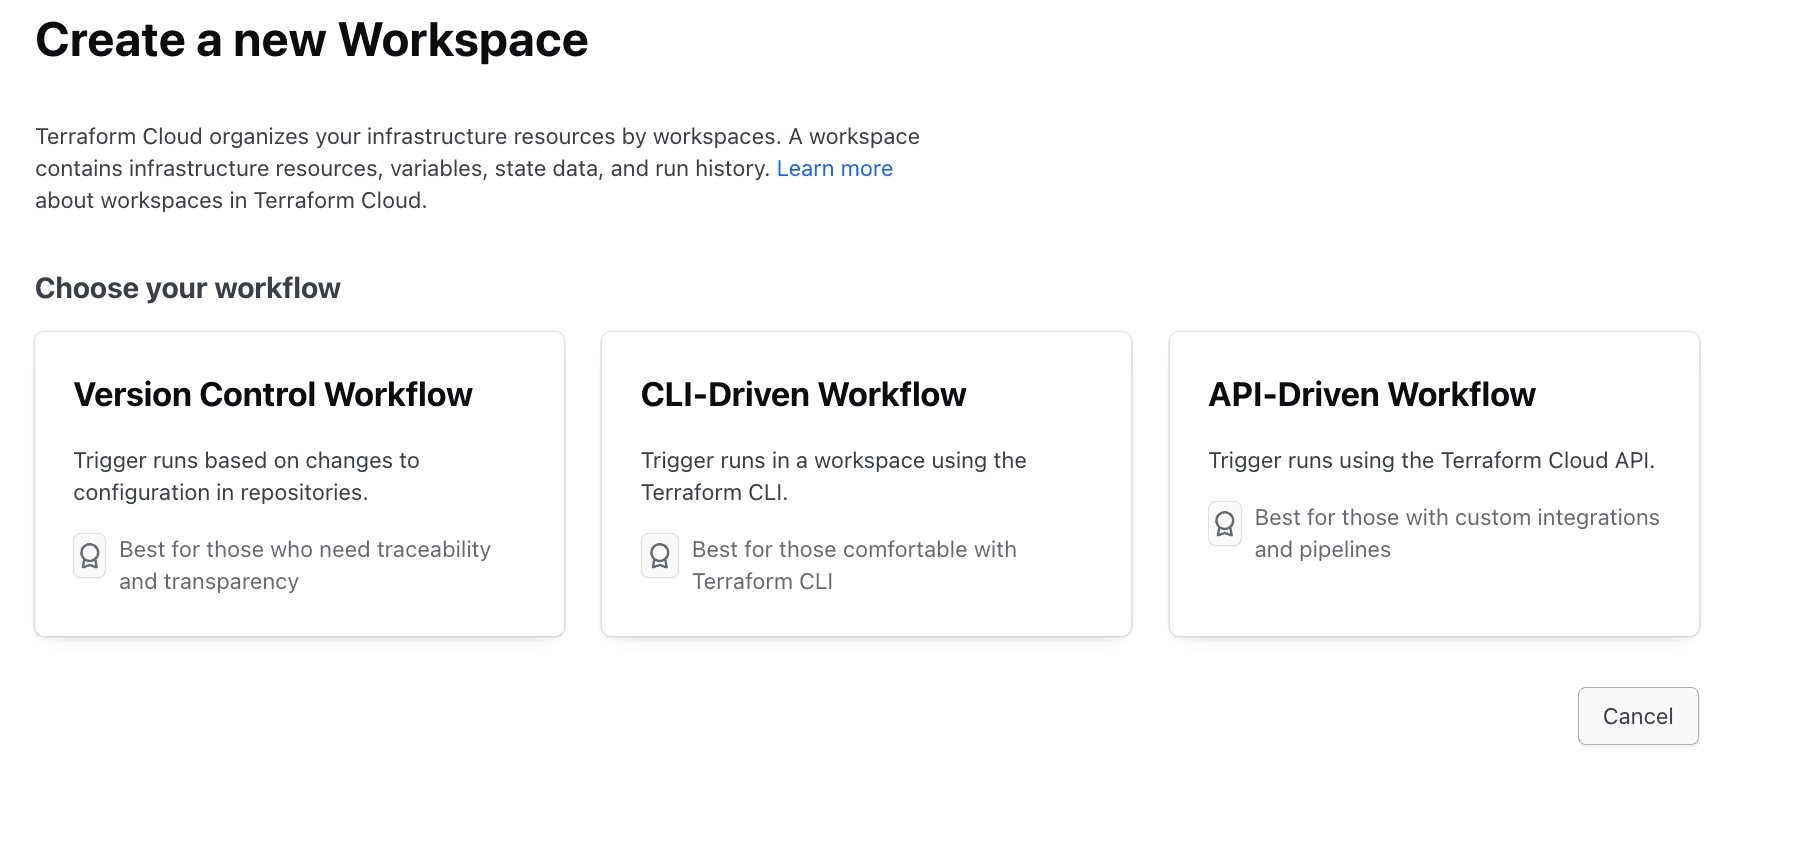
Here, you will need to select a workflow type, but for most use cases, you will select the Version Control Workflow. Selecting this takes you to the next screen:

Here, you need to select your version control provider. You can choose any of the providers you have configured for your account. In my case, I just connected my GitHub account, so I’ll select it. Terraform Cloud/Enterprise also supports Gitlab, BitBucket, and Azure DevOps.
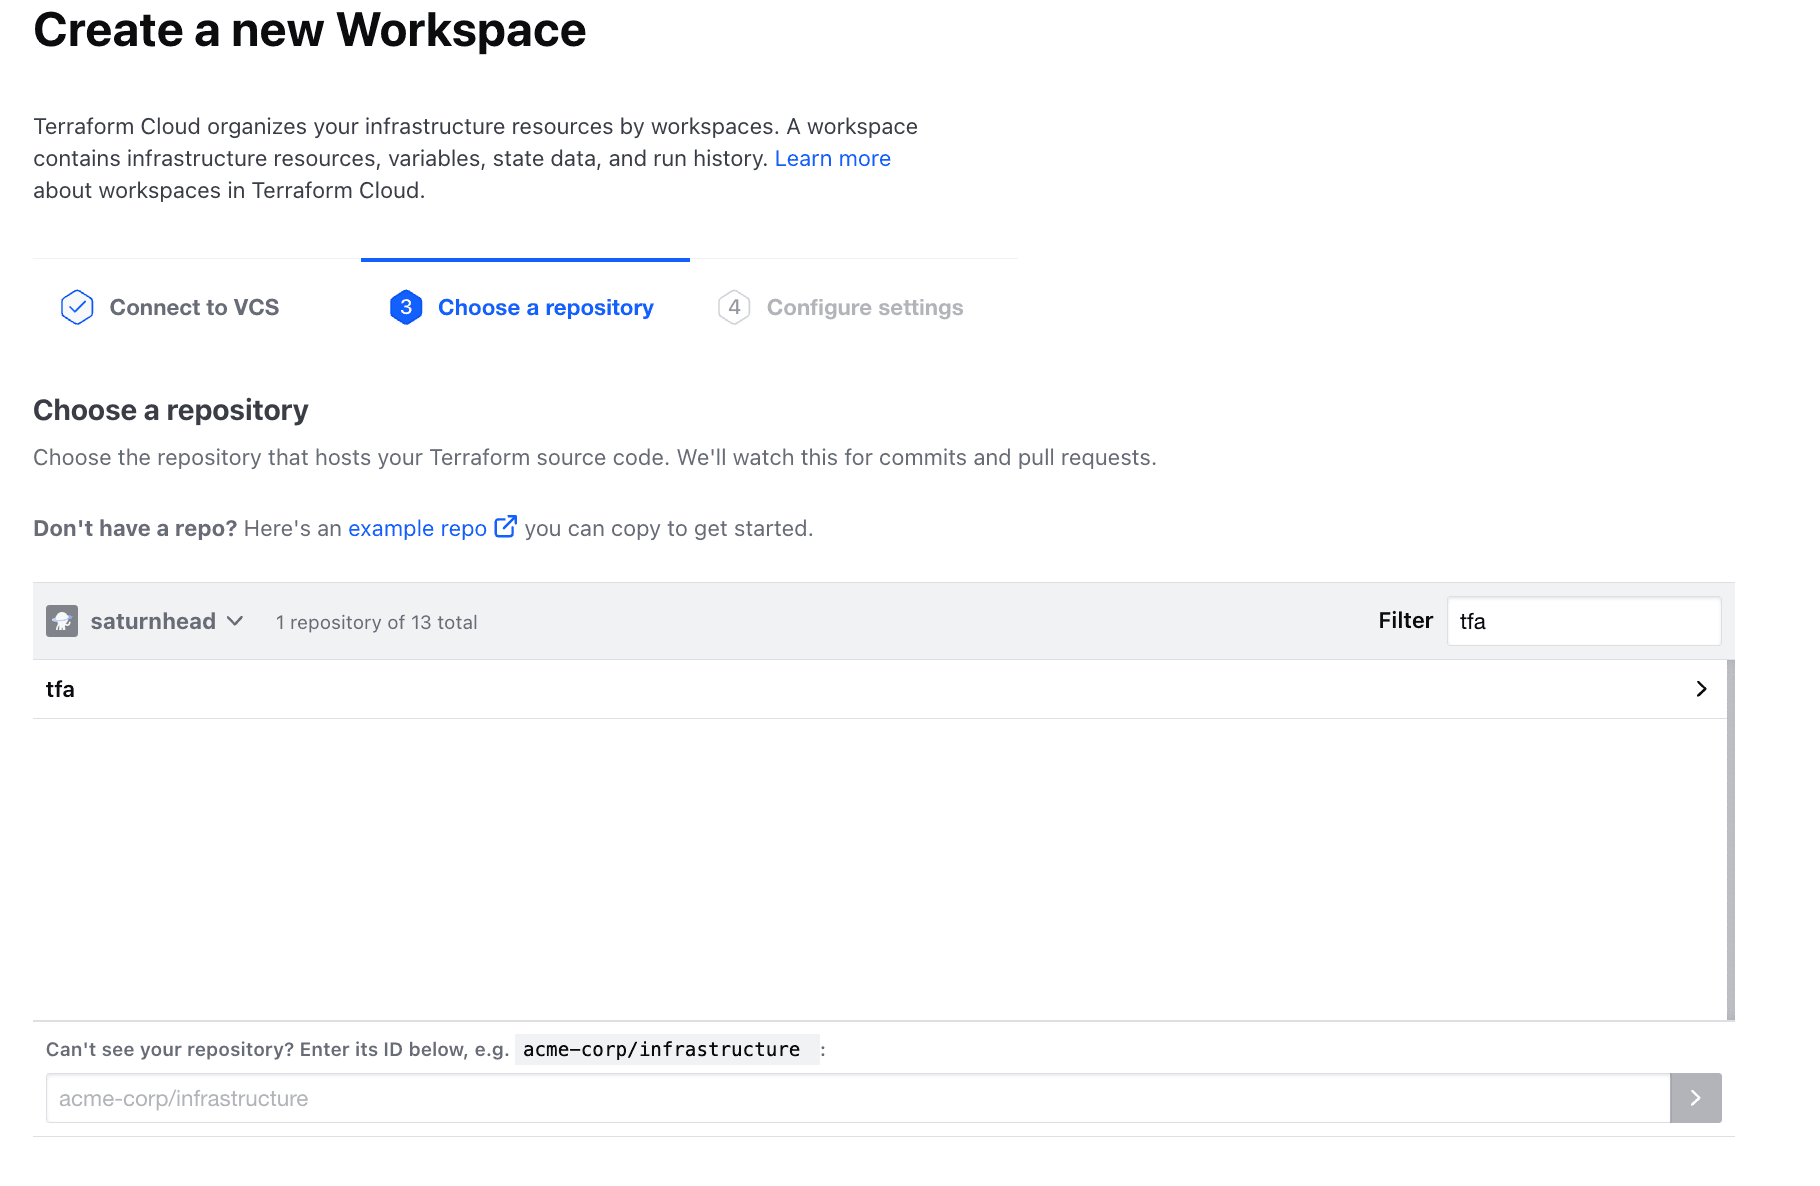
In the next step, you will need to select a repository, and you can even filter based on name.
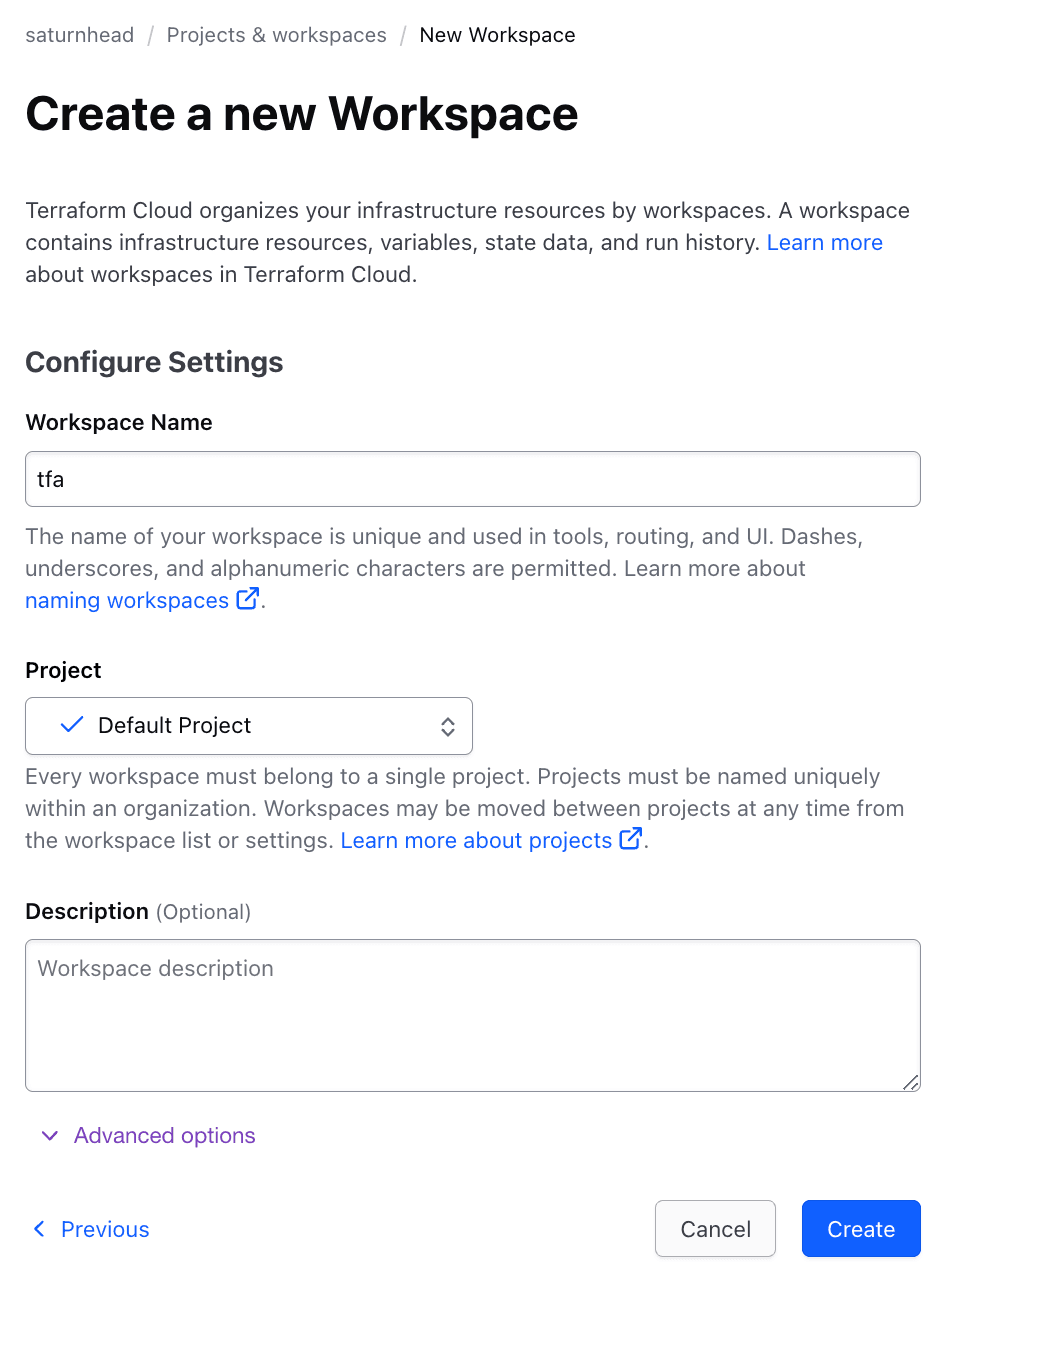
Next, you need to add a name for your workspace, a project in which you want it to reside, and an optional description. You can also configure some advanced options such as:
- Terraform Working Directory
- Auto-Apply Settings
- VCS Triggers
- Pull-Request basic behavior
- Include submodules or clone
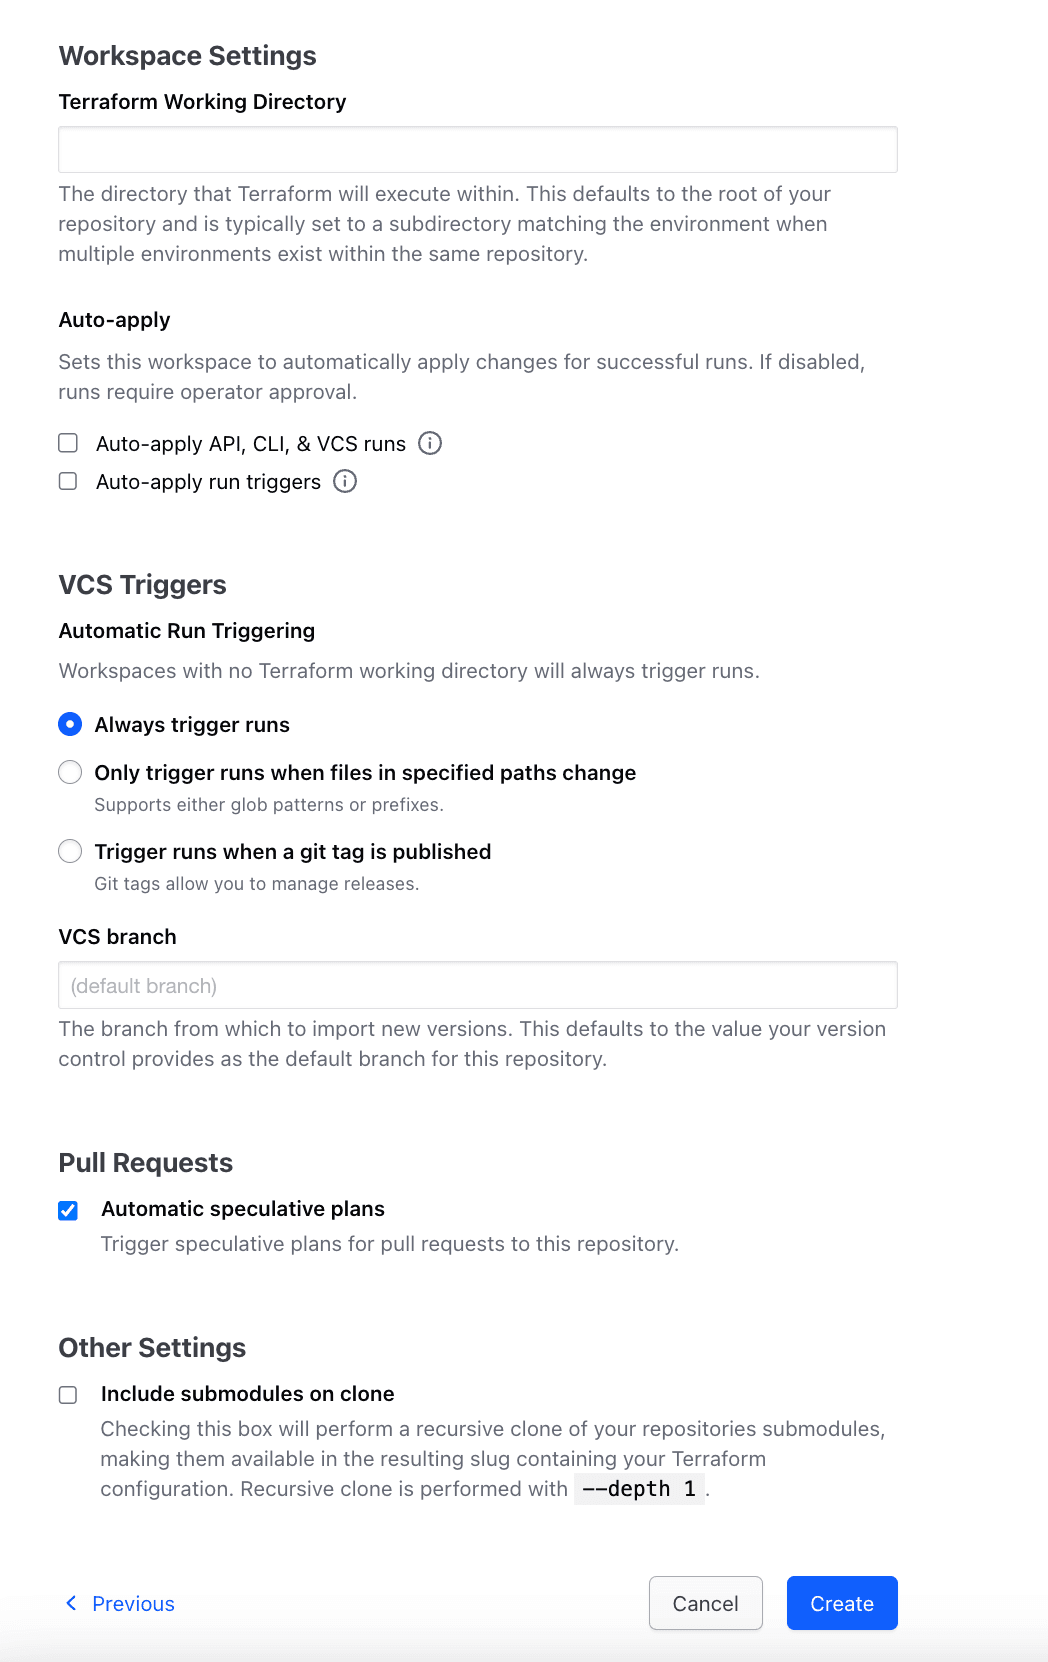
This is everything you can configure on Terraform Cloud/Enterprise before the workspace is created.
After you click on Create, your workspace becomes available.
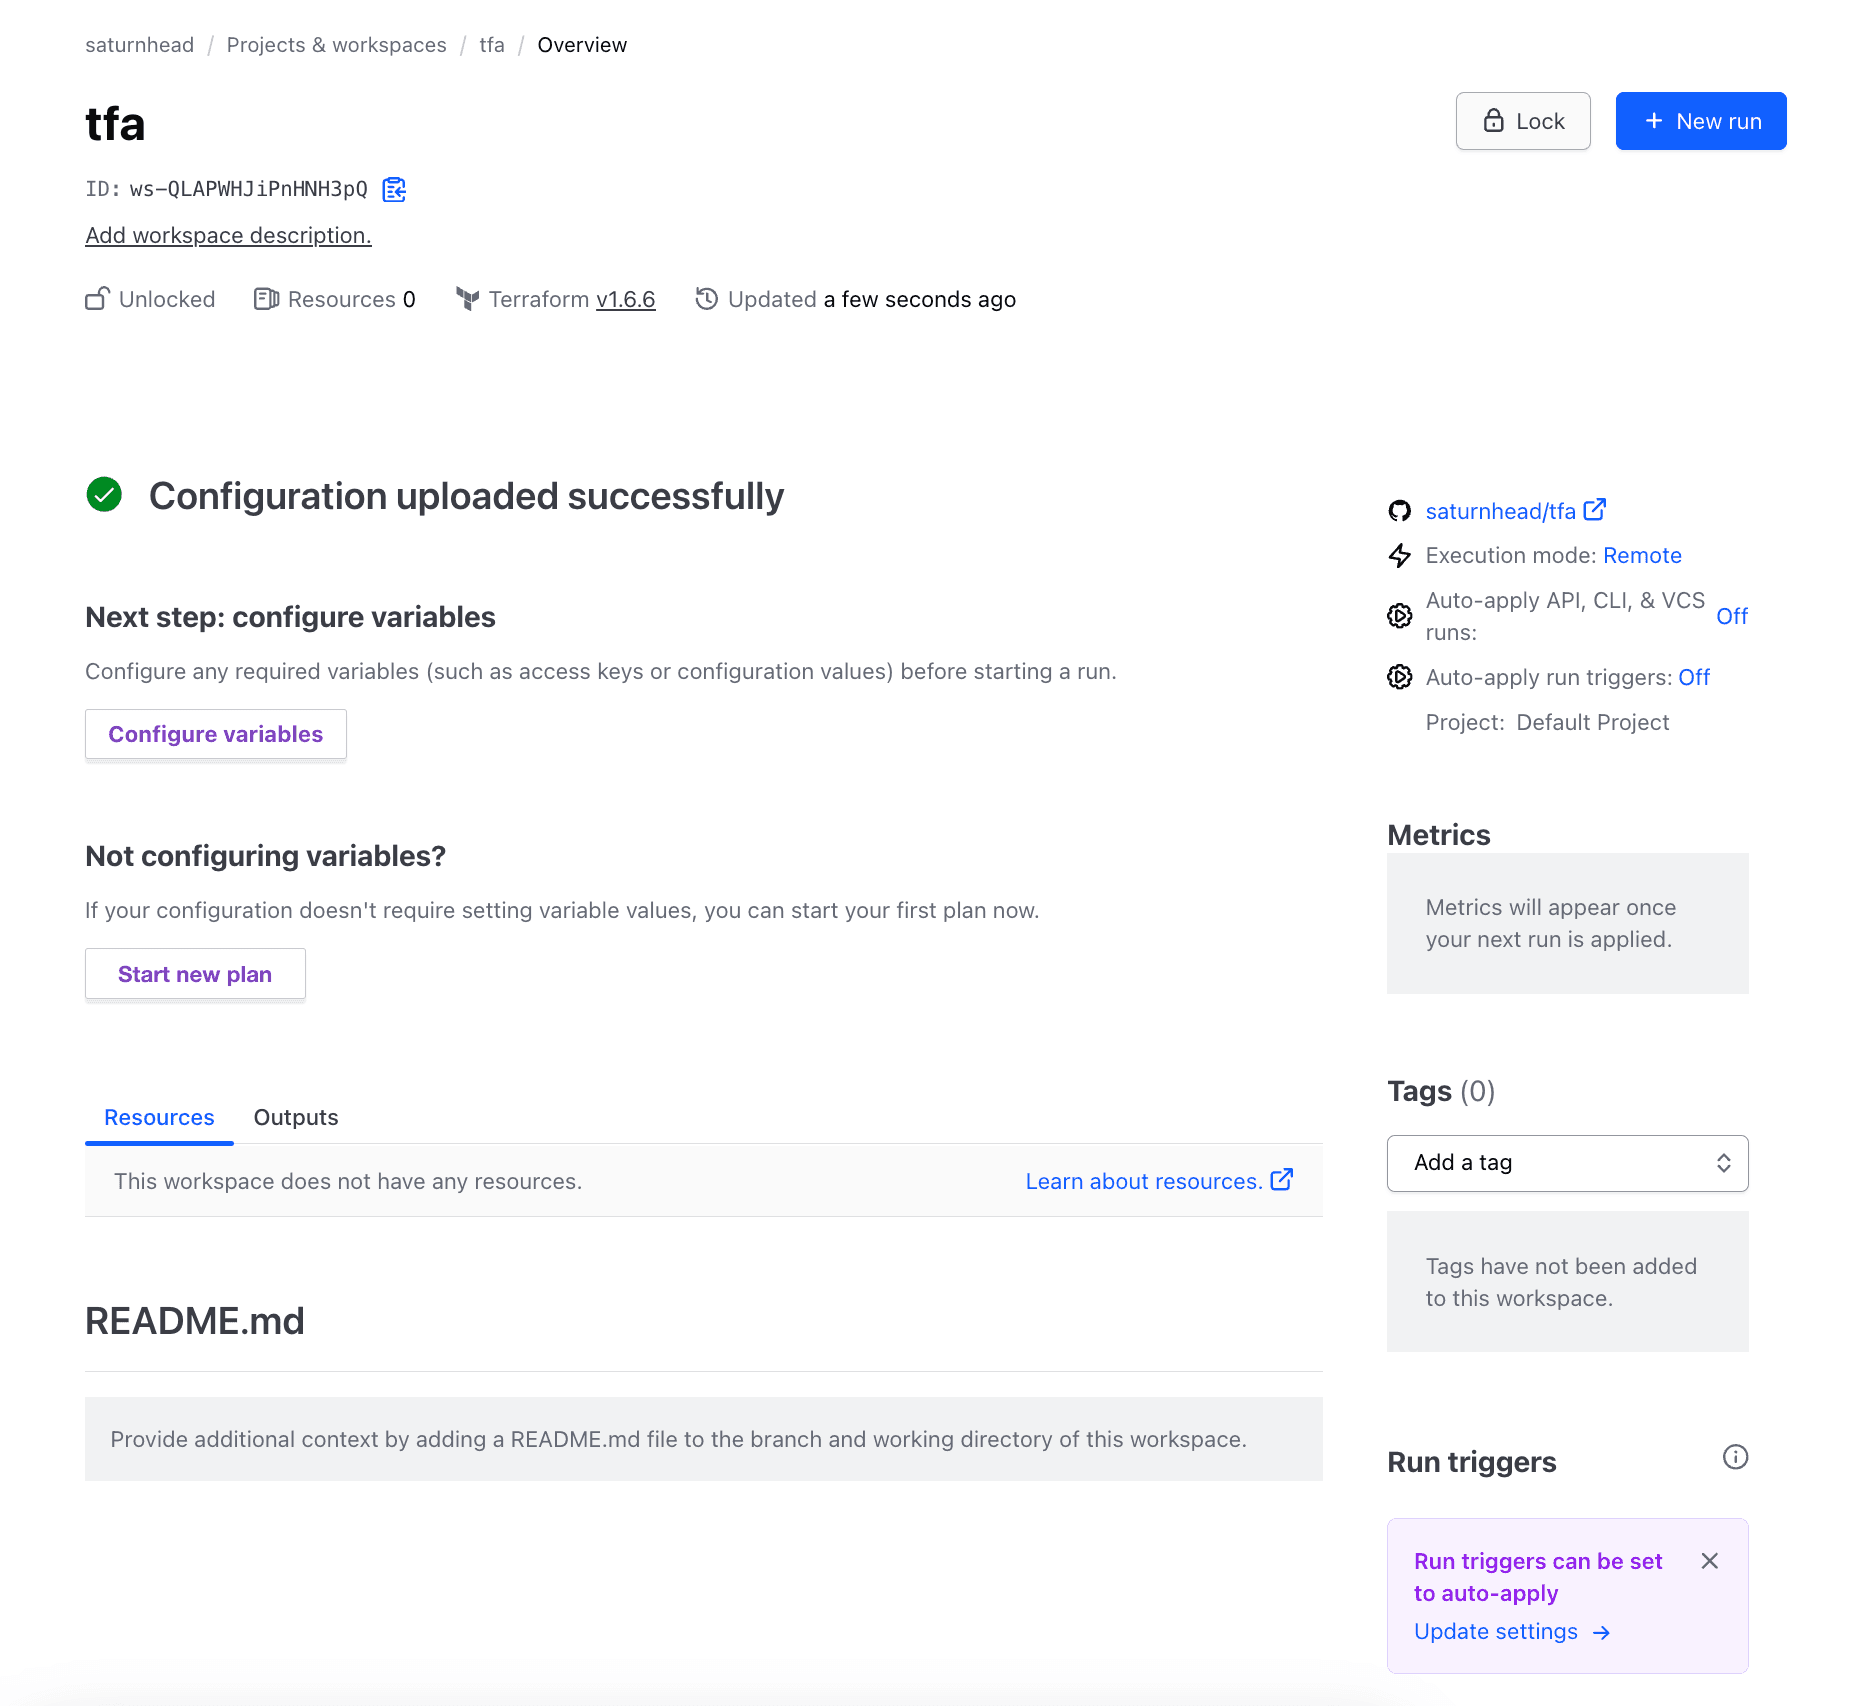
In the workspace itself, you can see all the details associated with your workspace, such as the number of resources it has deployed and what terraform version it is using. You can also unlock options such as starting a plan or configuring the environment variables.
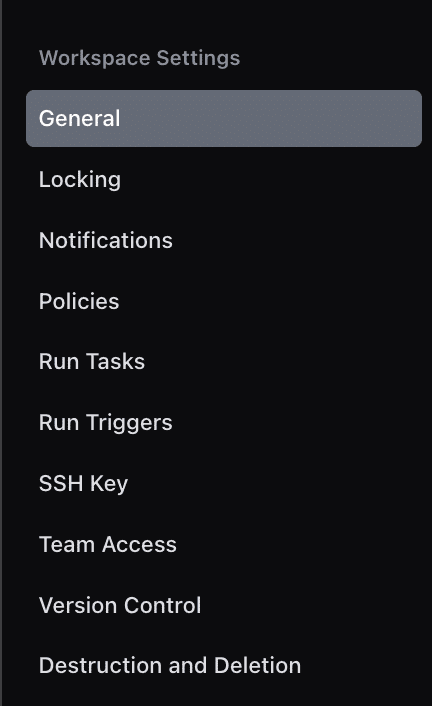
To add other things to your workspace, you will need to go to settings. In this tab, you can enable notifications, attach policies (remember you have only one policy set with a maximum of five policies in the free and standard tiers), integrate with supported third-party tools via run tasks (note that you can integrate with only one tool, and this can be attached to a maximum of ten workspaces in the free and standard tiers), view team access, and others:
How to delete a Terraform Cloud Workspace
To delete a Terraform Cloud/Enterprise workspace, navigate to the Terraform Cloud UI, select the workspace you wish to remove, and then use the workspace settings to select the Destruction and Deletion option.
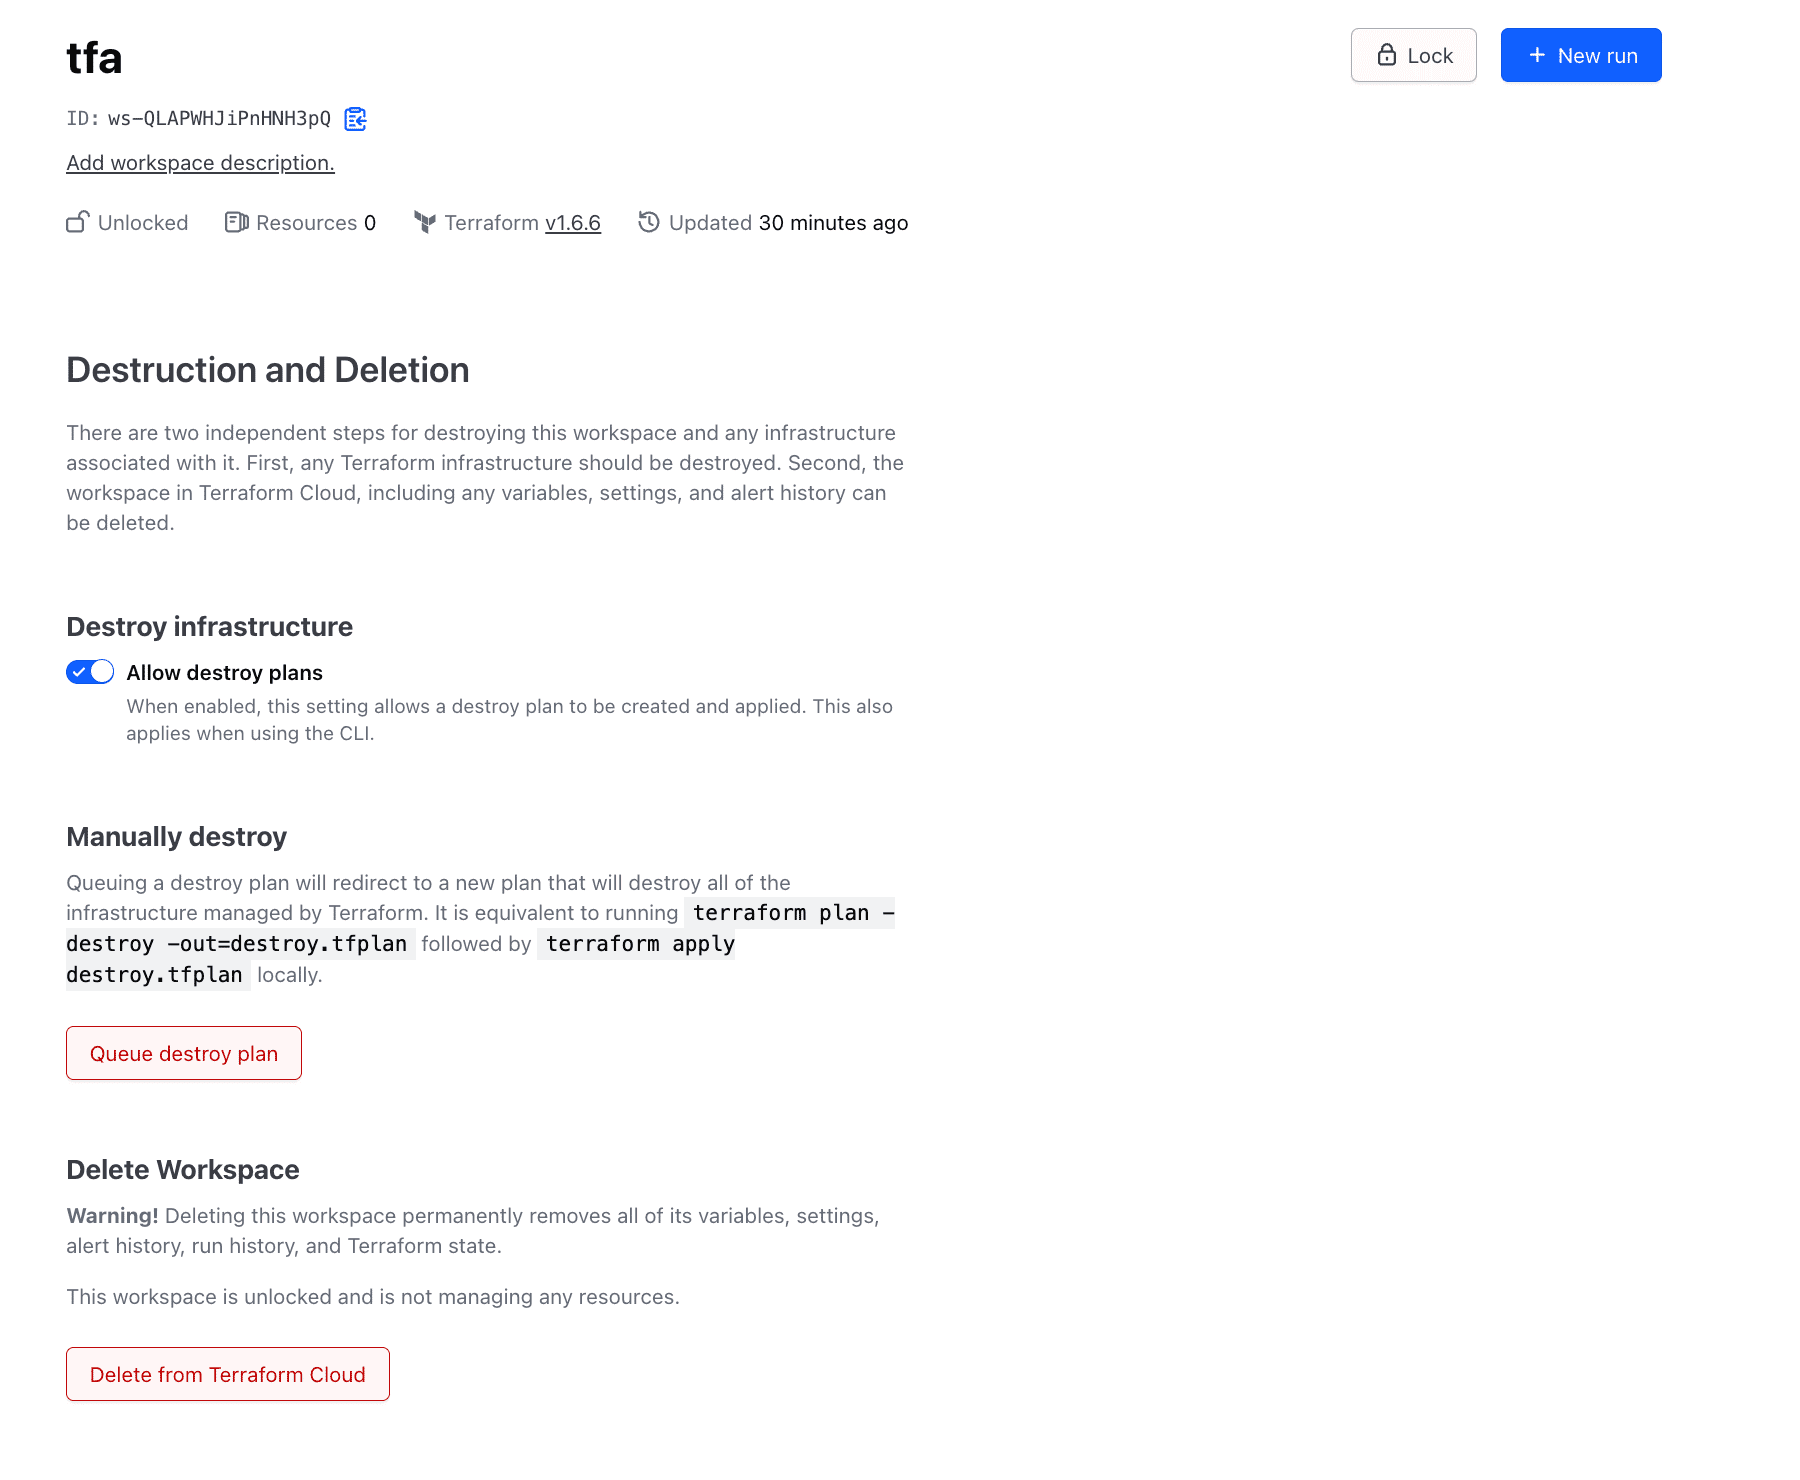
Deleting the workspace from Terraform Cloud/Enterprise won’t delete its associated resources, so you need to ensure that you first queue a destroy plan and apply it, and then delete the associated workspace.
In a nutshell, to delete a Terraform Cloud/Enterprise workspace you need to:
- Go to Settings → Destruction and Deletion
- Queue destroy plan and apply it
- Use the Delete from Terraform Cloud/Enterprise option
What is a Spacelift stack?
At a high level, Spacelift stacks are pretty similar to Terraform Cloud/Enterprise workspaces, in the sense that they also combine source code, a git branch, a tool you are using, and a directory. We will discuss some very important differences between them below.

Working with Spacelift stack - example
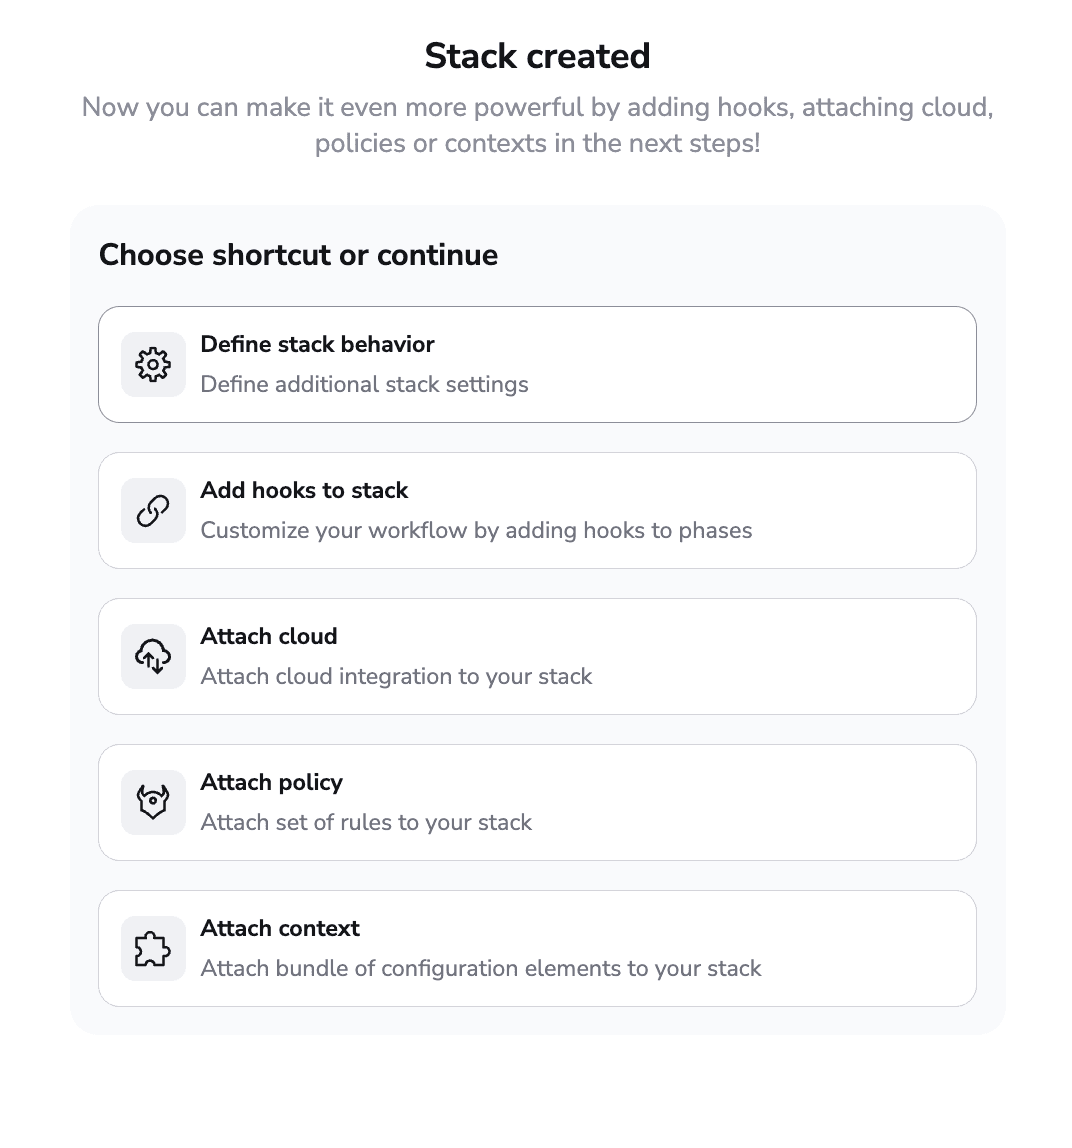
To create a Spacelift stack, go to Stacks and select Create Stack. On the left-hand side, you will see all the options that can be configured:
- Stack details
- Integrate VCS
- Choose vendor
- Define behavior (Optional)
- Add hooks (Optional)
- Attach cloud integrations (Optional)
- Attach policies (Optional)
- Attach context (Optional)
- Summary
First, define a name for your stack, the space in which it resides, and an optional description and optional labels. Labels’ basic capability is to help users filter their stacks, but they can do far more than this. By using special labels, you can view plans directly on pull requests, and you can even auto-attach policies and contexts.

After you have added all the details related to your stack, the next step is to select your VCS repository.
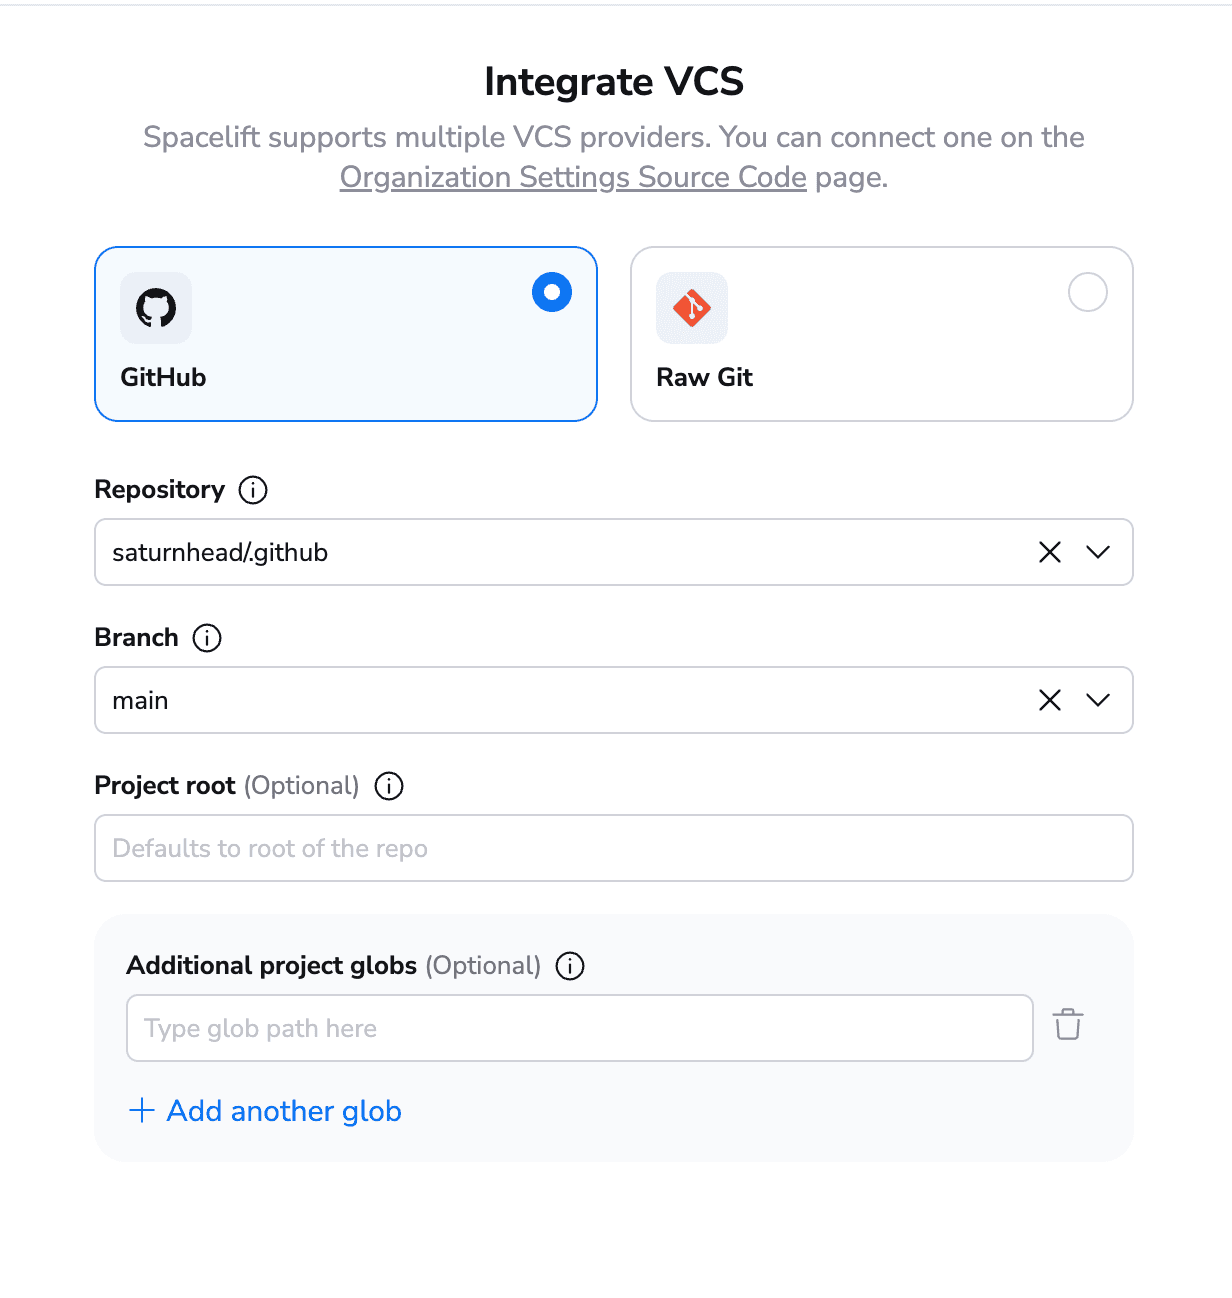
In my account, I have configured only GitHub, but Spacelift also supports Gitlab, BitBucket, and Azure DevOps, as well as using a Raw Git repository that you don’t even have to own. Apart from specifying the working directory, you also can select project globs, so whenever there is a change to another directory, this could trigger runs for you.
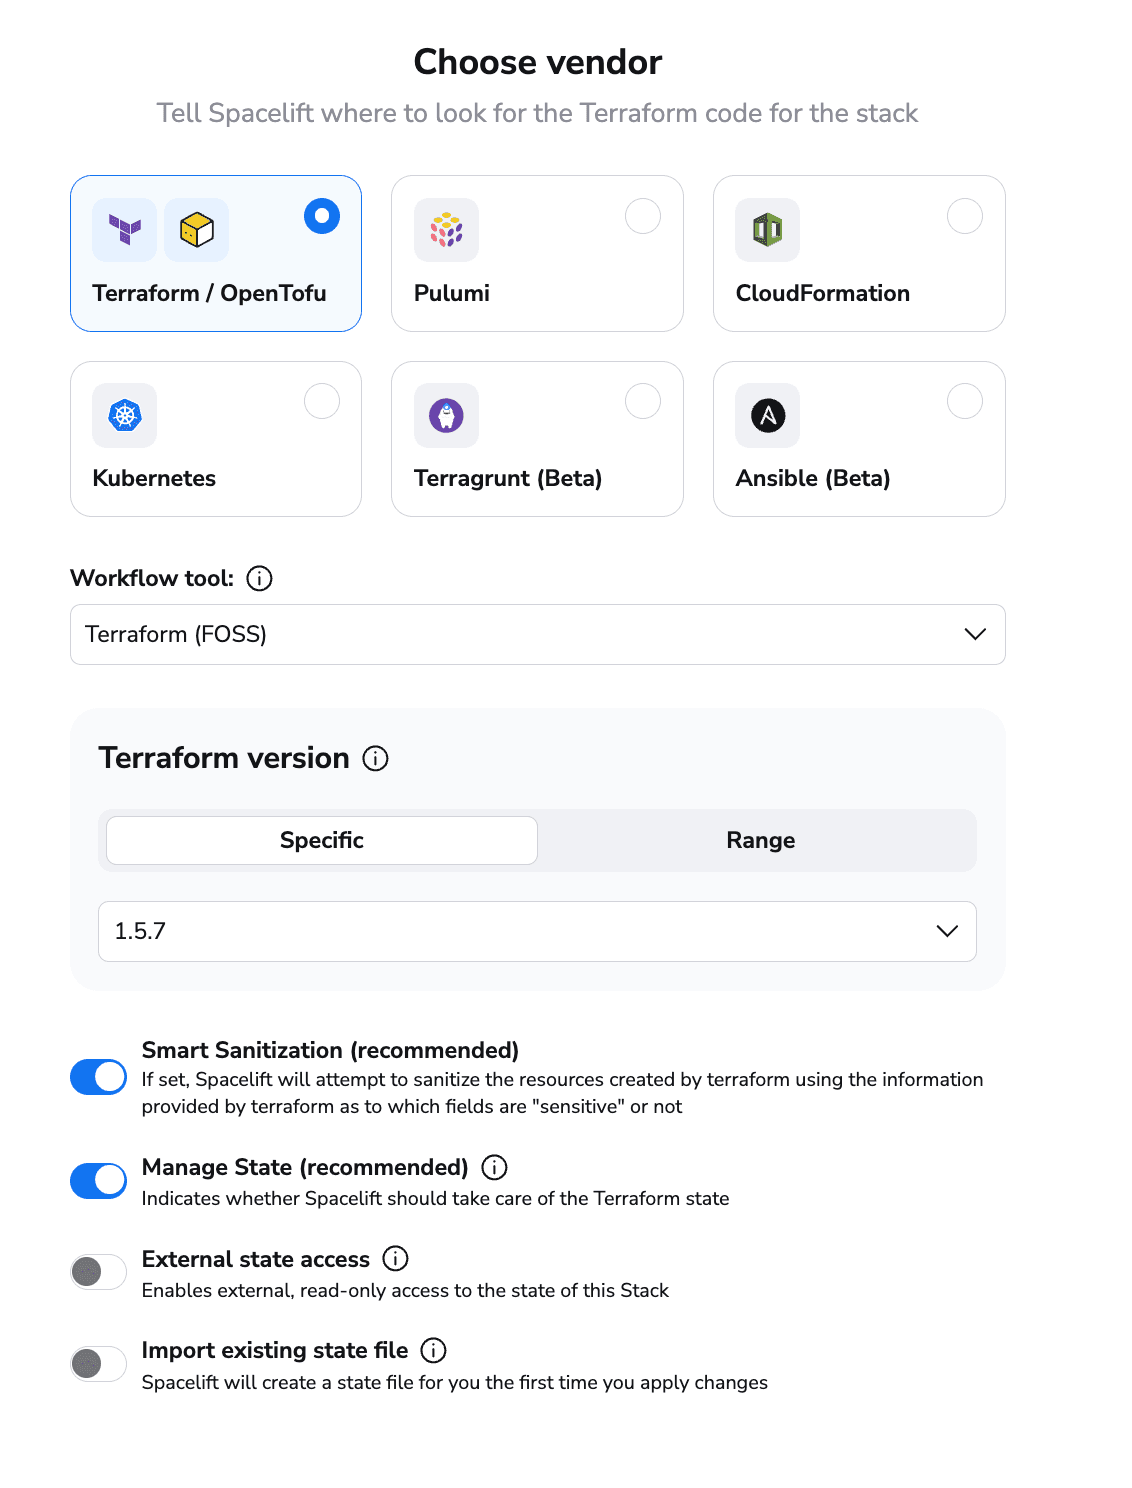
Unlike Terraform Cloud/Enterprise, Spacelift supports multiple tools. As well as supporting Terraform, Spacelift allows you to use OpenTofu and any custom binary built from OpenTofu and Terraform. In addition, you can run Pulumi, CloudFormation, Kubernetes, Terragrunt, and Ansible.
After you select a tool and have done the configurations required for it, click create and continue and then choose to either select the parts you want to configure or proceed through all the steps.
I will walk you through all the steps that can be configured:
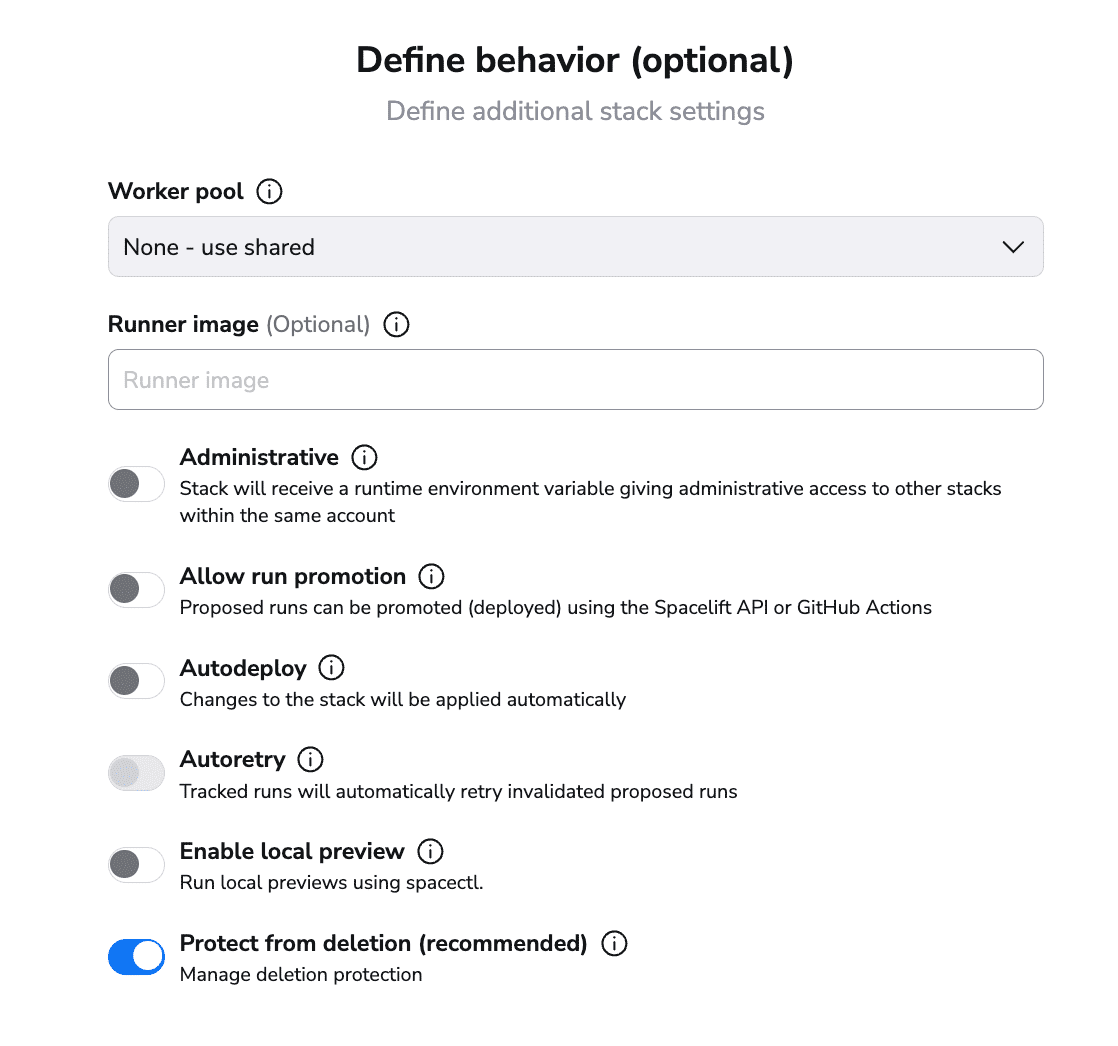
In this section, you can select:
- whether you want your stack to use the public worker pool or a private one that you configure
- whether you want to use your own runner image
- whether the stack should be administrative — Spacelift has its own Terraform/OpenTofu provider. This option allows you to manage Spacelift with Spacelift without having to provide credentials.
- whether you want to allow run promotion
- whether you want to do auto-deploy and auto-retry
- whether you want to see local previews using Spacelift’s cli called spacectl.
- whether you want to protect the stack from deletion
As you can see, you can configure many more options in this section than you can with Terraform Cloud/Enterprise’s capabilities.
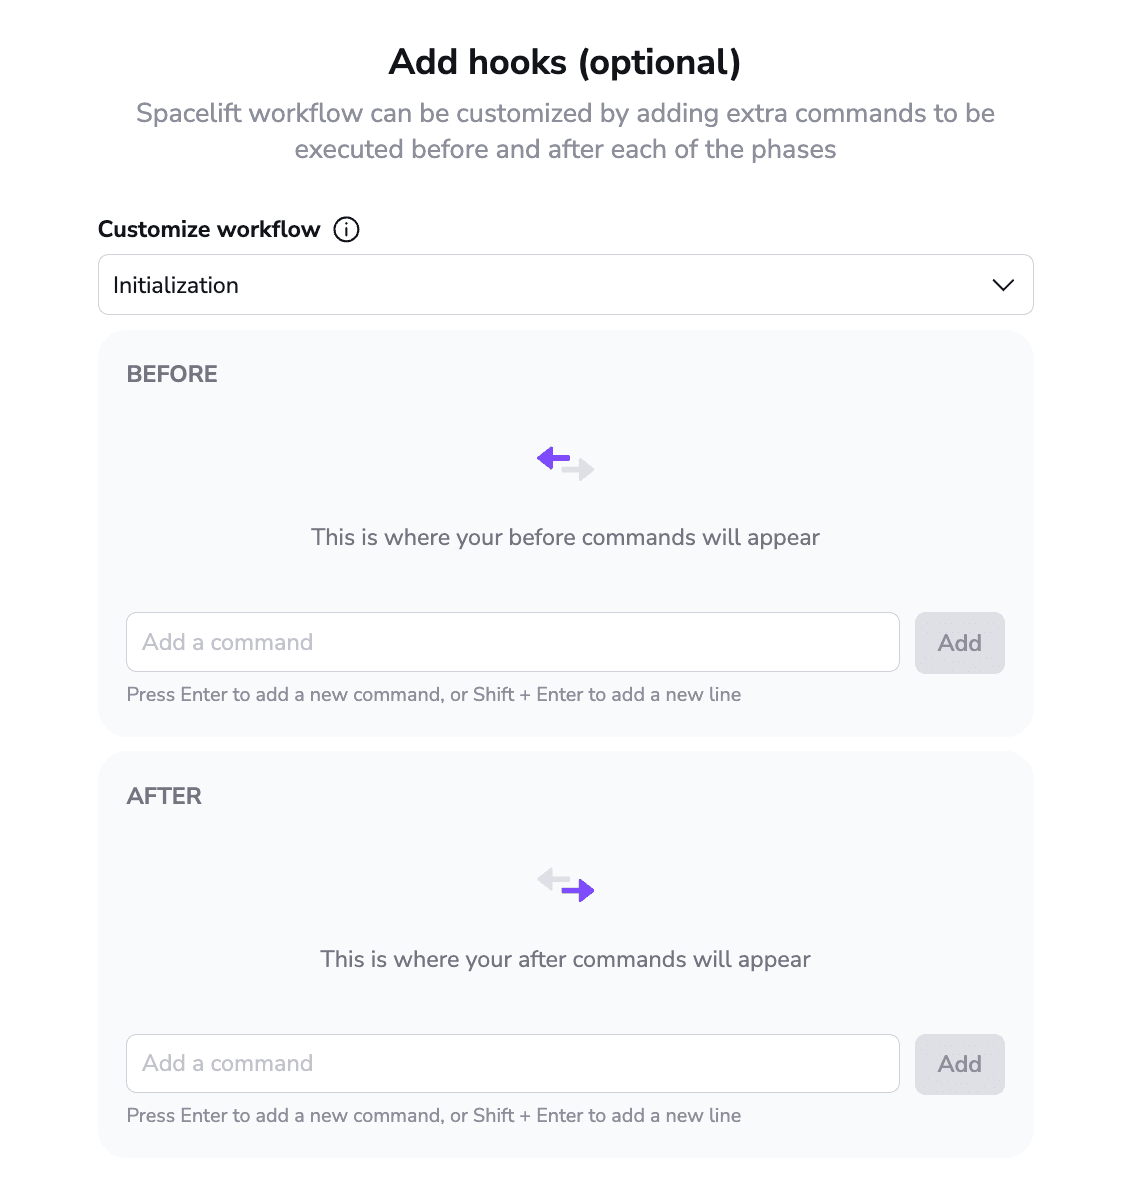
As the above screen shows, you can customize what happens before and after every runner phase, enabling you to install, configure, and run any tools you want, without being limited to a single run task. This functionality is available from the free tier too.
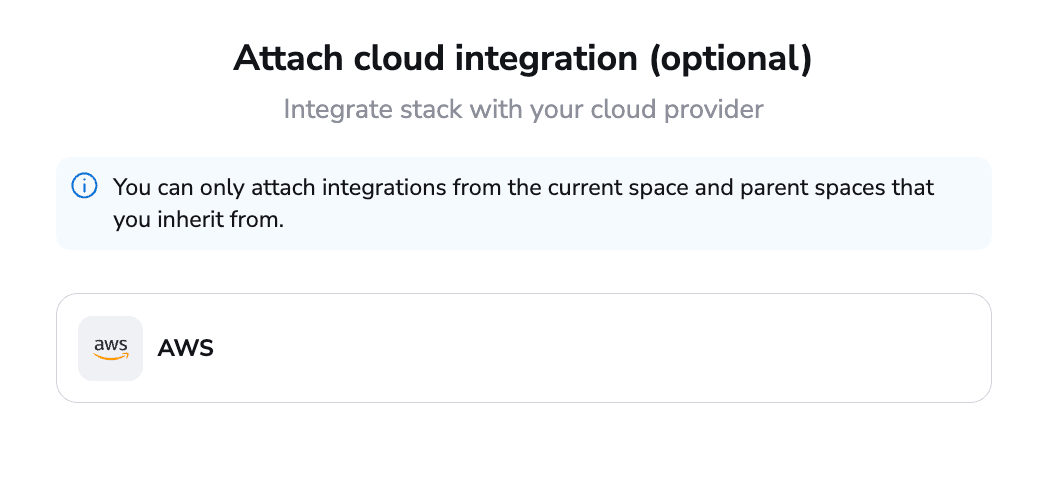
In the next section, you can attach a cloud integration for dynamic credentials. Although you can choose from AWS, Azure, and Google Cloud, I have only configured sets of AWS credentials in my account, so that’s why only this option is visible.
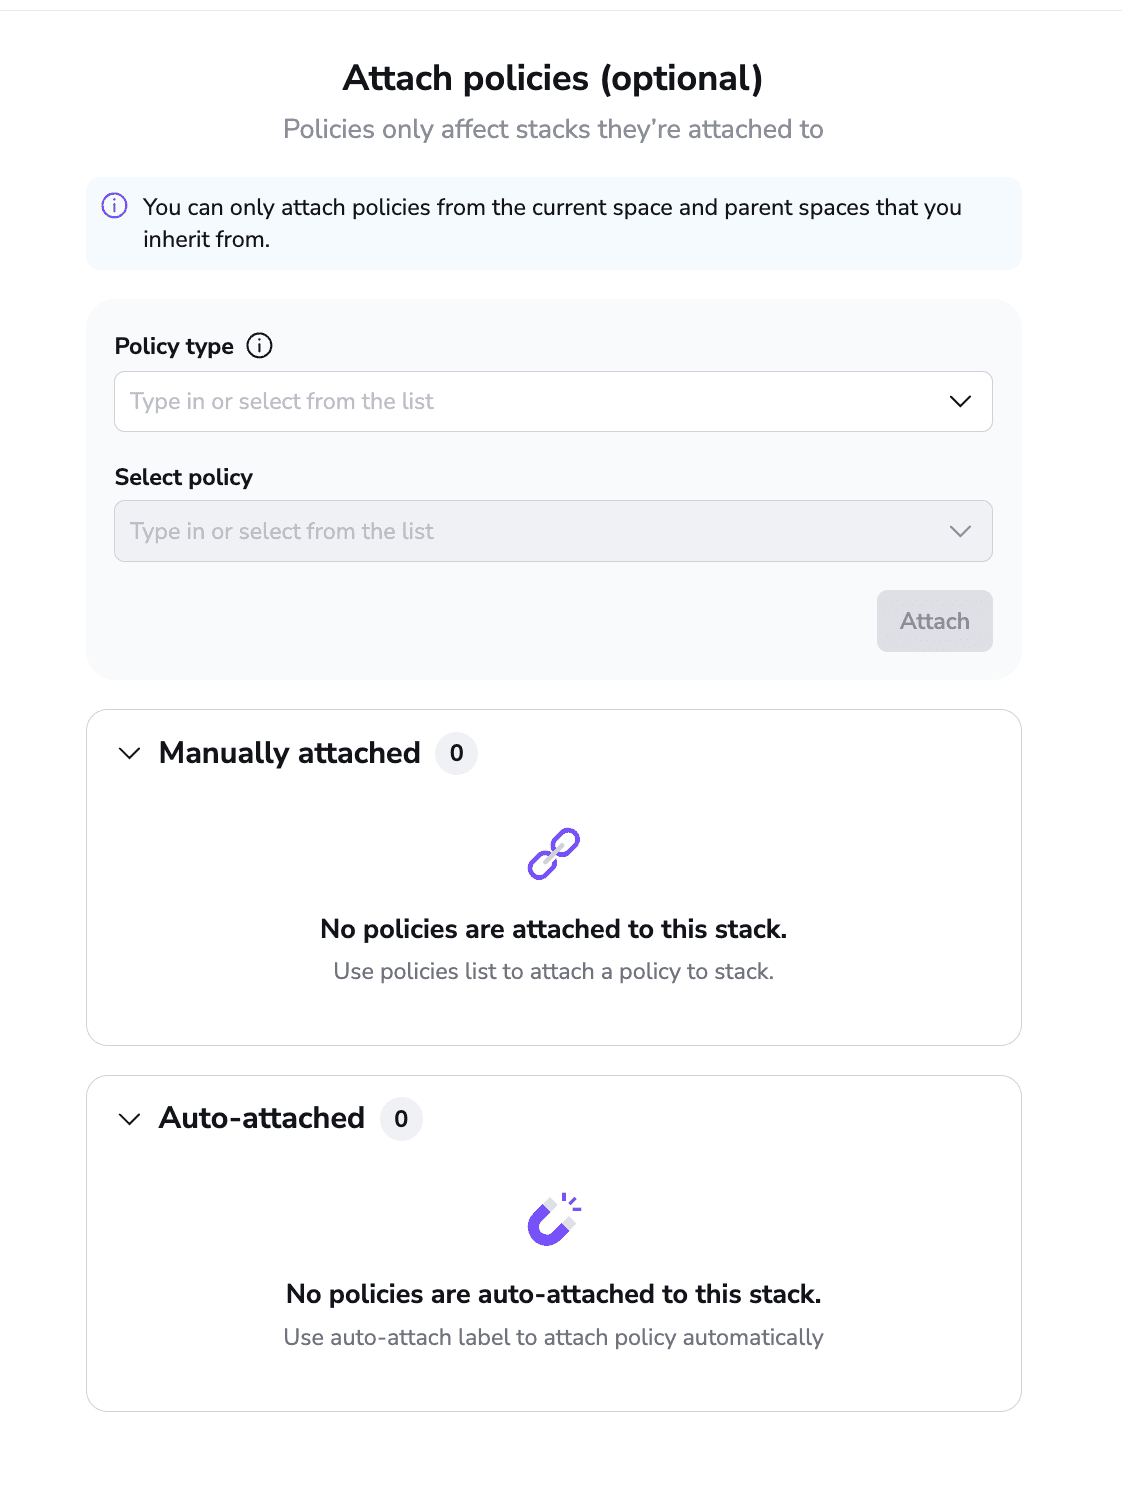
Spacelift supports multiple policy types, not only plan and approval. You unlock the plan and approval ones from the free tier, attaching as many policies as you can attach to a stack.
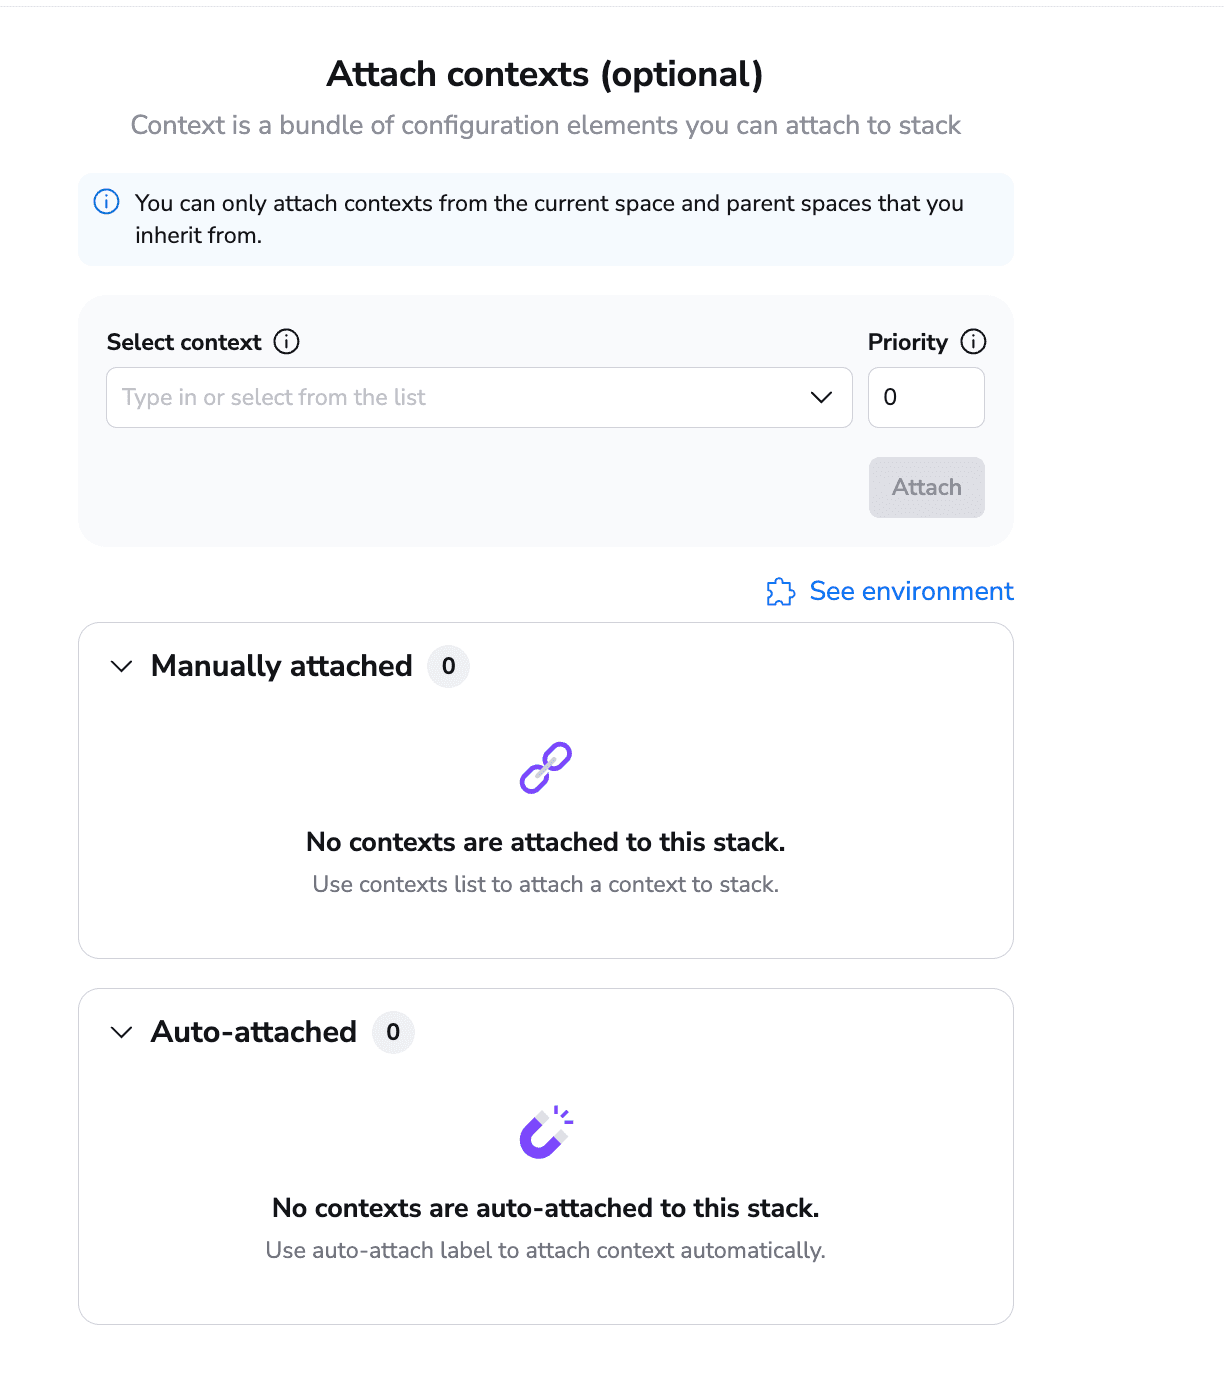
You can also attach contexts to your stack. Contexts are a bundle of environment variables, mounted files, and hooks that can be reused as you wish, with no limits. You can even set priorities to contexts, so if you attach two contexts that reference the same environment variable, you can determine which one is selected based on priorities.
After you finish with contexts, you can view your stack:
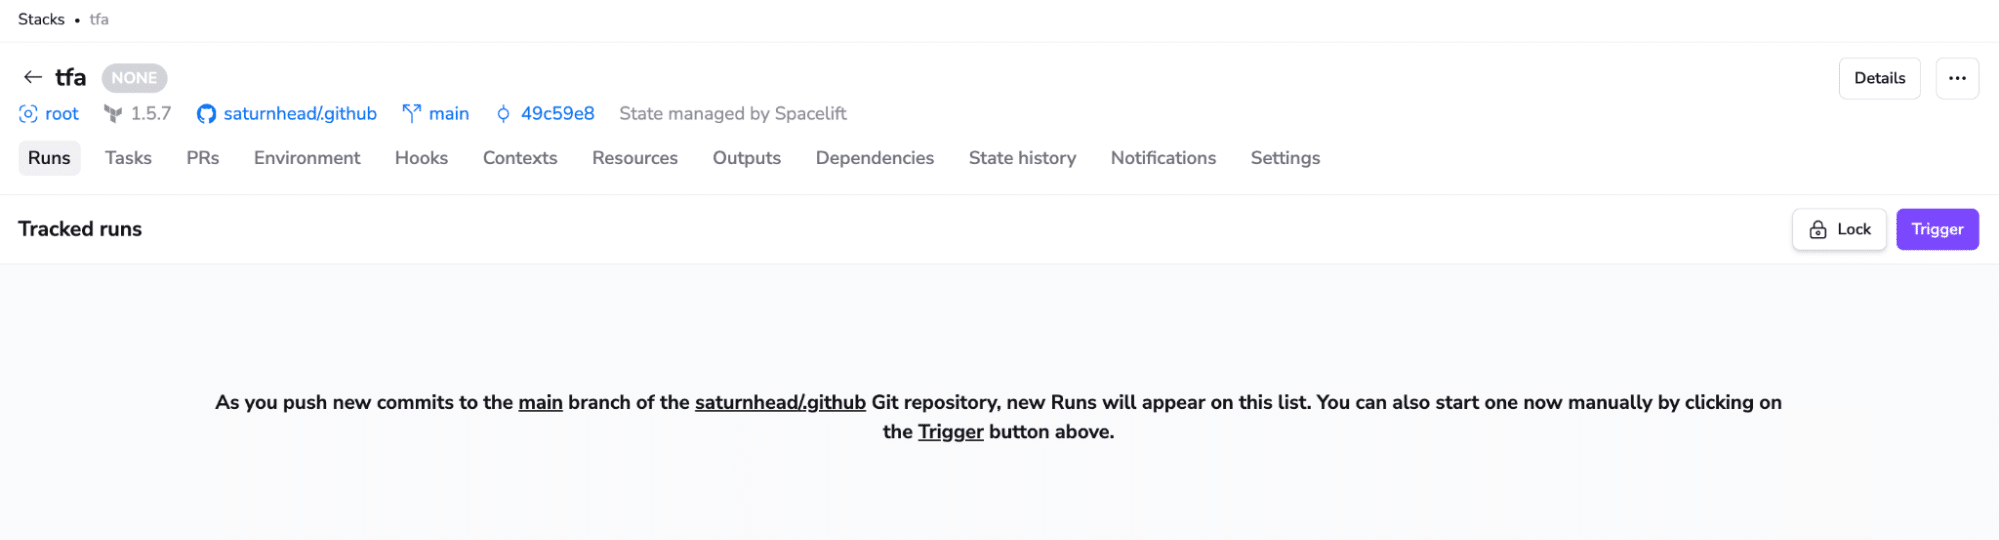
At the stack level, you can see all the runs that happened; run arbitrary tasks; see all open PRs against the tracked branch; and see the environment variables and mounted files, hooks defined, contexts attached, resources deployed, outputs, dependencies between stacks, state history, notifications, and all the stack settings.
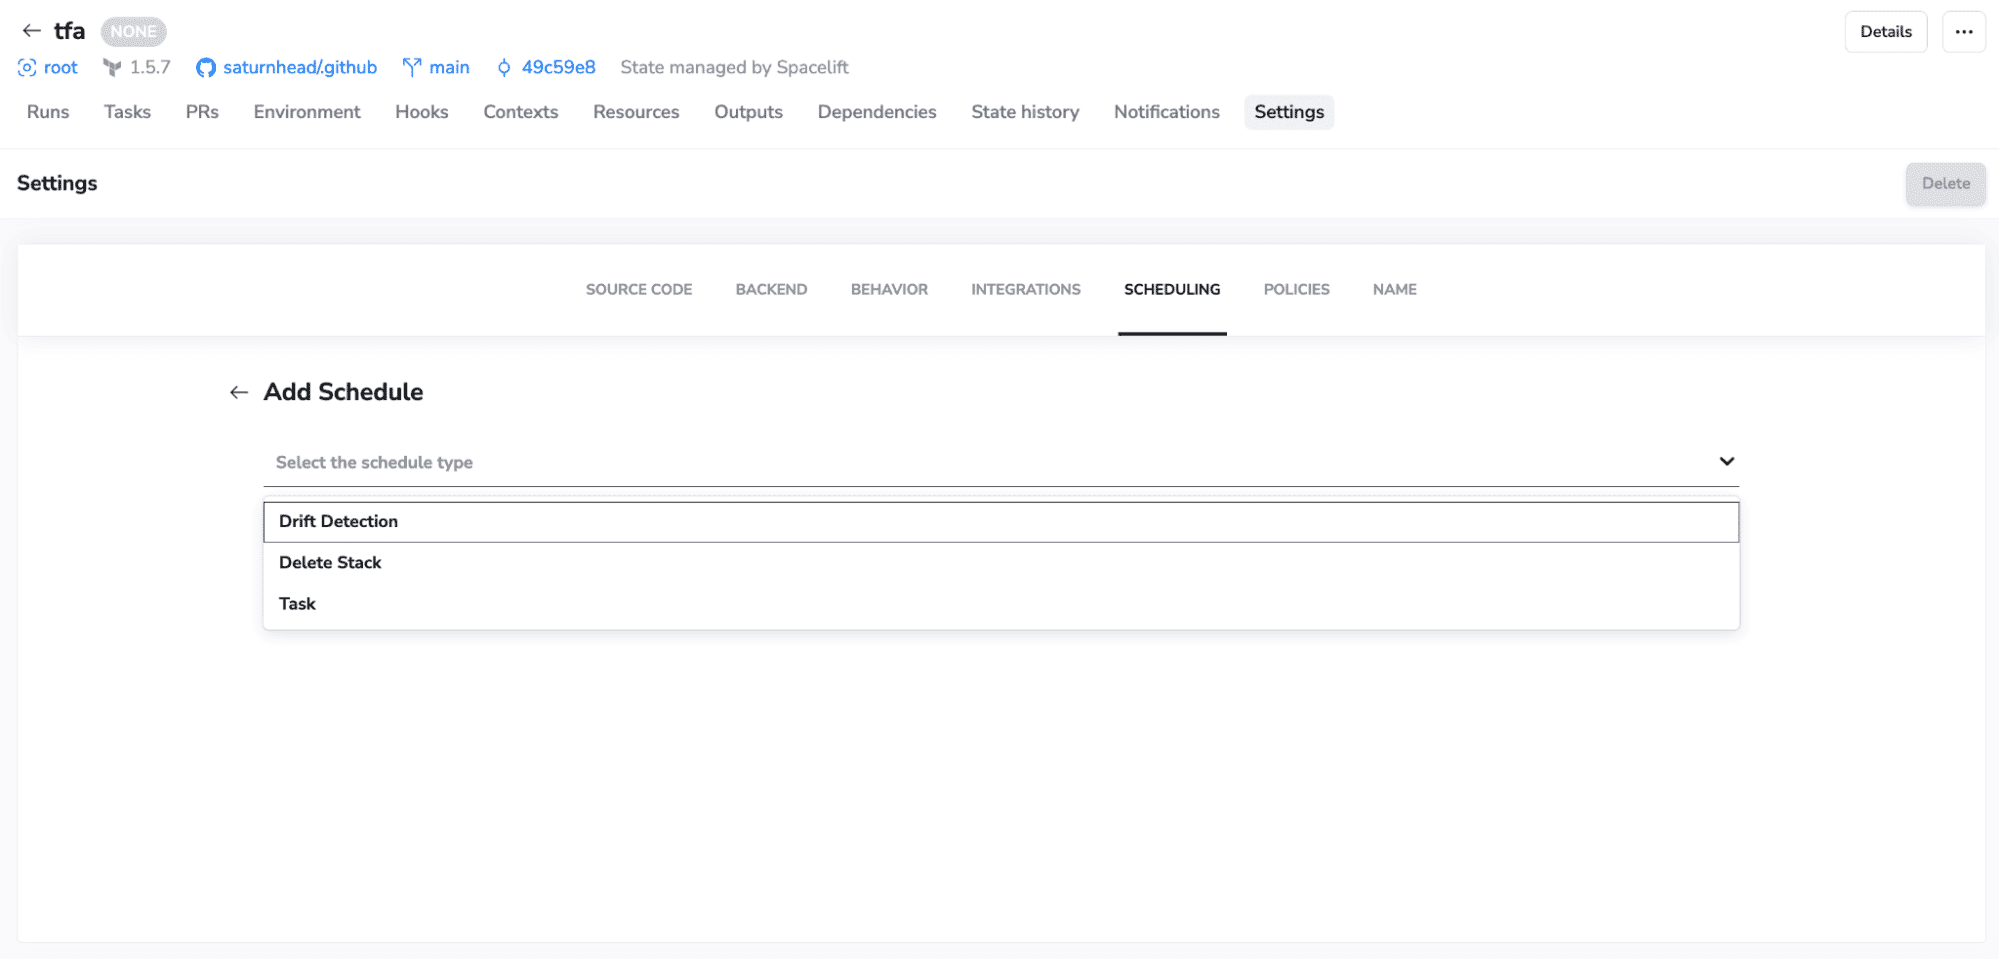
On the settings side, you also unlock scheduling capabilities, allowing you to configure drift detection and remediation, run arbitrary tasks, or schedule stack deletion:
Our stack view has a new design, and it comes packed with many new options that can help you understand what is happening to your stacks more effortlessly. Check out the video below:
Terraform Cloud workspaces vs Spacelift stacks
Now that you’ve seen how to create both Terraform Cloud/Enterprise workspaces and Spacelift stacks, let’s look at some key similarities and differences.
Similarities
In both cases, the core concept inside the platform is used to combine the source code, a branch, a working directory, and a tool.
The process for both involves choosing a vcs repository, and both products support GitHub, GitLab, BitBucket, and Azure DevOps.
Both products support Terraform, can integrate with third-party tools, and can integrate with policies/contexts (variable sets).
Differences
One of the first differences we noted is the fact that Spacelift stacks support multiple tools. Apart from Terraform, you can use OpenTofu, Pulumi, CloudFormation, K8s, Ansible, and Terragrunt. Spacelift also supports attaching cloud integrations, contexts, and policies at the stack creation level, whereas, for Terraform Cloud/Enterprise, you will need to configure some of them at the workspace settings level and others in their respective categories.
Furthermore, Spacelift allows you to customize your workflow by bringing your own image and controlling what happens before and after every runner phase, which you cannot do with TFC/TFE.
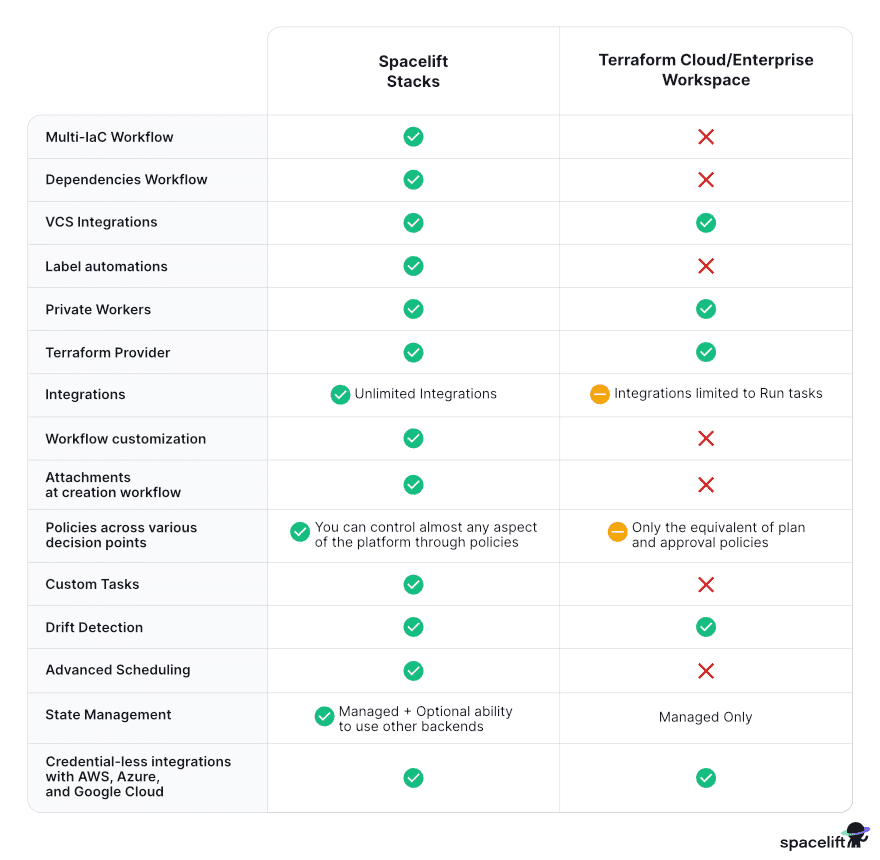
Table comparison
The table below shows the main differences between Terraform Cloud workspaces and Spacelift stacks:
Key points
In this post, you learned how to create a TFC/TFE workspace and a Spacelift stack and discovered the similarities and differences between them. Both will enhance your Terraform workflow, but if you require multiple IaC tools or don’t want to be limited in the entry-level tiers, Spacelift delivers.
If you want to learn more about Spacelift, book a demo with one of our engineers or start a free trial.
Manage Terraform better with Spacelift
Orchestrate Terraform workflows with policy as code, programmatic configuration, context sharing, drift detection, resource visualization, and more.
Frequently asked questions
What is a Terraform Cloud workspace?
A Terraform Cloud workspace is an isolated “container” for running Terraform against a specific environment or component, like prod-network or staging-app. It centralizes the state and execution context so changes are tracked, reviewed, and applied consistently.
Is a Terraform CLI workspace the same thing as a Terraform Cloud workspace?
A Terraform CLI workspace is just a named state instance within the same local configuration, while a Terraform Cloud workspace is a remote execution and state management container with its own settings, variables, permissions, and integrations.
Will deleting a Terraform Cloud workspace delete my infrastructure in the cloud?
No, deleting a Terraform Cloud workspace does not automatically delete the cloud resources it manages. It removes the workspace, its run history, variables, and access settings, but your infrastructure typically remains because Terraform is no longer applying changes or running a destroy.
