
In this article, we will provide a practical end-to-end example of using Terraform to deploy infrastructure on Microsoft Azure. We will also share some best practices, common problems you might encounter when first starting, and how to troubleshoot them. Let’s go!
What we will cover:
TL;DR
Terraform lets you define, provision, and manage Azure infrastructure as code using a simple declarative language. It works across multiple cloud providers, integrates with CI/CD pipelines, and handles resource dependencies automatically.
This guide walks you through setting up Terraform with Azure from scratch, covers the key best practices, and includes a real Kubernetes deployment example to get you started.
What is Terraform?
Terraform is an infrastructure-as-code (IaC) tool that lets you define and provision cloud infrastructure using a declarative configuration language called HCL. Rather than manually clicking through the Azure portal, you describe the desired state of your infrastructure in code, and Terraform figures out how to make it happen.
It supports multiple cloud providers including Microsoft Azure, AWS, and GCP, making it a popular choice for teams managing multi-cloud or hybrid environments.
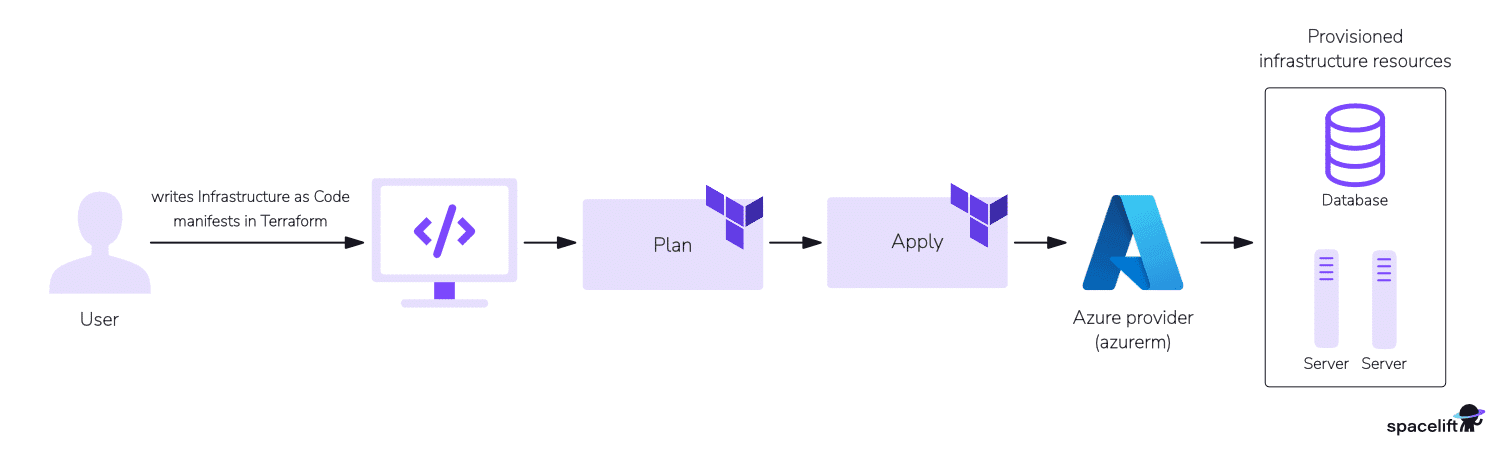
A typical Terraform workflow comes down to three steps: write your infrastructure configuration, run terraform plan to preview the changes, then run terraform apply to provision them.
Basic Terraform commands — quick reference
Here are some common commands you will use in Terraform:
terraform init— Initialize the Terraform working directory. It fetches required plugins and prepares the environment for other commands.terraform plan— Generate an execution plan outlining the changes Terraform will make based on your configuration files. It shows what will be created, updated, or destroyed.terraform apply— Apply the planned changes to your infrastructure based on the Terraform configuration. Review the plan carefully before applying.terraform destroy— Destroy the infrastructure managed by Terraform. Use with caution, as it can permanently remove resources.terraform show— Show details about a specific resource or the current state of your infrastructure.terraform state rm <resource name>— Remove a resource from Terraform state management.terraform state refresh— Refresh the Terraform state to match the actual state of your infrastructure in the cloud provider.terraform fmt— Reformat your Terraform configuration files to follow the standard coding style.terraform validate— Validate your Terraform configuration for syntax errors.terraform get <provider>— Download and install plugins for specific providers (optional argument to specify a provider).
To see all the Terraform commands in one place, check out our Terraform cheat sheet with 23 CLI Commands & Examples.
What is Microsoft Azure?
Microsoft Azure is a cloud computing platform developed by Microsoft. It offers a wide range of services, including computing, analytics, storage, and networking, that allow you to build, deploy, and manage applications across a global network of data centers. Users pick and choose from these services to develop and scale new applications or run existing ones.
Common use cases for the Azure public cloud include building and deploying web and mobile applications, developing and deploying cloud-native applications, storing and managing data, and creating and managing virtual machines.
Microsoft Azure features
- Microsoft Azure offers over 200 products and services.
- Azure supports all languages and frameworks, allowing you to develop how you want and deploy where you need to.
- Whether on-premises or across multiple clouds, Azure meets you where you are. It provides services designed for hybrid cloud environments.
- Azure prioritizes security, compliance, and privacy.
Why use Terraform on Azure?
Terraform allows you to define your infrastructure in code, making it versionable, repeatable, and auditable. You can manage your Azure resources using declarative configuration files. Compared with Azure Resource Manager (ARM) templates, Terraform can be more concise and easier to maintain for complex infrastructure deployments.
Note that Terraform is cloud-agnostic, so you can use the same language to provision resources across Azure, AWS, Google Cloud, and other providers. It also supports hybrid scenarios, seamlessly integrating on-premises and cloud environments. This flexibility is a key reason why many organizations choose to use Terraform as their preferred IaC tool.
Terraform has a dedicated Azure provider (azurerm) that supports a wide range of Azure resources, allowing you to manage Azure services comprehensively, and it also integrates well with Azure DevOps, enabling you to create CI/CD pipelines for automated deployment and management of your Azure infrastructure.
Terraform ensures consistent resource provisioning. You define the desired state, and Terraform handles the actual deployment, reducing configuration drift.
At the same time, Terraform automatically manages resource dependencies. For example, if you create a virtual machine that requires a virtual network, Terraform ensures the network is provisioned first.
Terraform maintains a state file that tracks the actual Azure infrastructure state. This helps with tracking changes, collaboration, and understanding the current environment.
Lastly, Terraform has a vibrant community and a rich ecosystem of providers and modules. You can find pre-built modules for common Azure services, saving time and effort.
How to run Terraform with Azure
To run Terraform with Azure, follow the steps below:
- Install the Azure CLI tool.
- Install Terraform.
- Connect to Azure.
- Configure the Terraform Azure provider.
- Create and add an Azure resource group.
- Verify the results.
- Clean up.
1. Install the Azure CLI tool
First, we need to install the Azure CLI tool.
Windows:
Head to the Microsoft download page.
Choose the appropriate installer for your system (32-bit or 64-bit) and download the installer file (.msi).
macOS or Linux:
Open a terminal window and run the following command:
curl -sL https://aka.ms/install-azure-cli | bashOr using homebrew:
brew install azure-cliAfter installation, confirm it has been successful:
az --versionIf the installation was successful, you should see the installed Azure CLI version displayed.
2. Install Terraform
Visit the official Terraform download page.
Select the appropriate version for your operating system (Windows, macOS, or Linux) and architecture (32-bit or 64-bit). Download the installer file (typically a .zip archive for Windows/macOS or a .tar.gz archive for Linux).
Most distributions also offer Terraform packages through package managers. This can be a convenient way to install and update Terraform.
- Ubuntu/Debian:
sudo apt install terraform - RedHat/CentOS:
sudo yum install terraform - macOS (Homebrew):
brew tap hashicorp/tap && brew install hashicorp/tap/terraform - chocolatey (Windows):
choco install terraform
Verify Terraform is installed:
terraform --versionIf the installation was successful, you should see the installed Terraform version displayed.
If you need more help with your Terraform installation, check out How to Download & Install Terraform on Windows, MacOS, Linux.
3. Connect to Azure
After installing the Azure CLI, you need to log in to your Azure account using the az login command. Follow the prompts to authenticate and complete the login process.
az loginIf you have multiple Azure subscriptions, you can set your subscription to use for subsequent commands:
az account set --subscription <subscription_id_or_name>4. Configure the Terraform azurerm provider
The Azure provider is configured in a Terraform configuration file using the azurerm provider configuration block. Create a Terraform configuration file named main.tf (or a name of your choosing) in your project directory.
provider "azurerm" {
  features {}
  # Replace with your Azure subscription ID
  subscription_id = "<your_subscription_id>"
  # Optional: Choose the desired Azure environment from [AzureCloud, AzureChinaCloud, AzureUSGovernment]
  # environment = "AzureCloud"
  # Optional: Set the Azure tenant ID if using Azure Active Directory (AAD) service principal authentication
  # tenant_id = "<your_tenant_id>"
  # Optional: Set the client ID of your AAD service principal
  # client_id = "<your_client_id>"
  # Optional: Set the client secret of your AAD service principal
  # client_secret = "<your_client_secret>"
}
You can optionally configure authentication using an Azure Active Directory (AAD) service principal by providing tenant_id, client_id, and client_secret. This is a more secure approach compared with using your Azure subscription credentials directly. To avoid hardcoding these in the configuration file, you can set them as environment variables:
export ARM_CLIENT_ID="xxxxx"
export ARM_CLIENT_SECRET="xxxxx"
export ARM_SUBSCRIPTION_ID="xxxxx"
export ARM_TENANT_ID="xxxxx"
Refer to the official Terraform documentation for detailed instructions on configuring service principal authentication.
5. Create and add an Azure resource group
Add the configuration for the Azure resource group to your configuration file using the azurerm_resource_group block.
resource "azurerm_resource_group" "example_group" {
  name     = "my-resource-group"
  location = "uksouth"
  tags = {
    environment = "dev"
  }
}
In your terminal window, navigate to your Terraform project directory.
Run the command terraform init to initialize Terraform.
Run the command terraform plan to see the changes Terraform will make. This will show you the creation of the resource group. If the plan looks good, run terraform apply to create the resource group in your Azure subscription.
6. Verify the results
Log into the Azure portal and navigate to the Resource Groups section to see your newly created resource group with the specified name and location.
7. Clean up
If you no longer need the resource group, you can remove it using Terraform by running terraform destroy.
Best practices for using Terraform with Azure
Following best practices from the start of your project can save you from painful restructuring and security headaches down the line. Here is what we recommend.
Configuration structure and style
Good configuration hygiene makes the difference between a codebase that scales and one that becomes a maintenance burden.
- Use a modular design. Break your infrastructure into reusable modules for common components like networking, compute, and storage. This promotes code reuse, simplifies complex deployments, and makes your configurations much easier to maintain over time.
- Adopt a consistent naming convention. Apply clear, predictable names to your resources and variables so anyone reading your code can understand it at a glance. Use the
descriptionattribute on resources and modules to add context, and apply Azure tags to categorize resources for cost allocation and monitoring. - Centralize your state. Use HCP Terraform, Spacelift, or an Azure Storage Account as your Terraform backend. This prevents state conflicts when multiple pipelines or team members are running deployments simultaneously.
- Format and validate before every apply. Run
terraform fmtto keep your code style consistent andterraform validateto catch syntax errors early, before they cause failures mid-deployment.
Security and access control
Security mistakes in infrastructure code can have serious consequences. Build good habits early.
- Never hardcode secrets. Do not store access keys, passwords, or client secrets directly in your Terraform configuration files. Use Azure Key Vault or environment variables instead, and treat any accidental commit of credentials as a security incident.
- Use service principal authentication. Rather than relying on your personal Azure subscription credentials, authenticate through an Azure Active Directory (AAD) service principal scoped to the least privilege required for the job.
- Implement Policy as Code. Define Azure Policy alongside your Terraform configuration to enforce security best practices and compliance requirements automatically, rather than relying on manual reviews.
- Enforce access control with RBAC. Use Azure Role-Based Access Control to restrict who can manage which resources, and keep those assignments in code so they are versioned and auditable.
Testing and deployment
Automating your deployment pipeline reduces human error and gives your team confidence when making changes.
- Integrate infrastructure testing. Use tools like Terratest or Azure Resource Explorer in your CI/CD pipeline to validate your Terraform code before it ever touches a real environment.
- Automate with CI/CD. Automate your infrastructure deployments through a pipeline. This reduces manual steps, catches errors earlier, and ensures every deployment follows the same process.
- Store everything in version control. Keep all Terraform configuration files in Git. This gives you a full history of infrastructure changes, makes collaboration straightforward, and allows you to roll back if something goes wrong.
- Review Terraform code like application code. Implement code reviews for your infrastructure configurations to catch mistakes, enforce consistency, and share knowledge across the team.
Additional considerations
A few final things that are easy to overlook but worth building into your workflow from the start.
- Handle errors gracefully. Build proper error-handling logic into your Terraform code so unexpected situations during deployments do not leave your infrastructure in a partially provisioned state.
- Document as you go. Maintain clear documentation for your configurations explaining the purpose of each resource, module, and variable. Tools like
terraform-docscan automate much of this. - Keep Terraform and the Azure provider up to date. New versions bring bug fixes, security improvements, and support for newer Azure services. Use a tool like tfenv or Spacelift to manage Terraform versions across your team.
- Instrument and alert on your infrastructure. Set up Azure Monitor, Prometheus, or Grafana to track resource health and performance, and configure alerts for critical thresholds so you can respond to issues proactively rather than reactively.
Troubleshooting common issues when running Terraform on Azure
Troubleshooting common issues when running Terraform on Azure often involves checking for correct authentication configurations, ensuring accurate resource dependencies, verifying network connectivity, and reviewing the Azure provider settings for any discrepancies or updates required to align with the current Terraform and Azure CLI versions.
1. State locking errors
Issue: You see errors like “Error acquiring the state lock” when running Terraform commands. This indicates another Terraform process might already be modifying the state file, causing a lock. e.g., Error: Error locking state: Error acquiring the state lock: state blob is already locked.
Solution: Check if any other terminal windows or CI/CD pipelines are running Terraform commands against the same state file. If using remote state storage (e.g., Azure Remote State Management), verify if other users are modifying the state concurrently. Consider using locking mechanisms provided by the remote state backend service.
2. Permission errors
Issue: You encounter errors suggesting insufficient permissions to manage Azure resources. e.g. AuthorizationFailed: The client '<client_id>' with object id '<object_id>' does not have authorization to perform action '<action>' over scope '<scope>'.
Solution: Double-check the access assigned to the service principal you’re using for authentication in Terraform. Ensure it has the necessary permissions (e.g., Contributor or Owner) on the resource group and specific resources you’re trying to manage. Verify that your Azure subscription ID and environment (AzureCloud, etc.) are correctly configured in the Terraform provider block.
3. Resource not found errors
Issue: Terraform throws errors like “azurerm_resource.example not found” when trying to access existing resources.
Solution: Ensure the resource you’re referencing actually exists in your Azure subscription and the same resource group defined in your Terraform configuration. Check for typos or inconsistencies in resource names between your Terraform code and actual Azure resources.
4. Syntax errors
Issue: Terraform fails with cryptic error messages indicating syntax issues in your configuration files.
Solution: Utilize terraform validate to identify potential syntax errors before applying the configuration. Carefully review your Terraform code for typos, missing quotation marks, or incorrect indentation.
5. Provider configuration issues
Issue: Terraform might struggle to find the Azure provider or encounter issues during initialization. e.g.Error: provider.<provider_name>: no suitable version installed or Error: provider.<provider_name>: provider registry.terraform.io/<provider_namespace>/<provider_name> was not found in the Terraform Registry.
Solution: Run terraform init again to ensure the Terraform Azure provider is downloaded and configured correctly. Verify your Terraform version is compatible with the installed Azure provider version. You can check the provider documentation for supported Terraform versions.
6. Resource limitations
Issue: QuotaExceeded: The requested resource exceeds the allowed limits.
Solution: Check Azure resource quotas and limits for the subscription, region, and resource type you’re trying to provision. If necessary, increase quotas through the Azure portal or by contacting Azure support. Consider optimizing resource configurations or deleting unused resources to stay within limits.
7. Networking issues
Issue: Failed to retrieve plugin executables from URL: dial tcp: lookup <url> on <dns_server>.
Solution: Check network connectivity from your Terraform host to the specified URLs (e.g., Terraform registry, provider download URLs). Ensure that firewalls, proxies, or network policies allow outbound connections. Verify DNS resolution by testing with nslookup or dig commands. If DNS resolution fails, troubleshoot DNS configuration or use alternative DNS servers.
8. Terraform version compatibility
Issue: Error: Unsupported Terraform Core version.
Troubleshooting: Ensure that you’re using a Terraform version compatible with the Azure provider version specified in your configuration. Check the compatibility matrix in the Terraform documentation to find compatible versions of Terraform and the Azure provider.
Example: Kubernetes deployment with Terraform on Azure
Let’s see a practical example of using Terraform on Azure. The code can be found here.
We will be using two resources:
azurerm_resource_group– used to create resource groups inside of Azureazurerm_kubernetes_cluster– used to create the Kubernetes cluster inside of Azure
In this example, cluster management will always be free; you pay only for the cluster’s underlying nodes.
To create the number of resources of the type we want, we are using for_each on both resources.
resource "azurerm_resource_group" "this" {
 for_each = var.resource_groups
 name     = each.key
 location = each.value.location
}

resource "azurerm_kubernetes_cluster" "this" {
 for_each            = var.kube_params
 name                = each.key
 location            = azurerm_resource_group.this[each.value.rg_name].location
 resource_group_name = azurerm_resource_group.this[each.value.rg_name].name
…
}
The link between the resources above is created on the Kubernetes one, specifically at the location and resource_group_name parameters. This allows us to ensure the resource group is created first, and we access its location and name attributed inside the Kubernetes Cluster. The cluster and the resource group in which it will be created will reside in the same location.
We declare the variables using map(object) types. We are also ensuring optional values to make the code easier to use.
variable "kube_params" {
 description = "AKS parameters"
 type = map(object({
   rg_name             = string
   dns_prefix          = string
   np_name             = string
   tags                = optional(map(string), {})
   vm_size             = optional(string, "Standard_B2s")
   client_id           = optional(string, null)
   client_secret       = optional(string, null)
   enable_auto_scaling = optional(bool, false)
   max_count           = optional(number, 1)
….
The values of these variables are provided in the default block, but it’s also possible to use terraform.tfvars or a *.auto.tfvars file, or environment variables to pass these values.
Right now, with the default values, this looks like this:
default = {
   rg1 = {
     location = "westus"
   }
 }

default = {
   aks1 = {
     rg_name    = "rg1"
     dns_prefix = "kube"
     np_name    = "np1"
   }
 }
In this example, we have declared two outputs: one will show a map containing name and location pairs for the resource groups, and the other will have some details related to the Kubernetes cluster in the following format name => id, fqdn.
output "resource_groups" {
 description = "Resource Group Outputs"
 value       = { for rg in azurerm_resource_group.this : rg.name => rg.location }
}

output "aks" {
 description = "AKS Outputs"
 value       = { for kube in azurerm_kubernetes_cluster.this : kube.name => { "id" : kube.id, "fqdn" : kube.fqdn } }
}
To run this code, we have initialized the working directory using terraform init.
Initializing the backend...

Initializing provider plugins...
- Finding latest version of hashicorp/azurerm...
- Installing hashicorp/azurerm v3.49.0...
- Installed hashicorp/azurerm v3.49.0 (signed by HashiCorp)

Terraform has created a lock file .terraform.lock.hcl to record the provider
selections it made above. Include this file in your version control repository
so that Terraform can guarantee to make the same selections by default when
you run "terraform init" in the future.

Terraform has been successfully initialized!

You may now begin working with Terraform. Try running "terraform plan" to see
any changes that are required for your infrastructure. All Terraform commands
should now work.

If you ever set or change modules or backend configuration for Terraform,
rerun this command to reinitialize your working directory. If you forget, other
commands will detect it and remind you to do so if necessary.
To apply the code, run the terraform apply command.
azurerm_resource_group.this["rg1"]: Creating...
azurerm_resource_group.this["rg1"]: Creation complete after 3s [id=/subscriptions/subid/resourceGroups/rg1]
azurerm_kubernetes_cluster.this["aks1"]: Creating...
azurerm_kubernetes_cluster.this["aks1"]: Still creating... [10s elapsed]
azurerm_kubernetes_cluster.this["aks1"]: Still creating... [20s elapsed]
azurerm_kubernetes_cluster.this["aks1"]: Still creating... [30s elapsed]
…
azurerm_kubernetes_cluster.this["aks1"]: Still creating... [3m50s elapsed]
azurerm_kubernetes_cluster.this["aks1"]: Creation complete after 3m52s [id=/subscriptions/subid/resourceGroups/rg1/providers/Microsoft.ContainerService/managedClusters/aks1]

Apply complete! Resources: 2 added, 0 changed, 0 destroyed.

Outputs:

aks = {
 "aks1" = {
   "fqdn" = "kube-pocuwyy7.hcp.westus.azmk8s.io"
   "id" = "/subscriptions/subid/resourceGroups/rg1/providers/Microsoft.ContainerService/managedClusters/aks1"
 }
}
resource_groups = {
 "rg1" = "westus"
}
The cluster will be visible now in the Azure Portal:

Enhance your IaC workflow with Spacelift
Terraform is really powerful, but to achieve an end-to-end secure GitOps approach, you need to use a product that can run your Terraform workflows.
Enter Spacelift. Not only does Spacelift take care of your Terraform workflows, but it can also help build workflows for OpenTofu, Kubernetes, Pulumi, Ansible, and CloudFormation. Spacelift is GitOps native, and you can use it to build really sophisticated workflows by leveraging stack dependencies.
Your workflows will probably require policies to ensure the necessary guardrails for your infrastructure. Notifications are also really important to alert you when something goes wrong.
Integrations with major cloud providers prevent the use of static credentials, which can be easily replicated if you are not careful with them.
Using custom inputs makes it easy to integrate security tools into your workflows. You can easily run policies on this feature to ensure engineers are not introducing vulnerabilities in their code.
If Terraform modules make your code DRY, check out Spacelift’s Templates feature, which really takes reusability to the next level.
Let’s reuse the above example and create a stack for it in Spacelift. We will also apply a policy to ensure people do not change the size of the VM. I would suggest creating your own repository that holds the above code to integrate everything.

After that click Continue, and on the Integrate VCS tab, select the repository. You can leave everything else as a default.
In the Configure backend tab, select the backend (in our case, it is Terraform), the Terraform version, whether Spacelift manages your state, and whether you want smart sanitization enabled.

Select Continue and in the Define behavior tab, leave everything as a default.
You have created a stack. You need to handle the authentication to Azure before starting to run the stack per se. You can do this in multiple ways, and Spacelift’s documentation explains it well.
When you have finished this, you can start running your code. Triggering a run reveals an output of the Terraform plan. If you want to create the resources inside this plan, you will need to confirm it. Otherwise, you can easily discard it and make other changes to your code.

After confirming the run, an apply job gets triggered and this is its output.

As you can see, the subscription id is directly masked inside the output, which also makes for easier demonstrations without having any fear that you will be leaking sensitive information.
The workflow can be easily extended at each step by either adding commands before and after phases, changing the runner image, integrating security tools, adding policies, and other methods.

If you want to learn more about Spacelift, create a free account today, or book a demo with one of our engineers.
Key points
Terraform is a solid choice for provisioning and managing your infrastructure on Azure. Its declarative approach, robust Azure provider, and multi-cloud flexibility make it one of the most widely adopted IaC tools available today. Here is a quick recap of what we covered:
- Terraform lets you define Azure infrastructure as code, making it versionable, repeatable, and auditable across environments.
- The
azurermprovider gives you broad coverage of Azure services and integrates well with Azure DevOps and other CI/CD tools. - Authentication should be handled through AAD service principals or managed identities rather than personal credentials, with secrets stored in Azure Key Vault or environment variables.
- Remote state storage using an Azure Storage Account backend is essential for team collaboration and preventing state conflicts.
- Following best practices around modular design, naming conventions, code reviews, and infrastructure testing will save you significant pain as your deployments grow in complexity.
- The Kubernetes deployment example in this article shows how Terraform handles resource dependencies automatically, provisioning your resource group before your AKS cluster without any manual ordering on your part.
Note: New versions of Terraform are placed under the BUSL license, but everything created before version 1.5.x stays open-source. OpenTofu is an open-source version of Terraform that expands on Terraform’s existing concepts and offerings. It is a viable alternative to HashiCorp’s Terraform, being forked from Terraform version 1.5.6.
Automate Terraform Deployments with Spacelift
Automate your infrastructure provisioning and build more complex workflows based on Terraform using policy as code, programmatic configuration, context sharing, drift detection, resource visualization, and more.
Frequently asked questions
What are some common use cases for Terraform on Azure?
Terraform is commonly used on Azure for provisioning and managing infrastructure as code. Key use cases include:
- Automating deployment of Azure resources like VMs, VNets, AKS, and storage accounts
- Managing multi-environment setups with reusable modules and workspaces.
- Enforcing infrastructure consistency across teams or regions
- Integrating with CI/CD pipelines to provision infrastructure alongside application deployments
- Managing role assignments and policies through Azure RBAC and Azure Policy integration
How do I store Terraform state on Azure securely?
To store Terraform state securely on Azure, use an Azure Storage Account with a private container and enable server-side encryption (enabled by default). Use Azure Blob storage as the backend in your Terraform config, specifying the storage account name, container name, and a secure state file key.
For added security:
- Enable soft delete for blobs to recover from accidental deletions
- Use a storage account with private endpoint access
- Restrict access via Azure RBAC or SAS tokens
- Consider customer-managed keys (CMK) for encryption
Is Terraform better than Azure Bicep?
Neither is objectively better. Bicep is the simpler choice if you work exclusively with Azure, while Terraform is the stronger option if you manage multi-cloud or hybrid infrastructure, since the same HCL configuration language works across AWS, GCP, Azure, and beyond.
Can Terraform manage existing Azure resources?
Yes, you can bring existing Azure resources under Terraform management using the terraform import command, which maps a real resource to a Terraform state entry without recreating it. From that point on, Terraform tracks and manages the resource like any other in your configuration.
How do I store Terraform state on Azure?
The recommended approach is to use an Azure Storage Account as a remote backend, configuring an azurerm backend block in your Terraform configuration with your storage account name, container name, and state file key. This centralizes state, enables team collaboration, and supports state locking via Azure Blob lease to prevent concurrent modifications.
What Azure provider version should I use with Terraform?
You should use the latest stable release of the azurerm provider. Always pin a minimum version in your required_providers block (e.g., version = “~> 4.0”) to prevent unexpected breaking changes from automatic upgrades.
