
State management is one of the pillars of Terraform. It informs Terraform about the state of your whole infrastructure and which resources need to be added, removed, or edited. Without it, Terraform treats each run as if you were building your infrastructure from scratch.
The state is a Terraform JSON file that maps all your infrastructure resources, stored in an accessible location configured with Terraform backends.
In this blog post, we will cover:
TL;DR
Terraform backends control where and how your state file is stored. Local backends are fine for development, but any team or CI/CD setup needs a remote backend like S3, Azure Blob Storage, or GCS for state locking, durability, and shared access.
What are backends in Terraform?
Backends in Terraform are responsible for managing the storage and state of infrastructure deployments. They define where and how Terraform’s state data is stored, how it can be accessed, and who can access it, ensuring the state is preserved across multiple runs. Common backend types include local and remote services (such as AWS S3, GCP Cloud Storage, and Azure Blob Storage).
What are the key features of Terraform backends?
The core feature of Terraform backends is the ability to safely store your state file so Terraform knows which changes have been applied already and which will be applied when you need to run your code again.
The key Terraform backend features include:
- State storage
- State locking
- Partial configuration
1. State storage
The main role of Terraform backends is to store your Terraform state file safely in a place where Terraform can access, store, update, and delete it (if necessary). Backends determine how the state data is loaded and how the state is updated. The default local backend stores state in a local JSON file, but Terraform also supports remote backends that store state in cloud storage services like Amazon S3.
Some supported backend types:
Local Storage— The default backend for Terraform, where the state file is stored and managed in the local machine that runs TerraformAWS S3 Bucket— The state file is stored and managed in an AWS S3 bucket.Azure Blob Storage— The state file is stored and managed in Azure Blob Storage.Google Cloud Storage bucket— The state file is stored and managed in a Google Cloud Storage bucket.Remote— Stores state snapshots and executes Terraform CLI operations for HCP Terraform or supported Terraform CI/CD platform, like SpaceliftHttp— Stores and manage state files in a server by fetching via GET, updating via POST, and deleting with DELETE.
You can see all the backend types supported by Terraform here.
Note: Terraform doesn’t support any backend that is not built-in.
2. State locking
State locking allows your IaC runner to lock the state file while running your Terraform code, so it cannot be updated until it completes its run, successfully or not. This guarantees that nothing can edit your state file and cause conflicts.
State locking is most effective in team environments where multiple people can trigger your Terraform runner simultaneously. This way, the first runner will lock the state file, and any other runners will have to wait until the state file has its lock released, thus guaranteeing a consistent state.
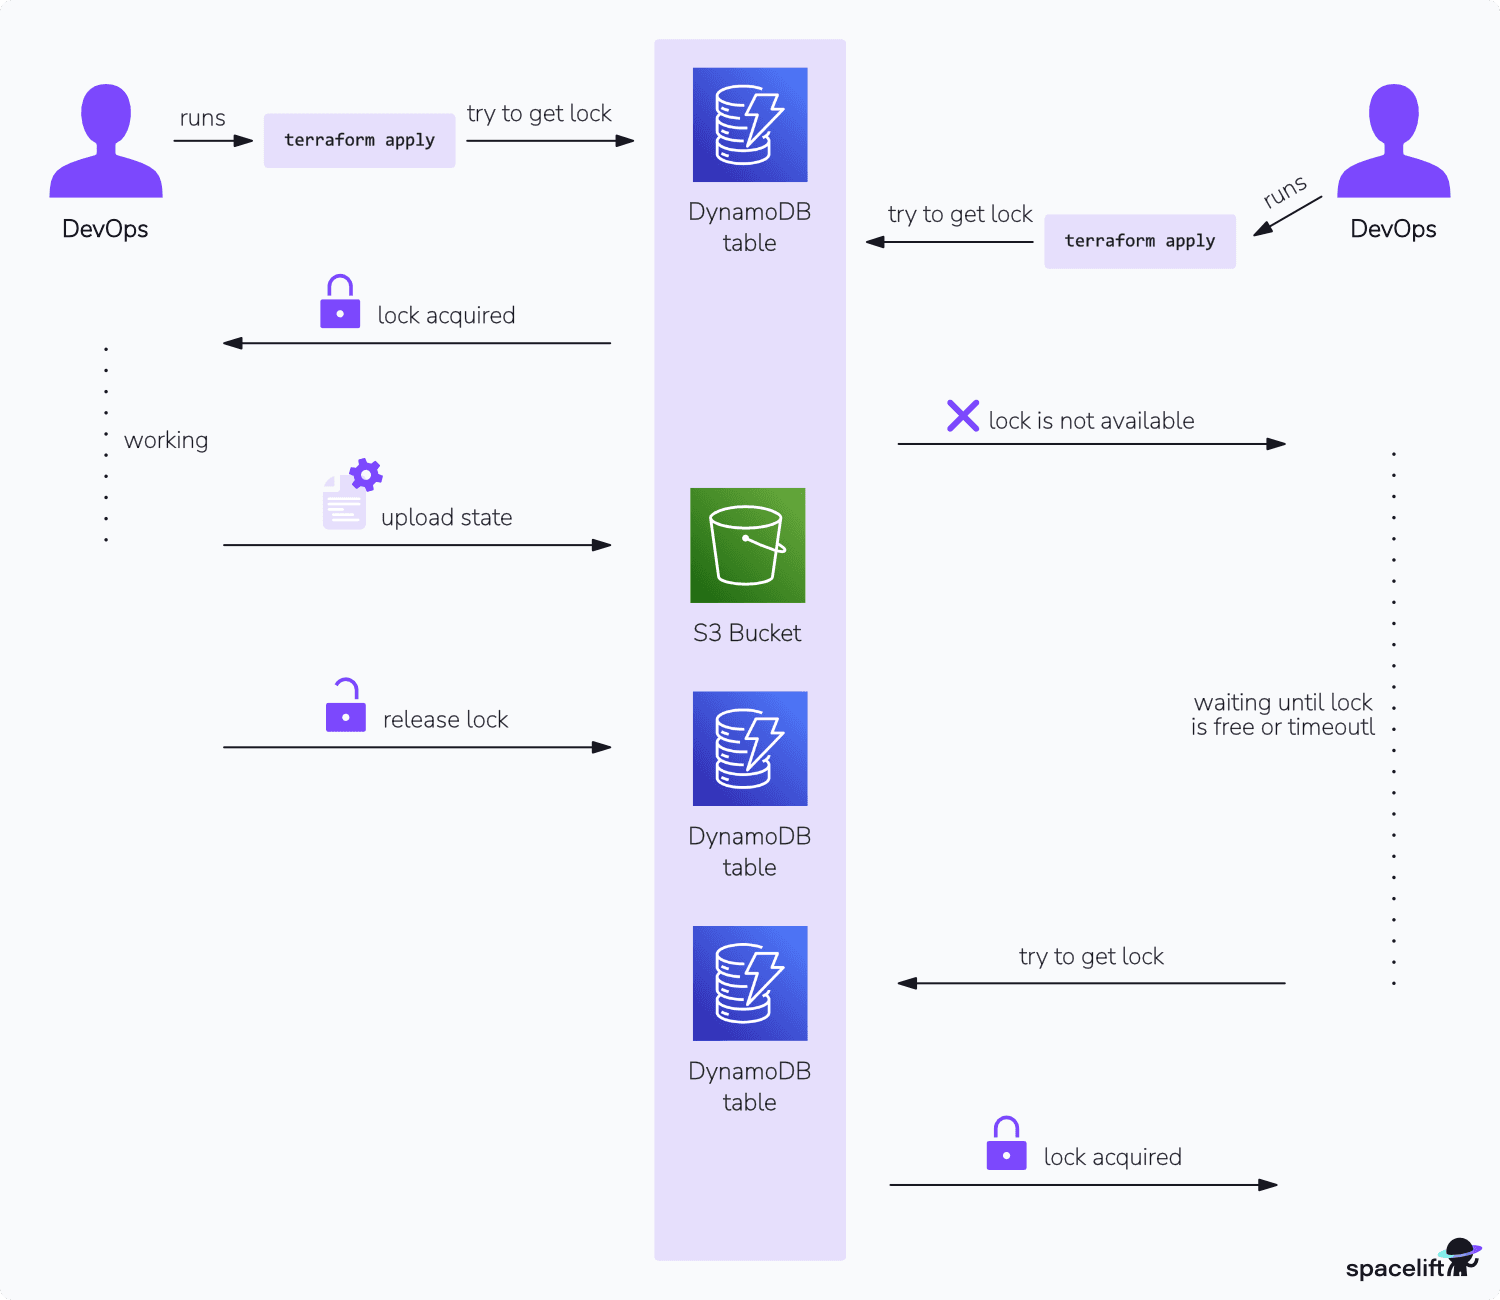
How locking is implemented depends on the backend. The S3 backend, for example, can lock state natively with a lock file in the same bucket since Terraform 1.10, and older setups use a separate DynamoDB table. Below is an example showing state locking using DynamoDB tables and the S3 bucket.
3. Partial configuration
When configuring your backend, you’ll often be required to specify sensitive credentials that Terraform needs to be able to access and use the backend you want to manage your state.
You can specify these values directly in code, like the Terraform configuration below for AWS S3:
terraform {
  backend "s3" {
    bucket          = "MY_BUCKET"
    key               = "PATH/TO/KEY"
    region           = "MY_REGION"
    access_key  = "AWS_ACCESS_KEY"
    secret_key	 = "AWS_SECRET_KEY"
  }
}
However, this presents a high-security risk because your data will probably be stored in a shared space. Their credentials will be visible and easy to leak.
To prevent this, the recommended way to configure your backend is to use the partial configuration provided by Terraform.
Terraform enables the passing of sensitive information to our configuration, so we don’t need to set it as plain text. The code for our AWS S3 backend can be reduced to:
terraform {
  backend "s3" {
    bucket          = "MY_BUCKET"
    key               = "PATH/TO/KEY"
  }
}
You have several options for passing this information.
File configuration
You can specify the backend configuration variables in a file named using the recommended pattern *.{BACKEND}.tfbackend (e.g., configuration.s3.tfbackend) and pass this file during Terraform initialization.
Note: Although Terraform documentation suggests this pattern to clarify your file’s purpose, it is not enforced but is the recommended naming convention.
Then set the variables in the file:
region          = AWS_REGION
access_key = SUPER_KEY
secret_key  = THIS_IS_SUPER_SECRET
Specify the file path in your terraform init code:
terraform init -backend-config=configuration.s3.tfbackendHowever, this is not the recommended method for specifying access keys.
Command-line key/value pairs
With this method, instead of statically specifying variables in a file, you pass them to your initialization command inline using the -backend-config=”variable=value” switch.
This gives you more flexibility to work with secrets in CI runners. In Spacelift, you can set secrets in your CI configuration that will be encrypted and passed to your command line during runtime without being outputted in the logs.
terraform init \
-backend-config=”access_key=ACCESS_KEY_VARIABLE” \
-backend-config=”secret_key=SECRET_KEY_VARIABLE” \
-backend-config=”region=REGION_VARIABLE”
Environment variables
Terraform allows you to use system environment variables for some variables. If these environment variables are set, Terraform will fetch the values and apply them directly to the backend configuration variables.
This is by far the best way to set sensitive information. It allows you to set these values ahead of time in your CI configuration and not worry about them leaking.
For example:
| Remote backend type | Environment variables |
| AWS S3 backend |
|
| Azure Blob Storage backend |
|
You can check each backend configuration documentation here for a complete list of all the supported variables.
What backend types does Terraform support?
Terraform supports many backend types, including remote backends such as Amazon S3, Azure Blob Storage, and Google Cloud Storage, as well as a local file system. Each type has its own specific configuration requirements.
Here’s a quick comparison of some of the available backends:
Terraform local backends
Local backends allow Terraform to store and manage state on the local filesystem of the machine running your Terraform code.
This is the default setting defined by Terraform if you haven’t configured or used the backend block. With this configuration, Terraform creates a terraform.tfstate file in the directory where you run your Terraform code.
Terraform remote backends
Remote backends refer to any type of backend that is not local. They allow Terraform to store and manage state in remote data stores, such as an S3 bucket or Azure Blob Storage.
Note: Don’t confuse remote backends with the backend type remote, which is also a type of remote backend.
Here are some examples of Terraform remote backend types:
- AWS S3 Bucket (
s3) - Azure Blob Store (
azurerm) - Google Cloud Buckets (
gcs) - HTTP Server (
http) - Remote (
remote)
Benefits of using remote backends
The benefits of using remote backends in Terraform are:
- Scalability — You can have multiple servers/runners that share the Terraform state and can manage your Terraform infrastructure.
- Durability — Your file will be stored on a remote server, usually in the cloud, so it won’t depend on your local machine/server to keep the state file safe. For example, S3 is designed for 11 nines of durability (99.999999999%).
- Availability — As with scalability, you don’t depend on a local server to store the state. Your state file will be widely available for use by any runner.
What is the difference between the Terraform local and remote backend?
The key difference between local and remote backends is that a local backend stores state on the machine where the Terraform operation is running. In contrast, a remote backend stores state on a cloud server or a dedicated server.
Using a remote backend, you are not bound to the limitations of the Terraform runner. For example, if you run your Terraform operation in GitHub Actions with the local backend enabled, you probably won’t be able to retrieve the initialized state, as you cannot guarantee that all actions will run in the same runner.
How to configure different Terraform backends?
To configure a backend for your Terraform code, you need to define it in a backend block inside your terraform block. Then, you’ll be able to add and configure your desired backend.
The Terraform configuration below is set to use an AWS S3 bucket as its backend.
terraform {
  backend “s3 ”{
    …
  }
}
Example 1: AWS S3 bucket backend configuration
To configure your Terraform backend as an AWS S3 bucket, you can use the s3 keyword and pass your AWS credentials and configuration.
terraform {
  backend "s3" {
    bucket          = "MY_BUCKET"
    key               = "PATH/TO/KEY"
    region           = "MY_REGION"
    access_key  = "AWS_ACCESS_KEY"
    secret_key	= "AWS_SECRET_KEY"
  }
}
Things to note about configuring the S3 backend:
- access_key – This is your AWS account access key. It is an optional value that can be sourced from the environment variable
AWS_ACCESS_KEY_ID, AWS shared credentials file (e.g.,~/.aws/credentials), or AWS shared configuration file (e.g.,~/.aws/config). - secret_key – This is the AWS account secret key. AWS_SECRET_ACCESS_KEY environment variable, AWS shared credentials file (e.g.,
~/.aws/credentials), or AWS shared configuration file (e.g.~/.aws/config). - region – This is the region where the S3 bucket is created. It can be passed through the environment variables
AWS_DEFAULT_REGIONandAWS_REGION. (According to the Terraform documentation, this is required only if these variables have not been set).
The preferred way to configure your credentials is to use environment variables, reducing the amount of sensitive data in your Terraform code.
So, the best approach is for us to set the AWS_ACCESS_KEY_ID, AWS_SECRET_ACCESS_KEY, and AWS_DEFAULT_REGION:
terraform {
  backend "s3" {
    bucket          = "MY_BUCKET"
    key               = "PATH/TO/KEY"
  }
}
You’ll only need to set the region if you require the S3 bucket to be in a specific region that differs from where your provider is set.
Lastly, the AWS user or role Terraform uses requires permissions from s3:ListBucket, s3:GetObject, and s3:PutObject to manage the state file. An example of IAM policy is below:
{
  "Version": "2012-10-17",
  "Statement": [
    {
      "Effect": "Allow",
      "Action": "s3:ListBucket",
      "Resource": "arn:aws:s3:::mybucket"
    },
    {
      "Effect": "Allow",
      "Action": ["s3:GetObject", "s3:PutObject"],
      "Resource": "arn:aws:s3:::mybucket/path/to/my/key"
    }
  ]
}
The permission s3:DeleteObject is only required if you are using workspaces.
State locking
Since Terraform 1.10, the S3 backend can lock state natively by writing a lock file to the same bucket, so you no longer need a separate DynamoDB table. Set use_lockfile = true in your backend block to turn it on:
terraform {
  backend "s3" {
    bucket       = "MY_BUCKET"
    key          = "PATH/TO/KEY"
    use_lockfile = true
  }
}
Native locking became stable in Terraform 1.11, which also deprecated the dynamodb_table argument. Migrate existing configurations to use_lockfile, because DynamoDB-based locking will be removed in a future version.
Legacy DynamoDB locking
Before native locking, Terraform used a DynamoDB table for state locking with AWS. This table needs to be created before it can be used.
This approach also requires the AWS IAM permissions dynamodb:DescribeTable, dynamodb:GetItem, dynamodb:PutItem, and dynamodb:DeleteItem. You can find an example AWS IAM policy permission document below:
{
  "Version": "2012-10-17",
  "Statement": [
    {
      "Effect": "Allow",
      "Action": [
        "dynamodb:DescribeTable",
        "dynamodb:GetItem",
        "dynamodb:PutItem",
        "dynamodb:DeleteItem"
      ],
      "Resource": "arn:aws:dynamodb:*:*:table/mytable"
    }
  ]
}
Then, you specify your state-locking DynamoDB table in your backend block:
terraform {
  backend "s3" {
    bucket                  = "MY_BUCKET"
    key                       = "PATH/TO/KEY"
    dynamodb_table  = "YOUR_DYNAMODB_TABLE"
  }
}
To migrate without downtime, set both use_lockfile = true and dynamodb_table at the same time, then remove dynamodb_table once every machine runs Terraform 1.11 or later.
Example 2: Azure Blob Storage backend configuration
To configure Azure Blob Storage, set the backend type to azurerm. Then, specify the resource group name, storage account name, container name, the key for your Terraform state file, and the desired authentication method.
Below, you can find a partial configuration without any authentication yet set:
terraform {
  backend “azurerm ”{
    resource_group_name  = "StorageAccount-ResourceGroup"
    storage_account_name = "abcd1234"
    container_name             = "tfstate"
    key                                 = "terraform.tfstate"
    …
  }
}
Azure has three types of authentication:
- Access Key
- SAS Token
- Azure Active Directory
Let’s discuss them now.
Access key
This is the default authentication method, where you provide the Azure Storage account access key directly in the configuration via the access_key property. You can do it directly in the backend configurations or follow the best approach we discussed before — set it to the ARM_ACCESS_KEY environment variable.
The configuration should look as follows:
terraform {
  backend "azurerm" {
    resource_group_name  = "StorageAccount-ResourceGroup"
    storage_account_name = "abcd1234"
    container_name             = "tfstate"
    key                                 = "terraform.tfstate"
   # access_key is being set through the ARM_ACCESS_KEY environment variable
  }
}
With this method, you are responsible for rotating it according to your needs.
Even though it is the default option, Terraform and Microsoft do not recommend it. This is because the access key has full permissions to your Blob Storage, posing a high risk if it gets leaked.
SAS token
You can also use the SAS token (Shared Access Signature token) — a more secure storage account authentication method with which you can define granular access, such as temporary access.
The configuration is very simple. Let’s say you have this SAS token sp=racwdl&st=2021-09-28T05:49:01Z&se=2023-04-01T13:49:01Z&sv=2020-08-04&sr=c&sig=O87nHO01sPxxxxxxxxxxxxxsyQGQGLSYzlp6F8%3D. You can pass it directly to the configuration through the sas_token property, or use the more recommended method by setting the value in the environment variable ARM_SAS_TOKEN:
terraform {
  backend "azurerm" {
    resource_group_name  = "StorageAccount-ResourceGroup"
    storage_account_name = "abcd1234"
    container_name             = "tfstate"
    key                                 = "terraform.tfstate"
   # sas_token is being set through the ARM_SAS_TOKEN environment variable
  }
}
Azure AD
This authentication method relies on Azure Active Directory to authenticate and authorize your Blob Storage. Using Service Principal or Managed Identities is the most recommended method for Azure Blob Storage because it exposes the least sensitive data.
To use Azure AD with Service Principal or User Assigned, you need to have one of these with a role that has access to your Storage Account. Then, you just need to set ARM_CLIENT_ID, ARM_SUBSCRIPTION_ID, and ARM_TENANT_ID environment variables with your client, subscription, and tenant IDs.
terraform {
  backend "azurerm" {
    resource_group_name  = "StorageAccount-ResourceGroup"
    storage_account_name = "abcd1234"
    container_name             = "tfstate"
    key                                 = "prod.terraform.tfstate"
    use_oidc                        = true
    use_azuread_auth         = true
  }
}
The service principal needs to have Storage Blob Data Owner role when using Azure AD auth. In practice, according to the documentation, if you don’t set use_azuread_auth, Terraform will generate an access key to access the Blob Storage. In this case, it needs the ListKeys permission to access the storage account and retrieve those keys. Remember that the generated key will have full access to the storage account. Therefore, it is recommended that Azure AD authentication be used instead.
You can also configure a Service Principal or User Assigned by setting the Client Secret or the Client Certificate. To configure them, you just need to set one of their respective environment variables and not set the use_oidc property:
- Client Secret – Set the
ARM_CLIENT_SECRETenvironment variable with the client secret - Client Certificate – Set the
ARM_CLIENT_CERTIFICATE_PATHenvironment variable with the path to the client pfx certificate file and then set theARM_CLIENT_CERTIFICATE_PASSWORDwith the certificate password
The backend configuration should be similar to the following:
terraform {
  backend "azurerm" {
    resource_group_name  = "StorageAccount-ResourceGroup"
    storage_account_name = "abcd1234"
    container_name             = "tfstate"
    key                                 = "prod.terraform.tfstate"
    use_oidc                        = true
    use_azuread_auth         = true
  }
}
The configuration for using backends authenticated with an Identity Principal is very similar to the Service Principal. The only difference is that you will set the use_msi property to true and not set the use_oidc property.
terraform {
  backend "azurerm" {
    resource_group_name  = "StorageAccount-ResourceGroup"
    storage_account_name = "abcd1234"
    container_name             = "tfstate"
    key                                 = "prod.terraform.tfstate"
    use_msi                         = true
    use_azuread_auth         = true
  }
}
You must also set the ARM_CLIENT_ID, ARM_SUBSCRIPTION_ID, and ARM_TENANT_ID environment variables.
State locking
One advantage of Azure Blob Storage as a backend is that you don’t need to configure any state locking separately. It is already configured to use the blob storage’s native capabilities to handle it.
Example 3: Local backend configuration
As mentioned previously, a local backend is the default Terraform behavior, and you don’t need to configure it. Terraform will automatically generate a terraform.state file in the directoryt that you run terraform init. For example, running it on ~/dev/project, will create the file ~/dev/project/terraform.tfstate.
However, you can configure where the file will be created and managed by defining the backend “local” and passing the path property. Terraform will use this path for state management.
See the example local backend configuration below:
terraform {
  backend "local" {
    path = "relative/path/to/terraform.tfstate"
  }
}
Note: Terraform uses the local filesystem to also lock the file, preventing update conflicts.
Can you use multiple backends in Terraform?
Terraform does not support using multiple backends within a single configuration. Each configuration can be associated with just one backend defined in the backend block.
However, the Terraform Workspaces feature includes instances of state data tied to a working directory. It’s a collection of all related Terraform configurations, and each collection must belong to a workspace. By default, every Terraform configuration is assigned to the ‘default’ workspace unless you create a new one.
Why are we talking about workspaces? Each workspace can only have one backend type configured. For example, if you have configured AWS S3 for the default workspace, you cannot also configure Azure Blob Storage.
However, you can have multiple workspaces in a single Terraform configuration. If each workspace has only one configured backend, you can also have multiple backends.
Below, you can find a list of the backends that support multiple workspaces:
- AzureRM
- Consul
- COS
- GCS
- Kubernetes
- Local
- OSS
- Postgres
- Remote
- S3
The full documentation can be found here.
Best practices for managing a Terraform backend
Best practices for Terraform backends include securing and encrypting state files, enabling versioning, using state locking to prevent concurrent operations, regularly backing up state files, and monitoring access logs for suspicious activity.
Use a remote backend over a local backend
Because local backends store the state on the server disk, the state is tied to the lifecycle of that machine. If the machine stops, the state becomes inaccessible. If the machine breaks down, you lose your state.
This is more obvious when you are working with CI/CD tools that don’t rely on a single server but instead launch a new server each time a pipeline is run. In this scenario, one of two things can happen: Either you don’t get the same machine, and Terraform won’t have access to the updated state, or you get a node machine, which is designed to run only a few times before being destroyed. In either case, you risk losing your state entirely.
Remote backends provide a more reliable way to store and access your state.
Use partial configuration
As a rule of thumb, you should never store sensitive information in plain text. This is a big security risk because anyone with access to the file can view that secret.
With Terraform configuration files, it is recommended that you use partial configurations, setting only the most vital and non-sensitive information in your backend block.
For credentials, you should pass this information through environment variables, like the AWS_SECRET_ACCESS_KEY, or a command line argument with the -backend-config during the terraform init code, like -backend-config=”secret_key=SECRET_KEY_VARIABLE”.
Enable versioning on your state storage
If you’re using a remote backend such as S3 or GCS, enable versioning for the bucket. This gives you a full history of state file changes, so you can roll back to a previous state if a run corrupts it or if something goes wrong during a migration. For S3, this is a single setting in your bucket configuration. There’s no reason not to have it on in production.
Managing Terraform remote backends with Spacelift
Spacelift makes it very easy to enable backends for your Terraform project. When creating a stack, you have two options:
- Set up your backend for state management.
- Enable Spacelift to manage your state as your Terraform backend.

As Sqills grew and transitioned to the cloud, it was no longer practical or desirable to have the infrastructure engineers automate Terraform with Bash scripts. Sqills needed a low-maintenance Terraform automation solution they could depend on — and that’s when they discovered Spacelift.
Let’s review how to set up Spacelift as your Terraform backend.
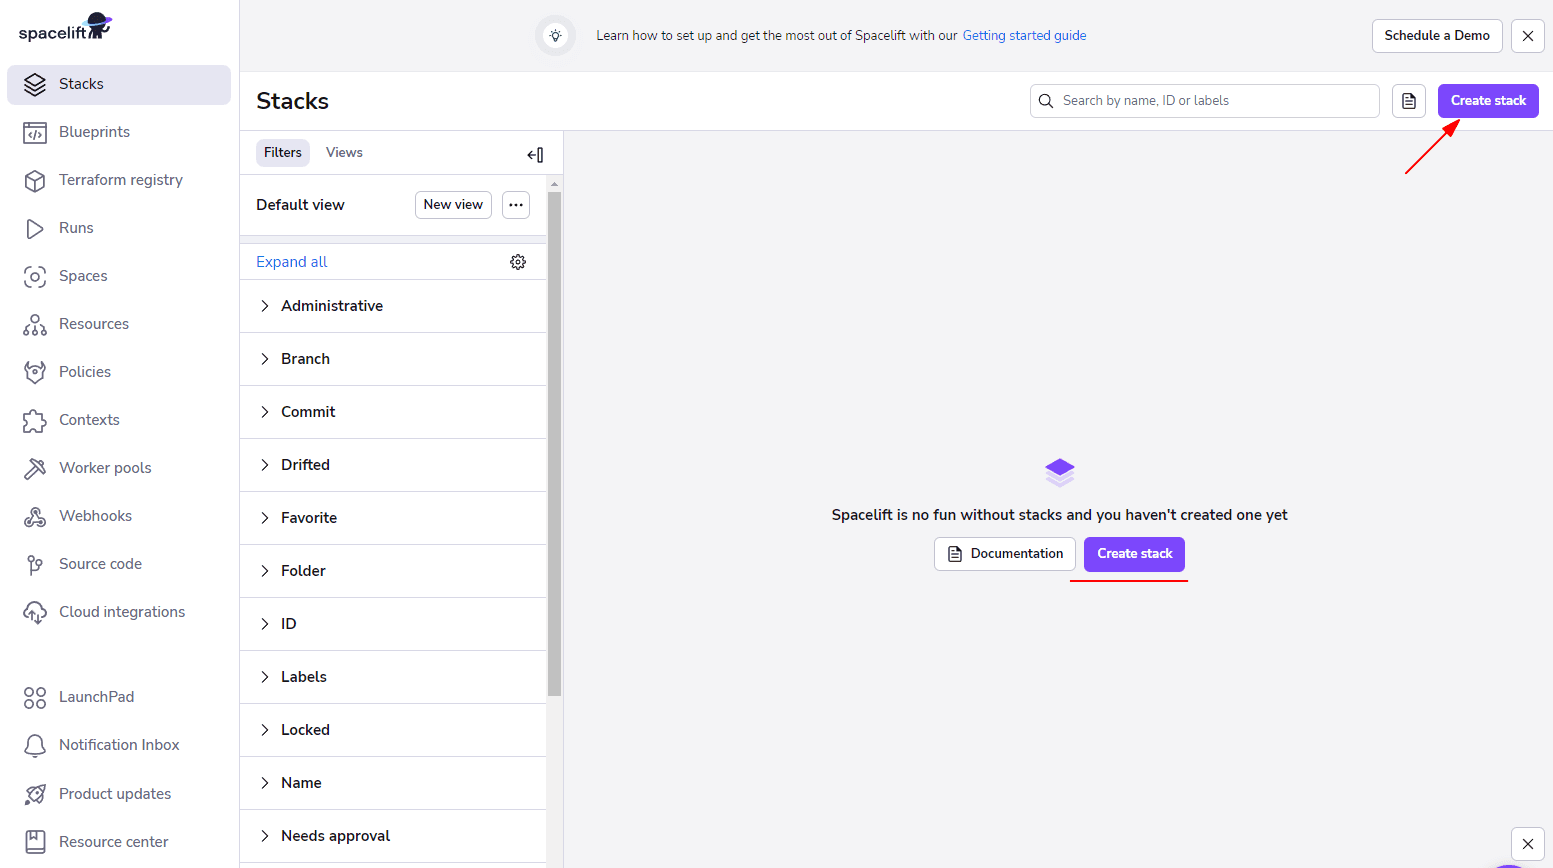
First, log in to Spacelift and create a stack by clicking on Create Stack.
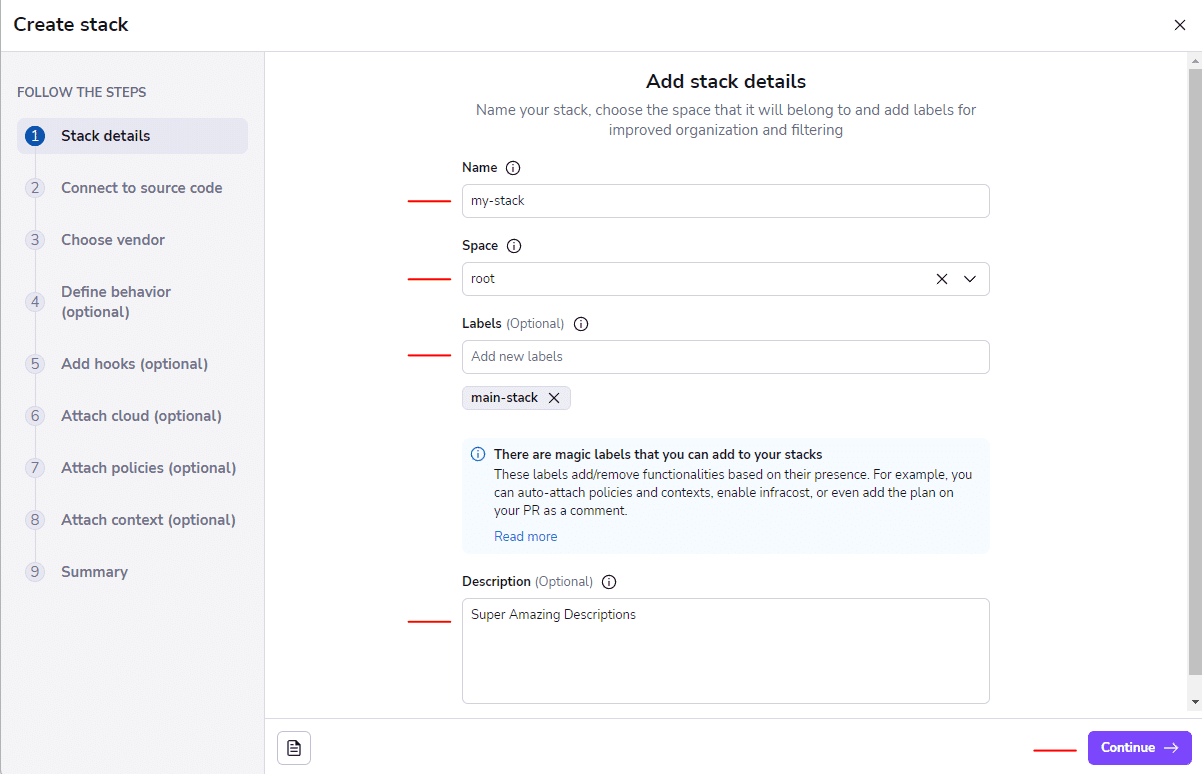
Enter your stack name, the space, label, and description, and click on Continue.
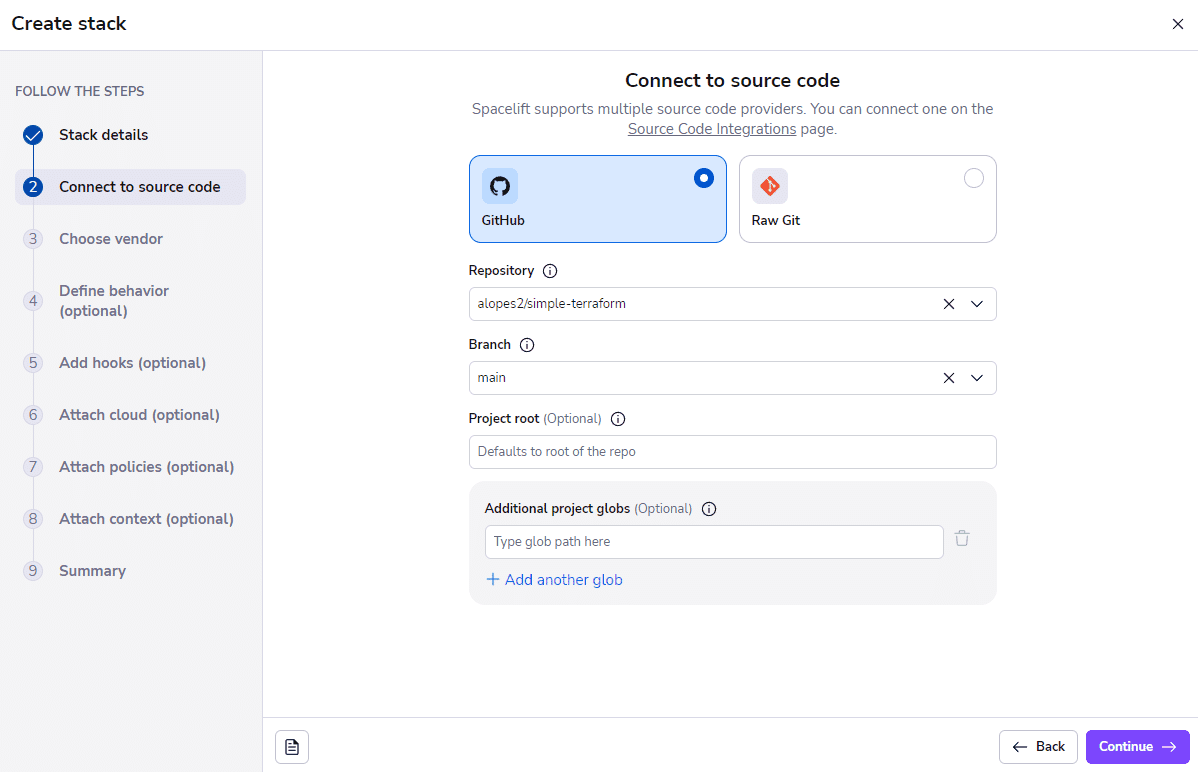
Now, select the source code integration where your code is hosted. We have selected GitHub. Then select the repository and branch and specify the Project root.
Note: The Project root is the folder/working directory where your Terraform code is. So, if it is in the root folder, you don’t need to specify anything. But if it is in the iac folder, for example, you can specify iac.
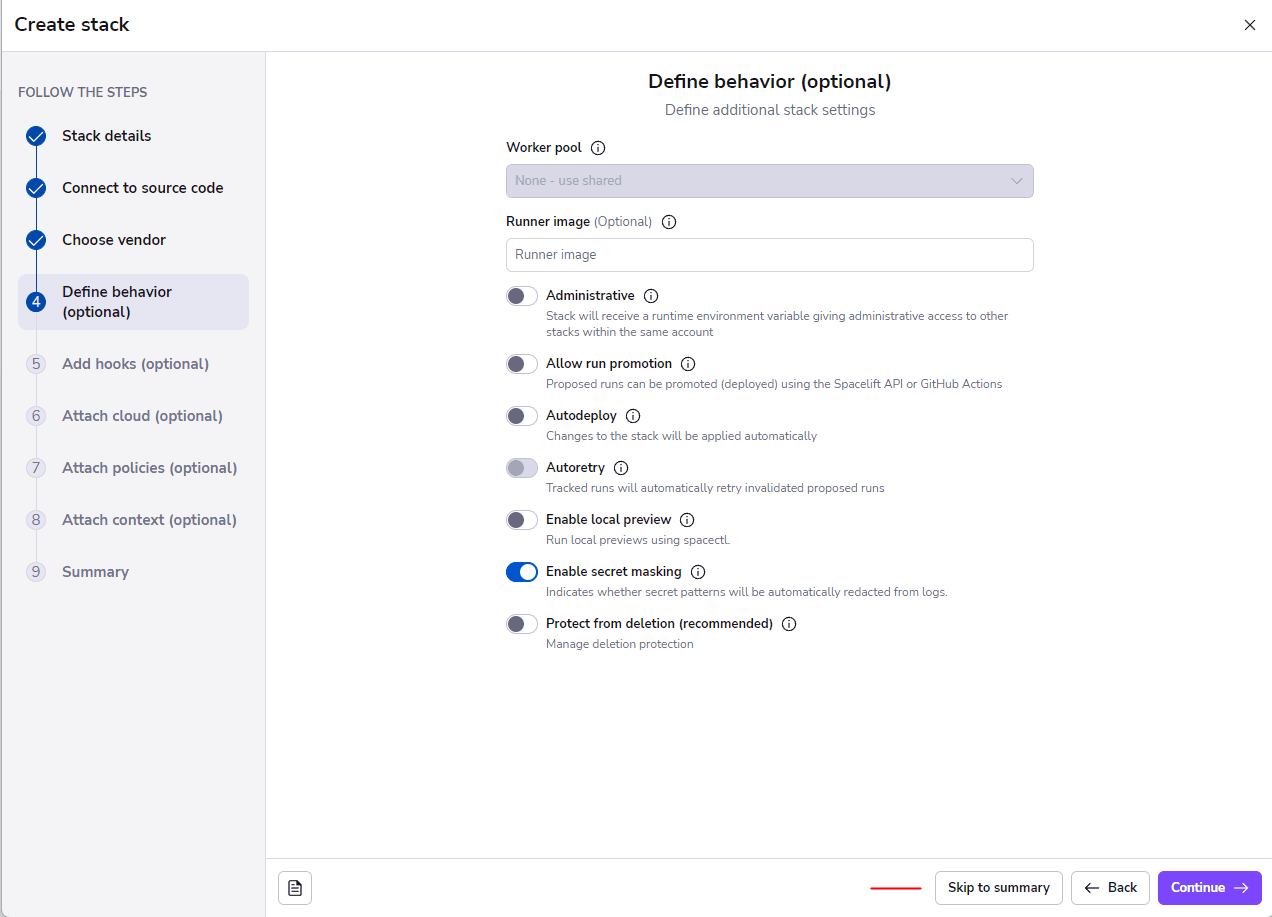
On the next page, we select Terraform as our vendor. You have the option to set up a backend of your own or use Spacelift as your backend for managing state.

If you deselect the Manage State option, you’ll need to configure any backend you’d like to manage your state, such as the examples we viewed before.
If you select the option, you enable Spacelift as your backend, and it will generate and manage your state for you out of the box.
Note: This is the only chance you’ll have to enable Spacelift as your backend. Once you create your stack, this option cannot be changed.
We want to set Spacelift as our backend, so we select the Manage State option.
External state access allows your state managed by Spacelift to be accessed from external sources. Only other stacks with administrative access or a user with write permissions with this stack can access the state. To understand more about how you can externally access your remote state, you can check this article, which explains how you can enable a remote backend to access and perform terraform actions in your state.
Then, we click on Create and Continue.
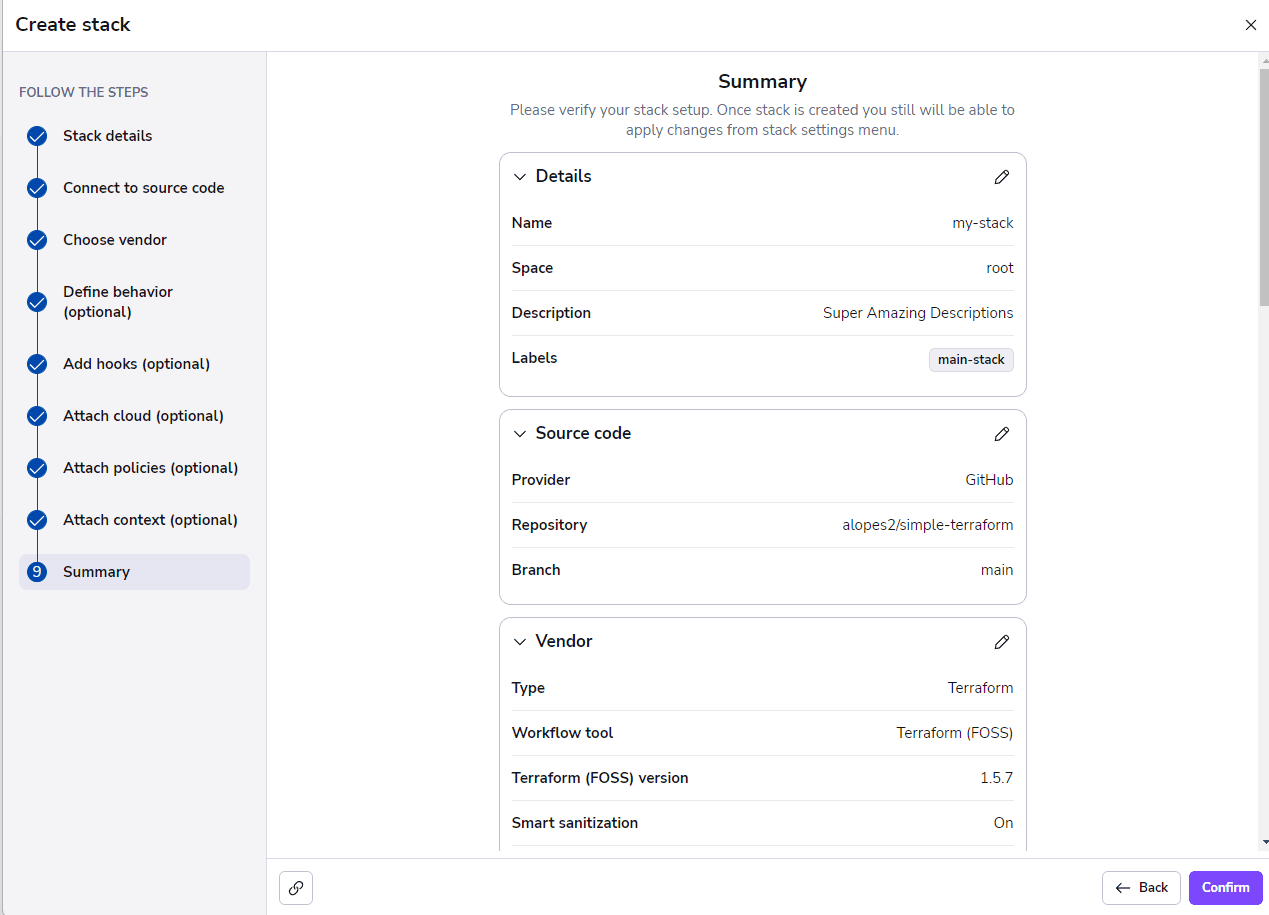
On the next page, click on Skip to summary.
Here, you can review your Spacelift configuration. If everything is good, click on Confirm.
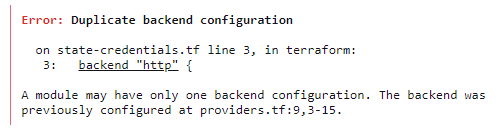
You shouldn’t specify any backend in your Terraform code because, with the Manage State option enabled, Spacelift already has an http backend configured to manage your state. If you manually specify a backend in your Terraform project, you’ll encounter an error during initialization.
Now, you need to add the credentials for your cloud provider as environment variables. You have two options:
1. Manually add the credentials to the environment variables
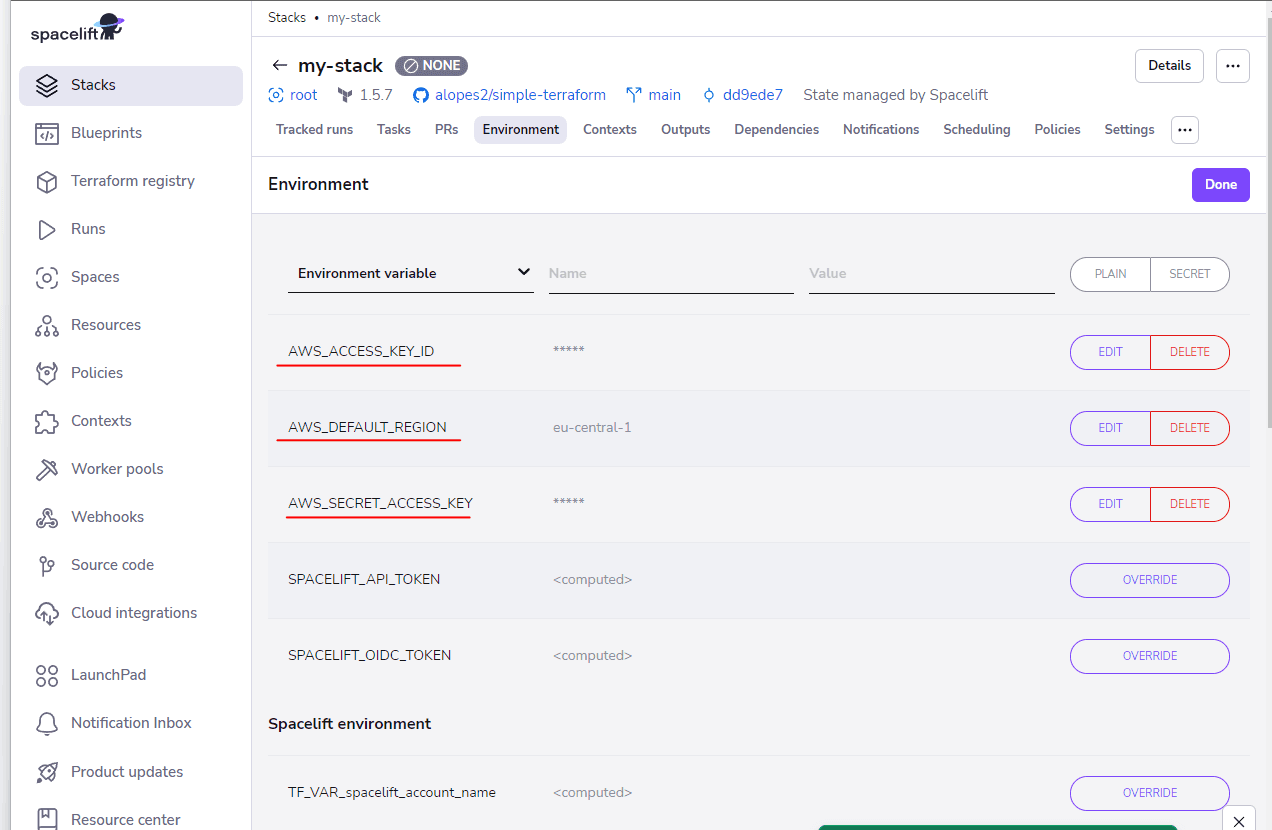
Go to the Environment section in your stack:
Add the credentials as environment variables. Here, we add AWS credentials:
2. Use Spacelift cloud integration
With this approach, we let Spacelift integrate directly with our cloud provider without creating static keys. For example, you will create a new role for AWS and grant access to Spacelift through an IAM policy. This is the recommended approach, since you don’t expose static credentials.
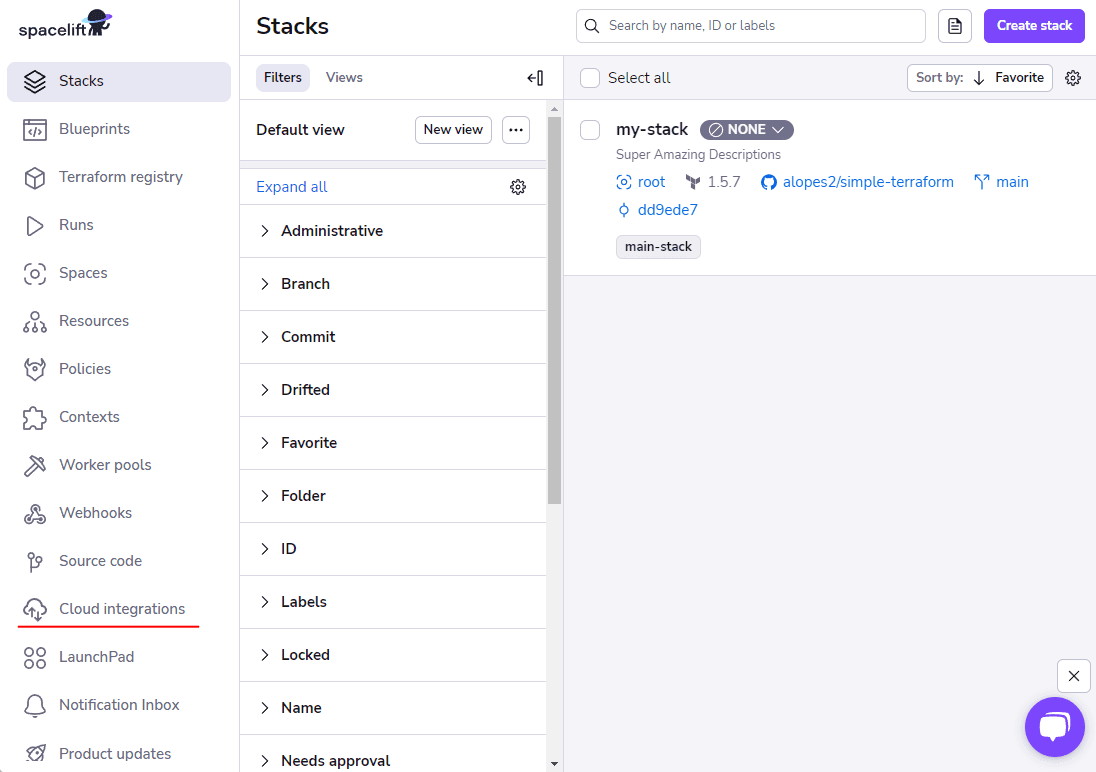
To integrate with a cloud provider, click on the Cloud integrations button on the left menu:
Then, select your cloud provider from AWS, Azure, or GCP and click on Add your first integration.
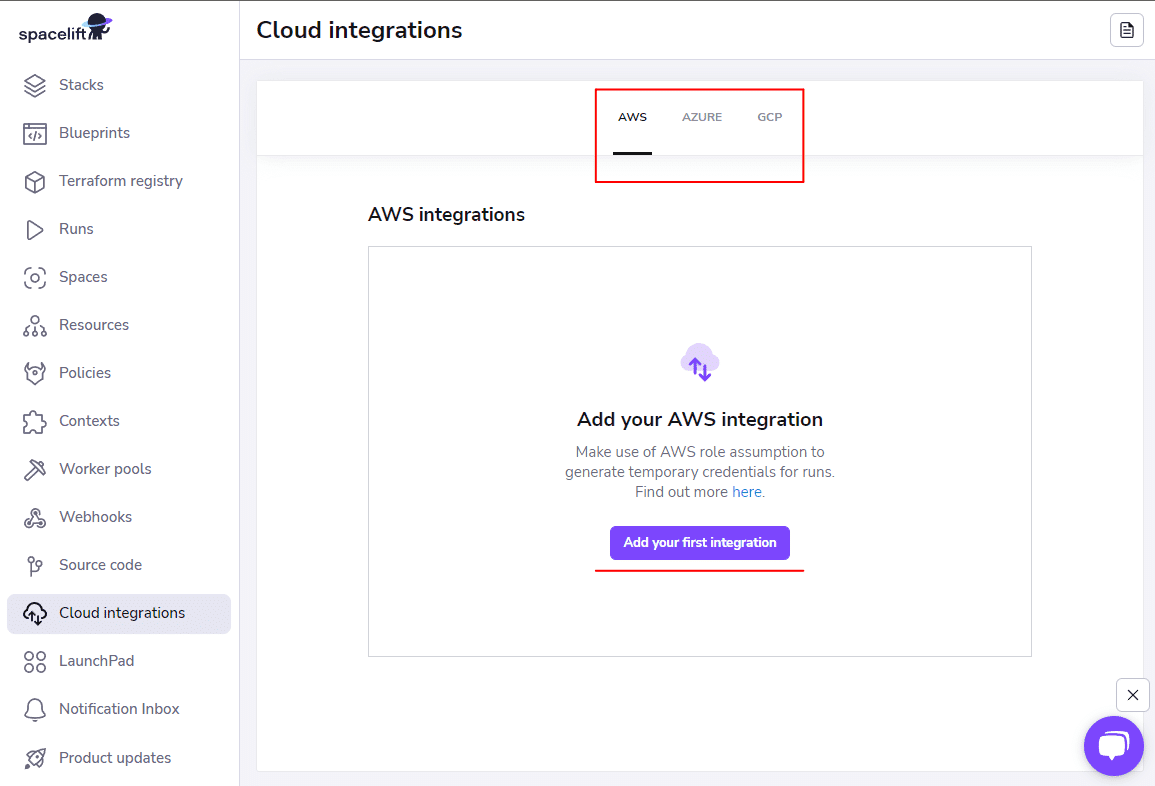
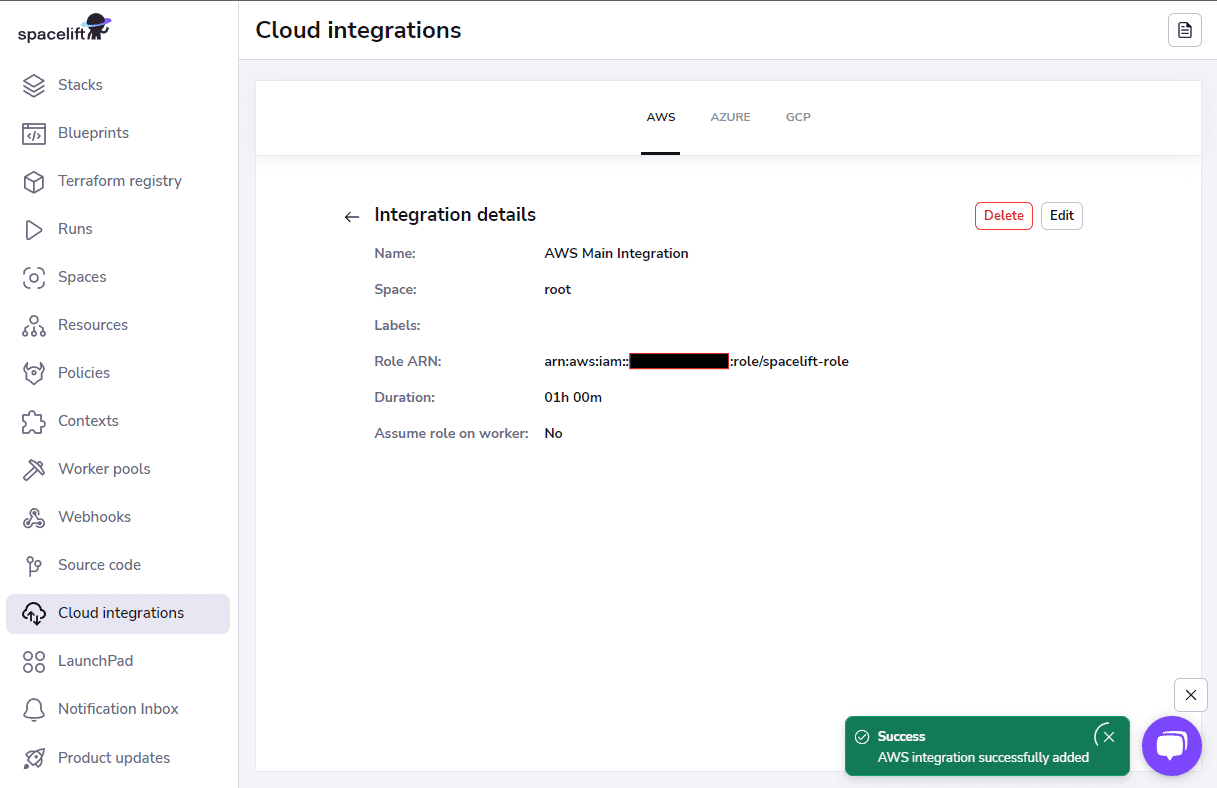
Here, we’ll demonstrate how to integrate with AWS.
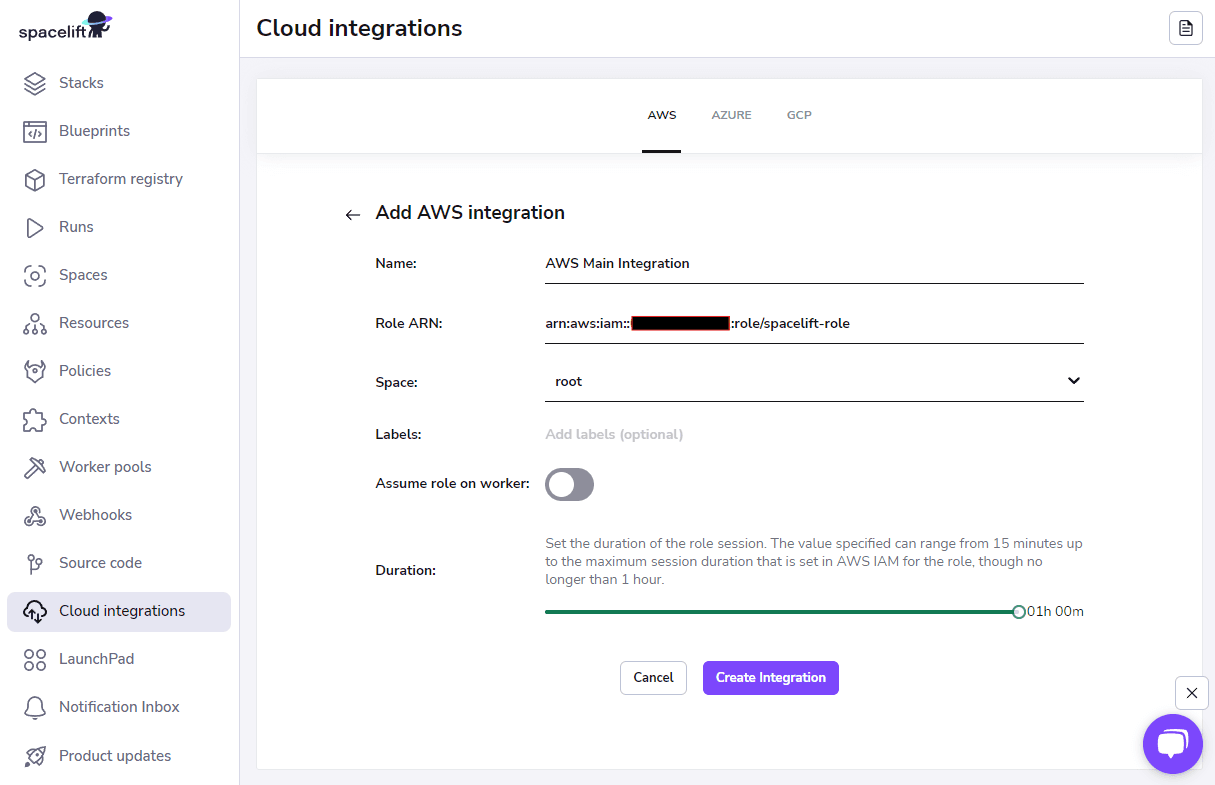
Add a name to your integration, and then add the role ARN that Spacelift will use to assume and perform Terraform actions in your AWS account. This role will need a policy attached to it to enable Spacelift to assume it.
The role ARN is always in the format arn:aws:iam::<ACCOUNT_ID>:role/<ROLE_NAME>. Here our role name will be spacelift-role.
Then click on Create Integration to create it.
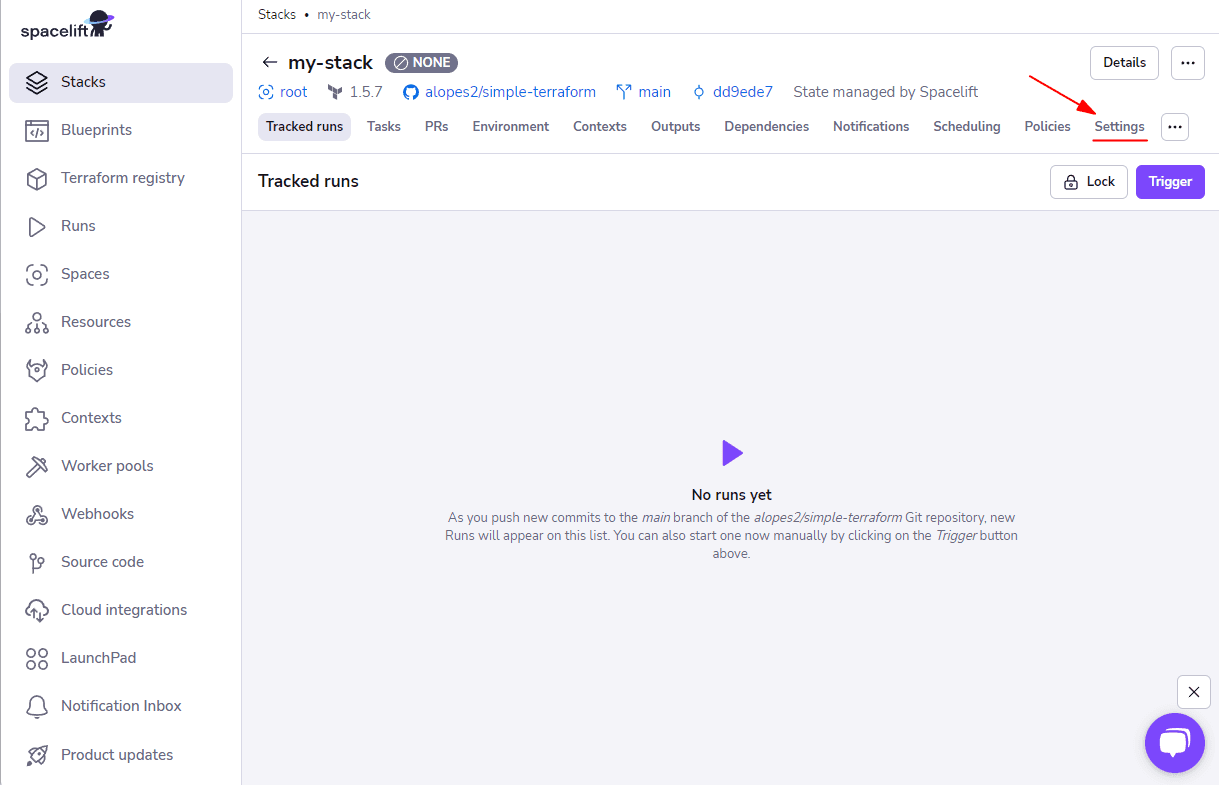
We need to add this integration to our stack so it can use it.
Go to your stack and click on the Settings tab.
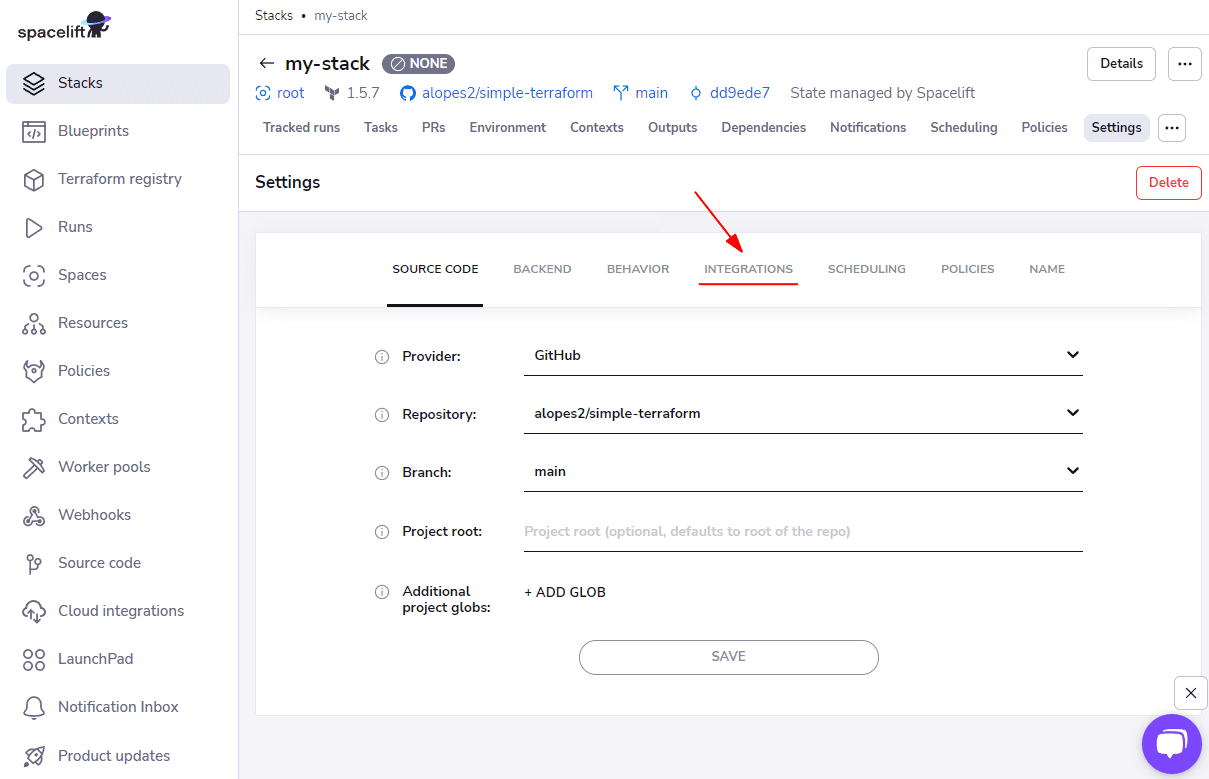
Then go to the Integrations tab.
Select AWS from the dropdown list of supported integrations.
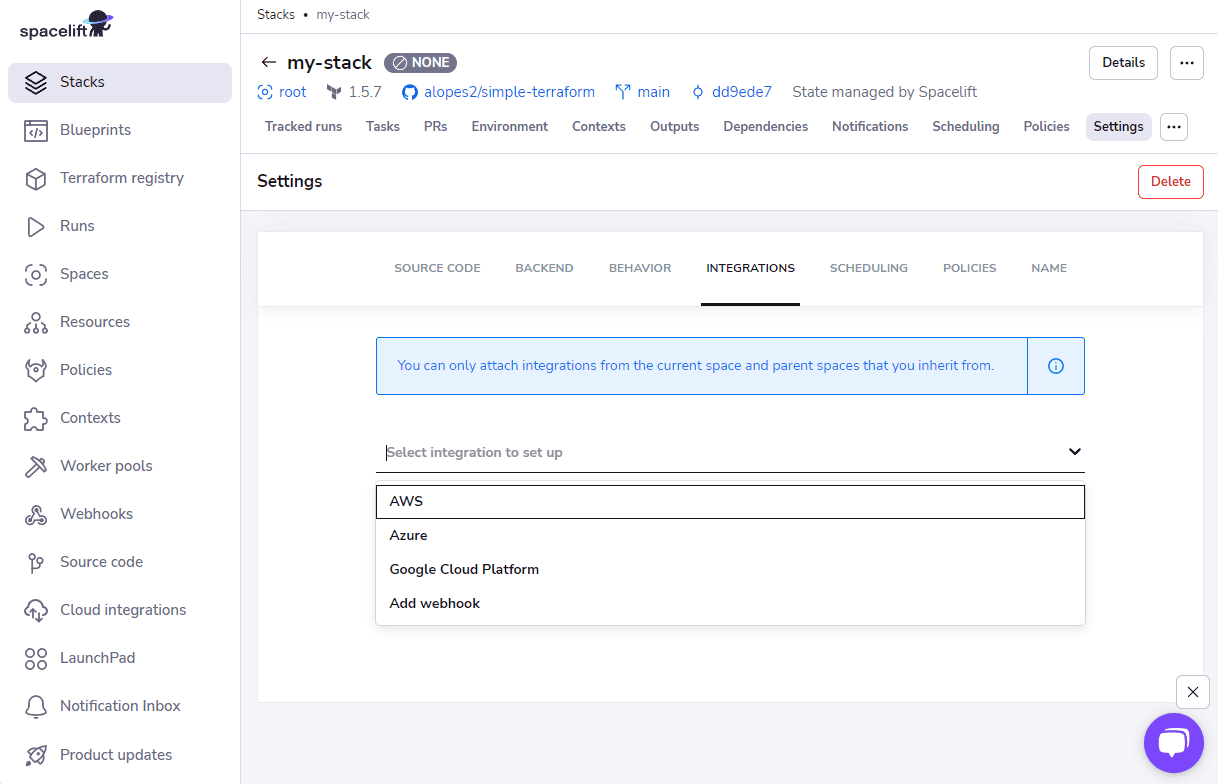
Then select your integration and mark Read and Write.
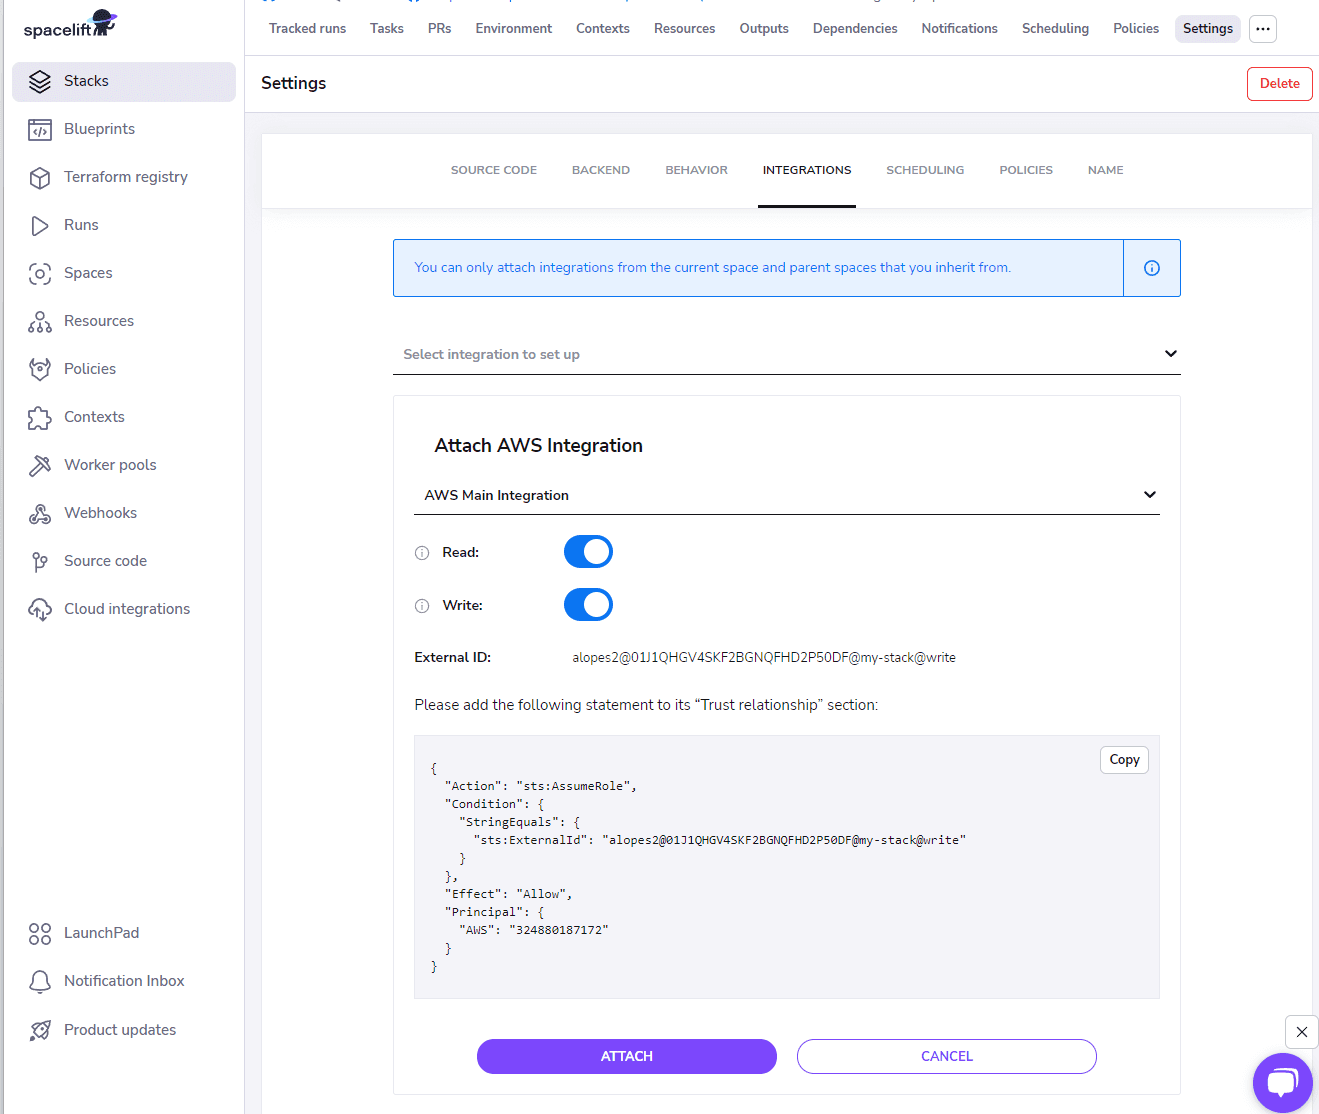
Read– It is required for theplanphase when Terraform requires to read information.Write– It is required for theapplyphase when Terraform will create resources.
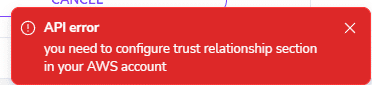
Note the policy attachment generated by Spacelift. It contains the necessary permissions your role requires to allow Spacelift to assume it. Without it, the following error will appear when you attach the integration to your stack.
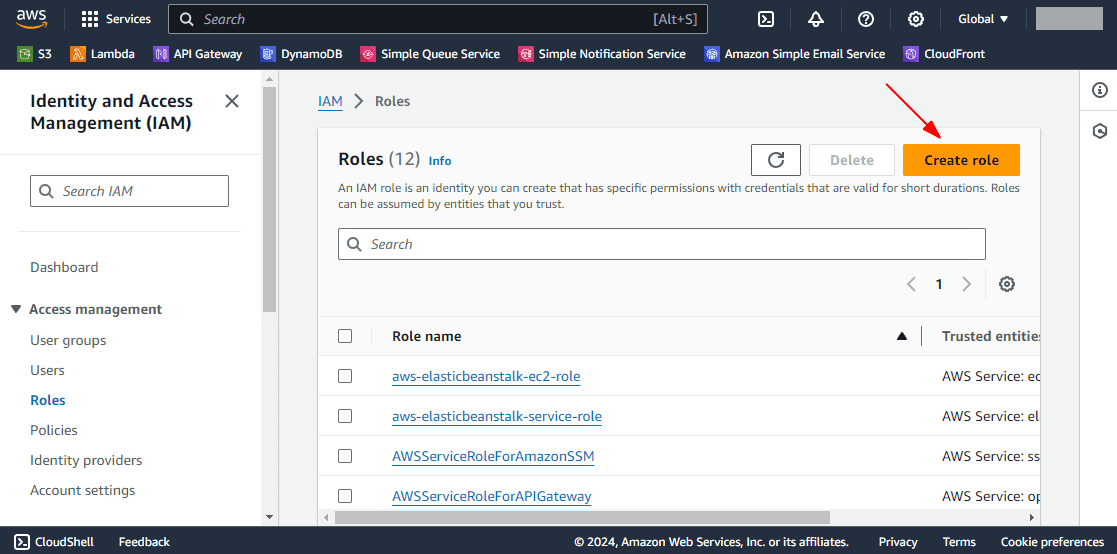
Let’s create our role and add the required permissions. Go to your AWS account in the IAM console.
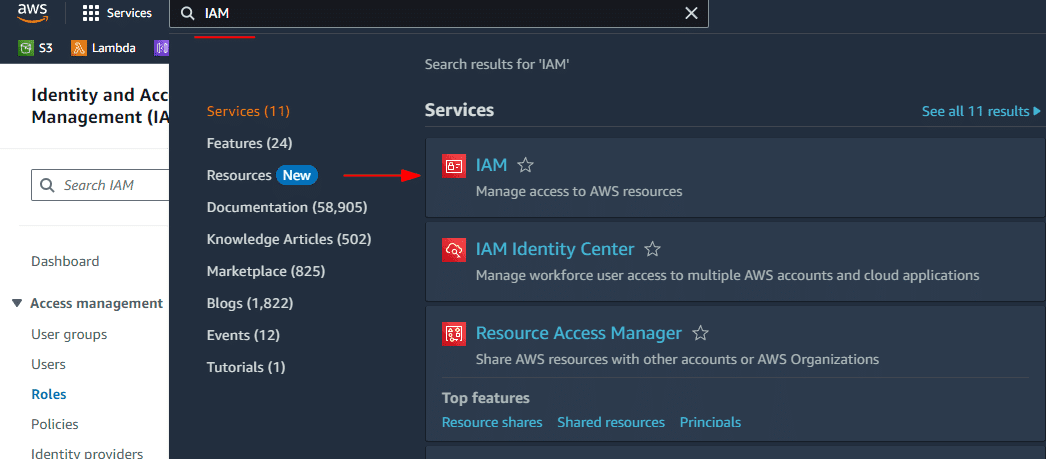
Then go to the Roles section.
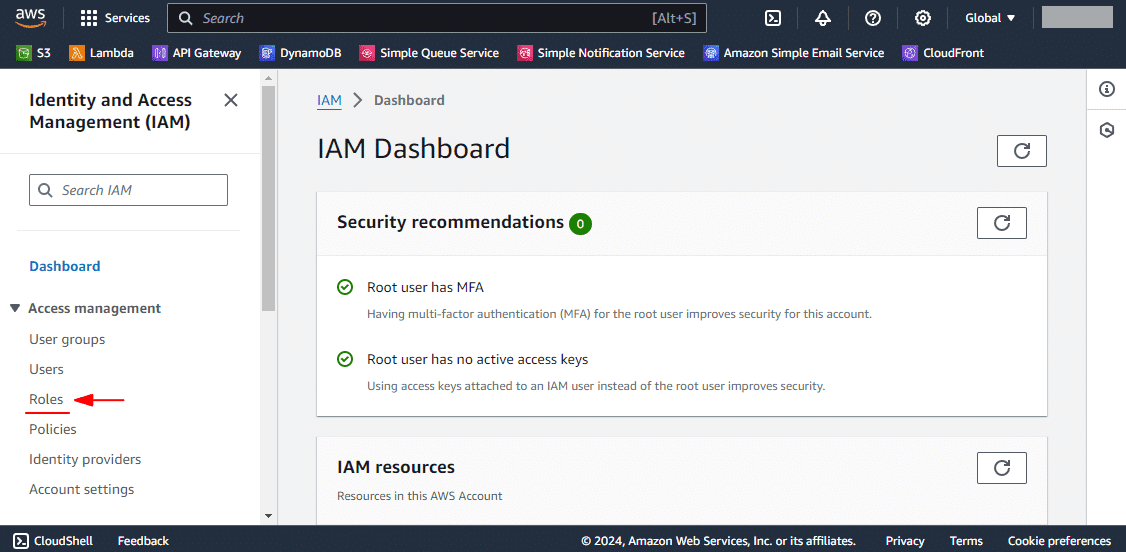
Then click on Create role.
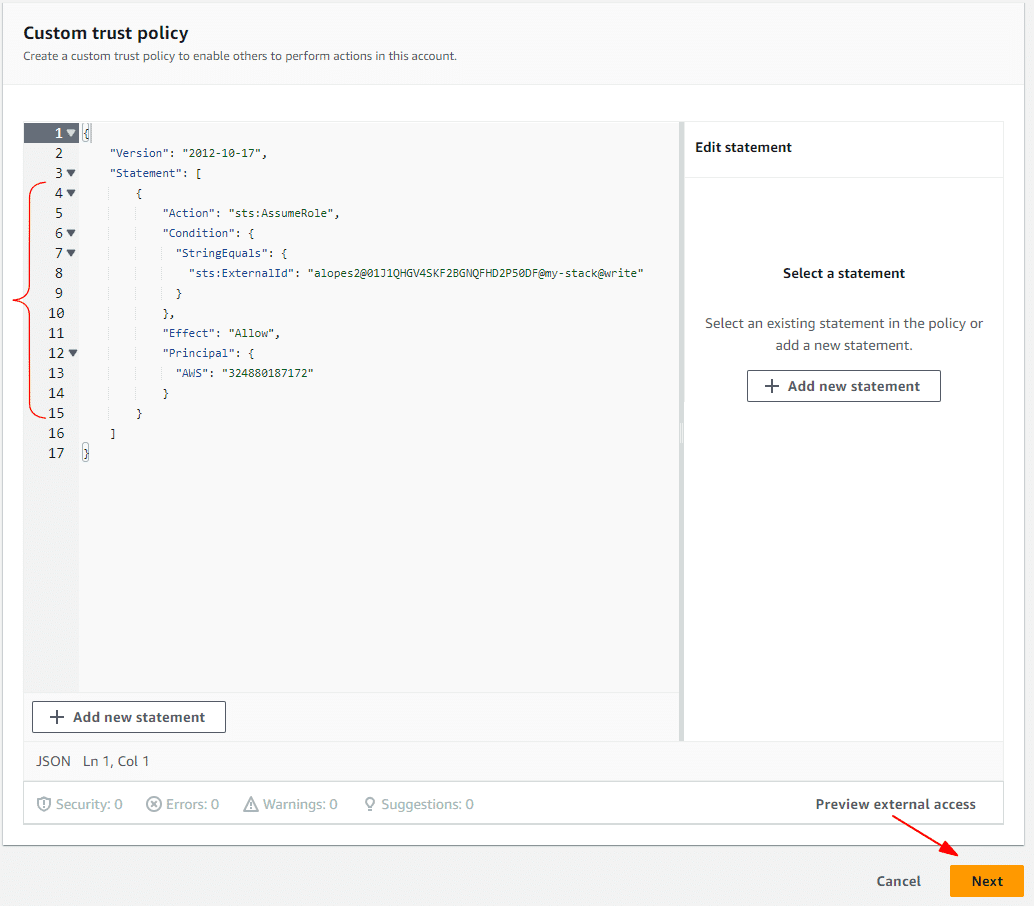
Select Custom trust policy.

Below, you’ll see a section to add your own policy. Copy the policy given by Spacelift, paste it inside the Statement array, and click on Next.
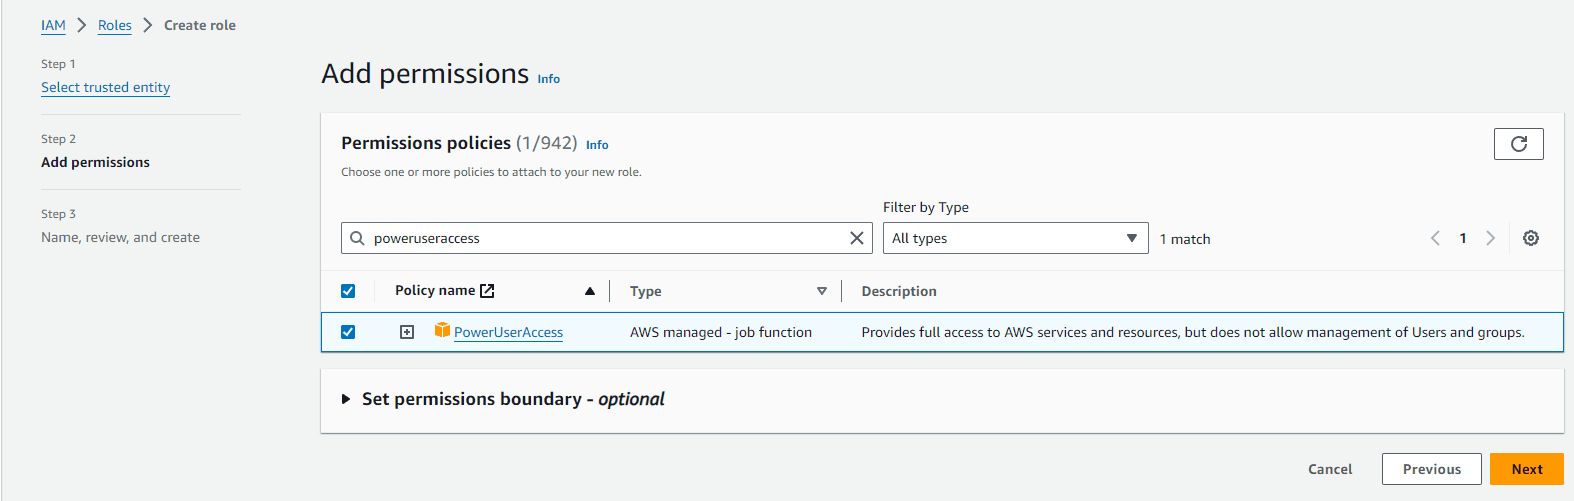
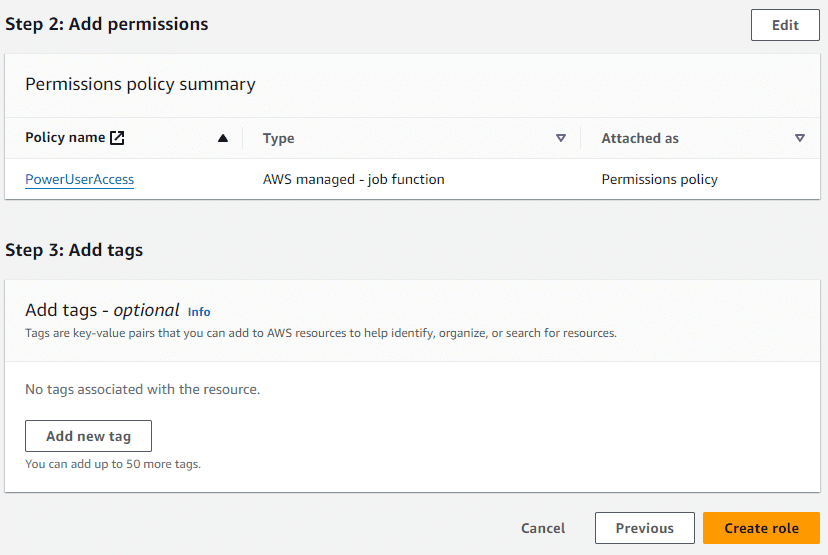
In the next section, select the minimum permissions your Terraform role will require to manage your infrastructure. If you don’t need to manage users or groups, select Power User Access and click Next.
Give your role a name and a description. It must be the same name used in your AWS Integration in Spacelift.
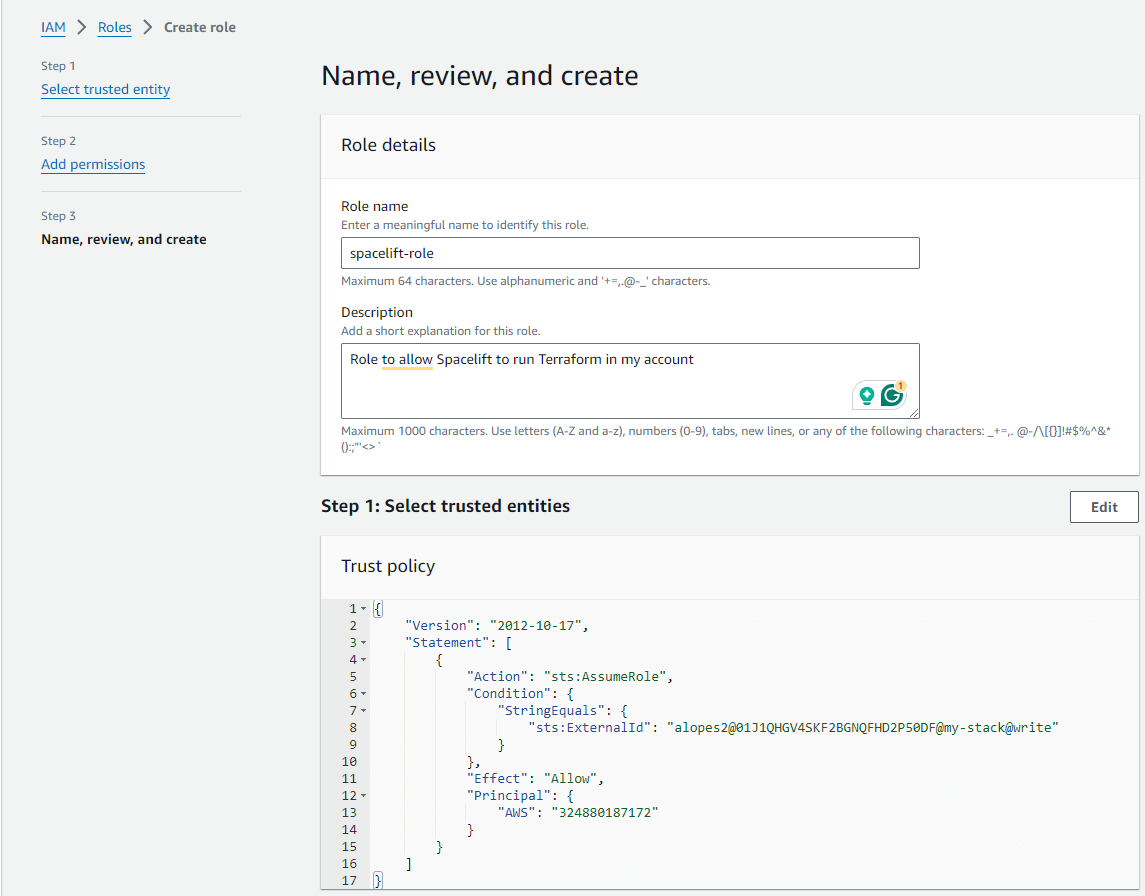
Review your role permissions, add tags if you’d like, and then click Create role.
Now, go back to the AWS integration attachment window and click on Attach.

You should see a similar statement confirming the attachment was successful.

Note that this method doesn’t automatically set the desired region. You’ll need to set it either in the AWS Terraform provider or through the environment variables AWS_DEFAULT_REGION or AWS_REGION.
Go to your stack and click on Trigger if you already have Terraform code in your repository. If you don’t, Spacelift has a hook that triggers a new run and plan every time you push code to the working directory you specified during the stack creation. (But don’t worry; it will ask for your confirmation before making any changes.)
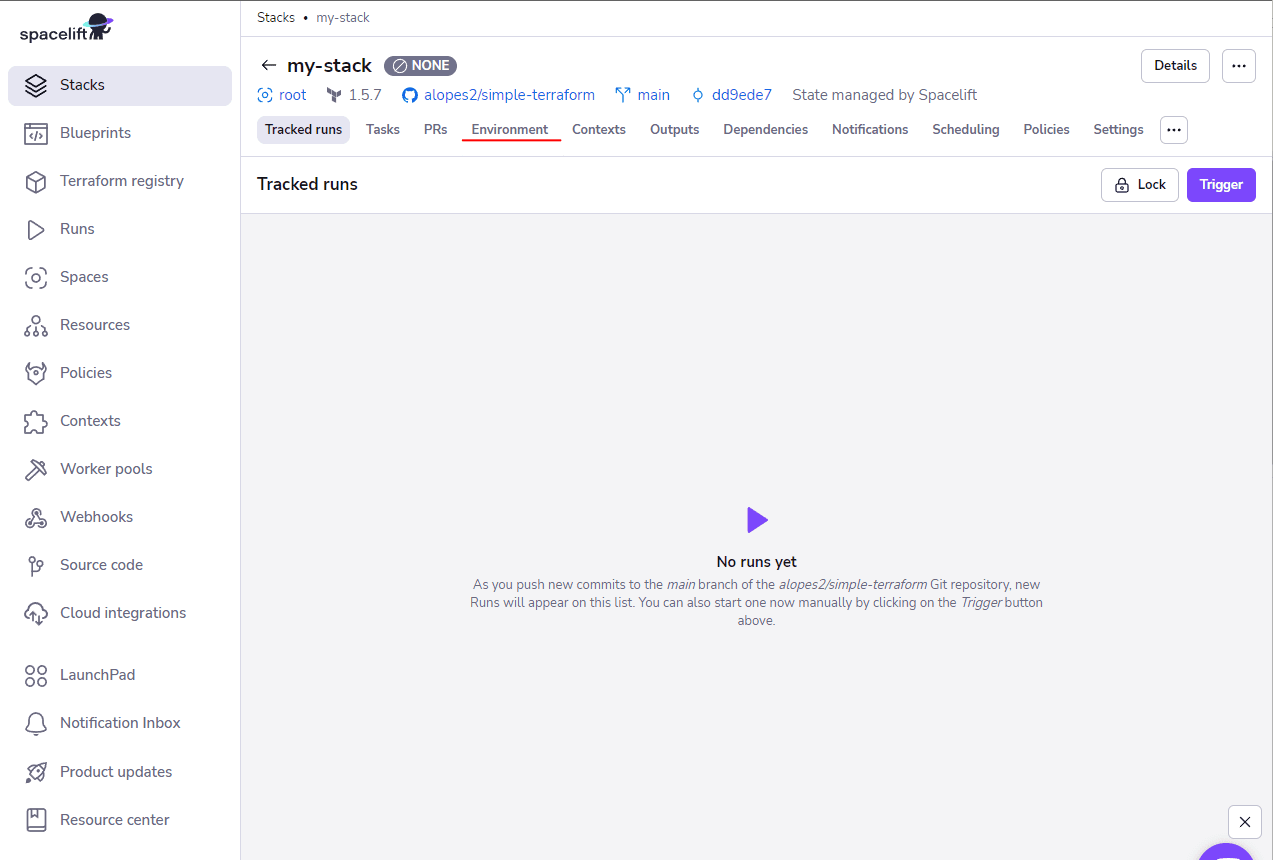
Once you trigger a new run, you can see in the Initializing step that Spacelift has added an http backend.
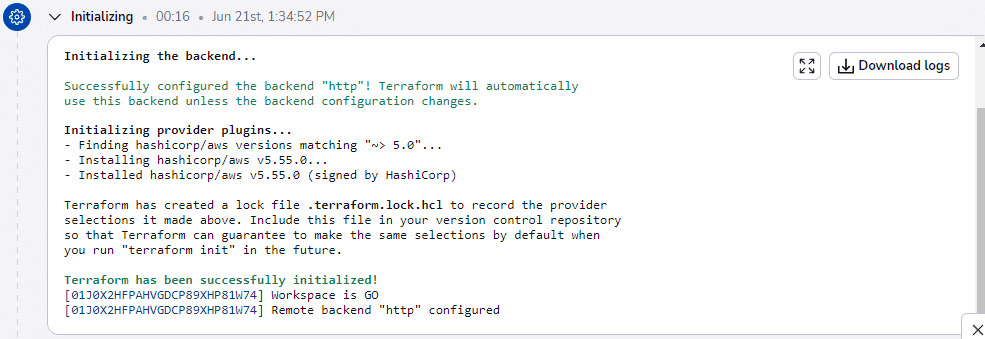
Terraform will then ask for your confirmation to apply the changes after planning.
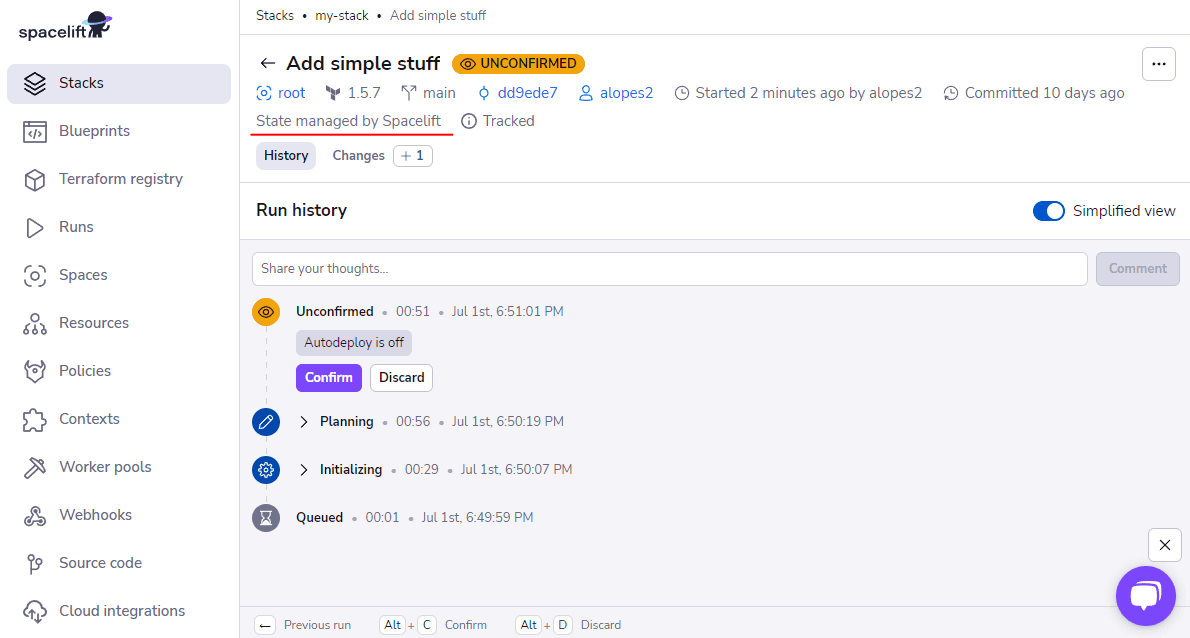
You can also see the State managed by Spacelift text, which confirms that Spacelift is indeed our backend and managing our state for us.
Key points
Terraform backends were designed to enable Terraform to store the state and easily access it in local storage or the cloud.
You should always favor a remote backend over a local one because the state file should be stored in a location that is more reliable and accessible, such as AWS S3 or Azure Blob Storage.
For a simple, reliable way to store and manage your state, use Spacelift as your state management. It provides a backend option out of the box and with no configuration. It has an HTTP backend configured with all the necessary features and configurations, so you can focus on your infrastructure design.
If you want to learn more about Spacelift, create a free account today, or book a demo with one of our engineers.
Manage Terraform better with Spacelift
Build more complex workflows based on Terraform using policy as code, programmatic configuration, context sharing, drift detection, resource visualization and many more.
Frequently asked questions
What is the difference between Terraform backend and state?
Terraform state is the actual data file that records resource mappings, attributes, and dependencies so Terraform can plan and apply changes correctly. A backend is the configuration that specifies where this state lives and how it is accessed, whether locally on disk or remotely in services like S3, Consul, or Terraform Cloud. In short, state is the content, backend is the storage mechanism.
What is a Terraform backend?
A Terraform backend determines where state is stored and how operations like locking, reading, and writing state are performed, with options ranging from local files to remote services like S3, Azure Blob, or Terraform Cloud.
What's the difference between local and remote backends?
Local backends store state on the machine running Terraform, while remote backends keep state in a shared service that supports locking, versioning, and team collaboration across distributed environments.
Which Terraform backend should I use in production?
Use a remote backend like S3 with DynamoDB locking, Azure Blob Storage, GCS, or Terraform Cloud in production to enable state locking, encryption, versioning, and secure team access.
Does Terraform support multiple backends?
No, each Terraform configuration supports one backend at a time, though you can split infrastructure across multiple root modules or workspaces, each with its own backend definition.
