
Terraform is a product by Hashicorp that uses Infrastructure as Code (IaC) to provision cloud infrastructure. With the right approach and resources, learning Terraform can be an exciting and rewarding experience, regardless of your background or familiarity with related concepts.
In this getting started Terraform tutorial, we will cover all the basics (and more) of the Terraform workflow and show how to use Terraform step-by-step, enabling you to manage cloud infrastructure with IaC.
This Terraform tutorial includes:
Infrastructure as Code (IaC) is a practice where infrastructure is managed and provisioned using code rather than manual processes. Similar to application code, the infrastructure code is stored in a version control systems (VCS), that ensure infrastructure changes are trackable and scalable. By defining infrastructure in descriptive, machine-readable files, IaC enables automation, consistency, and repeatability while reducing human error.

Terraform is an IaC tool that allows users to provision and manage infrastructure resources across various cloud platforms and on-premises environments. It uses declarative configuration files, written in HashiCorp Configuration Language (HCL) or JSON, to define and automate the lifecycle of resources, ensuring predictability and consistency. Terraform’s extensible plugin-based architecture supports a wide range of providers, enabling seamless integration and management of diverse infrastructure environments.
Why use Terraform?
Terraform is favored for its ability to streamline infrastructure management through code, ensuring consistency and reducing human error.
Its declarative approach allows users to define the desired state of their infrastructure, which Terraform then enforces. This capability extends across various cloud providers and on-premises environments, offering flexibility and reducing the complexity of managing multi-cloud or hybrid environments.
Moreover, Terraform’s state management and change automation features enhance team collaboration and accountability. By adopting Terraform, teams can achieve greater efficiency, scalability, and reliability in their infrastructure operations.
Terraform’s learning curve is relatively gentle, thanks to its straightforward syntax and comprehensive documentation. Beginners can start with basic concepts and gradually explore more advanced features. Its configuration files are written in HashiCorp Configuration Language (HCL) or JSON, making it accessible to those familiar with similar languages.
Traditionally, cloud infrastructure was managed manually without IaC (Infrastructure as Code). This method was inefficient and prone to errors. Maintaining consistency was especially challenging when managing multiple servers and clusters. While configuration management tools were available, their support for infrastructure was quite limited.
In contrast, application code development has significantly evolved thanks to version control systems, DevOps toolchains, modern development practices, and delivery methodologies.
Terraform revolutionized infrastructure management by introducing the concept of Infrastructure as Code (IaC), which inherently takes advantage of these advancements to manage infrastructure more effectively.
Let’s take a look at a few of the benefits Terraform has to offer.
| Benefit | Description |
| Consistency
|
Infrastructure is managed via code, making it very easy to version and track changes. Since cloud resource provision happens logically, we can rely on its consistency to create a scaled set of infrastructure.
|
| Automation
|
Terraform workflow manages the lifecycle of cloud resources – from their creation till they are destroyed or decommissioned. This provides an opportunity to enable end-to-end automation right from the infrastructure layer. Automation workflows also assist in strengthening deployment strategies. Read more about: Terraform automation.
|
| Less risk
|
Using Terraform to develop infrastructure as code provides validation beforehand. It also isolates manual efforts and errors associated with it. Thus once developed, infrastructure provisioning and de-provisioning cycles execute identically.
|
| Modular and DRY
|
Infrastructure can be developed in a modular way so that it can be reused across multiple projects. This approach also enables organizations to ingrain their security and governance practices around infrastructure resources, thus offsetting the initial efforts spent every time a new project kicks off.
|
Note: New versions of Terraform are placed under the BUSL license, but everything created before version 1.5.x stays open-source. OpenTofu is an open-source version of Terraform that expands on Terraform’s existing concepts and offerings. It is a viable alternative to HashiCorp’s Terraform, being forked from Terraform version 1.5.6.
Some of the key features of Terraform that make it a versatile and powerful tool for managing infrastructure include:
| Terraform feature | Description |
| Declarative
|
Terraform uses the Hashicorp Configuration Language (HCL), which provides a declarative syntax for developing infrastructure as code. The HCL configuration language helps declare the target state of cloud resources to be provisioned.
|
| Cloud agnostic
|
Terraform is a great tool to automate multi-cloud deployments. Its modular architecture enables working with multiple well-known cloud vendors simultaneously.
|
| Ecosystem
|
The provider and module ecosystem of Terraform is well established. Certified modules and providers are available on Terraform Registry to be readily used. Customers can create and publish their own modules both publicly and privately.
|
| Extendible
|
Terraform can be extended to support lesser-known or private data centers.
|
| Agentless
|
Terraform works with the programmatic access provided by cloud provider APIs, so there is no need to install agents.
|
Getting started with Terraform involves installing it on your system, setting up the environment and writing your first IaC script. The general process for deploying Terraform resources in the cloud includes the following steps:
- Install Terraform and set up an account on any cloud provider (AWS, Azure, GCP, etc.)
- Configure the Terraform provider
- Write configuration files
- Initialize Terraform
- Run
terraform plan - Create resources with
terraform apply - Delete resources using
terraform destroy

With that in mind, let us get our hands dirty.
Terraform comes in two forms: Terraform and HCP Terraform (formerly Terraform Cloud). HCP Terraform is an online hosted platform that provides a UI for automation of provisioning tasks and management, but the code still needs to be manually developed.
You can also check out Spacelift, a sophisticated and compliant infrastructure delivery platform that makes Terraform management easy.
For the sake of this tutorial, we would work with an open-source version that offers all of the same features for self-hosting. The Terraform binary can be downloaded from the Terraform website.
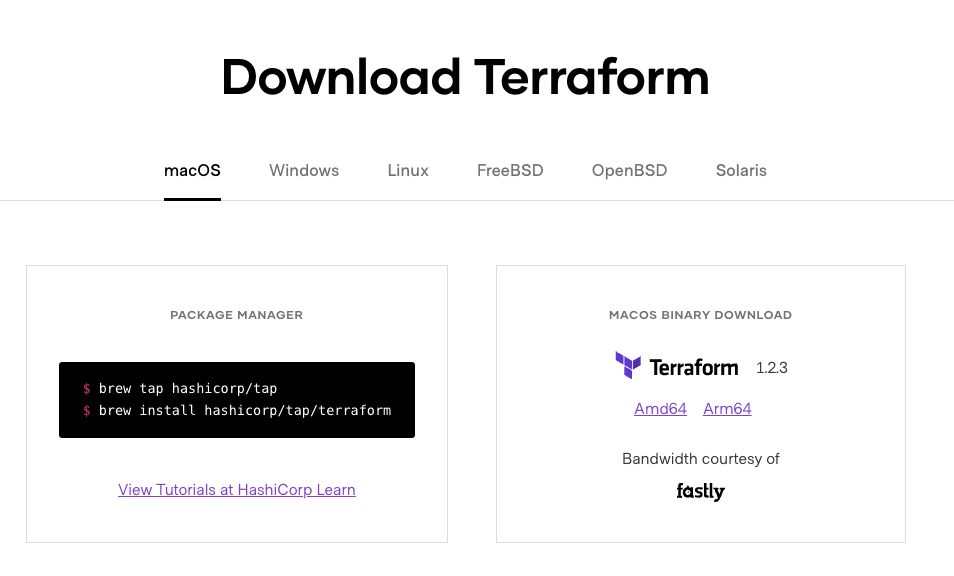
Choose the OS and package manager or binary download option according to your system’s choice. The screenshots in this tutorial are based on macOS. Apart from the setup, the steps described in this tutorial are the same across all operating systems.
If you need more details, see a complete guide on installing Terraform on Windows, Linux, and macOS. The Terraform installation steps generally included downloading the appropriate binary and setting up the path variable.
Once installed successfully, test if the installation works by checking the version below. We will be using Terraform version v1.2.3.
sumeetninawe@Sumeets-MacBook-Pro tf-tuts % terraform -v
Terraform v1.2.3
on darwin_arm64
sumeetninawe@Sumeets-MacBook-Pro tf-tuts %
The code for this tutorial is available at this GitHub repository.
Cloud account
Since we will be working with AWS to provision our infrastructure using Terraform, we also need to install AWS CLI. Follow the steps listed here, to install the latest version of AWS CLI for your OS.
After a successful installation, check the version of AWS CLI, as shown below. When writing this tutorial, the latest was 2.7.9.
sumeetninawe@Sumeets-MacBook-Pro tf-tuts % aws --version
aws-cli/2.7.9 Python/3.9.11 Darwin/21.3.0 exe/x86_64 prompt/off
sumeetninawe@Sumeets-MacBook-Pro tf-tuts %
Terraform uses AWS CLI to make API calls to execute any provisioning task. Log in to AWS Web Console and create a user for Terraform. The user needs programmatic access to AWS, so check the corresponding checkbox only.
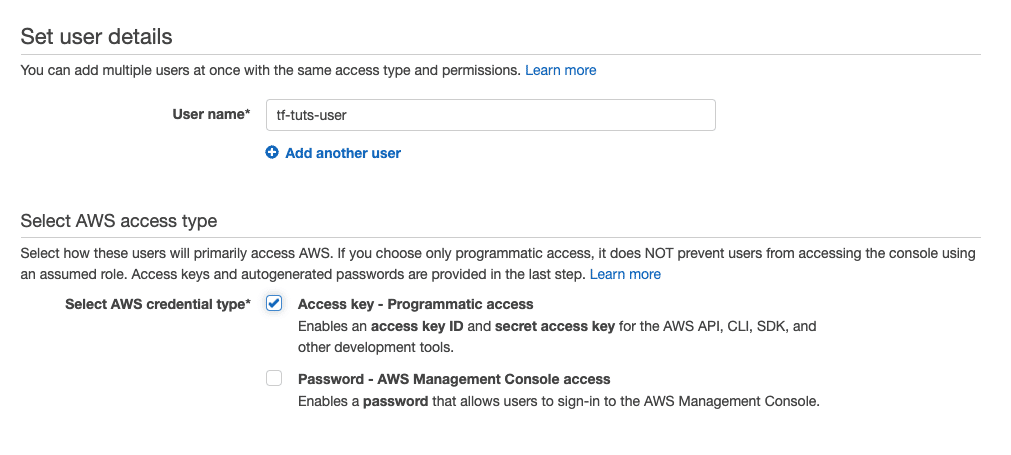
For now, provide the administrative role to this user. However, it is recommended to follow the principle of least privilege when working on projects.
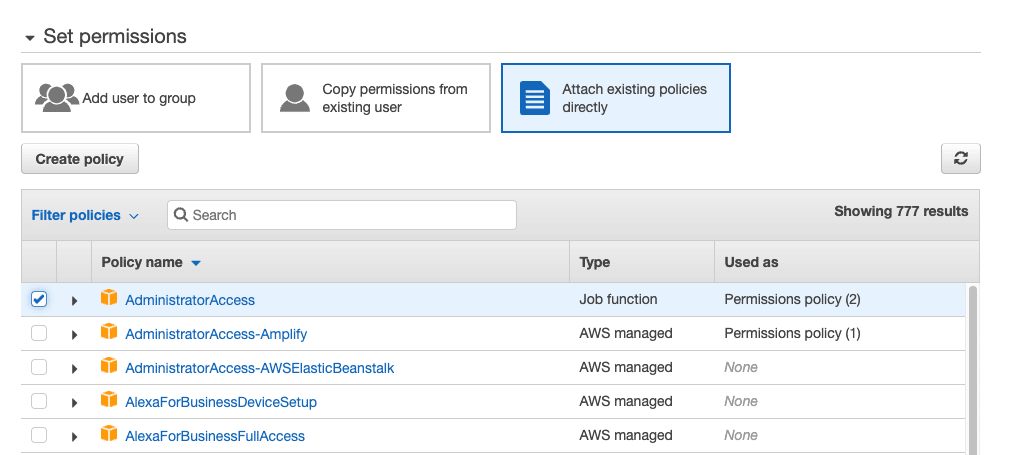
Once the user is successfully created, take note of the Access Key ID and Secret Access Key.

We need to configure these credentials in the AWS CLI we just installed. Open the terminal and run the aws configure command to configure default credentials. We have left the region as the default value. Select the region of your choice if required.
sumeetninawe@Sumeets-MacBook-Pro tf-tuts % aws configure
AWS Access Key ID [****************PYVK]: ****PYVK
AWS Secret Access Key [****************duMt]: ****duMt
Default region name [eu-central-1]:
Default output format [None]:
sumeetninawe@Sumeets-MacBook-Pro tf-tuts %
We have successfully set up our environment to begin working with Terraform and AWS.
Note: Terraform can make API calls without the AWC CLI if you hardcode credentials or use some other method to access AWS.
Terraform implements a modular approach in its application architecture. The Terraform binary we downloaded is the core module required to perform core Terraform function. Any operation or a CLI command that does not involve invoking any cloud provider API are core functions of this binary.
In our example, Terraform instantiates a corresponding module to work with a cloud provider, AWS. It downloads the binary in the project’s root directory. We instruct Terraform to use a specific version of the AWS provider so that our Terraform project can provision AWS resources.
Now is the time to create our Terraform project. Create a directory in your system and open this path into an IDE of your choice. All the Terraform code goes into .tf files created in the root of this directory. Add the first file named provider.tf into this empty directory, write the provider block as below, and save the file.
terraform {
 required_providers {
   aws = {
     source  = "hashicorp/aws"
     version = "~> 4.19.0"
   }
 }
}
As mentioned before, Terraform uses HCL syntax, a declarative configuration language that helps us declare the cloud resources we want to provision. In the provider.tf file, we have specified a terraform block, in which we have declared another block that represents required_providers.
The required_providers block includes an aws attribute, which is assigned an object containing several properties. These properties specify the source and desired version of the AWS provider. The above code instructs Terraform to initialize the AWS provider with version 4.19.0.
The provider-specific documentation is maintained in the registry. To check the latest version of the available provider and configure various types of resources with AWS, refer to the Terraform registry.
Run terraform init command in the root directory to initialize our Terraform project and observe the output as below.
sumeetninawe@Sumeets-MacBook-Pro tf-tuts % terraform init
Initializing the backend...
Initializing provider plugins...
- Finding hashicorp/aws versions matching "~> 4.19.0"...
- Installing hashicorp/aws v4.19.0...
- Installed hashicorp/aws v4.19.0 (signed by HashiCorp)
Terraform has created a lock file .terraform.lock.hcl to record the provider
selections it made above. Include this file in your version control repository
so that Terraform can guarantee to make the same selections by default when
you run "terraform init" in the future.
Terraform has been successfully initialized!
You may now begin working with Terraform. Try running "terraform plan" to see
any changes that are required for your infrastructure. All Terraform commands
should now work.
If you ever set or change modules or backend configuration for Terraform,
rerun this command to reinitialize your working directory. If you forget, other
commands will detect it and remind you to do so if necessary.
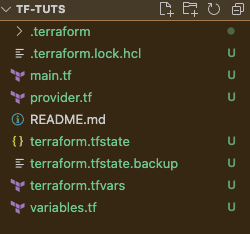
sumeetninawe@Sumeets-MacBook-Pro tf-tuts %As we can see, Terraform has successfully initialized the desired version of the AWS provider. Let’s look at our root directory:
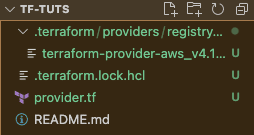
Apart from the provider.tf and README.md files, we have the .terraform.lock.hcl file and a subdirectory named .terraform. The lock file is used to manage checksums for the downloaded module binaries, which we will discuss in the next sections. The .terraform subdirectory is the target where the AWS provider plugin binary is downloaded.
If you have followed the steps successfully so far, this is how your directory should look.
At this point, we have set up the Terraform provider, and we can now move on to creating some resources in our AWS console using Terraform.
Create another file named main.tf in the same directory.
The intention of creating this file is to declare the resources we want to create in AWS. It is completely okay to skip creating this file and just append provider.tf file with the below code. However, creating separate files helps manage the Terraform code in a better way.
Add the code below to the main.tf file.
resource "aws_instance" "my_vm" {
 ami                       = "ami-065deacbcaac64cf2" //Ubuntu AMI
 instance_type             = "t2.micro"

 tags = {
   Name = "My EC2 instance",
 }
}
Here, we have declared a resource block of type “aws_instance”. This instructs Terraform that we want to create an EC2 instance resource in AWS with the given attributes. aws in aws_instance helps Terraform identify the provider it would require to perform this provisioning task.
Note: To identify the correct resource type and associated attributes, refer Terraform Registry.
The second parameter is “my_vm”, an internal identifier that refers to this particular EC2 instance elsewhere in the code. We can assign any name to this identifier.
Among the resource attributes, we have declared the ami, which defines the image we want to use to create this EC2 instance. The chosen AMI here is an Ubuntu image in Central Europe. We have also specified the instance_type to define the size of the EC2 instance to be created.
We have also assigned a tag “Name” with the value “My EC2 Instance”.
With this, we have successfully created the code to create an EC2 instance in AWS using Terraform.
We have created the Terraform code to provision our AWS resources, but we have not yet provisioned them. This is what we would do in this section. Let’s take a look at some of the most important Terraform CLI commands that also help us understand the resource lifecycle managed by Terraform.
1. Format (fmt)
Assuming we have already written some Terraform code with correct syntax, it may still lack proper indentations. A properly indented code is very valuable as it improves readability. terraform fmt command helps us format the Terraform code for all .tf files in the given directory.
In your project directory, where you have created the main.tf and provider.tf files, run terraform fmt to achieve well-formatted Terraform code.
sumeetninawe@Sumeets-MacBook-Pro tf-tuts % terraform fmt
main.tf
sumeetninawe@Sumeets-MacBook-Pro tf-tuts %
It outputs a file named “main.tf.” On closer inspection, in the main.tf file we created earlier, the attributes – although aligned according to the “=” sign – had unnecessary spaces between the names and the “=” sign. After formatting the code, these spaces have been removed.
The output represents a list of all those files which are reformatted by fmt command.
2. Initialize (init)
Usually, the terraform init command is run only at the beginning of a Terraform project, as long as we stick with the same provider.
However, if we decide to add more providers or change the version of existing ones and try to execute the Terraform code without initializing, it will throw an error. Missing this step is a common mistake for new developers.
In our provider.tf file, change the version attribute of aws from “4.19.0” to “4.18.0” and run terraform plan command in the console.
sumeetninawe@Sumeets-MacBook-Pro tf-tuts % terraform plan
╷
│ Error: Inconsistent dependency lock file
│
│ The following dependency selections recorded in the lock file are inconsistent with the current configuration:
│   - provider registry.terraform.io/hashicorp/aws: locked version selection 4.19.0 doesn't match the updated version constraints "~> 4.18.0"
│
│ To update the locked dependency selections to match a changed configuration, run:
│   terraform init -upgrade
╵
sumeetninawe@Sumeets-MacBook-Pro tf-tuts %
As it must be clear from the error message, Terraform identifies this change and asks us to initialize this directory again to update the appropriate provider module. Now, let’s run terraform init -upgrade.
sumeetninawe@Sumeets-MacBook-Pro tf-tuts % terraform init -upgrade

Initializing the backend...

Initializing provider plugins...
- Finding hashicorp/aws versions matching "~> 4.18.0"...
- Installing hashicorp/aws v4.18.0...
- Installed hashicorp/aws v4.18.0 (signed by HashiCorp)

Terraform has made some changes to the provider dependency selections recorded
in the .terraform.lock.hcl file. Review those changes and commit them to your
version control system if they represent changes you intended to make.

Terraform has been successfully initialized!

You may now begin working with Terraform. Try running "terraform plan" to see
any changes that are required for your infrastructure. All Terraform commands
should now work.

If you ever set or change modules or backend configuration for Terraform,
rerun this command to reinitialize your working directory. If you forget, other
commands will detect it and remind you to do so if necessary.
sumeetninawe@Sumeets-MacBook-Pro tf-tuts %
Running init command with the -upgrade flag has helped us match the version of the provider module to be used.
3. Plan (plan)
The Terraform plan command helps us validate the resource declaration we have done. It takes into account all the Terraform configuration files and identifies any syntax errors, version miss-match errors (like above), etc.
Additionally, it validates the code with the state file to identify and highlight resources that will be created, updated, or deleted if we choose to execute the current version of the code. This process provides a useful snapshot of changes before applying them to the target infrastructure.
In our code directory, run terraform plan and observe the output.
sumeetninawe@Sumeets-MacBook-Pro tf-tuts % terraform plan

Terraform used the selected providers to generate the following execution plan. Resource actions are indicated with the following symbols:
  + create

Terraform will perform the following actions:

  # aws_instance.my_vm will be created
  + resource "aws_instance" "my_vm" {
      + ami                                  = "ami-065deacbcaac64cf2"
      + arn                                  = (known after apply)
      + associate_public_ip_address          = (known after apply)
      + availability_zone                    = (known after apply)
      + cpu_core_count                       = (known after apply)
      + cpu_threads_per_core                 = (known after apply)
      + disable_api_termination              = (known after apply)
      + ebs_optimized                        = (known after apply)
      + get_password_data                    = false
      + host_id                              = (known after apply)
      + id                                   = (known after apply)
      + instance_initiated_shutdown_behavior = (known after apply)
      + instance_state                       = (known after apply)
      + instance_type                        = "t2.micro"
      + ipv6_address_count                   = (known after apply)
      + ipv6_addresses                       = (known after apply)
      + key_name                             = (known after apply)
      + monitoring                           = (known after apply)
      + outpost_arn                          = (known after apply)
      + password_data                        = (known after apply)
      + placement_group                      = (known after apply)
      + placement_partition_number           = (known after apply)
      + primary_network_interface_id         = (known after apply)
      + private_dns                          = (known after apply)
      + private_ip                           = (known after apply)
      + public_dns                           = (known after apply)
      + public_ip                            = (known after apply)
      + secondary_private_ips                = (known after apply)
      + security_groups                      = (known after apply)
      + source_dest_check                    = true
      + subnet_id                            = (known after apply)
      + tags                                 = {
          + "Name" = "My EC2 instance"
        }
      + tags_all                             = {
          + "Name" = "My EC2 instance"
        }
      + tenancy                              = (known after apply)
      + user_data                            = (known after apply)
      + user_data_base64                     = (known after apply)
      + user_data_replace_on_change          = false
      + vpc_security_group_ids               = (known after apply)

      + capacity_reservation_specification {
          + capacity_reservation_preference = (known after apply)

          + capacity_reservation_target {
              + capacity_reservation_id                 = (known after apply)
              + capacity_reservation_resource_group_arn = (known after apply)
            }
        }

      + ebs_block_device {
          + delete_on_termination = (known after apply)
          + device_name           = (known after apply)
          + encrypted             = (known after apply)
          + iops                  = (known after apply)
          + kms_key_id            = (known after apply)
          + snapshot_id           = (known after apply)
          + tags                  = (known after apply)
          + throughput            = (known after apply)
          + volume_id             = (known after apply)
          + volume_size           = (known after apply)
          + volume_type           = (known after apply)
        }

      + enclave_options {
          + enabled = (known after apply)
        }

      + ephemeral_block_device {
          + device_name  = (known after apply)
          + no_device    = (known after apply)
          + virtual_name = (known after apply)
        }

      + maintenance_options {
          + auto_recovery = (known after apply)
        }

      + metadata_options {
          + http_endpoint               = (known after apply)
          + http_put_response_hop_limit = (known after apply)
          + http_tokens                 = (known after apply)
          + instance_metadata_tags      = (known after apply)
        }

      + network_interface {
          + delete_on_termination = (known after apply)
          + device_index          = (known after apply)
          + network_card_index    = (known after apply)
          + network_interface_id  = (known after apply)
        }

      + root_block_device {
          + delete_on_termination = (known after apply)
          + device_name           = (known after apply)
          + encrypted             = (known after apply)
          + iops                  = (known after apply)
          + kms_key_id            = (known after apply)
          + tags                  = (known after apply)
          + throughput            = (known after apply)
          + volume_id             = (known after apply)
          + volume_size           = (known after apply)
          + volume_type           = (known after apply)
        }
    }

Plan: 1 to add, 0 to change, 0 to destroy.

────────────────────────────────────────────────────────────────────────────────────────────────────────────────────────────────────────────────────────────────────────────────────────────────────────────────────────────────

Note: You didn't use the -out option to save this plan, so Terraform can't guarantee to take exactly these actions if you run "terraform apply" now.
sumeetninawe@Sumeets-MacBook-Pro tf-tuts %
The output provides a detailed overview of all the resources that will be created. Since this is our first time running the code, there are no changes or deletions highlighted. The summary at the end of the output is useful for matching statistics when we manage a larger set of resources.
4. Apply (apply)
Now that we have verified the actions Terraform will perform if we execute this cde, let’s go ahead and create these resources.
The terraform apply command helps us provision all the resources declared in the main.tf file. When you run terraform apply, it will once again display the output similar to the plan command and ask for final confirmation as shown below:
.
.
.
 + network_interface_id  = (known after apply)
        }

      + root_block_device {
          + delete_on_termination = (known after apply)
          + device_name           = (known after apply)
          + encrypted             = (known after apply)
          + iops                  = (known after apply)
          + kms_key_id            = (known after apply)
          + tags                  = (known after apply)
          + throughput            = (known after apply)
          + volume_id             = (known after apply)
          + volume_size           = (known after apply)
          + volume_type           = (known after apply)
        }
    }

Plan: 1 to add, 0 to change, 0 to destroy.

Do you want to perform these actions?
  Terraform will perform the actions described above.
  Only 'yes' will be accepted to approve.

  Enter a value:
Type in ‘yes’ and hit Enter.
Enter a value: yes

aws_instance.my_vm: Creating...
aws_instance.my_vm: Still creating... [10s elapsed]
aws_instance.my_vm: Still creating... [20s elapsed]
aws_instance.my_vm: Still creating... [30s elapsed]
aws_instance.my_vm: Creation complete after 31s [id=i-0eba265e21a442a36]

Apply complete! Resources: 1 added, 0 changed, 0 destroyed.
sumeetninawe@Sumeets-MacBook-Pro tf-tuts %
Terraform starts to provision the EC2 instance with the attributes we have specified. For all those attributes which are not specified, it assumes the default value. As seen from the output, it took 31 seconds for Terraform to successfully provision our EC2 instance.
Verify it by logging into your AWS console.
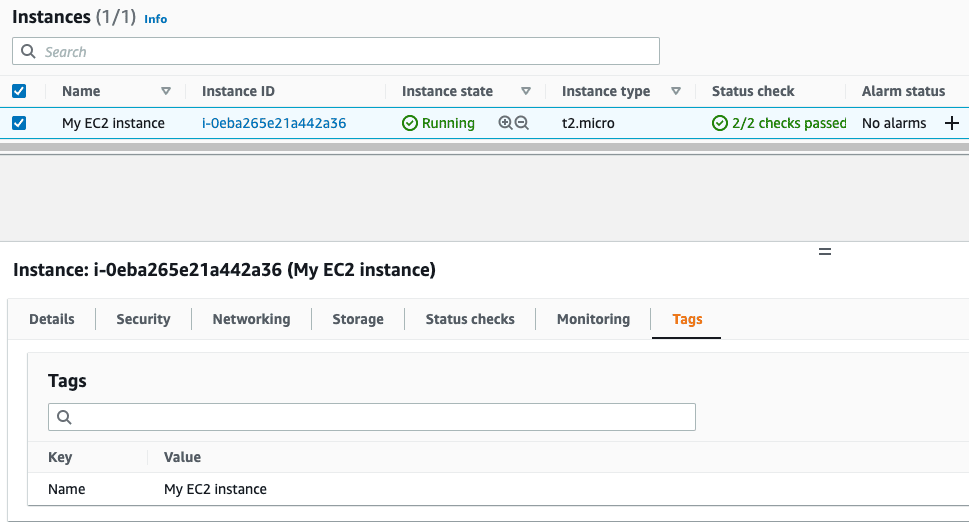
Under the hood, Terraform uses the AWS provider plugin, which in turn makes programmatic API calls to AWS using the credentials we configured during setup.
Congratulations if you have managed to reach this point! 🎉
5. Destroy (destroy)
Terraform manages the lifecycle of infrastructure. This means that if Terraform is responsible for creating a particular resource, it is also responsible for deleting or destroying it. The terraform destroy command helps us completely delete all these resources.
To delete the EC2 instance created using apply, run terraform destroy.
.
.
.
- instance_metadata_tags      = "disabled" -> null
        }

      - root_block_device {
          - delete_on_termination = true -> null
          - device_name           = "/dev/sda1" -> null
          - encrypted             = false -> null
          - iops                  = 100 -> null
          - tags                  = {} -> null
          - throughput            = 0 -> null
          - volume_id             = "vol-009f1a15512afd580" -> null
          - volume_size           = 8 -> null
          - volume_type           = "gp2" -> null
        }
    }

Plan: 0 to add, 0 to change, 1 to destroy.

Do you really want to destroy all resources?
  Terraform will destroy all your managed infrastructure, as shown above.
  There is no undo. Only 'yes' will be accepted to confirm.

  Enter a value:
It prompts us again for confirmation, showing which resources will be deleted. If we respond with anything other than ‘yes’, Terraform will cancel the operation. Since the plan summary correctly indicates that one resource will be destroyed, which matches our expectations, let’s confirm the deletion.
Enter a value: yes

aws_instance.my_vm: Destroying... [id=i-0eba265e21a442a36]
aws_instance.my_vm: Still destroying... [id=i-0eba265e21a442a36, 10s elapsed]
aws_instance.my_vm: Still destroying... [id=i-0eba265e21a442a36, 20s elapsed]
aws_instance.my_vm: Still destroying... [id=i-0eba265e21a442a36, 30s elapsed]
aws_instance.my_vm: Destruction complete after 40s

Destroy complete! Resources: 1 destroyed.
sumeetninawe@Sumeets-MacBook-Pro tf-tuts %
As we can see, Terraform has successfully deleted the EC2 instance. Verify the same from the AWS EC2 console.

So far, we have been able to create and destroy AWS EC2 instances using Terraform. The Terraform commands we just discussed are essential for every developer to know. These commands are crucial as they define the entire end-to-end lifecycle of the resources managed by Terraform.
Variables play an important role in managing Terraform projects. Until now, we have hardcoded all the values required to provision our EC2 instances, such as AMI, Instance Type, and Tags. Imagine doing this for multiple resources — EC2 instances with various configurations, RDS instances, VPCs, and so on — this approach can quickly become cumbersome.
Variables introduce the flexibility and dynamism needed to manage larger sets of infrastructure. They are also essential for applying the DRY (Don’t Repeat Yourself) principle when creating modules. We will discuss modules in the upcoming sections.
There are mainly three types of variables in Terraform – local, input, and output. We will discuss this one by one.
Local variables
As the name suggests, these are locally declared variables. They provide a way to name any attribute value that needs to be used throughout the Terraform code.
Local variables are particularly useful when you need to reference the same values in multiple places within your Terraform configuration. Additionally, you can perform various operations to calculate these values based on other values.
We will keep it simple for our example, create a file named variables.tf in the root directory and declare the local variables as below.
locals {
 ami      = "ami-065deacbcaac64cf2"
 type     = "t2.micro"
 name_tag = "My EC2 Instance"
}
Here we have declared all the hardcoded values into their corresponding local variables. Once declared, local variables can be referred to anywhere within the module. To refer to these variables in our main.tf file, use the syntax local.<variable_name> at appropriate places. After the changes are done to main.tf reflect usage of variables in main.tf file, it should look like below.
resource "aws_instance" "my_vm" {
 ami           = local.ami //Ubuntu AMI
 instance_type = local.type

 tags = {
   Name = local.name_tag,
 }
}
To verify if we have correctly declared and referred local variables in our code, run terraform plan and observe that it does not throw any error. At this moment, it is enough to rely on the planned output for verification.
Input variables
There are situations where values need to be provided during the execution of code at runtime. Local variables, however, only work within their own scope and cannot accept or assign values dynamically during runtime.
It can be achieved using input variables, which also help us define input values for modules that accept values on the fly from the parent module.
Let us redefine our variables.tf file with input variables instead of locals for the same attributes.
variable "ami" {
   type        = string
   description = "Ubuntu AMI ID"
}

variable "instance_type" {
   type        = string
   description = "Instance type"
}

variable "name_tag" {
   type        = string
   description = "Name of the EC2 instance"
}
We have created three variables – all of the type string – and provided them with descriptions. Input variables descriptions help in generating documentation if we decide to publish this as a module on the Terraform registry.
Do the corresponding changes to main.tf file to use input variables instead of locals.
resource "aws_instance" "my_vm" {
 ami           = var.ami //Ubuntu AMI
 instance_type = var.instance_type

 tags = {
   Name = var.name_tag,
 }
}
When we run terraform plan command at this point, it validates the code successfully. However, try to run terraform apply and observe the output.
sumeetninawe@Sumeets-MacBook-Pro tf-tuts % terraform apply
var.ami
  Ubuntu AMI ID

  Enter a value:
Here Terraform asks to provide the value for ‘Ubuntu AMI ID’, and it would ask the same for the other two variables consecutively. This is just to prove that Terraform allows us to provide these values dynamically during runtime.
If we want to avoid supplying values one by one in CLI, we can declare default values in the same variables.tf file as shown below.
variable "ami" {
   type        = string
   description = "Ubuntu AMI ID in N. Virginia Region"
   default     = "ami-065deacbcaac64cf2"
}

variable "instance_type" {
   type        = string
   description = "Instance type"
   default     = "t2.micro"
}

variable "name_tag" {
   type        = string
   description = "Name of the EC2 instance"
   default     = "My EC2 Instance"
}
Now if we run terraform apply, it will automatically assume the default values provided in this file and proceed towards provisioning of the EC2 resource.
A better way to manage these default values is to create another file named terraform.tfvars. Terraform automatically interprets tfvars as a group of key-value pairs and maps them with the declared variables in the variables.tf file.
Clear out all the default values from variables.tf file and create terraform.tfvars. The syntax is quite straightforward – on every line, there is a key assigned with a value.
If we try to run terraform plan command at this point, Terraform would indicate a successful plan output.
Note: The name terraform.tfvars is a prerequisite. If we choose any other name before .tfvars extension then the file needs to be explicitly supplied in the CLI command with the -var-file flag. Optionally, we can also use the .auto.tfvars extension so that Terraform can pick this file automatically to read variable values.
Output Variables
So far, we have successfully created EC2 instances using Terraform code and CLI commands. However, to get details about these EC2 instances, we typically log in to the AWS Console to view the necessary attributes.
Output variables allow us to retrieve the details we are interested in directly in the CLI terminal. Additionally, output variables “return” values to the parent modules for further processing.
We define output variables in the variables.tf file. Generally, you can define both output and input variables in any .tf file, and Terraform will interpret them as long as they are in the working directory.
For example, let’s say we want to know the public IP and Instance ID of the provisioned EC2 instance. We would declare the output variables as shown below. Add the following code to the variables.tf file:
output "public_ip" {
 value       = aws_instance.my_vm.public_ip
 description = "Public IP Address of EC2 instance"
}

output "instance_id" {
 value       = aws_instance.my_vm.id
 description = "Instance ID"
}
Run terraform apply and observe the output.
+ volume_id             = (known after apply)
          + volume_size           = (known after apply)
          + volume_type           = (known after apply)
        }
    }

Plan: 1 to add, 0 to change, 0 to destroy.

Changes to Outputs:
  + instance_id = (known after apply)
  + public_ip   = (known after apply)

────────────────────────────────────────────────────────────────────────────────────────────────────────────────────────────────────────────────────────────────────────────────────────────────────────────────────────────────

Note: You didn't use the -out option to save this plan, so Terraform can't guarantee to take exactly these actions if you run "terraform apply" now.
sumeetninawe@Sumeets-MacBook-Pro tf-tuts %
The plan output now also indicates the values which will be known after apply. It chooses to display these values because we have declared their corresponding output variables. Add more output variables to know more about your instance after provisioning.
Run terraform apply to see the values being generated.
Do you want to perform these actions?
  Terraform will perform the actions described above.
  Only 'yes' will be accepted to approve.

  Enter a value: yes

aws_instance.my_vm: Creating...
aws_instance.my_vm: Still creating... [10s elapsed]
aws_instance.my_vm: Still creating... [20s elapsed]
aws_instance.my_vm: Still creating... [30s elapsed]
aws_instance.my_vm: Creation complete after 32s [id=i-0dc24a32faa0f3bbd]

Apply complete! Resources: 1 added, 0 changed, 0 destroyed.

Outputs:

instance_id = "i-0dc24a32faa0f3bbd"
public_ip = "3.122.236.175"
sumeetninawe@Sumeets-MacBook-Pro tf-tuts %
As we can see, Terraform has successfully provisioned the EC2 instance and we also have the instance ID and public IP information handy. We did not have to log in to the AWS console to find the same.
Note: Regarding the naming convention of the files, except for .tfvars, there are no strict rules. You can name them as you wish – Terraform considers all the files with .tf extension in any given directory. The names provider, variables, and main are generic conventions used in the ecosystem.
State management in Terraform is one of the crucial things to know and learn about especially when working with teams. In this section, we dive deep into understanding how state files in Terraform work and the impact it creates on the resource lifecycle management workflow.
In this tutorial, we have created multiple files and if we look at our root directory, the system/Terraform seems to create a few more files. Now is the right time to revisit them.
We have already discussed the .terraform directory, .terraform.lock.hcl file, main.tf, provider.tf, variables.tf, and terraform.tfvars files. By now we know the purpose of these files. The two new files created are –
terraform.tfstateterraform.tfstate.backup
As a quick recap of our journey, we have set up the Terraform environment and declared the configuration/code to create an EC2 instance in AWS. We also destroyed the resource which we created in this process. We have seen how Terraform performs these operations under the wraps and updates the status in the CLI terminal.
Notice how Terraform only works with the resources created using Terraform alone. AWS resources that are created using Terraform – only those resources are destroyed. If we had multiple EC2 instances existing before the one created by Terraform, those resources will not be affected.
Terraform manages only those resources that the code written by us creates. For this, Terraform maintains the mapping information regarding the resources defined in the configuration and their corresponding real-world cloud entities. This mapping is saved in the state files.
terraform.tfstate file thus maintains this mapping which in turn helps Terraform to identify the current state of the resources which are already provisioned, and the resources yet to be provisioned, or to be deleted.
When configuring infrastructure as code using Terraform’s declarative language, we essentially define the desired target state of the infrastructure. Any modifications to this code – addition or removal of resources – define the newer target state.
Spacelift can optionally manage the Terraform state for you, offering a backend synchronized with the rest of the platform to maximize convenience and security. You also get the ability to import your state during stack creation, which is very useful for engineers who are migrating their old configurations and states to Spacelift.
When the modified configuration is executed, i.e. terraform plan/apply command is run – Terraform compares the modifications made with the state files, for the corresponding existence in the real world.
If additional resources are found in the configuration, Terraform plans to provision those resources in the next apply command execution. Whereas, if lesser resources are encountered, Terraform identifies the removed resources by comparing the configuration with the state file and plans to destroy them.
Thus, the state file – terraform.tfstate – is an extremely important piece of information maintained by Terraform itself. The .terraform.tfstate.backup file – as the name suggests, the backup file holds the previous execution’s backup.
Note: Terraform CLI offers various commands to query and modify state information. These commands are directly related to this state file. It is recommended to avoid any manual changes as that approach is risk-prone. Always use the state manipulation commands for operations related to the state file.
State lock file
There is one more file involved in all of this – .terraform.tfstate.lock.info. We do not have it in the previous screenshot, as its existence is temporary, only when plan, apply, or destroy commands are being executed.
To observe this behavior, run terraform apply in the root directory of our project and do not enter anything when Terraform asks for the confirmation step below.
.
.
.
  + volume_type           = (known after apply)
        }
    }

Plan: 1 to add, 0 to change, 0 to destroy.

Changes to Outputs:
  + instance_id = (known after apply)
  + public_ip   = (known after apply)

Do you want to perform these actions?
  Terraform will perform the actions described above.
  Only 'yes' will be accepted to approve.

  Enter a value:
Hold on to this moment, and observe the file directory.
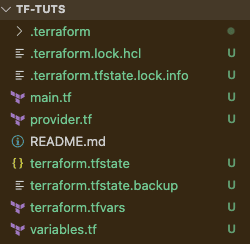
Here we can see .terraform.tfstate.lock.info file is created automatically. If you now enter ‘yes’, this file exists for the duration until Terraform successfully provisions these resources. Similar behavior is observed for the destroy command.
The purpose of this lock file is to prevent race conditions. Imagine a scenario where a Terraform environment is set up on a shared VM, and multiple developers are trying to apply their changes simultaneously. To ensure changes are applied in a specific order, Terraform uses this lock file to manage the sequence of executions.
You can stay on top of everything you’re responsible for with Spacelift – helping you visualize your resources, regardless of the technology used.
If we look at the lock file below, it contains information about the current execution—ID, time when the execution is triggered, who triggered it, the path to the state file, etc. in the JSON format.
{
  "ID": "404956fe-e8f8-93c2-5d5d-684d0014963c",
  "Operation": "OperationTypeApply",
  "Info": "",
  "Who": "sumeetninawe@Sumeets-MacBook-Pro.local",
  "Version": "1.2.3",
  "Created": "2022-06-19T19:58:26.273189Z",
  "Path": "terraform.tfstate"
}
Any request that is prioritized to be executed, creates this temporary information set – stored in terraform.tfstate.lock.info file – and temporarily puts on hold any other request till the current execution is completed.
Such simultaneous requests for Terraform’s execution is a very rare and rather non-suggested scenario, and the Terraform seems to have a fallback in the form of such a locking mechanism.
However, even if it is so when working in the team setup, this falls short of avoiding corruption in the resource configuration. In the next section, we will see why and how remote backends help address this issue.
The state files we discussed in the previous section reside in the same directory where the rest of the Terraform code is being developed, so it uses a ‘local backend’. It works well if only one developer controls/contributes to the infrastructure being developed.
Another issue with working in local mode is version control of the code itself. Using version control systems like Git can be risky if state files are included in the same remote repository.
In a team where multiple developers are responsible for developing Terraform code, committing the state file to the remote Git repo can cause variations in the state stored locally by each developer. Multiple developers contributing to this repository may commit their own versions of state files.
When these files are pulled by other developers, it leads to inconsistencies, resulting in state file corruption. This can cause Terraform to create unnecessary orphan resources or destroy required resources, posing a serious problem, especially in large teams working on extensive infrastructure.
Additionally, state files may contain sensitive information like credentials and keys, which makes storing them in remote repositories risky.
Remote backends solve these problems by using a separate storage service to securely store state files independently. Note that this does not mean using remote Git repositories.

When we introduce a remote backend in the Terraform development workflow, the development may follow the below workflow.
- Multiple developers have copies of the Terraform code from remote Git repositories available locally. They make their changes and push these changes back to the remote Git repository.
- They execute
terraform plancommand from their local environment. This causes- Terraform to apply the lock over the state file in the remote backend.
- Query for state information.
- Perform validation and present the plan.
- Release the state file lock.
- They execute
terraform applycommand from their local environment. This causes- Terraform to apply the lock over the state file in the remote backend.
- Query for state information.
- Identify the differences.
- Terraform applies the Terraform Backends changes in the configuration to the cloud provider.
- Upon successful execution, Terraform releases the lock over the state file
- This works similarly for the destroy command
In our example, we have been working with the local backend. We would now configure the remote backend to address shortcomings identified when using local file storage for state files.
A range of compatible backends is available and can be found here. Check out also our giuide to different types of Terraform backends.
Since we are dealing with AWS, we will use S3 as our remote backend. This is not a necessity, though; we can use any backend of our choice.
To use Amazon S3 as a backend, we need one S3 bucket. Let us add the configuration for the S3 bucket in our main.tf file as below.
resource "aws_s3_bucket" "state_bucket" {
 bucket = "tf-tuts-state"

 tags = {
   Name = "State Bucket"
 }
}
Run terraform apply to provision this bucket in AWS. To use this bucket as a backend, add backend "s3" block to the terraform block present in provider.tf file. The final contents of the provider.tf file should look like below.
terraform {
 required_providers {
   aws = {
     source  = "hashicorp/aws"
     version = "~> 4.18.0"
   }
 }

 backend "s3" {
   bucket = "tf-tuts-state"
   key    = "state"
   region = "eu-central-1"
 }
}
If you try to run terraform apply it should throw an error. This is because we need to reinitialize Terraform since we have changed the backend information. Now when you run terraform init, it asks for confirmation to move the pre-existing “local” backend to the newly configured “s3” backend. This is exactly what we want.
Type in ‘yes’ to confirm the same and hit enter.
sumeetninawe@Sumeets-MacBook-Pro tf-tuts % terraform init
Initializing the backend...
Do you want to copy existing state to the new backend?
Pre-existing state was found while migrating the previous "local" backend to the
newly configured "s3" backend. No existing state was found in the newly
configured "s3" backend. Do you want to copy this state to the new "s3"
backend? Enter "yes" to copy and "no" to start with an empty state.
Enter a value: yes
Successfully configured the backend "s3"! Terraform will automatically
use this backend unless the backend configuration changes.
Initializing provider plugins...
- Reusing previous version of hashicorp/aws from the dependency lock file
- Using previously-installed hashicorp/aws v4.18.0
Terraform has been successfully initialized!
You may now begin working with Terraform. Try running "terraform plan" to see
any changes that are required for your infrastructure. All Terraform commands
should now work.
If you ever set or change modules or backend configuration for Terraform,
rerun this command to reinitialize your working directory. If you forget, other
commands will detect it and remind you to do so if necessary.
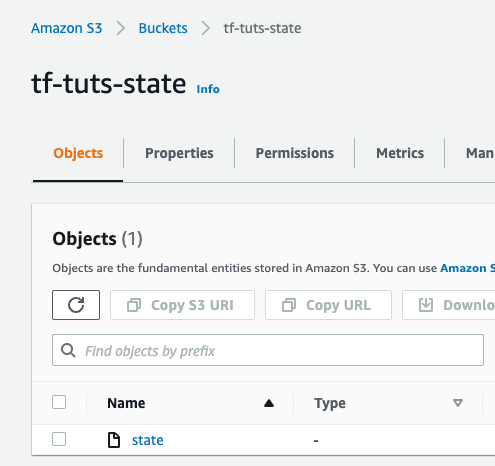
sumeetninawe@Sumeets-MacBook-Pro tf-tuts %If you see the output as above, it means we have successfully configured the given S3 bucket as our remote backend. Log in to the AWS console and verify the same.
Caution: If you now try to destroy the resources using the terraform destroy command, it will also delete the newly created S3 bucket – which is currently serving as our remote backend.
Run terraform destroy, and observe the output without confirming the same.
- grant {
          - id          = "c4233ad0c24d9bf54760dcdad7a19568e99ff370317355eac649e3d08ec886eb" -> null
          - permissions = [
              - "FULL_CONTROL",
            ] -> null
          - type        = "CanonicalUser" -> null
        }

      - versioning {
          - enabled    = false -> null
          - mfa_delete = false -> null
        }
    }

Plan: 0 to add, 0 to change, 2 to destroy.

Changes to Outputs:
  - instance_id = "i-0a253c64f002f85fc" -> null
  - public_ip   = "18.184.50.169" -> null

Do you really want to destroy all resources?
  Terraform will destroy all your managed infrastructure, as shown above.
  There is no undo. Only 'yes' will be accepted to confirm.

  Enter a value: no

Destroy cancelled.
This is one of those cases where we would want to remove the bucket from Terraform management. The other option is to create an S3 bucket separately and use it to configure the remote backend in the Terraform block.
Removing the S3 bucket from Terraform management implies that we need to update the state file by removing the corresponding S3 bucket information. Doing this manually is risky. Ideally, the state files should never be touched. Terraform provides various state file management commands. One such command is terraform state rm command, which removes the given resource from the state file.
From the terminal, run terraform state rm aws_s3_bucket.state_bucket.
sumeetninawe@Sumeets-MacBook-Pro tf-tuts % terraform state rm aws_s3_bucket.state_bucket
Removed aws_s3_bucket.state_bucket
Successfully removed 1 resource instance(s).
sumeetninawe@Sumeets-MacBook-Pro tf-tuts %
Also remove the corresponding S3 bucket configuration from the main.tf file. Now, if we try to run terraform destroy, it only destroys the EC2 instance. This way, the state file still remains intact and serves the purpose of our backend.
.
.
.
- throughput            = 0 -> null
          - volume_id             = "vol-0ff38441fb0e2cd82" -> null
          - volume_size           = 8 -> null
          - volume_type           = "gp2" -> null
        }
    }

Plan: 0 to add, 0 to change, 1 to destroy.

Changes to Outputs:
  - instance_id = "i-0a253c64f002f85fc" -> null
  - public_ip   = "18.184.50.169" -> null

Do you really want to destroy all resources?
  Terraform will destroy all your managed infrastructure, as shown above.
  There is no undo. Only 'yes' will be accepted to confirm.

  Enter a value: yes

aws_instance.my_vm: Destroying... [id=i-0a253c64f002f85fc]
aws_instance.my_vm: Still destroying... [id=i-0a253c64f002f85fc, 10s elapsed]
aws_instance.my_vm: Still destroying... [id=i-0a253c64f002f85fc, 20s elapsed]
aws_instance.my_vm: Destruction complete after 30s

Destroy complete! Resources: 1 destroyed.
sumeetninawe@Sumeets-MacBook-Pro tf-tuts %
As we can see from the output, Terraform has only destroyed one resource, i.e. the EC2 instance.
If you want to learn more tips on managing S3 buckets with Terraform, check out our How to manage an AWS S3 Bucket in Terraform tutorial.
Terraform is really powerful, but to achieve an end-to-end secure Gitops approach, you need to use a product that can run your Terraform workflows. Spacelift takes managing Terraform to the next level by giving you access to a powerful CI/CD workflow and unlocking features such as:
- Policies (based on Open Policy Agent) – You can control how many approvals you need for runs, what kind of resources you can create, and what kind of parameters these resources can have, and you can also control the behavior when a pull request is open or merged.
- Multi-IaC workflows – Combine Terraform with Kubernetes, Ansible, and other IaC tools such as OpenTofu, Pulumi, and CloudFormation, create dependencies among them, and share outputs
- Build self-service infrastructure – You can use Blueprints to build self-service infrastructure; simply complete a form to provision infrastructure based on Terraform and other supported tools.
- Integrations with any third-party tools – You can integrate with your favorite third-party tools and even build policies for them. For example, see how to Integrate security tools in your workflows using Custom Inputs.
Since AI-driven commercial property risk platform Archipelago started working with Spacelift, they have eliminated manual processes around direct Terraform applications and streamlined change coordination among their engineers.
Spacelift enables you to create private workers inside your infrastructure, which helps you execute Spacelift-related workflows on your end. For more information on configuring private workers, refer to the documentation.
To learn more about Spacelift, create a free account today or book a demo with one of our engineers.
We have covered a lot of ground in this begginer friendly Terraform tutorial. We started from scratch, and then
- Installed Terraform and AWS CLI
- Setup the AWS provider
- Created and destroyed EC2 instance using Terraform
- Worked with various types of variables
- Worked with State files and understood their importance
- Migrated our local backend to remote backend to enable team development
We hope this has been helpful to you. This was just an introduction, and there are still some advanced concepts to be covered. If you need more help with Terraform, we encourage you to check the following blog posts: How to Automate Terraform Deployments, and 12 Terraform Best Practices.
Terraform management made easy
Spacelift effectively manages Terraform state, more complex workflows, supports policy as code, programmatic configuration, context sharing, drift detection, resource visualization and includes many more features.


Terraform CLI Commands Cheatsheet
Initialize/ plan/ apply your IaC, manage modules, state, and more.