
Using Terraform on Google Cloud (GCP) provides a robust and efficient way to manage your cloud infrastructure. With Terraform’s declarative configuration language, you can define your GCP resources as code, allowing for version control, collaboration, and automated provisioning. Whether you’re deploying virtual machines, managing Kubernetes clusters, or setting up networking components, Terraform simplifies the process, making it an invaluable tool for any GCP user.
In this post, we’ll look at:
What is GCP (Google Cloud)?
Google Cloud infrastructure consists of physical assets, like computers and HDDs, and virtual resources, such as VMs or cloud functions, contained in data centers around the world. Each of their locations is in a region.
Regions are available in America, Australia, Europe, Africa, Asia, the Middle East, and North and South America. Each region is a group of zones isolated from each other. Each zone is identified by a name that combines the letter identifier with the region’s name. For example, zone a in the East Asia region is named asia-east1-a.
What’s neat about GCP is its focus on AI and machine learning tools, which are integrated into many of its services. So, you could easily train a machine learning model using TensorFlow and then deploy it at scale using GCP’s infrastructure. It’s all about scalability and performance, and they have a global network of data centers to make sure your applications run smoothly worldwide. Think of it as Google’s powerhouse for all things cloud computing.
How is Terraform used with GCP?
As with any other cloud provider, you write Terraform configuration files that specify what resources you need, like virtual machines, databases, or storage buckets, and how you want them configured. Terraform has a GCP provider and many others, so you can interact with all of Google’s cloud services directly through Terraform. You can also create Terraform modules of the GCP resources to reuse the same code and avoid redundancy.
In the backend, Terraform uses APIs to call GCP resources. For example, by writing Terraform code, you could set up a complete network environment with VPCs, subnets, and firewall rules. This is super handy because it makes your infrastructure reproducible and version-controlled. It also gives you the desired state configuration, which would have been impossible with their cloud console or shell scripts.
Terraform and GCP integration

The diagram above shows that:
- The DevOps/Infra Engineer creates the manifest files in Terraform for the GCP resources.
- Terraform CLI reads these files, sets up the Google Cloud provider and the required provisioners, and updates or creates the Terraform state file.
- Finally, it sends a request to the Google Cloud API to create the infrastructure in GCP according to the configuration(.tf files) and updates the state accordingly.
What is the Terraform Google Cloud provider?
The Terraform Google Cloud provider is a plugin that enables Terraform to interact with GCP services. It translates your Terraform configurations into API calls to GCP, allowing Terraform to provision resources in GCP and manage your infrastructure-as-code (IaC).
When setting up your infrastructure on Google Cloud using Terraform, you’ll start by configuring the GCP provider. This is the entry point of your configuration files, since without authentication, GCP won’t know if you can access it. Here’s how you typically do it:
provider "google" {
    project     = "your-gcp-project-id"
    region      = "us-central1"
    credentials = file("path/to/your/service-account-key.json")
  }
Now, let’s break down the above configuration:
- The project is your GCP project ID, which is where your resources live.
- The region specifies which geographical region these resources are located in.
- The credentials point to your service account key file, which Terraform uses to authenticate with GCP.
If you don’t set credentials in the provider, the Google provider can authenticate via Application Default Credentials (ADC), which Google recommends for Terraform auth flows.
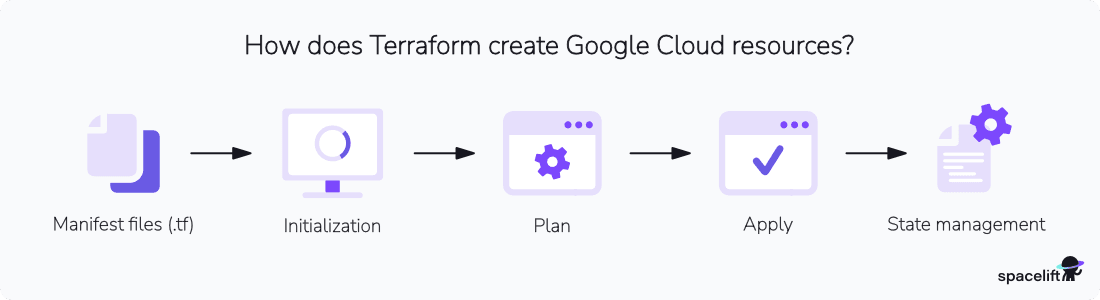
How does Terraform create Google Cloud resources?
Creating resources in GCP with Terraform is a straightforward process that involves several steps happening behind the scenes:
- Manifest files (.tf) — You define your desired infrastructure in .tf files describing the resources and their configurations. This is where you lay down the “what” of your infrastructure.
- Initialization — Terraform uses the necessary plugins (Terraform providers) to interact with GCP. It also sets it up if the code mentions a remote backend configuration, such as Google Cloud Storage.
- Plan — Terraform reads the current state from the .tfstate file to understand the existing infrastructure. It compares the desired state (from your .tf files) with the current state (from the .tfstate file). This difference between the two states tells Terraform what needs to be created, updated, or deleted and generates an execution plan.
- Apply — Terraform executes the plan using the Google Cloud provider plugin to send requests to GCP’s REST APIs. Terraform updates the state file to reflect the new actual state as each resource is created or modified.
- State management — Terraform maintains a state file (.tfstate) to track the current state of your infrastructure. The state file contains the IDs of the resources created in GCP, which Terraform needs to know which resources to manage.
Terraform GCP Example: Creating Cloud Storage Bucket in GCP with Terraform
Now that we’ve outlined the theoretical steps, let’s dive into a practical example to create a Google Cloud Storage. To integrate Terraform with GCP and start creating resources, the first step is to create a Service Account in GCP with the required permissions.
Prerequisites
Before we begin working on GCP, ensure that the Terraform CLI is installed. If you haven’t done this yet, follow this Terraform installation guide to install it. You will also need a Google Cloud account.
1. Create a Service Account in GCP
In the Service Accounts section of GCP, create a new Service Account and assign a role to it with the required permissions:

Authenticate Terraform to GCP (recommended options)
Local development (recommended): Application Default Credentials (ADC)
Install and initialize the Google Cloud CLI, then create an ADC file:
gcloud init
gcloud auth application-default login
ADC is the recommended way to authenticate to Google Cloud when using Terraform.
CI/CD (recommended): Workload Identity Federation / OIDC (no keys)
For automation, prefer Workload Identity Federation so your pipeline uses short-lived credentials instead of long-lived service account keys. Workload Identity Federation eliminates the maintenance and security burden associated with service account keys.
Avoid service account JSON keys unless you have no alternative. If you must use them, treat them as high-risk secrets and rotate them.
2. Configure the Google provider
Now, create a new Terraform project on your local machine and add a main.tf Terraform configuration file and the below Google provider plugin:
provider "google" {
  project = "your-gcp-project-id"
  region  = "us-central1"
}
3. Define your Google Storage Bucket
Next, add the configuration for the Google Cloud Storage Bucket you want to create in your main.tf. Provide the bucket a unique name in the name parameter and pass its location in the location parameter. Add output variable bucket_name to verify the resource creation. Here’s a simple example:
resource "google_storage_bucket" "my_bucket" {
  name     = "spacelift-bucket"
  location = "US"
  }

  output "bucket_name" {
    value = google_storage_bucket.my_bucket.name
  }
4. Initialize and apply your configuration
Apply the following commands to execute the above code:
terraform initterraform planterraform apply

Run terraform destroy to delete resources.
Finally, verify the creation of the resources in the Google Cloud console.

By now, you must have experienced Terraform’s power and flexibility when managing infrastructure on GCP. It allows you to define resources declaratively and manage them efficiently. However, managing complex Terraform configurations locally across multiple environments can be quite challenging.
When using Terraform locally, you quickly run into several issues that can make managing infrastructure a real headache.
For starters, it’s tough to maintain consistency across different team members’ environments. What works on one engineer’s laptop might not work on another’s due to version mismatches or local config differences.
There’s also the challenge of tracking and reviewing changes. Without a centralized CI/CD pipeline, it’s easy for infrastructure updates to slip through without proper review, leading to potential outages or misconfigurations. Plus, managing state files locally is a nightmare. You risk state file corruption or loss, which can wreak havoc on your infrastructure.
When managing infrastructure with Terraform, it’s crucial to implement robust CI/CD pipelines to handle code changes efficiently. In real-world scenarios, running Terraform commands locally is not practical. Instead, using a governed pipeline with CI/CD ensures consistent, secure, and automated deployments. This is where Spacelift comes in, enhancing your Terraform workflows by integrating with your source code repository and automating the entire process.
Using Spacelift for setting up Terraform with GCP
Spacelift is the infrastructure orchestration platform for the AI-accelerated software era, supporting Terraform, Ansible, OpenTofu, Terragrunt, Pulumi, AWS CloudFormation, AWS CDK, Kubernetes, and more.
It manages the full lifecycle for both traditional infrastructure as code and AI-provisioned infrastructure, with Spacelift Intelligence adding natural language provisioning, diagnostics, and operational insight across both workflows. Spacelift is designed and implemented by long-time DevOps engineers based on previous experience with large-scale installations: dozens of teams, hundreds of people, and tens of thousands of cloud assets.
Spacelift is also easy to get started with. You can fully manage your cloud infrastructure within minutes, with no prerequisites. It integrates with key tools across the industry, notably GitHub and AWS.

The diagram above shows that:
- The DevOps/Infra Engineer creates the manifest files in Terraform for the GCP resources and pushes the code to an SCM, in this case, GitHub.
- Spacelift identifies the change in the repository on code push and pulls the manifest files.
- Spacelift runs the complete CI/CD pipeline on the files, applies all the environment variables, and provides all the pipeline logs.
- Finally, Spacelift deploys all the changes to the infrastructure in the cloud provider, which is GCP in this case.
Now that you understand Spacelift, its benefits, and how it works, let’s set up a Spacelift pipeline for your infrastructure deployment. This process will involve integrating your Terraform code into Spacelift to efficiently automate and manage your infrastructure.
The first step involves integrating a Version Control System (VCS) like GitHub with Spacelift. This integration automates the detection of code changes and triggers the CI/CD pipeline whenever updates occur, ensuring seamless and consistent deployments.
1. Set up GitHub as the source code in Spacelift
Login to the Spacelift platform, and in the Source code section, select ‘GitHub’ in the ‘Set up integration’ dropdown as shown in the below image:

Set VCS via the wizard and give the app a unique name in GitHub. After getting redirected back to the Spacelift platform, provide an integration name, select the integration type as ‘Default’ and click ‘Set up’:

The integration should now be visible in the Source code. Click on ‘Install the app’ in the integration:

Install the app in your GitHub account and select the repositories that have to be integrated with Spacelift:

This integration ensures that Spacelift automatically detects every change pushed to your GitHub repository, triggering the appropriate CI/CD pipelines for infrastructure deployment.
After setting up GitHub as the source code, the next step is to create a new stack in Spacelift. A stack in Spacelift represents a unit of infrastructure code and its state, allowing you to manage and deploy your infrastructure seamlessly.
2. Creating a new stack in Spacelift
Return to the Spacelift platform, and in the Stacks section, click on ‘Create stack’:

In the next panel, add a unique name to the stack and click ‘Continue’:

Set up the configuration of your repository and click on ‘Continue’:

Set up the remaining stack configurations according to your requirements. This setup is crucial because it defines the infrastructure deployment process and ensures that all changes are managed consistently and securely.
The next step is setting up the environment variables in Spacelift. Environment variables are key for securely storing sensitive data like API keys, credentials, and other config settings needed for your deployment. This way, you avoid hard-coding sensitive info directly into your infrastructure files, which boosts security and flexibility.
Environment variables also help define different environments, such as production, pre-production, or development. For example, you might use environment variables to scale resources based on the environment: spin up multiple high-powered Compute Engine VM for production but just one low-powered instance for development. This approach makes your infrastructure more dynamic and adaptable to different needs.
3. Setting up environment variables in Spacelift
In the Environment tab of the stack, click Edit and add any variables your Terraform code expects (for example TF_VAR_project_id and TF_VAR_region).

For authentication, use Spacelift’s GCP integration via OIDC so you don’t store long-lived service account keys. Once configured, Spacelift injects a short-lived token into each run as GOOGLE_OAUTH_ACCESS_TOKEN, which the Terraform Google provider can use without a credentials JSON in your code or stack variables.
Fallback (not recommended): If you can’t use OIDC/WIF, you can add GOOGLE_CREDENTIALS as a secret and paste the service account JSON key. Prefer OIDC to avoid long-lived keys.
Now, trigger a run if it does not happen automatically. In the run history, you can review the authentication and end-to-end Terraform logs (init/plan/apply), output values, and other operational details, as shown in the image below.

After the run finishes, verify the resources in your GCP project to ensure everything was deployed correctly.
Once your infrastructure is up and running, maintaining its integrity over time is crucial. This is where drift detection comes into play. In the infrastructure-as-code (IaC) world, drifts are an inevitable headache. A drift occurs when there’s a discrepancy between the desired state of your infrastructure (as defined in your IaC tool) and the actual state of your resources. This mismatch can be caused by manual changes, scripts, or even automated processes that bypass your version-controlled configurations.
Identifying drifts in GCP using Spacelift’s drift detection
Suppose you’re using Terraform to manage your GCP infrastructure. Your Terraform scripts define that a VM instance should have specific network settings. However, during an on-call firefighting session, a DevOps engineer manually changes the VM’s subnet to fix a connectivity issue quickly. Now, the actual state of the VM differs from the configuration declared in Terraform. This discrepancy is what we call a drift.
Identifying and correcting drifts involves a lot of manual checks and balances, which is time-consuming and error-prone. This is where Spacelift’s drift detection capabilities come into play.
Spacelift’s drift detection
Spacelift provides a powerful drift detection feature that continuously monitors your infrastructure to detect any deviations from the desired state defined in your IaC tool. Here’s how it works and why it’s invaluable:
- Continuous monitoring — Spacelift automatically scans your GCP infrastructure to compare the actual state of resources with your Terraform configurations. This continuous monitoring ensures that any unauthorized changes are promptly detected.
- Alerting — When Spacelift detects a drift, it can send alerts to your preferred communication channels (like Slack or email), allowing your team to take immediate action. This proactive approach helps mitigate potential issues before they escalate into larger problems.
- Automated correction — Spacelift can automatically attempt to correct the drift by reapplying the desired state depending on your setup. This feature is very useful in dynamic environments where manual intervention is impractical.

Key points
In this guide, we’ve explored how to effectively use Terraform with Google Cloud Platform (GCP) and integrate Spacelift to streamline your CI/CD workflows. Here’s a recap of what we covered:
- We introduced Google Cloud Platform (GCP) and highlighted its extensive range of cloud services.
- We discussed Terraform as a powerful infrastructure-as-code tool for defining and managing GCP resources.
- We walked through the process of setting up Terraform with GCP, including configuring the provider and deploying resources like Google Cloud Storage.
- We covered how Spacelift enhances Terraform workflows by integrating seamlessly with version control systems like GitHub, automating the CI/CD process, and managing complex infrastructure configurations.
- We explored Spacelift’s drift detection to identify discrepancies between your Terraform configurations and actual GCP infrastructure, ensuring consistency and compliance.
By combining Terraform with GCP and utilizing Spacelift for your CI/CD pipeline, you can achieve a robust and scalable infrastructure management setup. This approach not only simplifies deployment but also enhances control and visibility over your cloud resources.
Manage Terraform better with Spacelift
Orchestrate Terraform workflows with policy as code, programmatic configuration, context sharing, drift detection, resource visualization, and more.
Google Cloud Docs. Overview of Terraform on Google Cloud. Accessed: 17 October 2025
Terraform Docs. Get Started – Google Cloud. Accessed: 17 October 2025
Terraform Registry. Terraform provider for Google Cloud. Accessed: 17 October 2025
Frequently asked questions
What is Terraform GCP used for?
Terraform on GCP is used to define, provision, and manage Google Cloud resources as code. It lets you version infrastructure, automate deployments, and keep environments consistent across projects and regions.
How do I configure the Google provider in Terraform?
You configure the GCP provider by specifying the google (or google-beta) provider block, setting a project, region/zone, and authentication method (service account or ADC). Credentials are usually passed via a service account key file or environment variables.
How do I authenticate Terraform to GCP for local development?
The simplest option is Application Default Credentials (ADC) via the gcloud CLI: gcloud auth application-default login
Then configure the provider with project and region (and omit credentials unless you have a specific reason to use a key file).
How do I store Terraform state in Google Cloud Storage (GCS)?
Create a dedicated GCS bucket for state and configure a gcs backend. It’s common to enable object versioning on the bucket to help recover from accidental overwrites.
What’s the difference between region and zone in GCP (for Terraform)?
A region is a geographic area (e.g., us-central1), while a zone is a specific datacenter within a region (e.g., us-central1-a). Some resources are regional (like many networking components), while others are zonal (like VM instances). Match provider defaults to the resources you’re provisioning.
How do I import existing GCP resources into Terraform?
You can use terraform import to attach an existing resource to Terraform state, then define the matching resource configuration in code. For newer Terraform versions, you can also use declarative import blocks (when available in your workflow) to make imports easier to track.
Can I manage multiple GCP projects with Terraform?
Yes. You can manage multiple projects using separate providers or aliased providers in a single configuration, letting you deploy shared resources and cross-project architectures from one Terraform codebase.
What is Terraform used for?
Terraform automates the provisioning, management, and scaling of infrastructure resources across multiple cloud providers by defining Infrastructure-as-Code.
Is Terraform a cloud platform?
No, Terraform is not a cloud platform. Using Terraform, users can automate cloud resources’ creation, modification, and destruction, ensuring that infrastructure is defined and managed consistently and predictably. However, Terraform itself is not a cloud platform; instead, it interacts with cloud platforms to perform its tasks.
