
When beginning their journey with a tool, a great many people make a mistake I call “the first time problem”. They look for the instructions or tutorials, but they seek them out only to copy and paste the code. They do this because they seemingly have no goals, and their only desire is to finish the next point in training on the platform, to add a badge to their profile.
In this tutorial, you will learn how to create a self-hosted WordPress instance. But the purpose of this article is not for it to become yet another copy-paste template. We want to give you a clear path from point A to point B, which means from a bare repository to a finished, ready-to-use WordPress page, without specifying every move. At the end of this journey, we will leave you with the freedom to deepen your knowledge of tools and resources.
If you want to learn more, check out Terraform on GCP Overview.
1. Configure Terraform GCP Provider
First, we need to configure the Terraform provider, which allows us to connect with Google Cloud API and get down to business. Don’t worry about credentials, we will handle this in a later part of the article.
provider "google" {
 project     = “google-demo”
 region      = "europe-west1"
}

provider "google-beta" {
 project     = “google-demo”
 region      = "europe-west1"
}
Second, we need a place where resources could be stored. This is required because without it, we will not be able to create the resources. For this purpose, we will use a GCP resource called ‘project’. It works as a container for all our components. This article will assume that you already have a project created, and that its name is “google-demo”.
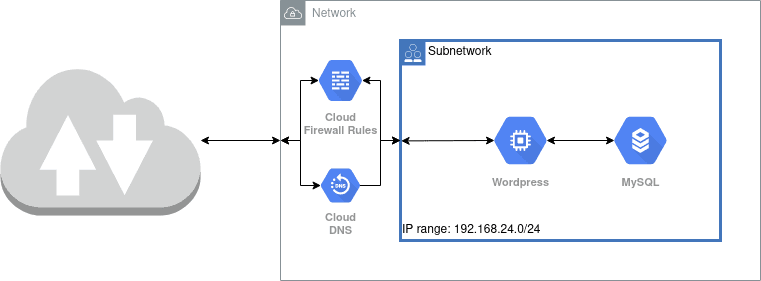
2. Create a virtual network
Core networking
To work with a machine in our project or display our page in the web browser, we need a virtual network where other Google Cloud resources like nodes, addresses, and firewall rules can be added.
Firstly, create a network and subnetwork with an available IP range for our machines.
resource "google_compute_network" "this" {
  auto_create_subnetworks = false
  name                    = "example"
  routing_mode            = "REGIONAL"
}

resource "google_compute_subnetwork" "this" {
  name          = "example"
  ip_cidr_range = 192.168.24.0/24
  region        = "europe-west1"
  network       = google_compute_network.this.id
}
Secondly, create a private address for our database instance, which we will create later so as not to make it publicly available.
resource "google_compute_global_address" "this" {
  provider = google-beta

  name          = "private-ip-db-address"
  purpose       = "VPC_PEERING"
  address_type  = "INTERNAL"
  prefix_length = 16
  network       = google_compute_network.this.id
}

resource "google_service_networking_connection" "this" {
  provider = google-beta

  network                 = google_compute_network.this.id
  service                 = "servicenetworking.googleapis.com"
  reserved_peering_ranges = [google_compute_global_address.this.name]
}
DNS
No one uses an IP address to reach sites on the internet, therefore we need a domain address. To that end, create an address resource and bind DNS records of “A” and “CNAME” types to expose our page on a domain www.example.com to the world. Of course, a Cloud DNS hosted zone with your desired name is required—in this article, we will use the “example-com” zone and assume that we have registered it previously.
resource "google_compute_address" "this" {
  name   = "example"
  region = "europe-west1"
}

resource "google_dns_record_set" "wordpress" {
  name         = "example.com."
  type         = "A"
  ttl          = 300
  managed_zone = "example-com"

  rrdatas = [google_compute_address.this.address]
}

resource "google_dns_record_set" "wordpress_www" {
  name         = "www.example.com."
  type         = "CNAME"
  ttl          = 300
  managed_zone = "example-com"

  rrdatas = ["example.com."]
}
Firewall
Last but not least, we need to configure the most crucial component of our infrastructure—the firewall. It is critical because we don’t want to accidentally open ports or expose instances to the world.
resource "google_compute_firewall" "wordpress_ingress" {
  name    = "example-http"
  network = google_compute_network.this.id

  allow {
    protocol = "icmp"
  }

  allow {
    protocol = "tcp"
    ports    = ["80", "443"]
  }

  source_ranges = ["0.0.0.0/0"]
}

resource "google_compute_firewall" "wordpress_ingress_ssh" {
  name    = "example-ssh"
  network = google_compute_network.this.id

  allow {
    protocol = "tcp"
    ports    = ["22"]
  }

  source_ranges = ["<your_IP>/32"]
}
3. Deploy MySQL Database
To properly launch a functional WordPress instance, we need a database. The most common option is MySQL, because WordPress supports it out of the box. We could create another machine for the database, install and configure it, but why would we? We can utilize managed services using the cloud and do not need to worry about creating the entire infrastructure from scratch. Instead, relying on resources and a few lines of code, we can deploy a new and shiny MySQL instance that is ready to work.
resource "google_sql_database_instance" "this" {
  database_version = "MYSQL_5_7"
  name             = example-wordpress
  region           = "europe-west1"

  depends_on = [
  google_service_networking_connection.this]

  settings {
    availability_type = "REGIONAL"
    disk_autoresize   = false
    disk_size         = 50
    disk_type         = "PD_HDD"
    tier              = "db-g1-small"

    backup_configuration {
      enabled            = true
      start_time         = "04:00"
      binary_log_enabled = true
    }

    ip_configuration {
      ipv4_enabled    = false
      private_network = google_compute_network.this.id
    }

    location_preference {
      zone = "europe-west1-a"
    }

    database_flags {
      name  = "max_connections"
      value = 500
    }
  }
}

resource "google_sql_database" "this" {
  name      = "wordpress"
  instance  = google_sql_database_instance.this.name
  charset   = "utf8"
  collation = "utf8_general_ci"
}
resource "random_string" "this" {
length = 24
special = false
min_upper = 5
min_lower = 5
}
resource "random_password" "this" {
length = 24
special = false
min_upper = 5
min_lower = 5
}
resource "google_sql_user" "this" {
name = random_string.this.result
password = random_password.this.result
instance = google_sql_database_instance.this.name
}To get a username and password created by Terraform, we add the output code:
output "sql_db_username" {
 value = random_string.this.result
 sensitive = true
}
output "sql_db_password" {
value = random_password.this.result
sensitive = true
}4. Create initialization script
To install WordPress on our machine, we create a simple script, which installs a web server (Apache2) and downloads a package with WordPress after operating system startup.
#!/usr/bin/env bash

apt update
apt install -y apache2 \
            ghostscript \
            libapache2-mod-php \
            php \
            php-bcmath \
            php-curl \
            php-imagick \
            php-intl \
            php-json \
            php-mbstring \
            php-mysql \
            php-xml \
            php-zip

mkdir -p /srv/www
sudo chown www-data: /srv/www
curl --silent https://wordpress.org/latest.tar.gz | sudo -u www-data tar zx -C /srv/www
find /srv/www/ -type d -exec chmod 755 {} \;
find /srv/www/ -type f -exec chmod 644 {} \;
cat << EOF > /etc/apache2/sites-available/000-default.conf
<VirtualHost *:80>
  DocumentRoot /srv/www/wordpress
  <Directory /srv/www/wordpress>
      Options FollowSymLinks
      Require all granted
      DirectoryIndex index.php
      Order allow,deny
      Allow from all
  </Directory>
  <Directory /srv/www/wordpress/wp-content>
      Options FollowSymLinks
      Order allow,deny
      Allow from all
  </Directory>
</VirtualHost>
EOF
a2enmod rewrite
systemctl reload apache2
sudo -u www-data cp /srv/www/wordpress/wp-config-sample.php /srv/www/wordpress/wp-config.php

sudo -u www-data sed -i 's/database_name_here/wordpress/' /srv/www/wordpress/wp-config.php
sudo -u www-data sed -i 's/username_here/${DB_USERNAME}/' /srv/www/wordpress/wp-config.php
sudo -u www-data sed -i 's/password_here/${DB_PASSWORD}/' /srv/www/wordpress/wp-config.php
sudo -u www-data sed -i 's/localhost/${DB_HOST}/' /srv/www/wordpress/wp-config.php

systemctl restart apache2
5. Create GCP machine
Having gone through the initial configuration, we are now able to create the machine. To do that, we will need some details:
- Which type of machine we choose.
- What image we choose.
- What size of disk we want.
The first item on our list is machine type. We can check for it in GCP documentation. For tutorial purposes, we don’t need a big machine with a ton of vCPUs and RAM, so let’s choose a small one, such as e2-standard-2.
Next, we need an image. The standard option is, of course, GNU/Linux distribution. I personally prefer Debian, but you can choose whatever distribution you want from this list.
The template of an image value will look like this: ‘image-project/image-family’.
Lastly, we need to think about the size of our attached disk. We will use a small number, but if you want to do what is right for your case, you will need to think about extra size to accommodate
- Future WordPress updates.
- Future WordPress plugin updates.
- Your custom changes to the page.
- Custom themes for your page.
- Uploaded assets.
- Page cache.
Now that we’ve gathered all the needed information, let’s code it.
resource "google_compute_instance" "this" {
 name                    = "example-wordpress"
 machine_type            = "e2-standard-2"
 zone                    = "europe-west1-b"
  metadata_startup_script = templatefile("${path.module}/init.sh", {
    DB_USERNAME = random_string.this.result
    DB_PASSWORD = random_password.this.result
    DB_HOST     = google_sql_database_instance.this.private_ip_address
  })

 boot_disk {
   initialize_params {
     image = “debian-cloud/debian-10”
     size  = 50
   }
 }

 network_interface {
   subnetwork = google_compute_subnetwork.this.id

   access_config {
     nat_ip = google_compute_address.this.address
   }
 }

 service_account {
   scopes = ["userinfo-email", "compute-ro", "storage-ro"]
 }
}

resource "google_compute_resource_policy" "this" {
 name   = "example-wordpress"
 region = “europe-west1”

 snapshot_schedule_policy {
  schedule {
    daily_schedule {
      days_in_cycle = 1
      start_time    = "02:00"
    }
  }

  retention_policy {
    max_retention_days    = 60
    on_source_disk_delete = "KEEP_AUTO_SNAPSHOTS"
  }

  snapshot_properties {
    storage_locations = ["eu"]
  }
 }
}

resource "google_compute_disk_resource_policy_attachment" "this" {
 name       = google_compute_resource_policy.this.name
 disk         = "example-wordpress"
 zone        = "europe-west1-b"
 depends_on = [google_compute_instance.this]
}
At this point, our code is ready. We can push it to our version control system of choice and proceed with automation configuration.
How to Integrate GCP with Spacelift
When using infrastructure-as-code automation tools such as Terraform, AWS CloudFormation, or Pulumi, these tools typically require credentials to execute. Usually, these are very powerful credentials, administrative credentials, sometimes. And these can do a lot of damage. Typically, you’d provide those credentials statically – think AWS credentials, GCP service keys, etc. This is dangerous and against security best practices. Spacelift GCP integration allows Spacelift to manage your Google Cloud resources without the need for long-lived static credentials.
Step 1. Stack configuration
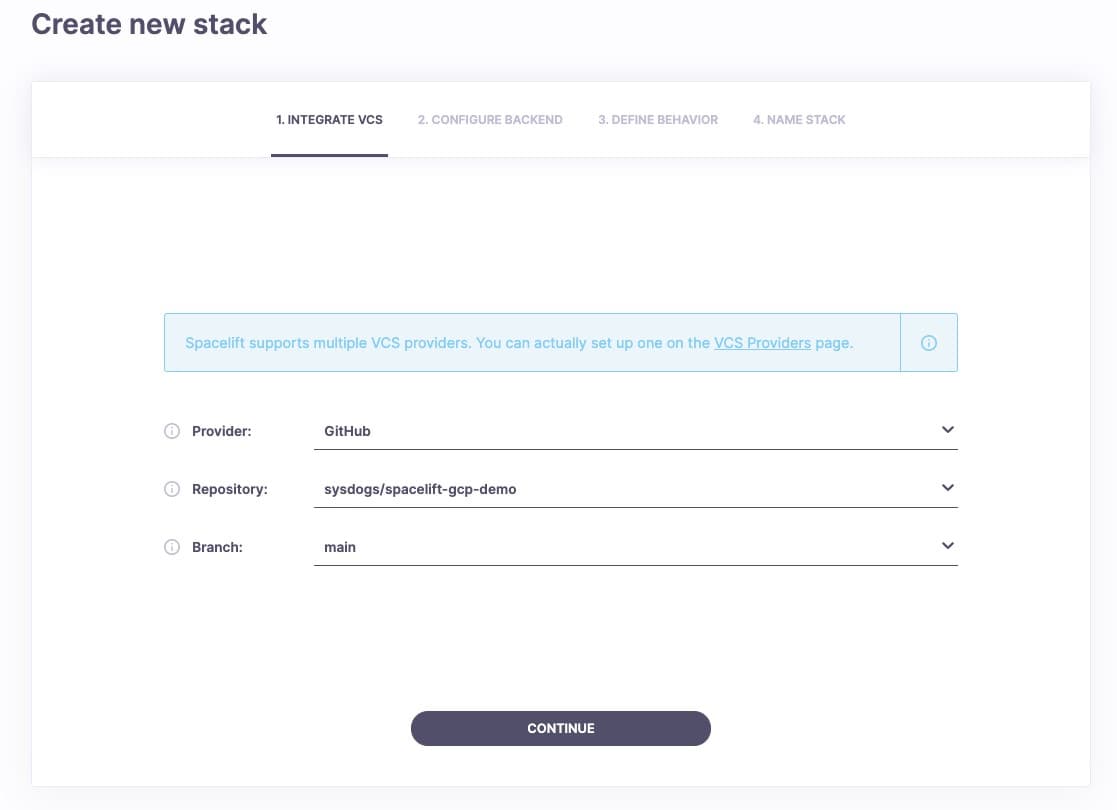
We do not want to deploy all of the prepared code manually from our computer. Instead, we want it to be deployed automatically. For this, we will leverage Spacelift. At first, you need to create a stack:

Choose a version control system provider (GitHub in this scenario), repository and branch.
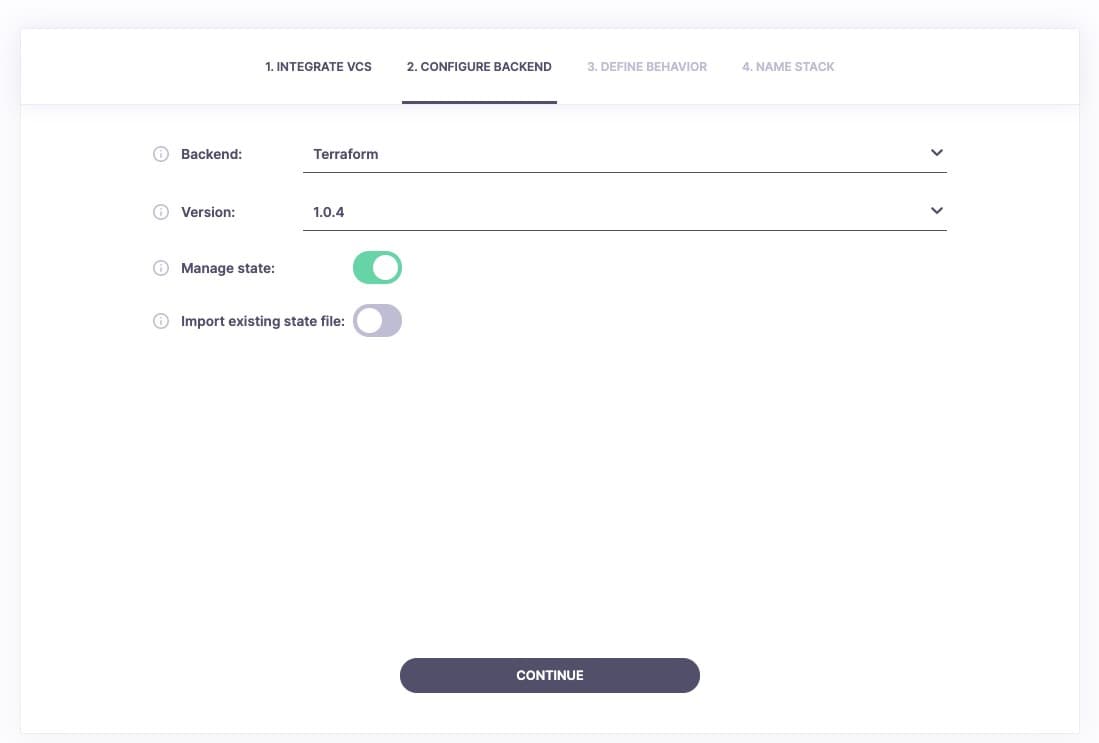
Next, we proceed to a backend configuration. Since we have been using Terraform, we will naturally select Terraform for our backend. For the purpose of this article, we will also let Spacelift manage our Terraform state.
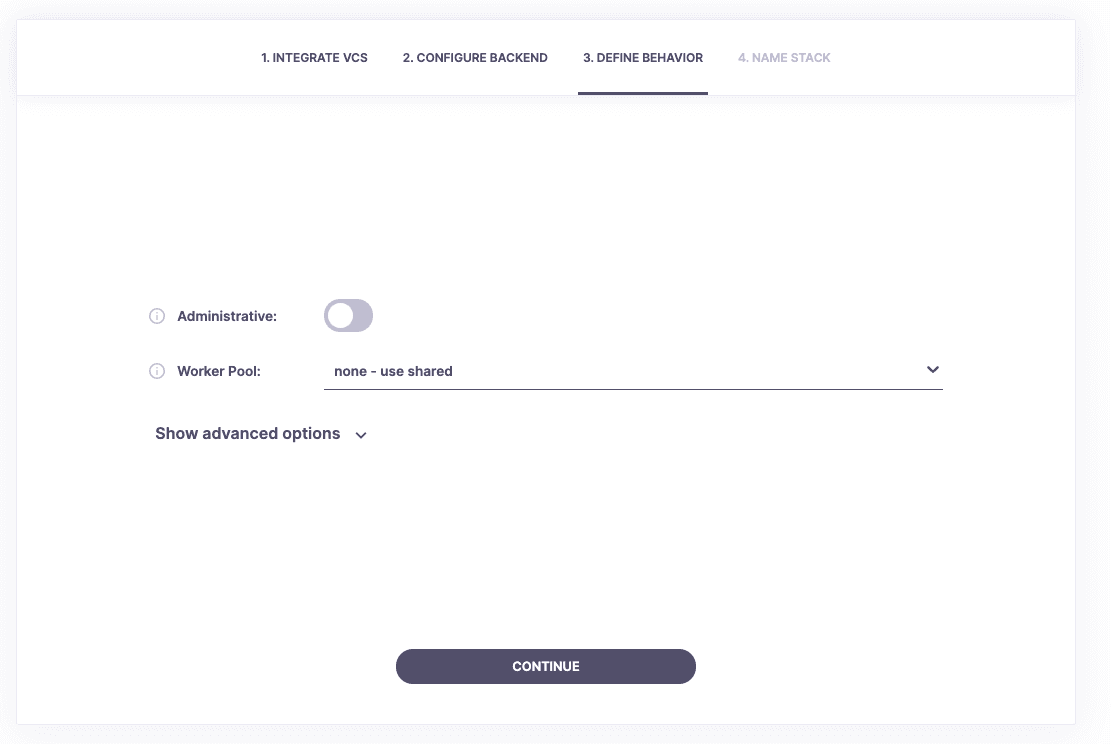
Last but not least, a few minor details such as a worker pool and the name of a stack.

Step 2. Integration with GCP
Once our stack is created, we can proceed to integrate it with our Google Cloud Platform project.
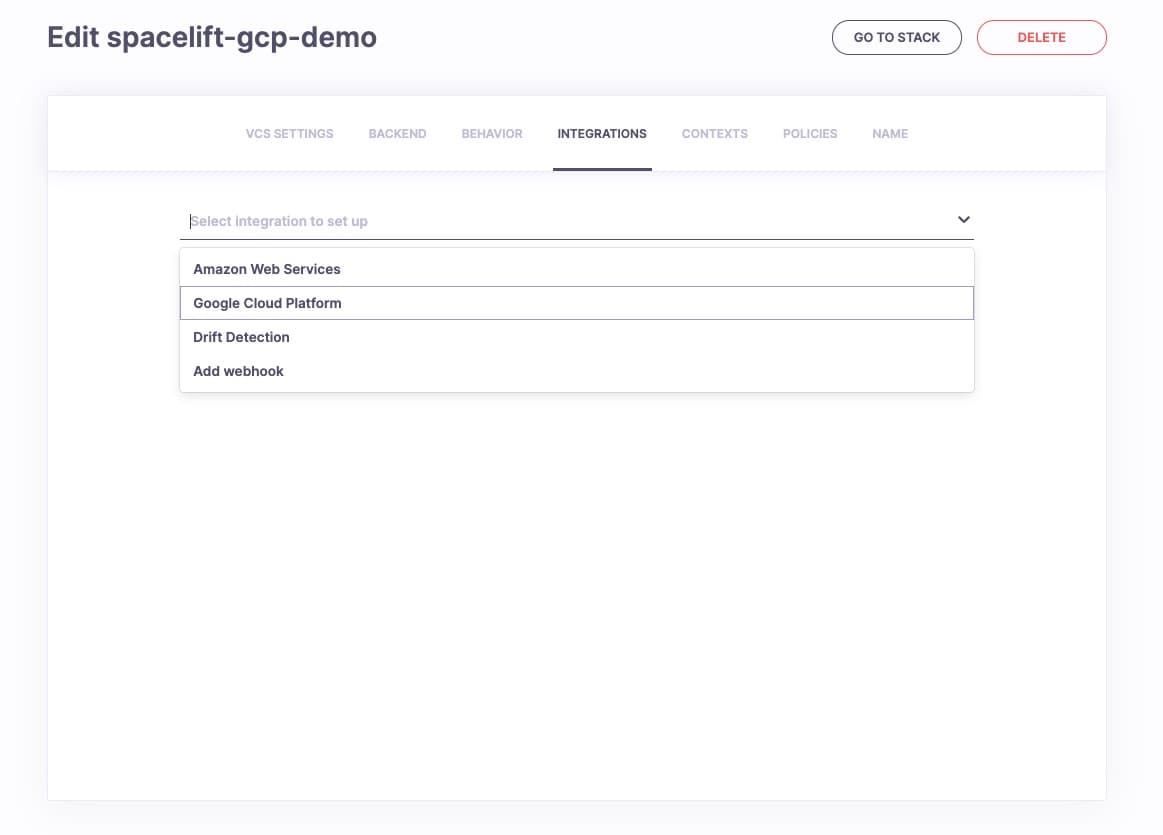
Edit your stack and go to the “Integrations” tab. Select Google Cloud Platform.
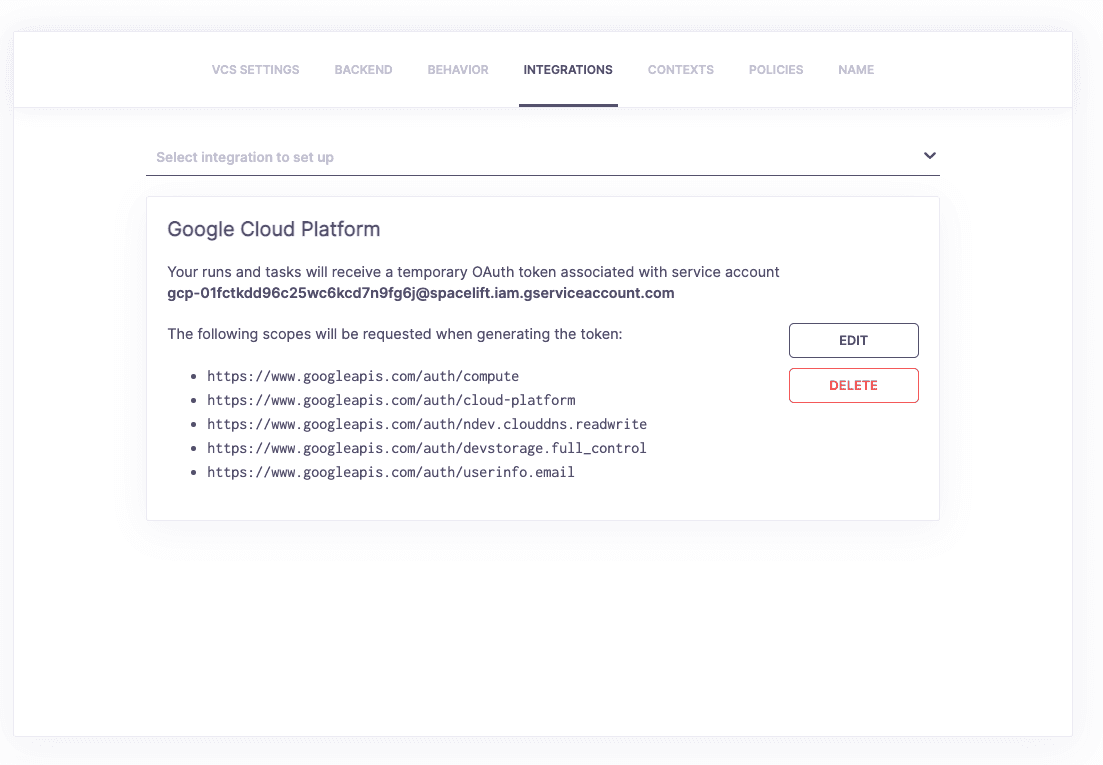
Generate a service account that will be used with this particular stack.
Now, head to the Google Cloud Platform console and into the Identity and Access Management (IAM) tab.
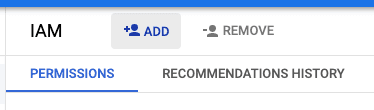
Add the appropriate permissions to the service account generated in the previous step. For the sake of our exercise, we will grant it Owner permissions (this permission is appropriate only for tutorial purposes. (To avoid issues and risks associated with the possibility of hostile permission escalation, never do this on real environments.)

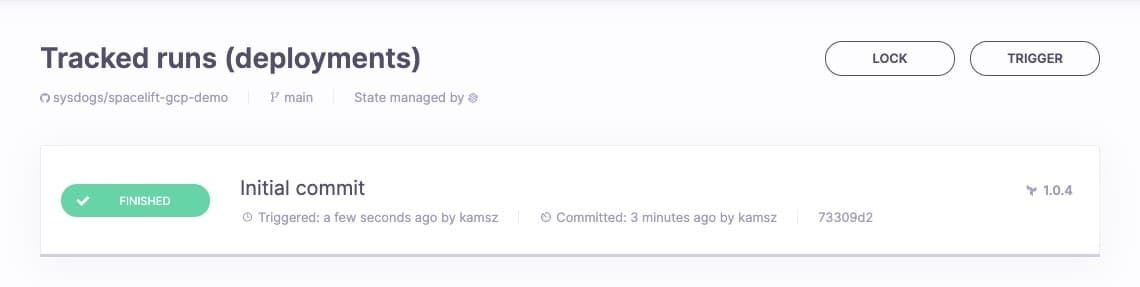
Once this is done, you can simply click on the “Trigger” button in order to trigger a new deployment.
Key Points
Looking at all the headings and code that we wrote today, it may seem complicated and hard, but it really isn’t. If you have planned what has to be done, and if you read the descriptions added to properties that you want to use, you will see that it will begin to arrange itself into a coherent whole.
Google Cloud Platform is big and has a lot of components, which might be intimidating. To avoid losing your head, I recommend sticking to the KISS principle.
Now that we’ve come to the end of this tutorial, you should have a working WordPress page and a bunch of scripts. As you have probably noticed, your site is not secured by an SSL certificate. That is correct—this will be your homework, dear reader. Take what you have learned today and build on it!
Note: New versions of Terraform are placed under the BUSL license, but everything created before version 1.5.x stays open-source. OpenTofu is an open-source version of Terraform that expands on Terraform’s existing concepts and offerings. It is a viable alternative to HashiCorp’s Terraform, being forked from Terraform version 1.5.6.
Manage Terraform Better with Spacelift
Build more complex workflows based on Terraform using policy as code, programmatic configuration, context sharing, drift detection, resource visualization and many more.
Frequently asked questions
What is Terraform for GCP?
Terraform for GCP is the use of Terraform’s infrastructure-as-code framework to provision and manage Google Cloud resources. It relies on the Google Cloud provider plugin, which maps Terraform configurations to GCP services like Compute Engine, GKE, and Cloud Storage. This approach enables repeatable, version-controlled deployments and simplifies multi-environment management.
How to connect Terraform with Google Cloud?
Install gcloud, enable required APIs, and authenticate using ADC (gcloud auth application-default login) or a service account key (GOOGLE_APPLICATION_CREDENTIALS). In Terraform, set the Google provider with project and region, then run terraform init and terraform apply. For CI, use Workload Identity Federation instead of long-lived keys.
