
Ansible is one of the most popular open-source software tools for configuration management, software provisioning, and application deployment of cloud or on-premises environments. This article will examine best practices for setting up Ansible projects and suggest approaches to deal with Ansible’s internals effectively.
- Generic best practices and tips for Ansible project structure
- Best practices for Ansible plays & playbooks
- Best practices for Ansible variables
- Best practices for Ansible modules
- Best practices for Ansible roles
- Execution and deployments best practices and tricks
- Ansible security best practices
If you are new to Ansible, take a look at this Ansible Tutorial for Beginners.
Quick tips for operating and configuring Ansible projects
- Use a clear directory structure
- Stick to YAML best practices
- Use Ansible Vault for secrets (or any other secrets management system)
- Leverage dynamic inventories: In cloud environments, dynamic inventories help you easily build your inventory and account for changes made to your infrastructure.
- Keep playbooks idempotent
- Take advantage of role dependencies
- Use version control: Store your Ansible projects in Git for easy cycling through different versions.
- Use tags: Leverage tags for selective execution.
- Implement observability into your playbooks: This process may seem hard, but if you are leveraging Spacelift, you have an account-level overview of all the hosts that have been used in your Ansible workflows with Spacelift.
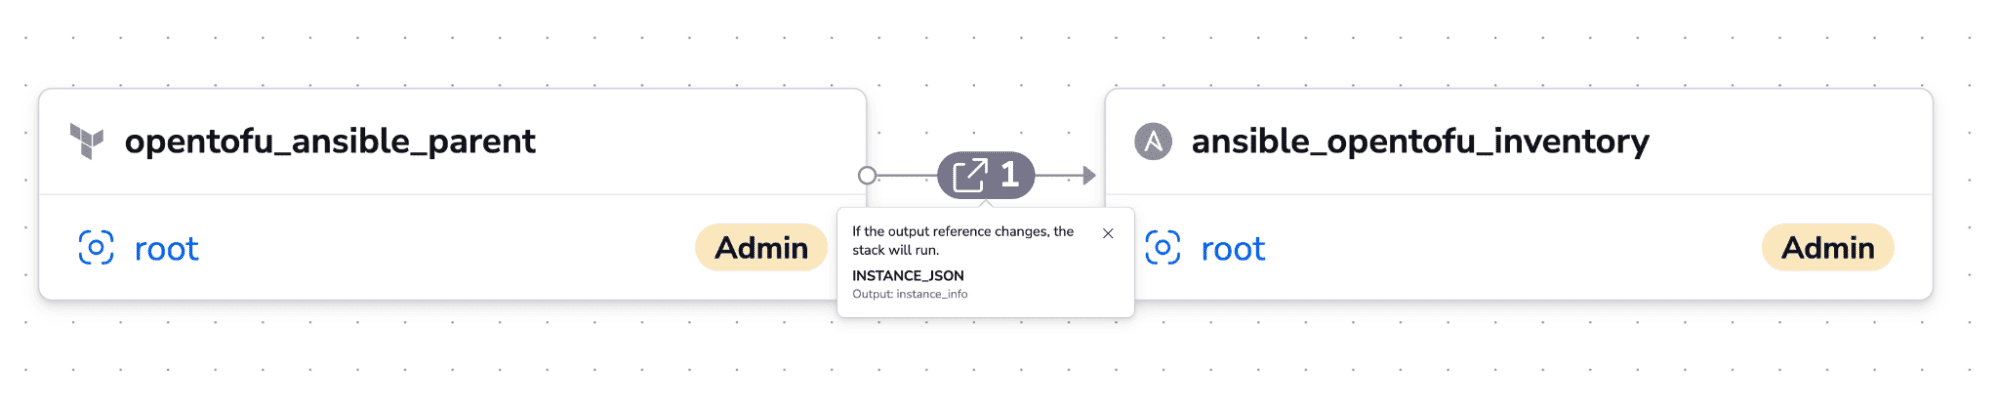
- Combine provisioning and configuration in a single workflow: Dynamic inventories are very powerful, but creating your inventory using IaC and then sharing it with Ansible can be really helpful in many situations. Spacelift lets you do this natively without having to write any code to pass the output from the IaC tool to the configuration management one.
1. Generic best practices and tips for Ansible project structure
In this section, we examine and discuss general best practices and recommendations for organizing your projects and getting the most out of Ansible.
Generic Best Practices
– Favor YAML over JSON: Although Ansible allows JSON syntax, using YAML is preferred and improves the readability of files and projects. (See: YAML vs. JSON)
– Use consistent whitespaces: To separate things neatly and improve readability, consider leaving a blank line between blocks, tasks, or other components.
– Use a consistent tagging strategy: Tagging is a powerful concept in Ansible because it enables more granular grouping and management of tasks. Tags allow us to add fine-grained controls to task execution.
– Add comments: For further clarification, add a comment explaining the purpose and the reason behind plays, tasks, variables, etc.
– Use a consistent naming strategy: Before setting up your Ansible projects, consider applying a consistent naming convention for your tasks (always name them), plays, variables, roles, and modules.
– Define a style guide: Following a style guide encourages consistency. For inspiration, look at this style guide by OpenShift.
– Keep it simple: You don’t have to use all of Ansible’s many options and advanced features. Find the Ansible parts and mechanics that fit your use case, and keep your Ansible projects as simple as possible. For example, begin with a simple playbook and static inventory and add more complex structures or refactor later according to your needs.
– Store your projects in a Version Control System (VCS): Keep your Ansible files in a code repository and commit any new changes regularly.
– Standardize on collections: Use collections/ and requirements.yml instead of scattering custom modules and roles. Collections are now the main delivery format for roles, plugins, and modules.
– Pin collection and Python dependencies: Treat requirements.yml for collections and requirements.txt/pyproject.toml for Python dependencies as first-class artifacts of your automation stack.
– Test your Ansible projects: Use linting tools like Ansible Lint and add testing steps in your CI/CD pipelines for your Ansible repositories. For testing Ansible roles, look at Molecule. To test inputs or verify custom expressions, you can use the assert module.
And check out our Ansible CLI Commands and Basics Cheat Sheet.
Directory organization
Here’s an example of a well-organized Ansible directory structure:
inventory/
    production                # inventory file for production servers
    staging                   # inventory file for staging environment
    testing                   # inventory file for testing environment

group_vars/
   group1.yml             # variables for particular groups
   group2.yml
host_vars/
  host1.yml               # variables for particular systems
  host2.yml

library/                  # Store here any custom modules (optional)
module_utils/             # Store here any custom module_utils to support modules (optional)
filter_plugins/           # Store here any filter plugins (optional)

master.yml                # master playbook
webservers.yml            # playbook for webserver tier
dbservers.yml             # playbook for dbserver tier

roles/
   example_role/               # this hierarchy represents a "role"
       tasks/            #
           main.yml      #  <-- tasks file can include smaller files if warranted
       handlers/         #
           main.yml      #  <-- handlers file
       templates/        #  <-- files for use with the template resource
           ntp.conf.j2   #  <------- templates end in jinja2
       files/            #
           bar.txt       #  <-- files for use with the copy resource
           foo.sh        #  <-- script files for use with the script resource
       vars/             #
           main.yml      #  <-- variables associated with this role
       defaults/         #
           main.yml      #  <-- default lower priority variables for this role
       meta/             #
           main.yml      #  <-- role dependencies
       library/          # roles can also include custom modules
       module_utils/     # roles can also include custom module_utils
       lookup_plugins/   # or other types of plugins, like lookup in this case

   monitoring/              # same kind of structure as "common" was above, done for the monitoring role
– Use execution environments for consistent runtimes: Instead of relying on whatever Python is installed on your control node, package your Ansible runtime into a containerized Execution Environment (EE) that includes ansible-core, collections, and system dependencies. This gives you reproducible automation across laptops, CI, and Spacelift workers.
Read more: How to Create a Directory in Ansible
Inventory best practices
– Use inventory groups: Group hosts based on common attributes they might share (geography, purpose, roles, environment).
– Separate inventory per environment: Define a separate inventory file per environment (production, staging, testing, etc.) to isolate them from each other and avoid mistakes by targeting the wrong environments.
– Dynamic inventory: When working with cloud providers and ephemeral or fast-changing environments, maintaining static inventories can become complex quickly. Set up a mechanism to synchronize the inventory dynamically with your cloud providers instead.
– Leverage dynamic grouping at runtime: We can create dynamic groups using the `group_by` module based on a specific attribute. For example, group hosts dynamically based on their operating system and run different tasks on each without defining such groups in the inventory.
- name: Gather facts from all hosts
  hosts: all
  tasks:
    - name: Classify hosts depending on their OS distribution
      group_by:
        key: OS_{{ ansible_facts['distribution'] }}

# Only for the Ubuntu hosts
- hosts: OS_Ubuntu
  tasks:
    - # tasks that only happen on Ubuntu go here

# Only for the CentOS hosts
- hosts: OS_CentOS
  tasks:
    - # tasks that only happen on CentOS go here
– Combine provisioning and configuration in a single workflow – Dynamic inventories are very powerful, but creating your inventory using IaC and then sharing it with Ansible can be really helpful in many situations. Spacelift lets you do this natively, without having to write any code to pass the output from the IaC tool to the configuration management one:
Learn more about Ansible inventory: Working with Ansible Inventory – Basics and Use Cases.
2. Plays & playbooks best practices
In this section, we list and discuss best practices for using plays and playbooks — two basic components of Ansible projects.
– Always mention the state of tasks: To make your tasks more understandable, explicitly set the state parameter even though it might be unnecessary due to the default value.
– Place every task argument in its own separate line: This point aligns with the general approach to striving for readability in our Ansible files. Check the examples below.
This works but isn’t readable enough:
- name: Add the user {{ username }}
   ansible.builtin.user: name={{ username }} state=present uid=999999 generate_ssh_key=yes
   become: yes
Instead, use this syntax, which improves the readability and understandability of the tasks and their arguments:
- name: Add the user {{ username }}
   ansible.builtin.user:
     name: "{{ username }}"
     state: present
     uid: 999999
     generate_ssh_key: yes
   become: yes
– Use top-level playbooks to orchestrate other lower-level playbooks: You can logically group tasks, plays, and roles into low-level playbooks, use other top-level playbooks to import them, and set up an orchestration layer according to your needs. Refer to this example.
– Use block syntax to group tasks: Tasks that relate to each other and share common attributes or tags can be grouped using the block option. Another advantage of this option is easier rollbacks for tasks under the same block.
- name: Install, configure, and start an Nginx web server
  block:
    - name: Update and upgrade apt
      ansible.builtin.apt:
        update_cache: yes
        cache_valid_time: 3600
        upgrade: yes

    - name: "Install Nginx"
      ansible.builtin.apt:
        name: nginx
        state: present

    - name: Copy the Nginx configuration file to the host
      template:
        src: templates/nginx.conf.j2
        dest: /etc/nginx/sites-available/default

    - name: Create link to the new config to enable it
      file:
        dest: /etc/nginx/sites-enabled/default
        src: /etc/nginx/sites-available/default
        state: link

    - name: Create Nginx directory
      ansible.builtin.file:
        path: /home/ubuntu/nginx
        state: directory

    - name: Copy index.html to the Nginx directory
      copy:
        src: files/index.html
        dest: /home/ubuntu/nginx/index.html
      notify: Restart the Nginx service
  when: ansible_facts['distribution'] == 'Ubuntu'
  tags: nginx
  become: true
  become_user: root
– Use handlers for tasks that should be triggered: Handlers in Ansible allow a task to be executed after something has changed. This handler will be triggered when there are changes to index.html from the above example.
handlers:
  - name: Restart the Nginx service
    service:
      name: nginx
      state: restarted
    become: true
    become_user: root
Check out the Working with Ansible Playbooks blog post for more details about playbooks.
Leading online gaming operator Novibet needed to expand its IaC capabilities to align with its ambitious growth strategy. The Spacelift platform has allowed the team to deploy faster and with more control as they advance toward a platform engineering mindset and enable autonomy with guardrails.
3. Variables best practices
Variables allow users to parametrize different Ansible components and store values we can reuse throughout projects. Let’s look at some best practices and tips on using Ansible variables.
– Always provide sane defaults for your variables: Set default values for all groups under group_vars/all. For every role, set default role variables in roles/<role_name>/defaults/main.yml.
– Use groups_vars and host_vars directories: To keep your inventory file clean, prefer setting group and hosts variables in the groups_vars and host_vars directories.
– Add the role name as a prefix to variables: Try to be explicit when defining variable names for your roles by adding a prefix with the role name.
nginx_port: 80
apache_port: 8080
– Keep your variable’s setup simple: It is not advisable to use all of the many available Ansible variables unless you have specific needs. Pick the ones most appropriate for your use case and keep it as simple as possible.
– Use double quotes for strings and single quotes for literal values to avoid ambiguity and ensure that variables, strings, and other values are correctly interpreted.
Check out the How to Use Different Types of Ansible Variables blog post for more pointers and tips.
4. Modules best practices
This section provides tips and best practices for using Ansible modules efficiently in tasks.
– Keep local modules close to playbooks: Use each Ansible project’s ./library directory to store relevant custom modules. Playbooks that have a ./library directory relative to their path can directly reference any modules inside it.
– Avoid command and shell modules: Use command and shell modules only when there isn’t another option. Instead, prefer specialized modules that provide idempotency and proper error handling. Read more about the Ansible shell module.
– Specify module arguments when it makes sense: You can omit default values in many module arguments. To be more transparent and explicit, specify some of these arguments, like the state in our playbook definitions.
– Favor multi-tasks in a module over loops: The most efficient way to define a list of similar tasks, like installing packages, is to use multiple tasks in a single module.
- name: Install Docker dependencies
  ansible.builtin.apt:
     name:
       - curl
       - ca-certificates
       - gnupg
       - lsb-release
     state: latest
– Document and test your custom modules: Every custom module should include examples, explicitly document dependencies, and describe return responses. New modules should be tested thoroughly before release. You can create testing roles and playbooks to test your custom modules and validate different test cases.
For more details about using modules and writing your own custom modules, check the Ansible Modules – How to Use Them Efficiently blog post.
5. Roles best practices
Ansible roles enable reusability and efficient code sharing while providing a well-structured framework for configuring and setting projects. This section examines some best practices and tips for creating well-defined roles.
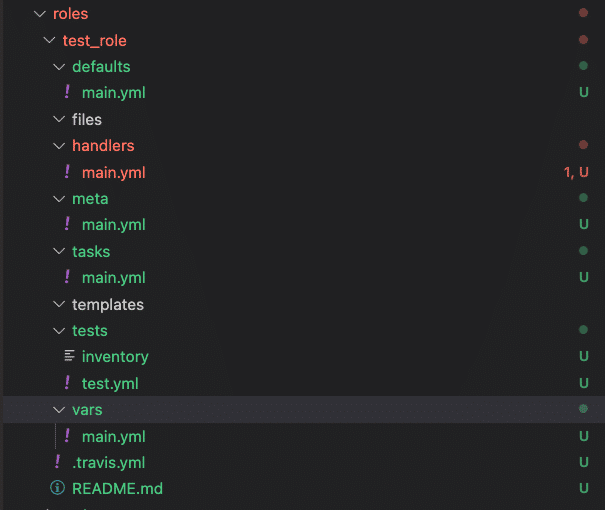
– Follow the Ansible Galaxy Role Directory structure: Leverage the ansible-galaxy init <role_name> command to generate a default role directory layout according to Ansible Galaxy’s standards.
– Keep your roles single-purposed: Each role should have a separate responsibility and distinct functionality to conform with the separation of concerns design principle. Separate your roles based on different functionalities or technical domains.
– Try to limit role dependencies: By avoiding many dependencies in your roles, you can keep them loosely coupled, develop them independently, and use them without managing complex dependencies between them.
– Use import_role or include_role: Enhance control of the execution order of roles and tasks by using import_role or include_role over the classic roles option.
– Do your due diligence for Ansible Galaxy Roles: When downloading and using content and roles from Galaxy, do your due diligence, validate their content, and pick roles from trustworthy contributors.
– Store Galaxy roles used locally: To avoid depending on Ansible Galaxy’s upstream, you can store any roles from Galaxy in your code repositories and manage them as part of your project.
6. Execution and deployment best practices and tips
Ansible provides many controls and options to orchestrate execution against hosts. In this section, we explore tips and tricks for optimally controlling Ansible execution based on our needs.
– Test changes in staging first: Testing your tasks in a staging or testing environment before production is a great way to validate that your changes have the expected outcome.
– Limit task execution to specific hosts: Use the --limit flag to run a playbook against specific hosts.
– Limit task execution to specific tasks based on tags: If you need to run only specific tasks from a playbook based on tags, you can define the tags to be executed with the --tags flag.
– Validate which tasks will run before executing: You can use the --list-tasks flag to confirm which tasks would be run without actually running them.
– Validate against which hosts the playbook will run: You can use the --list-hosts flag to confirm which hosts will be affected by the playbook without running it.
– Validate which changes will happen without making them: Leverage the --check flag to predict any changes that may occur. Combine it with --diff flag to show differences in changed files.
– Start at a specific task: Use the --start-at-task flag to start executing your playbook at a particular task.
– Use rolling updates to control the number of target machines: By default, Ansible attempts to run the play against all hosts in parallel. To achieve a rolling update setup, you can leverage the serial keyword. Using this keyword, you can define the number of hosts to which the changes should be performed in parallel.
– Control playbook execution strategy: By default, Ansible finishes the execution of each task on all hosts before moving to the next task. if you wish to select another execution strategy, look at this guide.
7. Ansible security best practices
– Don’t store sensitive values in plain text: For secrets and sensitive values, use Ansible Vault to encrypt variables and files and protect any sensitive information.
– Implement observability into your playbooks: This process may seem difficult, but if using Spacelift gives you an account-level overview of all the hosts that have been used in your Ansible workflows with Spacelift.
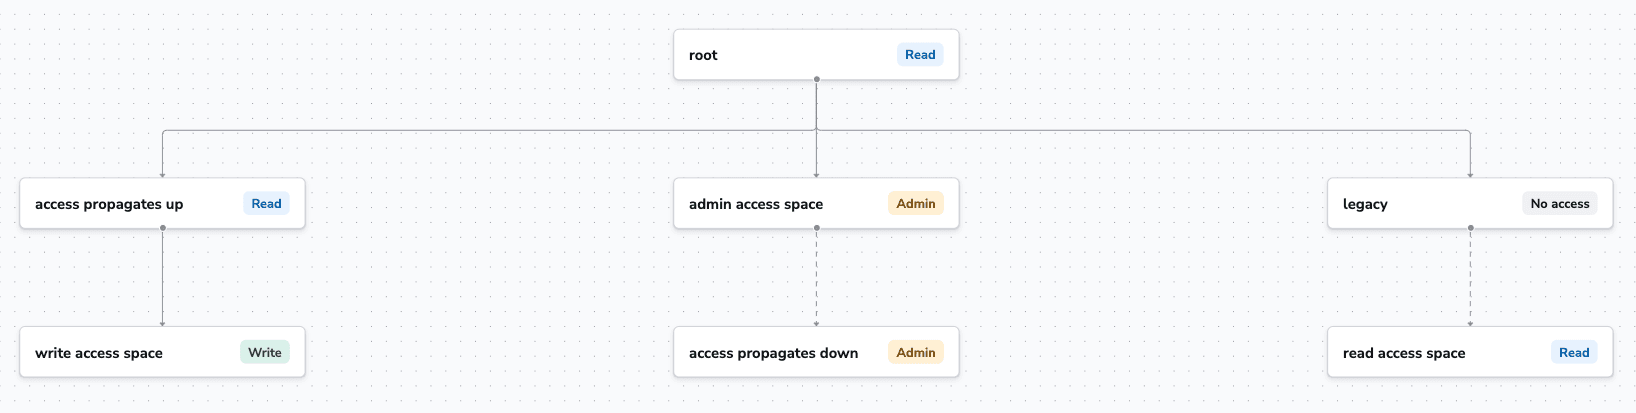
– Role-Based Access Control (RBAC): RBAC is always one of the most important aspects of security. For Ansible, this can be hard to implement, especially if you are not using a dedicated platform to run your workflows. Spacelift helps you with this by letting you define partial admin rights for your users:
– Limit your privilege escalation: Another important aspect of security for your Ansible workflows is to limit your privilege escalation, meaning that you should use the become: true module only when necessary.
– Implement governance: Implementing governance with policies to restrict certain tasks from running is another great security measure. Spacelift uses OPA for defining policies, so you can easily define fine-grained policies that restrict modules, enforce tagging, and more.
– Scan for security vulnerabilities: Scanning policies for security vulnerabilities ensures that you enforce best practices and are always up to speed regarding your configuration status. Spacelift integrates with any security vulnerability scanning tool and even lets you define custom policies for these tools, making it easy to make decisions for your runs.
– Verify the integrity of downloaded content: use ansible-sign and signed collections where available to ensure you don’t run tampered roles or modules in production.
Read more: Ansible Security Automation: Risks & 7 Best Practices
Why use Spacelift to elevate your Ansible automation?
Spacelift’s vibrant ecosystem and excellent GitOps flow can greatly assist you in managing and orchestrating Ansible. By introducing Spacelift on top of Ansible, you can easily create custom workflows based on pull requests and apply any necessary compliance checks for your organization.
With Spacelift, you get:
- Better playbook automation – Manage the execution of Ansible playbooks from one central location.
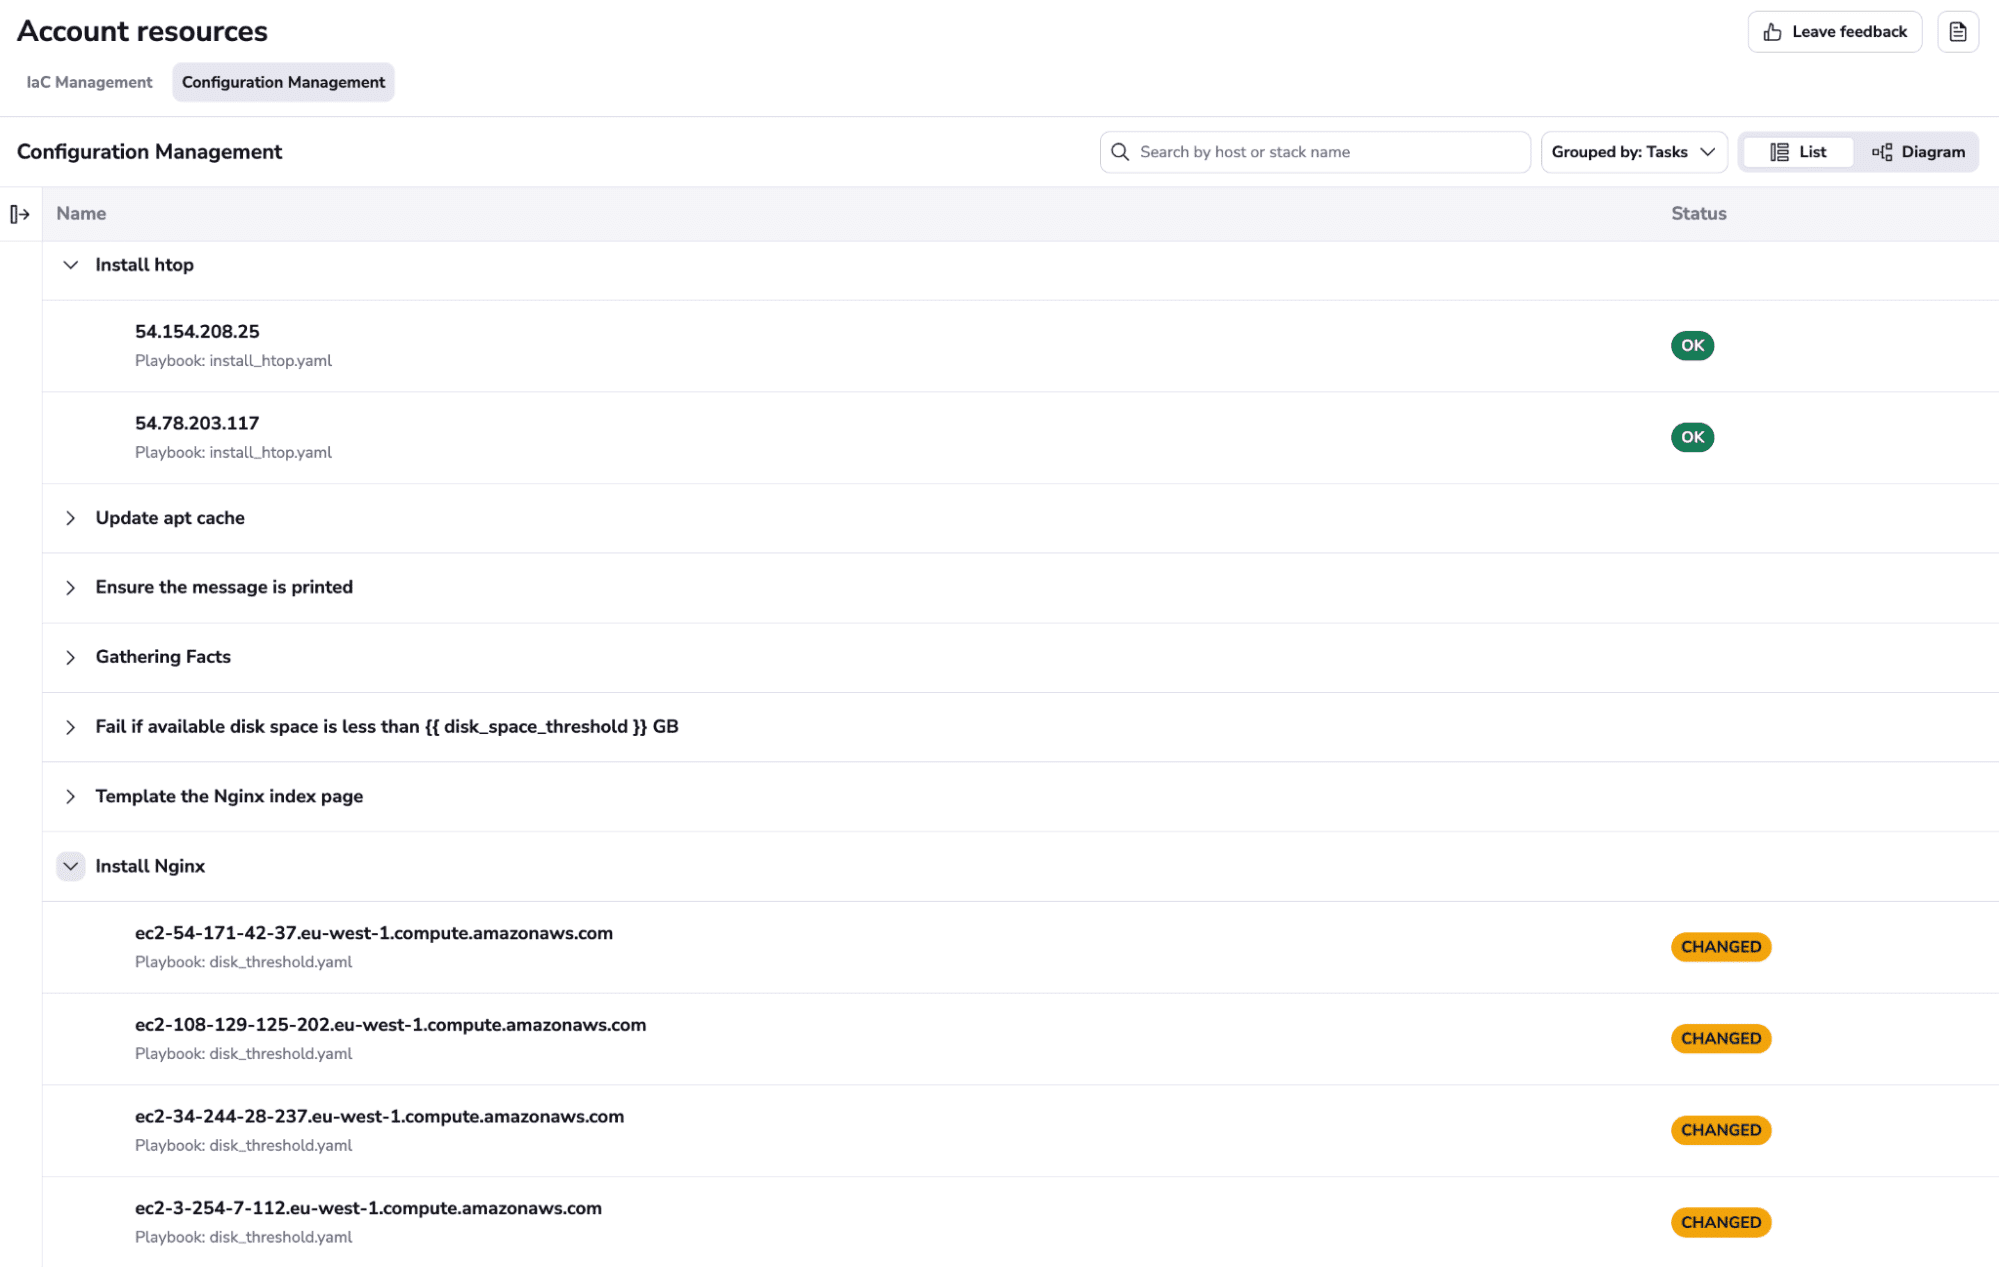
- Inventory observability – View all Ansible-managed hosts and related playbooks, with clear visual indicators showing the success or failure of recent runs.
- Playbook run insights – Audit Ansible playbook run results with detailed insights to pinpoint problems and simplify troubleshooting.
- Policies – Control what kind of resources engineers can create, what parameters they can have, how many approvals you need for a run, what kind of task you execute, what happens when a pull request is open, and where to send your notifications
- Stack dependencies – Build multi-infrastructure automation workflows with dependencies, having the ability to build a workflow that, for example, generates your EC2 instances using Terraform and combines it with Ansible to configure them
- Self-service infrastructure via Blueprints – Enable your developers to do what matters – developing application code while not sacrificing control
- Creature comforts such as contexts (reusable containers for your environment variables, files, and hooks), and the ability to run arbitrary code
- Drift detection and optional remediation
If you want to learn more about using Spacelift with Ansible, check our documentation, read our Ansible guide, or book a demo with one of our engineers.
Would you like to see this in action – or just want a tl;dr? Check out this video I put together showing you Spacelift’s new Ansible functionality:

Key points
In this blog post, we delved into best practices, tips, and tricks for operating and configuring Ansible projects. We explored approaches for structuring our Ansible projects and roles and set different configuration options regarding the inventory and variables. Lastly, we examined various tips for controlling our playbook’s execution and deployments.
Manage Ansible Better with Spacelift
Managing large-scale playbook execution is hard. Spacelift enables you to automate Ansible playbook execution with visibility and control over resources, and seamlessly link provisioning and configuration workflows.
