
Managing infrastructure across multiple cloud platforms like AWS and Google Cloud can quickly turn static Ansible inventories into a maintenance nightmare. Manually updating host lists doesn’t scale; frankly, it shouldn’t.
That’s where Ansible dynamic inventory comes in. Instead of hardcoding infrastructure details, it automatically pulls host data from your cloud provider, CMDB, or service registry, keeping your inventory up to date in real time.
This guide explains dynamic inventory, how it works, and how to use it with real-world examples.
We’ll cover:
- What is an Ansible dynamic inventory?
- What is the difference between static and dynamic inventory in Ansible?
- Why use dynamic inventories?
- Supported sources for Ansible dynamic inventories
- How to configure and use an Ansible dynamic inventory
- Example: Setting up AWS dynamic inventory with Ansible
- Best practices for using a dynamic inventory in Ansible
Prerequisites
To gain the full benefit of this article, you’ll need to:
- Ensure that Ansible is installed on your local machine or the control node
- Have API access to your cloud provider (AWS is the cloud provider of focus here)
- Have the required inventory plugin or script (usually provided by Ansible or the cloud provider)
- Configure
ansible.cfgto use the dynamic inventory source
What is an Ansible dynamic inventory?
Ansible dynamic inventory is a mechanism that allows Ansible to fetch host and group information from external sources at runtime, instead of relying on a static hosts file.
In real-world environments, things change. Servers get created, destroyed, scaled up, and moved. Static inventory can’t keep up. Dynamic inventory does. It gives you a fresh, real-time list of machines every time you run a playbook.
Dynamic inventory scripts or plugins query APIs to return JSON-formatted host data, which Ansible uses to determine which machines to manage. For example, AWS EC2 dynamic inventory pulls live instance data using boto and filters hosts based on tags, regions, or instance states.
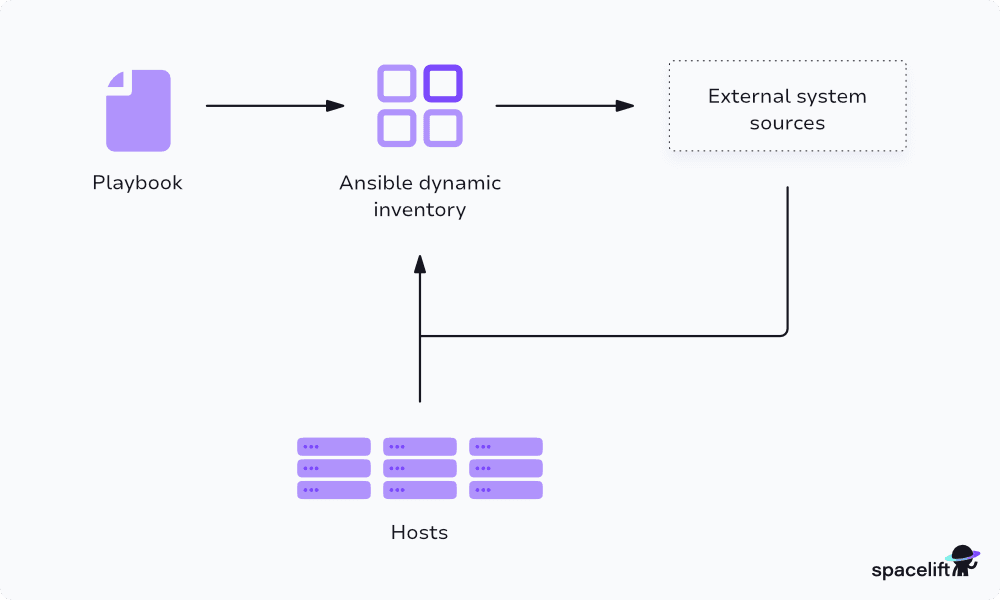
The diagram above shows an Ansible dynamic inventory workflow showing how host data is pulled from external sources like AWS during playbook execution.
Basic structure of Ansible dynamic inventory
At its core, a dynamic inventory source gives Ansible a JSON structure that looks something like this:
{
  "web": {
    "hosts": ["192.168.1.10", "192.168.1.11"]
  },
  "_meta": {
    "hostvars": {
      "192.168.1.10": { "ansible_user": "ubuntu" }
    }
  }
}
You can group hosts, define variables, and customize things like in a static inventory, but without the extra trouble of updating files.
You don’t want to spend your time editing inventory files. With dynamic inventory, you focus on writing playbooks and automating tasks. Ansible figures out who to run them on, in real time. It’s faster, more reliable, and far more scalable.
What is the difference between static and dynamic inventory in Ansible?
Now that you’ve seen what Ansible dynamic inventory can do, it helps to understand what it’s solving.
A static inventory in Ansible is a fixed file (like hosts.ini or YAML) that lists all managed nodes manually. It doesn’t change unless edited directly. On the other hand, a dynamic inventory is generated at runtime using scripts or plugins that query external sources like AWS, GCP, or CMDBs to automatically fetch up-to-date host data.
Before dynamic inventory, the standard was static inventory, a simple file where you manually listed every server. It still works, and for small, fixed environments, it’s totally fine. However, static inventory gets in the way once you start managing multiple environments, auto-scaling groups, or different cloud providers.
Let’s break down the differences and why they matter.
1. Source of information
With a static inventory, you’re the source of truth. You write every host into an INI or YAML file. That means you’re responsible for making sure it’s up to date. You’re in full control, which means you do all the work.
Dynamic inventory flips that scenario. Instead of you managing a list, Ansible talks directly to an external system, like AWS or Google Cloud, and asks, “Which servers are available right now?” It fetches a fresh list every time. This makes your setup far more accurate and responsive to real-world changes.
2. Flexibility and scaling
A static inventory starts to fall apart when your infrastructure becomes dynamic. If your environment changes often, with servers coming up and down, autoscaling, and multiple regions, you’ll constantly be editing that file. It becomes another piece of tech debt.
Dynamic inventory was designed for this kind of environment. Because it pulls live data, it can handle dozens, hundreds, or thousands of hosts without you lifting a finger. You don’t have to worry if a server exists; it’s either there or not when Ansible queries the source.
3. Maintenance
Let’s say you terminate an EC2 instance or rename a VM. With static inventory, you have a stale IP or hostname sitting in your file. If you forget to update it, your next playbook might fail or run against the wrong target. That’s a risk you don’t want.
Dynamic inventory removes that responsibility. If something disappears from your infrastructure, it disappears from the inventory too. There’s no manual cleanup. That means fewer errors, fewer surprises, and fewer “why didn’t this run?” moments.
4. Host grouping and variables
In a static inventory, grouping servers and assigning variables is entirely manual. You decide which servers go into [web] or [db], and you define variables in the file or in separate group/host var directories. It works, but again, it’s on you to keep it clean.
With dynamic inventory, groupings and variables are often based on metadata or tags. For example, in AWS, you can group instances by tags like Environment=Production or Role=Web. Ansible’s AWS inventory plugin takes care of grouping and variable assignment for you, based on real data from your cloud provider.
That means your inventory is smart and accurate. It knows what your infrastructure is intended to do because it’s pulling those labels straight from the source.
5. Initial setup vs long-term payoff
Static inventory is easy to get started with. There are no config files or plugins. Simply write a list of hosts, and that’s it. It’s great for learning, testing, or tiny setups.
However, that simplicity becomes a limitation in the long run. Dynamic inventory takes a bit more effort up front. You’ll need API credentials, maybe a plugin or two, and some basic configuration. But once it’s set, it saves you time every single day. It’s a one-time setup that pays off every time your infrastructure changes.
Similarities between static and dynamic inventory
For all their differences, static and dynamic inventories share the same function: They tell Ansible which machines to target and how to interact with them. The method might differ, but once the inventory is loaded, Ansible doesn’t really care where it came from.
Both inventory types support:
- Grouping hosts: You can organize servers into groups like web, db, or staging, regardless of inventory type. Whether you manually assign hosts to those groups in a file or pull them based on metadata from AWS, Ansible treats them the same.
- Assigning variables: Host-specific or group-specific variables work across both static and dynamic setups. You can define things like
ansible_user,ansible_port, or custom app settings. Ansible will pull them from your inventory or linked variable files. - Running ad-hoc commands and playbooks: The inventory format doesn’t change your workflow. You still run the same Ansible commands. Whether it’s a static or dynamic source, you can use tags, limit hosts, or target specific groups exactly the same way.
- Inventory plugins and customization: Static inventories can live in flat files, but Ansible also supports plugins for more structured formats like YAML, JSON, or even executable scripts. So while dynamic inventory often uses plugins, static inventory can benefit from them too.
Whether your hosts are listed in a text file or pulled from the cloud, the way you use Ansible stays consistent. That’s the beauty of it: Your playbooks don’t need to change.
Quick comparison table between static and dynamic inventories
Here’s a side-by-side look to help visualize the differences (and to clarify when you’d use each one):
| Feature | Static inventory | Dynamic inventory |
| Source | Manually written file | External source (cloud API, script, plugin) |
| Setup time | Quick and easy | Needs initial setup (API keys, plugins) |
| Updates automatically | No. Manual edits required | Yes. Syncs with the infrastructure on each run |
| Scales well | Not really, gets messy as infra grows | Built for cloud-native, auto-scaling setups |
| Grouping | Manual group definitions | Based on tags, labels, or metadata |
| Variable support | Yes, via host/group vars | Yes, via a dynamic source or custom scripts |
| Ease of use | Easier for beginners | Better for teams managing dynamic environments |
| Use case fit | Labs, dev environments, fixed servers | Production, multi-cloud, ephemeral infrastructure |
Why use dynamic inventories?
If you’re working in a modern infrastructure setup, especially one that touches the cloud, dynamic inventory isn’t just helpful, it’s necessary.
The days of managing ten servers with fixed IPs are mostly gone. Today, you’re dealing with cloud instances that spin up and down, autoscaling groups, container hosts, and hybrid environments. In that world, a static list of servers becomes outdated the minute something changes.
Here’s why dynamic inventory makes sense:
1. Your infrastructure is constantly changing
Let’s say you’re running an app in AWS with autoscaling enabled. When traffic spikes, more EC2 instances come online. When traffic slows down, they go away. With static inventory, you’d need to update your hosts file every time this happens, which is not realistic.
Dynamic inventory pulls fresh host data on demand. It doesn’t matter how often things change, Ansible always has the latest view of your infrastructure.
2. You’re managing multiple environments
Most teams work in more than one environment: dev, staging, and production, maybe even different cloud accounts or regions. Manually tracking all of that is a nightmare.
With dynamic inventory, you can filter by tags or regions. You can group machines automatically based on how they’re labelled in the cloud. That means your Ansible playbooks can stay the same; you just target web servers, and Ansible figures out the rest.
3. You want fewer errors and less overhead
When you manage static files, you’re one typo away from deploying to the wrong server. Or worse, skipping one entirely. Every manual update is a chance for human error to sneak in.
Dynamic inventory automates that part. It’s not just about saving time, it’s about being safer. You’re letting Ansible talk directly to your source of truth, so there’s no middleman and no guesswork.
4. You’re building reusable automation
One of the best parts about Ansible is how reusable your playbooks can be. But for that to work well, you need an inventory that adapts. Dynamic inventory lets your playbooks stay portable. You’re not tying them to a specific IP or hostname; you’re targeting roles, environments, and cloud tags that remain consistent across teams and accounts.
5. You need to move fast without breaking things
In fast-moving teams, slowing down to update inventory files kills momentum. You want to be able to spin up a stack, run a playbook, and move on. Dynamic inventory keeps up with that pace. It’s hands-off, reliable, and removes friction from your workflow.
The bottom line is that if your infrastructure is dynamic, your inventory should be, too. Otherwise, you’re trying to automate with one foot stuck in manual mode.
Supported sources for Ansible dynamic inventories
Ansible supports a wide range of inventory sources, meaning you can pull your infrastructure info directly from cloud providers, container platforms, monitoring tools, or even your own custom scripts. This flexibility is one of the reasons dynamic inventory is so powerful.
Let’s break down the most commonly used inventory sources:
- Cloud providers
- Container platforms and orchestration systems
- Virtualization and data centre tools
- Service discovery and monitoring
- Custom scripts
1. Cloud providers
These are the most common dynamic inventory sources. If your infrastructure lives in the cloud, then you’re in luck. Ansible has first-class support for most big-name cloud providers.
- AWS (Amazon EC2): Probably the most widely used dynamic source. Ansible can automatically pull your EC2 instances, group them by tags, availability zones, or other metadata. This is great for managing environments that scale up and down.
- Google Cloud: Similar to AWS, you can connect to your Google Cloud projects and discover instances based on zones, labels, and other metadata. It’s straightforward once you set up your service account and credentials.
- Microsoft Azure: Ansible can pull resources from Azure subscriptions for teams working inside the Microsoft ecosystem. You can group machines based on resource groups or tags, making it easy to keep things organized.
- OpenStack: Popular in private cloud or hybrid cloud environments. Ansible integrates with OpenStack APIs to fetch server instances dynamically.
- DigitalOcean, IBM Cloud, Oracle Cloud Infrastructure: These are supported as well, though they’re less commonly used in larger teams. Still, you’re covered if you’re working on one of these platforms.
Each of these cloud integrations uses an Ansible inventory plugin that talks to the provider’s API. You just need to enable the plugin and configure the correct credentials.
2. Container platforms and orchestration systems
Dynamic inventory becomes even more valuable if you’re running workloads in containers, especially in Kubernetes.
- Kubernetes: Ansible can query a Kubernetes cluster and generate an inventory based on pods, nodes, or services. It’s incredibly useful for automating configuration or post-deployment tasks in a live cluster.
- Docker: For smaller container setups or local testing environments, Ansible can pull a list of running containers and treat them like hosts. It’s simple but effective for dev setups.
These sources are ideal when your infrastructure is short-lived or frequently changing, as is often the case with containers.
3. Virtualization and data centre tools
If your infrastructure is more traditional or on-premises, there are still solid dynamic inventory options:
- VMware vSphere: Ansible can connect to vCenter and automatically fetch your VMs. You can filter by cluster, resource pool, or other properties.
- Foreman / Red Hat Satellite: These tools often act as a system source of truth. Ansible can connect to them and pull a dynamic list of hosts.
- NetBox: A favourite in many data centre setups, NetBox lets you manage IP addresses, devices, and racks. Based on the data it holds, Ansible can use it to generate real-time inventory.
- Cobbler: Although it’s an older provisioning system, it’s still supported for those environments that use it to manage PXE boot infrastructure.
These plugins are helpful when your infrastructure is heavily managed through internal tools or you have strict control over your environments.
4. Service discovery and monitoring
In environments where service discovery is already tracking running systems, Ansible can hook into that layer.
- Consul: If your infrastructure is built around HashiCorp tools, Consul is often used to track where and what’s running. Ansible can pull that data directly and turn it into usable inventory.
- CloudStack, Hetzner, and others: While these platforms aren’t as widely adopted as AWS or Azure, they’re still supported through their respective plugins.
5. Custom scripts
Finally, if you have a unique setup that doesn’t fit into any of the built-in plugins, you can write your own dynamic inventory script.
As long as your script outputs the proper JSON format, Ansible will accept it as valid inventory. This gives you full flexibility to connect to internal APIs, databases, or systems that Ansible doesn’t support out of the box.
You can write these scripts in Python, Bash, Go, or whatever language you’re comfortable with. It’s a great option if you’re dealing with a legacy environment or something totally custom.
How to configure and use an Ansible dynamic inventory
So now you understand what dynamic inventory is and why it’s worth using. Let’s talk about how to actually set it up.
First, let’s walk through the general steps for enabling dynamic inventory using Ansible’s built-in plugin system. Then we’ll zoom into a real-world example using AWS.
Ansible uses inventory plugins to connect to external sources. Each plugin has its own configuration file (YAML), which Ansible uses to pull host data when you run a playbook or ad-hoc command.
Here’s a high-level overview of what the setup looks like:
Step 1. Create a plugin-based inventory file
An inventory plugin is just a YAML file with a .yaml or .yml extension. Inside this file, you define the plugin, any authentication settings, filters, and regions if needed.
Here’s a simple example of a dynamic inventory config for AWS:
plugin: amazon.aws.aws_ec2
regions:
  - us-east-1
filters:
  tag:Environment: staging
keyed_groups:
  - key: tags.Name
    prefix: name
hostnames:
  - dns-name
compose:
  ansible_host: public_ip_address
Step 2. Enable the plugin in your Ansible config
Make sure your ansible.cfg file points to the location of this inventory file:
[defaults]
inventory = ./inventory/aws_ec2.yaml
Step 3. Install required collections or dependencies
Most modern plugins live in Ansible Collections. For example, AWS-related plugins are in the amazon.aws collection.
To install it, run this command:
ansible-galaxy collection install amazon.awsStep 4. Test your inventory
You can preview the hosts’ Ansible inventory with:
ansible-inventory --listOr to see a clean layout of the groups:
ansible-inventory --graphExample: Setting up AWS dynamic inventory with Ansible
Let’s now walk through a real AWS setup using the plugin method.
Step 1. Install the AWS collection
This plugin comes from the amazon.aws collection. You can install it like this:
ansible-galaxy collection install amazon.awsYou also need the boto3 and botocore Python packages:
pip install boto3 botocoreStep 2. Set up AWS credentials
Ansible relies on boto3, which in turn reads your AWS credentials. You can set them up in a few ways, but the simplest is by using environment variables:
export AWS_ACCESS_KEY_ID=your-access-key
export AWS_SECRET_ACCESS_KEY=your-secret-key
export AWS_REGION=us-east-1
You can also use a credentials file ~/.aws/credentials or configure a named profile with the AWS CLI.
Step 3. Create your inventory file aws_ec2.yaml
Here’s a full working example:
plugin: amazon.aws.aws_ec2
regions:
  - us-east-1
filters:
  tag:Environment: production
keyed_groups:
  - key: tags.Role
    prefix: role
hostnames:
  - public_ip_address
compose:
  ansible_host: public_ip_address
strict: False
Here’s what each part does:
plugin: This tells Ansible to use the AWS EC2 inventory pluginregions: This limits discovery to specific AWS regionsfilters: Only include instances with the Environment=production tagkeyed_groups: Automatically group hosts by their Role tag, prefixed with rolehostnames: Use the public IP address for hostnamescompose: This sets the ansible_host variable to use the public IPstrict: If set to False, this allows inventory to load even if no matching hosts are found
Step 4. Add to ansible.cfg
Make sure Ansible knows where to find your inventory:
[defaults]
inventory = ./inventory/aws_ec2.yml
Step 5. Run and verify
Now run:
ansible-inventory -i aws_ec2.yml --graphYou should see a visual tree of groups and hosts in a simple text-based graph format based on the config, like this:
@all:
  |--@aws_ec2:
  |  |--ec2-12-345-678-901.compute-1.amazonaws.com
  |  |--ec2-98-765-432-10.compute-1.amazonaws.com
  |  |--...
  |--@production:
  |  |--ec2-12-345-678-901.compute-1.amazonaws.com
  |  |--ec2-98-765-432-10.compute-1.amazonaws.com
  |--@ungrouped
Then run an ad-hoc ping test:
ansible all -m pingAssuming your instances are reachable (and accessible via SSH), you’ll get a green check.
12.345.678.901 | SUCCESS => {
    "changed": false,
    "ping": "pong"
}

98.765.432.10 | SUCCESS => {
    "changed": false,
    "ping": "pong"
}
This setup is repeatable and scalable. Once you’ve got the plugin working for AWS, adding more filters or regions is just a matter of updating the YAML. You don’t touch any IPs, and you don’t hardcode anything.
Best practices for using a dynamic inventory in Ansible
Using dynamic inventory is a huge win, but how you use it matters just as much as whether you use it. If you just plug it in and let it run wild, things can get messy fast. The goal is to keep your inventory clean, predictable, and scalable, especially when managing cloud infrastructure that changes by the hour.

Here are some hard-earned best practices that’ll keep your dynamic inventory setup solid:
1. Tag everything
Tags are your best friend in dynamic inventory. They’re how you filter, group, and target machines without hardcoding anything.
In AWS, for example, use tags like Environment, Role, App, or Owner. When you tag consistently, you can write playbooks that target tag_Environment_production instead of worrying about hostnames or IPs.
If you’re not tagging, you’re guessing. Don’t guess.
2. Use filters to keep it focused
Your dynamic inventory config should only return the hosts you actually need.
Avoid pulling every instance in your cloud account. Limit by region, tag, or instance state, using filters to make inventory faster, reduce noise, and avoid targeting the wrong machines.
For example:
filters:
  tag:Environment: production
This ensures you’re only working with production instances, not dev boxes or test VMs someone spun up for fun.
3. Group hosts by metadata, not IP
Let the plugin group hosts based on meaningful data, like tags or labels, not IP ranges or DNS names.
This makes your inventory easier to read and your playbooks easier to reuse. For example, group by Role or Environment, then target groups like role_web or env_staging in your plays.
keyed_groups:
  - key: tags.Role
    prefix: role
Now your inventory is organized automatically as your infrastructure grows.
4. Don’t hardcode hosts in playbooks
It’s tempting to stick a specific IP or hostname into your playbook for quick testing. Don’t do it.
Instead, target groups or dynamic selectors. This keeps your playbooks reusable across different clouds, environments, and regions.
A good target:
- hosts: role_appA bad target:
- hosts: 98.765.432.105. Validate your inventory regularly
Use ansible-inventory --list and --graph to check what your dynamic inventory is returning. Make it part of your routine.
It helps catch misconfigured tags, missing groups, or untagged instances before your playbook fails halfway through a deployment.
6. Lock down access
Your inventory plugin is pulling data from cloud APIs. That means API keys, credentials, and permissions.
Use IAM roles or scoped service accounts that follow the principle of least privilege. Don’t give your automation full admin rights if it only needs read access to instances.
Also, avoid hardcoding secrets. Use environment variables, config files, or secret managers like AWS SSM or HashiCorp Vault.
7. Version-control your inventory files
Despite the dynamic nature of dynamic inventory, you should still treat the config like code.
Store your inventory plugin files in Git alongside your playbooks. This way, changes are tracked, reviewed, and deployable. It also makes it easier to onboard new teammates or roll back if something breaks.
How Spacelift improves Ansible automation
Spacelift adds structure and control to your Ansible workflows without getting in the way. It’s designed for teams using Infrastructure as Code and offers better visibility, policy enforcement, and Git-based workflows for your playbooks and roles.
With Spacelift, you can trigger Ansible runs from pull requests, test your changes automatically, and manage environment-specific variables from a GitOps workflow. You can also apply Open Policy Agent (OPA) policies to enforce compliance across teams and environments.
Everything runs through a centralized platform, with logs, approvals, and integrations with your existing CI/CD tools. It helps you move fast while keeping things secure, consistent, and audit-friendly.
Read this blog post to learn how to use a custom Spacelift dynamic inventory (tofusible) built specifically for OpenTofu and Ansible using the stack dependencies feature.
If you’re serious about scaling Ansible automation, Spacelift gives you the tools to do it right. Check our documentation, read our Ansible guide, or book a demo with one of our engineers.
Key points
Dynamic inventory is an Ansible feature that just makes sense once you start using it. If your infrastructure changes often or lives in the cloud, it’s essential.
With dynamic inventory, you get real-time visibility, better automation, and less manual overhead. It scales with your setup, adapts to change, and keeps your playbooks flexible and clean.
Whether you’re running EC2 instances, Kubernetes clusters, or a fleet of VMs, Ansible can pull exactly what it needs when it needs it: no guesswork and no stale data.
Start small. Use tags. Filter what matters. And build from there.
You’ll spend less time managing your inventory and more time doing actual automation work.
Manage Ansible better with Spacelift
Managing large-scale playbook execution is hard. Spacelift enables you to automate Ansible playbook execution with visibility and control over resources, and seamlessly link provisioning and configuration workflows.
