
A service mesh is a technology rapidly gaining popularity in the cloud-native computing world. With security becoming increasingly important, capabilities such as observability, reliability, security management, and zero trust will be critical components of any modern system, making service-mesh technology a standard part of cloud-native platforms.
We will cover:
What is a service mesh?
Service mesh is a dedicated infrastructure layer that manages and secures communication between microservices within a distributed application. This layer adds reliability, security, and observability features when dealing with complex, distributed applications at scale.
Service mesh solves some of the challenges of microservices architecture, such as secure communication, traffic routing, load balancing, and observability. It makes managing service-to-service communication simpler by providing built-in features like fault tolerance, retries, and monitoring, reducing the need for custom code and enhancing system reliability and scalability.
How does a service mesh work?
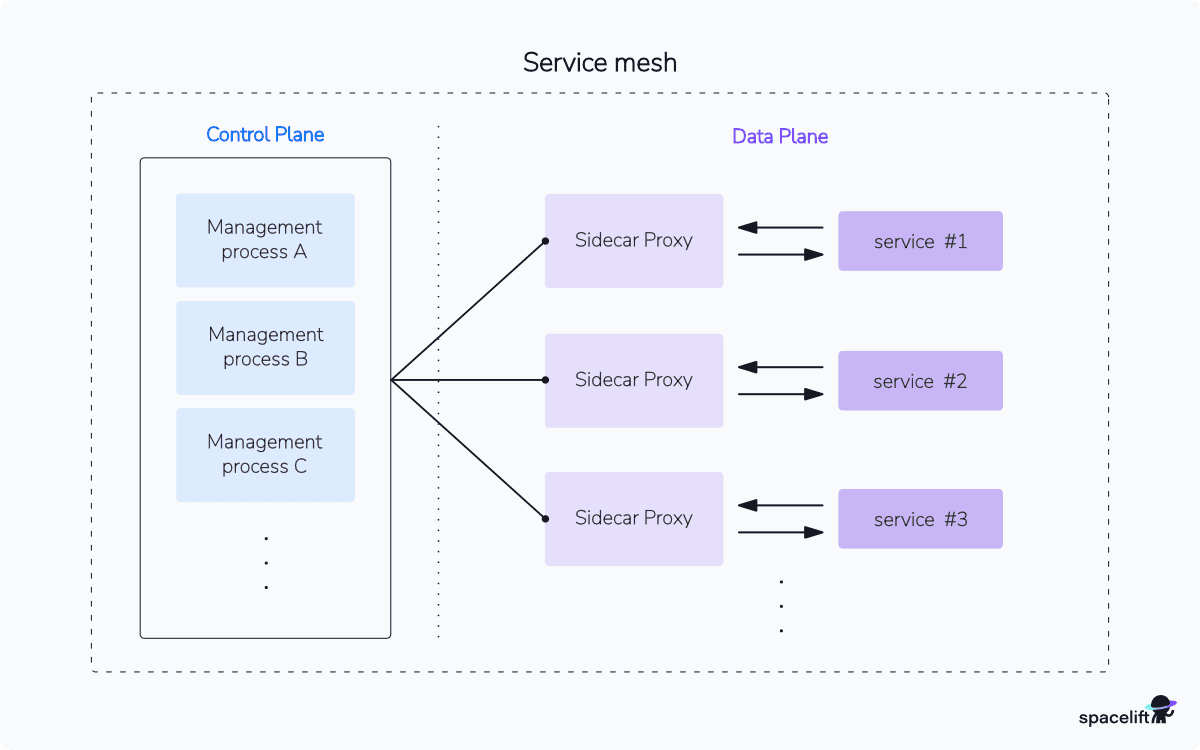
Until recently, service mesh was typically implemented as a set of proxies deployed alongside the applications that intercept and manage the traffic between services. In modern microservices, these lightweight proxies are implemented as sidecar containers that sit next to your application containers.
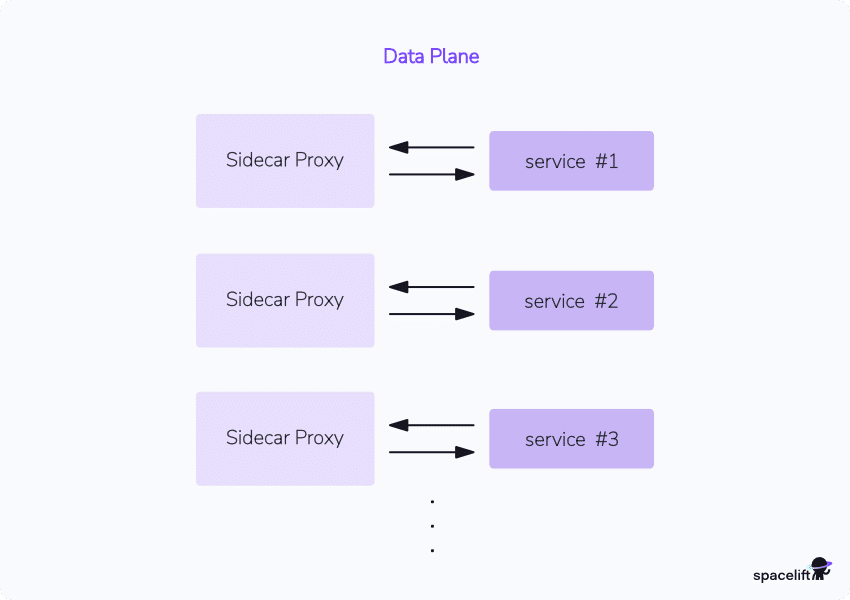
The data plane is the collection of all these network proxies that handle and monitor traffic in our platform. To orchestrate, manage, and coordinate the data plane, the service mesh maintains a centralized component, the control plane.
Here’s how it works in short steps:
- Proxy deployment: Each microservice runs alongside a lightweight proxy (sidecar).
- Traffic management: The proxies handle all incoming and outgoing requests, controlling traffic between services.
- Service discovery: Proxies know how to find other services via a registry.
- Security: Proxies encrypt and authenticate service-to-service communication (e.g., using mTLS).
- Observability: The mesh collects metrics, logs, and traces for monitoring service interactions.
- Policy enforcement: Proxies apply rules (e.g., rate-limiting, retries) to ensure reliable communication.
Before we analyze its different parts in detail, let’s discuss the various benefits of a service mesh.
Why adopt a service mesh?
Distributed microservices of cloud-native systems often create systems that suffer from complexity, reduced explainability, and lack of operational agility. The architecture topologies are often hard to understand, visibility and troubleshooting become a burden, the attack surface of systems increases constantly, and networking resiliency is challenging.
To help us simplify and alleviate some of the pains described above, we can implement a service mesh at our platform level. Some of the most common service mesh benefits include:
- Fine-grained traffic management
- Load balancing
- Network resiliency
- Service discovery
- Security policy
- Rich observability
- Centralized control
- Authentication
Service discovery
One of the service mesh key functionalities is the provided ability to discover and connect other services in the mesh. This is usually done through the control plane via a service registry, which tracks information for the different services.
Traffic management and resiliency
Another useful aspect of a service mesh is its advanced traffic management and control capabilities. By leveraging this technology, we can quickly implement fine-grained traffic control inside our systems, load balancing, canary deployments, retries, failover mechanisms, circuit breaking, and routing based on the custom criteria we define.
Observability
Most service mesh solutions implement built-in observability tools that track metrics, logs, and traces and can provide a holistic observability view of a distributed system. The out-of-the-box visibility enables developers and operators to monitor the health of systems and related services, improve the understandability of environments, and troubleshoot bottlenecks and performance issues.
Security
The service mesh intercepts and manages all the traffic inside the system, so it is also responsible for securing the communication within the mesh. The functionality provided in this domain includes enforcing encryption and mutual Transport Layer Security (mTLS), managing certificates, and providing tooling for fine-grained policies and access control.
These concepts and functionalities have existed and been implemented by software development teams for years.
The most exciting point of the service mesh is that it abstracts these responsibilities and capabilities from the application layer into a common platform layer that sits at the infrastructure level. This allows these capabilities to be centralized, simplified, and uniform across all applications and tooling regardless of the underlying technology, programming language, and framework used and completely decoupled from the application code.
Service mesh vs. API gateway
A service mesh manages internal service-to-service communication, offering traffic control, security, and observability. An API gateway handles external client-to-service requests, providing authentication, rate limiting, and request routing. In short, a service mesh focuses on internal ops, while an API gateway connects external users to services.
The table below summarizes the key differences:
| Aspect | API Gateway | Service Mesh |
| Purpose | Manages external traffic (north-south) | Manages internal service-to-service traffic (east-west) |
| Primary focus | Client-to-service communication | Service-to-service communication |
| Traffic direction | North-south (external clients to services) | East-west (internal services) |
| Key features | – Request routing, load balancing
– Authentication and authorization – Rate limiting, caching – Request/response transformation |
– Traffic shaping, retries, and failovers
– Service discovery and routing – Observability (tracing, metrics, logging) – Mutual TLS, encryption |
| Security | Client authentication and authorization (e.g., OAuth) | Mutual TLS for service-to-service encryption |
| Operational scope | Operates at the system edge (entry point) | Operates within the system (internal communication) |
| Examples | NGINX, Kong, Apigee, Amazon API Gateway | Istio, Linkerd, Consul Connect, Kuma |
| Use case | Exposing APIs to external clients | Managing secure and reliable internal communication |
| Complementary role | Frontend for client interactions | Backend for service communication |
Key components of a service mesh
A typical service mesh platform involves several key components that compile the full-service mesh implementation. Although the elements below apply to most cases, the exact details and specifics depend on the specific implementation and the particular service mesh technology chosen.
Later, we will explore some of the most common service mesh implementations and discuss the future of service meshes, which might change some key components below. For now, here’s what you need to know to get an overview of service mesh architecture:
1. Data plane
The data plane consists of lightweight userspace proxies (often sidecar proxies like Envoy) that are deployed alongside each service instance. These proxies handle all incoming and outgoing network traffic for their associated services, ensuring consistent communication.
The data plane intercepts all the traffic between different services for various reasons, such as enforcing security best practices, providing observability, and ensuring network resiliency.
2. Control plane
The control plane is a centralized component of different management processes that orchestrate and coordinate the proxies in the data plane. It provides centralized features like service discovery, traffic routing, authentication, authorization, and metrics collection.
You can consider this the service mesh’s central ” brain ” that controls the network proxies’ behavior and management and provides an API layer to interact with.
3. Sidecar proxy
In most of the implementations so far, an instrumental component has been the sidecar proxy.
A sidecar proxy container is deployed next to each service in a system that effectively handles all the service’s inbound and outbound traffic. The collection of all these proxies forms the data plane. Lately, there have been efforts to move towards sidecar-less implementations that remove the need to manage and maintain sidecar proxies.
4. API layer
Each service mesh implementation provides an API layer for the operators and developers to manipulate or interact with. Typically, this is used for automation in terms of configuration, custom tooling, integration with other systems, and maintenance.
Popular service mesh implementations
The growing popularity of service mesh technology has prompted increased implementation in the cloud-native landscape. Here are some of the most prominent solutions:
- Istio – Istio is one of the most popular implementations available. It provides application-aware networking by leveraging the powerful Envoy proxy. It is one of the most elaborate and feature-complete implementations and works with both Kubernetes and traditional environments. Some of its capabilities include features that enable universal traffic management, telemetry, and security.
- Linkerd – Linkerd is a popular service mesh technology written in Rust that prides itself on being extremely lightweight, fast, and simple. Developed primarily for Kubernetes setups, it is a graduated CNCF project. It focuses on simplicity with out-of-the-box functionalities in the security, observability, and reliability aspects of Kubernetes workloads.
- Consul – Consul is a multicloud service mesh solution that enables automatic service-to-service encryption and identity-based authorization and works with container orchestrators such as Kubernetes and Hashicorp’s Nomad. Consul ships with a built-in proxy but also supports Envoy. It is available as a self-installation project or as a fully managed service mesh solution known as HCP Consul Dedicated.
- AWS App Mesh – If you operate with the cloud provider AWS, you may consider leveraging its native service mesh implementation, AWS App Mesh, which provides excellent, seamless native integration with the other AWS services.
Example: Service mesh workflow with Kubernetes and Linkerd
Now that we know the basics and have a good understanding of service mesh technology let’s walk through and do a quick demo. For this demo, we will install Linkerd on a Kubernetes cluster and explore its capabilities.
Prerequisites
To run this demo with me, you need:
- A Kubernetes cluster (I will be using the default local Kubernetes cluster provided by Docker Desktop, but feel free to utilize any cluster you have available.)
- The kubectl command-line tool
- The Linkerd command-line tool
Step 1. Install Linkerd
Download and install the CLI from the Linkerd releases page or install it with Homebrew brew install linkerd.
Go ahead and run:
linkerd versionThe output should look like this (depending on your version):
Client version: stable-2.13.3
Server version: unavailable
Step 2. Validate Kubernetes cluster configuration
The next step is to validate that our Kubernetes cluster is configured correctly to install the Linkerd control plane.
Execute:
linkerd check --preThis command will run different checks in your Kubernetes cluster, and if you are good to go, your output will be similar to this:
kubernetes-api
--------------
√ can initialize the client
√ can query the Kubernetes API

kubernetes-version
------------------
√ is running the minimum Kubernetes API version

pre-kubernetes-setup
--------------------
√ control plane namespace does not already exist
√ can create non-namespaced resources
√ can create ServiceAccounts
√ can create Services
√ can create Deployments
√ can create CronJobs
√ can create ConfigMaps
√ can create Secrets
√ can read Secrets
√ can read extension-apiserver-authentication configmap
√ no clock skew detected

linkerd-version
---------------
√ can determine the latest version
√ cli is up-to-date

Status check results are √
Step 3. Install the Linkerd control plane
Now, let’s install the Linkerd control plane. Execute these two commands:
linkerd install --crds | kubectl apply -f -
linkerd install --set proxyInit.runAsRoot=true | kubectl apply -f -
First, we install the necessary custom resource definitions and then the Linkerd control plane. We are using the local Kubernetes cluster of Docker Desktop and the Docker container runtime, so we have to run the proxy-init container as root.
You can skip this set flag on the second command depending on your Kubernetes cluster.
To verify the installation run:
linkerd checkand you should see:
kubernetes-api
--------------
√ can initialize the client
√ can query the Kubernetes API

kubernetes-version
------------------
√ is running the minimum Kubernetes API version

linkerd-existence
-----------------
√ 'linkerd-config' config map exists
√ heartbeat ServiceAccount exist
√ control plane replica sets are ready
√ no unschedulable pods
√ control plane pods are ready
√ cluster networks contains all pods
√ cluster networks contains all services

linkerd-config
--------------
√ control plane Namespace exists
√ control plane ClusterRoles exist
√ control plane ClusterRoleBindings exist
√ control plane ServiceAccounts exist
√ control plane CustomResourceDefinitions exist
√ control plane MutatingWebhookConfigurations exist
√ control plane ValidatingWebhookConfigurations exist
√ proxy-init container runs as root user if docker container runtime is used

linkerd-identity
----------------
√ certificate config is valid
√ trust anchors are using supported crypto algorithm
√ trust anchors are within their validity period
√ trust anchors are valid for at least 60 days
√ issuer cert is using supported crypto algorithm
√ issuer cert is within its validity period
√ issuer cert is valid for at least 60 days
√ issuer cert is issued by the trust anchor

linkerd-webhooks-and-apisvc-tls
-------------------------------
√ proxy-injector webhook has valid cert
√ proxy-injector cert is valid for at least 60 days
√ sp-validator webhook has valid cert
√ sp-validator cert is valid for at least 60 days
√ policy-validator webhook has valid cert
√ policy-validator cert is valid for at least 60 days

linkerd-version
---------------
√ can determine the latest version
√ cli is up-to-date

control-plane-version
---------------------
√ can retrieve the control plane version
√ control plane is up-to-date
√ control plane and cli versions match

linkerd-control-plane-proxy
---------------------------
√ control plane proxies are healthy
√ control plane proxies are up-to-date
√ control plane proxies and cli versions match

Status check results are √
If you are curious about the different control plane components, you can look at them by running:
kubectl get all -n linkerdSo far, so good.
Step 4. Configure your application
For this demo, we will install a demo application provided by Linkerd, emojivoto. You can find more details on the Emoji.voto GitHub repository.
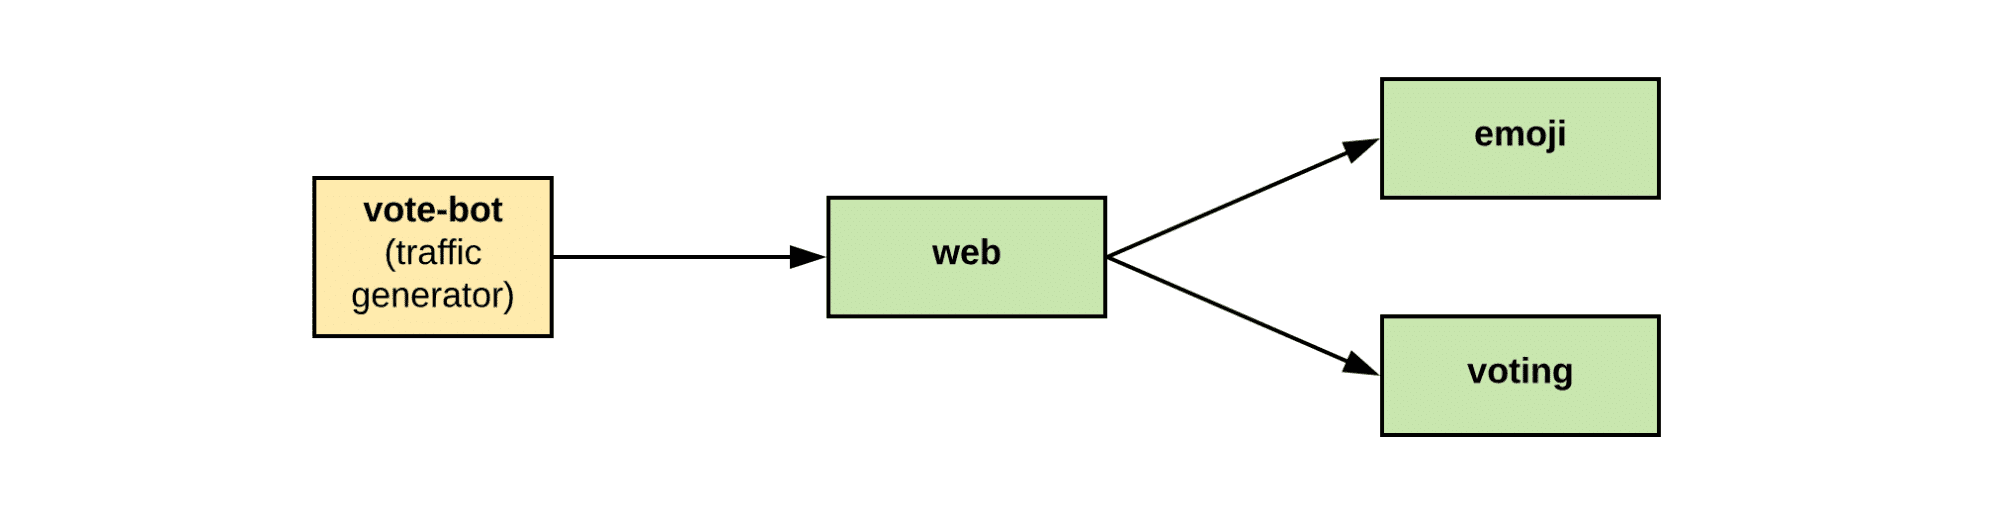
Basically, it’s a microservices application that allows users to vote for their favorite emoji and tracks votes received on a leaderboard.
The application comprises three microservices:
- emojivoto-web: Web frontend and REST API
- emojivoto-emoji-svc: gRPC API for finding and listing emoji
- emojivoto-voting-svc: gRPC API for voting and leaderboard
To install the demo application, run:
curl --proto '=https' --tlsv1.2 -sSfL https://run.linkerd.io/emojivoto.yml \
  | kubectl apply -f -
To look into the components that we deployed in our cluster, execute:
kubectl get all -n emojivotoNow you should see the demo application’s deployments, pods, and services up and running.
NAME                            READY   STATUS    RESTARTS   AGE
pod/emoji-78594cb998-cfhdz      1/1     Running   0          31s
pod/vote-bot-786d75cf45-l8vrc   1/1     Running   0          31s
pod/voting-5f5b555dff-pfkgs     1/1     Running   0          31s
pod/web-68cc8bc689-22ggw        1/1     Running   0          31s

NAME                 TYPE        CLUSTER-IP       EXTERNAL-IP   PORT(S)             AGE
service/emoji-svc    ClusterIP   10.98.210.142    <none>        8080/TCP,8801/TCP   31s
service/voting-svc   ClusterIP   10.110.117.148   <none>        8080/TCP,8801/TCP   31s
service/web-svc      ClusterIP   10.99.109.57     <none>        80/TCP              31s

NAME                       READY   UP-TO-DATE   AVAILABLE   AGE
deployment.apps/emoji      1/1     1            1           31s
deployment.apps/vote-bot   1/1     1            1           31s
deployment.apps/voting     1/1     1            1           31s
deployment.apps/web        1/1     1            1           31s

NAME                                  DESIRED   CURRENT   READY   AGE
replicaset.apps/emoji-78594cb998      1         1         1       31s
replicaset.apps/vote-bot-786d75cf45   1         1         1       31s
replicaset.apps/voting-5f5b555dff     1         1         1       31s
replicaset.apps/web-68cc8bc689        1         1         1       31s
To explore the sample application, we can use the port-forward command to expose the web-svc on a local port:
kubectl -n emojivoto port-forward svc/web-svc 8080:80Head to http://localhost:8080 and play around with the sample application. Keep the port-forward command running on this terminal tab.
Step 5. Apply the Linkerd service mesh
Next, open another terminal tab. Let’s apply the Linkerd service mesh by deploying the data plane proxies with a rolling deployment.
kubectl get -n emojivoto deploy -o yaml \
  | linkerd inject - \
  | kubectl apply -f -
This command injects the Linkerd proxies as sidecar containers in the pod of every deployment’s microservice for the emojivoto application. If you run the kubectl describe command on any application pod and check its Containers section, you will see that two containers are running. One container for the specific service and a linkerd-proxy.
To verify that you have deployed everything successfully, run the checks for the data plane this time:
linkerd -n emojivoto check --proxyTo get a visual representation of what Linkerd is actually doing, let’s install the viz extension with an on-cluster metric stack and dashboard:
linkerd viz install | kubectl apply -f -And access the dashboard with:
linkerd viz dashboard &This command will open a new browser tab with the monitoring dashboard. Select the emojivoto namespace and you should be able to see information about the network topology, metrics, and more.
Play around and explore the service mesh implementation.
What’s next for service mesh technology?
We have discussed the many benefits and functionalities of a service mesh, but many nuances, shortcomings, and complexity are associated with designing, building, maintaining, and operating a service mesh solution.
Introducing a proxy in front of every service adds extra components and processes that consume resources and additional latency that might impact performance.
These might be negligible in some cases, but this might be a factor to consider in other situations. More importantly, by introducing a service mesh we add an additional critical component handling all our traffic that could potentially fail or introduce security risks and disrupt our running systems.
The added complexity and operational burden that comes with adopting a service mesh is something that all the players in the market acknowledge. Looking at industry trends and the projects that most vendors are currently working on, the common theme is to make service mesh technology more straightforward and predictable. There is a consensus that the future of service mesh should focus on simplicity and maintainability to a point where we don’t have to think about it.
If you are interested in the subject, check out the recent session from KubeConEU Future of Service Mesh – Sidecar or Sidecarless or Proxyless? where industry experts discuss the topic. Different vendors have taken different approaches, with some new projects leveraging eBPF and proxies at different levels per node or service account.
Istio has been working on its ambient mesh solution, a sidecar-less data plane approach that leverages proxies per node deployed as DaemonSets for layer 3 and 4 network functions, such as mTLS and on-demand per service accounts proxies for layer 7 primitives. The core promise of a sidecar-less service mesh is that it is easier to operate and retains the same functionalities but at a lower operational cost and complexity.
Another prominent player in the space, Cilium, has introduced its eBPF-based and Kubernetes-native Cilium Service Mesh, which uses only a proxy per node and provides sidecar-free mTLS-based authentication. This implementation promises simplified operations, ease of maintenance, and improved network performance without sacrificing security. Cilium attempts to combine the best of both worlds, leveraging eBPF when possible and falling back to operations via the proxy when necessary.
In contrast, Linkerd sticks to its sidecar model by leveraging its resource-efficient purpose-built proxy and has openly questioned the sidecar-less approach, the security isolation of shared proxies, and the suitability of eBPF for some of the service mesh features. Check out the session Life Without Sidecars – Is eBPF’s Promise Too Good to Be True? for more information on the debate. Only time will tell if any of the newer approaches will push for a shift in the basics of a service mesh traditional architecture.
Another exciting development is the recent acceptance of the enhancement proposal to integrate natively sidecar containers in Kubernetes. This will be introduced in a future Kubernetes release to simplify the implementation of the sidecar pattern, make sidecars first-class citizens, and remediate some of the issues observed over the years. It will be interesting to see how the service mesh implementations will use and integrate this new functionality to their benefit.
Why use Spacelift to improve your infrastructure management?
Spacelift is not exactly a container orchestrator tool, but it will improve the management of your Kubernetes, Helm, Kustomize, or even CrossPlane configurations. This streamlined integration ensures consistency, repeatability, and scalability in container deployments, making it easier to maintain distributed applications.
You can build guardrails around your K8s configurations to ensure that every container deployment adheres to organizational standards and regulatory requirements. Thus, you reduce the risk of non-compliance and automate the enforcement of security practices, helping teams achieve container orchestration with confidence.
Apart from Kubernetes, you can also build workflows for tools such as OpenTofu, Terraform, Pulumi, CloudFormation, Ansible, and Terragrunt. You also can build multi-IaC workflows by creating dependencies between them and sharing outputs leveraging the stack dependencies feature.
The platform enhances collaboration among DevOps teams, streamlines workflow management, and enforces governance across all infrastructure deployments. Spacelift’s dashboard provides visibility into the state of your infrastructure, enabling real-time monitoring and decision-making. It can also detect and remediate drift.
If you want to learn more about what you can do with Spacelift, check out this article, create a free account today, or book a demo with one of our engineers.
Key points
We explored the world of service mesh, its concepts, and components. We analyzed service mesh capabilities and reviewed its main benefits, and shortcomings. We also provided a demo of a service mesh installation with Linkerd and saw how easy it is to get started. Finally, we discussed the approaches of some of the most prominent service mesh implementations and providers and considered the future of service mesh.
Solve your infrastructure challenges
Spacelift is a flexible orchestration solution for IaC development. It delivers enhanced collaboration, automation, and controls to simplify and accelerate the provisioning of cloud-based infrastructures.
