In this post, we discuss various aspects of managing multiple environments using Terraform. Typically we define our infrastructure as code using Terraform. Then using the Terraform CLI, we create the specified infrastructure components in the cloud platforms of our choice.
On the surface, it looks effortless and straightforward. However, when we dive deep into using it for our real-world scenarios, we quickly get into questions about managing sub-production and production environments.
The generally desired requirements for managing infrastructure for multiple environments using IaC are listed below:
- It should be possible to use the same IaC configurations for managing the production and non-production environments.
- Certain non-production environments like Development, QA, beta, or UAT should be identical and scaled-down versions of production and be present permanently.
- Team members should be able to create, manage, and destroy temporary environments which are identical to the production.
- All environments are not created in the same cloud account or subscription.
One of the keys here is to use the same Terraform configuration templates for the infrastructure across all environments. So there is nothing much to do with introducing modifications to the IaC, but in this post, we will focus on how we can efficiently manage various environments using Terraform workspaces, Git branches, and Spacelift stacks.
Terraform offers a workspaces feature that enables you to create and manage multiple identical, scaled-down environments using the same configuration. Multiple environments created in this way are completely isolated and do not interfere with each other in any way. This is a key feature which we are looking forward to. Let’s look at how we can leverage it.
Terraform workspaces are different from the Terraform Cloud workspaces. In Terraform Cloud, workspaces are analogous to a “project,” which corresponds to a Terraform config repository. Along with storing and managing state information, they also manage variables, credentials, history tracking, etc., to support the end-to-end Terraform Cloud CI/CD workflow.
Terraform CLI commands for working with workspaces
The table below represents the basic usage of Terraform workspace commands. Each command follows a simple format as below:
terraform workspace <command>
| Command | Description |
show |
To output the currently selected workspace. There is always a default workspace selected named ‘default.’ |
list |
To output the list of workspaces currently available for this config. |
new <name> |
To create a new workspace with a desired name. |
select <name> |
To select a specific workspace. |
delete <name> |
To delete the workspace. |
The CLI output below shows an example of managing workspaces. In short, we check the currently selected workspaces – the default, then create a new one named beta, list all the workspaces, and delete the beta workspace.
% terraform workspace show
default
% terraform workspace new beta
Created and switched to workspace "beta"!

You're now on a new, empty workspace. Workspaces isolate their state,
so if you run "terraform plan" Terraform will not see any existing state
for this configuration.
% terraform workspace list
  default
* beta

% terraform workspace select default
Switched to workspace "default".
% terraform workspace delete beta
Releasing state lock. This may take a few moments...
Deleted workspace "beta"!
% terraform workspace list
* default
Workspace interpolation
To manage multiple scaled-down environments using the same configuration, we need a way to let Terraform know which workspace we are working with. This helps the configs to be set appropriately. For example, we may want to provision more EC2 instances for an environment managed by a specific workspace and fewer instances for other environments.
Terraform workspace interpolation sequence gives us a way to implement this dynamic variation. By accessing the value of the selected workspace, we can use multiple constructs and operators to create environments with desired scale and other custom attributes.
Consider the example below. Here, the Terraform configuration is intended to create EC2 instances in AWS. However, the count attribute based on the workspace selected defines how many instances to create. Here, “terraform.workspace” interpolation sequence is used to access this.
resource "aws_instance" "my_vm" {
 count         = terraform.workspace == "default" ? 3 : 1
 ami           = var.ami //Ubuntu AMI
 instance_type = var.instance_type

 tags = {
   Name = format("%s_%s_%s", var.name_tag, terraform.workspace, count.index)
 }
}
If the “default” workspace is selected, then three EC2 instances will be created, or else just one. This is just an example. We can use more complex variables and operators to manage more environments. For more details about using Terraform workspace, read our Terraform workspaces tutorial.
Infra and app development
End-to-end product development requires infrastructure and the application that is to be deployed on the infrastructure. Typically, corresponding individual teams take care of the respective tasks.
In the microservices world, testing and developing the application on a local machine may not always be possible due to dependencies and resource limitations. The application team members might need to spin temporary environments to run their test cases even before deploying the changes to the “permanent” dev environment.
In this case, without worrying about the Terraform source code, they can simply clone the repository and then create their own temporary environment using the workspace feature. This ability is useful for the application development teams to run their test cases individually in isolation before merging the changes to dev and promoting them there onwards.
Accounts and credentials
Multiple environments are typically managed using multiple cloud accounts or subscriptions. Cloud platforms also implement the “Organizations” concept to manage multiple accounts from a single root account. This root account is responsible for all the management activities like billing, access provisioning, etc.
When a Terraform configuration is “applied,” the changes are validated and executed for the target account based on its provider configuration. Below you can find a Terraform provider configuration for AWS using a shared credentials file.
provider "aws" {
  shared_config_files      = ["/path/to/.aws/conf"]
  shared_credentials_files = ["/path/to/.aws/creds"]
  profile                  = "profile_name"
}
Here we have hard-coded the profile name so that Terraform uses the appropriate credentials for the target account. Here we can also take advantage of the workspace interpolation sequence to pick the profile name dynamically from the shared credentials file. Additionally, AWS provides a way to assume an IAM role in the target account.
Workspaces: Pros and Cons
State management in Terraform can be a sensitive topic when it comes to managing multiple environments using Terraform. However, workspace management provided by Terraform takes care of this under the hood by creating subdirectories in the currently set backend.
State management can also be a limiting factor, as all the state files are stored in the same backend directory. This means all the plugins used to work with the terraform configuration are also replicated per workspace.
Terraform workspaces offer a great way to create transient environments to test infrastructure changes by just learning a few commands.
Relying on internal wiring – using interpolation sequence. If the code is already built, introducing the workspace interpolation dependency can be some effort.
Terragrunt is a Terraform wrapper, designed to fill in the gaps when it comes to large scale Terraform configurations.
When managing cloud infrastructures, it’s typical to have multiple environments like dev, test, stage, and prod. These environments often have similar infrastructures but have different configuration values for their variables. Terragrunt helps you manage these multiple environments efficiently by offering DRY configurations, handling dependencies, and streamlining remote state management.
DRY Configurations with Terragrunt
One of the primary benefits of Terragrunt is its ability to keep configurations DRY. When dealing with multiple environments, there’s often a significant amount of configuration duplication across environment-specific Terraform configurations.
Terragrunt solves this issue by reusing Terraform configurations. Using its include option, you can inherit configurations from a parent terragrunt.hcl file, enabling you to define common configurations once and then have environment-specific overrides, reducing repetition and minimizing human errors.
Dependency Management
As infrastructure grows in complexity, dependencies between resources become inevitable. For instance, a database might need to be set up before an application server that relies on it. In some use cases, these resources are created in different Terraform configurations. Terragrunt’s dependency block allows you to express these inter-module dependencies explicitly.
By doing this, you can ensure that configurations are created or destroyed in the correct order, respecting the dependency chain. This feature is especially valuable in multi-environment setups where ensuring the correct order of resource provisioning across environments becomes crucial.
Streamlined Remote State Management
Particularly with multiple environments, remote state management in Terraform can become a challenge due to manual configuration and potential inconsistencies. Terragrunt streamlines this process by automatically managing backend configurations for you. It ensures that each environment’s state is stored in a separate, isolated location (for example, different S3 bucket paths), enhancing security and separation. This automated approach reduces the manual overhead and minimizes the risks associated with managing the state for various environments.
Terragrunt amplifies Terraform’s capabilities, especially for large-scale, multi-environment infrastructures, making environment management more scalable, maintainable, and less error-prone.
Read also Terragrunt vs. Terraform.
In this section we will explore the possibility of using Git branches to manage multiple environments and determine why it might not be the best strategy. The diagram below is intended to satisfy the requirements as stated in the introduction of this blog post.
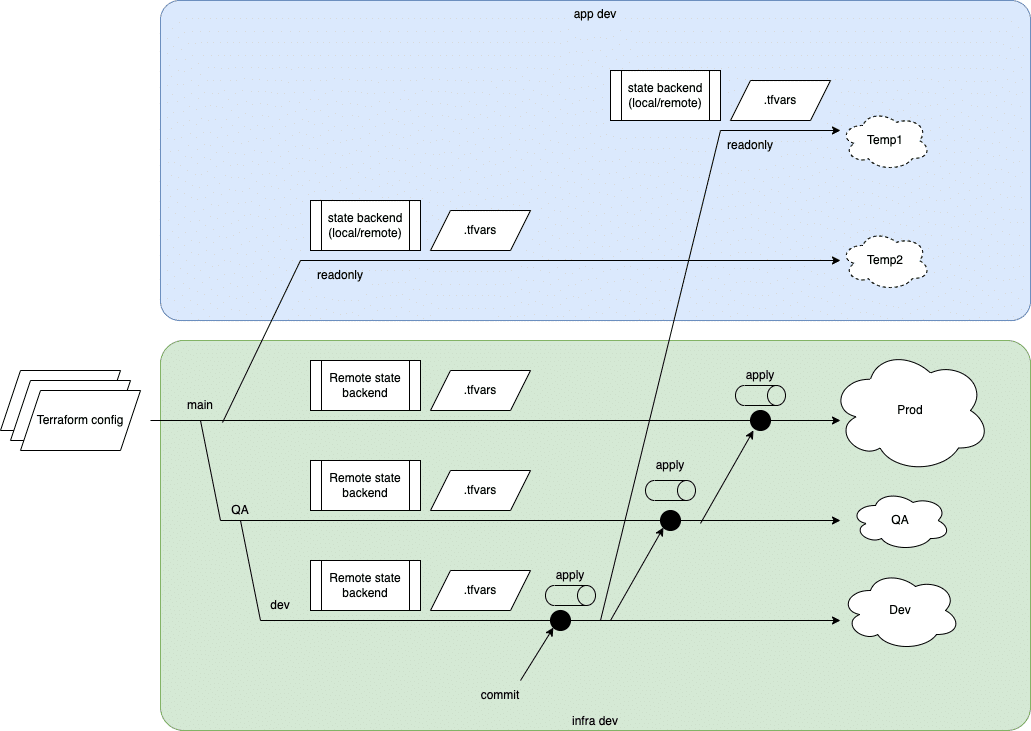
The two aspects of development – infrastructure and application – are highlighted in green and blue, respectively. The branching strategy represented here is a rough application of using Terraform configuration for various purposes. We will explore this further as we go through various sections of Git branching.
Purpose of Git
Simply put, Git is designed to coordinate development efforts across the team. It maintains various versions of source code and package releases for deployments. The main branch usually contains well-tested features meant for the general use of any given software.
To perform development activities or to introduce any changes in the form of bug fixes, features, or enhancements, a copy of the main branch is created upon which the modifications are performed, rebuilt, deployed to sub-production environments, and tested thoroughly before merging the changes to the main branch.
Git branches for environments
With this in mind, it is possible and rather tempting to use Git branches to manage multiple environments – one branch per environment. In the given diagram, the infra-dev team works on three branches:
- Main – for management of production infrastructure setup.
- QA – for management of QA infrastructure setup, where qualified users perform UAT tests.
- Dev – for management of development infrastructure setup, where features are first released and unit tested.
At a high level, it makes sense to branch out from the main branch and create copies of the same configuration to create QA and dev environments.
Issues with this approach
At a source code level, it all makes sense. However, when we think about deeper aspects of Terraform as IaC, we have to worry about some critical requirements:
- State file management and associated remote backends.
- Scaling aspects that translate to environment-specific attributes.
- Credentials for multiple accounts.
The environments in consideration here are separate infrastructure deployments. Each of these environments naturally has its own state information, which needs to be managed remotely and securely. Remote backends are defined in the terraform resource block.
The example below utilizes the AWS S3 backend.
terraform {
  required_providers {
    aws = {
      source  = "hashicorp/aws"
      version = "~> 4.18.0"
    }
  }

  backend "s3" {
    bucket         = "tf-state-bucket"
    key            = "terraform.tfstate"
    region         = "eu-central-1"
    dynamodb_table = "tf_state_lock"
  }
}
Assuming this is the configuration used by the production environment, i.e., the main branch, when we branch out from the main branch, the backend configuration is copied as well. All the Terraform CLI commands will assume this backend to be the same for all other copies (branches), which is not desirable and can prove to be very risky. In fact, running any Terraform commands like plan, apply, destroy, will refer to the production state files and even perform actions on production.
If we manually modify the backend config to use a different backend for QA and dev environments, it defeats the whole purpose of Git. Git merges will throw conflicts and ask developers to resolve these conflicts by choosing one of the backend.
This also holds true for environment-specific attribute values defined in .tfvars file. The scaling aspect of various environments is managed via variables – more specifically, the .tfvars files. Modern Git workflows usually demand pushes and pulls to happen to and from any branch. It may not be possible in this approach.
The provider configuration may hold multiple aliases to represent deployments in multiple cloud provider accounts and regions. This also is overridden by Git’s virtues.
CI/CD pipelines
Most of the remote Git repositories — notably, GitHub Actions and Gitlab CI/CD — provide the ability to introduce automation in the form of CI/CD pipelines.
As far as source code versioning is concerned, it makes sense to use a remote Git repository and define automation pipelines that take care of the credentials as well.
In our example, if we make a commit on a particular branch or approve a pull request, it is possible to run a branch-specific pipeline that uses environment-specific credentials to apply the changes to the correct target environments.
However, even if this solves the credential issue, the environment-specific provider configurations and attributes are still part of the Git workflow. This does not align with how Terraform expects these configurations to be for our intended change. Also, the CI/CD pipelines capability is a feature that any other Terraform workflow can leverage. So this does not add any specific advantage to depend on Git branches.
Application development
Modern application development is based on microservices, containers, and functions. A local development environment is often an issue encountered by development teams depending on various factors. A simple example is when running a set of containers dependent on each other and other factors, the resources available on the development machine may not be enough.
Using Terraform as IaC does help in spinning temporary and isolated environments to perform the unit tests for developers. It is also possible to create a temporary Git branch from a desired source branch (main, QA, or dev) and create an isolated scaled-down environment – as represented by the “Temp2” deployment in the diagram.
Additionally, if any application feature depends on a specific infrastructure component still under development, application teams can choose to branch out from the “dev” branch of infrastructure development, which contains the expected changes. It is represented by the “Temp1” deployment in the diagram.
It should be noted that managing environments using the Git branching strategy depends on the overarching assumption that the right branching policies are in place. For example, branches created by application development teams may not be merged into any of the infra dev team’s branches.
Adopting a Git branching strategy would make much more sense if there was a way for Terraform to know which branch is currently checked out. This exact function is provided by the workspace interpolation sequence when working with Terraform workspaces.
In a real-world scenario, we need the advantages of both Terraform workspaces to manage various environments and Git branching to maintain the IaC source code itself.
However, using workspaces and branches can pose serious risks, as discussed previously in this post. This is where Spacelift comes in. Spacelift offers a streamlined approach to satisfy our requirements, as laid out in the introduction of this post.
Git integration
With Spacelift, we can integrate with remote Git repositories like GitHub and Gitlab. This enables access to the repositories where the Terraform configurations are developed in a “usual” development flow using branches. I say “usually” because we do not have to worry about the challenges we discussed in the Git branch approach in the previous section.
Stacks
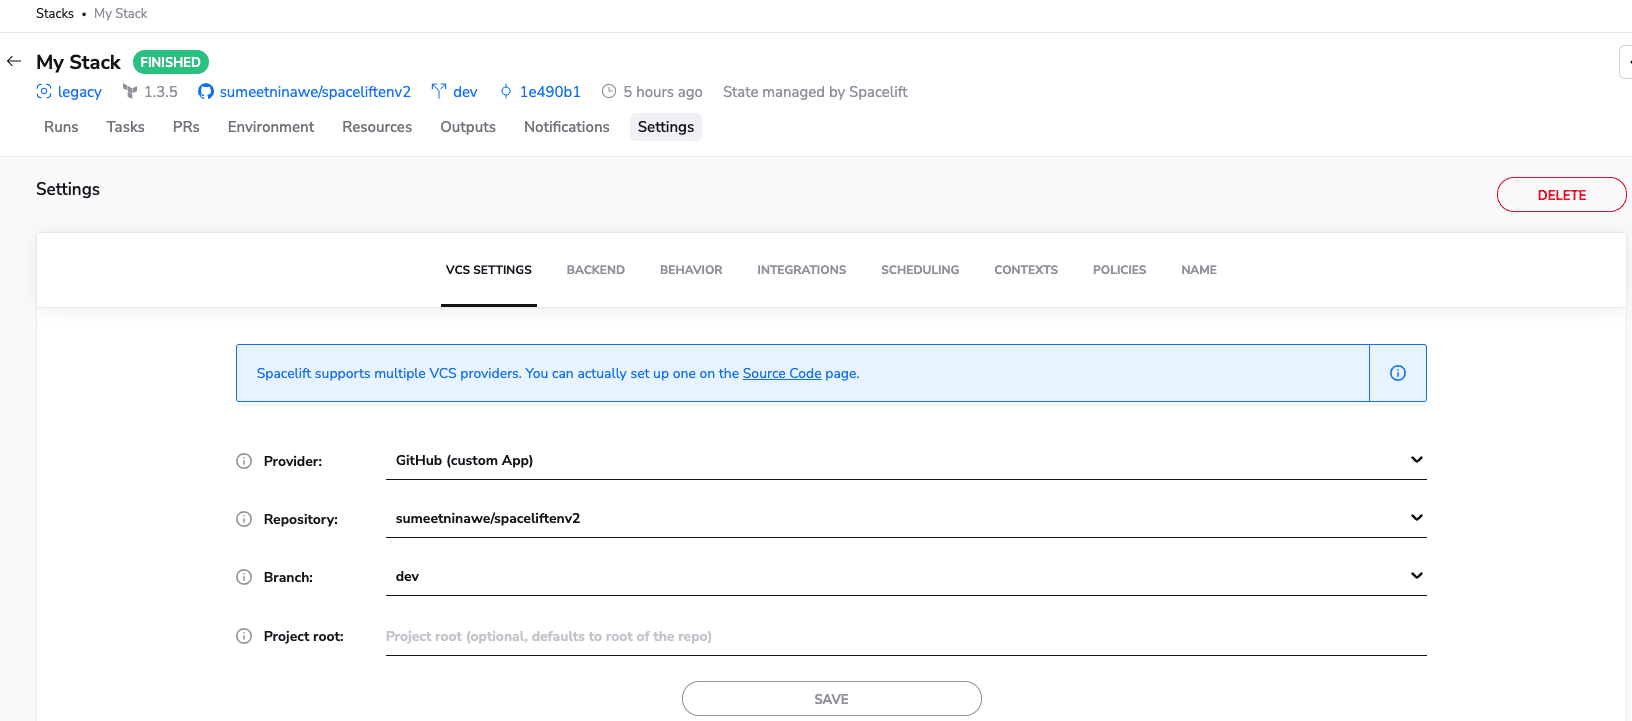
Stacks are one of the most important concepts when working with Spacelift. A Stack in Spacelift represents a deployment based on the given Terraform config. We can create Stacks by selecting appropriate Git repositories from all the repositories made available after we integrate Git.
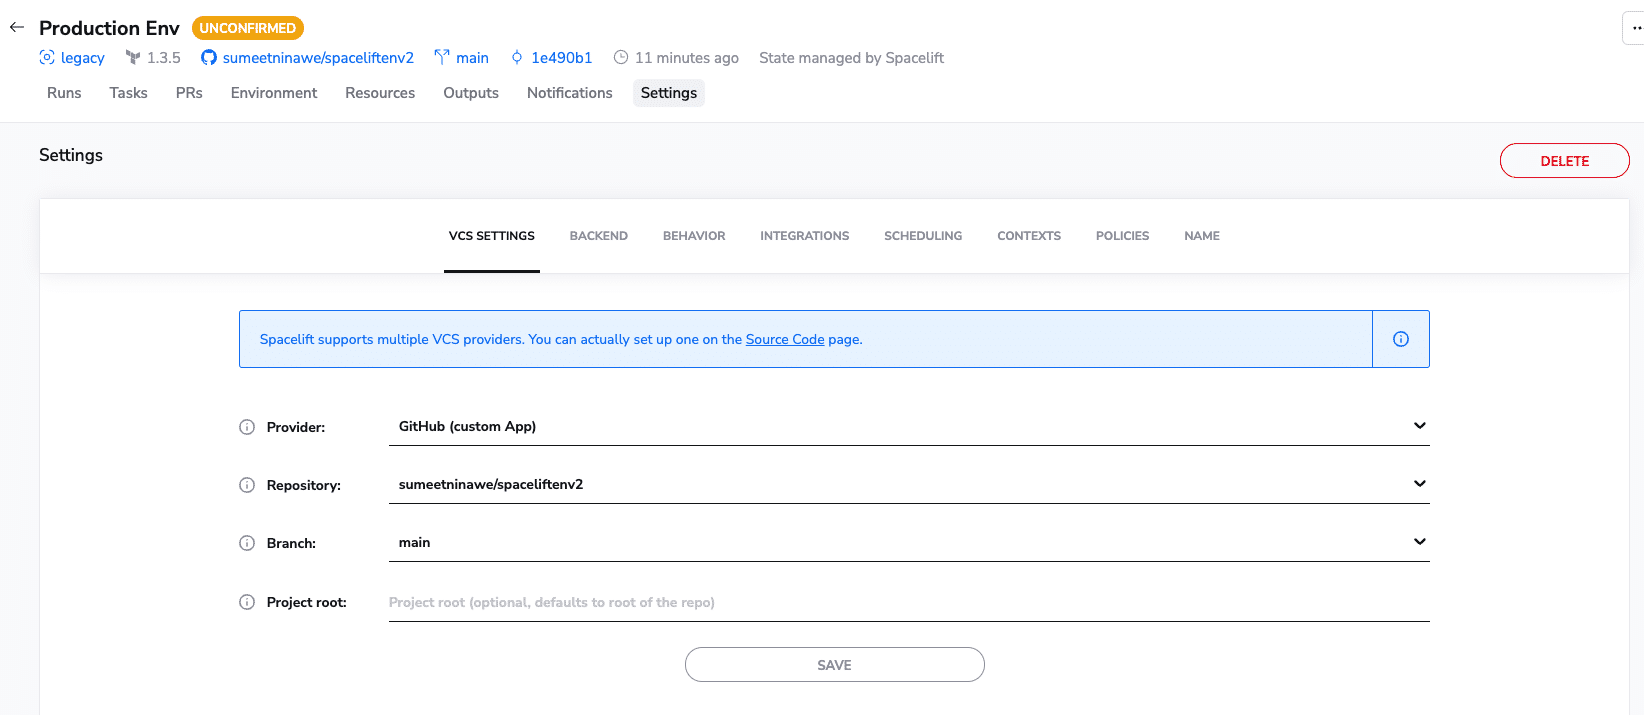
We can also select a desired branch of the select repository to create our Stack. In the screenshot below, we have created a Stack in Spacelift representing the production environment.
The selected repository contains the Terraform config for all the infrastructure components we want to create in the production environment. Notice that we have selected the main branch corresponding to the production environment.
Similarly, it is possible to create Stacks for all the environments we need by selecting the same repository but a different branch.
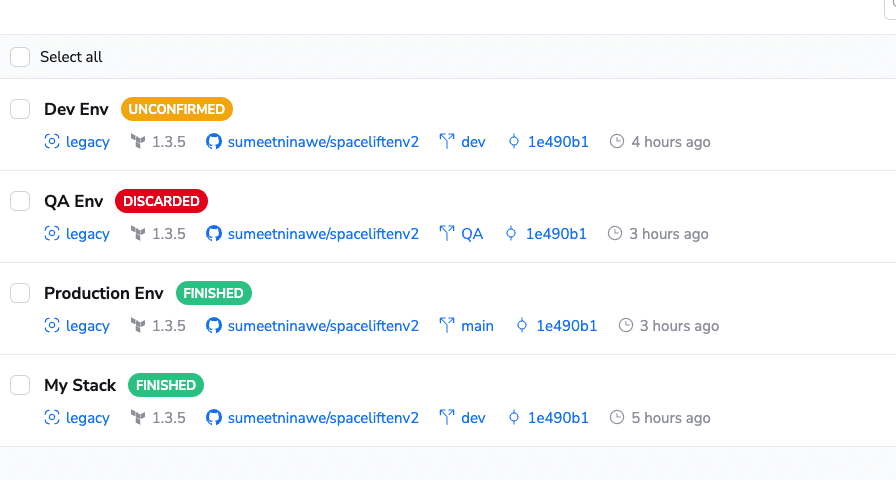
For example, the Stacks shown below represent the Dev and QA environments apart from the Prod, which are mapped to the corresponding branches of the same Git repository.
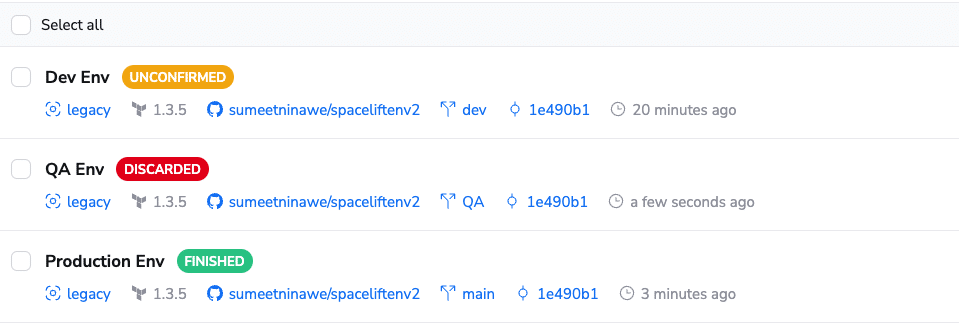
Any new commit or merging of a pull request on a particular branch will trigger the deployment of the corresponding Stack in Spacelift. This perfectly satisfies the requirements of providing a development experience for infrastructure teams.
- Infrastructure development can happen on the “dev” branch, reflecting changes in the dev environments.
- When the changes are confirmed on dev, these changes can be merged into the QA branch, which will eventually deploy the changes to the QA environment.
- This is followed by the pull request on the main branch, which will reflect the changes in the production environment.
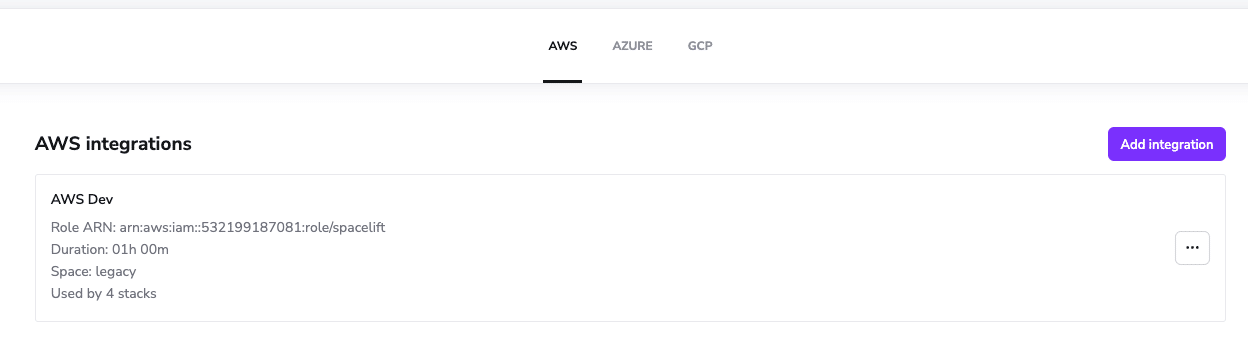
Manage multi-account deployments using cloud integrations
Cloud platforms like AWS can be safely integrated with Spacelift to perform the actions as per the Terraform configuration. The workers need this access to make appropriate API calls to cloud platforms. In the case of AWS, Spacelift cloud integrations employ the assume role policy used to provide temporary access.
Once the cloud integrations are configured, every Stack is associated with these integrations so that the deployments are targeted on appropriate accounts.
In the screenshot below, we have configured a single AWS account used by all the stacks. However, it is possible to configure more.
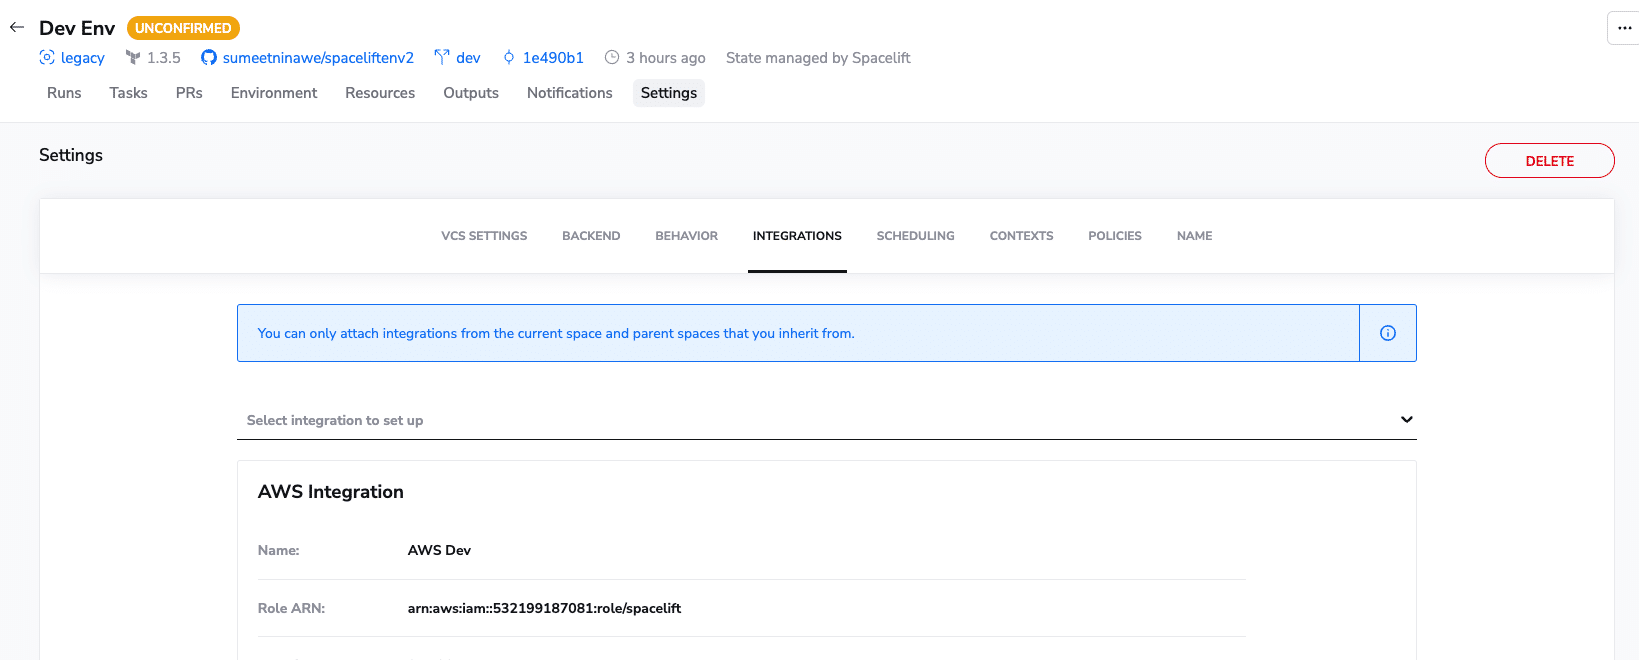
The screenshot below shows how cloud integrations are associated with Stacks. In this case, our Dev Env stack is currently using the AWS Dev integration configured above. Similarly, our QA and Prod stacks can have their own account configured.
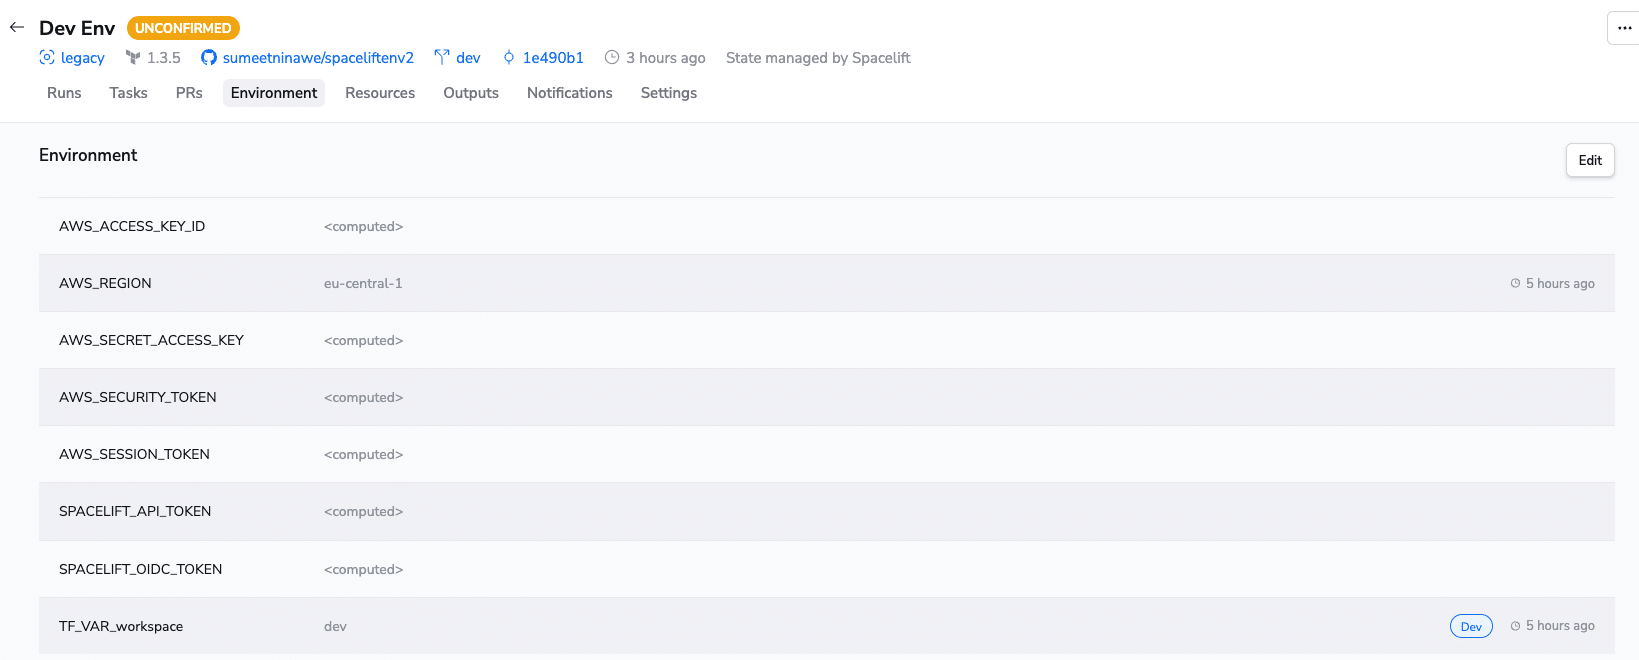
Manage scaling using Contexts
Every Stack has a set of environment variables that are used during run-time by Terraform. The most common examples are the AWS secret and access keys.
The screenshot below shows how these values are being set to “<computed>.” This is because these values/credentials are generated dynamically using associated cloud integrations, which are valid for an hour.
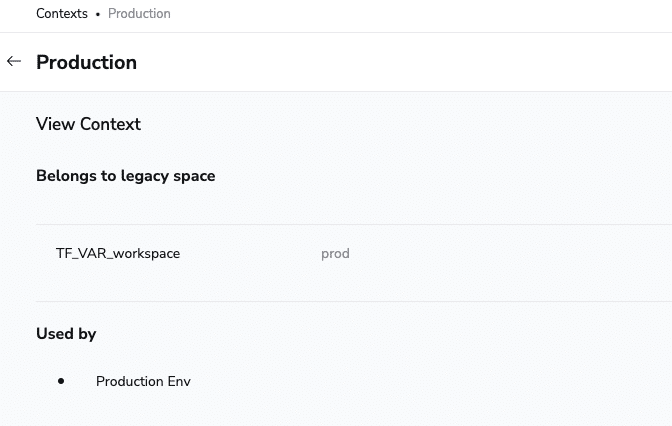
Additionally, we can define Contexts – a set of pre-defined environment variables. The Contexts are independent of Stacks. Thus it is possible to reuse them in multiple Stacks. In our case, we have configured a few pre-defined contexts which provide environment variables to corresponding Stacks.
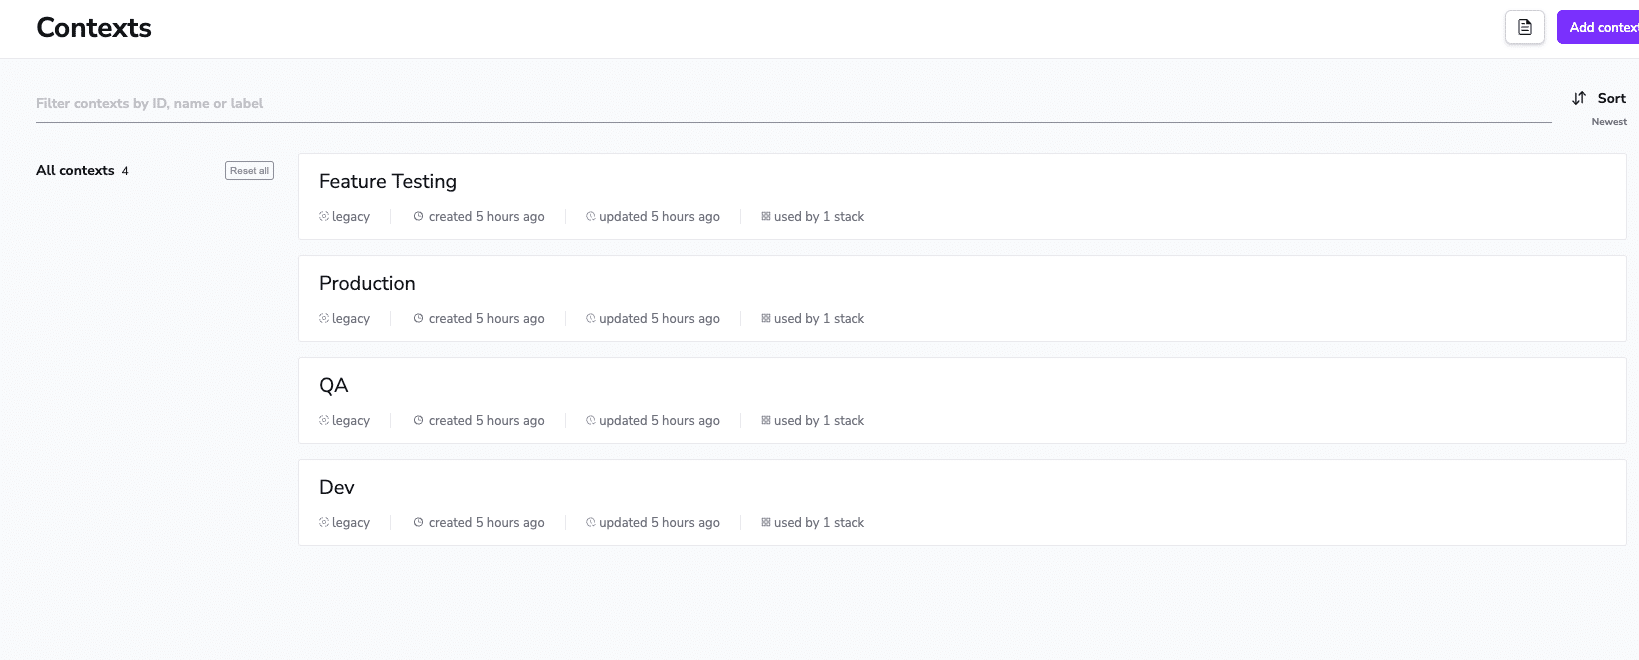
As far as the scaling aspect is concerned, Contexts can provide that vital information, which our Terraform configuration can create full-scale or scaled-down versions. There are two ways to do this:
- Provide a single flag value, and then interpret that value in the Terraform code to create cloud components with appropriate scale.
- Provide all the attribute values in the Context, which are then readily interpreted by the Terraform code to set appropriate scaling attributes.
We will use the first approach. Here, in every Context, we have specified the environment value for a variable named “workspace.” Do not confuse this with the Terraform workspace feature. We can select any name of our choice. The workspace variable here provides the context to Stacks, indicating which environment is being provisioned. The example below shows how workspace value is being set as “prod” for the Production environment.
The Terraform configuration then interprets this value automatically and spins three EC2 instances whenever Production Stack is triggered. For the rest, it automatically creates a single instance.
resource "aws_instance" "my_vm" {
  count         = var.workspace == "prod" ? 3 : 1
  ami           = var.ami //Ubuntu AMI
  instance_type = var.instance_type

  tags = {
    Name = format("%s_%s", var.name_tag, var.workspace)
  }
}
Additional stacks
As discussed previously, the application development teams may want to create their own isolated environments to test their development. To fulfill this requirement, the team members can create their own Stack based on the same Git repo and a branch of their choice.
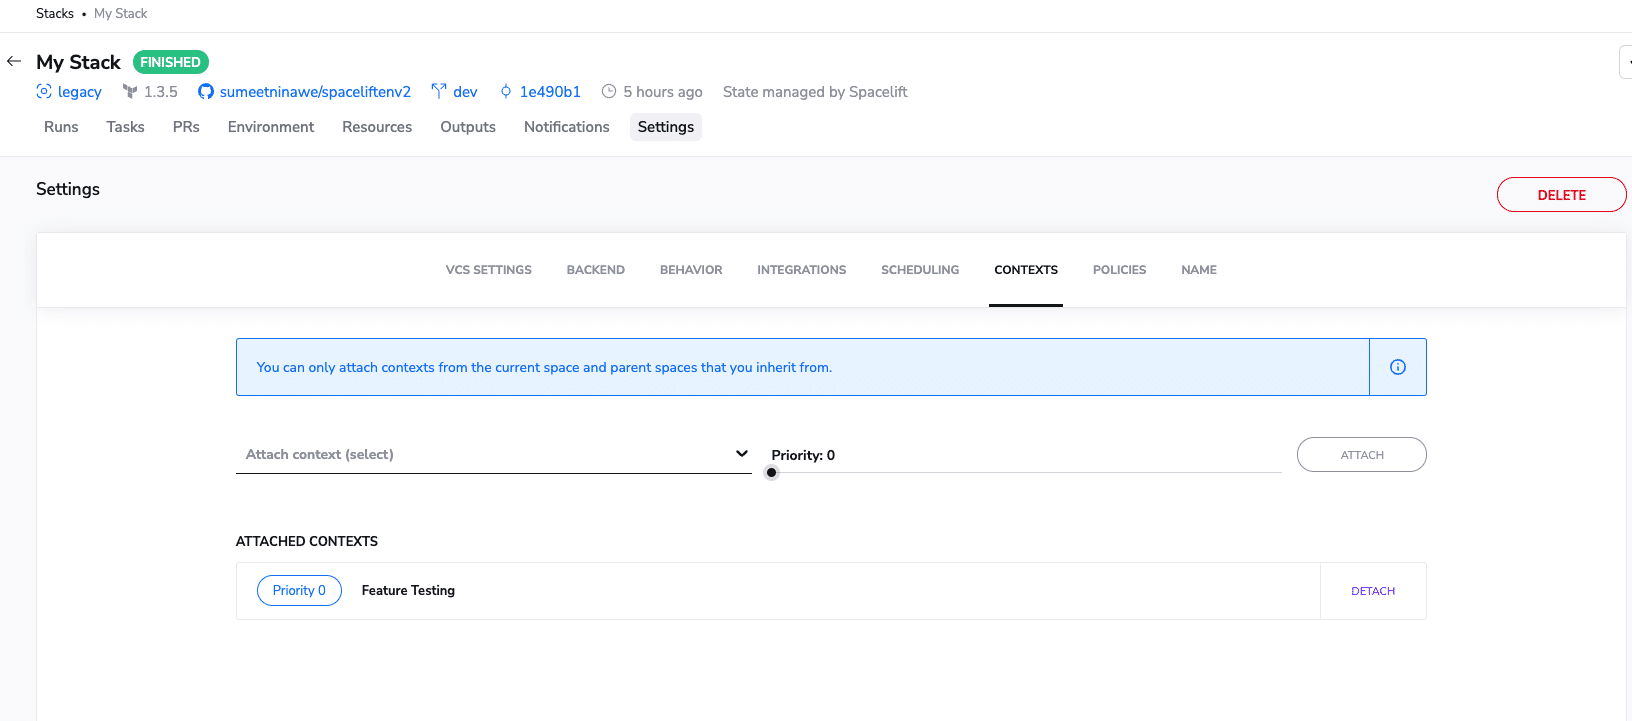
Pre-defined contexts can be made available by the infrastructure dev team to be used by the application development team.
In our case, the “My Stack” Stack uses a pre-defined context, “Feature Testing,” which provides them with appropriate scaling restrictions without worrying about the Terraform code.
Deploying the stacks
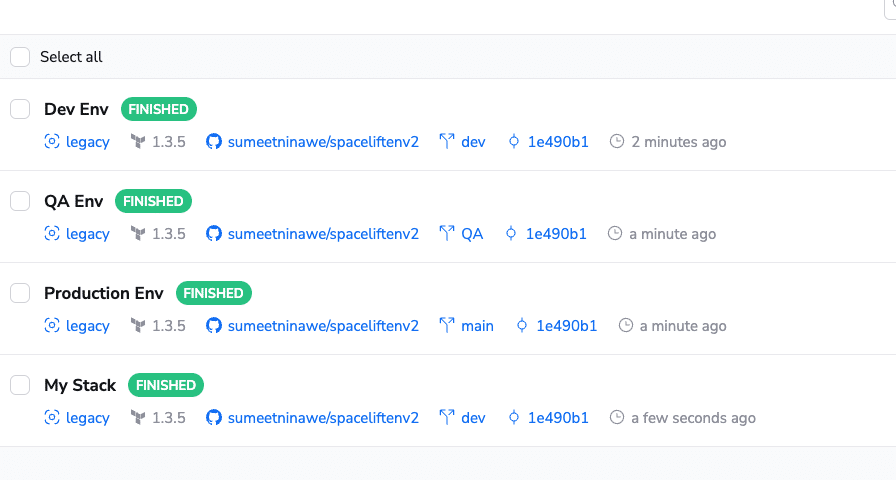
We have now created four stacks.
Let’s trigger the deployment for all of them and see the results. For the sake of simplicity, I have set the same region for all the stacks.
The screenshot below shows how all the runs are completed successfully.
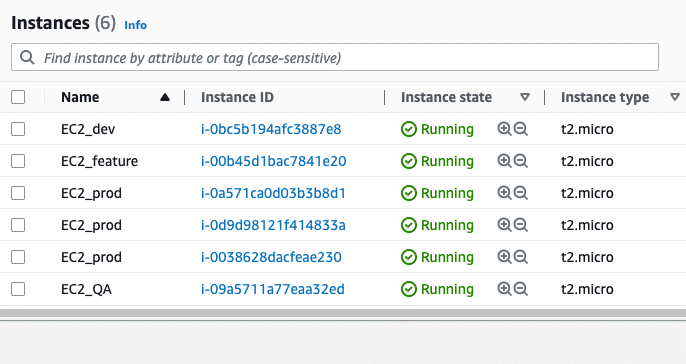
To confirm the corresponding EC2 instance creation, see the below screenshot. The stacks have created three instances for prod and one each for QA, dev, and feature.
Check out Spacelift Stack Dependencies v.2.
Spacelift is a powerful tool for managing the IaC workflow. Here we have just scratched the surface of its capabilities. Other features like policy management, drift detection, reconciliation, etc., which can be leveraged for a more streamlined approach towards infrastructure management using IaC.
Note: New versions of Terraform are placed under the BUSL license, but everything created before version 1.5.x stays open-source. OpenTofu is an open-source version of Terraform that expands on Terraform’s existing concepts and offerings. It is a viable alternative to HashiCorp’s Terraform, being forked from Terraform version 1.5.6.
Manage Terraform Better with Spacelift
Build more complex workflows based on Terraform using policy as code, programmatic configuration, context sharing, drift detection, resource visualization and many more.