
This article will give you an overview of what Lens does, why it’s useful, and how you can get started using it with your own Kubernetes clusters.
We will cover:
What is Kubernetes Lens?
Lens is a popular Kubernetes management tool that provides a feature-filled graphical interface. You can use Lens to interact with your clusters visually instead of being dependent on obscure CLI commands. It supports monitoring, deployment, and management scenarios in a clean user interface that features multi-cluster capabilities.
It is developed by Mirantis. The tool is billed as “the largest and most powerful Kubernetes platform” for professionals. It’s designed to offer an IDE-like experience for Kubernetes developers and administrators. Using Lens, you can take control of your Kubernetes clusters without learning any console commands.
Lens is a more powerful alternative to the official Kubernetes Dashboard. It also builds upon the capabilities of Kubectl, the Kubernetes CLI, by including Helm-based app deployment and advanced features for collaboration and security.
Is Lens free for Kubernetes?
Lens is developed using an “open core” model. Its source code is available on GitHub, but the Mirantis Lens Desktop product is offered under a commercial license. It includes extensions that carry traditional terms of service. Lens Desktop is free for personal use and individuals with annual revenue below $10m, but a Pro license is required for large-scale business use.
Kubernetes Lens use cases
Lens supports Kubernetes developers, operators, and administrators by providing a feature-complete UI that’s equally accessible to beginners and administrators alike. It’s ideal for a wide variety of use cases, including:
- Monitoring clusters — Lens includes built-in monitoring capabilities that let you easily check resource utilization metrics for your Nodes and Pods.
- Accessing logs — You can retrieve logs from all your applications using the unified interface. If you need to continue debugging, you can open Pod terminals in tabs that let you quickly move between resources.
- Deploying new apps — Lens can deploy new resources into your cluster. You can use Helm charts, Kubernetes manifests, and templates to launch new apps.
- Providing safe engineering access to clusters — Lens supports Kubernetes RBAC so you can use it to safely grant engineers access to specific Kubernetes namespaces, without having to open up your entire cluster.
- Make Kubernetes more accessible — Kubernetes is widely reputed to have a formidable learning curve. Newcomers can struggle to familiarize themselves with the ecosystem of YAML files and CLI tools. Lens provides an efficient graphical alternative with all management capabilities available in one interface.
- No need to modify your cluster — Lens is a standalone desktop app that you install on your devices. You don’t have to deploy anything extra into your cluster. Lens works with your existing Kubeconfig files so you can reuse Kubectl cluster connections.
Getting started with Kubernetes Lens - tutorial
Ready to try out Lens with your own clusters? Here’s a tour of the basics to get you started.
You’ll need access to a Kubernetes cluster before you continue—if you don’t have one yet, you can follow the Kubernetes installation tutorial to start a local cluster on your own machine.
How to install Lens?
The easiest way to install Lens is via the download link on the website homepage. Click the “Download Lens Desktop” button, then select the version that applies to your platform. Run the installer to add Lens to your system.
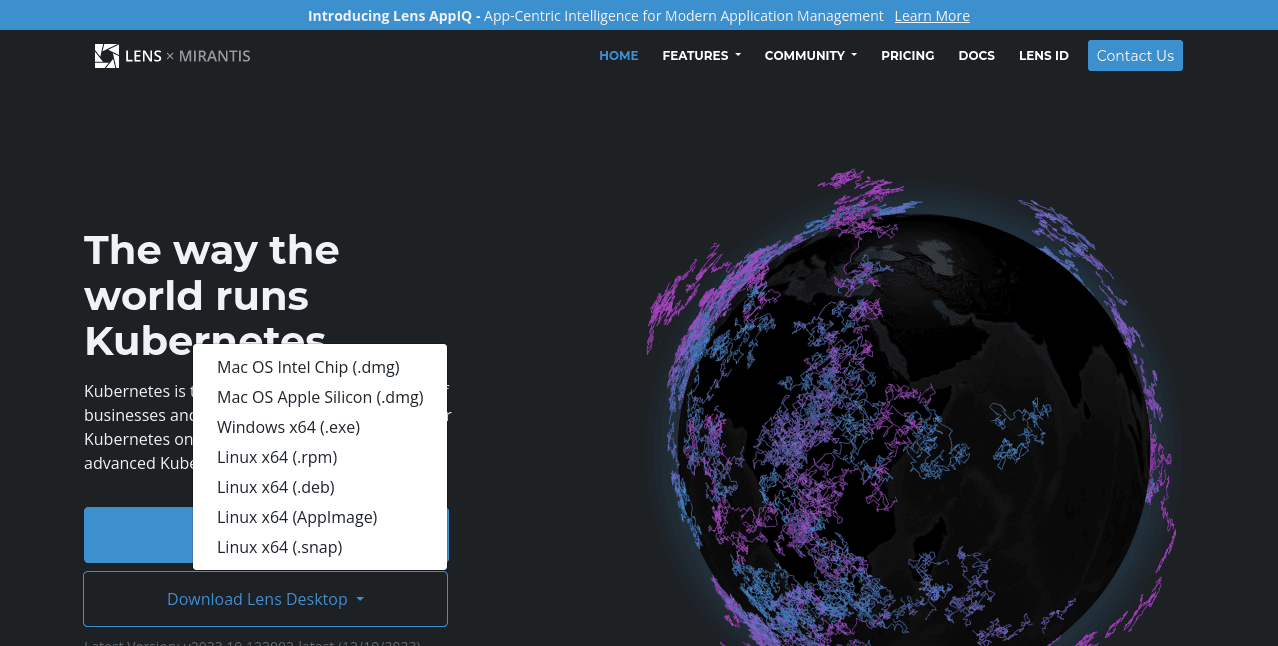
If you’re on Linux, you can follow the guidance in the Lens documentation to install the app from your package manager’s repository. Lens is also available as an AppImage, which requires no installation—to use this method, download the AppImage file from the webpage homepage link, make it executable, and then run it.
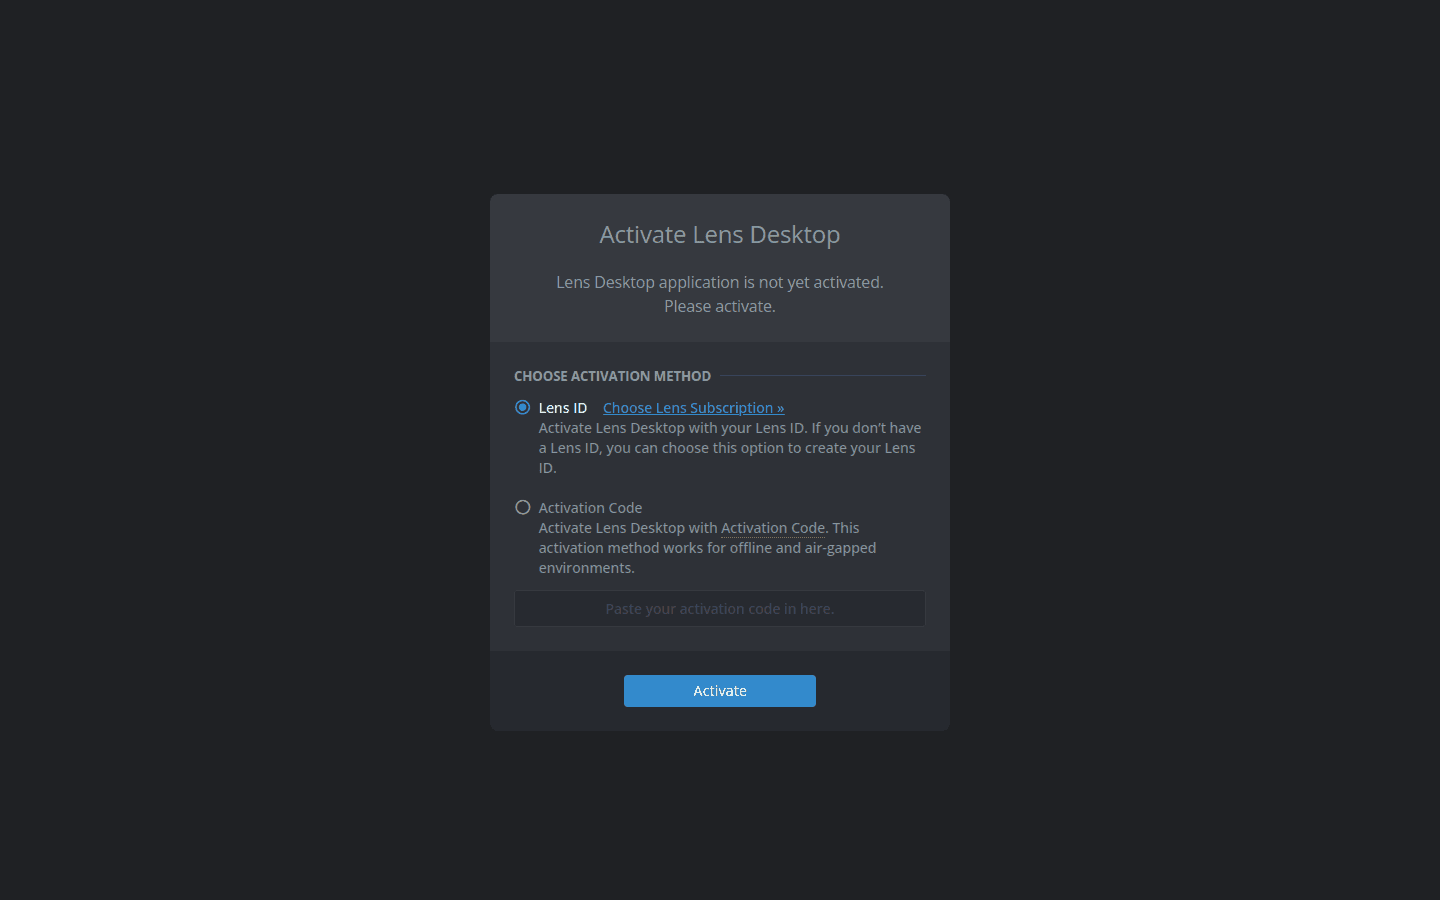
You’ll need to activate Lens when you open it for the first time. “Lens ID” is the easiest method: click the “Choose Lens Subscription” link to open a new browser tab that will let you choose your Lens edition.
Once you’re on the website, you can use the dropdown to the right of the screen to select the free Lens Desktop Personal edition if you are eligible.
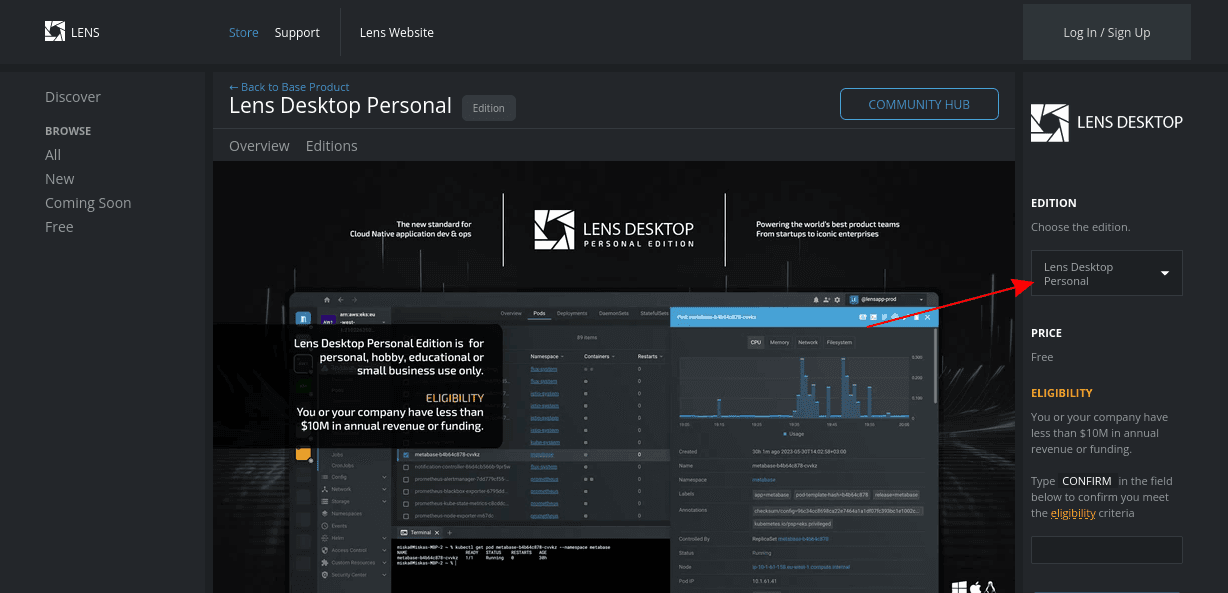
Follow the prompts to finish creating your subscription and a Lens account. Upon completion, you’ll be automatically redirected back into the Lens Desktop app, which will automatically sign you in.
How to use Lens interface?
The Lens home screen provides an overview of the available features.
To the left of the screen, a vertical hotbar allows you to switch between different clusters and screens. The Hotbar is customizable so that you can pin your favorite cluster connections.
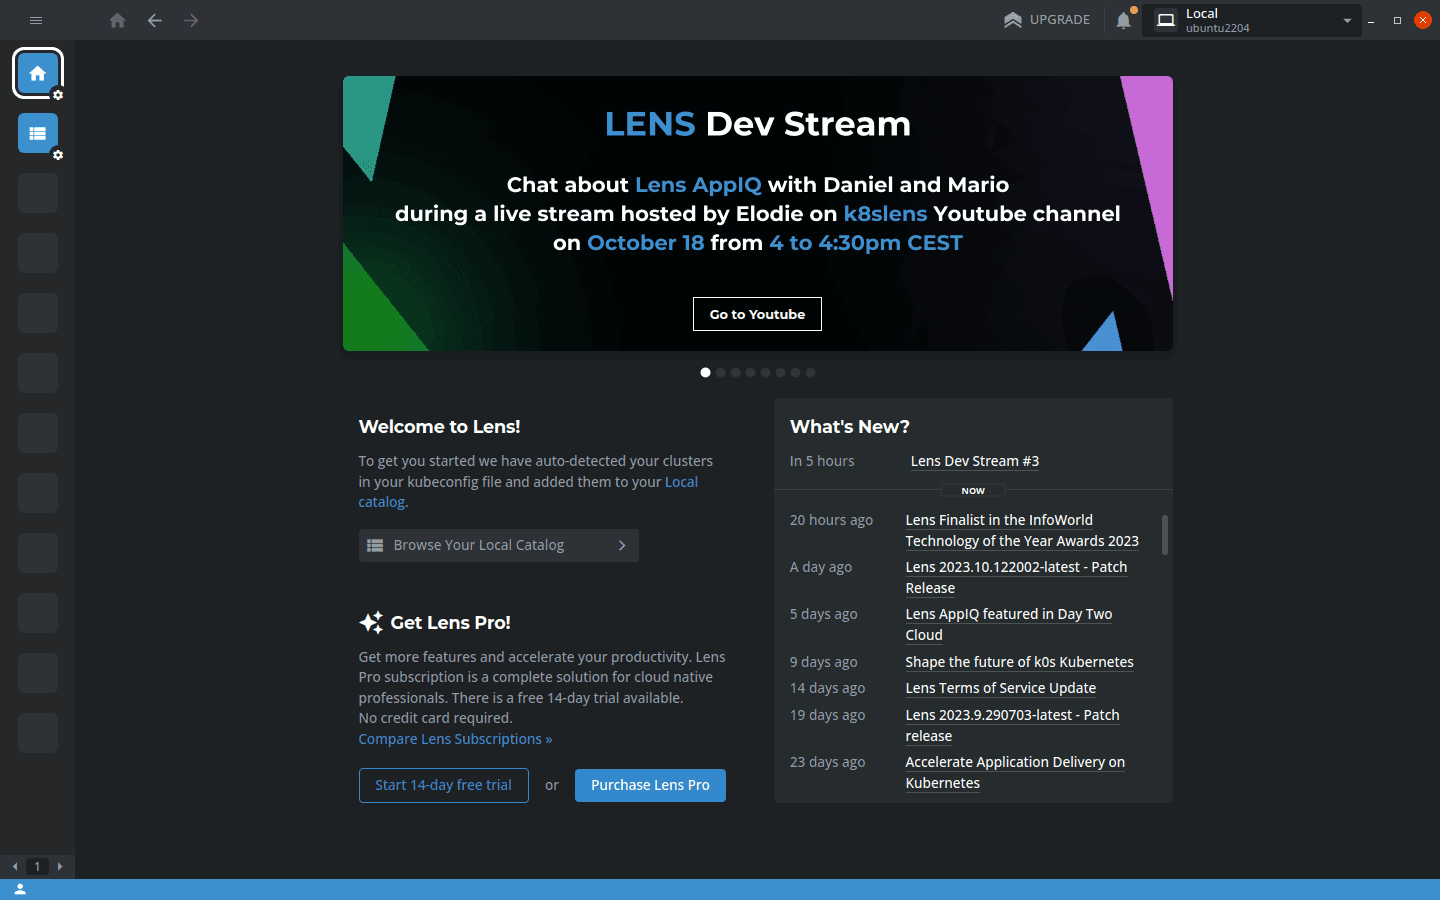
The app’s menu is accessed by clicking the icon in the top-left. The status bar at the bottom provides contextual information and a link to manage your Lens account. In the top-right of the screen, you’ll find a dropdown that lets you connect to other Lens environments synced to your Lens Cloud account.
We won’t cover these features in this tutorial, but you can use them to enhance collaborative work on Kubernetes and cloud-native apps.
Lens Catalog
The Lens Catalog screen is accessed by clicking the Hotbar link that’s the second from the top, below the home button.

The Catalog provides an index of the items you can view in Lens. These include cluster connections, website links, and Lens in-app views such as the settings screen. You can customize items by clicking the three-dot icon displayed for each record on the right of the screen.
Catalog items can also be pinned to your hotbar for quick access, either by clicking the pin icon next to their name or by choosing “Add to Hotbar” from the three dots menu.
Adding clusters to Lens
Lens should auto-detect your existing Kubeconfig files and add them to the Clusters section of your catalog. You can connect to these clusters by selecting them from the catalog or the Hotbar.
To add a new cluster, head to the catalog, then select the “Clusters” category from the sidebar and hover over the “+” floating action button in the bottom-right:
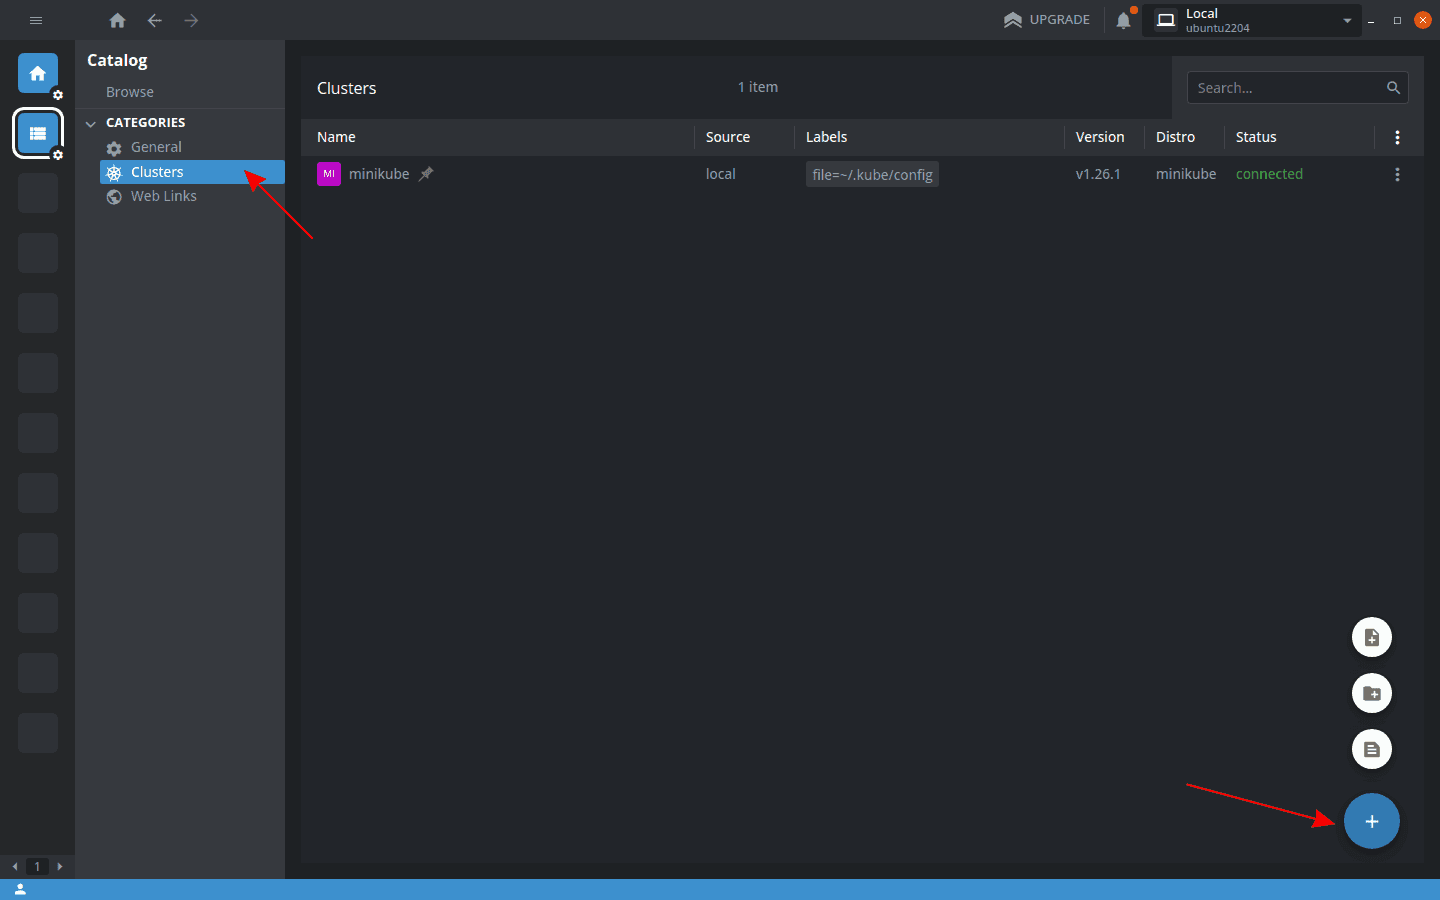
Three options will appear: “Sync Kubeconfig file(s)”, “Sync Kubeconfig folder(s)”, and “Add from kubeconfig”.
The sync options let you select an existing Kubeconfig file or folder to add to Lens. “Add from kubeconfig” allows you to paste in a Kubeconfig that will be imported to Lens, but not added to your ~/.kube/config file.
Once you’ve added your cluster, it will show up in the catalog. You can then connect to the cluster or pin it to your hotbar.
How to use Lens to manage clusters?
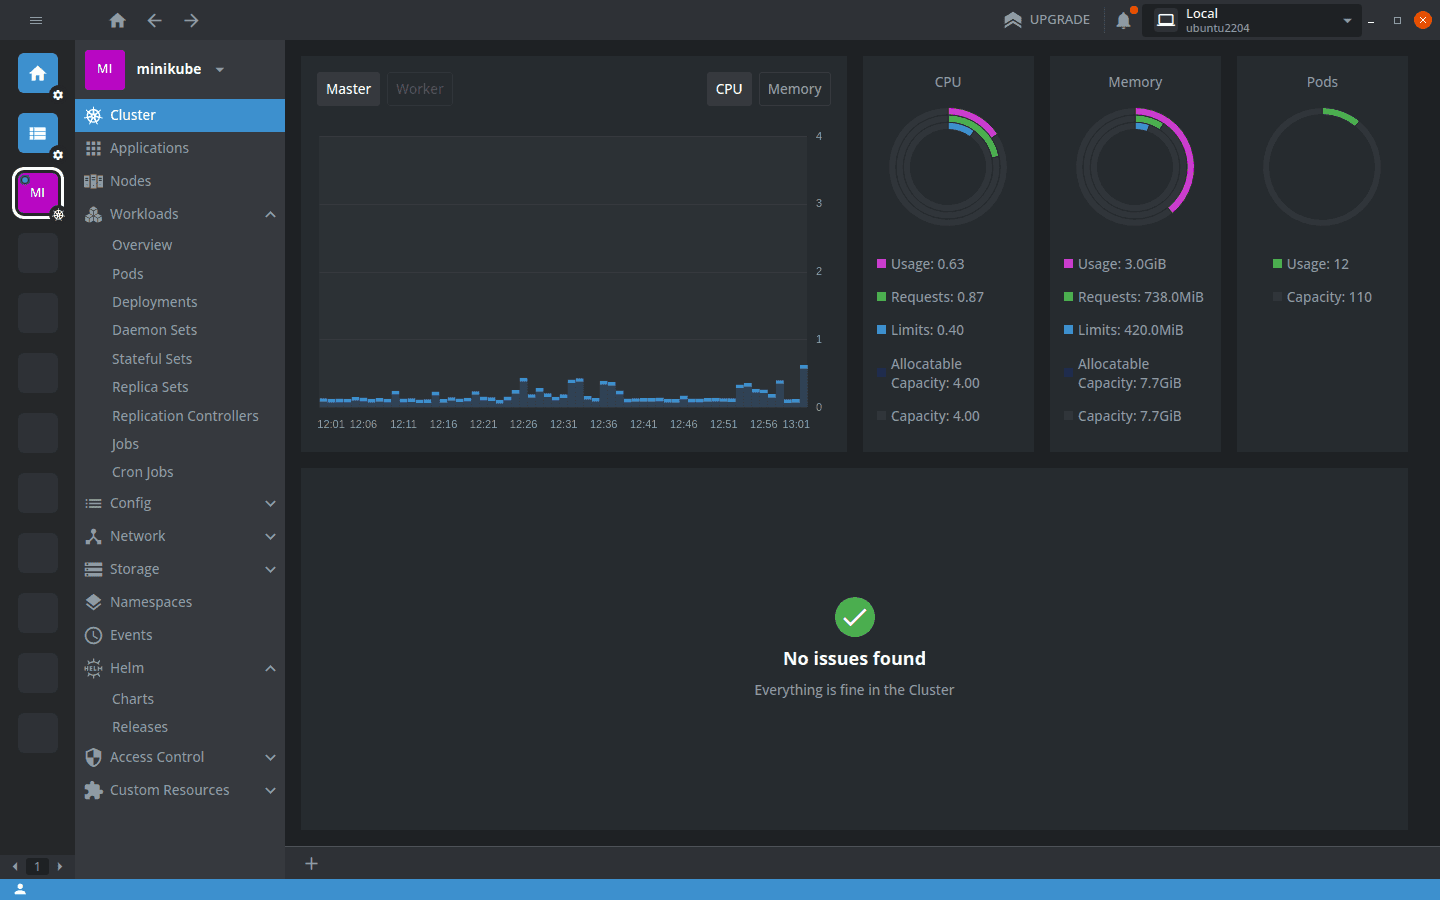
When you connect to a cluster, you’ll first see the Lens cluster-level dashboard screen. This gives you a high-level overview of your cluster’s metrics and any detected issues.
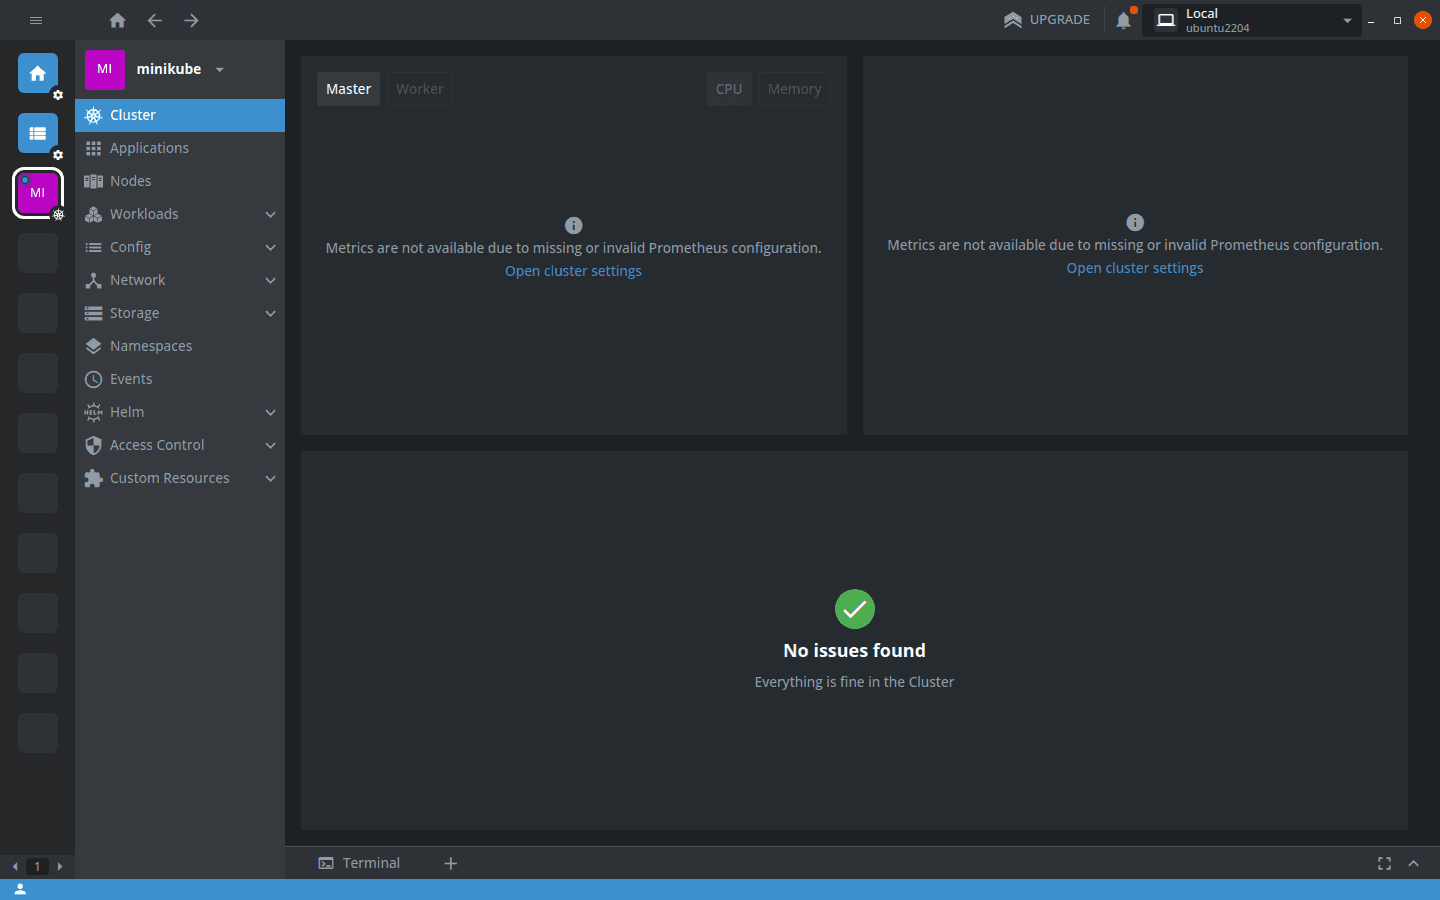
Metrics visibility depends on a supported metrics provider being installed in your cluster.
If you have a provider installed but see a “Metrics are not available” message, then you should click the “Open cluster settings” link to tell Lens which metrics system you’re using:
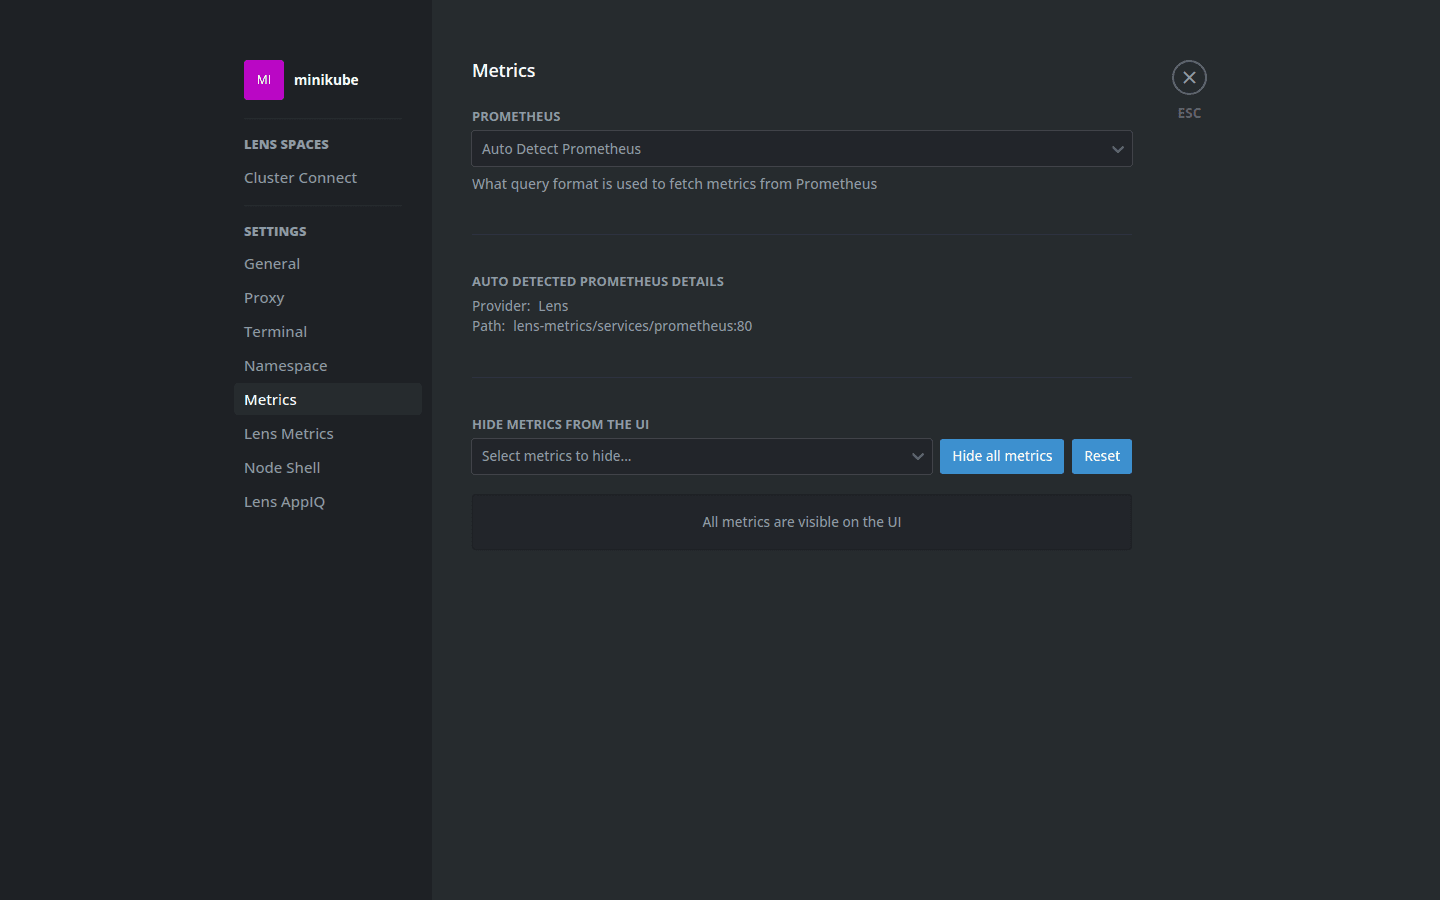
Lens can deploy a Prometheus-based metrics service for you.
To install this default stack in your cluster, switch to the “Lens Metrics” settings screen and then enable the options to use the bundled Prometheus, kube-state-metrics, and node-exporter stacks. You only need to activate the components that aren’t already running in your cluster.
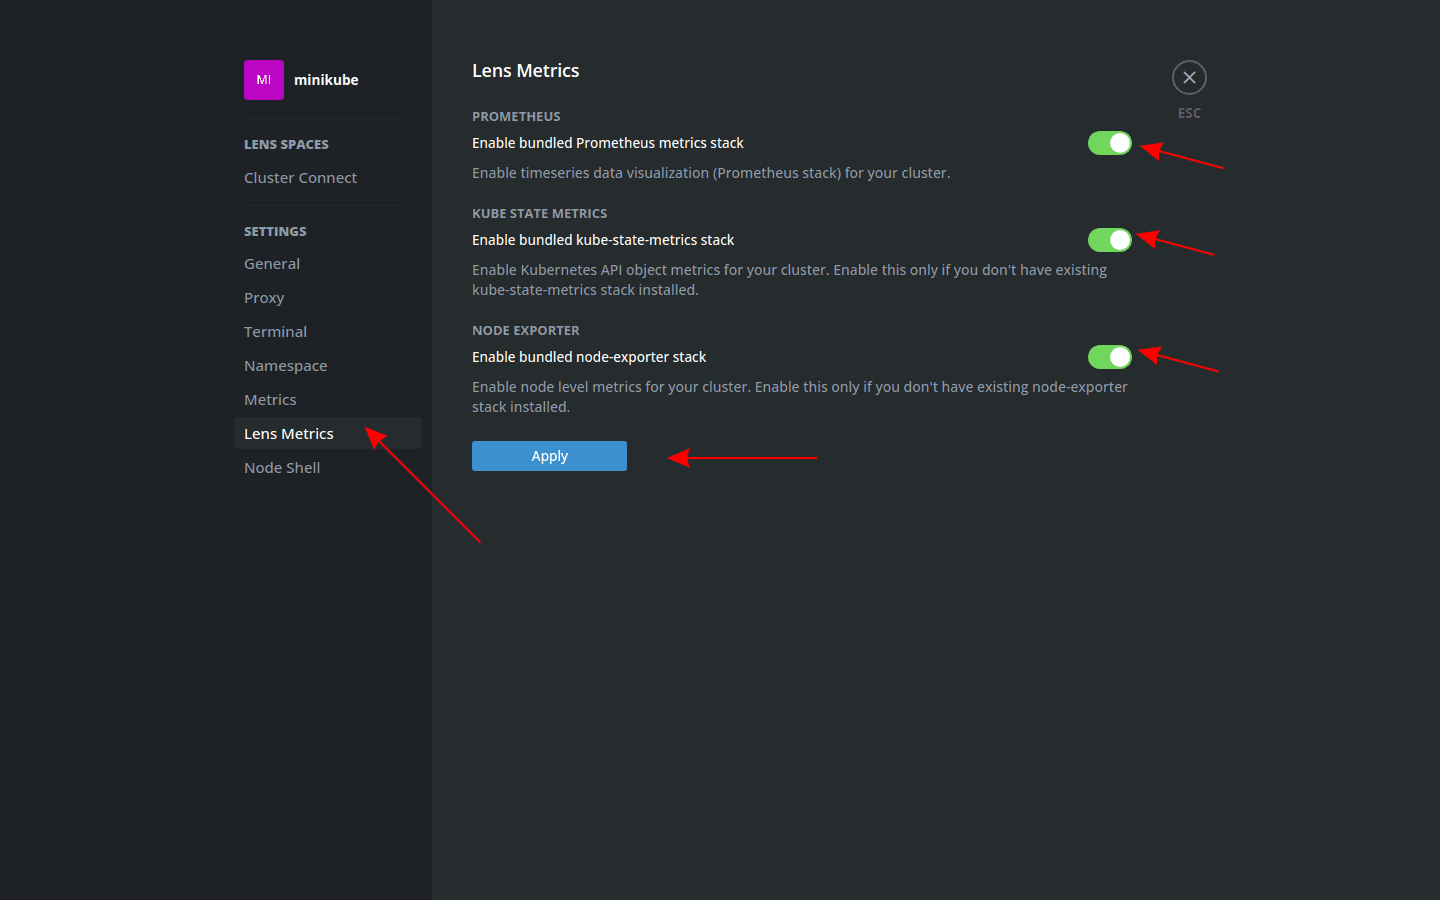
Click the “Apply” button to begin the deployment. Metrics may take several minutes to appear, as your cluster will need to start all the new components and then begin collecting data.
Managing cluster nodes
To see the Nodes in your cluster, click the Nodes link in the left sidebar.
In common with most other screens available in Lens, your Nodes will be displayed in a table that you can search, sort, and export to CSV. To take action against a Node—such as cordoning it, draining it, or opening a terminal shell—you can click the three dots menu to the right of the table.
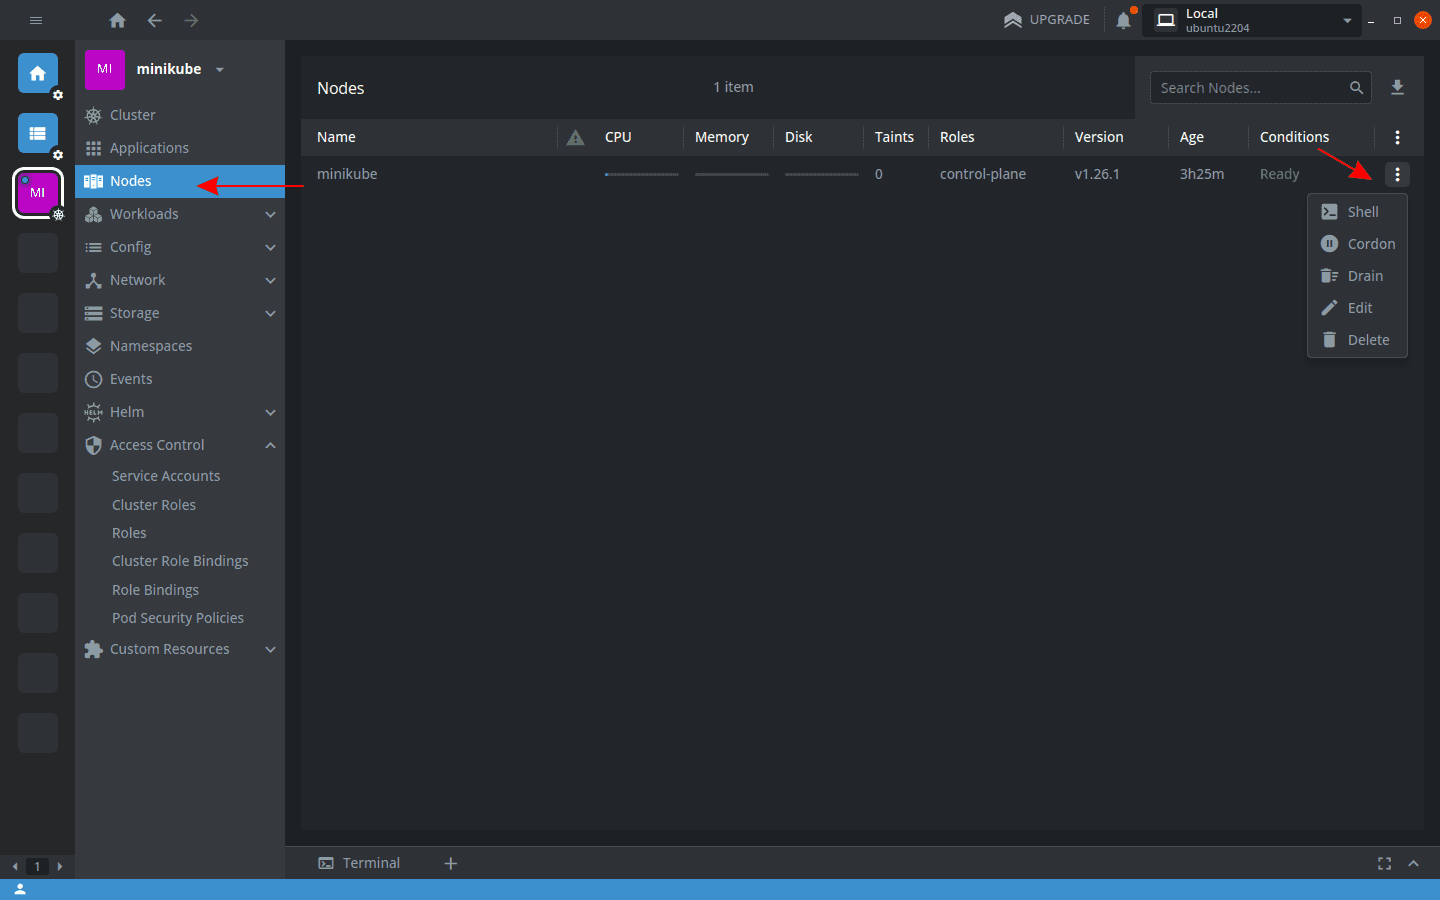
Selecting a Node in the table will display its details in an overlay panel. You can easily access resource utilization graphs and other information about the Node, such as its labels and annotations. Scrolling down reveals the list of Pods that are running on the Node.

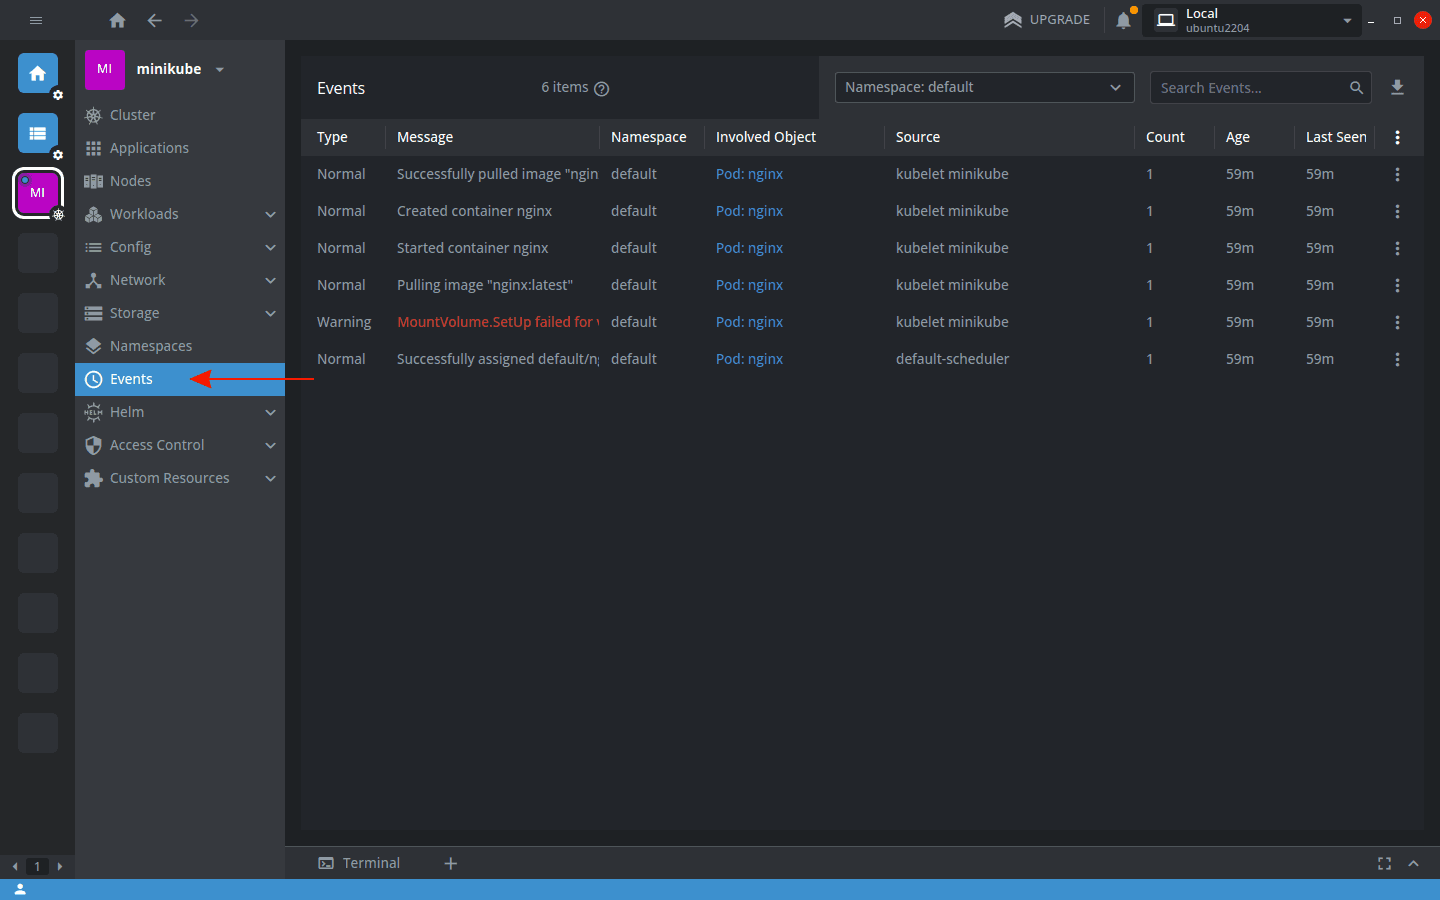
Monitoring Cluster Events
Kubernetes events are one of the main ways you can monitor and troubleshoot issues in your cluster. Error events such as “failed to pull image” need to be promptly addressed to ensure your workloads remain operational.
You can access your cluster’s event stream within Lens by clicking the Events link in the left sidebar. Lens will show the most recent 1,000 events in chronological order. You can filter the events by namespace using the dropdown at the top of the screen.
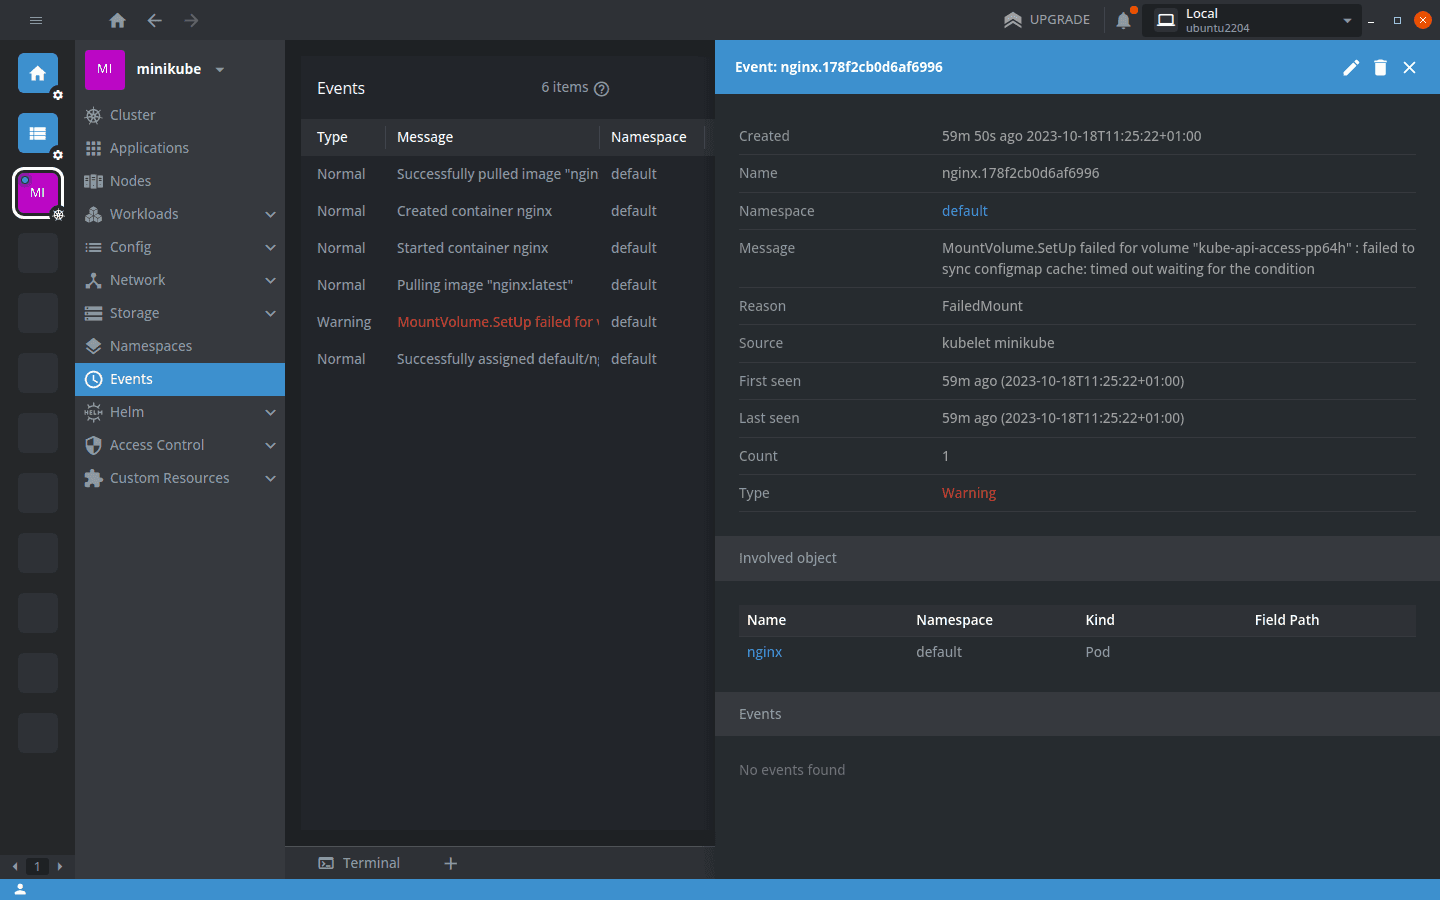
Clicking an event will display more information about it, including the full text of its message:
How to manage cluster workloads with Lens?
One of the most useful screens in Lens is the Workloads overview, accessed from the sidebar:
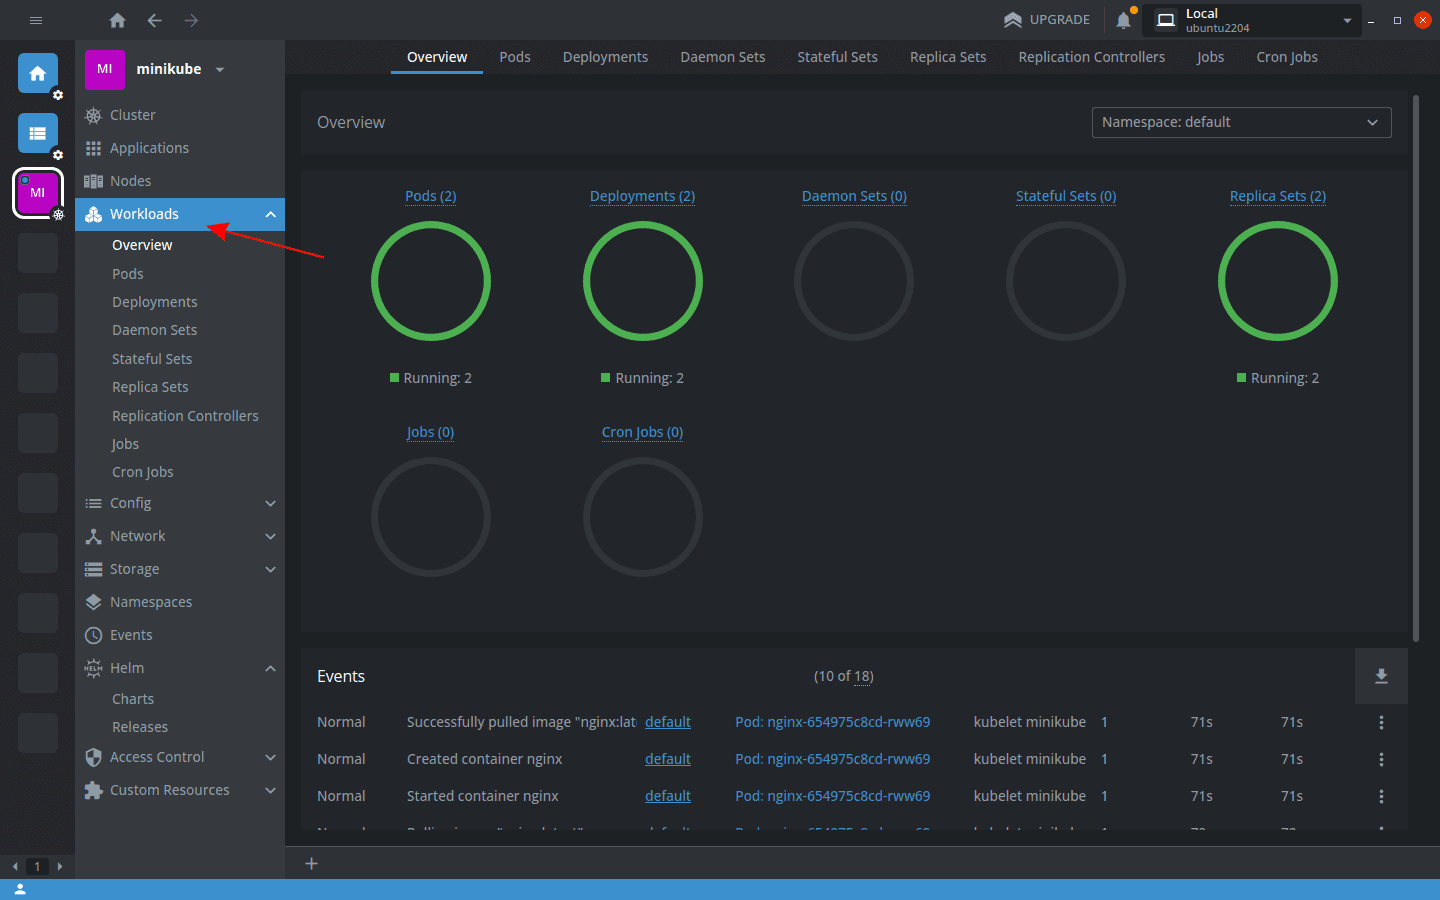
This gives you a graphical visualization of the resources running in your cluster. At the bottom of the screen, you can view the recent events that are associated with them.
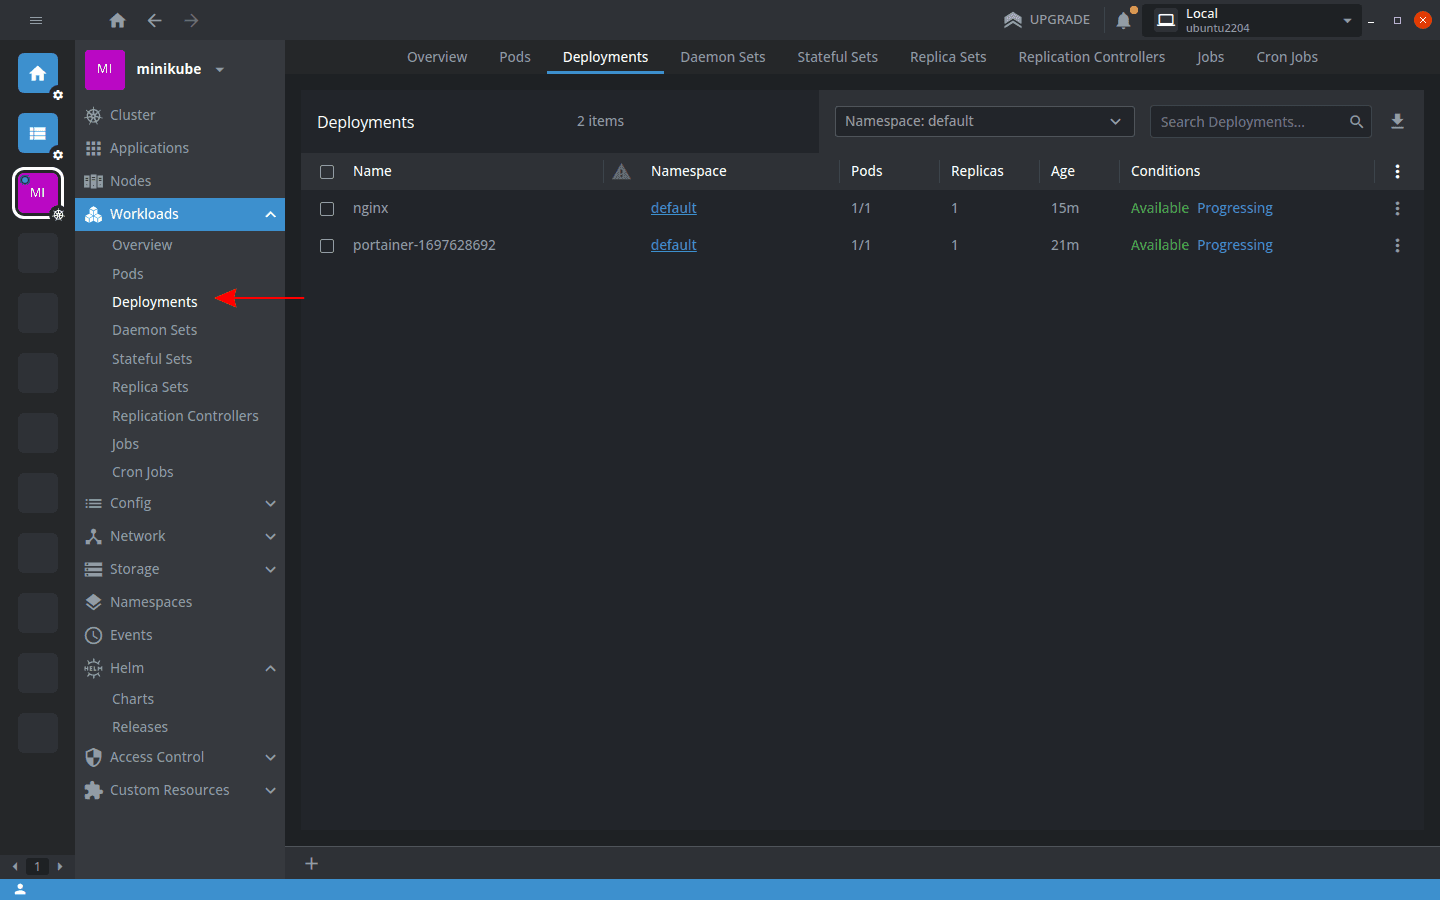
To view your actual resource objects, you can select links such as Pods and Deployments from the sidebar. These screens will display the relevant items in a table view.
Clicking a resource will display its details in one of the familiar overlay panels.
For example, choosing a Pod shows its metrics, properties, and containers; scrolling down reveals its volumes and events.
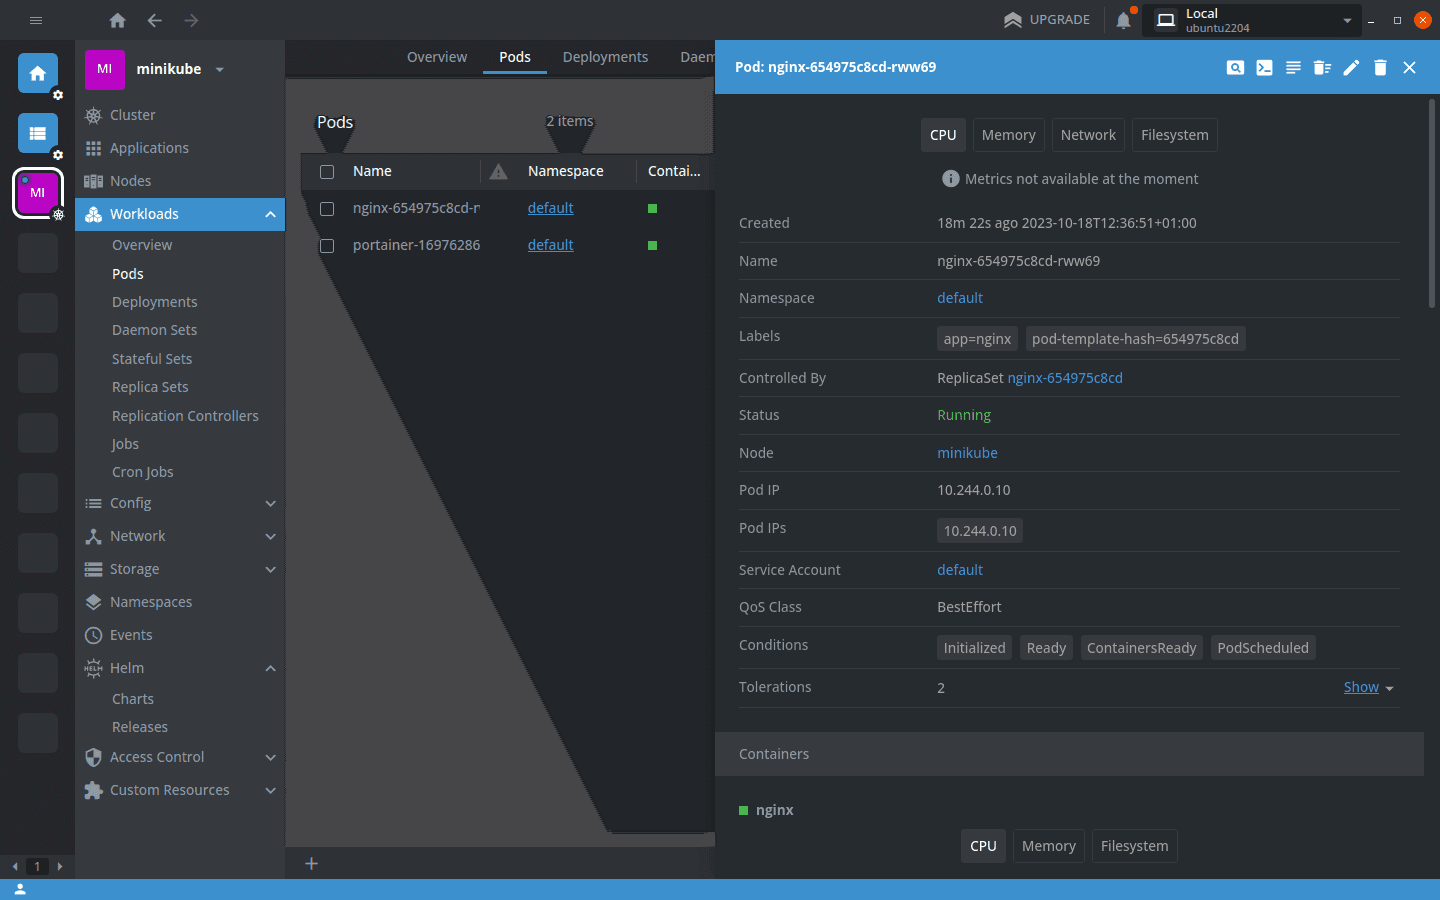
To view a Pod’s logs (or a Deployment’s logs), click the action button in the top-right of the panel (it’s the third one from the left). This will display the logs in a new tabbed pane at the bottom of the screen.
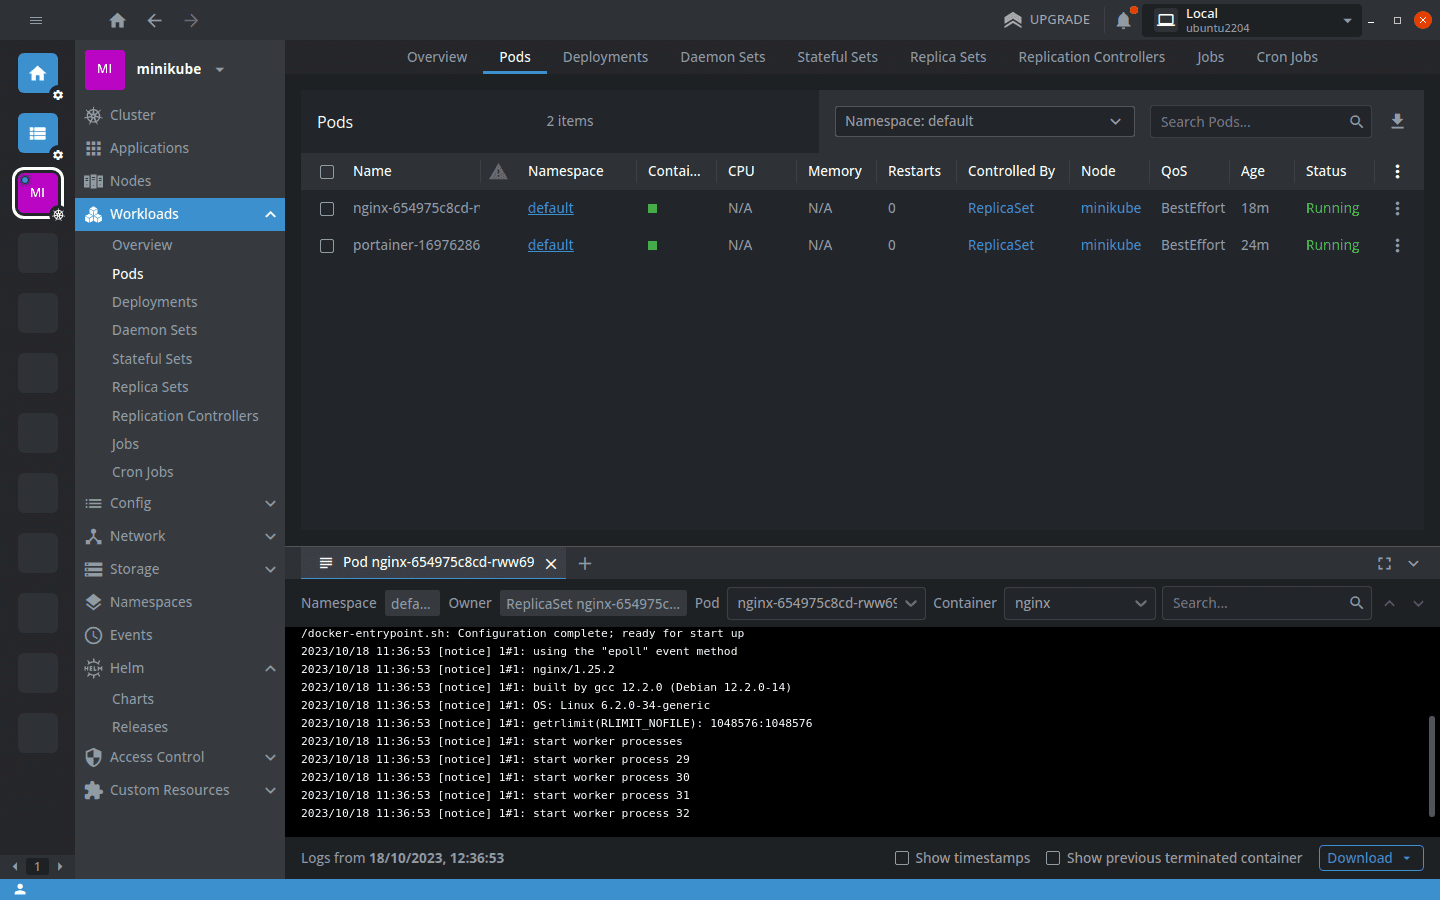
Similarly, you can open a shell in the Pod—or attach to its current foreground process—using the other action buttons in the overlay.
How to use Lens Apps with Helm charts?
Lens includes integration with Helm, the Kubernetes package manager.
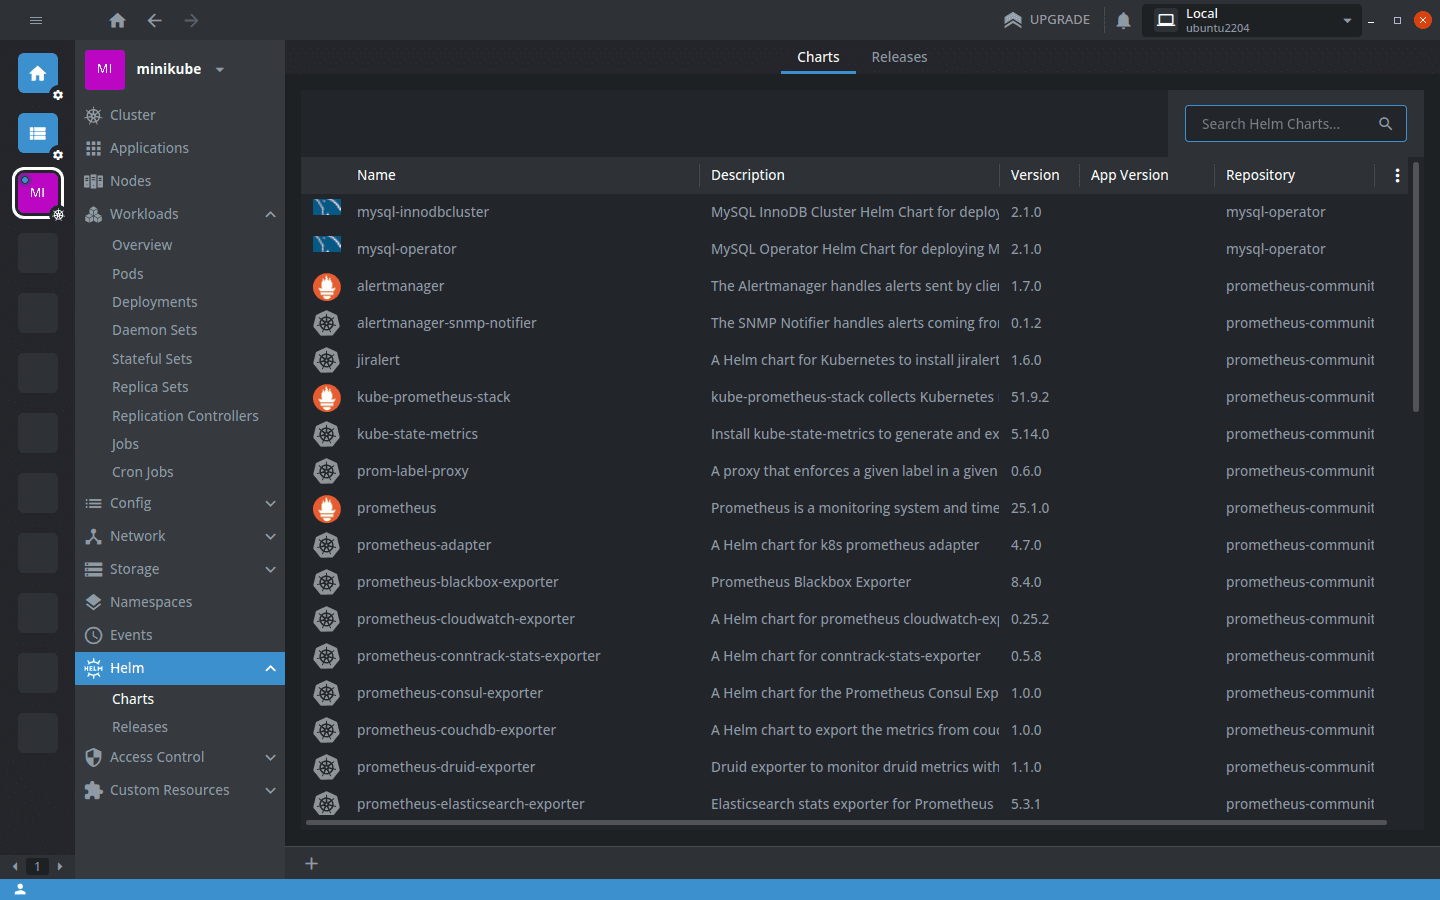
Clicking the Helm link in the Lens sidebar will show the charts you can install in your cluster, based on your current Helm repository list.
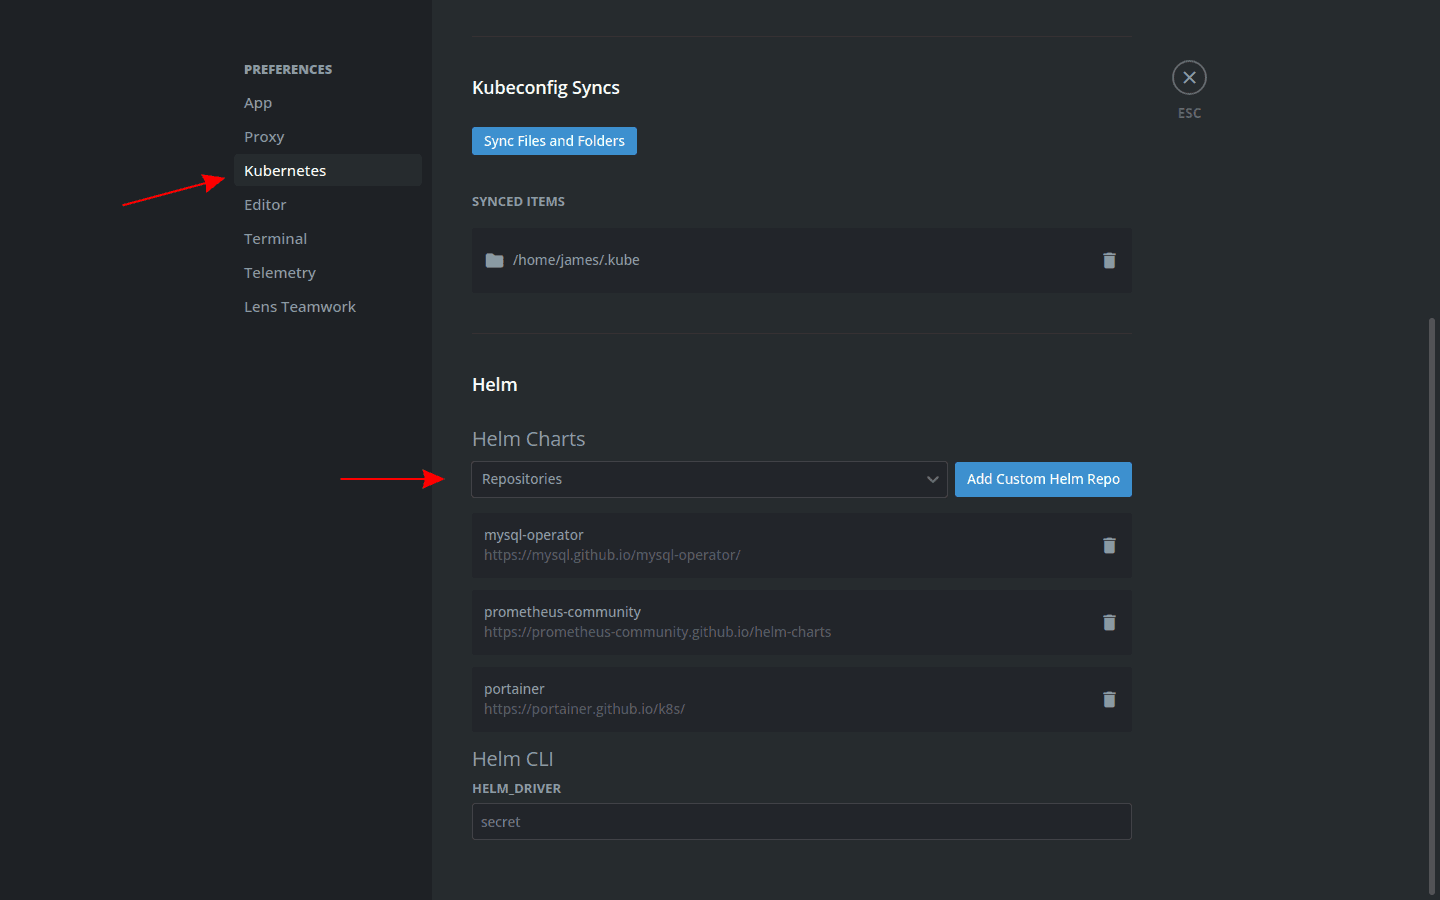
To register a new repository, open the app’s settings menu, then select “Kubernetes” from the sidebar and scroll down to the Helm Charts heading. Many known repositories are available to search from the dropdown, but you can also add a custom repository using a URL.
Once you’ve registered your chart’s repository, you can deploy the app by selecting the chart from the Helm > Charts screen.
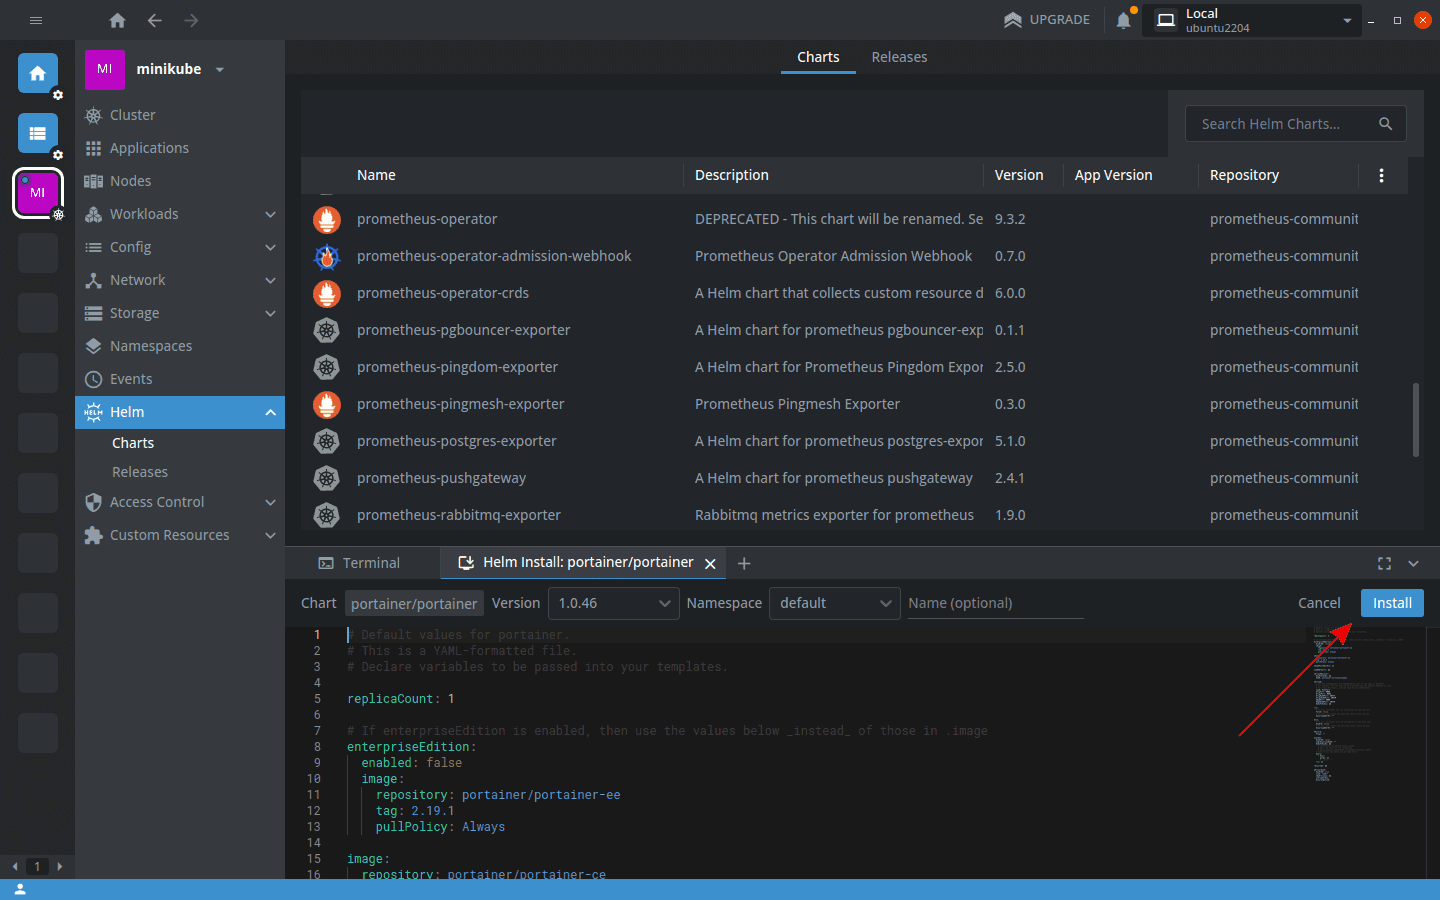
Click the blue “Install” button at the top-right of the overlay to install it into your cluster.

A terminal pane will appear that lets you customize the chart’s values.yml to configure the app. Click the “Install” button to confirm and begin the in-cluster installation.
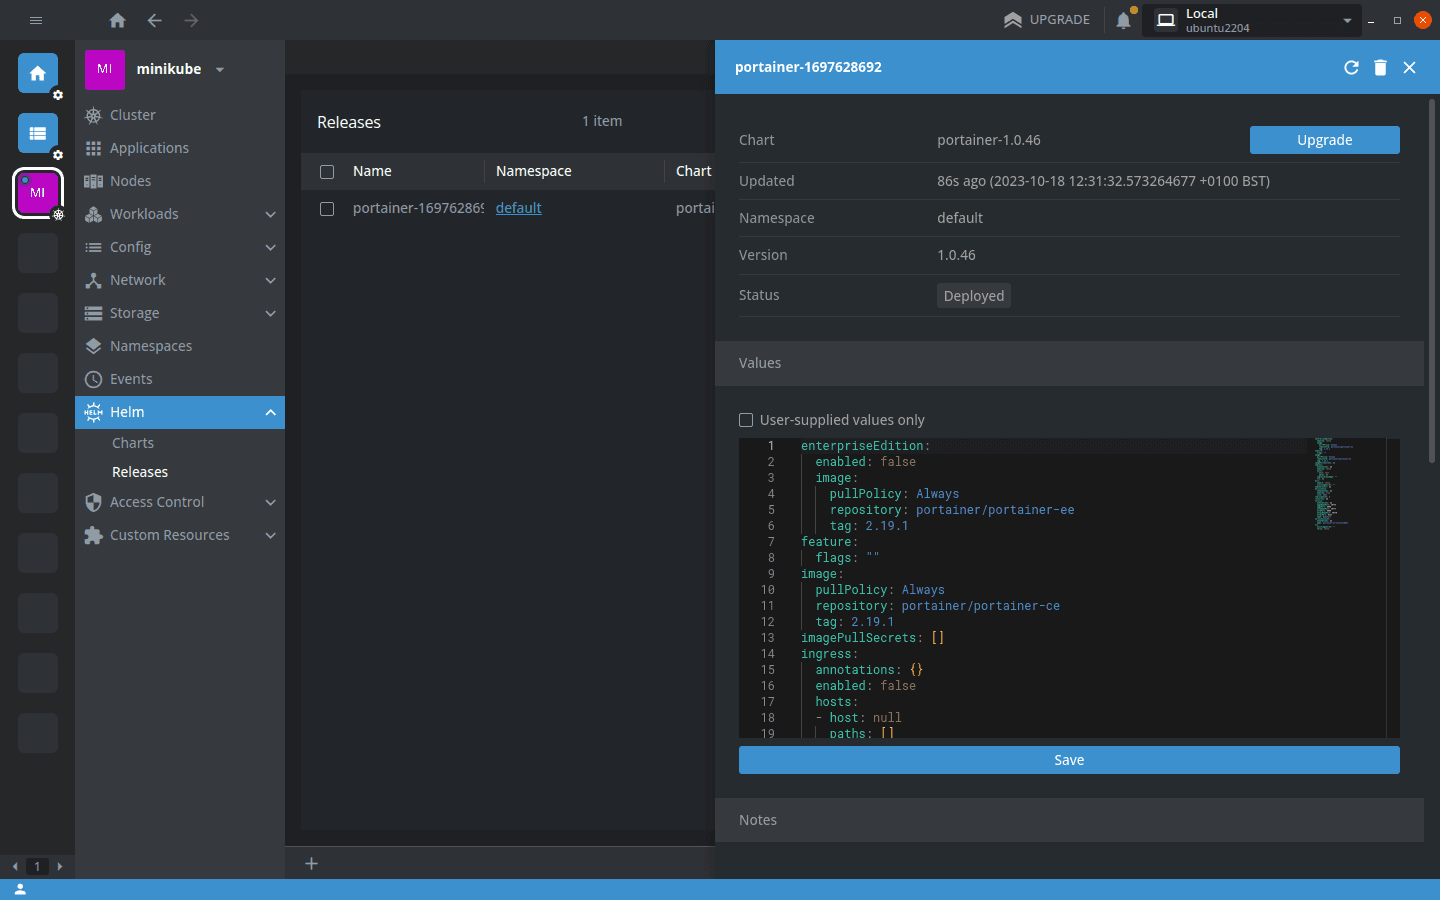
You can manage your deployed apps by heading to the Helm > Releases screen:
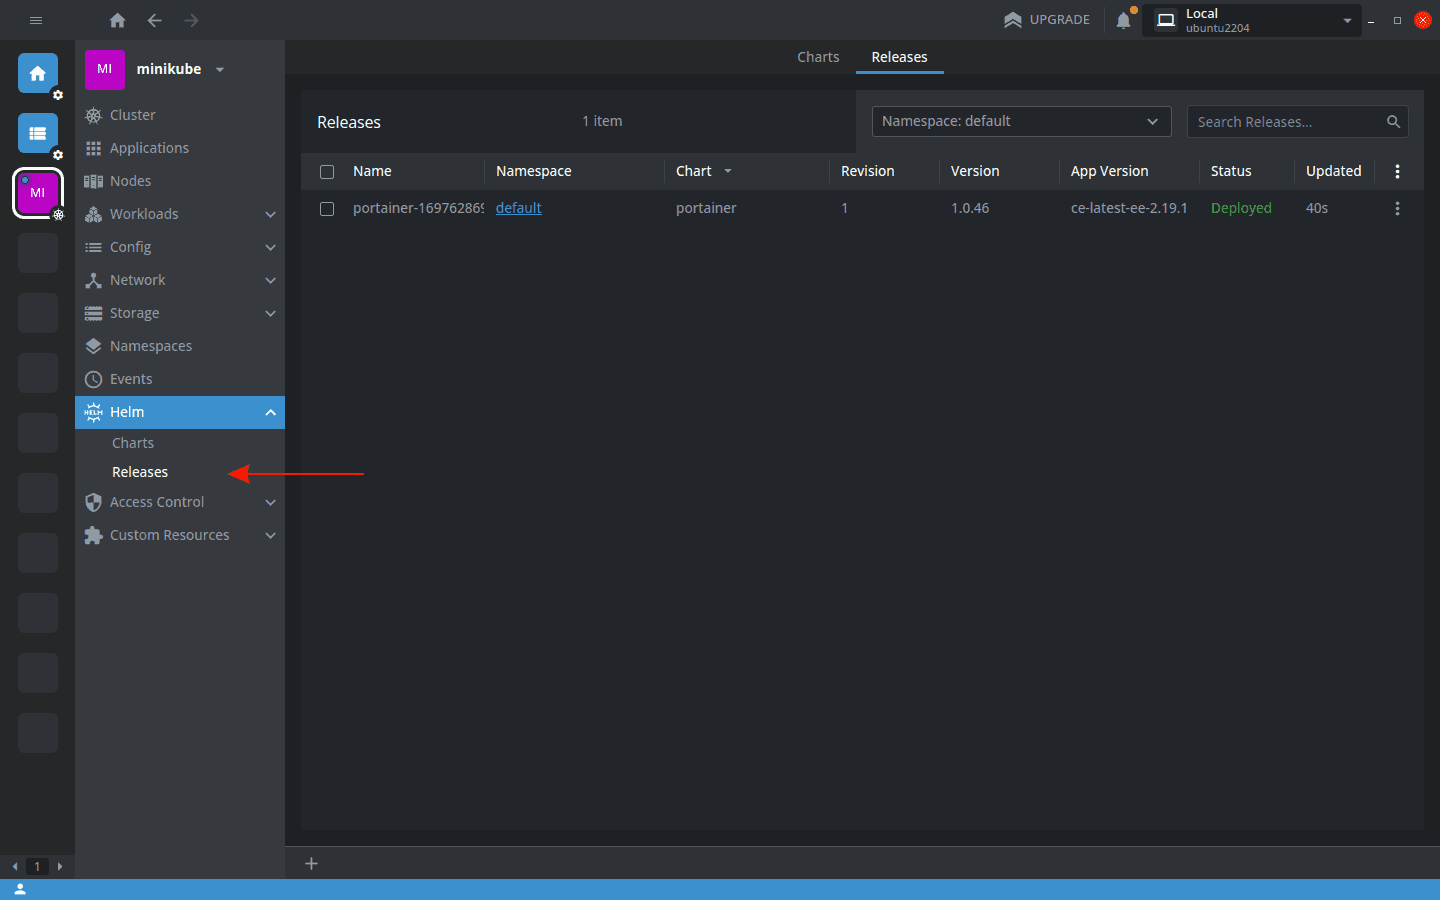
Clicking a release lets you view and modify the app’s configuration. You can also upgrade the deployment to the latest version of the Helm chart.
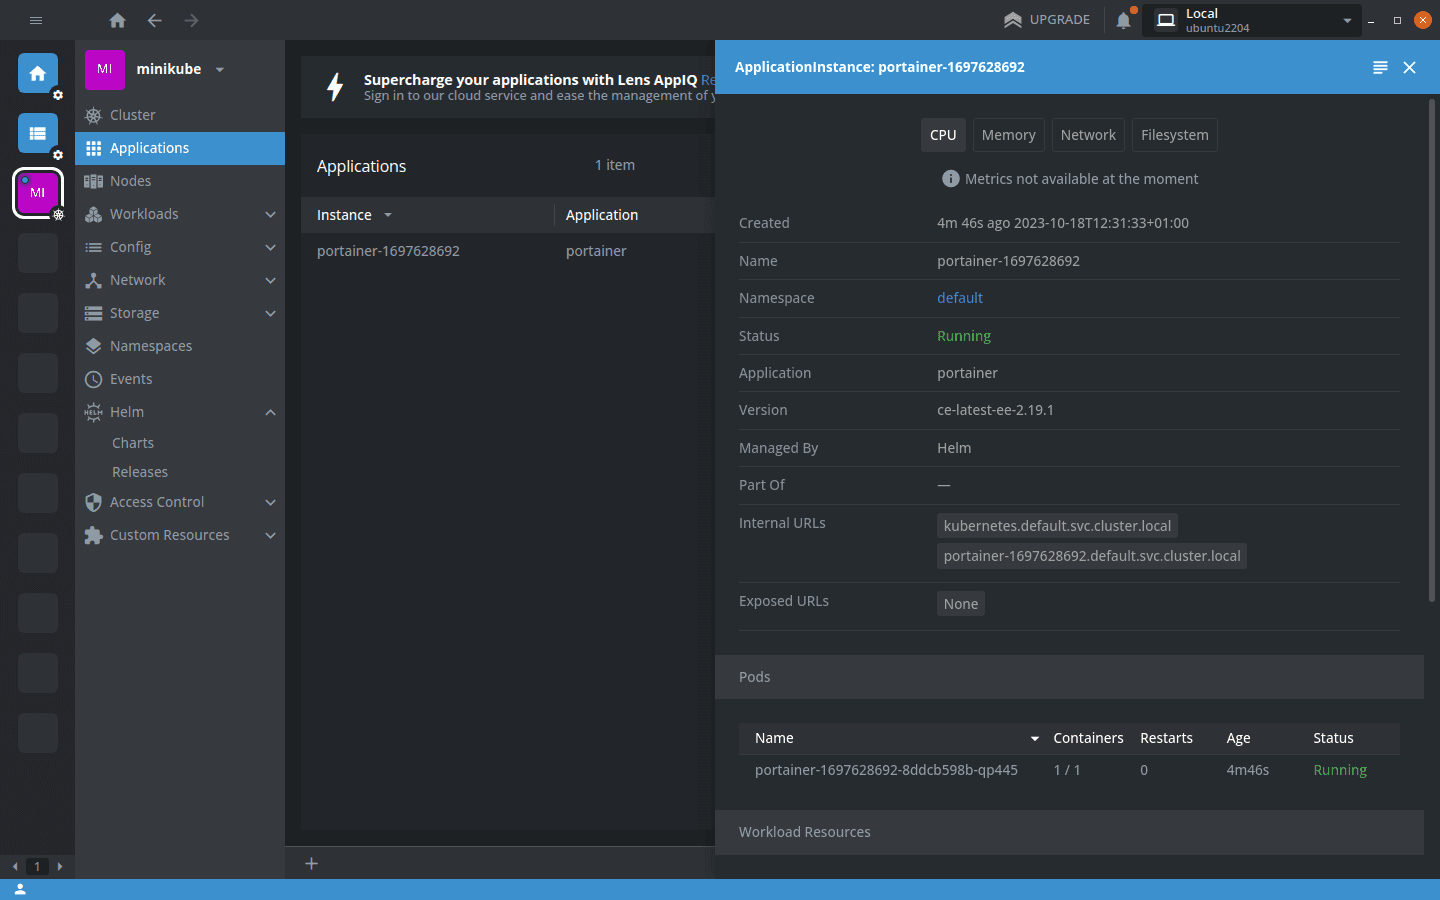
Finally, deployed charts additionally appear on the Applications screen:
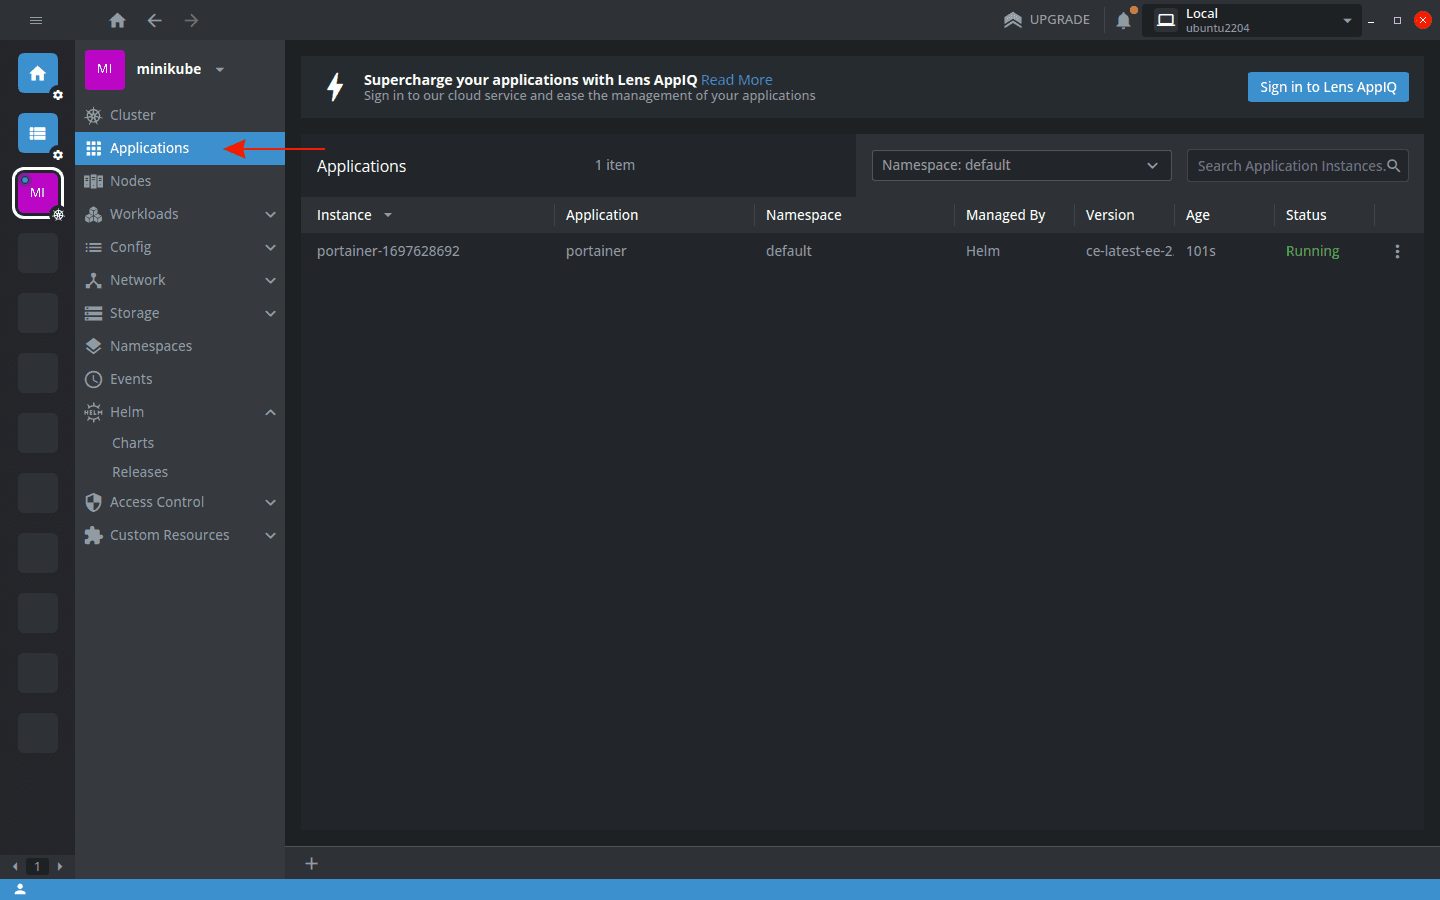
This screen gives you a high-level view of your deployments—you can directly access app logs, while clicking an app reveals a pane that displays current resource utilization metrics and the list of Kubernetes resources associated with the app.
What else can Lens do?
We’ve only scratched the surface of what Lens can do in this overview. Beyond the fundamentals of Kubernetes cluster management, Lens can be used to configure RBAC roles and bindings, inspect your cluster’s Custom Resources (CRDs), and perform security scans for vulnerabilities and misconfigurations.
In addition, Lens supports a suite of collaborative team features. Lens Spaces provide end-to-end encrypted communications that allow invited team members to securely access your clusters. Everyone in the team shares the same catalog, but you can restrict what each user can do by configuring Kubernetes RBAC. Lens also includes its own configuration policies that allow you to standardize how the tool is used in your organization.
Collectively, these capabilities mean Lens can be used in any Kubernetes scenario, whether you’re working as a solo developer or within a large organization.
Kubernetes Lens alternatives
Lens isn’t your only option when you’re seeking a graphical interface for Kubernetes. Here are five more choices to consider.
1. Kubernetes Dashboard
The official Kubernetes Dashboard remains one of the most popular options for visualizing cluster activity. Unlike Lens, it’s a web-based solution that must be deployed in your cluster. As the dashboard primarily targets troubleshooting workflows, it has relatively limited support for deploying and modifying resources.
2. Rancher
Rancher is a container management platform. Once you’ve deployed Rancher (either into Kubernetes, or externally), you can connect your clusters, then interact with them all using a single interface. Rancher includes app deployment, security, and access control capabilities.

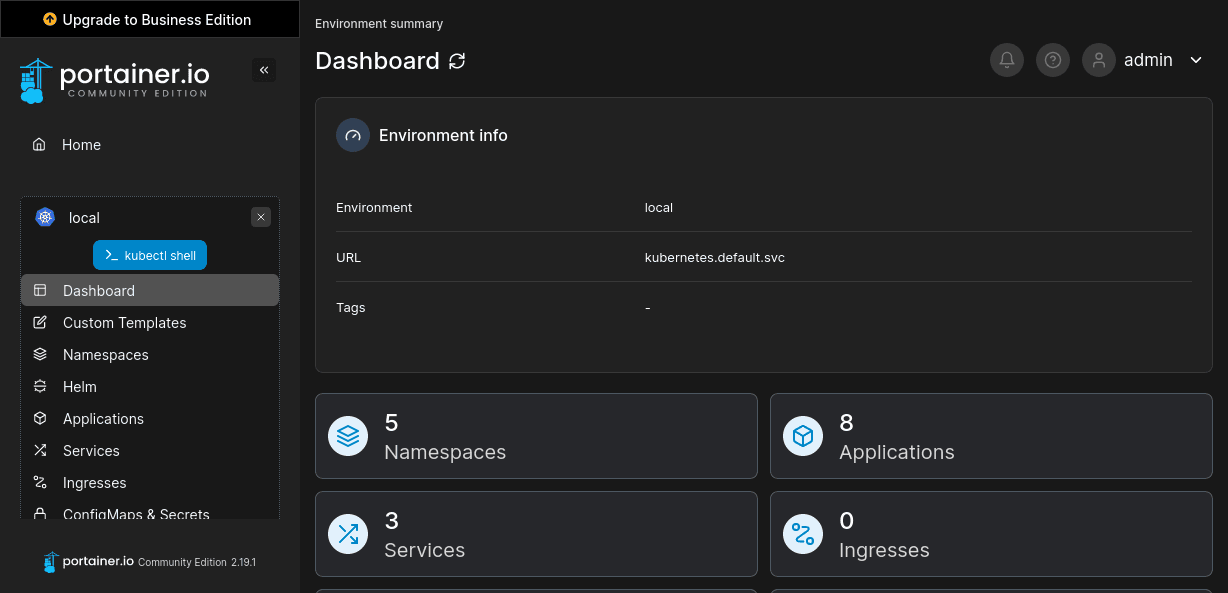
3. Portainer
Portainer is a Kubernetes management system that supports multi-cluster capabilities within a clean and intuitive interface. It’s a lighter alternative to Rancher that still supports external authentication, resource constraint controls, and automation via GitOps or the Portainer API.
4. Skooner
Skooner, previously known as k8dash, is a Kubernetes dashboard and management solution designed to facilitate full cluster administration. It also offers real-time metrics visualizations within an auto-updating UI that works equally well on desktop or mobile. It lies between Kubernetes Dashboard and Lens in terms of simplicity and capability.
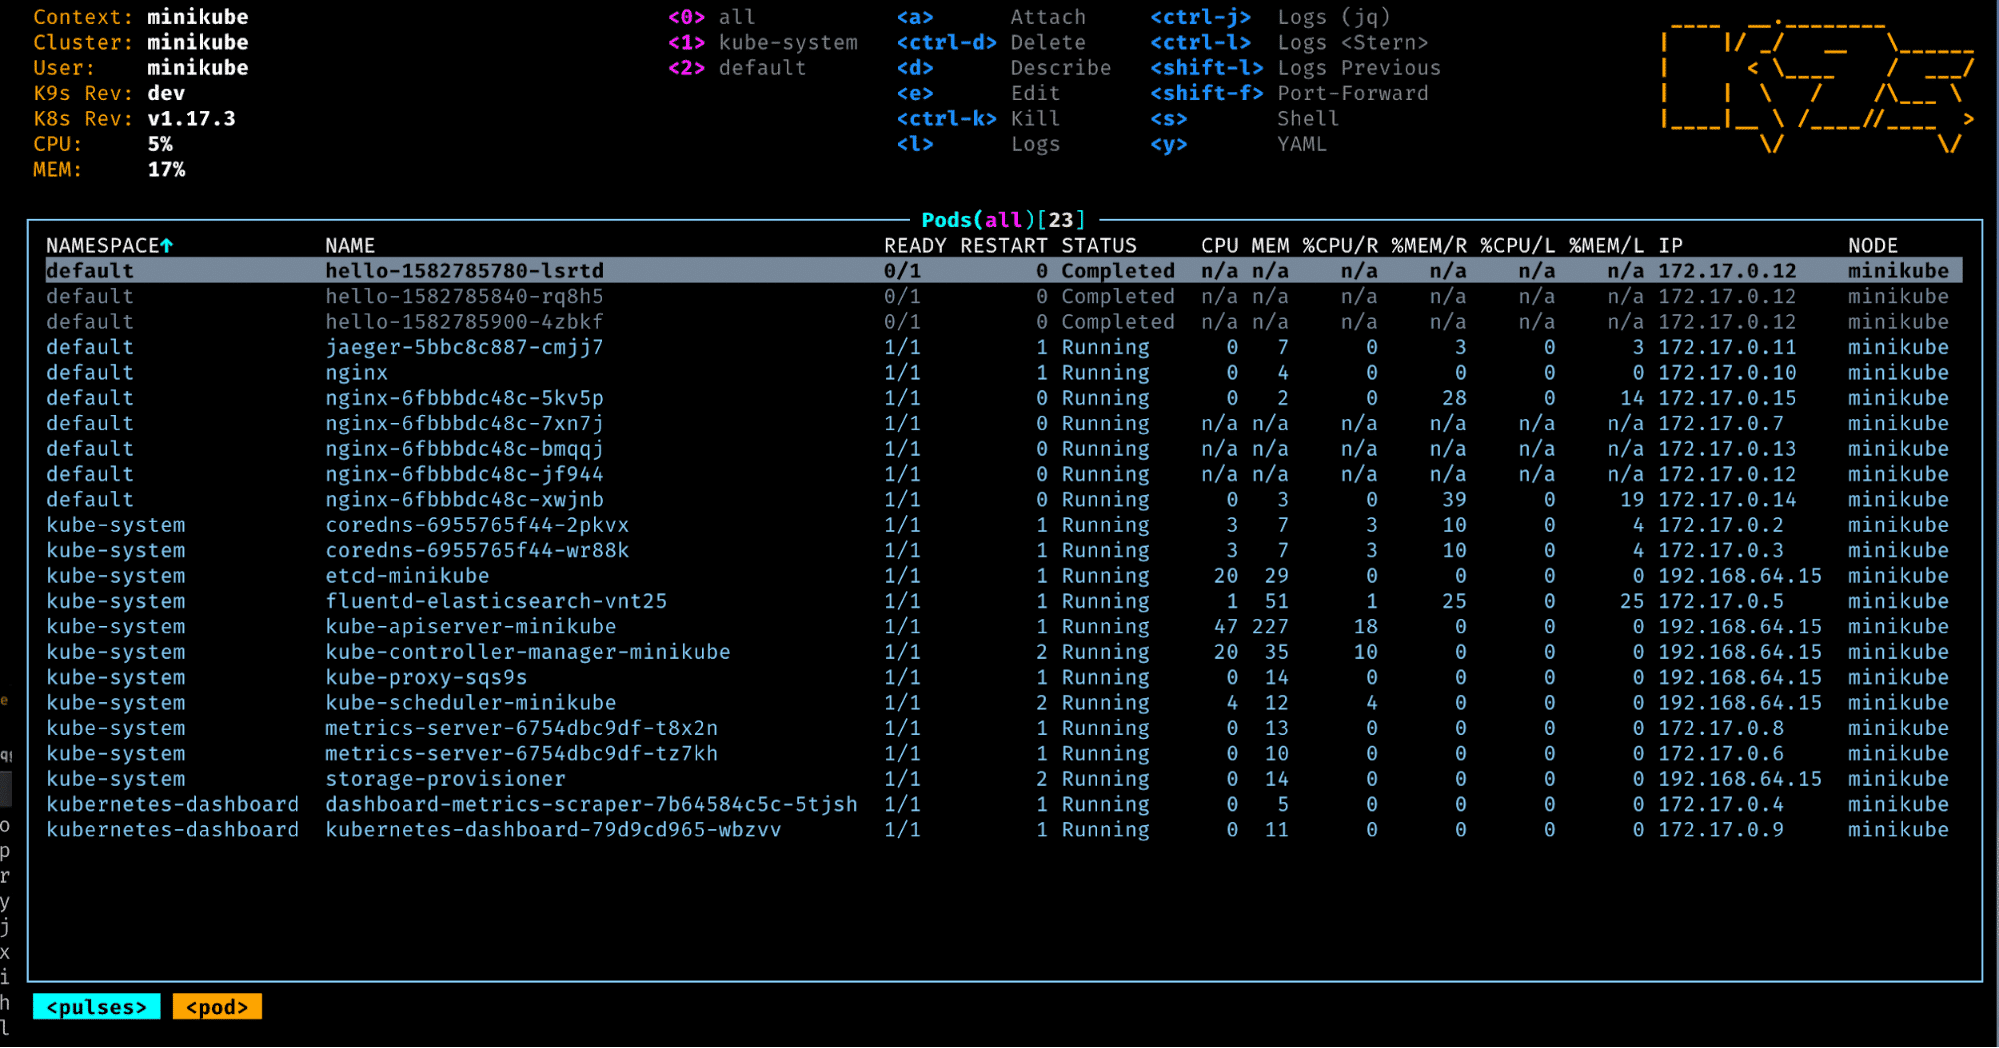
5. K9s
K9s is a bit different to any of the other options. It’s a graphical Kubernetes interface that runs in your terminal. K9s is a good option for power users who prefer terminal interactions, but want a highly visual view of their Kubernetes clusters. It connects to clusters using existing Kubeconfig files.
Key points
We’ve explored Lens, a Kubernetes IDE that’s designed to improve the productivity and efficiency of cluster operators and developers. You can use Lens to monitor and manage your Kubernetes environments from within one powerful interface. If you’re frustrated with the Kubernetes CLI experience, trying out Lens could make your cluster administration quicker and easier.
Lens is particularly useful for monitoring, visualization, and developer access scenarios. You should avoid using Lens to manually deploy your production workloads because these tasks are best automated as part of a CI/CD pipeline. Using CI/CD improves consistency, allows you to enforce deployment guardrails, and prevents your configuration from drifting over time. Lens can’t help you provision or modify your clusters at the cloud provider level, either—for that, you can try an IaC management platform like Spacelift that uses CI/CD to automate cloud infrastructure operations, including Kubernetes cluster creation. To discover how Spacelift can help you with your infrastructure, book a demo with one of our engineers.
Manage Kubernetes Easier and Faster
Spacelift allows you to automate, audit, secure, and continuously deliver your infrastructure. It helps overcome common state management issues and adds several must-have features for infrastructure management.
Frequently asked questions
What is the difference between the Kubernetes Dashboard and Lens?
The Kubernetes Dashboard is a lightweight, web-based UI for basic cluster management, while Lens is a full-featured desktop application designed for advanced multi-cluster operations.
Does Lens use kubectl?
Yes, Lens uses kubectl under the hood to communicate with Kubernetes clusters.
Lens provides a graphical interface but relies on the local kubectl binary and the user’s kubeconfig for authentication and cluster access. When you interact with resources in Lens, it runs the equivalent kubectl commands in the background. If kubectl is not installed, Lens may bundle a compatible version, but it still executes cluster operations through that binary.
