
In previous articles, we discussed why generic CI/CD tools are not the best choice for managing infrastructure as code (IaC) or Terraform. These tools are very powerful and proper use of them will improve the delivery process, but infrastructure has specific requirements in terms of provisioning and management.
You can use anything from configuration management tools like Ansible to different kinds of software development kits (SDKs) to manage different parts of your infrastructure, but IaC is the only way to control large, sophisticated infrastructure properly and effectively.
In this post, we create an infrastructure pipeline with GitHub Actions. We build a full process, with pull request integration and delivery to AWS. In the process, we learn the best practices for building pipelines and the caveats and limitations you will encounter.
Note: The specific approach we outline is not the only way to design CI/CD pipelines. Your organization’s pipelines should align with your goals, tools, experience, and so on. You can find more about designing CI/CD for your organization on this page.
We will cover:
- What is GitHub Actions?
- Why did GitHub Actions become so popular?
- How to manage IaC with GitHub Actions
- Define pipeline for Pull Requests
- Advantages of using GitHub Actions to manage IaC
- Limitations of managing IaC with GitHub Actions
- Do I recommend using GitHub Actions for IaC?
- Why use Spacelift instead of generic CI/CD tools?
- Download the pipeline source code
What is GitHub Actions?
GitHub enables users to run CI/CD pipelines through a deeply integrated process, called GitHub Actions. The configuration of pipelines is integrated with code repositories and needs to be placed under a dedicated path. GitHub Actions allows you to create pipelines for multiple purposes, configure triggers, etc. This tool has all the functionality of standalone (or SaaS) CI/CD tools.
GitHub Actions are constructed with Actions. An Action is a single unit, which runs specific executions, for example configure credentials, install Terraform, run tests, and so on.
You can search for Actions created by others on the GitHub Marketplace. We will use some of these in our examples later. You can also prepare your own Actions, store them, and version them in GitHub repositories.
Check out our GitHub Actions tutorial.
Why did GitHub Actions become so popular?
As a tightly integrated CI/CD tool, it makes sense that GitHub is widely leveraged and adopted. That deep integration delivers several benefits:
- Pipeline as code. Although even Jenkins allows us to use a pipeline-as-code approach, having CI/CD deeply integrated with the repository and executing it from the code delivers the full transparency, control, and audit function of the pipelines.
- Pipelines live with code. This gives developers a very easy way to control the pipeline’s build.
- Seamless integration. No external triggers are needed, so we eliminate potential points of failure.
How to manage IaC with GitHub Actions
It is time to get coding! We don’t need to configure anything special. If we want to run GitHub Actions, we just create a folder in our repository.
If you use Linux, simply execute this command in the repository’s root directory:
$ mkdir -p .github/workflows
Note, there is no specific convention for workflow names.
Before we go into pipelines, let’s understand how the workflows, Actions, and other elements work together.
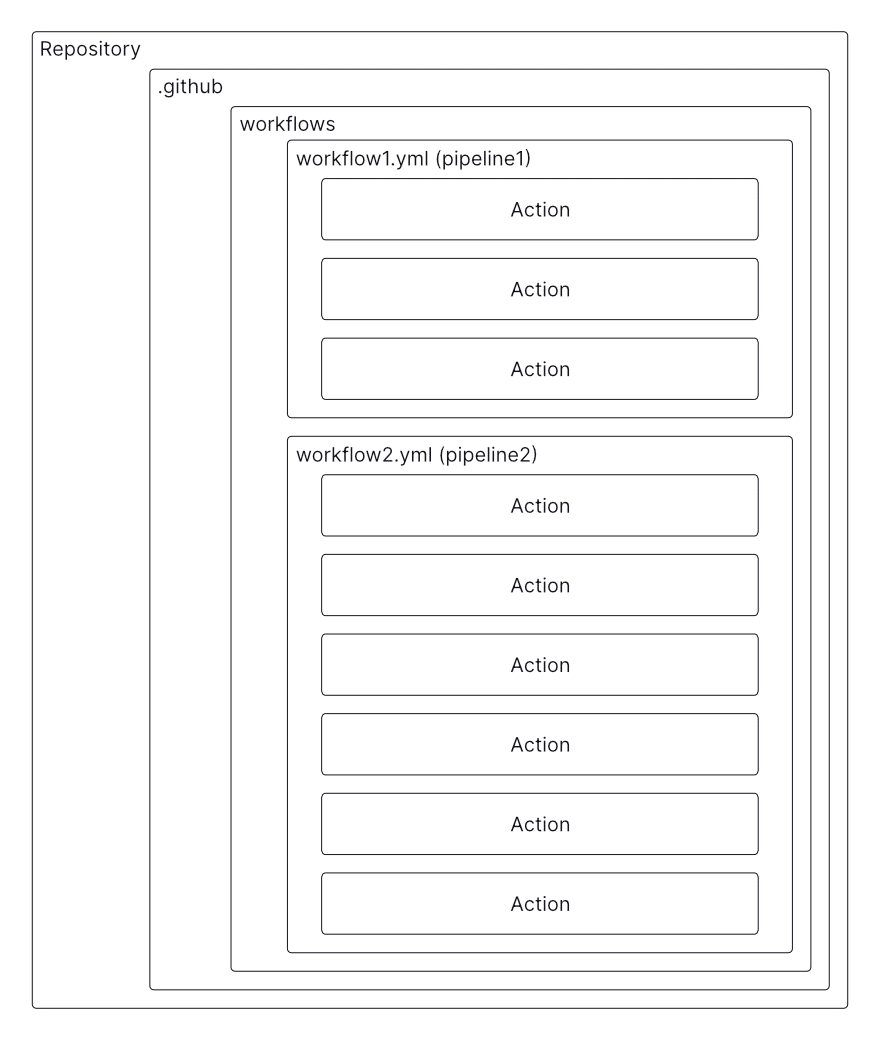
As the image shows, any number of pipelines — GitHub calls them workflows — can be created under the workflows directory. Every workflow is essentially built from a block – Actions. GHA uses yaml to create workflows.
In the first part of this exercise we will create a delivery pipeline, just as we discussed in this article.
To recap how the pipeline is constructed, please take a look at the diagram below:
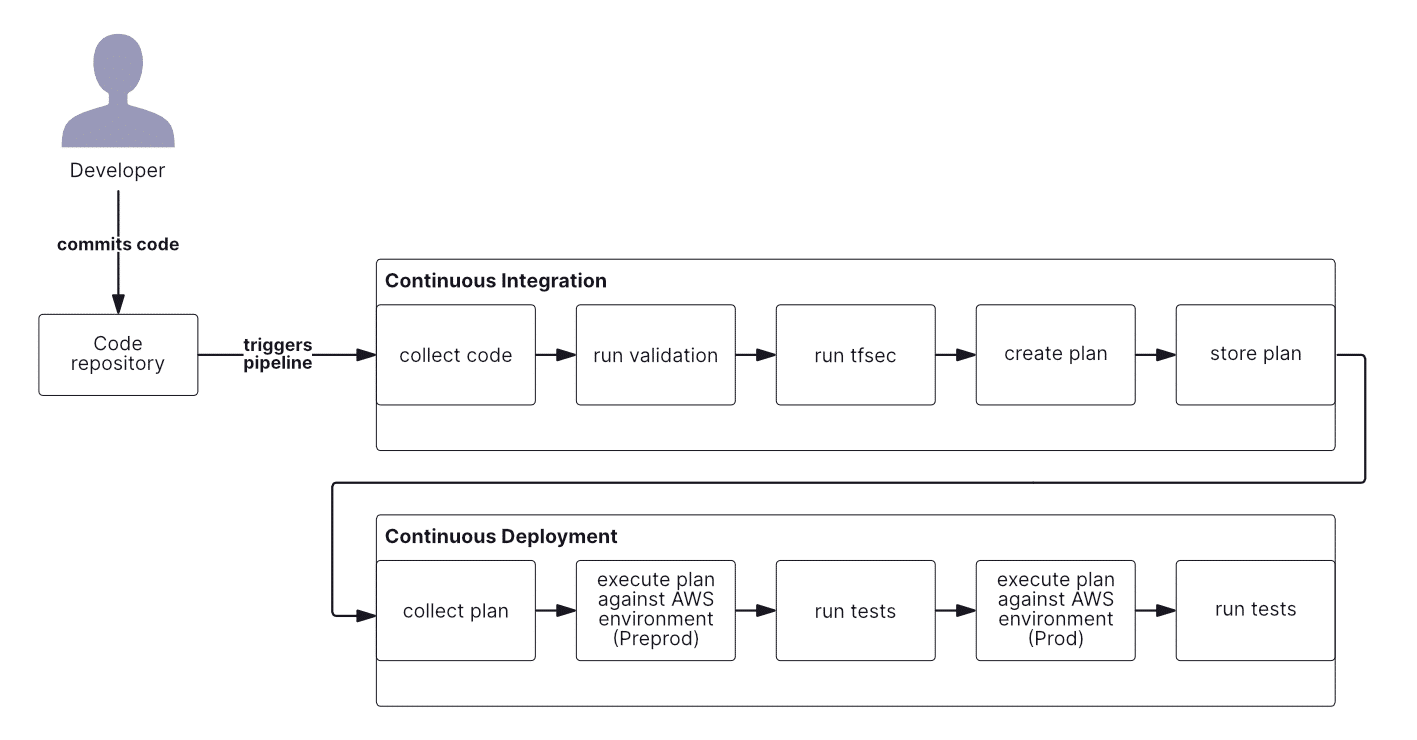
As I mentioned earlier, the design of your CI/CD pipeline depends on the use case, branching strategy, deployment strategy, testing strategies, and many other factors. Our example centers on a simple pipeline, which is executed from the main branch only and is split into two parts.
The first is continuous integration (CI), where we:
- Collect code
- Execute SAST test (tfsec) and also validate template
- Create artifact (plan file)
- Store artifact
And the second is continuous delivery (CD):
- Collect artifact
- Execute it against environments
- Perform tests
I won’t go deep with test scenarios, so we will implement a dummy test to show how it can be done later.
Design the pipeline for deployments
Let’s create a file called deploypipeline.yml. This will be the pipeline triggered from master only.
name: Example pipeline. GitHub Actions to AWS

on:
  push:
    branches:
      - main
    paths-ignore:
      - "README.md"
We see two declarations here.
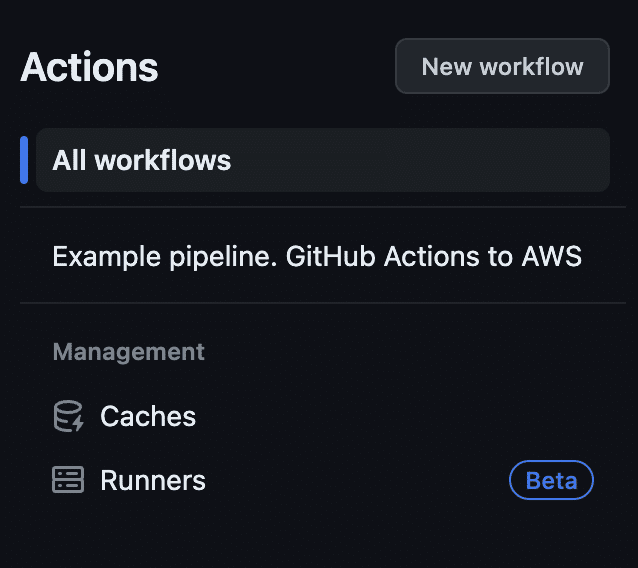
Name is simple; this is the name of the workflow, which will be visible in the summary view of all your actions, as in the screenshot below.
Second declaration is on. This is a very important configuration element, as it creates a trigger, or the conditions based on which the pipeline will be executed.
In the example above, we use push as trigger. It means that any push to the repository (merge is also a push) will execute the pipeline. We could keep this configuration, but in the real world it might be problematic. We want deployment to be completed from a single source of truth, not all branches in the repo.
This is why we limit the trigger to:
 branches:
      - main
Additionally, I do not want to run the pipeline after the README file update; I used paths-ignore to ignore push only if README was changed.
The diagram above shows that the plan will be generated to the file and stored. I want to be able to achieve a few things here:
- Distinguish between CI and CD parts.
- Come back and audit the plan file.
- Easily identify the artifact with exact run and further – with commit.
For these reasons, I created the env variables.
env:
  preprod_artifact_name: preprod_tfplan-${{ github.ref_name }}-${{ github.run_id }}-${{ github.run_attempt }}
  prod_artifact_name: prod_tfplan-${{ github.ref_name }}-${{ github.run_id }}-${{ github.run_attempt }}
I used some context information. In GitHub Actions, context is a way to access data related to the run. For example github.run_id will collect information about runtime ID.
Why is it so important to have two different artifacts?
In pipelines where we deploy applications, best practice is to “promote” the artifact, which means we create the artifact once, in the CI part of the pipeline. We then reuse this artifact for all environments where we deploy our application. The application code must be written so that all configurations will be injected into the application during runtime, which is why we separate the business logic of the application from its environment’s configuration.
In our example, we cannot do this. We need to inform Terraform (as this is what we use to deploy our infrastructure) which configuration needs to be applied. This means that each environment has its own backend (remote state file and locking mechanism) and configuration (for example naming convention, size of the instances, etc.). Ultimately, when you are dealing with multiple environments, you need a specific artifact for each one.
The final part of the workload we need to define is its structure.
jobs:
  Validation:
    name: Validate the template
    runs-on: ubuntu-latest
    steps:

  Test:
    name: Test the template
    runs-on: ubuntu-latest
    steps:

  BuildPreprod:
    name: Build the plan file
    needs: [Validation, Test]
    runs-on: ubuntu-latest
    steps:

  BuildProd:
    name: Build the plan file for Prod
    needs: [Validation, Test]
    runs-on: ubuntu-latest
    steps:

  DeployPreprod:
    name: TF apply on Preprod AWS account
    runs-on: ubuntu-latest
    needs: [BuildPreprod]
    steps:

  TestPreprod:
    name: Check Preprod
    runs-on: ubuntu-latest
    needs: [DeployPreprod]
    steps:

  Approval:
    name: Approval
    runs-on: ubuntu-latest
    needs: [BuildProd, TestPreprod]
    steps:

  DeployProd:
    name: TF apply on Prod AWS account
    runs-on: ubuntu-latest
    needs: [Approval]
    steps:

  TestProd:
    name: Check Prod
    runs-on: ubuntu-latest
    needs: [DeployProd]
    steps:
This code creates the skeleton of the pipeline, which will be executed in the same order as in the diagram below.

The blocks represent stages (“jobs” in the GHA naming convention). Each stage is a separated “container”, which means that actions from one stage don’t directly influence the next stage. The issue with GitHub Actions is that if you want to create a pipeline, rather than a simultaneous execution of all jobs, you have to use needs: This statement positions the job in the pipeline.
As each job is a separate container, we need to define what kind of container will be started for the job:
runs-on: ubuntu-latestThis way we inform the workload what to use to execute our steps.
We have reached the final element — steps.
Steps are single executions of encapsulated functionality. For example, install Terraform, run plan, and so on. Steps can be identified as a single Action. Actions can be copied from GitHub Marketplace, which has thousands of them.
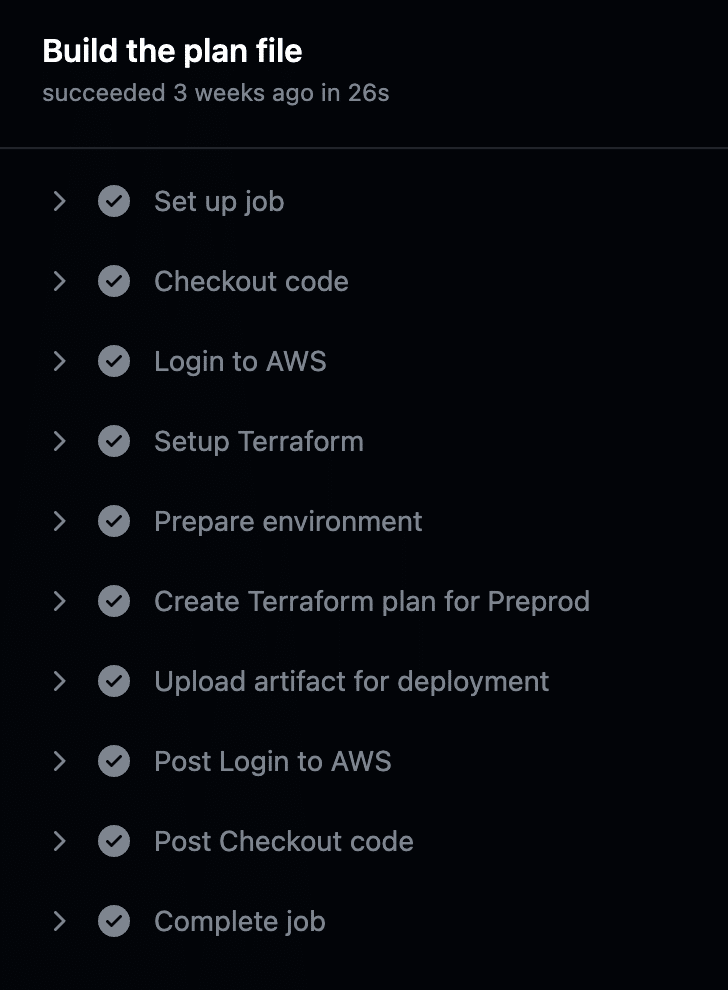
To shorten this tutorial, let’s take a look at one job only.
 BuildPreprod:
    name: Build the plan file
    needs: [Validation, Test]
    runs-on: ubuntu-latest
    permissions:
      id-token: write
      contents: read
    steps:
      - name: Checkout code
        uses: actions/checkout@v2
      - name: Login to AWS
        uses: aws-actions/configure-aws-credentials@v1
        with:
          role-to-assume: ${{ secrets.AWS_CA_ASSUME_ROLE }}
          role-session-name: GitHubActionsSession
          aws-region: eu-central-1
      - name: Setup Terraform
        uses: hashicorp/setup-terraform@v2
        with:
          terraform_version: 1.5.4
      - name: Prepare environment
        run: |
          terraform init -backend-config="environments/preprod_backend.hcl"
      - name: Create Terraform plan for Preprod
        run: terraform plan -var-file="environments/preprod.tfvars" -out ${{ env.preprod_artifact_name }}
      - name: Upload artifact for deployment
        uses: actions/upload-artifact@v3
        with:
          name: preprod-execution-plan
          path: ${{ env.preprod_artifact_name }}
Steps (Actions) are defined by uses: or run: statements. What is the difference?
uses:calls the specific Action, for example:actions/upload-artifact@v3run:is an equivalent of command line, where we can run commands, for example:run: terraform plan
Now we can easily see that this job has 6 Actions. When executed, this job will resemble the image below:
Each Action has its own configuration, which can be found in the Action’s documentation. We will look at two steps, one action, and one run.
 name: Setup Terraform
        uses: hashicorp/setup-terraform@v2
        with:
          terraform_version: 1.5.4
…
      - name: Create Terraform plan for Preprod
        run: terraform plan -var-file="environments/preprod.tfvars" -out ${{ env.preprod_artifact_name }}
The first step uses an action called setup-terraform, which is authored by HashiCorp. I’m using version 2 of this action here.
Statement with: allows me to provide some configuration parameters; in this case, I will use Terraform in version 1.5.4.
The second step is a run: commands. In this command, I execute terraform plan and send the output of it to the file, which I defined earlier as variable. I access this variable by using ${{ env.preprod_artifact_name }}.
The last element we should be aware of is the section for permissions:
permissions:
      id-token: write
      contents: read
Permissions can be passed to the job (as in our case here), to the whole workflow, or to a single step. This setting allows us to control how the workflow interacts with GitHub. In the example above, we gave read access to commit history and fetch an OpenID Connect token.
The code of the whole pipeline can be found in this repository.
Manage the Terraform state file in the pipeline
It is best practice to use a remote backend to store state file and lock database. The issue is that GitHub Action (and every other generic CI/CD tool) doesn’t offer this functionality, so we need to work on it ourselves.
In order to do this, I created the environments directory, where I store environment-related files, as shown below:
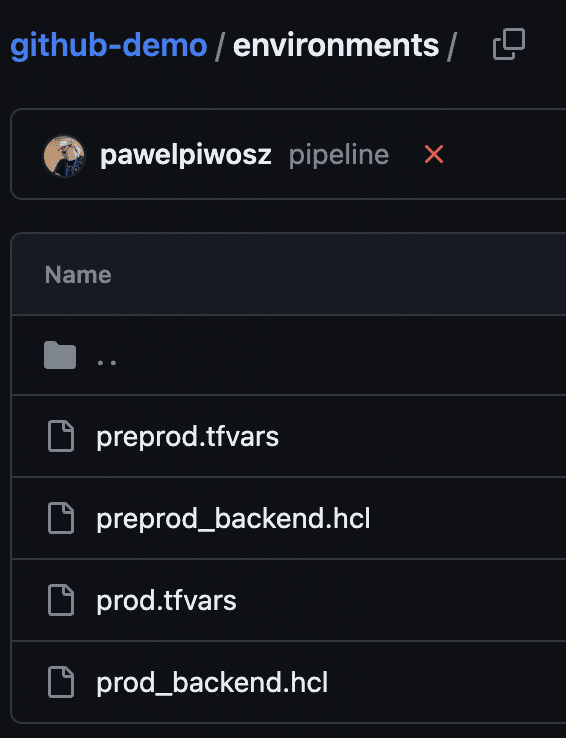
I have two environments in my pipeline, and these files represent this setup. One file is for variables, and *_backend.hcl is a configuration of my backend. The aim now is to correlate backend files with proper environments.
I mentioned earlier that every job (or stage) in GitHub Actions is a separate “container.” This has pros and cons. The positive aspect is that each container has a clean installation and configuration for Terraform; the drawback is that we need to implement this installation and configuration.
Let’s take a look at the code example:
  - name: Setup Terraform
        uses: hashicorp/setup-terraform@v2
        with:
          terraform_version: 1.5.4
      - name: Prepare environment
        run: |
          terraform init -backend-config="environments/prod_backend.hcl"
      - name: Create Terraform plan for Prod
        run: terraform plan -var-file="environments/prod.tfvars" -out ${{ env.prod_artifact_name }}
In the example, we execute three steps — one Action where Terraform is installed and two runs for initializing and executing terraform. If you are familiar with Terraform, you will know what -backend-config and -var-file are. The terraform init command has to be repeated in every job we build.
This way, we explicitly set the backend for Terraform. In fact, it is managed in exactly the same way that the CLI is in our local computer’s console. Proper configuration of this backend is crucial.
I use AWS, so I have to provide an S3 bucket and DynamoDB table. I have to ensure proper encryption, and I must also be aware of the name of my state file and where I store it. This adds a considerable management burden to my SDLC.
Inject variables into the pipeline
Terraform variables are the same as they are for running Terraform from CLI. Of course, we can use the variables/secrets functionality, but you might need to manipulate the workflow. This depends on the use case.
The problem we can encounter is related to missing clarity of the configuration.
We have Terraform related variables in tfvars files, but also repository-wide and organization-wide variables and secrets. This means that the track of who is responsible for maintaining the variables and which should be used by the pipeline becomes an urgent and important part of defining the pipeline. As this setup is not clear and visible, it might lead to misconfigurations.

Connect to a cloud provider
GitHub Actions may be closely coupled with GitHub, but it’s not connected to a specific cloud provider. This means we must create the connection, using the securest method possible. For GHA, we should use an OIDC connection and only pass the relevant IAM Role to the workflow.
I stored this IAM Role as Secret in the repository scope (this might be set as global on the GitHub organization level, but I do not recommend it) and use the secret in the workflow. This is common practice across professional tools.
If you use Environments, you can store the variables and secrets per environment.
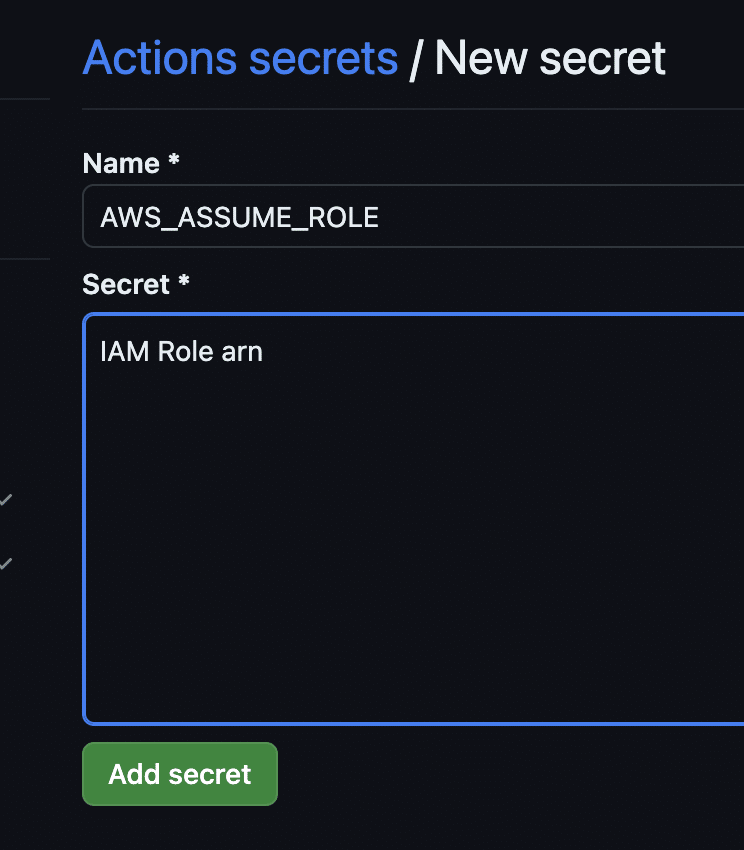
The image above presents an example of adding a secret, and the code below shows how it is used in the code:
      - name: Login to AWS
        uses: aws-actions/configure-aws-credentials@v1
        with:
          role-to-assume: ${{ secrets.AWS_ASSUME_ROLE }}
          role-session-name: GitHubActionsSession
          aws-region: eu-central-1
This section is needed if we want to deploy our Terraform into the AWS environment.
Great! We have a pipeline that is deploying Terraform templates to our environments. But something is missing…
Download the Build vs. Buy Guide to Scaling Infrastructure as Code

Define pipeline for Pull Requests
We automate Pull Requests (PRs) in order to have as useful a process as possible. This means we want information about all automated tasks in the PR. As well as knowing whether these tasks failed or not, we also need data about performance, number of checks, percentage of scanned code, and so on. With IaC, we also wish to see data about things like how many scans were performed and whether the syntax and plan are valid before we click “merge.”
For the PR process and even for code review, we cannot use the same pipeline. We have a couple of options:
We can add another trigger – pull-request: to section on: and use conditions to run steps on commit or during the PR process. But this introduces confusion, so I prefer to create another workload file, which will be responsible for Pull Requests only.
This is how our trigger looks for PR:
on:
  pull_request:
    branches:
      - main
    paths-ignore:
      - "README.md"
To successfully run Terraform in this pipeline, I need to install Terraform, initialize it, and so on. It is the same process as with the pipeline we discussed before.
However, in this pipeline I have to use a specific approach:
 - name: Terraform fmt
        id: tf-fmt
        run: terraform fmt -check
      - name: Terraform validate
        id: tf-validate
        run: terraform validate -no-color
As you can see, I added id: statement. I need it to pass information between steps. In this example, I’ll use the outputs of these two tasks to craft a message that will be added as a comment to Pull Request.
Terraform Validation \`${{ steps.tf-validate.outcome }}\`Here, I use an internal method to collect output from step with id tf-validate.
Address the lack of an existing Action
The issue here is the lack of a really useful Action to use. Everything we do at this point is based on run: or script:. Fortunately, the Internet offers many examples of how to approach the problem.
I have created a small snippet (using sources from Internet) for my own use, and here is one variant:
- name: Comment on Pull Request
        uses: actions/github-script@v6
        if: always()
        env:
          planPreprod: "terraform\n${{ steps.tf-plan-preprod.outputs.stdout }}\nErrors:\n${{ steps.tf-plan-preprod.outputs.stderr }}"
          planProd: "terraform\n${{ steps.tf-plan-prod.outputs.stdout }}\nErrors:\n${{ steps.tf-plan-prod.outputs.stderr }}"
        with:
          github-token: ${{ secrets.GITHUB_TOKEN }}
          script: |
            const { data: comments } = await github.rest.issues.listComments({
              owner: context.repo.owner,
              repo: context.repo.repo,
              issue_number: context.issue.number,
            })
            const botComment = comments.find(comment => {
              return comment.user.type === 'Bot' && comment.body.includes('Terraform Format and Style')
            })

            const output = `#### Terraform Format and Style 🖌\`${{ steps.tf-fmt.outcome }}\`
            #### Terraform Initialization for Preprod ⚙️\`${{ steps.tf-init-preprod.outcome }}\`
            #### Terraform Initialization for Prod ⚙️\`${{ steps.tf-init-prod.outcome }}\`
            #### Terraform Validation 🤖\`${{ steps.tf-validate.outcome }}\`
            <details><summary>Validation Output</summary>

            \`\`\`\n
            Output:\n
            ${{ steps.tf-validate.outputs.stdout }}\n
            Errors:\n
            ${{ steps.tf-validate.outputs.stderr }}
            \`\`\`

            </details>

            <h1> Preprod scan </h1>

            #### Terraform Plan 📖\`${{ steps.tf-plan-preprod.outcome }}\`

            <details><summary>Show Plan</summary>

            \`\`\`\n
            ${process.env.planPreprod}
            \`\`\`

            </details>

            <h1> Prod plan </h1>

            #### Terraform Plan 📖\`${{ steps.tf-plan-prod.outcome }}\`

            <details><summary>Show Plan</summary>

            \`\`\`\n
            ${process.env.planProd}
            \`\`\`

            </details>

            <hr>

            *Pusher: @${{ github.actor }}, Action: \`${{ github.event_name }}\`, Workflow: \`${{ github.workflow }}\`*`;

            if (botComment) {
              github.rest.issues.updateComment({
                owner: context.repo.owner,
                repo: context.repo.repo,
                comment_id: botComment.id,
                body: output
              })
            } else {
              github.rest.issues.createComment({
                issue_number: context.issue.number,
                owner: context.repo.owner,
                repo: context.repo.repo,
                body: output
              })
            }
I realize this is a lot of code.
It is a full step with a simple function — comment the Pull Request with data about format, validation, and plan execution for Terraform templates. It’s important to have clear and meaningful information to decide if we can or shouldn’t approve the PR.
Have a look at the image below:
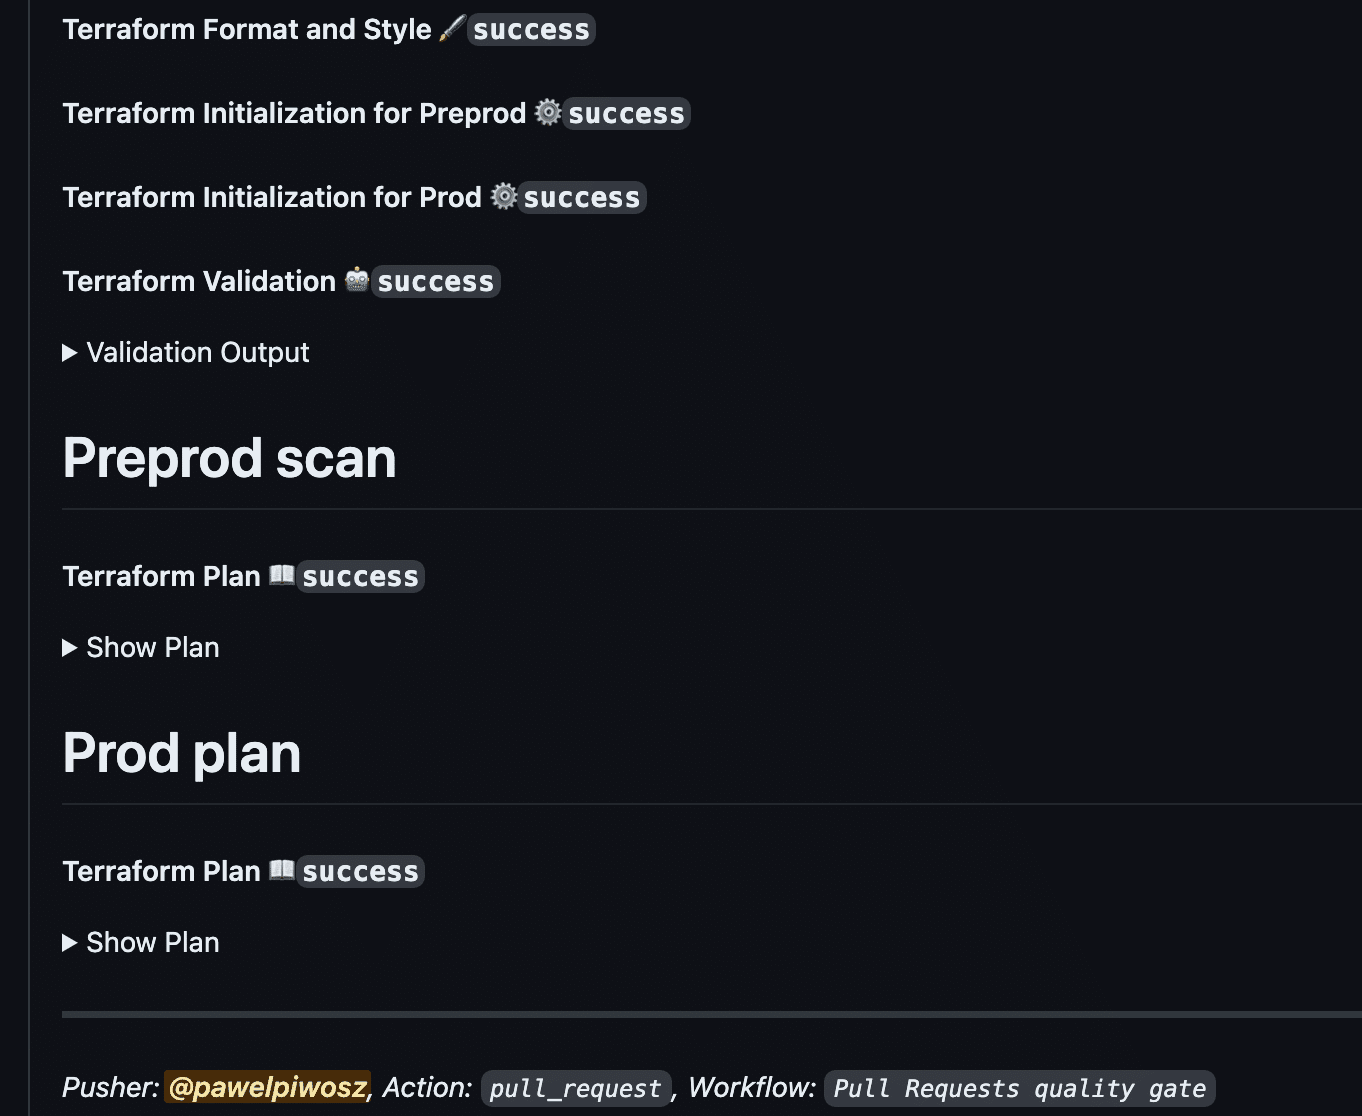
As you can see, the comment is clear, informative, and allows us to decide about the next steps.
Scan your template
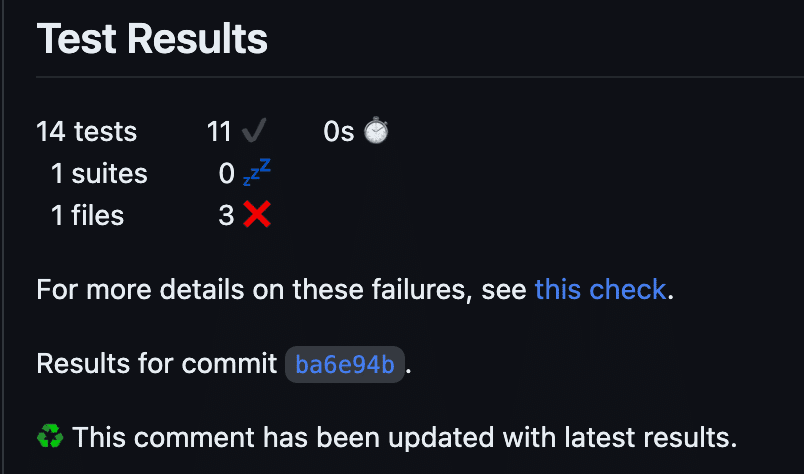
In the deployment pipeline we used tfsec to scan our template. This time I propose a small twist; we will use another tool, Checkov. This very powerful tool allows us to scan not only Terraform, but other IaC tools and also Kubernetes, Helm charts, GitHub Actions, and so on.
This scan should also comment on the PR. I also add Checkov’s report to artifacts, and this can be downloaded and used in release notes.
Let’s see the code:
      - name: Prepare reports directory
        run: mkdir test-results
      - name: Run Checkov
        id: checkov
        uses: bridgecrewio/checkov-action@master
        with:
          directory: .
          framework: terraform
          soft_fail: false
          output_format: junitxml
          output_file_path: test-results
      - name: Publish test artifact
        uses: actions/upload-artifact@v3
        if: always()
        with:
          name: Checkov-report
          path: test-results/results_junitxml.xml
      - name: Publish annotations
        uses: EnricoMi/publish-unit-test-result-action@v2
        if: always()
        with:
          junit_files: "test-results/**/*.xml"
Please note the statement if: always(). It is important to have the data available, not only after a successful run of the workflow, but also after a failed one.
I used three different Actions in this snippet. First, Checkov to run the scan, second upload-artifact, and third -publish-unit-test-result to incorporate the report in the PR’s comment section.
Can I implement drift detection with GitHub Actions?
Drift detection can be implemented easily with GitHub Actions. This tool provides multiple triggers, which are documented here.
One of them is schedule, which uses a cron-like format:
on:
  schedule:
    - '10 * * * *'
This example shows the trigger set to every ten minutes.
Of course, GitHub Actions doesn’t provide a built-in solution for drift detection. You have to use a third-party tool, or do it manually. With the latter option, you have to analyze the drift report, and rerun the stack again. Potentially with all stacks which are dependent ones. This is a time consuming process. Additionally, the risk of error is high, as the process relies on manual decisions and executions.
Advantages of using GitHub Actions to manage IaC
GitHub and GitHub Actions are very widely adopted in the industry, and there are good reasons for this.
As we already mentioned, GHA is a native CI/CD tool for GitHub. It is easy to create, relatively easy to manage, offers considerable flexibility, and has a community around it big enough to provide Actions for almost all purposes.
Here are the advantages of GitHub Actions:
- Deeply and well integrated with GitHub VCS
- Uses yaml that makes the development easy
- Has a wide community
- Marketplace offers a wide selection of Actions to be used
- Very good configurability (with different worker fleets, configuration per workflow, environment, repo or global)
- Great tool for developers and DevOps, as it works very close to the code
- Easy to learn (yaml is relatively easy to start with, documentation is very good)
- Large number of different triggers for workflows
Limitations of managing IaC with GitHub Actions
Here are some of the limitations and disadvantages of GHA when running IaC (Terraform, specifically):
- Scale problems. Big infrastructure, many repos, hundreds of pipelines. As with other generic CI/CD tools, scaling GitHub Actions raises throughput issues, incoherent dependencies between templates, inconsistency in runs, and so on.
- Access policies. In order to clearly separate access for people and pipelines to specific environments, you have to create a very complicated structure. This is far more significant with scale, where you have to control big infrastructure and many users.
- Architectural decisions on the level of pipeline design are needed. Each template requires multiple pipelines or conditions in the workflow, which makes the structure less clear.
- Although it is possible to trigger one workflow from another, there is no high level visibility of this process. If the infrastructure is complicated and built on multiple layers, it is extremely hard to track all dependencies and the order of executions.
- State file for Terraform must be managed in pipelines by developers. There is no tool to configure the setup automatically.
- Lock file must be established and managed. Without it, you risk clashes between workflow executions that might lead to degradation of infrastructure.
- Resources are not visualized in any way. If you want to see a visual representation of resources created by a template, you have to use third-party tools.
Do I recommend using GitHub Actions for IaC?
To be honest, it depends. Working effectively in IT requires a proper approach to process. First, we need to define the problem we want to solve. Then, we can think about the skills and tools we have or need to acquire. Selecting the tool before following this process is simply asking for trouble.
As with all generic CI/CD tools, GitHub Actions is a good option when massive scale is not involved. If you don’t have dedicated people for infrastructure management and your development teams have no capacity to learn new tools, you might use GitHub Actions if it is already incorporated into your SDLC.
However, you must remember that generic CI/CD tools were primarily created for shipping the application artifacts to the environment. These tools were adapted for Infrastructure, so they have limitations, which I mentioned earlier. If you are going to use generic CI/CD tools to deliver infrastructure, you must be aware of these limitations.
Why use Spacelift instead of generic CI/CD tools?
Spacelift was created as a platform for the continuous delivery and orchestration of infrastructure. This shifts the platform’s responsibility to delivery and management, leaving a little continuous integration. Let’s examine some of its functionality, which addresses the limitations of generic CI/CD tools I mentioned earlier.
Design pipelines with stacks, spaces, and policies
Governance of complicated infrastructure can be managed with a proper setup of Spaces where Stacks are run. Implementing OPA Policies can guarantee the encapsulation of systems on any level we want.
Terraform state? No problem for Spacelift!
Spacelift has implemented a native way of managing the state. As an end user of the platform, you just have to move one slider (if it is not the default setting for you), and the state will be fully managed by Spacelift. This doesn’t mean you cannot manipulate the state file. Though strongly discouraged, this option is available through Tasks.
Stack dependencies to control the chain of executions
Stack dependencies allow you to create a chain of executions between stacks and environments. Easy to control, this feature ensures that all stacks are updated when needed.
Variables and contexts
Contexts is a powerful tool to manage and govern all variables in a very useful way. If you have multiple environments and many stacks, Contexts give you a clear way to manage variables. They can be attached to Spaces for selected environments. Contexts can also be protected.
PRs as Spacelift’s native approach
We saw that managing PRs through workflow in GitHub Action is possible, but it requires additional work. Spacelift does this automatically for you. Additionally, you can enable richer comments by attaching a tag to your stack. No more writing dedicated code for this functionality!
Drift detection incorporated into the process
Drift detection is possible with Private workers pool (available on Enterprise plan), but when you run these pools, you have just one thing to do — schedule the execution of drift detection. If drift is detected, you can see it in the Resources section. Even better, by moving one toggle button, you can order Spacelift to re-run the stack to fix the drifts!
Resource visibility at your fingertips
I already mentioned Resources, but for a complete picture, this section allows you to understand your infrastructure and how it is deployed. It is a vital feature for more complicated setups.
Download the pipeline source code
The two pipelines we created in this tutorial can be downloaded from this repository. Both examples are functional, but you should adapt them to your needs.
Wrapping up
This was a long read, but it is important to understand why you should evaluate Spacelift to better manage your infrastructure and IaC.
Selecting a tool for your organization needs careful consideration because it is easy to end up with an overcomplicated toolset with dozens of third-party modules to manage your process. As a tool crafted specifically for IaC management and orchestration, Spacelift helps you to avoid that.
The three main benefits of using Spacelift instead of generic CI/CD tools are:
- Save time. The functions mentioned earlier make it easy to save time on building, maintaining, and troubleshooting executions.
- Encapsulate processes for infrastructure in one place with a dedicated tool.
- Get granular control of access and executions.
Are you seeking optimal orchestration of your infrastructure? Book a demo with our engineering team to discuss your options in more detail.
The most flexible management platform for Infrastructure as Code
Spacelift is a sophisticated SaaS product for Infrastructure as Code that helps DevOps develop and deploy new infrastructures or changes quickly and with confidence.
