
Various platforms are available for implementing CI/CD automation for Terraform IaC workflows. In this post, we will explore and implement a CI/CD pipeline for Terraform using GitLab. GitLab is a tool that provides remote Git repositories and integrated CI/CD automation.
We will refer to an example Terraform configuration, which creates an EC2 instance on AWS. Below is the summary of steps we will take to implement CI/CD on GitLab.
TL;DR
GitLab CI/CD lets you automate the full Terraform workflow directly from your Git repository, with built-in remote state management via GitLab’s HTTP backend.
The official GitLab Terraform CI/CD template is deprecated as of GitLab 18.0. This guide shows you how to use a pinned version or switch to the recommended OpenTofu alternative.
1. Set up a GitLab project repository
As a prerequisite, we need a Gitlab account. Create one here and log in.
From the homepage, click on the “New Project” button, as shown below.

On the following page, choose to create a blank project – which then navigates to the next page (screenshot below). When you provide a name to the project, it is automatically translated as a project slug in the URL.
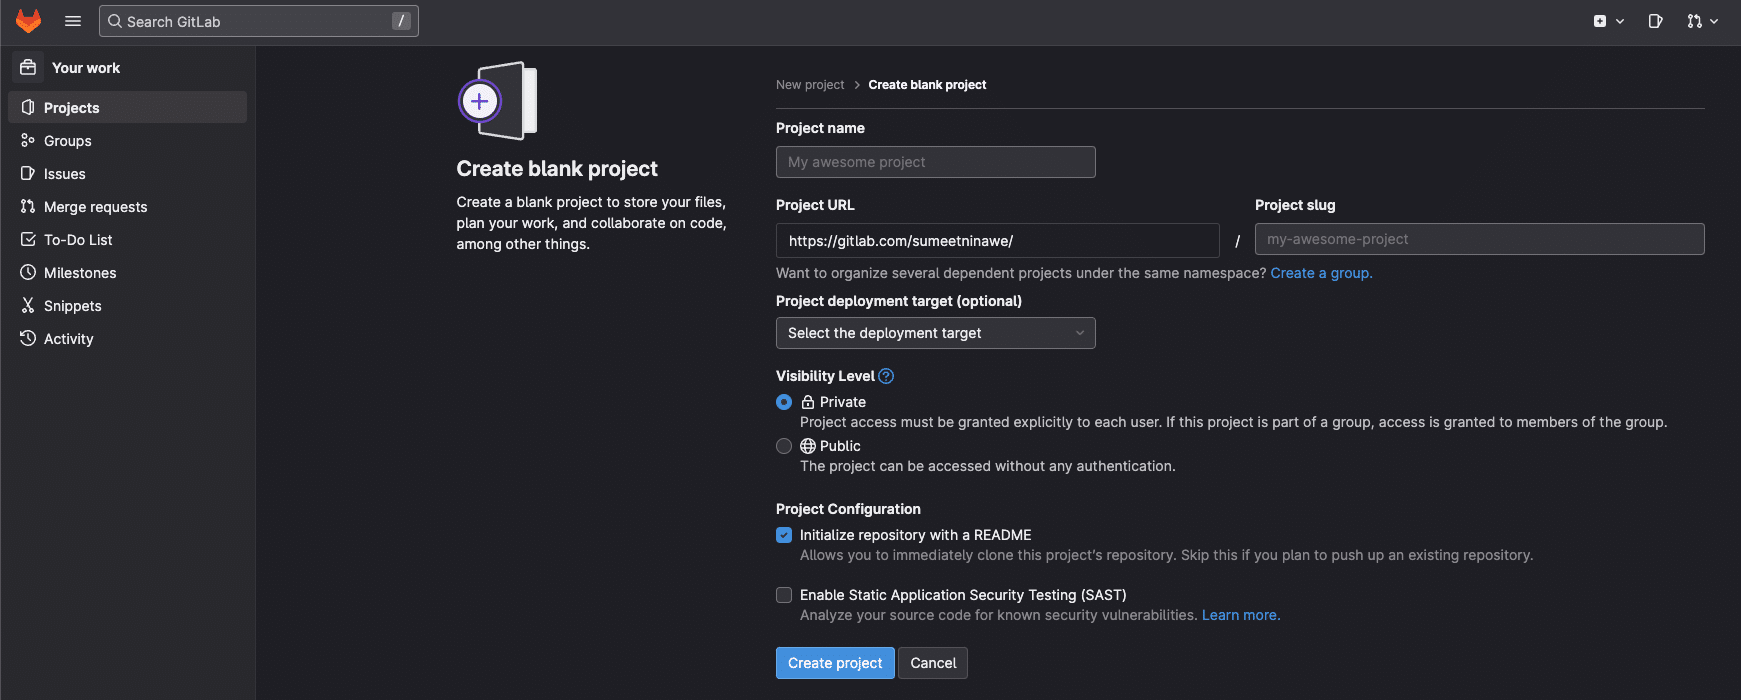
We can keep other settings as they are.
Note: Making the repository public would ease access to Git operations – clone, pull, push. Click on “Create project.”
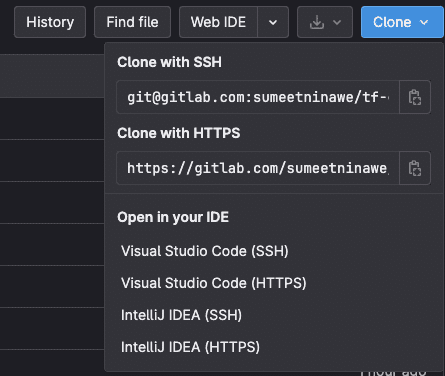
Once the project is created, navigate to the repository and click “Clone.” It has several options, as shown below. Clone this empty repository on the local machine with any of the suggested methods.
2. Create the Terraform configuration files
In this step, we will create the Terraform configuration in the repository we just cloned. As mentioned earlier, we will create an EC2 instance in AWS using Terraform and Gitlab pipelines.
To begin, we will create the files below:
- main.tf
- variables.tf
- provider.tf
- output.tf
The configuration below displays the contents of the main.tf file.
resource "aws_instance" "my_vm" {
  ami           = var.ami //Ubuntu AMI
  instance_type = var.instance_type

  tags = {
    Name = var.name_tag,
  }
}
The resource block defined above would create (manage) an instance of type “t2.micro” using Ubuntu AMI. It also provides a name tag to the instance with the value “My EC2 Instance”.
The values are set as defaults in the variables.tf file below.
variable "ami" {
  type        = string
  description = "Ubuntu AMI ID in eu-central-1 Region"
  default     = "ami-065deacbcaac64cf2"
}

variable "instance_type" {
  type        = string
  description = "Instance type"
  default     = "t2.micro"
}

variable "name_tag" {
  type        = string
  description = "Name of the EC2 instance"
  default     = "My EC2 Instance"
}
Finally, we create the provider configuration in a separate file named provider.tf below.
terraform {
  required_providers {
    aws = {
      source  = "hashicorp/aws"
      version = "~> 4.18.0"
    }
  }

  backend "http" {
  }
}

provider "aws" {
  region = "eu-central-1"
}
We recommend pinning to a major version and checking the Terraform Registry for the latest compatible minor release.
Note that we have declared the backend “http” block, but it is empty. We will discuss this later, but for now, we will keep it as it is.
Also, GitLab requires us to declare a provider block with a region attribute assigned explicitly. Optionally, we may create a file (output.tf) to define output variables as below.
output "public_ip" {
  value       = aws_instance.my_vm.public_ip
  description = "Public IP Address of EC2 instance"
}

output "instance_id" {
  value       = aws_instance.my_vm.id
  description = "Instance ID"
}
3. Configure GitLab pipeline using .gitlab-ci.yml
At this point, our Terraform configuration is ready – although we have not tested it. Before pushing this code to our Gitlab repository, we should create the pipeline YAML file in the same repository. If you are new to Gitlab CI/CD and pipeline configuration, refer to the documentation for all the syntax and conceptual references.
Create a file named “.gitlab-ci.yml” in the project root directory with the following contents. This defines a basic Terraform pipeline in the GitLab CI/CD platform. GitLab provides this template. If you want to customize this pipeline or create it from scratch – please refer to the documentation link above.
Note that this template is deprecated due to HashiCorp’s license change, and it was removed in GitLab 18.0. If you want to still use these templates, you need to add a specific version, such as:
include:
- project: 'gitlab-org/gitlab'
  file: '/lib/gitlab/ci/templates/Terraform/Base.gitlab-ci.yml'
  ref: 'v17.0.0-ee'
- project: 'gitlab-org/gitlab'
  file: '/lib/gitlab/ci/templates/Jobs/SAST-IaC.gitlab-ci.yml'
  ref: 'v17.0.0-ee"
stages:
 - validate
 - test
 - build
 - deploy
 - cleanup
fmt:
 extends: .terraform:fmt
 needs: []
validate:
 extends: .terraform:validate
 needs: []
build:
 extends: .terraform:build
deploy:
 extends: .terraform:deploy
 dependencies:
   - build
 environment:
   name: $TF_STATE_NAME
As the above is deprecated, GitLab states that you can continue building the Terraform templates and accompanying image (see https://gitlab.com/gitlab-org/terraform-images) yourself and use them as before. As an alternative to this, you can easily switch to OpenTofu, as GitLab provides an alternative OpenTofu CI/CD component for GitLab.com users.
To summarize:
fmt– formats the Terraform config.validate– validates the code.build– initializes the code on the runner.deploy– executes terraform apply command.cleanup– destroys the resource. We will get back to this later in this post.
Each stage uses the keyword “extends” with a certain .terraform:* value. It is a reference to the constructs from the files included at the very beginning.
With these five files created, create a commit and push the code to the Gitlab project/repository.
4. Add AWS credentials in GitLab
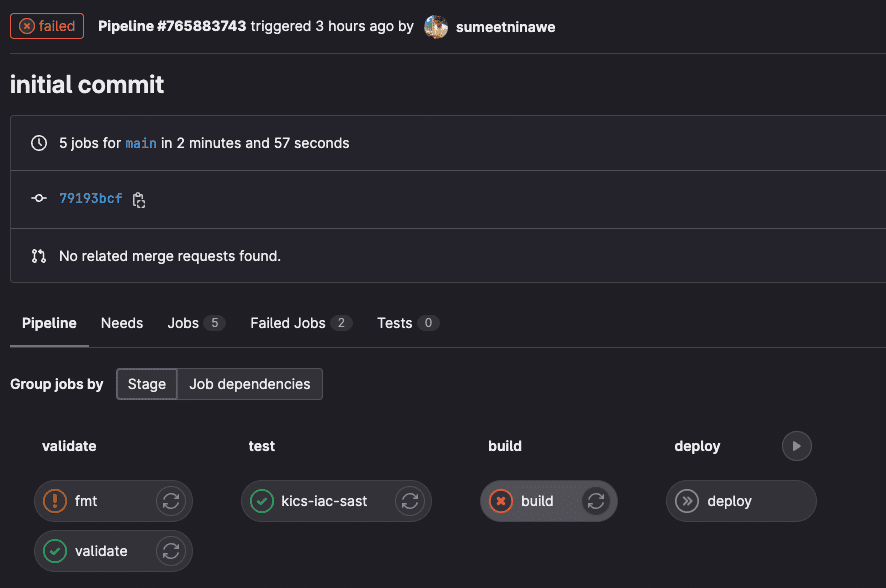
When the code is pushed to the GitLab project, the pipeline is automatically created and triggered based on the .gitlab-ci.yml file. However, the first run failed.
Navigate to: “Project > CI/CD > Pipelines”, and click on the run. Since it is the first run, there should be just one failed entry, as seen below.

A broader view:
Click on the failed job to see the logs and observe the error message. If you have followed all the steps correctly, then the following error message is valid. If it is not the same, then something else is wrong in your setup.
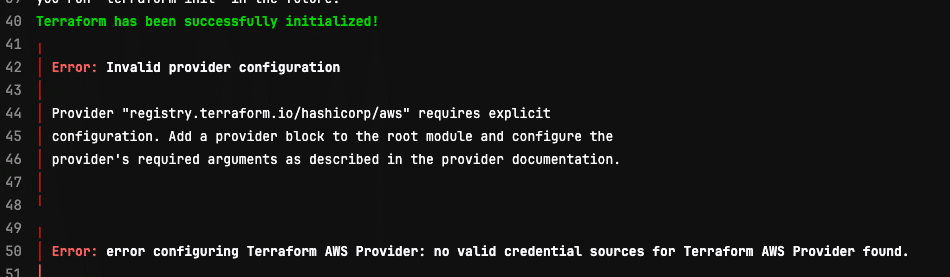
It is clear that the Terraform has been initialized successfully. However, there are no valid credentials configured for the Terraform AWS Provider. This makes sense since we never configured AWS credentials until now.
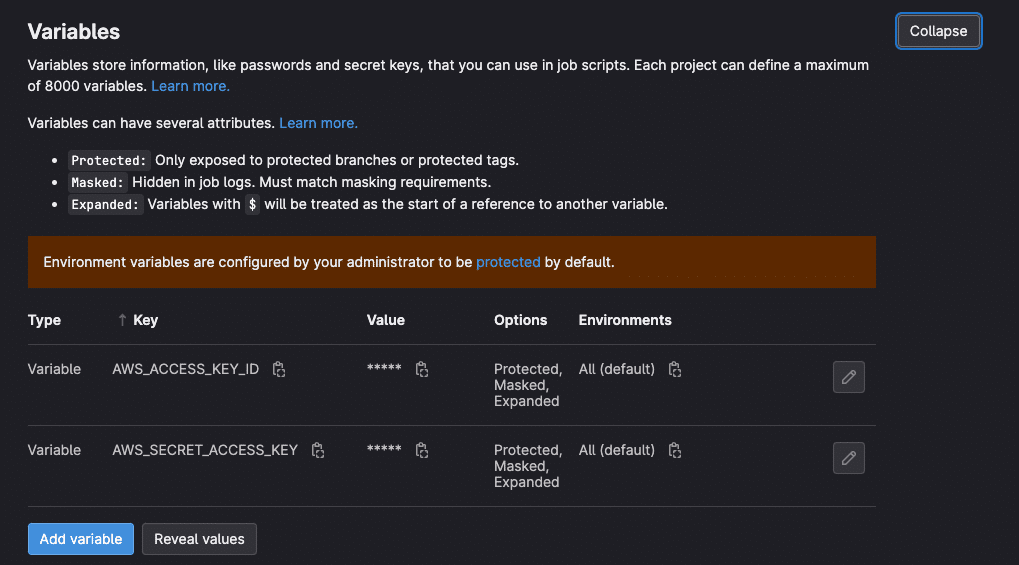
To address this issue, navigate to “Settings > CI/CD > Variables”, and click on Expand. Add the AWS Access Key ID and Secret Key here. Since these are project-specific CI/CD settings, this information will be made available to the runners via environment variables.
Re-run the pipeline now, and make sure it succeeds.

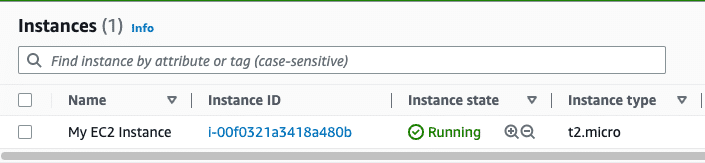
If the pipeline run is successful, log in to the AWS console and confirm creating an EC2 instance.
5. Set up the remote backend
As discussed in the first section, we left the backend “http” block empty. In fact, when we pushed the code to our GitLab repository for the first time, it automatically triggered the pipeline and also initialized Terraform successfully.
GitLab automatically configures the remote “http” backend. The Terraform config is version-controlled in GitLab repositories, the pipelines are run on GitLab runners, and the backend is also managed by GitLab.
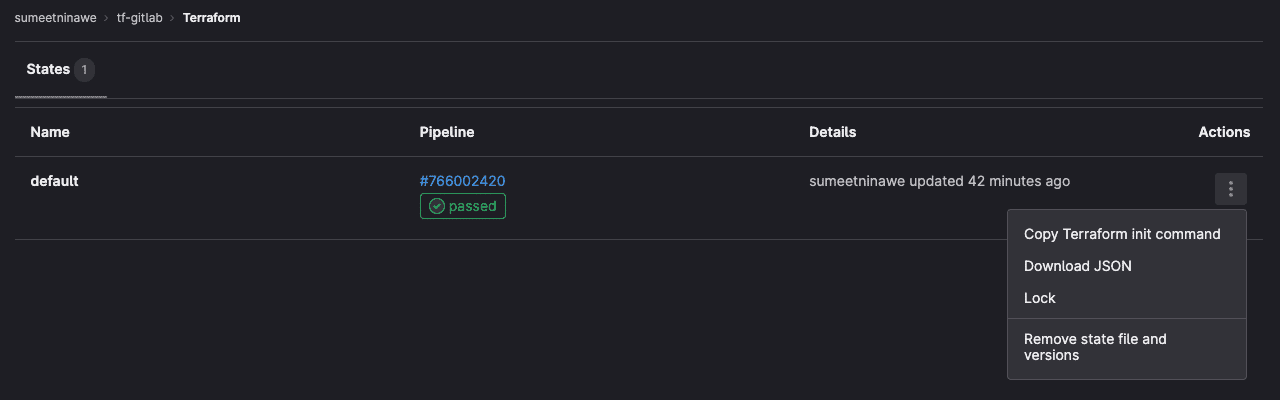
To access the remote backend, navigate to “Infrastructure > Terraform.” (now “Operate > Terraform states”) Here we find the “default” state being managed, as shown in the screenshot below. The state JSON file can also be downloaded and locked manually from here.
Read also: How to Manage Terraform State with GitLab
6. Configure the backend for local development
We have successfully set up:
- The configuration that creates an EC2 instance.
- CI/CD pipeline that automates the provisioning.
- Remote state backend.
As far as updating and committing the changes to the configuration on the web browser is concerned – all of this works well since everything is managed by GitLab.
However, we also have the Terraform configuration files created on the local system. Can we perform local development and perform tests? Perhaps, no, for a couple of reasons.
- The Terraform project is not initialized locally.
- Initialization requires us to connect to the remote backend.
For the local copy, the backend “http” block would not work. To confirm the same, try to run the terraform init command in the project’s root directory. It should complain about the backend configuration and authentication.
To make it work, we need to provide the following attribute values to the backend “http” block in the provider.tf file. More details.
address: to access the state informationlock_address: to lock the state fileunlock_address: to unlock the state file
To get this information for our Gitlab project, navigate to the Terraform state (same screenshot as above), and click on “Copy Terraform init command.” It should display the command as shown below.
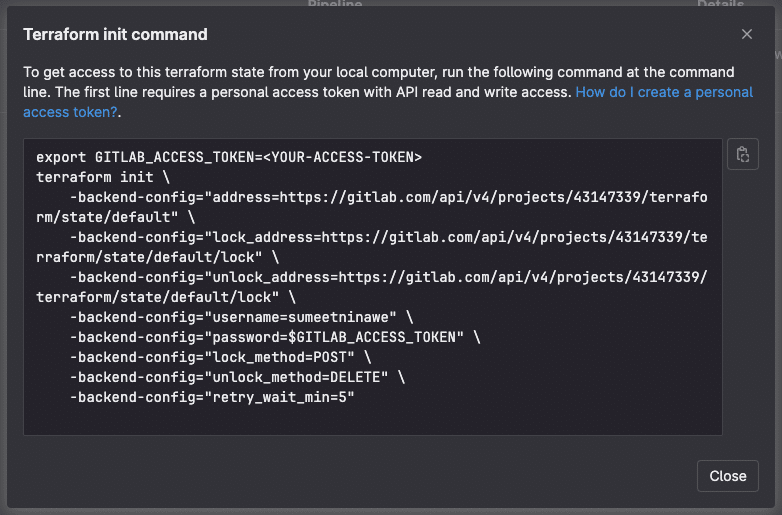
Update the address, lock_address, and unlock_address attributes in the backend “http” block in provider.tf from the information provided above.
The updated provider config should look like this:
terraform {
  required_providers {
    aws = {
      source  = "hashicorp/aws"
      version = "~> 4.18.0"
    }
  }

  backend "http" {
    address        = "https://gitlab.com/api/v4/projects/<ProjectID>/terraform/state/default"
    lock_address   = "https://gitlab.com/api/v4/projects/<ProjectID>/terraform/state/default/lock"
    unlock_address = "https://gitlab.com/api/v4/projects/<ProjectID>/terraform/state/default/lock"
  }
}

provider "aws" {
  region = "eu-central-1"
}
To initialize the Terraform project locally, run the remainder of the init command in the project’s root directory. You may be forced to use the -reconfigure flag, as simply running terraform init will first result in auth error, and second, we do not want to migrate the state from GitLab to local.
More details about migrating the state with GitLab are found here. The init command to run looks like this:
terraform init -reconfigure \
  -backend-config=username=<Your Username> \
  -backend-config=password=$GITLAB_ACCESS_TOKEN \
  -backend-config=lock_method=POST \
  -backend-config=unlock_method=DELETE \
  -backend-config=retry_wait_min=5
Once the project is initialized locally, you can test it by running the Terraform plan, apply, and destroy commands. A good test would be to destroy the EC2 instance from the local machine created by the GitLab pipeline.
GitLab now recommends using environment variables and the OpenTofu wrapper (gitlab-tofu) for backend configuration instead of inlining -backend-config everywhere. This reduces the risk of leaking backend details and keeps plan/apply behavior consistent between CI and local runs.
7. Implement pipeline conditions and destroy the pipeline
It is impossible to create multiple pipelines per project/repository in GitLab. Given the dependency on the state file, it becomes tricky to manage provisioning and de-provisioning activities in the same pipeline. However, GitLab’s pipeline syntax and template libraries enable us to create complex and flexible pipelines that are capable of covering multiple scenarios.
The current pipeline can provision new infrastructure or implement changes. However, the destruction of the same infrastructure needs to be managed from elsewhere (local machine).
To address this situation, we can rely on the commit message provided when the changes were committed to the repository. This is because that is the last piece of information that is under the control of the user before the pipeline takes control of the automation. The idea is to search for a keyword, e.g. “destroy”, and based on this, selectively run apply and destroy stages.
To implement these conditional runs, we take the help of the rules construct in GitLab YML syntax. Below is the updated .gitlab-ci.yml file.
include:
 - template: Terraform/Base.gitlab-ci.yml
 - template: Jobs/SAST-IaC.gitlab-ci.yml

stages:
 - validate
 - test
 - build
 - deploy
 - cleanup

fmt:
 extends: .terraform:fmt
 needs: []

validate:
 extends: .terraform:validate
 needs: []

build:
 extends: .terraform:build

deploy:
 extends: .terraform:deploy
 rules:
   - if: $CI_COMMIT_TITLE != "destroy"
     when: on_success
 dependencies:
   - build
 environment:
   name: $TF_STATE_NAME

cleanup:
 extends: .terraform:destroy
 environment:
   name: $TF_STATE_NAME
 rules:
   - if: $CI_COMMIT_TITLE == "destroy"
     when: on_success
The rules in the deploy stage specify an “if” condition, which checks if the commit message is not “destroy.” Thus, if the commit message contains anything other than “destroy,” the deploy stage would be executed, and the cleanup (destroy) stage would be skipped.
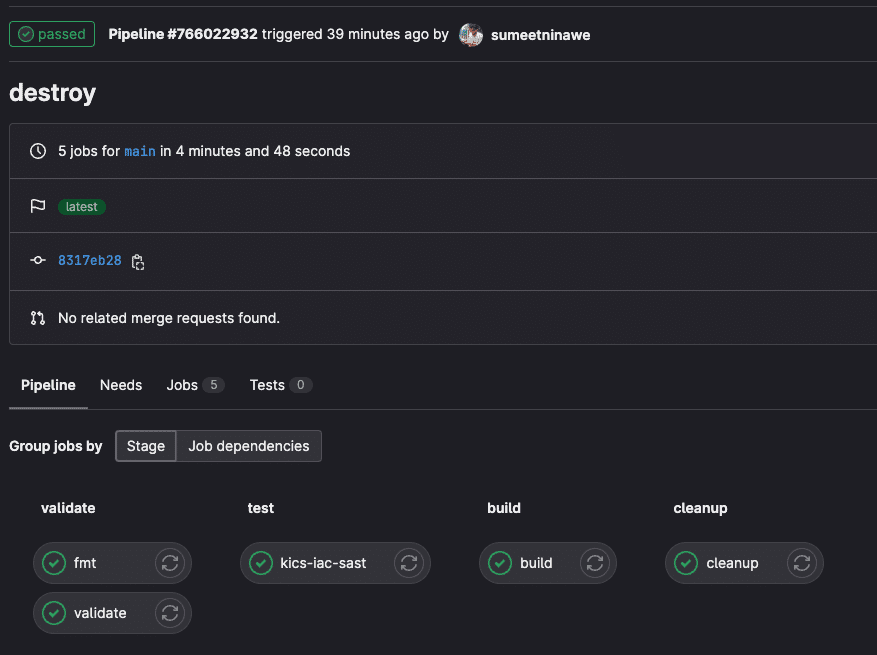
To run the destroy pipeline, make sure to have a commit message as “destroy.”
In the screenshot below, notice how the last stage selected for execution is “cleanup” and not “deploy.”
GitLab CI/CD Terraform best practices
Getting a GitLab Terraform pipeline running is one thing. Running it reliably and safely in production is another. Below are the most important practices to adopt before you scale your setup.
- Use OIDC instead of static AWS credentials – Storing
AWS_ACCESS_KEY_IDandAWS_SECRET_ACCESS_KEYas CI/CD variables works, but it introduces long-lived credentials that can be leaked through logs or misconfigured masking. The better approach is to configure OpenID Connect (OIDC) between GitLab and AWS. Your pipeline assumes an IAM role dynamically per run — no static keys stored anywhere. - Pin your Terraform/OpenTofu version explicitly – Always set
TF_VERSION(orOPENTOFU_VERSION) in your CI/CD variables rather than relying on the runner’s default. An unintentional version upgrade mid-project can introduce breaking changes in provider behavior or state format that are difficult to roll back. - Protect your
mainbranch and require plan approval before apply – Never letterraform applyrun automatically on a merge to main without a human review step. Use GitLab’s protected environments to require manual approval on the deploy stage for production. This gives your team a checkpoint to review theterraform planoutput before any infrastructure changes go live. - Use one state per environment, not one state per repository – Set
TF_STATE_NAMEto match your target environment (e.g.,staging,production) so each environment maintains an independent state file. Sharing a single state across environments means a failed production apply can corrupt state for staging too. - Never print sensitive values in pipeline logs – Set output variables that contain secrets (API keys, connection strings, passwords) with
sensitive = truein your Terraform config. This prevents them from appearing in plain text in GitLab job logs, which are often accessible to all project members. - Keep your
.gitlab-ci.ymllean with templates or components – Avoid duplicating pipeline logic across jobs. Useextendsto reuse job definitions, or migrate to GitLab CI/CD components for a cleaner, versioned approach. For teams managing multiple Terraform repositories, a shared component reduces drift between pipelines and makes updates easier to roll out centrally.
Deploying Terraform resources with Spacelift
Implementing CI/CD for Terraform projects on platforms like GitLab, which are traditionally built for application-layer components, is a complex task. Spacelift is built specifically for infrastructure as code (IaC) automation workflows. Once integrated with your IaC Git repository, infrastructure sets are managed as stacks.
Stacks are associated with contexts that provide all the required environment variables for execution. Spacelift also manages Terraform state files efficiently, reducing the overhead of maintaining them in a separate backend. Along with this, Spacelift offers many features that are critical to IaC projects today.
With Spacelift, you get:
- Policy as code (based on Open Policy Agent) — Control how many approvals you need for runs, what kind of resources you can create, what parameters those resources can have, and what happens when a pull request is open or merged.
- Multi-IaC workflows — Combine Terraform with Kubernetes, Ansible, and other tools such as OpenTofu, Pulumi, and CloudFormation, create dependencies among them, and share outputs.
- Governed developer self-service — Use Blueprints and Templates to build Golden Paths for your teams. Complete a simple form to provision infrastructure based on Terraform and other supported tools, with guardrails enforced throughout.
- AI-powered infrastructure insights — Use Spacelift Intelligence to get contextual recommendations, surface risks, and accelerate troubleshooting across your stacks.
- Third-party integrations — Integrate with your existing tools and build policies around them. For example, see how to integrate security tools into your workflows using Custom Inputs.
- Private workers — Run Spacelift workflows inside your own infrastructure perimeter using private workers. See the documentation for configuration details.
Novibet is in the cloud, and everything is provisioned through Terraform, which the team previously managed using GitHub Actions. However, as the organization scaled, managing Novibet’s IaC through a generic CI/CD platform began to stretch the capabilities of both the tool and the DevOps team. The Spacelift platform has enabled the team to deploy faster and with greater control as they move toward a platform engineering mindset and enable autonomy with guardrails.
You can try Spacelift for free by creating a trial account or booking a demo with one of our engineers.
Key points
Implementing the Terraform workflow using GitLab CI/CD is good and follows a unique pattern. The vast library for constructing pipelines, the ability to nest and reuse templates, offer great flexibility. While on one side, one pipeline per repository may sound limiting and may force a small learning curve, on the other, GitLab’s ability to manage the config, state, remote backend, and automation might outweigh those limitations.
Note: New versions of Terraform are placed under the BUSL license, but everything created before version 1.5.x stays open-source. OpenTofu is an open-source version of Terraform that expands on Terraform’s existing concepts and offerings. It is a viable alternative to HashiCorp’s Terraform, being forked from Terraform version 1.5.6.
Automate Terraform deployments with Spacelift
Automate your infrastructure provisioning and build more complex workflows based on Terraform using policy as code, programmatic configuration, context sharing, drift detection, resource visualization, and many more.
Frequently asked questions
Why use GitLab for Terraform?
GitLab offers native Terraform integration through its CI/CD pipelines, letting teams plan, validate, and apply infrastructure changes alongside application code in a single platform. It includes a built-in Terraform state backend, merge request diff views for plan output, and access controls that enforce approval workflows before any apply runs.
Is the GitLab Terraform CI/CD template still available?
The official GitLab Terraform CI/CD template (Terraform/Base.gitlab-ci.yml) was deprecated following HashiCorp’s license change and was fully removed in GitLab 18.0. If your pipeline still references it, you have two options: pin to a specific older GitLab release (e.g., ref: ‘v17.0.0-ee’) to keep using the Terraform-based template, or migrate to GitLab’s OpenTofu CI/CD component, which is the officially recommended path going forward. GitLab maintains a separate Terraform images repository (gitlab-org/terraform-images) that you can fork and self-host if you want to continue using Terraform without switching to OpenTofu.
What is the difference between GitLab CI/CD for Terraform vs GitHub Actions?
GitLab CI/CD is a fully integrated pipeline system built into GitLab, with native support for Terraform via a managed terraform CI component and built-in state management through the GitLab Terraform HTTP backend. GitHub Actions is a workflow automation platform for GitHub repos, requiring third-party actions and external state storage.
How does GitLab manage Terraform state?
GitLab includes a built-in HTTP Terraform state backend, so you can store state files directly in a GitLab project without an external service like S3. State is scoped per project and protected by GitLab’s access controls. You configure it by pointing the Terraform backend block to your GitLab instance URL with a personal or CI/CD job token for authentication.
