I recently wrote an article providing an introduction to Terraform, which goes through its benefits and features and offers a step-by-step explanation with an example. The general IaC development for AWS using Terraform follows the steps below:
- Configure AWS CLI and credentials on Terraform host machine.
- Configure and initialize AWS provider in Terraform.
- Write Terraform configuration for the AWS resources to be created.
- Configure a backend for state management that enables team collaboration.
- Run
terraform plancommand to validate the configuration and generate a summary of changes that will be applied. - Run
terraform applycommand to actually apply the changes in configuration. - Run
terraform destroycommand to destroy all the AWS resources managed through Terraform configuration.
In this post, we will cover another interesting feature of Terraform – Workspaces. Workspace is a way to maintain multiple copies of deployments that can be created and destroyed on the go.
Terraform workspaces enable us to manage multiple deployments of the same configuration. When we create cloud resources using the Terraform configuration language, the resources are created in the default workspace. It is a very handy tool that lets us test configurations by giving us flexibility in resource allocation, regional deployments, multi-account deployments, and so on.
The information about all the resources managed by Terraform is stored in a state file. It is important to store this state file in a secure location. Every Terraform run is associated with a state file for validation and reference purposes. Any modifications to the Terraform configuration, planned or applied, are always validated first with references in the state files, and the execution result is updated back to it.
If you are not consciously using any workspace, all of this already happens in a default workspace. Workspaces help you isolate independent deployments of the same Terraform config while using the same state file.
What is the difference between the Terraform environment and the workspace?
A Terraform environment typically refers to the overall setup of your infrastructure, including all configurations and resources that define it. A workspace, on the other hand, is a named state file that enables you to manage multiple isolated instances of the same infrastructure configuration. By keeping state files separate, workspaces help prevent conflicts and simplify the management of distinct deployments.
Check out our guide on How to Manage Multiple Terraform Environments Efficiently.
Terraform workspace vs. Terraform module
Terraform workspaces and Terraform modules are two different concepts that serve different purposes in the Terraform ecosystem. Workspaces allow users to manage different sets of infrastructure using the same configuration by isolating state files. Modules, on the other hand, are a logical container for multiple resources that are used together, facilitating reusability and better organization of your code.
To begin, let’s look at the options available to us in the help:
terraform workspace --help
Usage: terraform [global options] workspace

  new, list, show, select, and delete Terraform workspaces.

Subcommands:
    delete    Delete a workspace
    list      List Workspaces
    new       Create a new workspace
    select    Select a workspace
    show      Show the name of the current workspace
The options are quite straightforward here. We can use the workspace command to list all the available workspaces and show the currently selected one. We can also create new workspaces and delete old ones. Finally, to navigate through workspaces, we use the select command.
1. Create an EC2 instance
For the sake of this blog post, let us consider a simple Terraform config that creates an EC2 instance with the configuration below. We are currently using three variables for AMI value, the type of instance to be created and the name tag.
resource "aws_instance" "my_vm" {
ami           = var.ami //Ubuntu AMI
instance_type = var.instance_type

tags = {
  Name = var.name_tag,
}
}
If we run terraform plan command at this point, it will show that it needs to create one resource, i.e. an EC2 instance. When the resource is created, the state file is updated with its information and other attributes.
Go ahead and create this EC2 instance. For reference, I am creating a t2.micro instance with Ubuntu 20.04 image.
Plan: 1 to add, 0 to change, 0 to destroy.

Changes to Outputs:
  + instance_id = (known after apply)
  + public_ip   = (known after apply)

Do you want to perform these actions?
  Terraform will perform the actions described above.
  Only 'yes' will be accepted to approve.

  Enter a value: yes

aws_instance.my_vm: Creating...
aws_instance.my_vm: Still creating... [10s elapsed]
aws_instance.my_vm: Still creating... [20s elapsed]
aws_instance.my_vm: Still creating... [30s elapsed]
aws_instance.my_vm: Still creating... [40s elapsed]
aws_instance.my_vm: Creation complete after 42s [id=i-07708992d1d3272c1]

Apply complete! Resources: 1 added, 0 changed, 0 destroyed.

Outputs:

instance_id = "i-07708992d1d3272c1"
public_ip = "3.73.0.139"
As we can see from the output, the EC2 instance was successfully created. Run the plan command again, and see if Terraform wants to perform any additional actions at this point. It probably won’t.
2. Run terraform workspace show
To check the current workspace we are in, run the command below.
terraform workspace show
default
The output here shows that we are currently in the workspace named default.
3. Run terraform workspace list
To be sure that no other workspaces currently exist, run the list command as shown below.
terraform workspace list
* default
The list command lists all the currently created workspaces, including the default workspace. The start mark beside the default workspace indicates the currently selected workspace we are in.
4. Create a new workspace
Let us create another workspace and select the same. We can do this by running the new command with the desired name of the new workspace as below.
terraform workspace new test_workspace
Created and switched to workspace "test_workspace"!

You're now on a new, empty workspace. Workspaces isolate their state,
so if you run "terraform plan" Terraform will not see any existing state
for this configuration.
Here, I have selected the name of the new Terraform workspace as “test_workspace”. Note that running this command has created the new workspace and switched to it.
5. Verify the setup
We can verify this selection is made by running the show command as below.
terraform workspace show
test_workspace
Of course, another way to verify it would be to run the list command and see where the asterisk (*) is pointing to.
terraform workspace list
  default
* test_workspaceWhen we create a new workspace, Terraform creates a corresponding new state file in the same remote backend that is configured initially. It is important to note that the backend being used should also be able to support the workspaces.
In this example, I have used the AWS S3 bucket as the remote backend.
When we look at the contents of the Terraform state S3 bucket, apart from our default terraform.tfstate file, we can see that a new directory named “env:/” is created, within which another directory with the name of our workspace (test_workspace) is created. A new terraform.tfstate file is maintained at this location.
Ignore the other details in the screenshot below. The Key column is relevant here.

Looking closely, the size of the default state file is considerably larger than that of the custom workspace-specific state file. This shows that the new state file is created, but it does not hold any information from the default state file. This is how Terraform creates an isolated environment and maintains its state file differently.
The contents of the test_workspace state file before running terraform apply are shown below:
{
  "version": 4,
  "terraform_version": "1.2.3",
  "serial": 0,
  "lineage": "c1aa5782-da15-419e-70f8-7024cadd0cfe",
  "outputs": {},
  "resources": []
}
As a result of this, if we run the plan command in the same directory now, Terraform will consider the state file as per the selected workspace. No resources are captured or maintained in this state file, so it will propose creating a new EC2 instance.
terraform plan
…
Plan: 1 to add, 0 to change, 0 to destroy.

Changes to Outputs:
  + instance_id = (known after apply)
  + public_ip   = (known after apply)
Note: The plan output does not specify the workspace information it is using while planning, so be sure to be very cautious while applying these changes, as using the wrong workspace may break the existing working environment.
Despite creating an EC2 instance using the same configuration in the default workspace, Terraform disregards its existence in a new workspace. This creates many possibilities for how infrastructure management may happen in various environments. The isolated nature of the Terraform workspace is used to test out modifications to the existing configuration before applying them to the critical environment, but this is just one of the use cases.
To delete the workspace, first select a different workspace. In our case, we go back to the default workspace and run the delete command. Terraform does not let us delete the currently selected workspace.
terraform workspace select default
Switched to workspace "default".

terraform workspace delete test_workspace
Deleted workspace "test_workspace"!
The corresponding directory structure in our S3 backend is deleted along with the state file.

Also, if you attempt to delete a workspace where certain resources are being managed by Terraform, it will not let you delete that workspace, suggesting using the -force option instead.
terraform workspace delete test_workspace
╷
│ Error: Workspace is not empty
│
│ Workspace "test_workspace" is currently tracking the following resource instances:
│   - aws_instance.my_vm
│
│ Deleting this workspace would cause Terraform to lose track of any associated remote objects, which would then require you to delete them manually outside of Terraform. You should destroy these objects with
│ Terraform before deleting the workspace.
│
│ If you want to delete this workspace anyway, and have Terraform forget about these managed objects, use the -force option to disable this safety check.
Using the -force option may not be a good idea as we will lose track of all the resources being managed by Terraform. A better option would be to select that workspace, run the destroy command, and then attempt to delete the workspace again.
Note: Default workspace cannot be deleted.
As an additional point, if you don’t want to manage Terraform state, Spacelift can help overcome common state management issues and adds several must-have features for infrastructure management. It offers an optional sophisticated state backend synchronized with the rest of the application to maximize security and convenience. Read more about the state management.
Managing variables with Terraform workspaces is essential when you need different configurations for different environments, like dev, test, stage, and prod.
First, you need to declare the variables as you would normally do for any Terraform configuration. Providing values to these variables can be done easily by using tfvars files.
For each environment, you can declare a tfvars file:
vars_dev.tfvars
vars_test.tfvars
vars_stage.tfvars
vars_prod.tfvars
Based on the workspace you are on (let’s suppose you are on the dev workspace), you will run an apply like:
terraform apply –var-file=vars_dev.tfvarsYou can also conditionally assign values to different parameters based on the workspace. Let’s take a look at an example:
locals {
  instance_type = terraform.workspace == “prod” ? “t2.large” : “t2.micro”
}
The above code will assign a t2.large value to the instance_type local variable if the workspace is prod or a t2.micro, if there is any other workspace selected.
There is also an option to set up environment variables conditionally based on the workspace you are on, but this implementation uses a differentwill take advantage of another scripting language (bash/powershell/python), and you will need to create the logic of the script yourself. That’s why using multiple tfvars files makes the most sense in this approach.
As a best practice, wherever possible, you should assign default values to your variables, especially when you are working with workspaces, to avoid repeating code in the tfvars files. This will make your configuration less error-prone.
With the basics of Terraform workspaces in the background, it makes sense to use this knowledge within the Terraform configuration objects to identify the resources belonging to the respective workspaces.
For example, the EC2 instances created using the same configuration in the previous example are created with the same name, i.e., whatever value is specified in the name_tag variable. When we look at these instances in the AWS console, it becomes difficult to quickly identify which EC2 instance belongs to which workspace.
Terraform provides an interpolation sequence to reference the value of the currently selected workspace, as shown below:
${terraform.workspace}Let’s use this to set our name tags according to the respective workspace being selected. In the configuration below, we have set our name_tag variable with a default value of EC2. The aws_instance resource block uses this variable in combination with the workspace interpolation sequence to set different and respective names.
variable "name_tag" {
  type        = string
  description = "Name of the EC2 instance"
  default     = "EC2"
}

resource "aws_instance" "my_vm" {
ami           = var.ami //Ubuntu AMI
instance_type = var.instance_type

tags = {
  Name = format("%s_%s", var.name_tag, terraform.workspace)
}
}
Note: the format() function is used to concatenate multiple strings to for a valid name value.
We deleted the workspace from the previous section, so let’s also create a new workspace named “test” and create EC2 instances in both the workspaces – default, and test. See the console output below:
terraform workspace list
* default


terraform apply
…
Plan: 1 to add, 0 to change, 0 to destroy.

Changes to Outputs:
  + instance_id = (known after apply)
  + public_ip   = (known after apply)

Do you want to perform these actions?
  Terraform will perform the actions described above.
  Only 'yes' will be accepted to approve.

  Enter a value: yes

aws_instance.my_vm: Creating...
aws_instance.my_vm: Still creating... [10s elapsed]
aws_instance.my_vm: Still creating... [20s elapsed]
aws_instance.my_vm: Still creating... [30s elapsed]
aws_instance.my_vm: Creation complete after 31s [id=i-0c0a6ffa4405249d7]

Apply complete! Resources: 1 added, 0 changed, 0 destroyed.

Outputs:

instance_id = "i-0c0a6ffa4405249d7"
public_ip = "3.122.229.252"


terraform workspace new test
Created and switched to workspace "test"!

You're now on a new, empty workspace. Workspaces isolate their state,
so if you run "terraform plan" Terraform will not see any existing state
for this configuration.


terraform apply
…
Plan: 1 to add, 0 to change, 0 to destroy.

Changes to Outputs:
  + instance_id = (known after apply)
  + public_ip   = (known after apply)

Do you want to perform these actions in workspace "test"?
  Terraform will perform the actions described above.
  Only 'yes' will be accepted to approve.

  Enter a value: yes

aws_instance.my_vm: Creating...
aws_instance.my_vm: Still creating... [10s elapsed]
aws_instance.my_vm: Still creating... [20s elapsed]
aws_instance.my_vm: Still creating... [30s elapsed]
aws_instance.my_vm: Creation complete after 32s [id=i-0362373fe324e402f]

Apply complete! Resources: 1 added, 0 changed, 0 destroyed.

Outputs:

instance_id = "i-0362373fe324e402f"
public_ip = "3.72.73.27"
Here, two EC2 instances were created using the same configuration but in different workspaces. To validate if the interpolation sequences worked, log in to the AWS console and verify the names of the newly created EC2 instances.

As we can see, the names are set as expected, and now we can easily identify which instance belongs to which Terraform workspace.
Using the Terraform workspace enables us to isolate the infrastructure management of production and sub-production environments, we can also leverage the workspace interpolation sequence to allocate appropriate resources to them.
This helps us avoid the unnecessary costs of creating transient sub-production environments, as these can be the scaled-down version of the original configuration. With workspace interpolation sequence and conditions, configurations are improved, as shown below.
In the example shown below, we have used the workspace interpolation sequence to define the number of EC2 instances to be created based on the workspace selected. If the default workspace is selected, the given configuration would create three instances, and for all other workspaces, it would just create a single instance.
variable "name_tag" {
type = string
description = "Name of the EC2 instance"
default = "EC2"
}
resource "aws_instance" "my_vm" {
count = terraform.workspace == "default" ? 3 : 1
ami = var.ami //Ubuntu AMI
instance_type = var.instance_type
tags = {
Name = format("%s_%s_%s", var.name_tag, terraform.workspace, count.index)
}
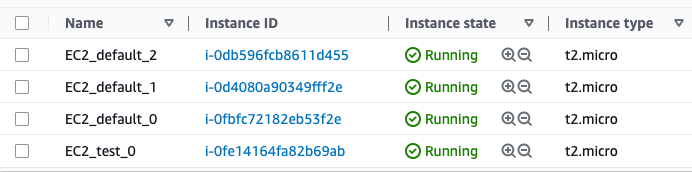
}Furthermore, corresponding changes are made to the Name tag to include the count index to distinguish between multiple instances. When we apply this configuration in the default and test workspace (which we created in the last section), we should then be able to see the following instances with names:
- EC2_default_0
- EC2_default_1
- EC2_default_2
- EC2_test_0
Let’s repeat the steps to apply this configuration in both workspaces as described in the console output of the previous section. The screenshot below shows the corresponding EC2 instances created in default and test workspaces.
Thus we have been able to limit the resource utilization of transient environments using interpolation sequence for Terraform workspaces. Similarly, we can leverage the concept of workspaces with more specific use cases.
You shouldn’t confuse branches in the version control systems with Terraform workspaces. Both have different purposes.
Git branches maintain various versioned copies of the same configuration used to develop new features or Terraform modules, whereas workspaces completely depend upon the state file maintained in the remote backend by Terraform.
In general, it is not recommended to use feature branches for deployments in the default workspace. The table below summarizes the impact of various combinations. It assumes that:
- The Terraform configuration is maintained in a Git repository
- Workspaces are used to create replica sets for debugging or developmental purposes
- The remote backend is configured for Terraform workflow
| Default workspace | Test workspace | |
| main branch | This is the desired scenario. | When we want to create a scaled-down replica of the existing environment for debugging or development purposes. |
| feature branch | Strict no. Feature branches may contain configurations and modules which are still under development. So deploying this using the default workspace should be avoided at all costs. | May not break the production, but would definitely interfere with someone else’s work in progress. Maybe consider creating a new workspace. |
When working with Terraform, if workspaces are used, they take precedence over the version control strategy.
As discussed in the previous section, introducing workspaces in the Terraform workflow, along with existing Git practices, also increases the risk of human error. If the team is not well-versed in using workspaces and branches in conjunction, the chances of wrong infrastructure deployments are high.
As we have seen before, the workspaces create a separate working directory structure to store state files. This also means that the plugins and modules are cached separately for each workspace. In a team where developers may create their own workspaces to test their changes, this can cause bandwidth and space issues on the remote backend host.
Workspaces are best used to test the changes in an isolated replica of infrastructure just before the production deployment. They are meant to be temporary and may not be the best solution to manage multiple staging environments since organizations usually want these environments to be strictly separate.
To improve your Terraform workflow, check out these 20 Terraform Best Practices.
Note: New versions of Terraform are placed under the BUSL license, but everything created before version 1.5.x stays open-source. OpenTofu is an open-source version of Terraform that expands on Terraform’s existing concepts and offerings. It is a viable alternative to HashiCorp’s Terraform, being forked from Terraform version 1.5.6.
We encourage you also to explore how Spacelift makes it easy to work with Terraform. If you need any help managing your Terraform infrastructure, building more complex workflows based on Terraform, and managing AWS credentials per run, instead of using a static pair on your local machine, Spacelift is a fantastic tool for this. It supports Git workflows, policy as code, programmatic configuration, context sharing, drift detection, and many more great features right out of the box. You can check it for free by creating a trial account or booking a demo with one of our engineers.
Automate Terraform Deployments with Spacelift
Automate your infrastructure provisioning, and build more complex workflows based on Terraform using policy as code, programmatic configuration, context sharing, drift detection, resource visualization, and many more.


Terraform CLI Commands Cheatsheet
Initialize/ plan/ apply your IaC, manage modules, state, and more.