
Open Policy Agent (OPA) is a general-purpose policy engine that evaluates inputs against expressions you configure. Although OPA is suitable for a wide variety of use cases, it’s most commonly found enforcing security policies that prevent unsafe configurations from being applied to your cloud resources and infrastructure components.
This article will introduce you to the benefits of OPA and explain how it integrates with Kubernetes to support security, compliance, and access controls. We’ll then walk through a simple guide to getting started with your own OPA policies in your cluster.
What we will cover:
What is Open Policy Agent (OPA)?
OPA is a tool that allows you to write and query policies using a declarative language. Policies are sets of rules and conditions that configure the criteria for allowing an operation. In a Kubernetes context, you could create policies that enforce best practices — such as Pods having correct labels, including a safe security context configuration, and not binding directly to host ports.
OPA is a flexible system designed to support easy integration with all your tools. You can feed OPA any JSON input — such as a Kubernetes manifest — to check compatibility with your policies and produce a decision on whether the content is valid.
OPA policies are written in the Rego query language. Rego is purpose-built to make it easy to write complex conditions in an expressive format that remains relatively approachable for human readers. You define what the query should do — such as throw an error if a particular input field is present — rather than coding exactly how to carry out the checks.
Rego policy example
A minimal Rego rule that requires Kubernetes objects to have a team_id label might look like this:
package kubernetes_team_id_label

import rego.v1

default allow := false

allow if input.review.object.metadata.labels.team_id
When this policy is evaluated, it will output a JSON object:
{
  "allow": true
}
If the Kubernetes manifest JSON supplied to OPA includes a team_id label, he value of the allow property will be true. Otherwise, it will be false.
What is OPA used for in Kubernetes?
Using OPA with Kubernetes allows you to define requirements for objects your cluster’s users create and change. For example, you could write a policy that ensures only images from your own registry are used, preventing potentially hazardous external sources from being deployed. Because OPA policies are continually enforced, you can be confident you’re protected without having to manually check what’s running in your cluster.
Kubernetes supports validating admission controllers that allow external services to determine whether objects should be admitted to your cluster. When a controller is enabled, it receives each object update and can issue a response to either accept or reject it. When the object is rejected, Kubernetes will block the operation and return an error to the user.
Using OPA with Kubernetes, therefore, requires an admission controller that will send your objects to your OPA instance. You also need an OPA installation and a way to define and register its Rego policies.
Although it’s possible to connect Kubernetes and OPA manually, it’s normally easier to use the OPA Gatekeeper project. Adding Gatekeeper to your cluster installs OPA and provides a set of Kubernetes CRDs for configuring your policies (which Gatekeeper refers to as “constraints”). This automates the process of preparing your cluster to use OPA for object validation.
What is the difference between Gatekeeper and OPA?
OPA is a general-purpose policy engine. It’s not specific to Kubernetes and can be used in any scenario where you need to validate JSON input against predefined policy conditions. It’s commonly used with tools like Terraform to protect against IaC misconfigurations, for example, and you can also integrate it with your own applications.
Gatekeeper combines OPA with a Kubernetes-native layer that includes CRDs and a cluster admission controller implementation to enforce policies on Kubernetes resources. This makes it easier to utilize OPA in a Kubernetes cluster, without having to manually configure an admission controller and administer an OPA instance. For this reason, Gatekeeper is the recommended approach for using OPA policies in a Kubernetes cluster.
Benefits of using OPA with Kubernetes
OPA is a versatile mechanism for creating declarative security policies that protect your Kubernetes clusters from misconfiguration. Here are some of the benefits that OPA and Gatekeeper provide:
- Ensure objects use only authorized configuration: OPA rules allow you to configure the fields and values that can be used in your Kubernetes manifests. It provides a robust mechanism for ensuring only authorized configurations are used, preventing security oversights caused by developers accidentally making unsafe choices.
- Apply consistent controls across all teams and apps: OPA policies can target all the objects in your cluster, guaranteeing that each team, app, and environment is held to a minimum security baseline.
- Maintain compliance with regulatory standards: Policy enforcement and attestation are central to compliance. OPA makes it simple to enforce security controls and demonstrate which policies are active and the rules they include. This helps to prove ongoing compliance.
- Enable granular security policy and rule enforcement: Rego policies are expressive but powerful. You can enforce granular constraints for specific resource types in your cluster, ensuring each one is subject to the specific controls it requires.
- Centrally manage policies as code: OPA allows you to manage your policies as code using an IaC approach. This simplifies the process of creating and changing policies. Policies may also be reused across multiple clusters, helping reduce operational overheads.
These advantages make OPA one of the most popular and flexible ways to enforce policies in Kubernetes clusters. Now let’s look at how to get started with OPA in practice.
Example: How to deploy OPA in Kubernetes
This tutorial will provide a simple overview of installing Gatekeeper in your Kubernetes cluster and creating a basic policy. You can learn more about writing policies by reading our Rego tutorial or the OPA documentation.
Deploying OPA in Kubernetes involves the following steps:
- Install Gatekeeper.
- Create a constraint template.
- Create an instance of the constraint template.
- Test your Gatekeeper constraint.
- Experiment with more complex policy constraints.
1. Install Gatekeeper in your Kubernetes cluster
You’ll need Kubectl, Helm, and access to a Kubernetes cluster to follow along with this tutorial.
It’s easiest to install Gatekeeper from its official Helm repository. First, add the repository to your Helm client:
$ helm repo add gatekeeper https://open-policy-agent.github.io/gatekeeper/charts
"gatekeeper" has been added to your repositories
Next, run helm update to discover the Helm charts available in the repository:
$ helm repo update
Hang tight while we grab the latest from your chart repositories...
...Successfully got an update from the "gatekeeper" chart repository
Update Complete. Happy Helming!
You can now run the following command to install Gatekeeper in your cluster:
$ helm install gatekeeper/gatekeeper \
  --name-template gatekeeper \
  --namespace gatekeeper-system \
  --create-namespace
NAME: gatekeeper
LAST DEPLOYED: Wed May 22 17:23:33 2024
NAMESPACE: gatekeeper-system
STATUS: deployed
REVISION: 1
TEST SUITE: None
Use Kubectl to check the installation completes successfully and Gatekeeper’s deployments become available:
$ kubectl get deployments -n gatekeeper-system
NAME                            READY   UP-TO-DATE   AVAILABLE   AGE
gatekeeper-audit                1/1     1            1           98s
gatekeeper-controller-manager   3/3     3            3           98s
Gatekeeper is now ready to use.
2. Create a Constraint Template
You’re ready to create the first policy for your cluster. Gatekeeper models policies as “constraints,” meaning criteria that your Kubernetes objects must meet to be accepted into your cluster.
Constraints are created from Constraint Templates. A Constraint Template is a CRD that defines a Rego policy. You then create instances of the Constraint Template to apply the policy to specific Kubernetes object types. We’ll see this in the next step.
For now, copy the following ConstraintTemplate YAML manifest and save it as constraint-template.yaml. It defines a Rego policy called TeamId; similarly to the example shown earlier, the policy requires that Kubernetes objects have a team_id label attached.
apiVersion: templates.gatekeeper.sh/v1beta1
kind: ConstraintTemplate
metadata:
  name: teamid
spec:
  crd:
    spec:
      names:
        kind: TeamId
  targets:
    - target: admission.k8s.gatekeeper.sh
      rego: |
        package team_id_label

        import future.keywords.if

        default allow := false

        allow if input.review.object.metadata.labels.team_id

        violation[{"msg": msg, "details": {}}] {
          not allow
          msg := "The team_id label is required"
        }
This policy builds upon our original version. The violation Rego block is a Gatekeeper requirement — Rego uses this block as your rule’s entry point. If a violation occurs, it should be added to the block’s output as an object that includes msg and details (optional) properties.
In this rule, we check whether the allow variable is false, indicating that a policy violation occurred; if so, an explanatory message is provided to help the Kubernetes user understand why their object has been rejected.
Use Kubectl to deploy the ConstraintTemplate into your cluster:
$ kubectl apply -f constraint-template.yaml
constrainttemplate.templates.gatekeeper.sh/teamid created
3. Create an instance of the Constraint Template
When you create a Constraint Template in your cluster, Gatekeeper automatically defines a new Kubernetes CRD that allows you to create instances of the template. The name of the CRD’s object kind is taken from the value of the spec.crd.spec.names.kind field in the Constraint Template’s manifest — this is TeamId in our example.
To begin enforcing our Rego policy, we need to create a new TeamId constraint object. This object selects one or more Kubernetes object types that the policy will be enforced for.
The following example applies the TeamId constraint to Pods in the cluster. This will prevent Pods from being created or changed unless they have the team_id label applied:
apiVersion: constraints.gatekeeper.sh/v1beta1
kind: TeamId
metadata:
  name: teamid-pods
spec:
  match:
    kinds:
      - apiGroups: [""]
        kinds: ["Pod"]
    excludedNamespaces:
      - kube-system
  parameters: {}
The spec.match.excludedNamespaces field is important because it ensures Kubernetes system Pods in the kube-system namespace won’t be inadvertently flagged as violating the policy. The spec.parameters field can be used to supply inputs to the Constraint’s template in more advanced scenarios, but this isn’t required for this example.
Save the manifest as constraint.yaml and use Kubectl to apply it:
$ kubectl apply -f constraint.yaml
teamid.constraints.gatekeeper.sh/teamid-pods created
4. Test your Gatekeeper constraint
You can now test your constraint! Based on the rule we’ve created, the following behavior should be observed:
- You can create Pods if they include the
team_idlabel. - Pods without the label will trigger an error and won’t be added to the cluster.
Copy the following Pod manifest and save it as invalid-pod.yaml:
apiVersion: v1
kind: Pod
metadata:
  name: invalid-pod
spec:
  containers:
    - name: nginx
      image: nginx:alpine
Applying this Pod manifest to your cluster will display the violation error message defined in your Gatekeeper ConstraintTemplate:
$ kubectl apply -f invalid-pod.yaml
Error from server (Forbidden): error when creating "invalid-pod.yaml": admission webhook "validation.gatekeeper.sh" denied the request: [teamid-pods] The team_id label is required
The Pod doesn’t include the team_id label, so Gatekeeper denied the request.
Try modifying the Pod manifest so that the label is set:
apiVersion: v1
kind: Pod
metadata:
  name: valid-pod
  labels:
    team_id: frontend
spec:
  containers:
    - name: nginx
      image: nginx:alpine
Save this manifest as valid-pod.yaml, then repeat the Kubectl command to add it to your cluster:
$ kubectl apply -f valid-pod.yaml
pod/valid-pod created
This time Gatekeeper accepts the request, so the Pod is successfully admitted into the cluster.
5. Next steps
Now you’ve seen OPA and Gatekeeper in action, you can continue your learning to begin creating more complex policy constraints for your Kubernetes deployments.
The OPA website provides helpful background context on how OPA and the Rego language are designed. The OPA Gatekeeper Constraint Framework documentation also offers a useful description of the requirements that apply to Rego policies used with Gatekeeper.
Another valuable resource is OPA’s Rego Playground. This interactive tool allows you to write policies, lint them, and test their outputs. The Playground also includes a selection of example policies, including ones for Kubernetes.
Defining policies with Spacelift
OPA is integrated into the Spacelift platform. You can define policies for different purposes:
- Use login policies to control who can log in to your Spacelift account and what role they should have once inside.
- Use approval policies to control who can approve or reject runs of your stacks or to allow or reject runs automatically based on some other condition.
- Use plan policies to control what changes can be applied to your infrastructure.
You can find the schema for the input for each type of policy in the Spacelift documentation.
If you use Terraform to configure your Spacelift environment, you can create policies using the spacelift_policy resource type:
resource "spacelift_policy" "business_hours" {
  name        = "deny-run-outside-business-hours"
  description = "Deny runs to start outside of business hours"
  body        = file("${path.module}/policies/business-hours.rego")
  type        = "APPROVAL"
  space_id    = "root"
  labels = [
    "autoattach:team"
  ]
}
This policy is configured as an approval-type policy. The content is provided in the body argument and kept in a separate file.
To enforce your OPA policies at scale in Spacelift, you can place them in the root space and add the special autoattach:<label> label, where <label> is a label you attach to the stacks where the policy should automatically be applied. In the example above, all stacks with the team label will automatically have this policy attached. This makes managing policies at scale a breeze.
To see an overview of all the policies you have defined, go to the policy overview page in Spacelift:
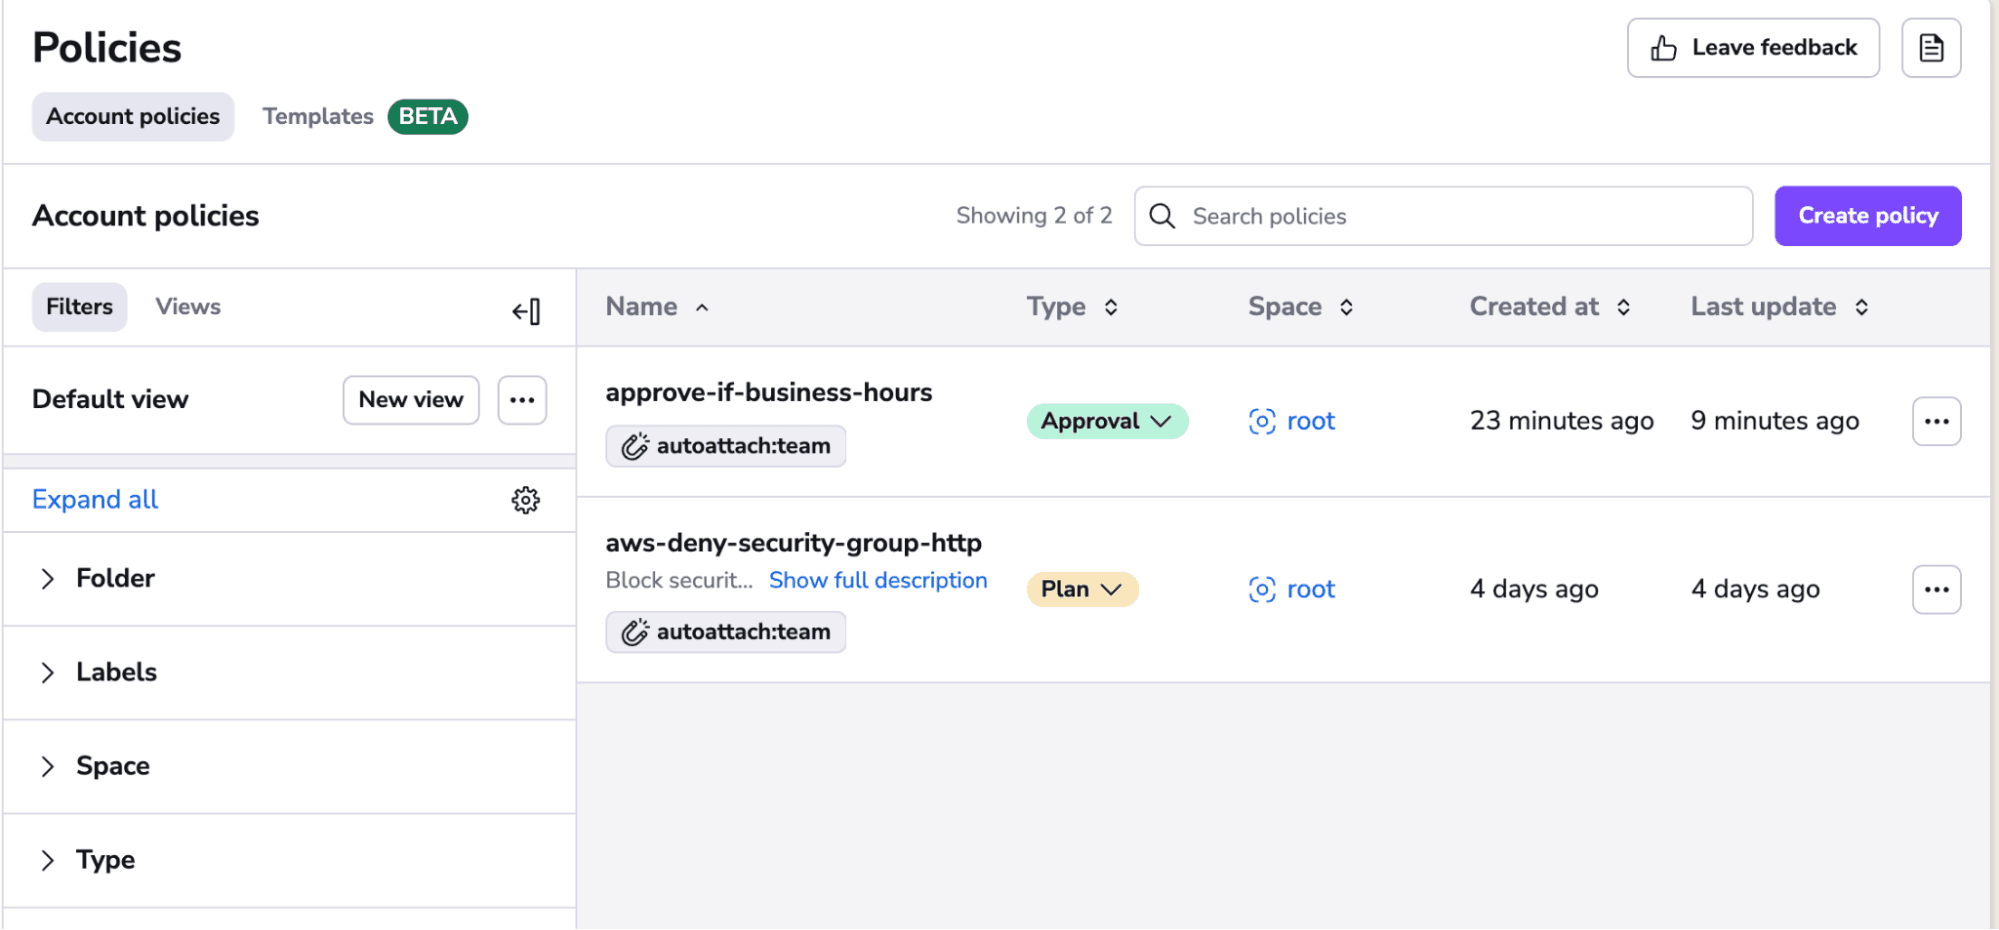
This list shows all policies, their type, their location, and any labels attached to them.
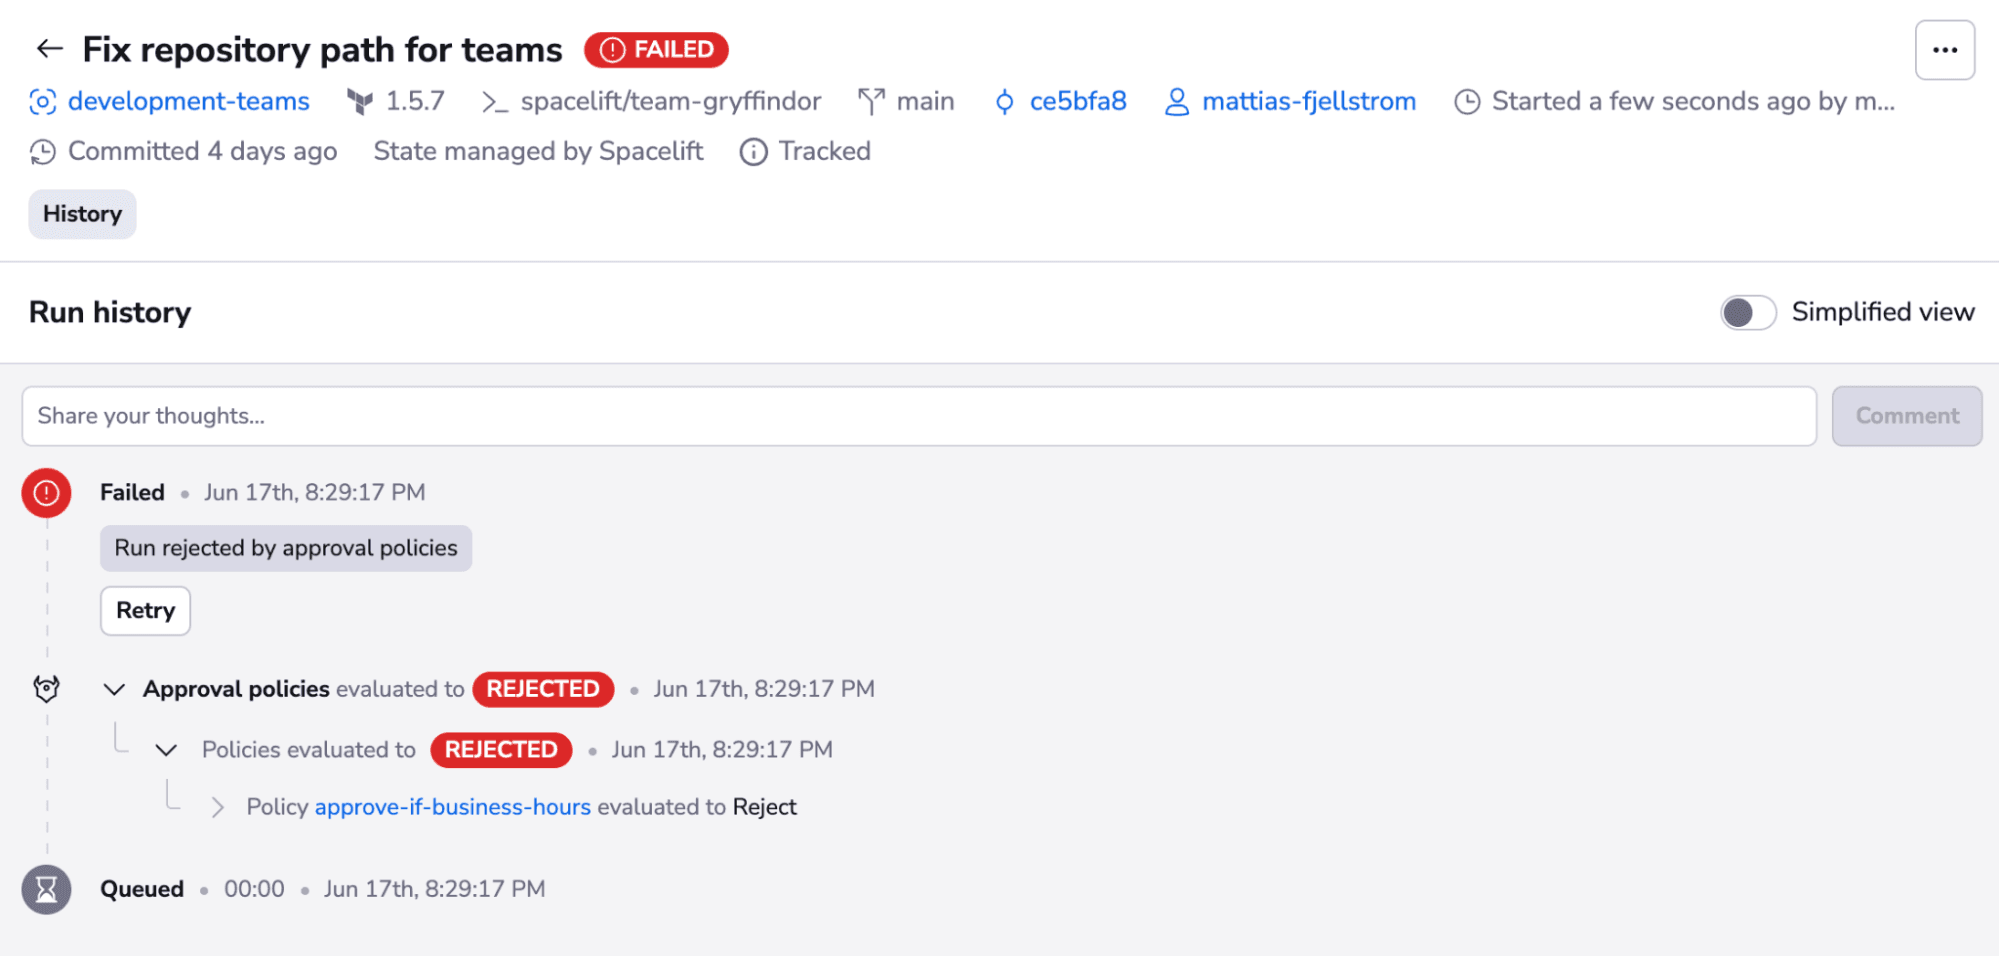
The different kinds of policies available in Spacelift are applied at different times. When a new run is triggered for a given stack, any approval-type policies are applied immediately. In the image below, a run was triggered outside business hours, and an approval policy automatically denied the run from continuing:
If the run passes all the approval policies, the plan phase starts. Once the plan phase is complete, any plan phase policies are evaluated, taking the plan output into account.
The ability to apply policies in different phases is extremely powerful. You can stop a plan from happening if approval policies are denied, and you can stop an apply phase from going ahead if a plan phase policy is violated.
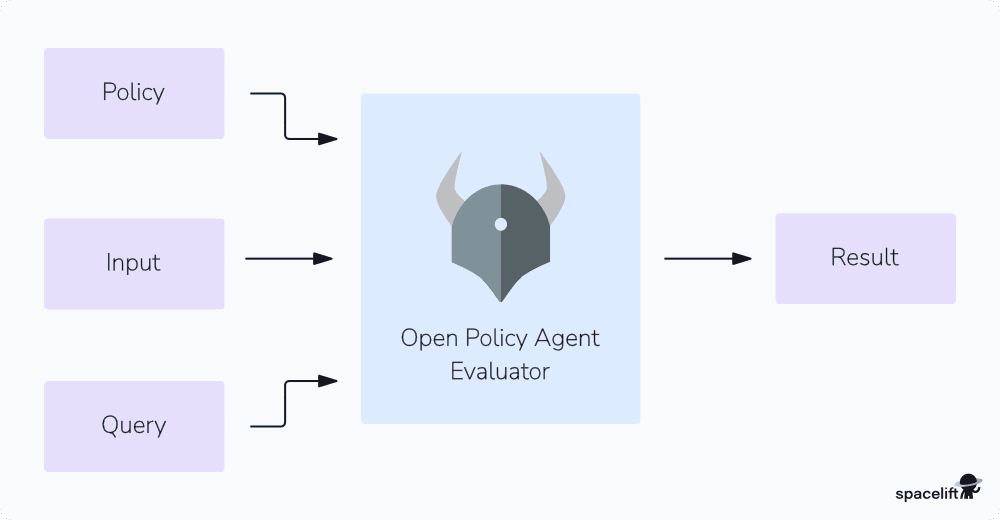
Note that when we created policies and applied them in Spacelift, we only ever explicitly provided one of the three required parts to run OPA: the policy itself. The Spacelift platform handles the other two parts — the input and the query. To write successful policies, we must be aware of the schema of the input and the query Spacelift is using. All of this information can be found in the documentation for each type of policy.
Check out this video where we dive into common use cases of Spacelift policies and how teams are using them to achieve security and cost control of their infrastructure:
If you want to learn more about Spacelift, create a free account today, or book a demo with one of our engineers.
Key points
OPA is an open-source tool for defining and validating Rego policies. It lets you express complex criteria as human-readable rules. The rules are evaluated against inputs such as OPA Kubernetes manifest changes to determine whether an operation is permitted in your environment.
Gatekeeper allows you to easily integrate OPA for Kubernetes admission control. It includes a set of Kubernetes CRDs you can use to declaratively manage your cluster’s OPA policies. It also automates the process of configuring OPA as a Kubernetes admission controller, ensuring OPA is consulted each time a cluster object is created, updated, or deleted.
OPA improves Kubernetes security by protecting against unsafe configurations applied by users. Nonetheless, it’s important to continue following other Kubernetes best practices too, such as use of RBAC to prevent unauthorized user access and security contexts to restrict Pod runtime capabilities.
Manage Kubernetes Easier and Faster
Spacelift allows you to automate, audit, secure, and continuously deliver your infrastructure. It helps overcome common state management issues and adds several must-have features for infrastructure management.
Frequently asked questions
What is a key reason for using Open Policy Agent in a Kubernetes cluster?
A key reason to use Open Policy Agent (OPA) in a Kubernetes cluster is to enforce fine-grained, customizable admission control policies. OPA lets you define rules in Rego to validate or reject Kubernetes API requests, such as restricting deployments to certain namespaces or blocking privileged containers, without modifying the cluster’s core components.
Can OPA be used for authorization?
Yes, OPA (Open Policy Agent) is commonly used for authorization. It allows you to define fine-grained access control policies using its Rego language, separate from application code. OPA can enforce decisions across microservices, APIs, Kubernetes, or custom apps by evaluating whether a user action on a resource is allowed based on policy logic and input data.
