
Terraform is a standard in infrastructure as code (IaC), but managing it at scale can be cumbersome. As a result, the adoption of Terraform Automation and COllaboration Software (TACOS) is rising. One of these tools is Atlantis.
We will cover:
What is Atlantis
Atlantis is an automation tool that enhances the PR workflows for Terraform projects. It is used to reduce the complexity of collaboration and governance for your Terraform workflow. The tool is open-source and does not offer any SaaS, so you will have to install and configure it yourself.
With Atlantis, you get support for multiple VCS providers such as GitHub, Bitbucket, GitLab, and Azure DevOps, and you can leverage both Terraform and Terragrunt workflows.
Atlantis runs as a golang binary or Docker image and you can deploy it on VMs, Kubernetes, Fargate, etc.
See Atlantis vs. Terraform Cloud/Enterprise comparison.
How does Atlantis work
Atlantis offers a structured approach that ensures infrastructure changes are made in a controlled, transparent, and collaborative manner, integrating seamlessly with the existing pull request workflow used by development teams.
Key steps of how Atlantis works:
- Initialization: You need to install and configure Atlantis in your environment. It can be configured either on-premise, or in a cloud environment. There are various ways to install it. Atlantis server starts by initializing itself with the configuration from its atlantis.yaml file.
- Connecting to a VCS: Atlantis can integrate with GitHub, GitLab, Bitbucket, and Azure DevOps, and it works by creating webhooks that listen to events related to pull requests, commits to the tracked branch, and comments.
- Detecting Pull Request: When a developer creates or updates a pull request in a linked VCS, Atlantis will detect this action.
- Automatic Plan: Atlantis will automatically run terraform plan for the Terraform configuration affected by the pull request. This generates an execution plan showing potential changes to the infrastructure, without making the changes per se.
- Commenting Plan Output: The result of the terraform plan command is posted as a comment in the pull request window, allowing developers to review the proposed change and make everyone with sufficient rights to view the PR aware of what will potentially happen,
- Manual Approval: Team members review the plan within the pull request and provide approvals or feedback.
- Applying Changes: Once the proposed changes are approved, a team member needs to issue a command in a comment (typically atlantis apply), instructing Atlantis to apply them.
- Executing Apply: Atlantis runs terraform apply to make the approved changes to the infrastructure.
- Locking State: During the plan and apply phases, Atlantis locks the Terraform state to prevent eventual conflicts or inconsistencies generated by concurrent executions.
- Reporting Status: Atlantis reports the status of the apply back to the pull request, indicating whether the changes were successfully completed or not.
- Logging and Auditing: All actions taken by Atlantis are logged, providing an audit trail for changes made to the infrastructure.
- Custom Workflows: Atlantis allows for the configuration of custom workflows to accommodate specific needs or policies of a development team.
Atlantis default workflow
In a nutshell, this is how the default Atlantis workflow operates:
- A DevOps engineer makes some changes to a Terraform repository from a feature/hotfix branch.
- Then he opens a PR against the main branch.
- This will trigger an atlantis plan:
- Behind the scenes, this will run a terraform plan against the code.
- Atlantis will comment on the PR with the output of terraform plan so engineers can review the infrastructure changes.
- Peer Review → Engineers will check the plan, discuss potential issues or improvements, and finally approve or discard the run. If the run is discarded, the process stops at this point.
- If the review ends with an approval, you can run atlantis apply via a PR comment.
- Atlantis will run terraform apply behind the scenes and comment the output on the PR.
- If everything is successful, you can merge the pull request and delete the feature/hotfix branch.
Atlantis benefits
The main focus of Atlantis is to extend Terraform’s capabilities when working in a team. It ensures changes are collaborative, auditable, and consistent.
Here are some examples of Atlantis use cases:
- Enhanced collaboration: Atlantis fosters better collaboration among team members by integrating with version control systems. It provides a centralized platform for code review and feedback, ensuring a structured and efficient workflow.
- Pull request management: Atlantis excels in managing pull requests within your VCS. It enables the automatic triggering of Terraform commands within the context of pull requests, allowing reviewers to make thorough decisions when there are infrastructure changes.
- Automation and consistency: It automates Terraform workflows and maintains consistency across different environments. Terraform commands are automated, and this reduces the need for manual intervention and minimizes human error.
- Integration with CI/CD systems: Atlantis can be seamlessly integrated into CI/CD systems, enabling IaC CI/CD. This integration ensures that changes are tested and deployed automatically while maintaining the necessary visibility and review processes.
- Environment stability: Atlantis provides a locking mechanism for environments or workspaces when provisioning infrastructure. This prevents conflicts and ensures stability by stopping the execution of conflicting operations.
- Scaling infrastructure management: For organizations scaling their operations, Atlantis helps manage the growing complexity of infrastructure requirements. It simplifies and streamlines the process, making it easier to handle an increasing number of projects and environments.
Atlantis limitations
Atlantis enhances your workflow, but you should consider the following limitations before choosing it as the TACOS for your organization:
- Workflow complexity – Atlantis is heavily reliant on pull requests for its operations. This approach can be non-intuitive and cumbersome, especially when setting up multiple workspaces linked to the same Git repository
- The lack of direct mapping between projects and branches/tags – Any user with comment access on an approved pull request can deploy code, potentially leading to unintended deployments to production or other environments.
- Policy framework – While Atlantis supports Open Policy Agent (OPA) as part of the workflow, the integration is not as robust as you would get from any TACOS, thus limiting the effectiveness of ensuring compliance all around your projects.
- No private registry – Atlantis doesn’t offer any solution for private module/provider registry, whereas other TACOS do.
- Complex configuration process – It is hard to configure when you compare it with other TACOS.
- No drift detection – Atlantis doesn’t offer direct drift detection as other TACOS do, but you can configure drift detection tools as part of your CI/CD.
How to use Atlantis to manage Terraform and Terragrunt projects
Step 1: Prerequisites for all installation types
First, we need to install and configure Atlantis. This guide describes various ways you can do the actual deployment.
- Regardless of the method of installation, we need to define Git Host access credentials for the specific VCS provider we use, as shown here. I’ll be using my GitHub user, so I have to create a Personal Access Token (PAT) for that. I will save this token, as it will only be shown once, and we need to make a record of it.
- Apart from the token, we also need to create a webhook secret, and you can use any random string generator for that. This secret should have more than 24 characters. You can:
- Generate via Ruby with ruby -rsecurerandom -e ‘puts SecureRandom.hex(32)’
- Generate online with https://www.browserling.com/tools/random-string
Take note of this webhook secret, as we will need it in the future.
Step 2: Create an EKS cluster
I will use an EKS cluster to install Atlantis. To create an EKS cluster, you can use any method you’d like:
- AWS Management Console
- AWS CLI
- eksctl
- Terraform
- CloudFormation
- AWS SDKs
- Etc.
You can also look into AWS’ official documentation here.
After the cluster setup is complete, ensure you have updated your local kubeconfig:
aws eks update-kubeconfig --region <Your_Region> --name <Your_ClusterName>
Step 3: EKS cluster Atlantis installation prerequisites
We need to do a few things before proceeding to the installation. From EKS 1.23 onwards, to get your PersistentVolumeClaims served by a PersistentVolume you need a Container Storage Interface (CSI) driver. A PersistentVolume will be required for Atlantis, so we will have to do this.
To install this driver we need to:
- Install eksctl:
# MacOS
brew tap weaveworks/tap
brew install weaveworks/tap/eksctl

# Linux
curl --silent --location "https://github.com/weaveworks/eksctl/releases/latest/download/eksctl_$(uname -s)_amd64.tar.gz" | tar xz -C /tmp
sudo mv /tmp/eksctl /usr/local/bin- Enable IAM OIDC provider:
eksctl utils associate-iam-oidc-provider --region=<Your_Region> --cluster=<Your_ClusterName> --approve- Create a Service Account for the Amazon EBS CSI driver role:
eksctl create iamserviceaccount \ --region eu-central-1 \ --name ebs-csi-controller-sa \ --namespace kube-system \ --cluster <Your_ClusterName> \ --attach-policy-arn arn:aws:iam::aws:policy/service-role/AmazonEBSCSIDriverPolicy \ --approve \ --role-only \ --role-name AmazonEKS_EBS_CSI_DriverRole- Add the Amazon EBS CSI add-on:
eksctl create addon --name aws-ebs-csi-driver --cluster <Your_ClusterName> --service-account-role-arn arn:aws:iam::$(aws sts get-caller-identity --query Account --output text):role/AmazonEKS_EBS_CSI_DriverRole --forceStep 4: Prepare the Helm chart
We will leverage the official Helm chart for installing Atlantis and follow the steps provided in the link.
- Add the Helm repo:
helm repo add runatlantis https://runatlantis.github.io/helm-charts- Create a folder in which you want to save the values you will use for your Atlantis installation:
mkdir atlantis
cd atlantis- Save the values file from the Helm chart in a local file:
helm inspect values runatlantis/atlantis > values.yaml- Make changes to the following parts inside your values file:
orgAllowlist: github.com/<Your_User/Your_Org>/*
…
github:
  user: <Your_GitHub_User>
  token: <Your_GitHub_PAT>
  secret: <Your_Webhook_SECRET>
…
service:
  type: LoadBalancer
  port: 80
…
We need to ensure that our details are accurate in this section and that the service is set to LoadBalancer instead of NodePort for the Atlantis server to be accessible.
Step 5: Install the Helm Chart
To install the helm chart, you need to simply run:
helm install atlantis runatlantis/atlantis -f values.yamlAfter a couple of minutes, you should see the pod up and running in the default namespace, by running kubectl get pods.
Now that Atlantis is installed we need to get the exposed service and access it. For that, we can run:
kubectl get svc --namespace default atlantis -o jsonpath='{.status.loadBalancer.ingress[0].hostname}'

<a056470e3e2fc4675a68…>.eu-west-1.elb.amazonaws.com
Let’s access the service through a browser:
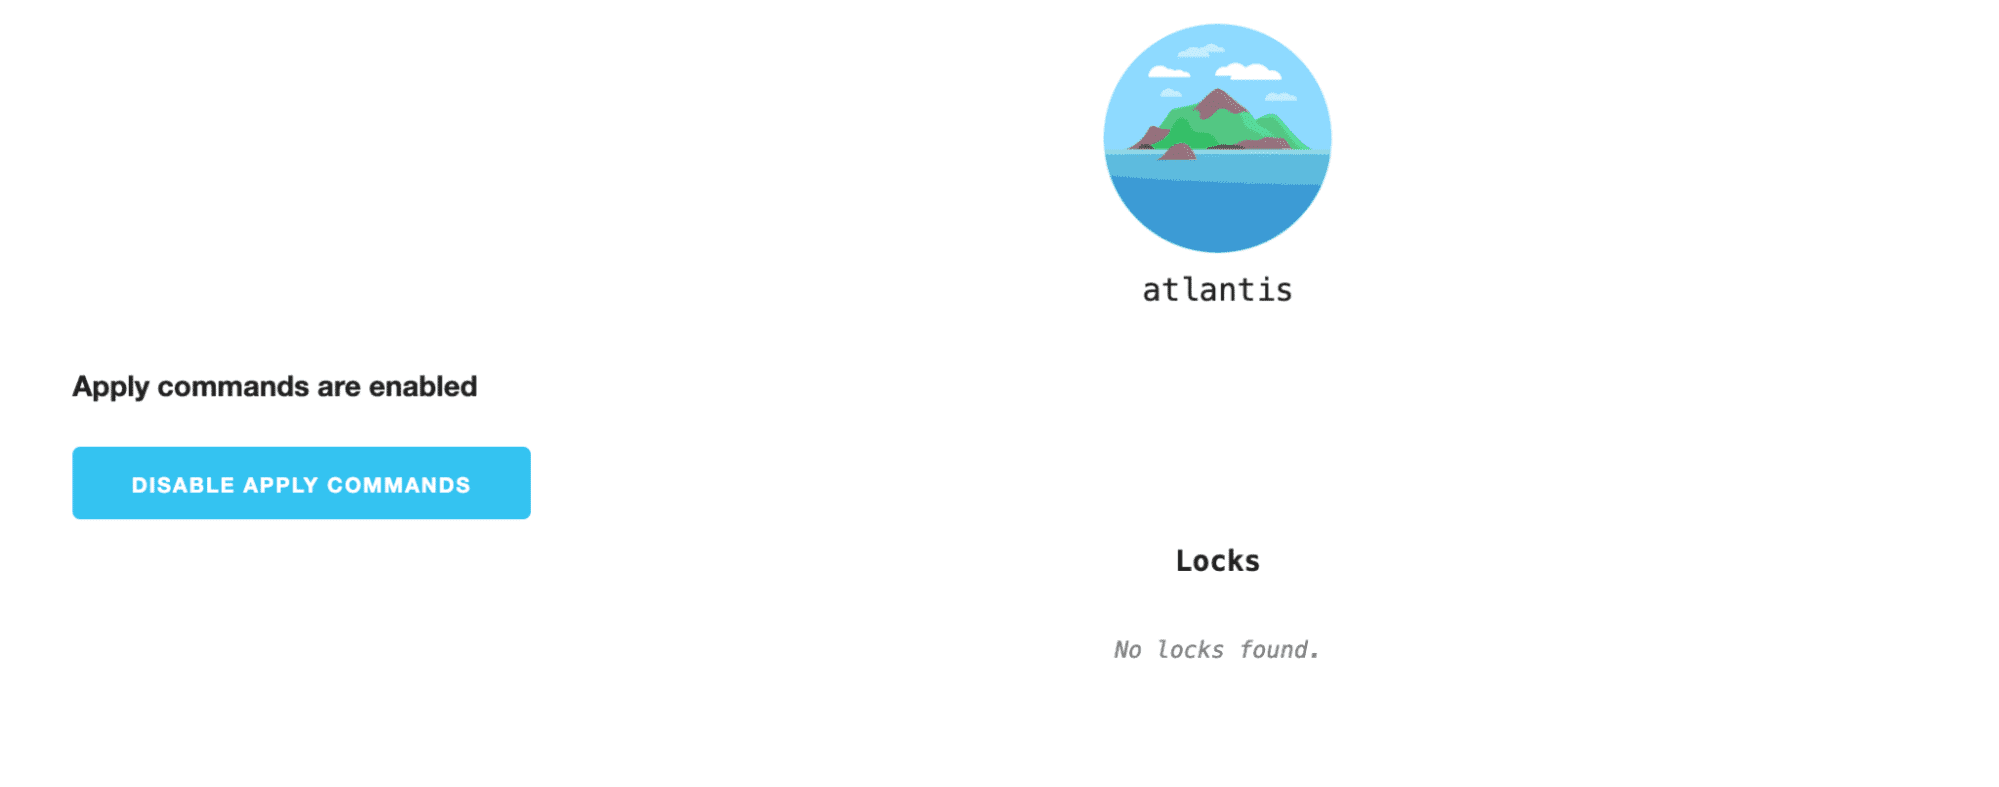
As you can see, the service is now accessible, but we are not yet ready to take advantage of Atlantis as we need to configure our repositories to use it.
Step 6: Configure a repository to use Atlantis
To configure a repository inside your GitHub account to use Atlantis, go to that particular repository’s settings page and select Webhooks.
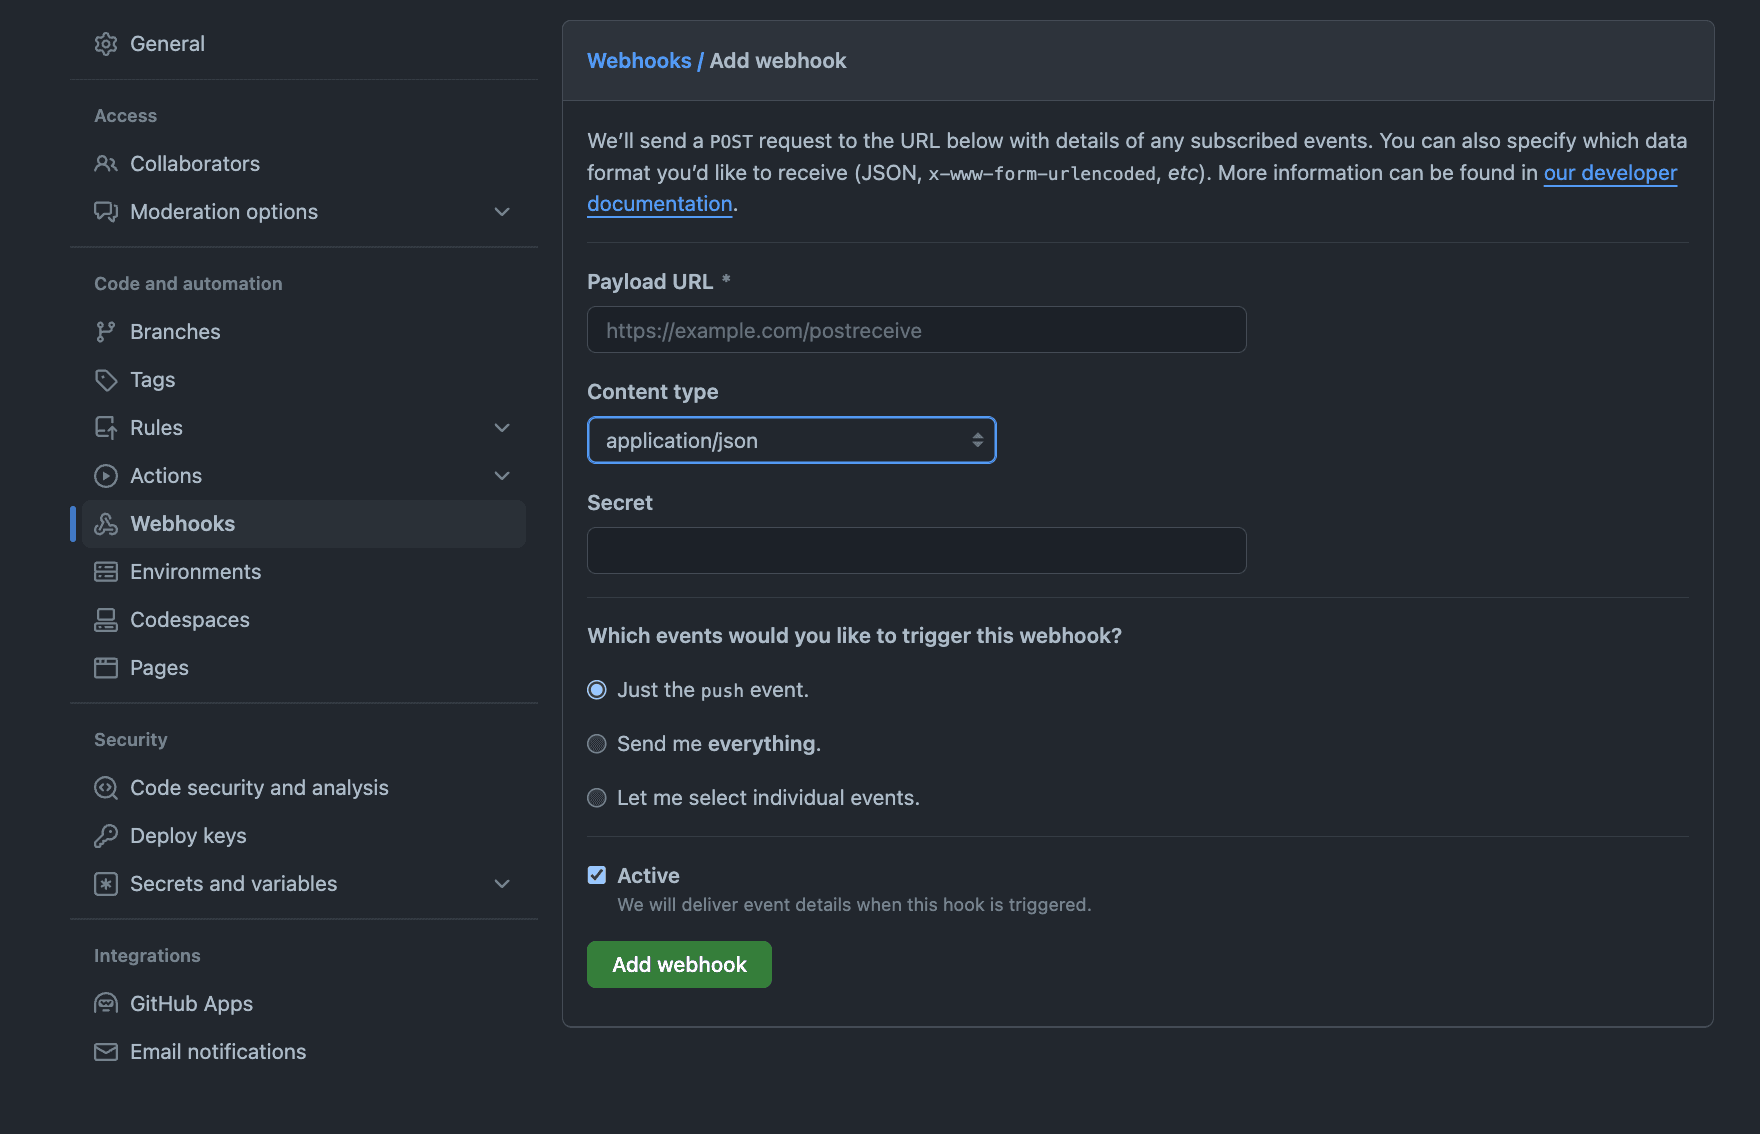
The payload URL is the hostname we’ve exposed in step 5, followed by a /events. In my case this is: <a056470e3e2fc4675a68…>.eu-west-1.elb.amazonaws.com/events
The content type should be set to the application/json, and the secret should be set to the webhook secret we have created before.
We will need to change the events that trigger this webhook to “Let me select individual events”. These events should be:
- Pull-Request
- Push
- Pull-Request Reviews
- Issue Comments
After we have selected these, we can click on the “add webhook” option.
Now we are ready to take Atlantis for a spin.
Step 7: Using Atlantis
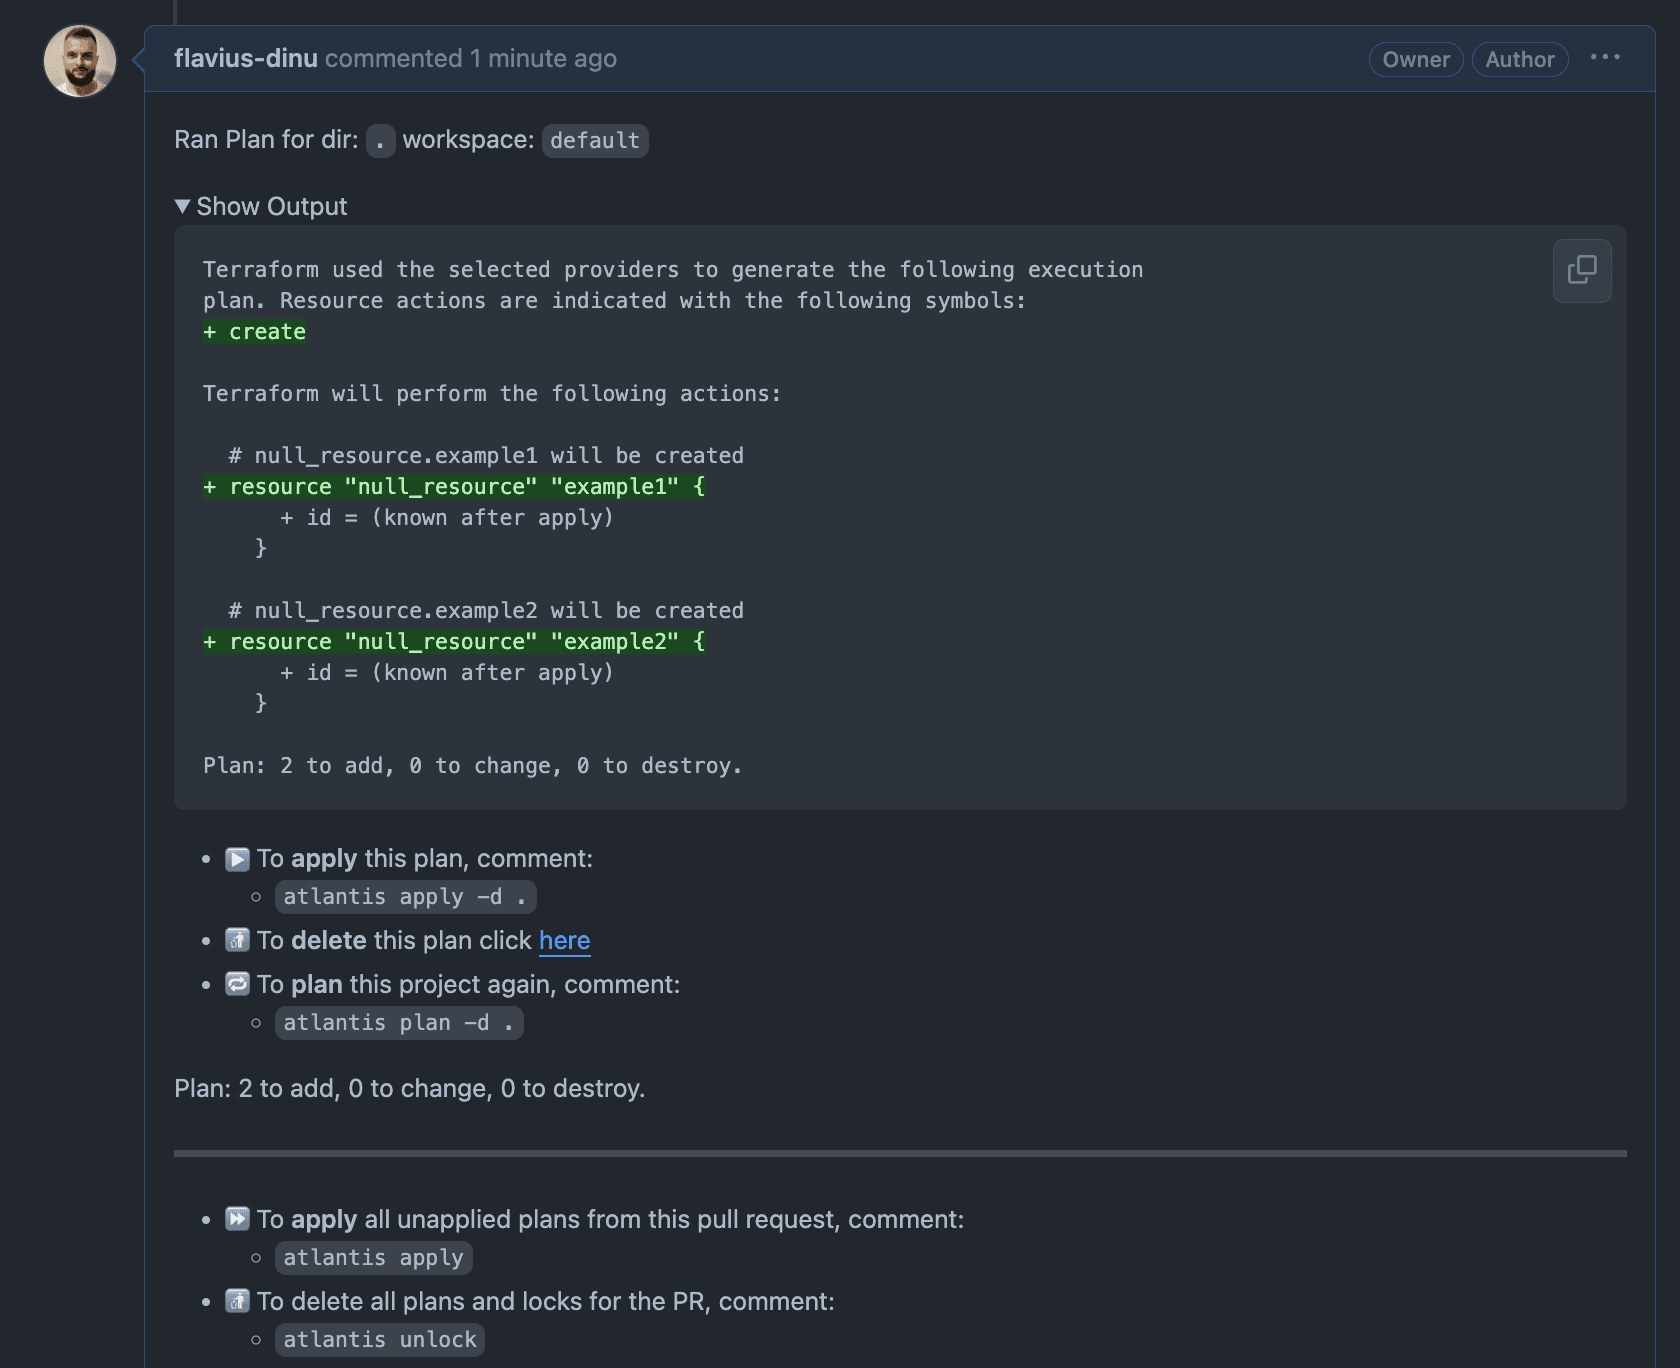
Now that we have everything set up, we can take advantage of Atlantis. My repository had only a README.md initially, so I’ve added a simple terraform code that creates two null resources with the local-exec provider inside of them in another branch.
I’ve pushed the branch and created a pull request. I immediately saw a plan running in my PR, and after it finished, I received the output of this plan in a PR comment as shown below:
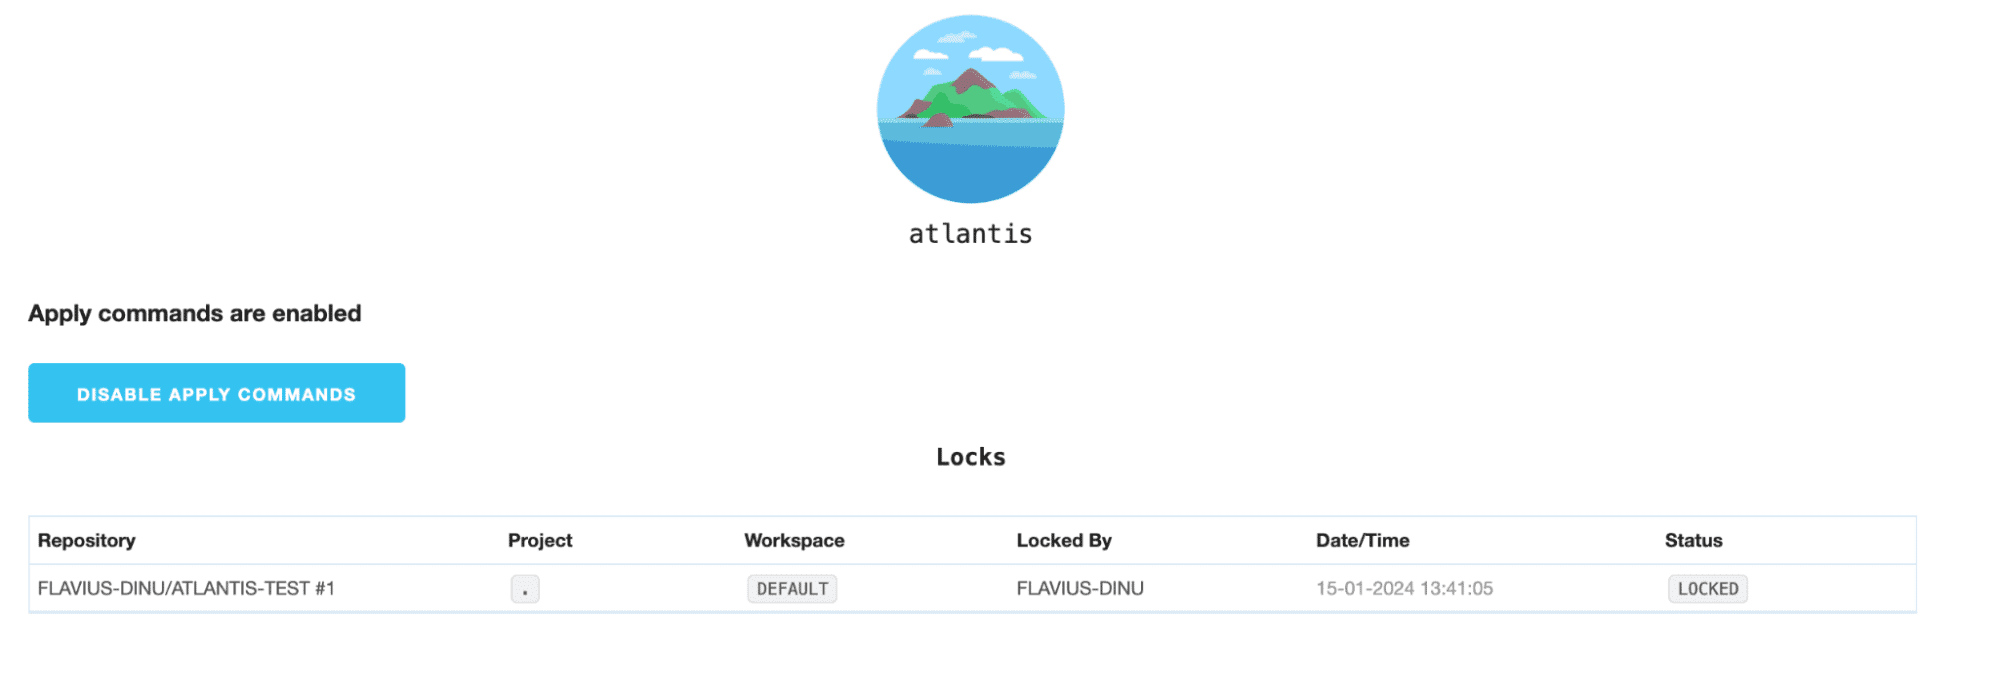
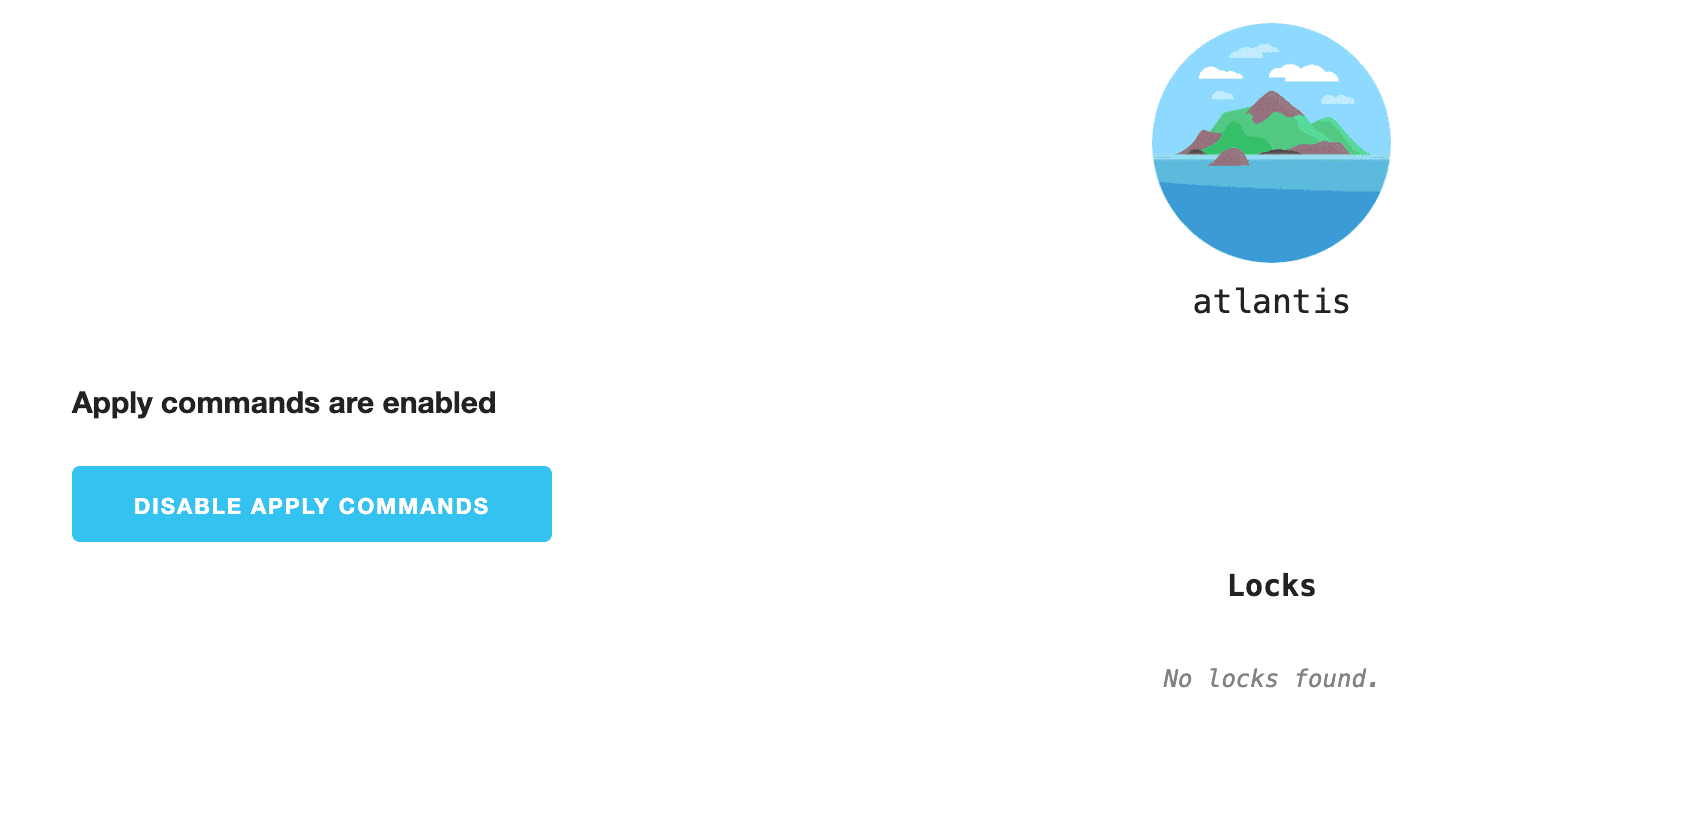
I also went to the Atlantis UI and saw that my repo is now locked, to prevent any other changes from happening on it:
As I was happy with my plan, I commented on my pull request with atlantis apply, and a terraform apply started, and as soon as it finished, I received the output again in a PR comment.
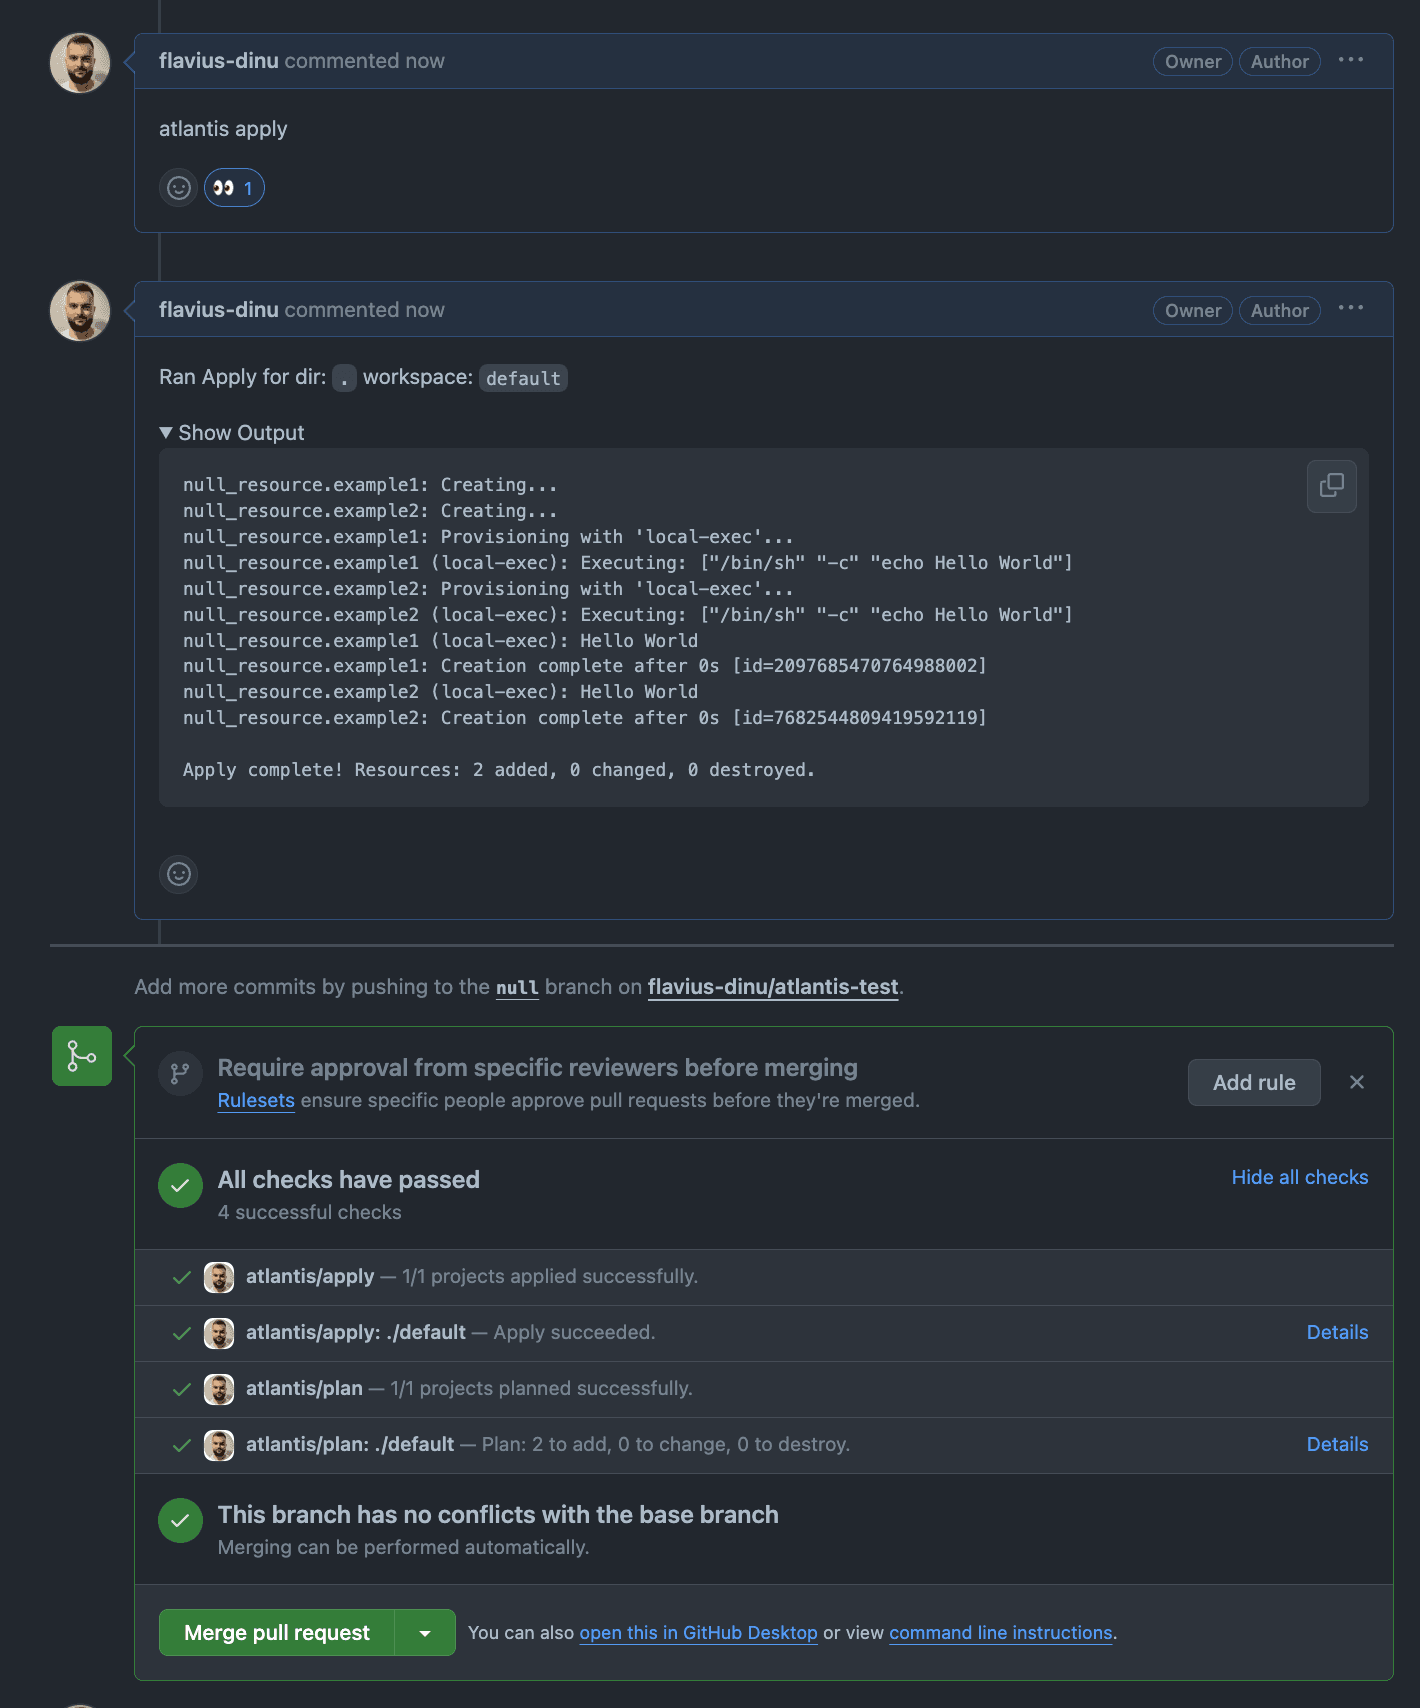
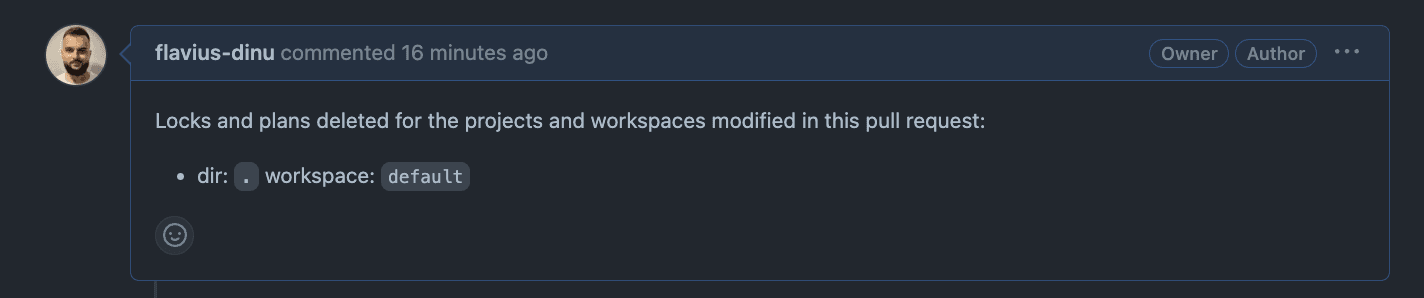
As everything went as I wanted, I merged the pull request and deleted my branch. When that was done, the lock was released and the plans were deleted:
This was a really simple example of how you can use Atlantis. For real-life scenarios, you will also need to configure your provider credentials as shown here, configure remote state, and set up HTTPS.
Atlantis best practices
Atlantis helps you achieve key best practices when it comes to managing your Terraform and Terragrunt projects. Some of these best practices are::
1. Secure Atlantis Server
Set up HTTPS, use a secure webhook secret, and ensure the server is not publicly accessible without proper authentication and authorization.
2. Version control and workspace management
This enables you to take advantage of git for version control and workspaces for managing multiple instances of your infrastructure without needing to duplicate your code. This ensures better isolation between your environments and also reduces the chances for conflicts.
3. Improve overall collaboration
As Atlantis relies on the Pull Request workflow, it improves collaboration drastically, as everyone involved will be able to see everything that is happening with the deployment on the Pull Request level.
4. Manage state securely
Even though Atlantis doesn’t offer a built-in mechanism for state management, it supports any remote state that Terraform supports. Ensure you are using remote-state with versioning enabled, state files are encrypted at rest, and access is controlled
5. Implement change management
By leveraging Atlantis, a change management process can be easily structured for reviewing and approving infrastructure changes. This is critical for the integrity and stability of your deployments.
6. Automate testing and validation
Combined with another CI/CD pipeline, Atlantis, can be extremely helpful for embedding terraform fmt, terraform validate, and even security vulnerability scanning tools inside your workflow
7. Implement RBAC
Take advantage of RBAC to control who can execute commands in Atlantis. This avoids unauthorized changes to your infrastructure and reduces potential for error.
8. Monitor and enable logging for Atlantis
By implementing monitoring and enabling logging, you can easily identify any performance issues and solve them promptly.
Alternative to Atlantis - Spacelift
If you are looking for a TACOS that has more features than Atlantis and supports other tools apart from Terraform and Terragrunt — such as Pulumi, CloudFormation, Kubernetes, and Ansible– Spacelift is the answer.
Spacelift has a fully customizable workflow, allowing you to control what happens before and after every phase the runner goes through, and you have full flexibility to integrate the third-party tools you want, thanks to custom inputs and the notification policy. In addition, Spacelift’s stack dependencies allow you to create links between multiple configurations and pass outputs from one configuration to another without the extensive work required to do so with Terraform’s remote state datasource.
Redfin investigated Spacelift alternatives including Atlantis but swiftly ruled them out because using them would require an unacceptable level of hands-on management. Reasonable pricing made Spacelift the leading candidate to replace their IaC automation platform, and positive feedback from their engineers plus exceptional flexibility clinched the deal. Spacelift’s responsiveness before and after they signed the contract helped sustain and enhance those positive impressions.
With Atlantis, you have to do some work to configure OPA, but with Spacelift’s native policies based on OPA, you don’t have to do anything to configure them. You can control various decision points inside the application and also implement powerful guardrails that ensure reliability.
Spacelift gives you native drift detection, and you can schedule tasks and Stack deletion to alert you to anything happening outside your workflow, and configure cron-based tasks. Atlantis can only rely on drift detection tools installed and configured outside of the Atlantis pipeline.
Spacelift offers a native module registry that also enables you to test the module to ensure everything is working properly. This is not available in Atlantis.
Self-service infrastructure can be easily implemented with Spacelift’s blueprints.
You can see a more detailed comparison between the products here. If you’d rather watch, check out the video below:

Key points
Although Atlantis can be a good introduction to TACOS, it presents limitations that become apparent as soon as you scale. It will help your overall Terraform workflow, but it can be hard to install and configure, and there are a couple of caveats you will need to remember to follow best practices related to your Terraform workflow.
Spacelift solves all these limitations and can enhance your workflow even further. To try Spacelift out, create a free account here, and if you want to speak with one of our engineers, don’t hesitate to book a demo.
The best alternative to Atlantis
Spacelift is an Atlantis alternative that provides a more intuitive, versatile, and robust GitOps workflow, granular access control, drift detection, and many more. It’s a better, more flexible CI/CD for Terraform, offering maximum security without sacrificing functionality.
Frequently asked questions
Is Atlantis for Terraform free?
Atlantis is free and open source under the Apache 2.0 license. It can be self-hosted without any licensing cost, making it a popular choice for teams automating Terraform pull request workflows. Some companies offer paid support or hosted versions, but the core tool itself is free.
What is the main benefit of using Atlantis with Terraform?
The main benefit of using Atlantis with Terraform is that it enables automated Terraform operations via pull requests, enforcing infrastructure-as-code workflows through Git. When a PR is opened, Atlantis runs plan, adds results as a comment, and applies changes only after review and approval, reducing risk and improving collaboration.
