
In this guide, we will explore how Ansible AWX simplifies IT automation and highlight its role in modern infrastructure management.
Additionally, we will cover the following topics:
- Key features of Ansible AWX in detail
- Components of AWX and their functionalities
- Overview of the dashboard and configuration options
- Step-by-step guide on using Ansible AWX
By the end of this post, you will gain hands-on experience setting up and using AWX for efficient automation workflows.
What is Ansible AWX?
Ansible AWX is the open-source web-based user interface, REST API, and task engine for Ansible automation. It provides a centralized visual dashboard to manage playbooks, inventories, credentials, job templates, and scheduling, making Ansible more accessible to teams without requiring command-line interaction.
AWX provides role-based access control, detailed logging, notifications, workflow automation, and seamless integration with cloud providers and external tools, making it well-suited for multi-user and enterprise environments.
As the upstream open-source project for Red Hat’s Ansible Automation Platform (formerly known as Ansible Tower), AWX delivers the same core functionality with community-driven support and flexible deployment options, including containerized environments like Docker and Kubernetes.
What is the difference between Ansible AWX and Ansible Automation Platform?
AWX is the community-developed upstream project that serves as the foundation for the Ansible Automation Platform. It is free, open source, and updated frequently.
Ansible Automation Platform, on the other hand, is the enterprise-grade, supported product offered by Red Hat. It includes AWX core functionality along with additional features such as role-based access control, enhanced security, analytics, and official support.
While AWX is suitable for experimentation or small-scale use, AAP is designed for production environments where stability, support, and advanced capabilities are critical.
Ansible AWX vs Ansible Tower
Originally a standalone product, Ansible Tower (now referred to as the automation controller) has become a component within the broader Red Hat Ansible Automation Platform. Ansible Tower focuses on providing a user interface and management capabilities for Ansible.
Both Ansible AWX and Ansible Tower offer similar core functionality, such as job scheduling, role-based access control, and workflow management, but Tower is tailored for production use with long-term support, regular patches, and integration into the Red Hat ecosystem.
AWX is free but lacks SLAs and compliance guarantees, making Tower the preferred choice for enterprises with critical automation needs.
Key features of Ansible AWX
Here are the key features of Ansible AWX:
- User-friendly dashboard: The AWX dashboard offers a centralized view of automation activities. It displays job statuses, recent projects, and system metrics for quick actions.
- Role-Based Access Control (RBAC): AWX allows administrators to define user roles and permissions for secure access control. This granular control enhances security and compliance within automation processes.
- Job scheduling: Users can schedule playbook executions at specified times or intervals to automate routine tasks without manual intervention.
- Integrated notifications: AWX supports integration with various notification platforms, such as email and messaging services, to alert users about job statuses and system events.
- Scalability and high availability: Designed to handle enterprise-level workloads, AWX supports clustering and load balancing to deliver reliable performance as automation demands grow.
Spacelift has allowed Archipelago to move toward automated CI/CD of our infrastructure code in a way that we aren’t blocked by having to develop our own code. By liberating developers from repetitive tasks, the platform makes developers’ work lives much easier, more productive, and more interesting.
Components of Ansible AWX and their functionalities
Ansible AWX consists of several key components that simplify automation. Here are some of AWS’s important components, which serve different purposes when automating your workflows.
1. Projects
In AWX, Projects serve as structured containers for Ansible playbooks, typically synchronized with version control systems like GitHub or GitLab. This integration ensures every change is tracked, making it easier to manage playbook versions across environments.
By centralizing playbooks, projects help enforce consistency and standardization in automation practices. They also simplify team collaboration by automatically pulling updates from the linked repositories.
2. Inventories
Inventories define the infrastructure targets for your automation, listing the hosts and grouping them logically for streamlined task execution. AWX supports both static inventories (like manually defined host lists) and dynamic ones that adapt to infrastructure changes via external sources.
Grouping hosts by function or environment (e.g., web-servers, prod-db) allows precise task targeting, while host and group variables enable fine-tuned configuration management at scale.
3. Credentials
Credentials in AWX provide a secure way to manage authentication data such as SSH private keys, API tokens, and cloud provider credentials. These are encrypted and safely stored, ensuring sensitive information is protected while allowing Ansible to connect seamlessly to remote systems. Using credentials in this way reduces manual input and mitigates the risk of unauthorized access during automation.
4. Job templates
Job templates are preconfigured blueprints for running Ansible jobs. They connect key elements like a project (playbooks), an inventory (target hosts), and credentials (access).
Templates can be customized with parameters, allowing the same template to be reused across different scenarios. When combined with scheduling, they enable reliable, hands-off task execution across your infrastructure.
5. Organizations
Organizations in AWX offer a way to structure user access and resources within a shared environment. They help divide automation responsibilities by grouping users, teams, projects, and inventories.
With built-in role-based access control, organizations ensure that users have only the permissions they need. This setup is especially useful for teams managing separate environments or business units, promoting both security and operational clarity.
Ansible AWX dashboard overview
The Ansible AWX dashboard provides a comprehensive view of automation tasks. It displays recent activities, job statuses, and system usage. This overview helps us monitor ongoing processes and track resource consumption on a single screen.
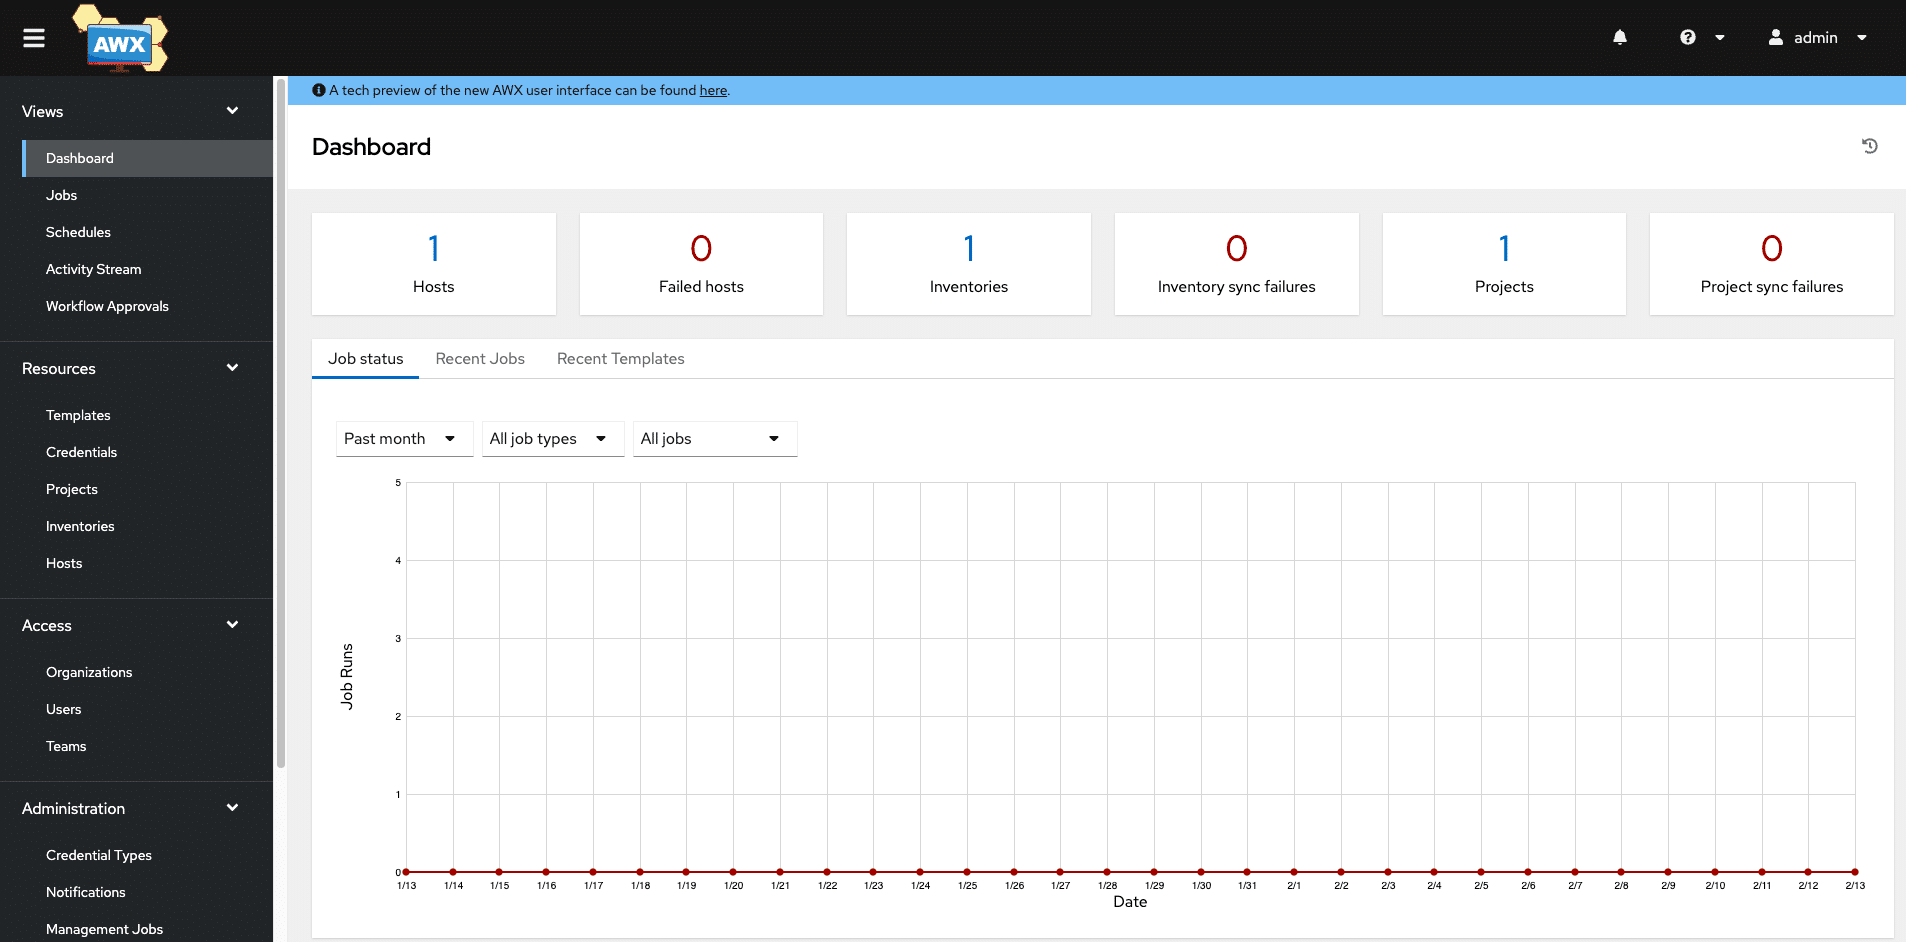
The left sidebar organizes configuration options for efficient navigation. It includes sections like Projects, Inventories, Credentials, and Templates. Each section is logically grouped to streamline workflow management.

Let’s examine each of these headings to understand AWX’s capabilities better.
Views
Views provide insights into ongoing activities and automation workflows. The options include:

- Dashboard: Displays an overview of system status and recent activities
- Jobs: Lists all executed jobs with their statuses and detailed logs
- Schedules: Manages scheduled tasks for recurring automation workflows
- Activity Stream: Tracks all user activities for auditing and accountability
- Workflow Approvals: Shows pending approvals required for specific automation workflows
Resources
Resources manage assets needed for automation tasks. They include:

- Templates: Predefined job configurations for consistent playbook execution
- Credentials: Secure storage of authentication details for remote connections
- Projects: Organize playbooks sourced from version control systems
- Inventories: Manages target systems for playbook execution
- Hosts: Lists individual systems under each inventory group
Access
The access segment provides options to control user and team permissions. It includes:
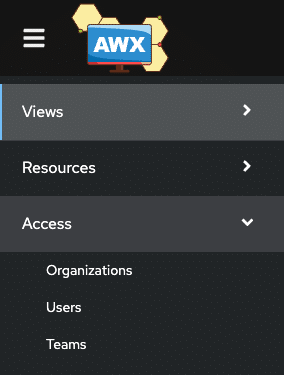
- Organizations: Logical grouping of resources and users for role-based access
- Users: Manages individual user accounts and permissions
- Teams: Groups of users with shared permissions and responsibilities
Administration
Administration configures system-wide settings and advanced features. It includes:
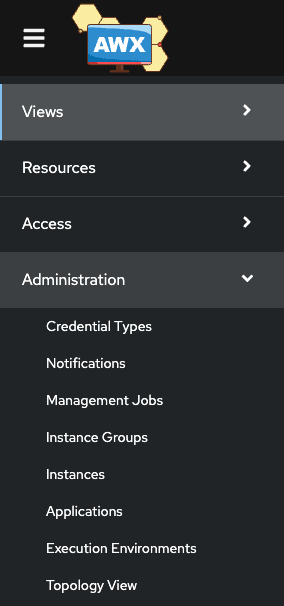
- Credential Types: Defines custom credential categories for different connection types
- Notifications: Set up alerts for job statuses and system events
- Management Jobs: Handles system maintenance tasks like data cleanup
- Instance Groups: Organizes execution nodes for load balancing
- Instances: Lists nodes participating in job execution
- Applications: Manages OAuth2 applications for API access
- Execution Environments: Defines containerized environments for playbook execution
- Topology View: Visual representation of node and instance group architecture
Settings
Settings allow you to configure global settings for the entire AWX instance. These include authentication methods, logging, and job execution settings. This centralized management simplifies configuration changes across the platform.
How to install Ansible AWX
To install Ansible AWX, use either Docker Compose (quick for local use and testing) or Kubernetes (for production-grade deployments). The recommended and preferred approach for production is to deploy AWX via its official Kubernetes Operator.
Let’s quickly see the installation via Docker Compose:
- Install Docker and Docker Compose.
- Clone the AWX repository:
git clone https://github.com/ansible/awx.git- Navigate to the Docker Compose directory:
cd awx/tools/docker-compose- Run:
docker compose upThis will start AWX locally for testing.
How to use Ansible AWX for automation
In this section, we will review the steps involved in using Ansible AWX to organize automation efforts.
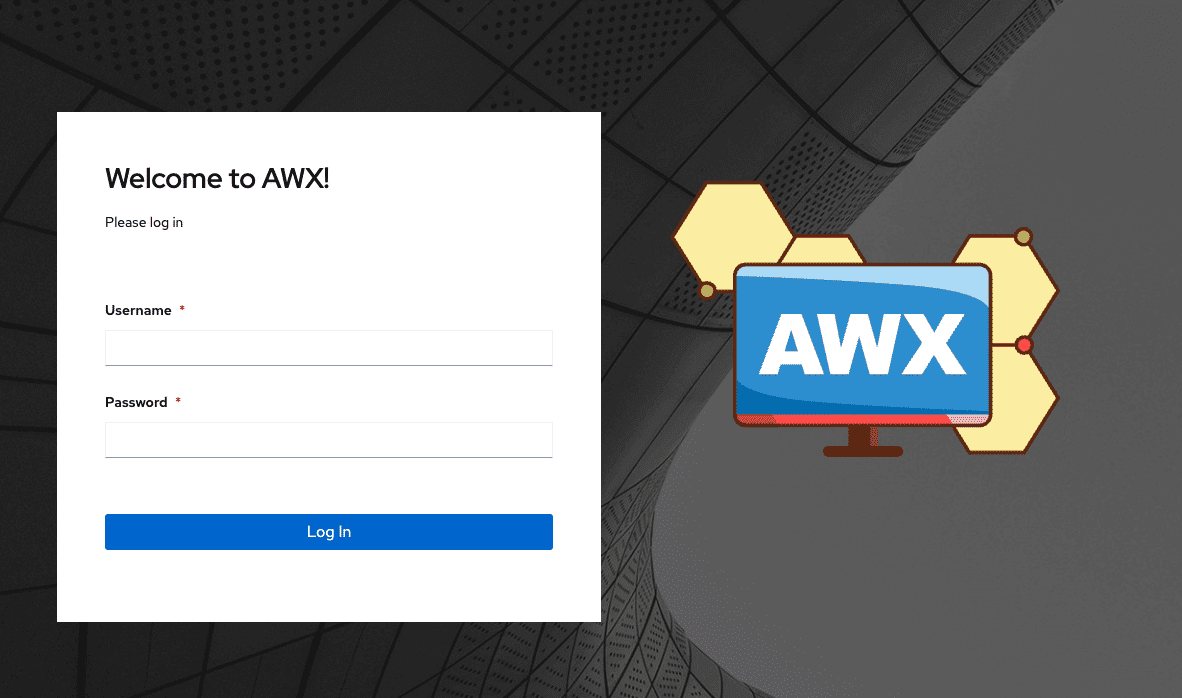
Step 1: Log into AWX
Begin by logging into the AWX interface.
The login screen requires admin credentials to access the dashboard. In this example, we use the default admin username and a secure password.
Methods of acquiring the initial credentials differ according to how Ansible AWX is deployed and configured.
Step 2: Create an inventory
Inventories define the systems targeted by playbooks. Let’s create a new inventory to organize hosts and manage configurations efficiently.
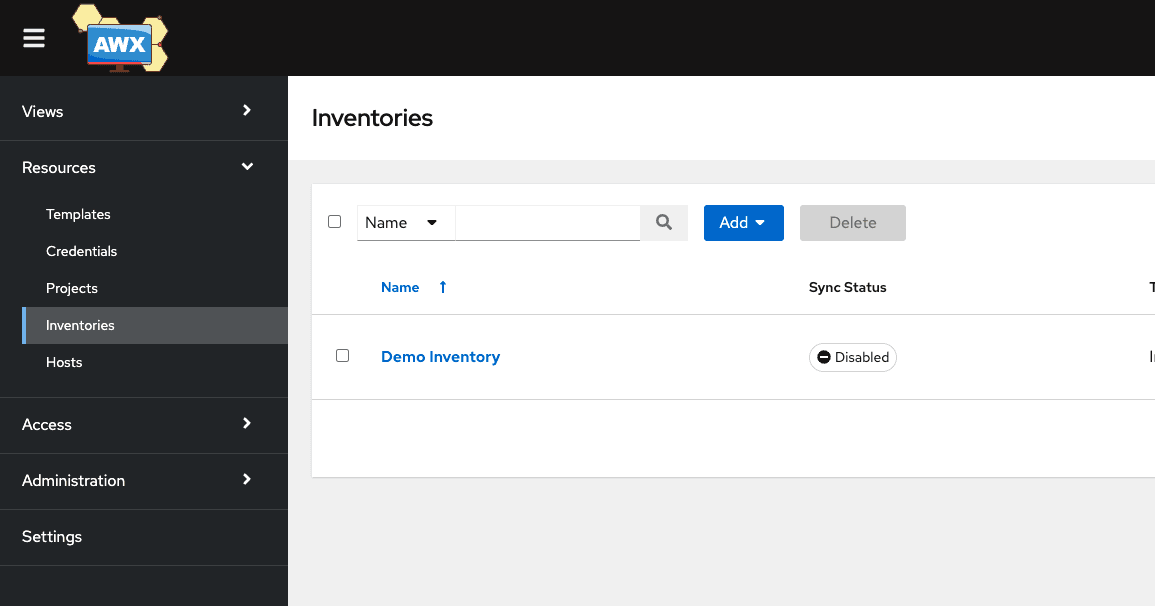
Start by navigating to the “Inventories” option from the sidebar and clicking on “Add Inventory.”
In the form that is presented, specify a name and an organization.
For now, we have selected the “Default” organization for this demo. Organizations make these inventories accessible to all developers of corresponding playbooks.
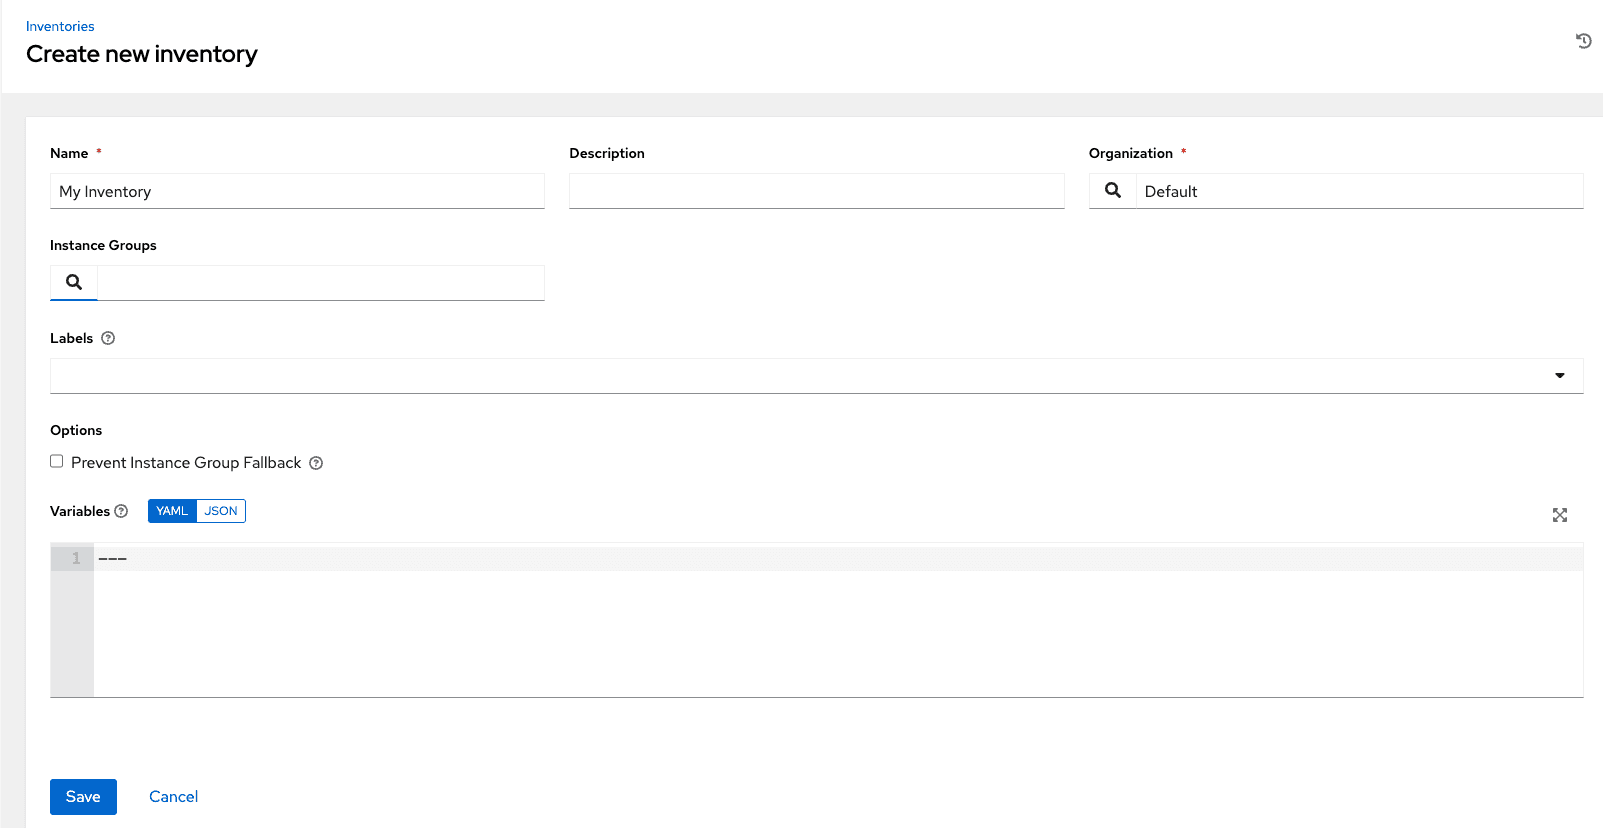
You can use Instance Groups and Labels for efficient resource organization and management. The checkbox labeled “Prevent Instance Group Fallback” stops jobs from returning to other instance groups if the assigned one is unavailable. We’ll leave it unchecked for now for flexible job execution.
The “Variables” section defines variables in YAML or JSON format. They provide dynamic values to playbooks. The current example uses no variable, but you can add configuration details for targeted hosts. Click on Save to create the inventory and the empty inventory record. Next, we add hosts to this inventory.
Step 3: Configure hosts and Inventory view
Let’s add the first host, “Webserver 1,” to the inventory we created in the last step.
Navigate to “My Inventory” and click on “Add Host.” You should see the form below. Enter the hostname and provide its IP address for connectivity.
Under “Variables,” add configuration settings for this host to help customize playbook behavior for specific systems.
Save the changes to make the “Webserver 1” part of “My Inventory.”

Next, use the same process to add a second host, named “Webserver 2.” Adding hosts in this way keeps our inventory organized and manageable.
Saving the configuration makes “Webserver 2” appear under the inventory.
The name field expects the IP addresses of the target machines, which AWX uses to connect to them over SSH. Change the hosts’ values to the corresponding IP addresses, as shown in the inventory view below. For example, the IPs below belong to the two EC2 instances created in AWS.
After adding both hosts, review the inventory to verify the configuration.
In the inventory view, we selected “My Inventory” to see a list of hosts. “Webserver 1” and “Webserver 2” are displayed with their IP addresses.
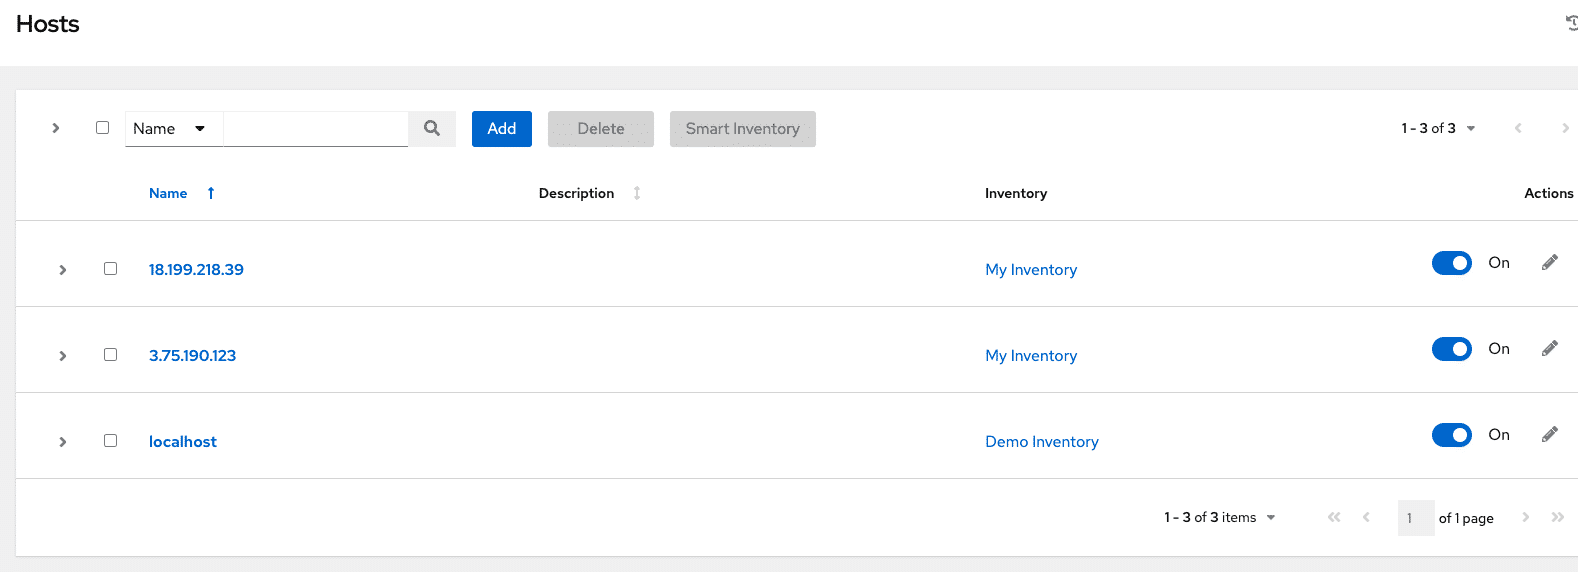
AWX shows its status, enabling quick monitoring. This overview ensures all systems are correctly configured before executing playbooks. It helps us manage and organize multiple hosts.
Step 4: Create a project
Projects in AWX serve as centralized hubs for managing automation assets. To create one, go to the sidebar, select “Projects,” and click “Add Project.” This not only links your playbooks with corresponding files from version-controlled repositories like Git, but also ensures that every deployment pulls from a consistent and trackable source.
For instance, naming the project “AWX Demo Playbook” clearly indicates its role in demonstrating playbook workflows.
Grouping related playbooks under a single project streamlines maintenance, simplifies updates, and provides a cleaner overview, especially when juggling multiple environments or configurations.

Add detailed information to the project creation form for better management. Select “Default” to link this project to the default organization.
AWX offers multiple Source Control Types, from which it can pull the playbook YAML files for execution. In this example, we selected Git as the source type for this project.
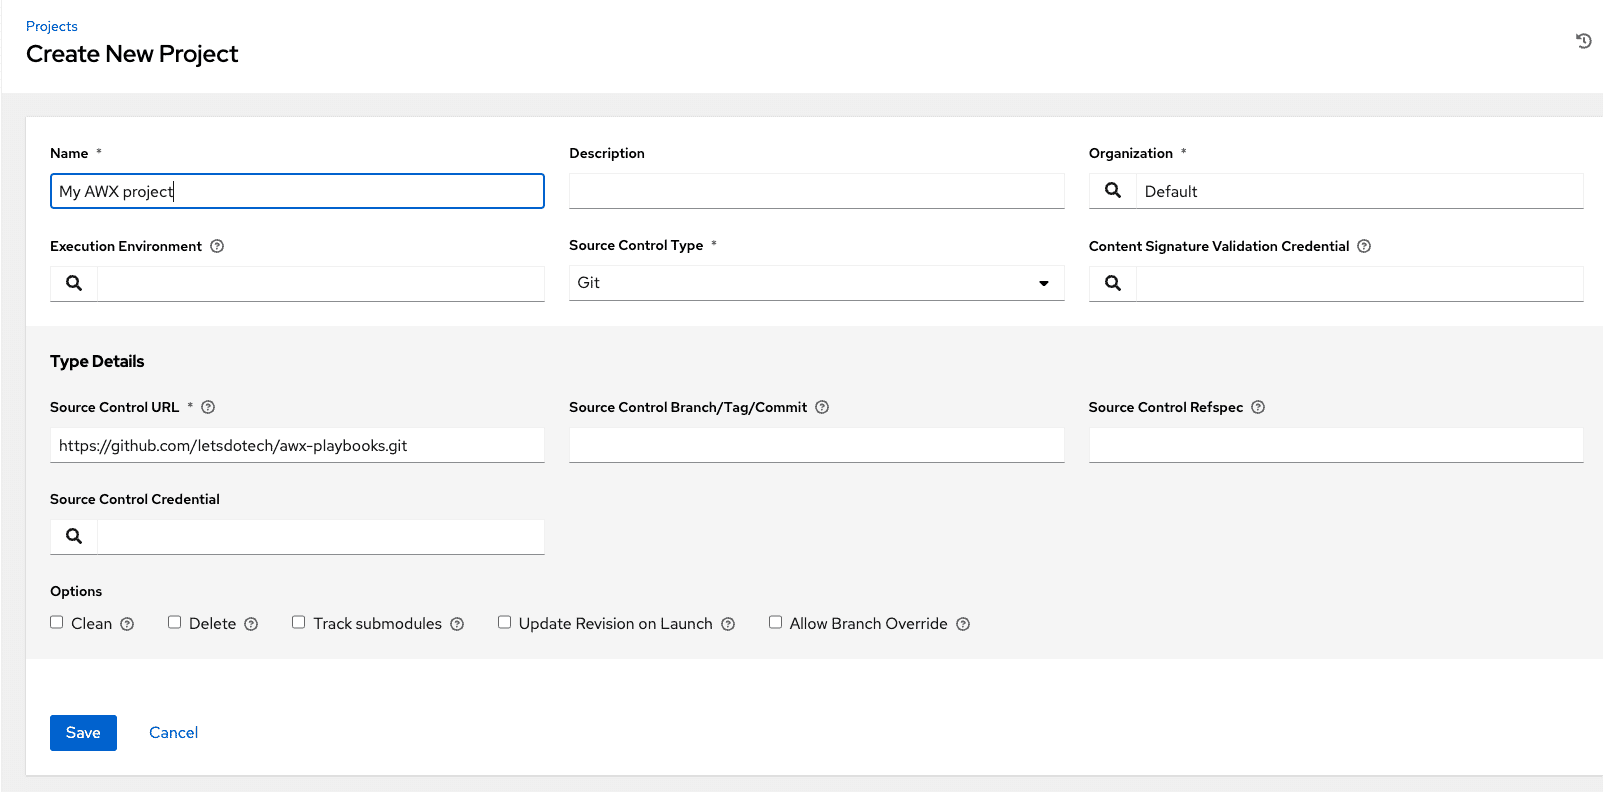
After selecting the source type as Git, you will see options to set various Type Details. Here, we choose the source of the playbooks.
Specify the link to the Git repository, where all the relevant playbooks reside. Leave other options with default values, and continue to save the project.
Step 5: Review your playbook and code
Once the project is created, the playbooks specified in the Git repo are automatically synced. Below is the playbook we want to execute on the target machines.
---
- name: Sample AWX Playbook for Ubuntu Servers
  hosts: all
  become: yes
  tasks:
    - name: Update apt cache
      apt:
        update_cache: yes

    - name: Install Nginx
      apt:
        name: nginx
        state: present

    - name: Start Nginx service
      service:
        name: nginx
        state: started
        enabled: yes

    - name: Create a test HTML file
      copy:
        content: "<html><body><h1>Hello from AWX!</h1></body></html>"
        dest: /var/www/html/index.html

    - name: Ensure proper permissions on web content
      file:
        path: /var/www/html
        owner: www-data
        group: www-data
        mode: '0755'
        recurse: yes
The playbook performs several tasks.
It updates the apt cache on Ubuntu EC2 instances. It installs Nginx, starts the service, and creates a test HTML file with a greeting message. It also delivers proper file permissions for security. This playbook demonstrates AWX’s capability to automate server configuration and application deployment using Ansible.
After saving the configuration, the project will appear on the list. You should be able to see its name, description, and status.
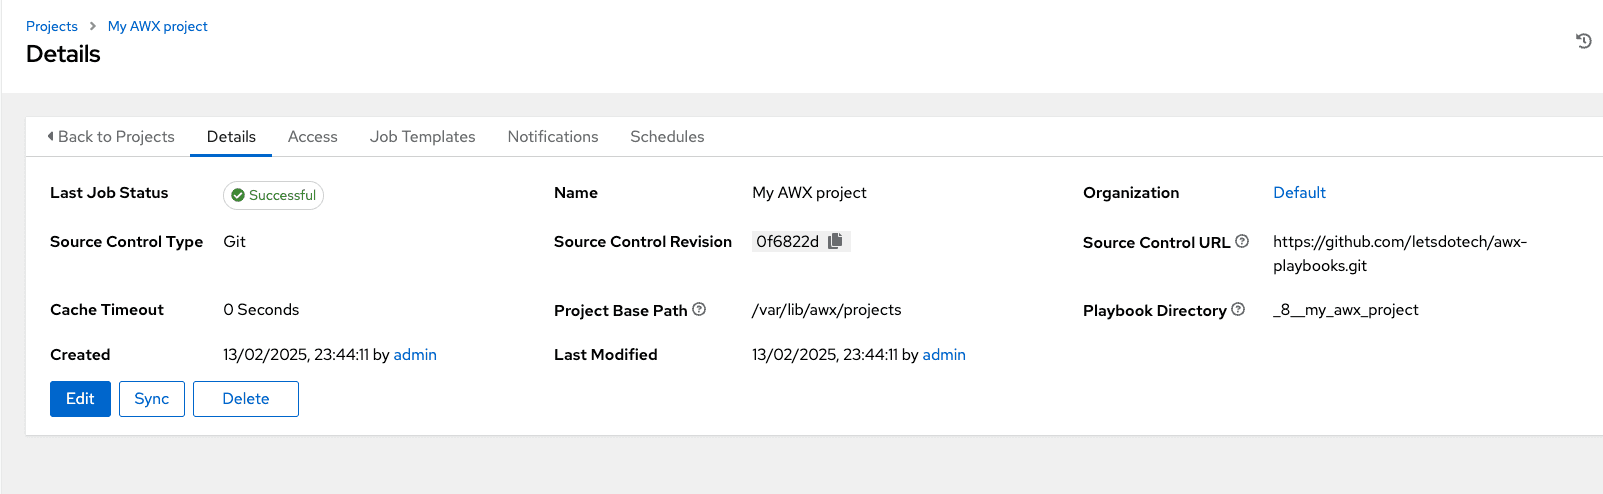
This overview helps us monitor synchronization and version control. The project is now ready to be linked with inventories and job templates. It ensures consistent automation workflows.
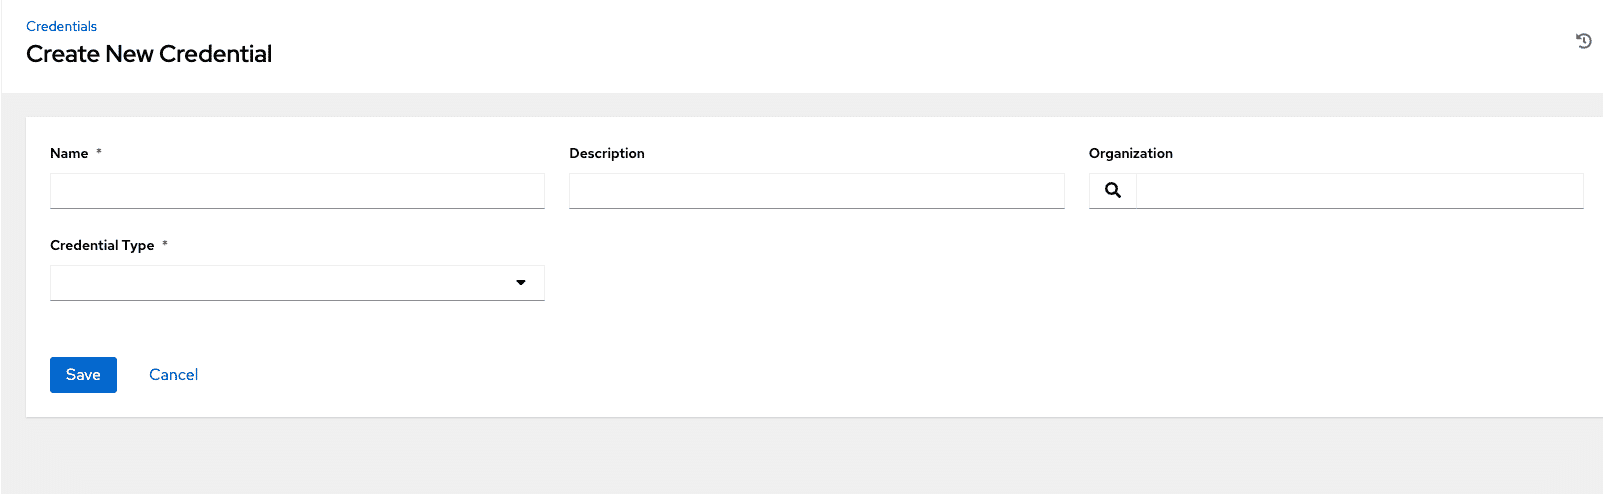
Step 6: Set up credentials for SSH access
Credentials are needed for AWX to connect to the hosts securely and perform the tasks specified in the playbooks. Navigate to the “Credentials” section and select “Add Credential.” Specify a name for this credential record.
In this example, we named the credential “Ansible SSH Key” for easy identification.
Next, choose the credential type “Machine.” In AWX, Machine credentials allow SSH authentication for remote systems.
We entered the Username as “ubuntu” since EC2 instances are created using an Ubuntu image, and AWX will use it to connect to hosts. Under SSH Private Key, paste the private key for secure access.

AWX encrypts this key to prevent unauthorized access. Leave Key Passphrase blank, as this key does not require one. If using a passphrase, we would enter it here to enable decryption. After filling in the details, click Save.
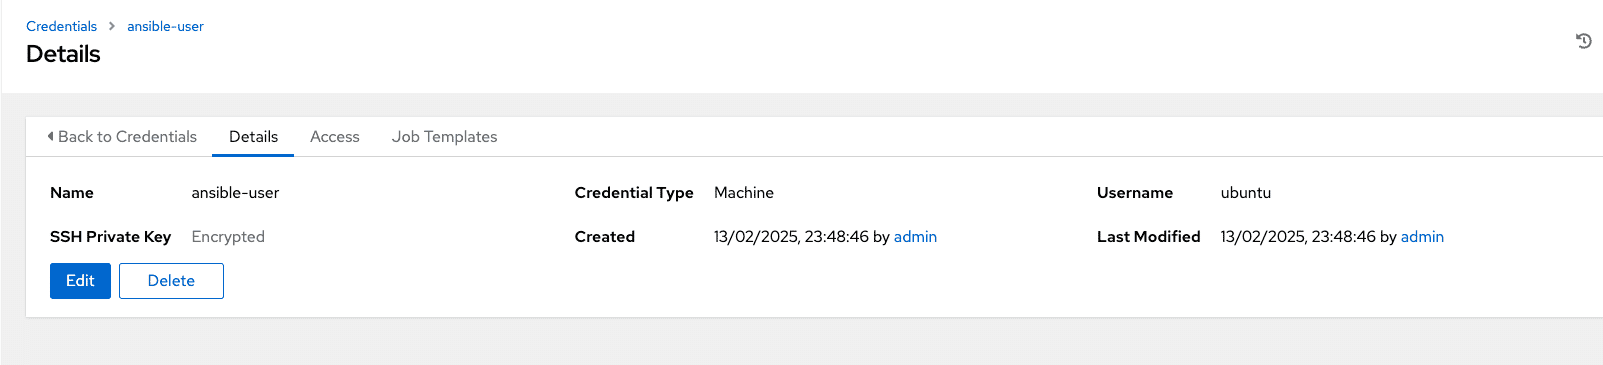
After saving, the credential appears on the list, showing its name, type, and associated organization. AWX displays the status, confirming successful creation. You can update or delete them as needed.
The credential is now ready to be linked to job templates to automate workflows securely.
Step 7: Create a job template
Navigate to the “Templates” section and click “Add Job Template.” Job templates define reusable configurations for running playbooks. We named the template “install_nginx” to clearly indicate its purpose.
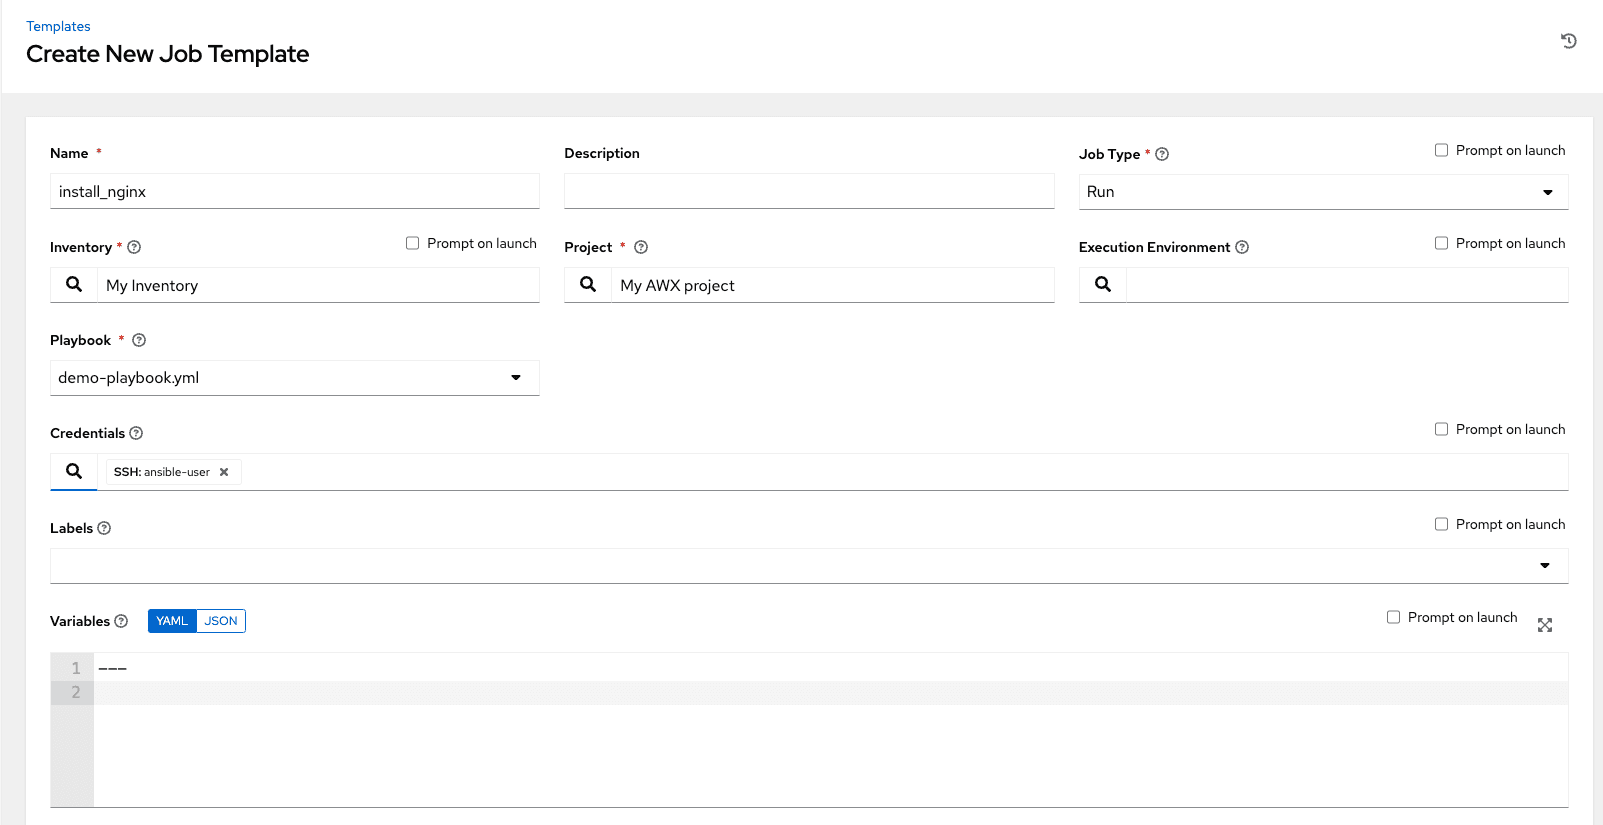
Select the Job Type as “Run” since we want to execute the playbook. The inventory is set to “My Inventory,” targeting the hosts configured earlier. This links the playbook to the correct systems.
Continue adding details to define the job template:
- Project: Select “AWX Demo Playbook,” linking the playbook with this job. This ensures the template uses the correct playbook version.
- Playbook: Choose “demo-playbook.yml,” the file that is pulled from the Git repo. It automates Nginx installation and configuration.
- Credentials: Link the “Ansible SSH Key” credential for secure SSH access to target systems. This enables passwordless authentication, maintaining security.
- Verbosity: Select “Standard Output” to see detailed logs during execution. This helps troubleshoot and verify playbook actions. You can use higher verbosity levels to debug issues.
Double-check all entries for accuracy and consistency. Linking the correct project, playbook, and credentials ensures successful execution.

AWX offers advanced configuration options to enhance job execution, as seen in the screenshot above.
- Limit: Leave this blank to target all hosts in the inventory. Specifying a limit restricts playbook execution to specific hosts.
- Job Tags: We don’t use tags in this example, but they allow selective task execution within the playbook, enhancing flexibility for complex workflows.
- Skip Tags: This option lets you skip specific tasks. Leave it blank as we want to run all tasks in the playbook.
- Privilege Escalation: Enable this for root-level actions, which is equivalent to using
become: yesin playbooks. It ensures necessary permissions for configuration changes.
Review the settings and click Save to create the job template. This template is now reusable for consistent playbook execution.
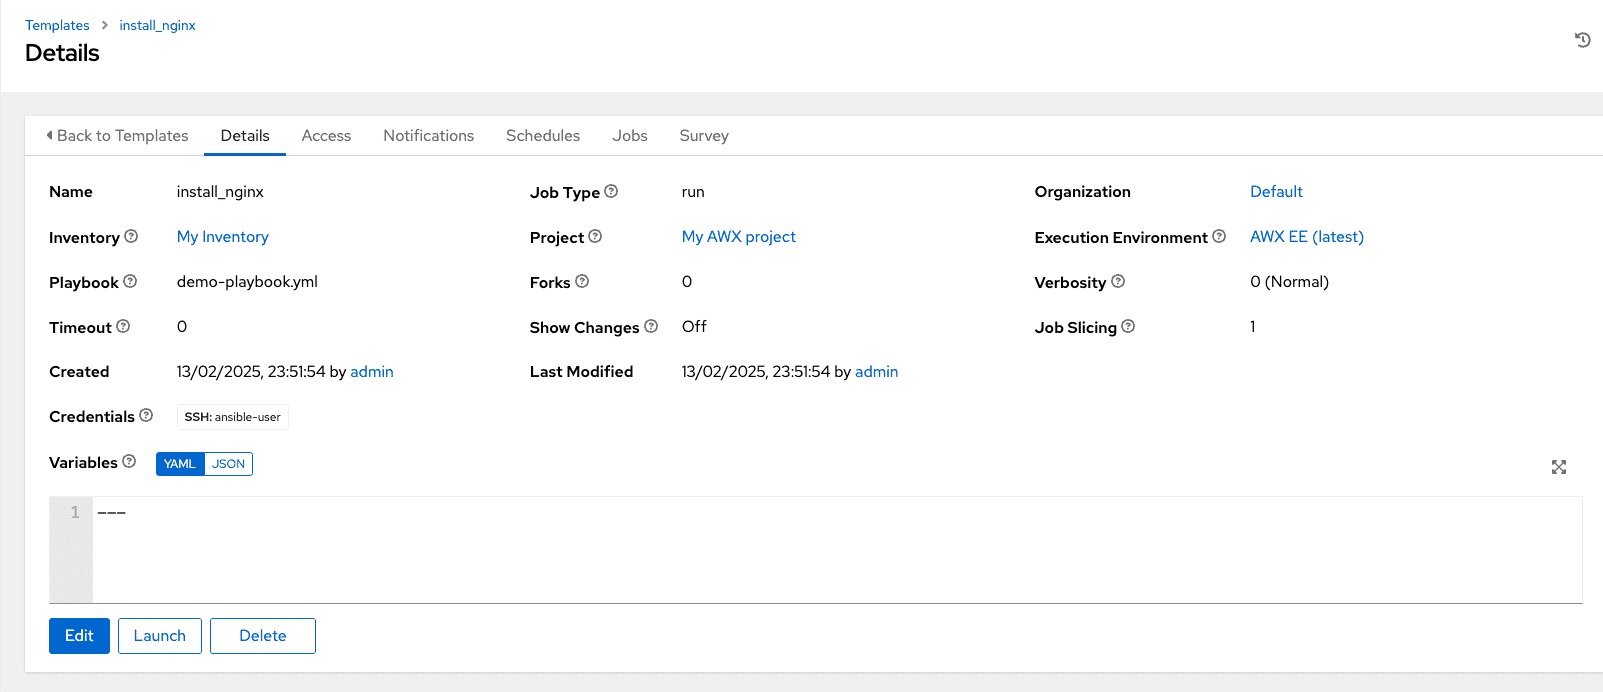
After saving, the template appears on the list, showing its name, inventory, and project details. AWX provides a status overview, confirming successful creation.
This display helps manage multiple templates efficiently. You can edit or delete templates as needed.
The template is now ready to be launched.
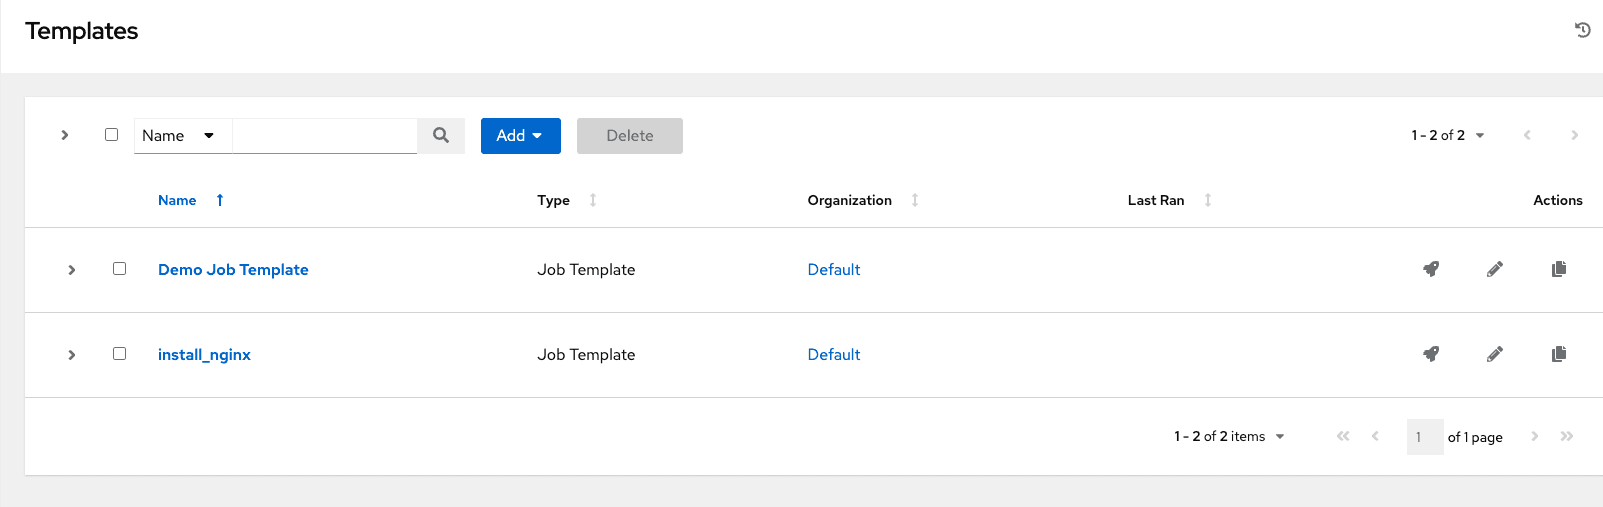
Navigate to the “Templates” section to view all available templates. The list shows each template’s name, inventory, project, and last run status.
This overview simplifies job management and monitoring. It ensures we launch the correct template for the intended playbook.
Step 8: Launching the job
Click on the “Rocket” icon next to the “Deploy Nginx” template to launch it.
AWX redirects to the job execution interface, displaying live updates. Each playbook task appears with a status indicator to show the progress spontaneously.
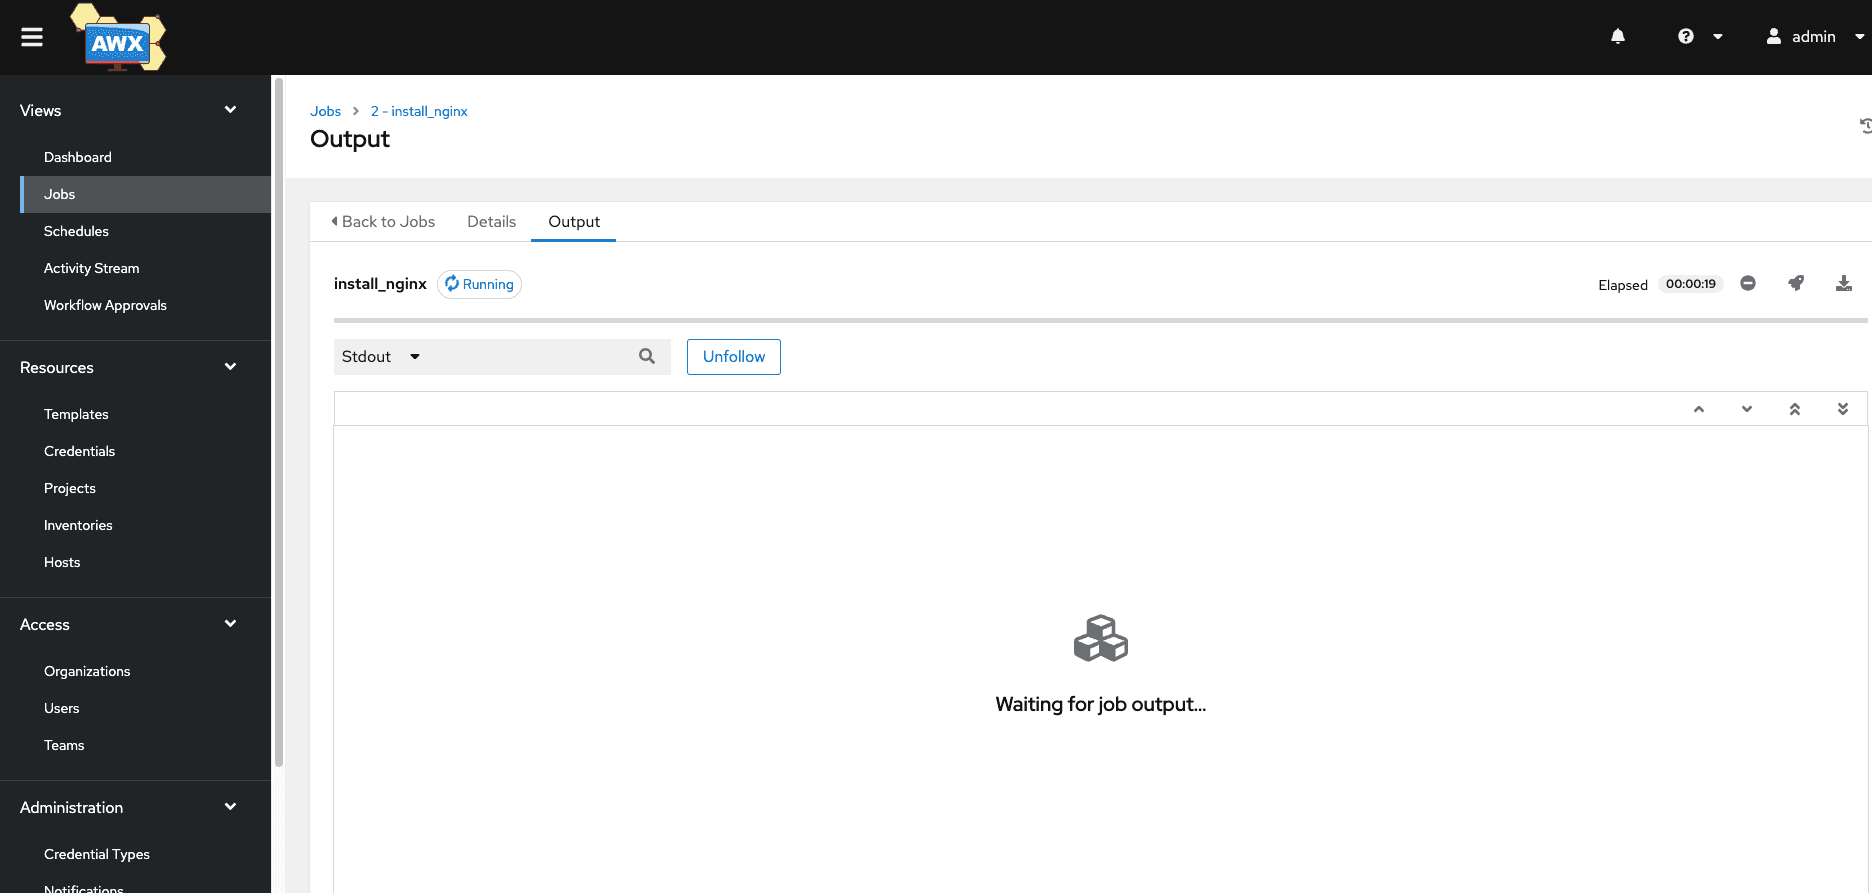
When the playbook executes successfully, confirm Nginx installation. The real-time updates show the instant status of the job run.
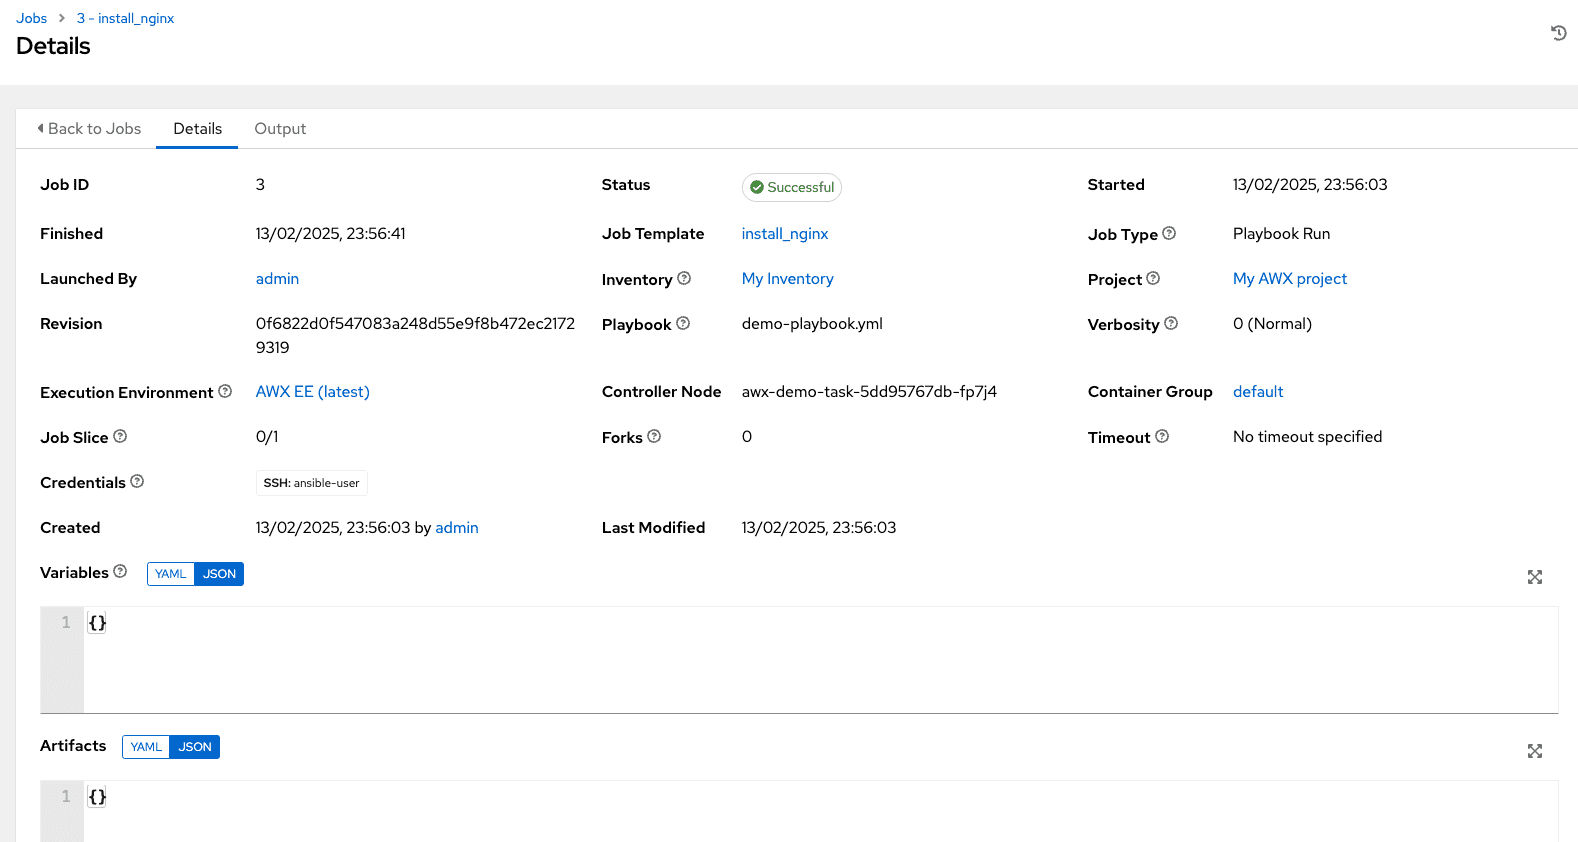
Step 9: Review job execution and output
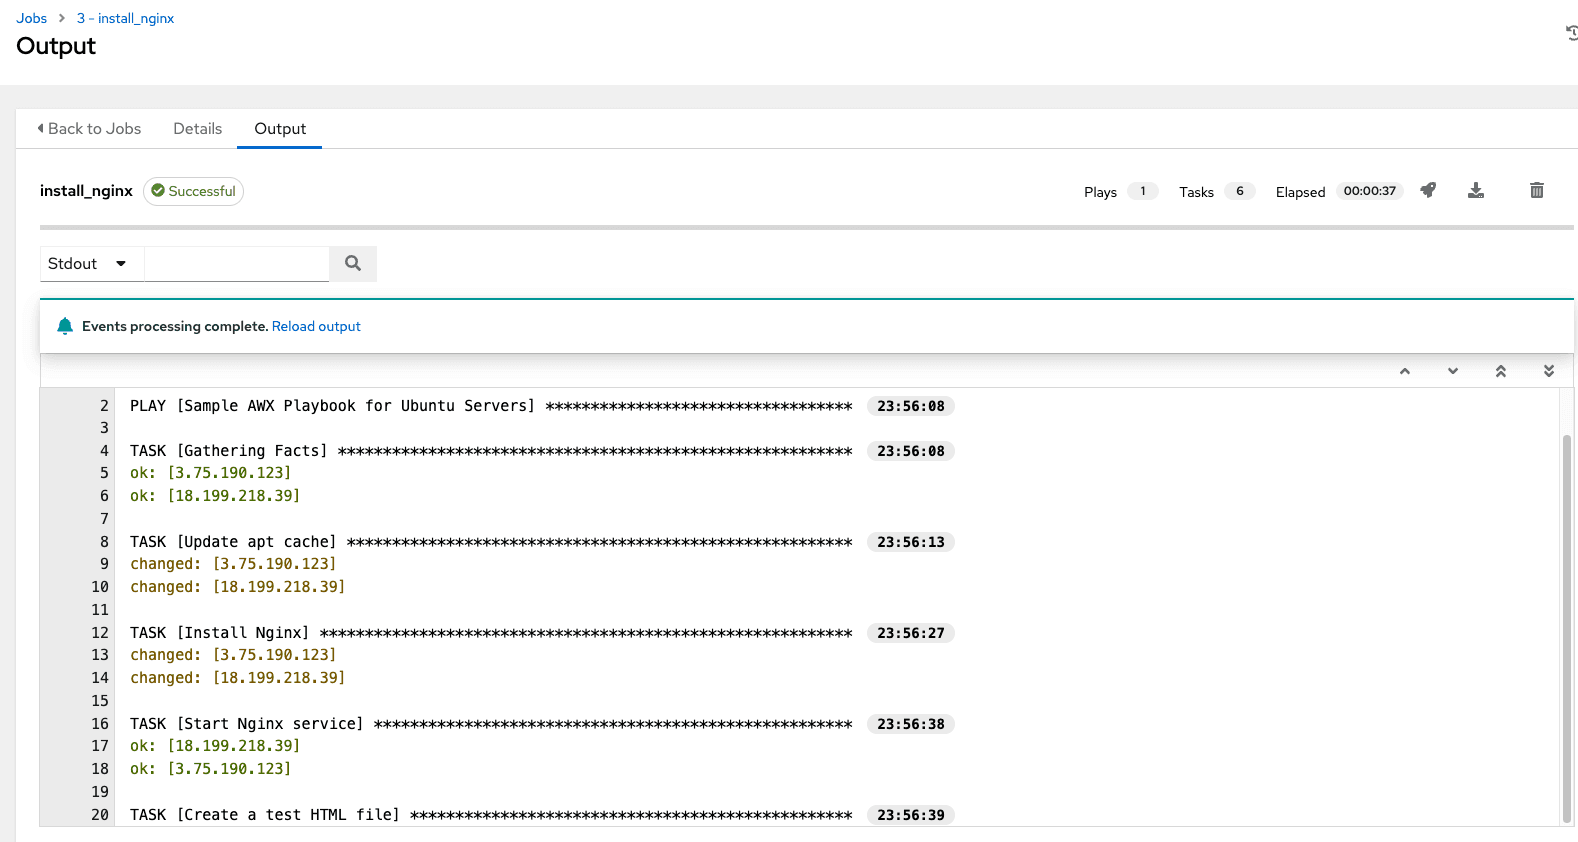
After launching, the playbook executes successfully. You can see detailed output for each task, confirming changes made to the target systems. This includes installing Nginx, creating the HTML file, and setting permissions.
The play recap shows a summary of all tasks performed.
Identity added: /runner/artifacts/3/ssh_key_data (/runner/artifacts/3/ssh_key_data)

PLAY [Sample AWX Playbook for Ubuntu Servers] **********************************

TASK [Gathering Facts] *********************************************************
ok: [3.75.190.123]
ok: [18.199.218.39]

TASK [Update apt cache] ********************************************************
changed: [3.75.190.123]
changed: [18.199.218.39]

TASK [Install Nginx] ***********************************************************
changed: [3.75.190.123]
changed: [18.199.218.39]

TASK [Start Nginx service] *****************************************************
ok: [18.199.218.39]
ok: [3.75.190.123]

TASK [Create a test HTML file] *************************************************
changed: [3.75.190.123]
changed: [18.199.218.39]

TASK [Ensure proper permissions on web content] ********************************
changed: [18.199.218.39]
changed: [3.75.190.123]

PLAY RECAP *********************************************************************
18.199.218.39              : ok=6    changed=4    unreachable=0    failed=0    skipped=0    rescued=0    ignored=0
3.75.190.123               : ok=6    changed=4    unreachable=0    failed=0    skipped=0    rescued=0    ignored=0
AWX provides a comprehensive overview of the job’s execution, similar to a standard Ansible console output. You can see task durations, system changes, and log summaries. This detailed reporting ensures accountability and helps in auditing automation tasks. The execution logs provide detailed output for every playbook task.
We see the following:
- Gathering Facts: AWX collects system information from the target hosts.
- Update Apt Cache: The apt cache is updated to fetch the latest package versions.
- Install Nginx: Nginx is installed on both servers.
- Start Nginx Service: The service starts automatically and is enabled for future reboots.
- Create Test HTML File: A custom HTML file is created in the web directory.
- Ensure Proper Permissions: File permissions are adjusted for security.
The Play Recap summarizes task statuses, showing all tasks completed successfully. This detailed output validates the automation workflow.
This detailed reporting also helps identify potential improvements in playbook design.
Step 10: Monitoring the dashboard
If we return to the dashboard after the job completion, the job status is marked as successful, confirming Nginx deployment on both servers.
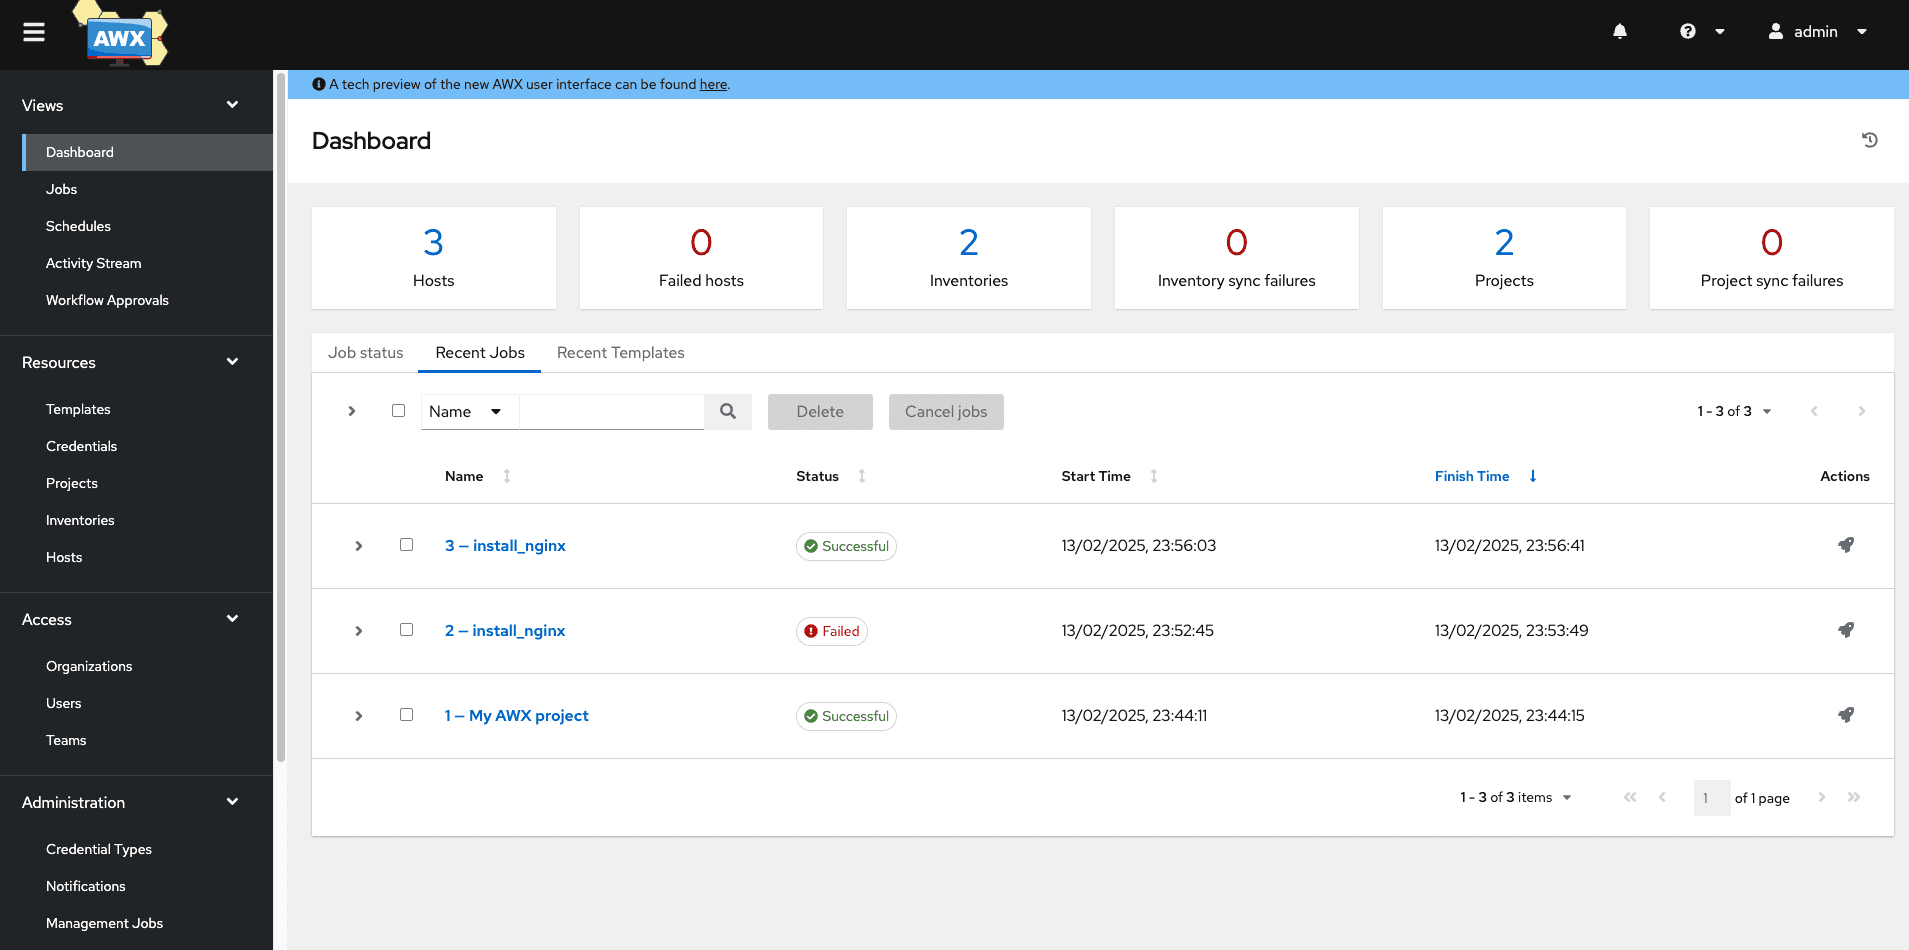
You can see a timeline of recent activities, helping us track automation history.
This overview supports efficient monitoring and management of automation workflows. The dashboard consolidates all execution details for easy reference.
How Spacelift can help you with Ansible projects
Spacelift’s vibrant ecosystem and excellent GitOps flow can greatly assist you in managing and orchestrating Ansible. By introducing Spacelift on top of Ansible, you can easily create custom workflows based on pull requests and apply any necessary compliance checks for your organization.
Another advantage of using Spacelift is that you can manage different infrastructure tools like Ansible, Terraform, Pulumi, AWS CloudFormation, and even Kubernetes from the same place and combine their stacks with building workflows across tools.
Our latest Ansible enhancements solve three of the biggest challenges engineers face when they are using Ansible:
- Having a centralized place in which you can run your playbooks
- Combining IaC with configuration management to create a single workflow
- Getting insights into what ran and where
Provisioning, configuring, governing, and even orchestrating your containers can be performed with a single workflow, separating the elements into smaller chunks to identify issues more easily.
Would you like to see this in action, or just get a tl;dr? Check out this video showing you Spacelift’s Ansible functionality:

If you want to learn more about using Spacelift with Ansible, check our documentation, read our Ansible guide, or book a demo with one of our engineers.
Key points
Ansible AWX streamlines IT automation with a clean interface and robust functionality. It’s a solid fit for small to mid-sized teams automating configuration management and infrastructure provisioning. This hands-on guide walked through the essential steps for getting started with AWX. We looked at how AWX simplifies day-to-day operations with tools like its web-based dashboard, job scheduling, and flexible configuration settings that reduce manual overhead.
The tutorial also explained how to set up inventories, manage access credentials, and build job templates to run tasks efficiently. The material should make you feel confident using AWX to automate routine operations, track job status, and audit execution logs for greater visibility.
Manage Ansible better with Spacelift
Managing large-scale playbook execution is hard. Spacelift enables you to automate Ansible playbook execution with visibility and control over resources, and seamlessly link provisioning and configuration workflows.
