
Every time we provision a new set of cloud infrastructure, there is a purpose behind it.
For example, when we create an EC2 instance, we create it to accomplish certain tasks – executing heavy workloads, acting as a bastion host, or simply serving as the frontend for all incoming requests. To enable it to function, this instance needs more actions like installing a web server, applications, databases, setting network firewall, etc.
Terraform is a great IaC tool that helps us build infrastructure using code. Additionally, when the EC2 instance boots or is destroyed, it is also possible to perform some of the above tasks using provisioners in Terraform. In this post, we will explore the scenarios handled by provisioners, how they are implemented, and preferable ways to do it.
Terraform provisioners have nothing in common with providers, they allow the execution of various commands or scripts on either local or remote machines, and they can also transfer files from a local environment to a remote one. There are three available provisioners: file (used for copying), local-exec (used for local operations), remote-exec (used for remote operations). The file and remote-exec provisioners need a connection block to be able to do the remote operations.
Provisioning mainly deals with configuration activities that happen after the resource is created. It may involve some file operations, executing CLI commands, or even executing the script. Once the resource is successfully initialized, it is ready to accept connections. These connections help Terraform log into the newly created instance and perform these operations.
It is worth noting that using Terraform provisioners for the activities described in this post should be considered as a last resort. The main reason is the availability of dedicated tools and platforms that align well with the use cases discussed in this post. Hashicorp suggests Terraform provisioners should only be considered when there is no other option. We discuss it further in the concluding section.
What is the difference between Terraform null resource and provisioner?
A Terraform null resource is a special resource that doesn’t create any infrastructure. It is the predecessor of terraform_data, and it acts as a mechanism to trigger actions based on input changes. It can be used together with provisioners to achieve different operations that are configured in them.
What is the difference between User_data and provisioner in Terraform?
User_data allows users to provide initialization scripts or configuration details that the instance uses upon startup via cloud-init. The user_data script runs only once when the bootstrap of the instance is done. Provisioners, however, can run multiple times, based on the declared configuration.
Terraform provider vs provisioner
Terraform providers are plugins used to authenticate with cloud platforms, services or other tools, allowing users to create, modify, and delete resources declared in the Terraform configurations. Provisioners are used only for copying files or executing local or remote operations.
There are three types of provisioners in Terraform:
- Local-exec provisioners
- Remote-exec provisioners
- File provisioners
The diagram below represents various types of provisioners you can implement using Terraform at different stages of provisioning.
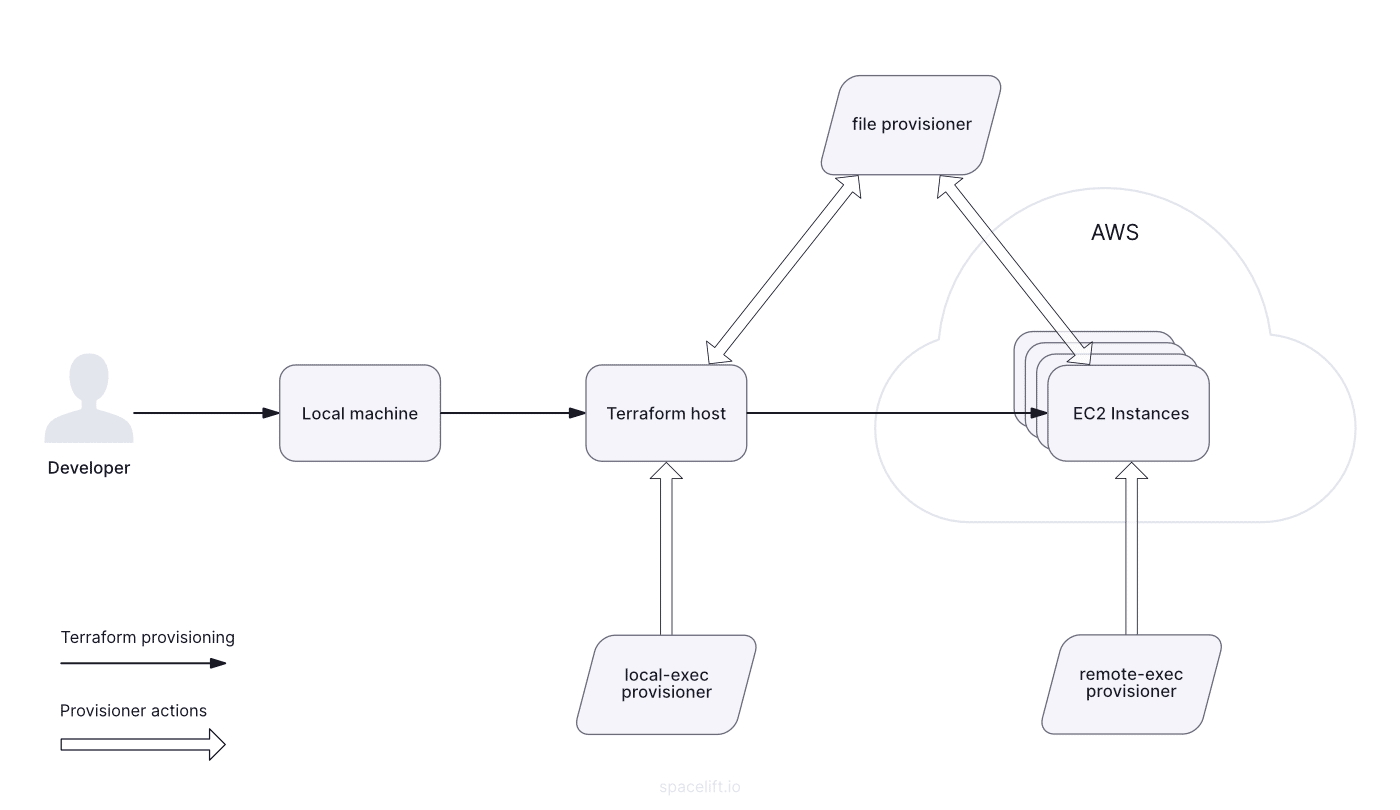
In the entire plan-apply-destroy cycle of Terraform, provisioners are employed at various stages to accomplish certain tasks. The local-exec provisioner is the simplest provisioner as it executes on the machine that hosts and executes Terraform commands. If the Terraform is installed on the developer’s local machine, the local-exec provisioner would run on the same machine.
It is simply because, unlike remote-exec and file provisioners, local-exec provisioners do not require connecting to the newly created resources to perform their tasks. Local-exec provisioner executes the commands or scripts on the host system and works on the data generated by the given Terraform configuration or data made available on the host machine.
As far as the target resources are concerned, we have to set up certain mechanisms to provide connection details to perform actions on the target machines. This is because the credentials used to log in to an EC2 instance are AWS key pairs (public and private keys) primarily.
We will take a look at these provisioners in detail in the next sections.
Read more about how to create AWS EC2 instance using Terraform.
Provisioners can be used inside any resource. You just have to declare the provisioner block and use one of the available options: file, local-exec, remote-exec.
Let’s take a look at an example with local-exec with a null-resource:
resource "null_resource" "example" {
  provisioner "local-exec" {
    command = "echo Hello World!"
  }
}

# null_resource.example: Creating...
# null_resource.example: Provisioning with 'local-exec'...
# null_resource.example (local-exec): Executing: ["/bin/sh" "-c" "echo Hello World!"]
# null_resource.example (local-exec): Hello World!
# null_resource.example: Creation complete after 0s [id=someid]
This will only run a shell command that outputs Hello World.
Let’s look into a real-life example. For this one, we are going to copy a YAML file from our local environment to an AWS instance using the file provisioner inside of a null resource. The AWS instance doesn’t exist, so we will script it too.
provider "aws" {
  region = "us-east-1"
}

data "aws_ami" "ubuntu" {
  filter {
    name   = "name"
    values = ["ubuntu-*"]
  }
  most_recent = true
}

resource "aws_key_pair" "example" {
  key_name   = "key"
  public_key = file("~/.ssh/id_rsa.pub")
}

resource "aws_instance" "web" {
  ami           = data.aws_ami.ubuntu.id
  instance_type = local.instance_type
  key_name      = aws_key_pair.example.key_name
}

resource "null_resource" "copy_file_on_vm" {
  depends_on = [
    aws_instance.web
  ]
  connection {
    type        = "ssh"
    user        = "ubuntu"
    private_key = file("~/.ssh/id_rsa")
    host        = aws_instance.web.public_dns
  }
  provisioner "file" {
    source      = "./file.yaml"
    destination = "./file.yaml"
  }
}

# null_resource.copy_file_on_vm: Creating...
# null_resource.copy_file_on_vm: Provisioning with 'file'...
# null_resource.copy_file_on_vm: Creation complete after 2s [id=someid]
As you can see, in the output of the null resource, the file provisioner finished its operation successfully. You can now log in to the vm and see the file copied in the specified directory.
It is possible to specify when the provisioners should run. Terraform mainly performs two operations – apply and destroy. If we want to run the provisioner to handle some logic at creation time, we use the creation-time provisioner. Similarly, if we want to handle the destroy-time scenario differently, we use the destroy-time provisioners.
The “when” attribute used in the provisioner block determines whether a provisioner is creation-time or destroy-time. By default, if the “when” attribute is not specified, the provisioner runs at creation time.
Creation-time provisioners
By default, all provisioners are creation-time provisioners. This means that when you are creating the resources associated with the provisioners, the provisioners will automatically run and do their tasks. You don’t need to specify the “when” option if you want to use creation-time provisioners. However, if you want to run a provisioner when a destroy of a resource happens, the when keyword becomes mandatory.
Destroy-time provisioners
In the example below, we create separate text files that contain event-specific messages for both create and destroy events.
resource "aws_instance" "my_vm" {
 ami           = var.ami //Amazon Linux AMI
 instance_type = var.instance_type

 provisioner "local-exec" {
   command = "echo 'Creation is successful.' >> creation.txt"
 }

 provisioner "local-exec" {
   when = destroy
   command = "echo 'Destruction is successful.' >> destruction.txt"
 }

 tags = {
   Name = var.name_tag,
 }
}
Try to apply and destroy the above Terraform configuration. This should generate two text files in respective order of operations – creation.txt and destruction.txt – in the project directory as below.
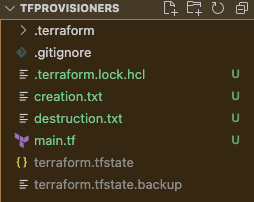
With text messages as below.
Note: Artifacts generated using provisioners are not managed via the Terraform state file.
Before we proceed to the next sections, it is important to discuss the connection block. The file provisioner and remote-exec provisioners – both operate on the target resource created in the future.
To enable Terraform to SSH into our Linux-based EC2 instance, we need two things:
- AWS key pair
- Security group to open up the HTTP access
Navigate to the AWS console, manually create a key pair, and save the private key file locally – on the Terraform host. I have created the key pair and named it “tfsn”. The name of the key file downloaded locally on my machine is “tfsn.cer”.
This information is used by Terraform provisioners to SSH into the EC2 instance. Additionally, we use this key pair to SSH into the EC2 instance ourselves for validation purposes.
In the Terraform configuration, add the configuration for a new security group that enables HTTP traffic from the internet to access it via browser and SSH login required by provisioners. We would need this for validation when we discuss the remote-exec provisioner.
Below is an example configuration of the security group in Terraform:
resource "aws_security_group" "http_access" {
 name        = "http_access"
 description = "Allow HTTP inbound traffic"

 ingress {
   description = "HTTP Access"
   from_port   = 80
   to_port     = 80
   protocol    = "tcp"
   cidr_blocks = ["0.0.0.0/0"]
 }

 ingress {
   description = "SSH Access"
   from_port   = 22
   to_port     = 22
   protocol    = "tcp"
   cidr_blocks = ["0.0.0.0/0"]
 }

 egress {
   from_port   = 0
   to_port     = 0
   protocol    = "-1"
   cidr_blocks = ["0.0.0.0/0"]
 }

 tags = {
   Name = "http_access"
 }
}
Note: In the sections that follow, the code snippets may not contain the security group configuration (like variables and provider), but it is assumed to be present.
The local-exec provisioner works on the Terraform host – where Terraform configuration is applied/executed. It is used to execute any shell command. It is used to set or read environment variables, details about the resource created, invoke any process or application, etc.
If we ship any shell script along with the Terraform config, or if the shell scripts are already available on the host to be invoked, local-exec provisioners are used to execute the same.
Local-exec example
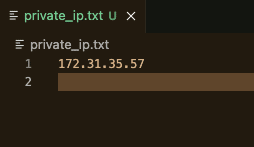
In the example below, we create an EC2 instance in AWS. It uses a local-exec provisioner to save the private_ip address of the instance created in a text file. This provisioner executes in the same working directory where terraform apply is run once the provisioning is successful.
resource "aws_instance" "my_vm" {
 ami           = var.ami //Amazon Linux AMI
 instance_type = var.instance_type

 provisioner "local-exec" {
   command = "echo ${self.private_ip} >> private_ip.txt"
 }

 tags = {
   Name = var.name_tag,
 }
}
Once this configuration is applied successfully, a new file is created in the project directory.

The contents of the private_ip.txt file are as expected.
It is important to note that the command executes once the provisioning task is successful.
The file provisioner is a way to copy certain files or artifacts from the host machine to target resources that will be created in the future. This is a very handy way to transport certain script files, configuration files, artifacts like .jar files, binaries, etc. when the target resource is created and boots for the first time.
File provisioner example
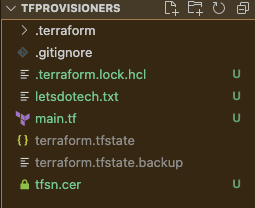
To demonstrate this, we have a file named “letsdotech.txt” which we would like to copy into the home directory of the target EC2 instance. The project directory currently looks like the image below.
“tfsn.cer” is the private key file we created in the previous section for enabling the Terraform provisioner to SSH into the EC2 instance.
Note: It is recommended to use better mechanisms to manage key files. Making the key file a part of the shared git repository is highly discouraged.
Terraform configuration for the EC2 instance along with file provisioner appears below. Various attributes are described in the table that follows.
resource "aws_instance" "my_vm" {
 ami           = var.ami //Amazon Linux AMI
 instance_type = var.instance_type

 key_name        = "tfsn"
 security_groups = [aws_security_group.http_access.name]

 provisioner "file" {
   source      = "./letsdotech.txt"
   destination = "/home/ec2-user/letsdotech.txt"
 }
 connection {
   type        = "ssh"
   host        = self.public_ip
   user        = "ec2-user"
   private_key = file("./tfsn.cer")
   timeout     = "4m"
 }

 tags = {
   Name = var.name_tag,
 }
}| Attribute | Description |
| ami
|
The Amazon Linux AMI.
|
| instance_type
|
The size of the instance we need. It is currently set to “t2.micro”.
|
| key_name
|
Name of the key file as created in the AWS console in the previous section.
|
| security_groups
|
Reference to the Security Group name as created in the previous section.
|
| provisioner
|
The file provisioner block contains information about the source and destination.
Source – is a path to the file on the Terraform host Destination – is a path on the target EC2 instance, where the source file should be copied
|
| connection
|
The connection block used by the file provisioner to SSH into the EC2 instance to copy the file.
Type – specifies the protocol i.e. SSH Host – specifies the public IP address of the EC2 instance that will be created User – Amazon Linux AMIs have ec2-user as the default user Private_key – Path to the private key file named tfsn.cer stored locally Timeout – 4 minutes. If the provisioner is not able to perform the given operation within 4 minutes, it throws an error.
|
| tags
|
To name our EC2 instance.
|
When the above configuration is applied, it creates the EC2 instance and we can verify the same in the AWS console. Once the instance is created, the file provisioner copies the text file to the destination path. We can verify the same from the Terraform output after apply.
---------------------Console output--------------------
.
.
.
Do you want to perform these actions?
  Terraform will perform the actions described above.
  Only 'yes' will be accepted to approve.

  Enter a value: yes

aws_security_group.http_access: Creating...
aws_security_group.http_access: Creation complete after 2s [id=sg-0e0d0c032fed5bd1a]
aws_instance.my_vm: Creating...
aws_instance.my_vm: Still creating... [10s elapsed]
aws_instance.my_vm: Still creating... [20s elapsed]
aws_instance.my_vm: Still creating... [30s elapsed]
aws_instance.my_vm: Provisioning with 'file'...
aws_instance.my_vm: Creation complete after 35s [id=i-0ef38d2558210f5c9]

Apply complete! Resources: 2 added, 0 changed, 0 destroyed.

Outputs:

instance_id = "i-0ef38d2558210f5c9"
public_ip = "3.74.154.19"

------------------------------------------------
Also, let us SSH into the EC2 instance and check if the file exists and the contents of the file.
---------------------------------------------------
[ec2-user@ip-172-31-42-133 ~]$ ls
letsdotech.txt
[ec2-user@ip-172-31-42-133 ~]$ cat letsdotech.txt
Hello, this is Sumeet!
[ec2-user@ip-172-31-42-133 ~]$
---------------------------------------------------
This is as expected. Thus we have successfully used the file provisioner to copy a file from the local machine/Terraform host machine to the newly created EC2 instance. Every time we recreate the EC2 instance using the above configuration, the text file letsdotech.txt would always be made available, thanks to the file provisioner.
The remote-exec provisioners are similar to local-exec provisioners – where the commands are executed on the target EC2 instance instead of Terraform host. This is accomplished by using the same connection block that is used by the file provisioned. We use a remote-exec provisioner to run a single command or multiple commands.
Remote-exec example
The example below performs a simple task on the EC2 instance that is created by Terraform. Once the EC2 instance creation is successful, Terraform’s remote-exec provisioner logs in to the instance via SSH and executes the commands specified in the inline attribute array.
resource "aws_instance" "my_vm" {
 ami           = var.ami //Amazon Linux AMI
 instance_type = var.instance_type

 key_name        = "tfsn"
 security_groups = [aws_security_group.http_access.name]

 provisioner "remote-exec" {
   inline = [
     "touch hello.txt",
     "echo 'Have a great day!' >> hello.txt"
   ]
 }

 connection {
   type        = "ssh"
   host        = self.public_ip
   user        = "ec2-user"
   private_key = file("./tfsn.cer")
   timeout     = "4m"
 }

 tags = {
   Name = var.name_tag,
 }
}
When we apply the above configuration, we can observe in the Terraform output that first the EC2 instance was created, then the remote-exec provisioner used the connection details to SSH into the instance, performed the tasks, and logged out.
----------------------------------Console output-----------------------------
.
.
.
Do you want to perform these actions?
  Terraform will perform the actions described above.
  Only 'yes' will be accepted to approve.

  Enter a value: yes

aws_security_group.http_access: Creating...
aws_security_group.http_access: Creation complete after 2s [id=sg-012859a7c2879af9b]
aws_instance.my_vm: Creating...
aws_instance.my_vm: Still creating... [10s elapsed]
aws_instance.my_vm: Still creating... [20s elapsed]
aws_instance.my_vm: Still creating... [30s elapsed]
aws_instance.my_vm: Provisioning with 'remote-exec'...
aws_instance.my_vm (remote-exec): Connecting to remote host via SSH...
aws_instance.my_vm (remote-exec):   Host: 3.122.228.94
aws_instance.my_vm (remote-exec):   User: ec2-user
aws_instance.my_vm (remote-exec):   Password: false
aws_instance.my_vm (remote-exec):   Private key: true
aws_instance.my_vm (remote-exec):   Certificate: false
aws_instance.my_vm (remote-exec):   SSH Agent: true
aws_instance.my_vm (remote-exec):   Checking Host Key: false
aws_instance.my_vm (remote-exec):   Target Platform: unix
aws_instance.my_vm (remote-exec): Connected!
aws_instance.my_vm: Creation complete after 32s [id=i-046efff75f6b96dd9]

Apply complete! Resources: 2 added, 0 changed, 0 destroyed.

Outputs:

instance_id = "i-046efff75f6b96dd9"
public_ip = "3.122.228.94"

--------------------------------------------------------------------
As a result, when we log into the same EC2 instance, we should have a file named “hello.txt” with the message “Have a great day!” in its contents.
Let’s verify the same.
--------------------------------------------------------------------------------------------------------------------------------------
[ec2-user@ip-172-31-37-69 ~]$ ls
hello.txt
[ec2-user@ip-172-31-37-69 ~]$ cat hello.txt
Have a great day!
[ec2-user@ip-172-31-37-69 ~]$
--------------------------------------------------------------------------------------------------------------------------------------
In this section, we use Terraform provisioners to install the Nginx web server. Successful installation of the Nginx web server requires a few commands to download, install, and configure the same correctly.
Instead of supplying these commands in an inline array attribute, we wrap them in a shell file and execute that shell file. This requires us to use the file provisioner to first transport the shell file in the target EC2 instance and then use the remote-exec provisioner to call the same.
Installing the Nginx web server is a relatively simple task, with few commands to execute. However, it gives us an idea of how complex tasks may be performed in a real-world scenario.
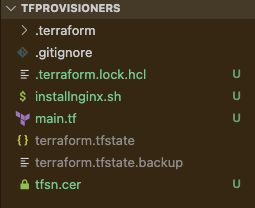
To prepare for our example, we first create the shell file named installnginx.sh, with the contents below. It simply updates the registries, installs Nginx, enables the Nginx service, and starts the server.
#!/bin/bash
sudo yum update -y
sudo amazon-linux-extras install nginx1 -y
sudo systemctl enable nginx
sudo systemctl start nginx
The project folder currently has the below files.
Modify the EC2 configuration as shown below.
Here, we have specified the file provisioner as discussed above. The inline commands modify the file permissions of installnginx.sh file, and then execute the same.
resource "aws_instance" "my_vm" {
 ami           = var.ami //Amazon Linux AMI
 instance_type = var.instance_type

 key_name        = "tfsn"
 security_groups = [aws_security_group.http_access.name]

 provisioner "file" {
   source      = "./installnginx.sh"
   destination = "/home/ec2-user/installnginx.sh"
 }

 provisioner "remote-exec" {
   inline = [
     "chmod 777 ./installnginx.sh",
     "./installnginx.sh"
   ]
 }

 connection {
   type        = "ssh"
   host        = self.public_ip
   user        = "ec2-user"
   private_key = file("./tfsn.cer")
   timeout     = "4m"
 }

 tags = {
   Name = var.name_tag,
 }
}
Apply the above configuration and observe the Terraform output.
----------------------------------------------------------------------------
.
.
.
Do you want to perform these actions?
  Terraform will perform the actions described above.
  Only 'yes' will be accepted to approve.

  Enter a value: yes

aws_security_group.http_access: Creating...
aws_security_group.http_access: Creation complete after 2s [id=sg-09d11628094c8a942]
aws_instance.my_vm: Creating...
aws_instance.my_vm: Still creating... [10s elapsed]
aws_instance.my_vm: Still creating... [20s elapsed]
aws_instance.my_vm: Still creating... [30s elapsed]
aws_instance.my_vm: Provisioning with 'file'...
aws_instance.my_vm: Provisioning with 'remote-exec'...
aws_instance.my_vm (remote-exec): Connecting to remote host via SSH...
aws_instance.my_vm (remote-exec):   Host: 3.122.254.50
aws_instance.my_vm (remote-exec):   User: ec2-user
aws_instance.my_vm (remote-exec):   Password: false
aws_instance.my_vm (remote-exec):   Private key: true
aws_instance.my_vm (remote-exec):   Certificate: false
aws_instance.my_vm (remote-exec):   SSH Agent: true
aws_instance.my_vm (remote-exec):   Checking Host Key: false
aws_instance.my_vm (remote-exec):   Target Platform: unix
aws_instance.my_vm (remote-exec): Connected!
aws_instance.my_vm (remote-exec): Starting install
aws_instance.my_vm (remote-exec): Loaded plugins: extras_suggestions,
aws_instance.my_vm (remote-exec):               : langpacks, priorities,
aws_instance.my_vm (remote-exec):               : update-motd
aws_instance.my_vm (remote-exec): Existing lock /var/run/yum.pid: another copy is running as pid 3202.
aws_instance.my_vm (remote-exec): Another app is currently holding the yum lock; waiting for it to exit...
aws_instance.my_vm (remote-exec):   The other application is: yum
aws_instance.my_vm (remote-exec):     Memory :  79 M RSS (370 MB VSZ)
aws_instance.my_vm (remote-exec):     Started: Mon Aug 15 17:23:51 2022 - 00:03 ago
aws_instance.my_vm (remote-exec):     State  : Running, pid: 3202
aws_instance.my_vm (remote-exec): Another app is currently holding the yum lock; waiting for it to exit...
aws_instance.my_vm (remote-exec):   The other application is: yum
aws_instance.my_vm (remote-exec):     Memory :  89 M RSS (381 MB VSZ)
aws_instance.my_vm (remote-exec):     Started: Mon Aug 15 17:23:51 2022 - 00:05 ago
aws_instance.my_vm (remote-exec):     State  : Running, pid: 3202
aws_instance.my_vm: Still creating... [40s elapsed]
aws_instance.my_vm (remote-exec): Another app is currently holding the yum lock; waiting for it to exit...
aws_instance.my_vm (remote-exec):   The other application is: yum
aws_instance.my_vm (remote-exec):     Memory : 143 M RSS (435 MB VSZ)
aws_instance.my_vm (remote-exec):     Started: Mon Aug 15 17:23:51 2022 - 00:07 ago
aws_instance.my_vm (remote-exec):     State  : Running, pid: 3202
aws_instance.my_vm (remote-exec): Another app is currently holding the yum lock; waiting for it to exit...
aws_instance.my_vm (remote-exec):   The other application is: yum
aws_instance.my_vm (remote-exec):     Memory : 167 M RSS (459 MB VSZ)
aws_instance.my_vm (remote-exec):     Started: Mon Aug 15 17:23:51 2022 - 00:09 ago
aws_instance.my_vm (remote-exec):     State  : Running, pid: 3202
aws_instance.my_vm (remote-exec): Resolving Dependencies
aws_instance.my_vm (remote-exec): --> Running transaction check
aws_instance.my_vm (remote-exec): ---> Package ec2-instance-connect.noarch 0:1.1-15.amzn2 will be updated
aws_instance.my_vm (remote-exec): ---> Package ec2-instance-connect.noarch 0:1.1-19.amzn2 will be an update
aws_instance.my_vm (remote-exec): --> Processing Dependency: ec2-instance-connect-selinux for package: ec2-instance-connect-1.1-19.amzn2.noarch
aws_instance.my_vm (remote-exec): ---> Package ec2-net-utils.noarch 0:1.6.1-2.amzn2 will be updated
aws_instance.my_vm (remote-exec): ---> Package ec2-net-utils.noarch 0:1.7.0-1.amzn2 will be an update
aws_instance.my_vm (remote-exec): ---> Package glibc.x86_64 0:2.26-59.amzn2 will be updated
aws_instance.my_vm (remote-exec): ---> Package glibc.x86_64 0:2.26-60.amzn2 will be an update
.
.
.
(lengthy installation logs)
.
.
.
aws_instance.my_vm (remote-exec):  60  mock2                    available    [ =stable ]
aws_instance.my_vm (remote-exec):  61  dnsmasq2.85              available    [ =stable ]
aws_instance.my_vm (remote-exec):  62  kernel-5.15              available    [ =stable ]
aws_instance.my_vm (remote-exec):  63  postgresql14             available    [ =stable ]
aws_instance.my_vm (remote-exec):  64  firefox                  available    [ =stable ]
aws_instance.my_vm (remote-exec): Created symlink from /etc/systemd/system/multi-user.target.wants/nginx.service to /usr/lib/systemd/system/nginx.service.
aws_instance.my_vm (remote-exec): Ending install
aws_instance.my_vm: Creation complete after 1m29s [id=i-04da69e10454dcd96]

Apply complete! Resources: 2 added, 0 changed, 0 destroyed.

Outputs:

instance_id = "i-04da69e10454dcd96"
public_ip = "3.122.254.50"

---------------------------------------------------------------------------------
The Terraform output indicates the sequence of activities it performed to provision this resource and install the Nginx. The activities can be summarized below.
- Created security group
- Created EC2 instance
- Executed file provisioner, which copied the file to the target instance
- Executed remote-exec provisioner, which executed the installnginx.sh file to install Nginx
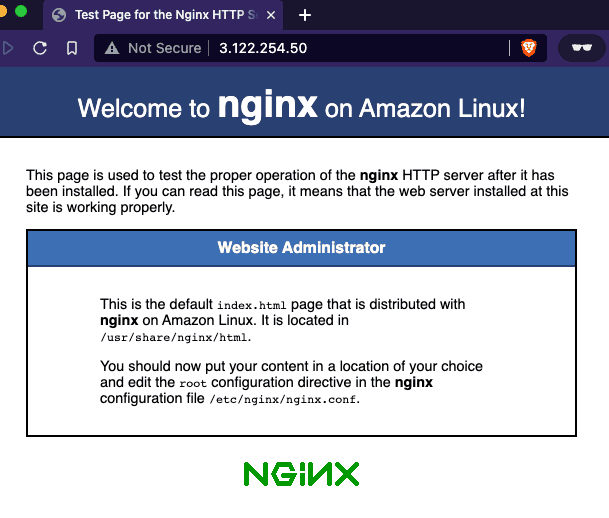
To verify if the Nginx was installed successfully, open the browser and access the home page with the public IP address displayed. If you can see the Nginx landing page, it means you have successfully used file and remote-exec provisioners to install the same.
Provisioners are great. But there are some limitations we should consider before using them. As mentioned in the Terraform documentation, provisioners should be used as the last resort to achieve any kind of configuration management tasks possible with them.
When provisioners enable us to execute any command in the future target resource, it involves considerable power and responsibility. It opens up huge scope for activities that can be performed on the OS and application layer. There is no tracking or accountability for these actions.
If, for some reason, the provisioner tasks fail to run on a few machines, this increases the overhead of identifying them and deploying a workaround. Gaining an understanding of why a particular provisioner did not work on a set of machines can be very difficult and is highly hostile because there are several factors potentially unique to each resource.
In a way, provisioners extend into the space of configuration management software but with low confidence. It is recommended to rely on software built for configuration management – like Chef, Puppet, Ansible, etc. – for such tasks. These tools have better control over configuration management, credential management, and better security standards.
For additional support, check out Spacelift, a sophisticated and compliant infrastructure delivery platform that makes Terraform management easy. It brings with it a GitOps flow, so your infrastructure repository is synced with your Terraform Stacks, and pull requests show you a preview of what they’re planning to change. It also has an extensive selection of policies, which lets you automate compliance checks and build complex multi-stack workflows.
Similarly, you should use a cloud-native approach to pass the data into the target resource. For example, while provisioning an AWS EC2 instance, the user_data attribute can be used to pass certain scripting data to the instances. These mechanisms depend on cloud-init software, which has become an industry standard and that takes care of the initialization process when the instance boots.
Provisioners have the most influence on the resource during the creation process because the scripts run during the instance boot process play a key role in the lifetime of the resource that has just started. If certain data, applications, patches, etc., can be pre-configured into a machine image, it is preferable to create custom AMIs.
In this post, we went through the scenarios handled by provisioners, how they are implemented, and preferable ways to do it. We explored different types of Terraform provisioners and learned why they should be used as a last resort.
Note: New versions of Terraform are placed under the BUSL license, but everything created before version 1.5.x stays open-source. OpenTofu is an open-source version of Terraform that expands on Terraform’s existing concepts and offerings. It is a viable alternative to HashiCorp’s Terraform, being forked from Terraform version 1.5.6.
Terraform Management Made Easy
Spacelift effectively manages Terraform state, more complex workflows, supports policy as code, programmatic configuration, context sharing, drift detection, resource visualization and includes many more features.


![Terraform Resource Lifecycle Meta-Argument [Examples]](/_next/image?url=https%3A%2F%2Fspaceliftio.wpcomstaging.com%2Fwp-content%2Fuploads%2F2022%2F08%2F84.terraform-resource-lifecycle.png&w=3840&q=75)