
Most organizations today use infrastructure as code (IaC) to manage their cloud infrastructure. Clicking buttons and dragging sliders in a graphical user interface is no longer the accepted way to manage infrastructure.
A related concept called policy as code (PaC) is gaining traction. Although there are similarities and some overlap between them strictly separating your infrastructure from the policies governing it is a recipe that scales well for organizations of any size.
This post will cover how to use and enforce policy as code in Terraform. Two popular PAC frameworks are HashiCorp Sentinel and Open Policy Agent (OPA).
What we will cover:
What is infrastructure as code?
To understand what PaC is and how it fits into your environment, it helps to discuss IaC first. IaC is the practice of defining your infrastructure using a configuration language (e.g. JSON or YAML), a high-level programming language (e.g. Python or Go), or a domain-specific language (e.g. HashiCorp Configuration Language or Azure Bicep). You treat your infrastructure code like your application code:
- You keep the code in a version control system (e.g. GitHub).
- Changes to your infrastructure go through a review process (e.g., pair programming or pull request), and you possibly have a build step and tests automated in a pipeline.
An infrastructure engine handles the action of turning your IaC into actual infrastructure. This could be a proprietary infrastructure engine, e.g., Azure Resource Manager or AWS CloudFormation, or an open-source or third-party infrastructure engine like Terraform, OpenTofu, or Pulumi.
IaC comes in two major flavors: declarative and imperative. Declarative IaC describes the desired end state, usually through a configuration language or a domain-specific language. Imperative IaC describes the journey to the final state, usually through a high-level programming language.
In the rest of this post, we’ll specifically focus on declarative IaC, and Terraform in particular. Terraform uses a domain-specific language known as HashiCorp Configuration Language (HCL). HCL is great for declaratively describing your resources with their desired properties. It can express relationships and dependencies between resources. It can also perform basic validation of input and output and, to some extent, verify the behaviors of your resources. However, it is not good at complex logic and advanced validation.
What is policy as code?
Policy as code is the practice of defining and managing policies through code, similar to infrastructure as code (IaC). It involves writing policies as code that dictate rules and constraints for resources, ensuring compliance with regulatory standards, security guidelines, and other external demands. Policy-as-code frameworks uses policy engines, like Azure Policy, HashiCorp Sentinel, or Open Policy Agent (OPA), to evaluate and enforce these policies automatically.
PaC is a logical continuation of IaC. Policies are rules that your resources should respect. An example of a policy is: “Security group in AWS should not expose ingress traffic on port 80 for the whole internet”, which clearly shows that a policy can usually be expressed using natural language.
Just as there are different IaC languages and frameworks, there are different languages and frameworks to implement policy as code. You write your policies in code and treat this code similarly to application and infrastructure code.

For PaC, a policy engine evaluates policies for the infrastructure changes you want to apply. This could be a proprietary policy engine, like the Azure Policy service. Third-party and open-source policy engines, such as HashiCorp Sentinel or the Open Policy Agent (OPA), are also available.
Policies
Policies usually arise from external demands that do not necessarily involve the infrastructure itself. These could be regulatory compliance frameworks, local regulations, environmental considerations, or something else. Turning these rules into code is where a PaC framework shines, and it is usually difficult or impossible to do something similar using traditional IaC frameworks alone.
A canonical example of a validation commonly built into your IaC is allowing specific cloud regions to be used for your resources. In Terraform, this could look like this:
variable “aws_region” {
  description = “AWS region for all resources”
  type = string
  validation {
    condition = contains([
      “eu-west-1”,
      “eu-west-2”,
      “eu-west-3”
    ], var.aws_region)
    error_message = “Please use an approved region only (eu-west-{1,2,3})”
  }
}
This snippet shows a Terraform variable asking for the name of an AWS region to use. A validation block ensures that only one of the three approved regions is provided.
To enforce this for all your infrastructure, you must make sure the validation block is added to all your modules. Updating the list of approved regions would require an update to all of your modules. This validation should be part of your PaC rather than your IaC. Expressing the same thing in a policy and applying the policy for all your infrastructure is a scalable solution.
Benefits of using policy as code for your infrastructure
As your organization grows, so do your cloud bill and your surface area of attack. Governing your cloud estate is clearly necessary, and this is where you can benefit from PaC.
If you are in a startup with three employees, you will probably get away with no clearly defined policies at all. As the startup starts to multiply in size, it would be beneficial to agree on a baseline set of policies. You could still get away by verbally communicating your policies peer to peer. When your startup has become a large organization, it will be more difficult to keep track of your infrastructure and ensure it is not violating your policies. As with IaC, the true benefits of PaC come with scale.
Some of the main benefits of policy as code are:
- Increased security — PaC helps you avoid infrastructure misconfigurations that could lead to security breaches or data loss.
- Improved developer efficiency — You can get instant feedback on your proposed infrastructure changes from policies. Avoid putting the responsibility of enforcing policies on your development teams.
- A known good state — You know that all infrastructure changes follow the policies you have set up. Getting to this point requires work unless you have policies in place from day one, but it is a very good position to be in.
- Better visibility — Keeping your policies as code in a central repository allows your key stakeholders to see them and provide feedback.
Policy-as-code use cases
Policy as code can be used for more than controlling individual settings of particular resource types. The list of possible use cases is potentially infinite.
A few commonly applied types of policies for Terraform are:
- Only allow approved cloud regions for all resources and data. This policy can come from both a performance or compliance requirement (e.g., the General Data Protection Regulation or GDPR in Europe.)
- Deny opening up certain high-risk ports in security groups and firewalls. This is one example of a security concern turned into a policy.
- Require a set of common tags on resources. This could include team names, departments, cost centers, and more. As your cloud footprint grows, you need a way to keep track of everything.
- Deny or restrict the use of certain instance types, sizes, SKUs, tiers, etc. You could have separate allow or deny lists for development and production environments. Your cloud resources are not free, so using policies to control expenses is beneficial.
- Require backups to be configured for all database resources and other storage services. Unless you run a stateless application, you are likely storing data your application depends on. If disaster strikes, you need a way to get that data back. Use policies to set up backup and redundancy for your storage services.
Terraform includes general policies you can set up to apply to all infrastructure, regardless of which resource providers you are using. However, some policies are specific to a given resource provider.
In summary, you can use policy as code to set up rules around your infrastructure. These rules generally spring from security concerns, budgets, the environment, regulatory compliance frameworks, and other sources.
Policy as code with Terraform and Sentinel
In this section, we will explore how to enforce policy as code in Terraform using Sentinel, which allows organizations to automate compliance and governance by embedding policy checks directly into the infrastructure provisioning workflow.
What is HashiCorp Sentinel?
Part of the HashiCorp ecosystem, Sentinel is both a policy language and a policy engine with the main purpose of writing and evaluating policies. It can be a stand-alone tool for policy as code, run locally, included in the continuous integration pipelines for Terraform, or used through its close integration with HCP Terraform. You can use it with your Terraform configuration, state file, plan output, and the HCP Terraform run environment itself. It can work with dates and times, query HTTP endpoints read arbitrary JSON data, and more.
It is not a product in the same sense as Terraform or Vault. It is closer to HCL and appears as a utility in other products. Other parts of the HashiCorp stack, such as Vault, Nomad, and Consul, also support Sentinel policies.
Sentinel has built-in support for testing, so you can write unit tests and verify that your policies behave as you expect. This is a best practice to follow if you apply PaC at scale, with Sentinel, or with any other PaC framework.
Why use Sentinel for policy as code?
If your organization uses HCP Terraform to manage infrastructure, Sentinel is an ideal choice for policy as code. If you already use Sentinel in other HashiCorp products, such as Vault, adopting Sentinel for Terraform will be straightforward and familiar, allowing for a cohesive and efficient policy management experience.
Many sample policies are available online to help you get started with Sentinel. HashiCorp has a Sentinel playground where you can quickly test your policies without needing to install any tools locally.
How to create and implement Sentinel policies for Terraform?
There are two main ways to implement Sentinel policies for your Terraform infrastructure — through the Sentinel integration in HCP Terraform or separately in your continuous integration platform of choice. We’ll look briefly at both approaches.
In HCP Terraform, your infrastructure lives in workspaces. One workspace is equivalent to one Terraform configuration. Note that these are not the same type of Terraform workspaces you can create using the Terraform CLI. You can create Sentinel policies and apply them to your workspaces as needed.
You can create one or more policy sets to apply Sentinel policies at scale in HCP Terraform. A policy set is a collection of one or more policies that you want to group together logically. An example of a policy set is all policies that should apply to your production workloads. You can connect a source code repository to a policy set and handle all policy updates via your normal git workflows.
Assuming you have a Terraform organization set up in HCP and you have configured the TFE provider (used to manage HCP Terraform and Terraform Enterprise), setting up a new policy set together with a single policy using Terraform code is as follows:
resource "tfe_policy" "business_hours" {
  name         = "deny-deploy-outside-of-business-hours"
  description  = "Deny deployments outside of business hours"
  kind         = "sentinel"
  policy       = file("${path.module}/policies/business-hours.sentinel")
  enforce_mode = "hard-mandatory"
}

resource "tfe_policy_set" "production" {
  name          = "production-workload-policies"
  description   = "Policy set for production workloads"
  kind          = "sentinel"
  agent_enabled = "true"
  policy_ids = [
    tfe_policy.business_hours.id,
  ]
  workspace_ids = [
    tfe_workspace.team1.id, # workspaces defined elsewhere (not shown)
    tfe_workspace.team2.id,
  ]
}
The policy is created with the enforce_mode argument set to hard-mandatory. Sentinel policies can be configured in three different modes:
- An advisory policy will output a warning if violated, but it will not stop the following run. You could apply this mode for new policies you are introducing but do not plan to enforce yet. This will allow your teams to make the necessary changes to their infrastructure in time.
- A soft mandatory policy will stop the run if violated unless an exception has been configured. Use this mode for policies that generally should not be bypassed but could be allowed in certain circumstances. Exposing an AWS S3 bucket to the public is generally a bad idea, but sometimes, this is exactly what you want to do.
- A hard mandatory policy will stop the run and cannot be bypassed. This type of policy is used for strict requirements that should always be followed, e.g., regulatory compliance and data residency policies.
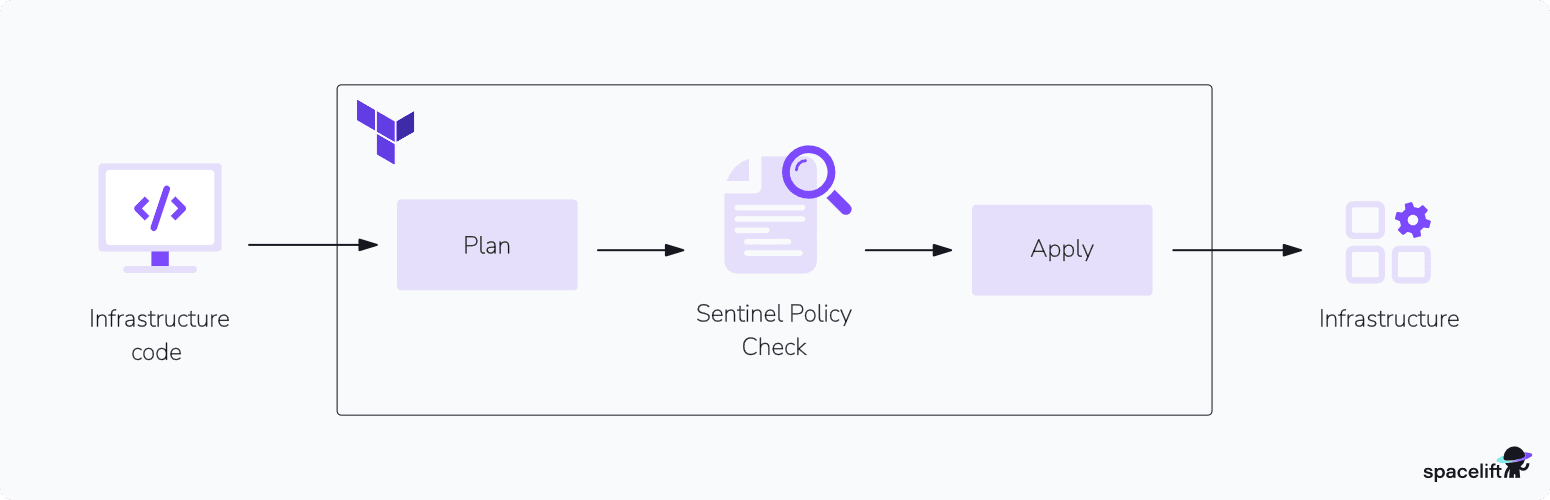
When you execute a run in HCP Terraform, it begins at the plan phase, which is followed by a cost estimation phase. Next, the data from the plan and cost estimation phases, together with your infrastructure configuration and current state, are passed to Sentinel for policy evaluation. If there is a failing soft or hard mandatory policy, the run will be stopped.
What if you are not using HCP Terraform? You can download the Sentinel binary to the environment where you want to enforce policies. This would typically be a continuous integration platform. Here is an example of how to achieve this using GitHub Actions.
The Sentinel CLI requires a configuration file written in HCL. A sample configuration file looks like this:
sentinel {
  features = {
    terraform = true
  }
}

import "plugin" "tfplan/v2" {
  config = {
    plan_path = "./plan.json"
  }
}

policy "business_hours" {
  source            = "./policies/business-hours.sentinel"
  enforcement_level = "hard-mandatory"
}

policy “security_groups” {
  source            = “./policies/security-groups.sentinel”
  enforcement_level = “hard-mandatory”
}
At a high level, this configuration file does the following:
- It enables the Terraform feature for Sentinel.
- It configures an import of the plugin type for Terraform plans. You must configure where the plan file can be found. This requires you to know beforehand where your plan file will be located relative to the Sentinel configuration file. Note that you are responsible for creating the state file in JSON format.
- It configures two policies, business_hours and security_groups. For each policy, we specify where the policy body can be read and how to configure an enforcement level. Note that the enforcement level is not automatically enforced when you run Sentinel in GitHub Actions, you will need to parse the output from the Sentinel run and take actions based on the results.
Let’s ignore what the Sentinel policies look like for now. We’ll come back to those in the next section. Having the Sentinel configuration file and the policy files with our Terraform configuration allows us to build a GitHub Actions workflow to run Sentinel.
Here is an example of such a workflow:
name: HashiCorp Sentinel workflow for Terraform

on:
  pull_request:
    branches:
      - main

jobs:
  policy-as-code:
    runs-on: ubuntu-latest
    defaults:
      run:
        working-directory: ./policy/sentinel
    env:
      SENTINEL_VERSION: 0.26.1
    steps:
      - name: Check-out source code
        uses: actions/checkout@v4
      - name: Install Terraform CLI
        uses: hashicorp/setup-terraform@v3
      - name: Install Sentinel CLI
        run: |
          FILENAME="sentinel_${{ env.SENTINEL_VERSION }}_linux_amd64.zip"
          wget "https://releases.hashicorp.com/sentinel/${{ env.SENTINEL_VERSION }}/$FILENAME"
          unzip "$FILENAME" -d $HOME/bin
          chmod +x $HOME/bin/sentinel
          echo "$HOME/bin" >> $GITHUB_PATH
      - name: Initialize Terraform configuration
        run: terraform init
      - name: Run Terraform plan and create JSON plan for Sentinel
        run: |
          terraform plan -out tfplan
          terraform show -json tfplan | jq > plan.json
      - name: Run Sentinel and store the result as JSON
        run: sentinel apply -json > results.json
      - name: Take actions based on results ...
        run: ... (not shown) ...
You can build a reusable GitHub Actions workflow for Terraform with Sentinel for your organization to make sure policies are enforced in a way you control. The steps to enforce this on GitHub are beyond the scope of this article.
Using the Sentinel CLI in a continuous integration platform requires closer attention to ensure policies are enforced and can’t be bypassed. It is easier to enforce policies at scale on a platform like HCP Terraform.
This example was for GitHub Actions, but you can achieve similar outcomes on other platforms.
Terraform Sentinel policy examples
We’ll consider a few policy examples to get a sense of the Sentinel policy language.
The policy named business_hours referred to in the previous section, allows infrastructure changes during business hours. The policy code looks like this:
import "time"

is_work_day = rule {
  time.now.weekday_name not in ["Saturday", "Sunday"]
}

is_business_hours = rule {
  time.now.hour >= 8 and time.now.hour < 17
}

main = rule {
  is_work_day and is_business_hours
}
This policy is special because it does not read any external data except for the current date and time.
Policies in Sentinel must have a rule named main. The main rule determines whether the policy passes or fails. Rules either evaluate to true or false. As in the business hours policy above, the main rule could consist of sub-rules, which make the policies easy to read, as is evident from the main rule.
The other policy referred to in the previous section was named security_groups, a policy to avoid exposing HTTP port 80 to the public internet in your AWS security groups. This is generally a bad idea because HTTP traffic is unencrypted. This policy code expressed with Sentinel can look like this:
import "tfplan/v2" as tfplan

ingress_rules = filter tfplan.resource_changes as _, rc {
  rc.type is "aws_vpc_security_group_ingress_rule" and
  rc.change.actions contains "create"
}

no_public_http_ingress = rule {
  all ingress_rules as _, ingress_rule {
    80 not in range(
      ingress_rule.change.after.from_port,
      ingress_rule.change.after.to_port + 1
    ) and
    "0.0.0.0/0" not in ingress_rule.change.after.cidr_ipv4
  }
}

main = rule {
  no_public_http_ingress
}
This policy illustrates the use of a filter expression. Filter expressions allow you to find the resources that the policy should cover. Filter expressions, together with rules, are the constructs you will write most often in your Sentinel policies.
Policy as code with Terraform and Open Policy Agent
Open Policy Agent is another option for enforcing policy as code in Terraform. Let’s see how to use it to automate policy enforcement and catch issues early in the deployment process:.
What is an Open Policy Agent (OPA)?
OPA, a graduated project in the Cloud Native Computing Foundation, is an open-source, general-purpose policy engine with many areas of applicability. It uses a purpose-built domain-specific language called Rego to write sophisticated policies for complex input data.
If you can express something in JSON, then you can use OPA as a policy framework to evaluate policies for that JSON content.
OPA is used extensively together with Kubernetes. Your applications can also use it for authorization decisions and more. You could apply OPA as a PaC framework for Azure Resource Manager templates or AWS CloudFormation templates, as long as they are expressed in JSON format. You can also use OPA to make policy decisions based on your Terraform configuration, plan files, and state files.
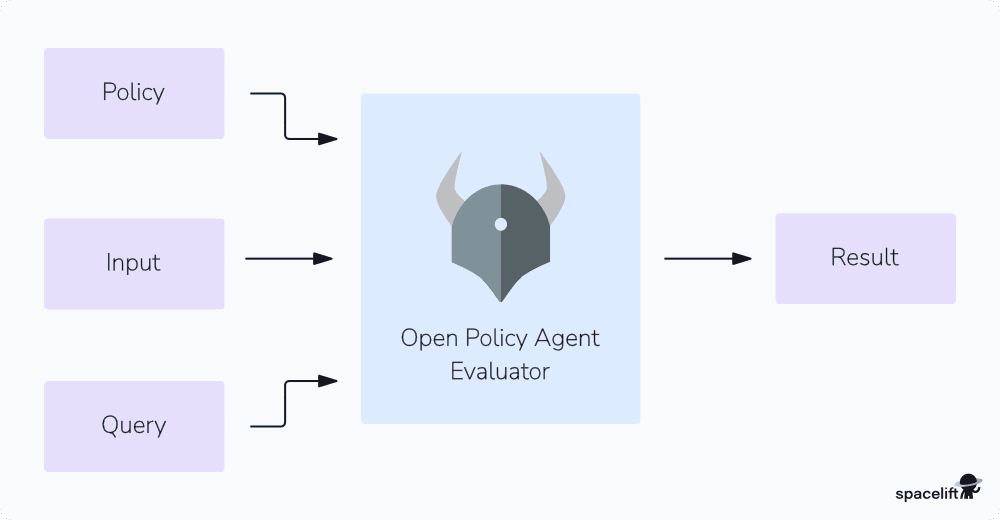
When you use OPA for policy decisions, you require:
- One or more policies expressed in Rego (These are your rules.)
- Input data to make policy decisions on (for example your Terraform plan file)
- A query that should result in an allow or deny decision
To clarify these steps, we’ll provide examples in other sections.
Watch the video below to learn more about the Rego policy language:

Why use OPA for policy as code?
OPA is open source and has a large community, so if you encounter issues with your policies, you will probably get help from the community. You can find large collections of policies for OPA online, covering many use cases.
OPA is applicable to anything that can be expressed as JSON. Apart from your Terraform configuration, state file, and plan file, this includes REST API requests and responses, Kubernetes manifests, AWS CloudFormation templates, Azure Resource Manager templates, and more.
You can even write policies for JSON coming as output from other tools, such as security scans, load tests, and more. OPA can cover all your PaC needs and prevents you from learning different PaC frameworks for different areas of applicability.
How to create and implement OPA policies for Terraform?
In this section, we will show how to use OPA as a stand-alone tool as part of your continuous integration workflows in GitHub Actions, and then we will look at how to define policies for Terraform with OPA in Spacelift.
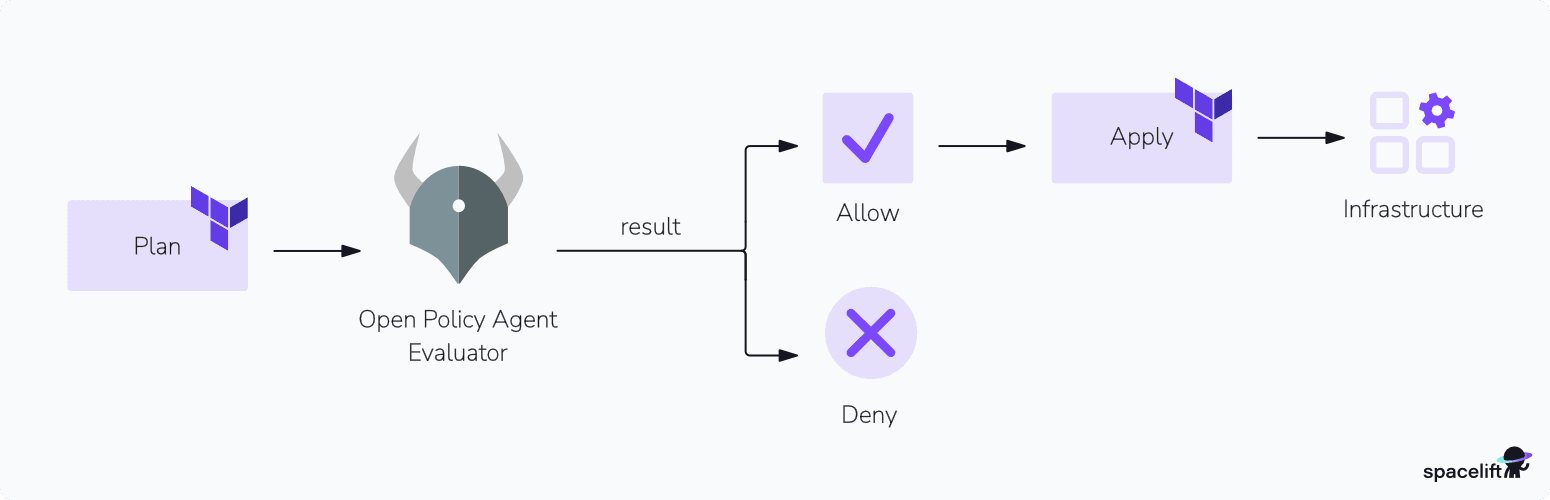
As mentioned previously, you need three pieces to run an evaluation using OPA.
- First, you need the appropriate input data. When working with Terraform, this is commonly the plan file specifying the infrastructure changes you are about to apply.
- Next, you need the policies to enforce.
- Finally, you need a query that you want OPA to evaluate.
These three pieces are connected, and two different environments (i.e. your GitHub Actions workflow and Spacelift) might not agree on what they should look like. Thus, you must ensure you follow the documentation for the environment in which you run OPA. When you build a workflow yourself using GitHub Actions, you are in control of all three pieces.
An example GitHub Actions workflow for Terraform with OPA looks like this:
name: OPA workflow for Terraform

on:
  pull_request:
    branches:
      - main

jobs:
  policy-as-code:
    runs-on: ubuntu-latest
    defaults:
      run:
        working-directory: ./policy/opa
    steps:
      - name: Check out source code
        uses: actions/checkout@v4
      - name: Install Terraform CLI
        uses: hashicorp/setup-terraform@v3
      - name: Install OPA
        uses: open-policy-agent/setup-opa@v2
        with:
          version: latest
      - name: Initialize Terraform configuration
        run: terraform init
      - name: Run Terraform plan and create JSON output for OPA
        run: |
          terraform plan -out tfplan
          terraform show -json tfplan | jq > plan.json
      - name: Check infrastructure compliance with OPA policies
        run: |
          opa eval \
            --input plan.json \
            --data security-groups.rego \
            "data.terraform.allow"
      - name: Take actions based on results ...
        run: ... (not shown) ...
This workflow looks similar to what we saw for HashiCorp Sentinel. To simplify the installation of OPA, we have used the open-policy-agent/setup-opa action.
Next, we initialize Terraform and create the Terraform plan file plan.json.
The command to run a policy evaluation with OPA is opa eval. We pass the input data to this command, using the flag --input plan.json, the policy we want to evaluate using --data security-groups.rego, and finally, the query data.terraform.allow.
The result passed back from OPA is:
{
  "result": [
    {
      "expressions": [
        {
          "value": false,
          "text": "data.terraform.allow",
          "location": {
            "row": 1,
            "col": 1
          }
        }
      ]
    }
  ]
}
The result indicates the value of our query evaluated to false. We can take action based on the result in the next steps of our workflow.
To understand where the query data.terraform.allow comes from, we must look at the policy we passed in using the --data flag in the opa eval command. This is the security-groups.rego file:
package terraform

default allow = false

deny {
  resource_change := input.resource_changes[_]
  resource_change.type == "aws_vpc_security_group_ingress_rule"
  resource_change.change.after.cidr_ipv4 == "0.0.0.0/0"
  resource_change.change.after.from_port == 80
  resource_change.change.after.to_port == 80
}

allow {
  not deny
}
This policy contains two values we can query for: deny and allow. The values are determined by the expressions contained in the curly brackets.
For the deny value, we look at all the resource changes. If there is a change for a resource of type aws_vpc_security_group_ingress_rule where port 80 is opened for the public, deny will be evaluated to true. The allow value will be the opposite of the deny value.
The query we passed into OPA (data.terraform.allow) asks for the resulting value of allow. The data.terraform part refers to the terraform package (specified in the first row of the policy) of the provided data (using the --data flag).
You can continue the GitHub Actions workflow by making decisions based on the OPA result. Similar to the HashiCorp Sentinel workflow, we must put in some extra work to ensure our policies are enforced. A platform such as Spacelift handles for you.
Defining policies with Spacelift
OPA is integrated into the Spacelift platform. You can define policies for different purposes:
- Use login policies to control who can log in to your Spacelift account and what role they should have once inside.
- Use approval policies to control who can approve or reject runs of your stacks, or to allow or reject runs automatically based on some other condition.
- Use plan policies to control what changes can be applied to your infrastructure. We defined this type of policy in HCP Terraform with Sentinel.
You can find the schema for the input for each type of policy in the Spacelift documentation.
If you use Terraform to configure your Spacelift environment, you can create policies using the spacelift_policy resource type:
resource "spacelift_policy" "business_hours" {
  name        = "deny-run-outside-business-hours"
  description = "Deny runs to start outside of business hours"
  body        = file("${path.module}/policies/business-hours.rego")
  type        = "APPROVAL"
  space_id    = "root"
  labels = [
    "autoattach:team"
  ]
}
This policy is configured as an approval-type policy. The content is provided in the body argument and kept in a separate file.
To enforce your OPA policies at scale in Spacelift, you can place them in the root space and add the special autoattach:<label> label, where <label> is a label you attach to the stacks where the policy should automatically be applied. In the example above, all stacks with the team label will automatically have this policy attached. This makes managing policies at scale a breeze.
To see an overview of all the policies you have defined, go to the policy overview page in Spacelift:
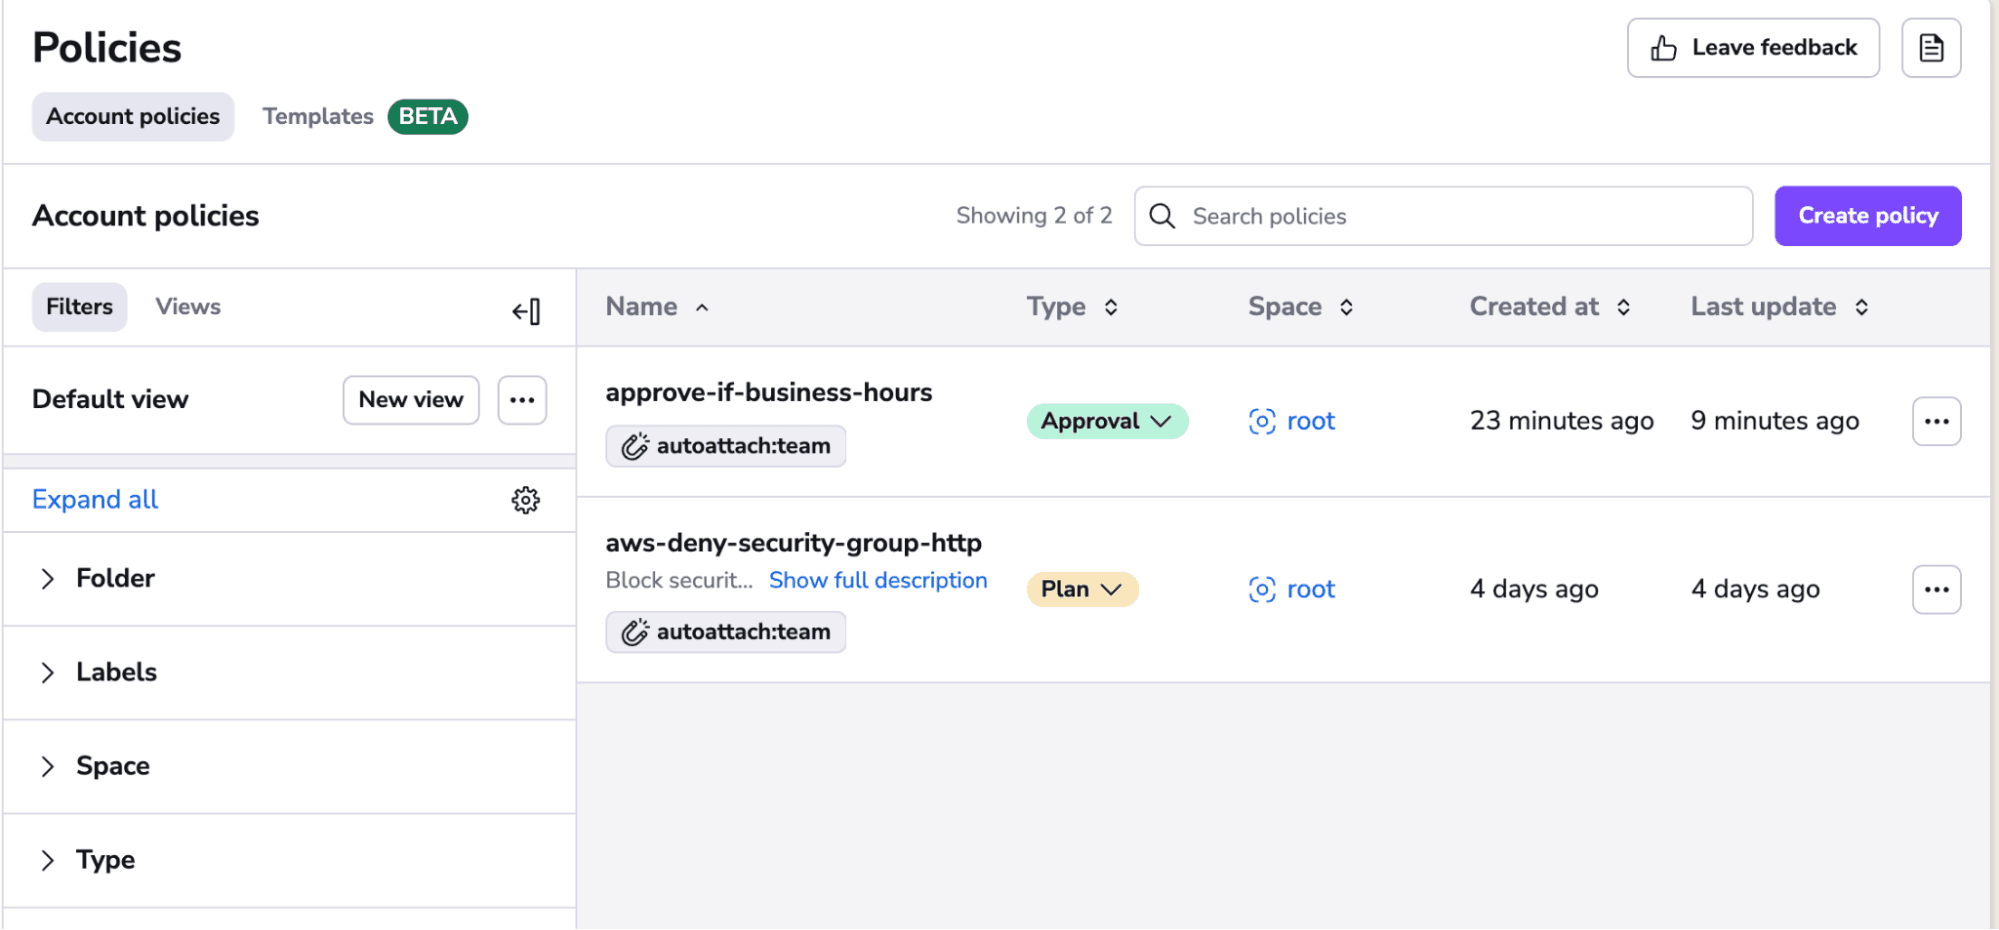
This list shows all policies, their type, their location, and any labels attached to them.
The different kinds of policies available in Spacelift are applied at different times. When a new run is triggered for a given stack, any approval-type policies are applied immediately. In the image below, a run was triggered outside business hours, and an approval policy automatically denied the run from continuing:
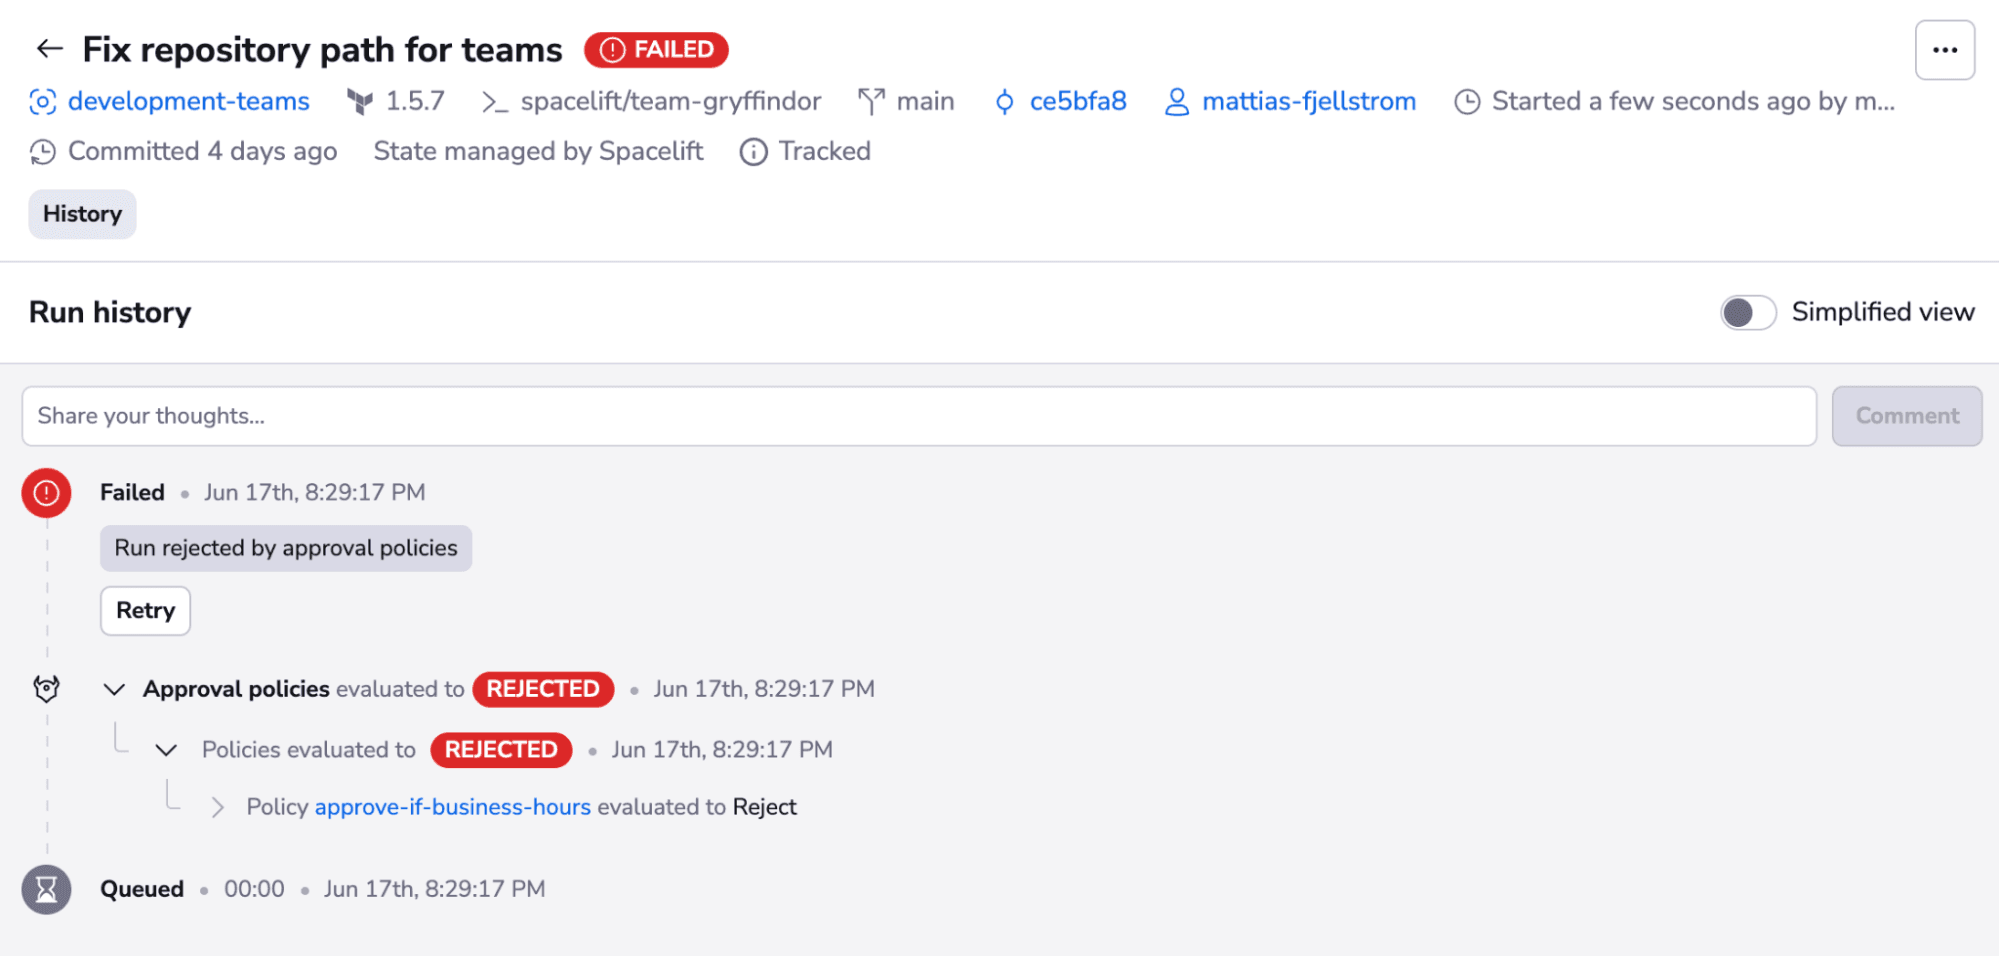
If the run passes all the approval policies, the plan phase starts. Once the plan phase is complete, any plan phase policies are evaluated, taking the plan output into account. This is similar to what we did using the GitHub Actions workflow described above.
The ability to apply policies in different phases is extremely powerful. You can stop a plan from happening if approval policies are denied, and you can stop an apply phase from going ahead if a plan phase policy is violated.
Note that when we created policies and applied them in Spacelift, we only ever explicitly provided one of the three required parts to run OPA: the policy itself. The Spacelift platform handles the other two parts — the input (the Terraform plan) and the query. To write successful policies, we must be aware of the schema of the input and the query Spacelift is using. All of this information can be found in the documentation for each type of policy.
Check out this video where we dive into common use cases of Spacelift policies and how teams are using them to achieve security and cost control of their infrastructure:
If you want to learn more about Spacelift, create a free account today, or book a demo with one of our engineers.
Key points
Policy as code is closely related to IaC. It allows you to scale the use of IaC while ensuring your organization’s rules are followed. Some of the existing checks and validations baked into your Terraform configuration are probably better expressed as policies.
PaC has many use cases. Among them are securing your infrastructure to stay in business, ensuring your organization meets regulatory compliance frameworks, and ensuring your infrastructure has monitoring and backup configured.
You can enhance your infrastructure management by implementing Terraform policy as code, which ensures that your configurations adhere to defined compliance and maintain security standards. Both HashiCorp Sentinel and OPA can express policies for a large number of Terraform scenarios. The framework you use depends largely on your current environment and skills.
Automate Terraform Deployments with Spacelift
Automate your infrastructure provisioning, build more complex workflows based on Terraform using policy as code, programmatic configuration, context sharing, drift detection, resource visualization, and many more.
Sentinel Docs. Terraform and Sentinel | Sentinel | HashiCorp Developer. Accessed: 17 October 2025
Open Policy Agent Core Documentation. Introduction | Open Policy Agent. Accessed: 17 October 2025
Open Policy Agent Core Documentation. Terraform | Open Policy Agent. Accessed: 17 October 2025
