
In this article, we will examine how to use Terraform with GitOps, explaining both and their benefits. We will then move on to some practical examples showing how to implement and configure Terraform to create cloud infrastructure in Azure with an integrated git repository and pipeline. If you’re new to Terraform or unfamiliar with GitOps, this article will get you up and running!
What we will cover:
What is Terraform?
Terraform is an infrastructure-as-code (IaC) tool developed by HashiCorp. It allows you to build, change, manage, and version your infrastructure through human-readable configuration files. It offers a unified way to define, provision, and manage resources across various cloud providers and services using Hashicorp Configuration Language (HCL) syntax, which is easy to learn and read.
Because Terraform lets you describe your infrastructure (servers, networks, storage, etc.) in code files, this enables version control, change tracking, collaboration, and repeatability when provisioning infrastructure, ensuring consistent deployments across environments and avoiding manual configuration errors.
Terraform supports infrastructure management across multiple cloud providers (AWS, Azure, Google Cloud) and on-premises data centers through plugins, which convert Terraform configurations into specific API calls for each platform.
Terraform uses a declarative approach. You define the desired state of your infrastructure, and Terraform then figures out the necessary steps to achieve that state. This is a simpler way to manage infrastructure than manually issuing commands or configuring resources through web interfaces.
Terraform integrates well with automation tools and CI/CD pipelines. As part of your development workflow, you can leverage Terraform scripts to automate infrastructure provisioning and configuration changes.
Since August 2023, new releases of Terraform have been published under HashiCorp’s Business Source License (BSL). While Terraform remains source-available, some commercial uses are restricted, which has prompted many organizations to review their IaC strategy.
If you prefer a fully open-source alternative, OpenTofu is a community-driven fork of Terraform’s last MPL-licensed release.
What is GitOps?
GitOps is an operational framework that leverages the popular version control system Git to manage infrastructure and applications. It applies DevOps best practices used for application development, such as version control, collaboration, and CI/CD (continuous integration and continuous delivery), to automate infrastructure provisioning and deployments.
Git repositories serve as the central location to store and manage all infrastructure and application configurations, ensuring everyone works from the same source, enhancing collaboration, and establishing a single source of truth. Configuration changes are tracked through Git version control, allowing for easy rollbacks to previous versions and providing a clear audit trail.
You define the desired state of your infrastructure and applications by specifying what you want with declarative languages like YAML or JSON, and dedicated tools handle how to achieve it.
A CI/CD pipeline integrated with Git can automate various stages of the development lifecycle. For instance, when a configuration change is committed and merged to the main branch, the pipeline can automatically trigger, build the infrastructure or application based on the new configuration, and deploy it to the target environment.
Read more: 15 GitOps Best Practices to Improve Your Workflows
How does GitOps work?
GitOps typically involves a workflow that includes a continuous feedback loop, which ensures that your infrastructure and applications always reflect the latest configuration stored in the Git repository.
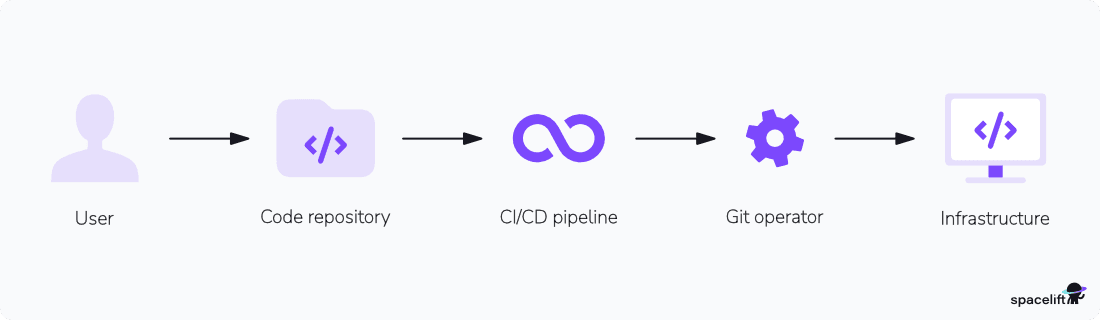
The GitOps workflow can include the following steps:
- Developers make a change: The developer modifies infrastructure or application configurations in the Git repository, following defined branching and pull request workflows for review and approval.
- CI/CD pipeline is triggered: Once a change is merged to the main branch, the CI/CD pipeline automatically kicks in.
- Configuration is applied: The CI/CD pipeline interacts with the Git repository to retrieve the latest configuration files.
- The desired state is enforced: The pipeline (or GitOps operator) translates the desired state into actions for the underlying infrastructure platform (e.g., creating VMs, and updating configurations).
- Infrastructure converges: The underlying platform automatically provisions or updates resources to match the desired state defined in the Git repository.
As GitOps is a framework, it consists of a combination of multiple tools (or it uses platforms that provide total solutions, such as GitHub, Spacelift, and HCP Terraform (formerly Terraform Cloud)
| Category | Tools |
| Version control | Git (Azure DevOps, GitHub, GitLab, Bitbucket) |
| CI/CD | Azure DevOps Pipelines, Jenkins, GitHub Actions, GitLab CI/CD, CircleCI |
| Infrastructure as code | Terraform, Pulumi, Bicep, Cloudformation |
| Kubernetes | Helm, Kustomize, Argo CD, Flux |
| Monitoring and alerting | Prometheus, Grafana |
Benefits of using Terraform and GitOps
Here are some of the benefits of using Terraform and GitOps:
- Improved collaboration: GitOps brings development and operations teams together by using familiar Git workflows for infrastructure management.
- Increased reliability: By maintaining a single source of truth, version control and declarative configurations enhance consistency and repeatability in deployments, reducing errors. Peer reviews and automated tests help catch issues early, improving overall security.
- Simplified rollbacks: Version control allows you to easily roll back to previous configurations if issues arise during deployments.
- Auditability: Git provides a clear history of changes, making it easier to track who made what modifications and when providing a clear audit trail.
- Scalability: Makes it easier to manage complex, distributed systems at scale.
In practice, you’ll see two common patterns:
- Push-based GitOps – a CI/CD system or IaC platform (like Spacelift) reacts to Git events and pushes changes to your infrastructure.
- Pull-based GitOps – operators such as Argo CD or Flux watch Git and pull changes into Kubernetes clusters.
Most real-world setups combine both: Terraform/OpenTofu manages cloud resources, while GitOps operators manage in-cluster workloads.
How to implement GitOps using Terraform?
Using Terraform with GitOps starts with the following four steps:
1. Set up a Git repository
Create a version control repository that will contain all your Terraform configuration files and modules. Organize your repository logically with directories for different environments (e.g., development, staging, production) and modules for reusable components.
2. Configure the infrastructure with Terraform
Define your infrastructure code using Terraform configuration files (.tf). Specify the necessary resources, providers, and variables to describe your infrastructure.
3. Create a pipeline for Terraform
Set up a CI/CD pipeline to automate the application of your Terraform configurations. The pipeline should include steps to validate, plan, and apply the Terraform code, ensuring changes are reviewed and tested before deployment. Integrate this pipeline with your version control system so that any push or merge to the repository triggers the pipeline, enabling a consistent and automated deployment process.
4. Manage your infrastructure with pull requests
Implement a workflow where all changes to the Terraform code are made through pull requests (PRs). Team members propose changes via PRs, which are then reviewed and approved before being merged into the main branch.
Additional considerations
- State management: Decide where to store your Terraform state file (e.g., remote backends like AWS S3 with DynamoDB for state locking).
- Secret management: Securely manage sensitive information (e.g., API keys and passwords) using cloud-specific secret management services or other tools.
- Monitoring and logging: Implement monitoring and logging for your CI/CD pipeline and infrastructure changes to ensure visibility and traceability.
- Identity and access: Prefer short-lived, federated credentials (OIDC, managed identities) instead of long-lived static keys. For example, Spacelift can assume roles in AWS or use managed identities in Azure without storing persistent secrets.
Example - Setting up a GitOps pipeline for Terraform
In this example, we will run through setting up a deployment to a subscription in the Azure Cloud using Terraform to create a storage account, using pipelines in Azure DevOps.
1. Set up a Git repository and the service connection
Create a project in Azure DevOps to house your Git repository and CI/CD pipeline.
You will also need to set up a service connection within Azure DevOps to allow it to interact with your Azure subscription. To do this, first create a service principal in Azure and note the appId, password, and tenantId. The command below shows how to do this using the Azure CLI.
az ad sp create-for-rbac --name "terraform-pipeline-sp" --role Contributor --scopes /subscriptions/{subscription-id}In Azure DevOps, go to your Azure DevOps project settings. Under the Pipelines section, click on Service connections. Using the service principal credentials, create a new service connection for Azure Resource Manager.
Now, go to the repos section of your project and create a new repository.
2. Configure the infrastructure with Terraform
Define your infrastructure as code using Terraform configuration files. These files specify the desired state of your Azure resources.
main.tf
provider "azurerm" {
  features {}
}

resource "azurerm_resource_group" "main" {
  name     = var.resource_group_name
  location = var.location
}

resource "azurerm_storage_account" "main" {
  name                     = var.storage_account_name
  resource_group_name      = azurerm_resource_group.main.name
  location                 = azurerm_resource_group.main.location
  account_tier             = var.account_tier
  account_replication_type = var.account_replication_type

  tags = {
    environment = "demo"
  }
}
variables.tf
variable "resource_group_name" {
  description = "The name of the resource group"
  default     = "myResourceGroup"
}

variable "location" {
  description = "The Azure region to deploy resources"
  default     = "uksouth"
}

variable "storage_account_name" {
  description = "The name of the storage account"
  default     = "mystorageaccount"
}

variable "account_tier" {
  description = "The tier of the storage account"
  default     = "Standard"
}

variable "account_replication_type" {
  description = "The replication type of the storage account"
  default     = "LRS"
}
Commit your Terraform configuration files to the Git repository in Azure DevOps.
3. Create a pipeline for Terraform
Create a new file to define your pipeline. The variables here are declared using environment variables directly in the pipeline, but you can also declare these in your Terraform code in a .tfvars file. If none are declared, then the default values set for the variables will be used.
<service-principal-client-id>— The app ID of the service principal.<service-principal-client-secret>— The password of the service principal.<azure-subscription-id>— Your Azure subscription ID.<azure-tenant-id>— The tenant ID of your Azure Active Directory.your-azure-service-connection— The name of the Azure service connection you created in Azure DevOps.
azure-pipelines.yaml
trigger:
- main

pool:
  vmImage: 'ubuntu-latest'

variables:
  ARM_CLIENT_ID: '<service-principal-client-id>'
  ARM_CLIENT_SECRET: '<service-principal-client-secret>'
  ARM_SUBSCRIPTION_ID: '<azure-subscription-id>'
  ARM_TENANT_ID: '<azure-tenant-id>'
  TF_VAR_resource_group_name: 'myResourceGroup'
  TF_VAR_location: 'uksouth'
  TF_VAR_storage_account_name: 'mystorageaccount'
  TF_VAR_account_tier: 'Standard'
  TF_VAR_account_replication_type: 'LRS'

stages:
- stage: Terraform
  jobs:
  - job: Terraform
    steps:
    - checkout: self

    - task: UseTerraform@0
      inputs:
        version: 'latest'
        command: 'init'
        workingDirectory: $(System.DefaultWorkingDirectory)

    - task: UseTerraform@0
      inputs:
        command: 'validate'
        workingDirectory: $(System.DefaultWorkingDirectory)

    - task: UseTerraform@0
      inputs:
        command: 'plan'
        workingDirectory: $(System.DefaultWorkingDirectory)
        environmentServiceNameAzureRM: 'your-azure-service-connection'
        additionalArguments: '-out=tfplan'

    - task: UseTerraform@0
      inputs:
        command: 'apply'
        workingDirectory: $(System.DefaultWorkingDirectory)
        environmentServiceNameAzureRM: 'your-azure-service-connection'
        additionalArguments: 'tfplan'
        publishPlanResults: 'true'
Once complete, commit this to your code repository.
Next, go to the Pipelines section in Azure DevOps, create a new pipeline, and select the file you uploaded to the repository. Click Run to trigger the pipeline.
4. Use pull requests to manage your infrastructure
Azure DevOps pull requests (PRs) are a core feature for collaborating on code changes. They facilitate a code review process before merging changes into your main branch. You should enforce PRs in most team-based situations by enforcing branch policies on pull requests. These could include requiring a certain number of approvals, mandating code coverage checks, or enforcing clean builds before merging.
One way to enforce the use of PRs in Azure DevOps is by enabling the “Require a minimum number of reviewers” policy on the main branch. This will block any attempt to directly push code changes to the main branch.
- Go to your Azure DevOps project and navigate to Repos > Branches.
- Locate the main branch and click the “…” menu next to it.
- Select Branch policies.
- Under the Build section, you’ll likely see existing policies or an option to Add policy.
- Look for a policy named Require a minimum number of reviewers or similar wording. If it’s not there, click Add policy and choose Require a minimum number of reviewers.
- Enable the policy and set the minimum number of reviewers required (typically one or two).
- Developers can initiate a PR from the web portal in Azure DevOps or directly from their IDE, such as Visual Studio Code. Once created, the reviewers can accept or reject the merge or add comments to the code.
Using OpenTofu? You can use the same configuration syntax shown here — OpenTofu is designed as a drop-in replacement for Terraform’s CLI. Just install tofu, switch your Spacelift stack or CI job to use OpenTofu, and the GitOps workflow stays the same.
Managing Terraform with Spacelift
Terraform is really powerful, but to achieve an end-to-end secure Gitops approach, you need to use a product that can run your Terraform workflows. Enter Spacelift. Not only does Spacelift take care of your Terraform workflows, but it can also help build workflows for Terraform, OpenTofu, Terragrunt, Pulumi, AWS CloudFormation, AWS CDK, Kubernetes, and Ansible — all from the same GitOps-native platform.
Inside each Spacelift stack you can choose the workflow tool: OpenTofu, Terraform (FOSS), or even a custom CLI. That makes it straightforward to standardize on OpenTofu, stay on Terraform, or run both side-by-side as your strategy evolves.
Avoid static cloud credentials entirely where you can. Use Spacelift’s cloud integrations (AWS IAM roles, Azure managed identities, etc.) to issue short-lived credentials automatically during runs, and keep secrets in your cloud’s native secret managers.
Use Custom Inputs to integrate security tools easily into your workflows. This feature also allows you to easily run policies to ensure engineers don’t introduce vulnerabilities with their code.
If Terraform modules make your code DRY, check out Spacelift’s Blueprints feature, which really optimizes reusability.
If you want to learn more about Spacelift, create a free account today, or book a demo with one of our engineers.
Key points
In summary, GitOps streamlines infrastructure management by leveraging familiar tools like Git, pull request code reviews, and CI/CD pipelines. Terraform GitOps is particularly well-suited for managing cloud-native deployments, but the core principles can be applied to various infrastructure environments.
Automate Terraform Deployments with Spacelift
Automate your infrastructure provisioning, build more complex workflows based on Terraform using policy as code, programmatic configuration, context sharing, drift detection, resource visualization, and many more.
