
Jenkins is an open-source automation tool for building, testing, and deploying software. It supports CI/CD, enabling efficient workflows and distributed builds across multiple machines.
As a Java-based program, it runs on Windows, Linux, macOS, and more, with easy web-based installation. Its vast plugin ecosystem allows customization, while environment variables enhance security and flexibility by managing data and secrets across CI/CD pipelines.
In this post, we will explore how these environment variables are managed in Jenkins. We’ll learn about built-in environment variables alongside their global configurations and local setups.
What we’ll cover:
- What are environment variables in Jenkins?
- Jenkins built-in environment variables
- Global environment variables in Jenkins
- Local environment variables in Jenkins
- Secrets in Jenkins environment variables
- How to view the Jenkins environment variables list
- How to override environment variables in Jenkins
What are environment variables in Jenkins?
Environment variables in Jenkins are key-value pairs that store configuration settings, credentials, and other dynamic values used during build and deployment processes. They help make Jenkins pipelines more flexible by allowing scripts and jobs to reference variables instead of hardcoded values.
These variables can be defined at different levels, including system-wide (Jenkins global settings), per-node, per-job, or within pipeline scripts. Common examples include BUILD_NUMBER, JOB_NAME, and WORKSPACE, which Jenkins automatically sets for each build.
Developers can define custom environment variables using the Jenkins UI, env directive in pipelines, or external configuration files.
Jenkins built-in environment variables
Jenkins has multiple predefined variables, often referred to as built-in environment variables. These provide essential context about pipeline configurations by dynamically storing and managing data related to builds and jobs. We can directly access the built-in variables in the pipeline scripts to streamline workflows. They eliminate the need for hardcoding specific script values and make pipelines more adaptable.
Here are the most useful built-in environment variables in Jenkins:
| Category | Variable | What it gives you |
| Build metadata | BUILD_NUMBER |
Sequential build number |
BUILD_ID |
Unique build identifier (string) | |
BUILD_TAG |
jenkins-${JOB_NAME}-${BUILD_NUMBER} |
|
| Job context | JOB_NAME |
Full job name (e.g. folder/job-name) |
BUILD_URL |
Full URL to this build | |
| Node & workspace | NODE_NAME |
Name of the agent/controller running the build |
WORKSPACE |
Absolute path to workspace | |
| Git / multibranch | GIT_BRANCH |
Branch being built (classic Git job) |
BRANCH_NAME |
Branch name in multibranch Pipeline | |
| Jenkins instance | JENKINS_URL |
Base URL of your Jenkins instance |
Environment variables vs parameters in Jenkins
Jenkins environment variables are predefined or custom variables that store system-wide or job-specific data. They persist throughout the build and can be accessed globally across all stages.
Jenkins parameters are user-defined inputs provided at the start of a job to influence execution. Unlike environment variables, parameters must be explicitly declared in the job configuration and are set before the job starts. They allow dynamic control, such as selecting a branch or setting a threshold value for testing.
Parameters define values before execution, while environment variables store values during runtime. Once the job starts, parameters can become environment variables, making them accessible like other system variables.
Global environment variables in Jenkins
Global environment variables in Jenkins are user-defined and accessible across all jobs and pipelines within a Jenkins instance. These variables simplify configurations by providing reusable values for commonly used settings, such as paths, credentials, or default configurations.
Unlike built-in variables, users explicitly define global variables to suit specific project requirements. They are handy for maintaining consistency across multiple jobs and efficiently centralizing configurations.
Let’s see how to set Jenkins environment variables:
Setting global environment variables using Jenkins console
We can use the Jenkins console to configure the global environment variables. Navigate to:
Dashboard > Manage Jenkins > System > Global Properties > Environment Variables
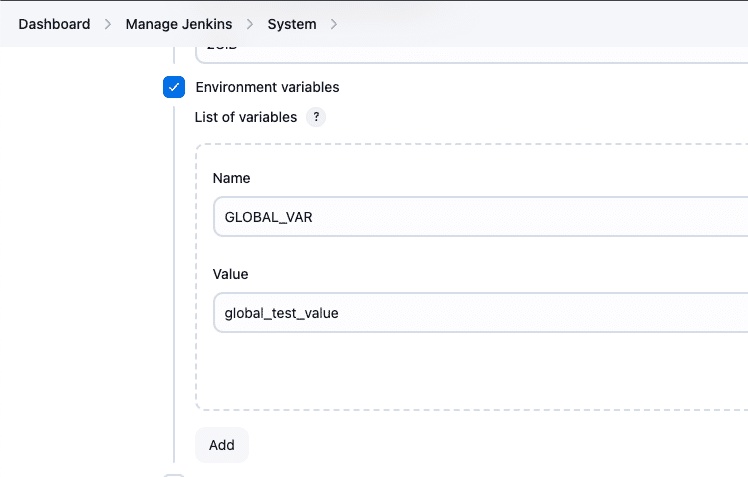
Click on the “Environment variables” checkbox and define the desired variable names and values in the provided fields. Once saved, these variables become accessible to all jobs and pipelines within the Jenkins instance.
This method can modify environment variable values without altering individual job settings.
Using Groovy script to set global environment variables
In Jenkins, we can programmatically set global environment variables using Groovy Scripts. Developers mainly use this method to configure complex pipeline workflows or automate specific scenarios.
Open the Jenkins Script Console to define or modify global variables using the following Groovy Script:
import jenkins.model.Jenkins
import hudson.slaves.EnvironmentVariablesNodeProperty
import hudson.slaves.NodeProperty
def jenkins = Jenkins.getInstance()
def globalNodeProperties = jenkins.getGlobalNodeProperties()
def envVarsNodePropertyList = globalNodeProperties.getAll(EnvironmentVariablesNodeProperty.class)
def newEnvVarsNodeProperty = null
def envVars = null
if (envVarsNodePropertyList == null || envVarsNodePropertyList.size() == 0) {
newEnvVarsNodeProperty = new EnvironmentVariablesNodeProperty()
globalNodeProperties.add(newEnvVarsNodeProperty)
envVars = newEnvVarsNodeProperty.getEnvVars()
} else {
envVars = envVarsNodePropertyList.get(0).getEnvVars()
}
// Add or update environment variables
envVars.put("GLOBAL_VAR2", "global_test_value_2")
envVars.put("GLOBAL_VAR3", "global_test_value_3")
jenkins.save()
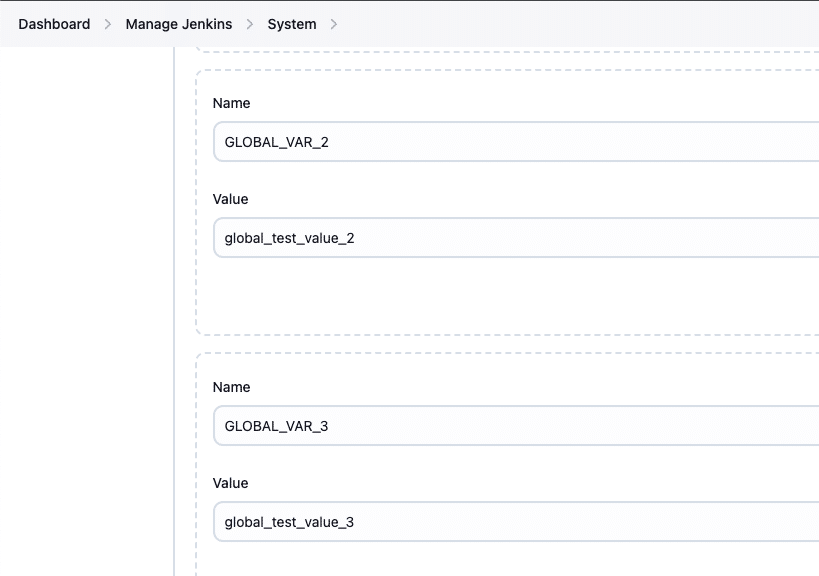
println "Environment variables set successfully."The script above first retrieves the existing global environment variable configurations using Jenkins API. If no environment variable configuration exists, it creates a new one. The script then accesses the list of environment variables and updates or adds the specified variables (GLOBAL_VAR2 and GLOBAL_VAR3) with their corresponding values. Finally, the script saves the updated configuration, and the new variables become available across all jobs and pipelines.
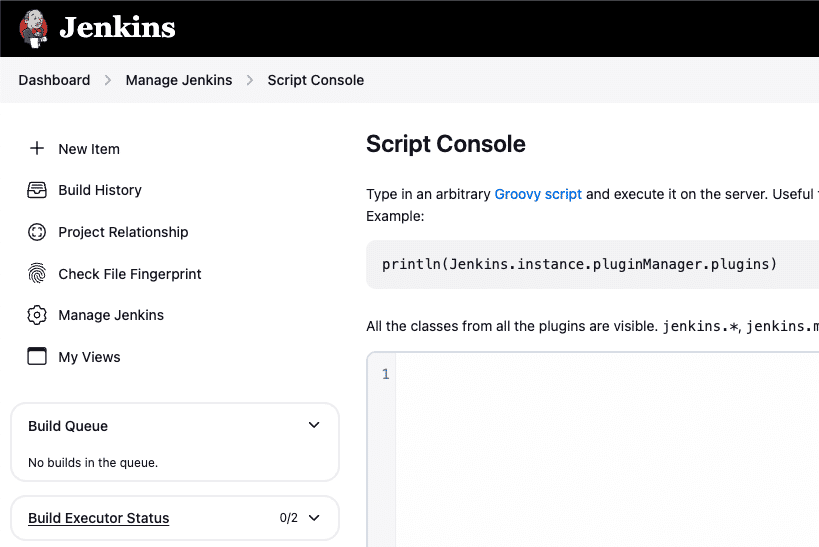
To execute this script, navigate to Dashboard > Manage Jenkins > Script Console in your Jenkins instance. The Script Console provides a dedicated interface for running Groovy scripts.
Running the script successfully creates or updates the specified global environment variables in Jenkins. We can verify the values by navigating to Dashboard > Manage Jenkins > System > Global Properties > Environment Variables.
If you’re using the Jenkins Configuration as Code (JCasC) plugin, you can also define global environment variables in YAML and point Jenkins to that configuration using the CASC_JENKINS_CONFIG environment variable. This is a good fit for GitOps workflows where Jenkins configuration (including env vars) lives alongside your code.
Local environment variables in Jenkins
Local environment variables in Jenkins are specific to individual jobs or pipelines. Unlike global variables, they are confined to the scope in which they are defined, making them ideal for managing job-specific configurations.
These variables are particularly useful for setting parameters that should only apply to a particular job, stage, or pipeline execution, allowing for more precise and controlled configurations.
Setting local environment variables in declarative pipelines
In Jenkins declarative pipelines, we can define local environment variables at both the pipeline level and the stage level. These variables are set within an environment block, and their scope is limited to where they are defined.
Variables defined at the pipeline level are accessible in all stages, whereas those defined at the stage level are only available within that specific stage. This scoping helps manage environment-specific configurations in a streamlined way.
For example:
pipeline {
    agent any
    environment { // accessible to all stages
        HELLO = 'WORLD'
    }
    stages {
        stage('Morning') {
            environment { // stage specific env var
                GREETING = 'Good morning!'
            }
            steps {
                echo env.HELLO // valid
                echo env.GREETING // valid
            }
        }
        stage('Afternoon') {
            steps {
                echo env.HELLO //valid
                echo env.GREETING // invalid
            }
        }
    }
}
In the example above, HELLO is a pipeline-level environment variable, so it’s accessible in all stages. GREETING is a stage-specific environment variable, only available in the “Morning” stage. In the “Afternoon” stage, accessing GREETING results in an invalid output since it is out of scope.
Started by user Admin

[Pipeline] Start of Pipeline
[Pipeline] node
Running on Jenkins
in /Users/ldt/.jenkins/workspace/JenkinsPipeline1
[Pipeline] {
[Pipeline] withEnv
[Pipeline] {
[Pipeline] stage
[Pipeline] { (Morning)
[Pipeline] withEnv
[Pipeline] {
[Pipeline] echo
WORLD
[Pipeline] echo
Good morning!
[Pipeline] }
[Pipeline] // withEnv
[Pipeline] }
[Pipeline] // stage
[Pipeline] stage
[Pipeline] { (Afternoon)
[Pipeline] echo
WORLD
[Pipeline] echo
null
[Pipeline] }
[Pipeline] // stage
[Pipeline] }
[Pipeline] // withEnv
[Pipeline] }
[Pipeline] // node
[Pipeline] End of Pipeline
Finished: SUCCESS
In the “Morning” stage, both HELLO and GREETING are correctly printed. HELLO is accessible globally, and GREETING is accessible within the stage where it was defined.
In the “Afternoon” stage, HELLO prints correctly, but GREETING results are null because it’s not accessible outside the “Morning” stage.
Using the withEnv() function for stage-specific variables in Groovy script
Let’s look at how the syntax changes when we use Groovy to set environment variables in Jenkins. In Groovy, environment variables can be set programmatically within a pipeline using the withEnv() function. Unlike the declarative pipeline syntax, where variables are defined in the environment block, Groovy provides more flexibility by allowing us to define and modify variables dynamically within specific stages.
Here’s a similar example:
node {
    // Global environment variable
    env.HELLO = 'WORLD'

    stage('Morning') {
        // Stage-specific environment variable
        withEnv(['GREETING=Good morning!']) {
            echo env.HELLO  // valid
            echo env.GREETING  // valid
        }
    }

    stage('Afternoon') {
        echo env.HELLO  // valid
        echo env.GREETING  // invalid
    }
}
The env.HELLO variable is set globally within the node and is accessible throughout the pipeline. The withEnv() function is used within the “Morning” stage to set a stage-specific variable GREETING. This limits GREETING‘s scope to just that stage.
The output of the Groovy script is the same as that of the declarative pipeline. This example demonstrates the importance of scope when using local environment variables in Jenkins.
Using local environment variables with Docker agents
Many Jenkins pipelines now run inside containerized build environments using Docker agents. Environment variables defined in the pipeline’s environment block are automatically available inside the container, which makes them a convenient way to pass configuration flags, feature toggles, or build settings into your build image.
pipeline {
    agent {
        docker {
            image 'node:20'
            args '-u root:root'
        }
    }

    environment {
        NODE_ENV        = 'production'
        DOCKER_BUILDKIT = '1'
    }

    stages {
        stage('Build') {
            steps {
                // Verify that our variables are available inside the container
                sh 'printenv | sort | head'

                // Use them as part of the build
                sh 'npm ci && npm run build'
            }
        }
    }
}
In this example:
- The pipeline runs inside the
node:20Docker image. NODE_ENVandDOCKER_BUILDKITare defined as local environment variables for the entire pipeline.- These variables are available to any processes executed inside the container, so your npm commands and any other tools can read them as normal environment variables.
This pattern is useful when you need different configurations for different jobs (for example, toggling NODE_ENV between staging and production) without changing the Docker image itself.
Secrets in Jenkins environment variables
Storing sensitive data — such as usernames, passwords, credentials, or tokens — directly in global or local environment variables poses a significant security risk. Because these values are stored in plain text, anyone with access to pipeline configurations can easily retrieve them, making shared environments particularly vulnerable.
To enhance security, Jenkins offers the Credentials Plugin, which provides a secure and centralized way to store and manage sensitive information within the Jenkins environment.
This plugin supports various credential types to support different use cases:
- Username and Password: This is used to store a username and its corresponding password for authentication.
- SSH Username with Private Key: It saves an SSH username and private key to enable secure remote access.
- Secret File: This uploads a file with sensitive data for use during builds.
- Secret Text: It stores a single secret string, such as an API token or password.
- X.509 Client Certificate: This is for managing an X.509 certificate for client-side authentication.
- Certificate: It is used to keep a digital certificate to establish secure connections.
The Credentials plugin encrypts all stored data and ensures that only authorized jobs can access it.
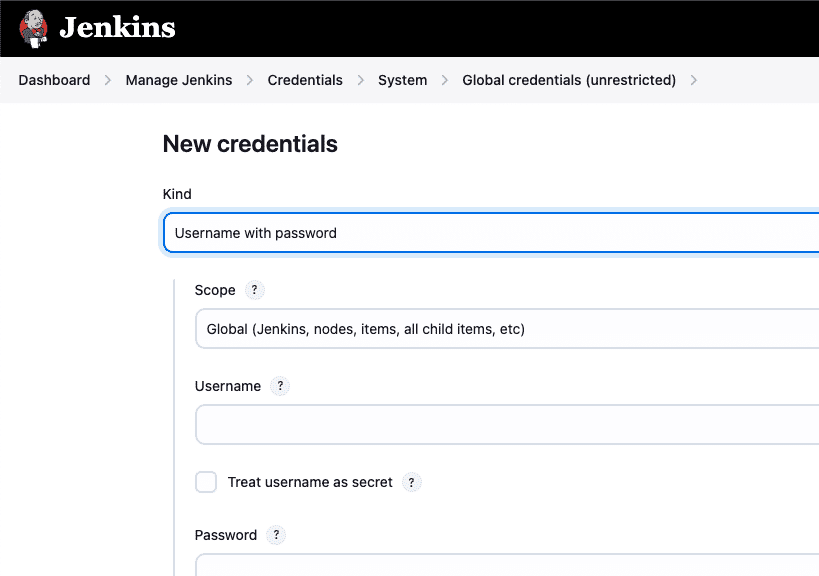
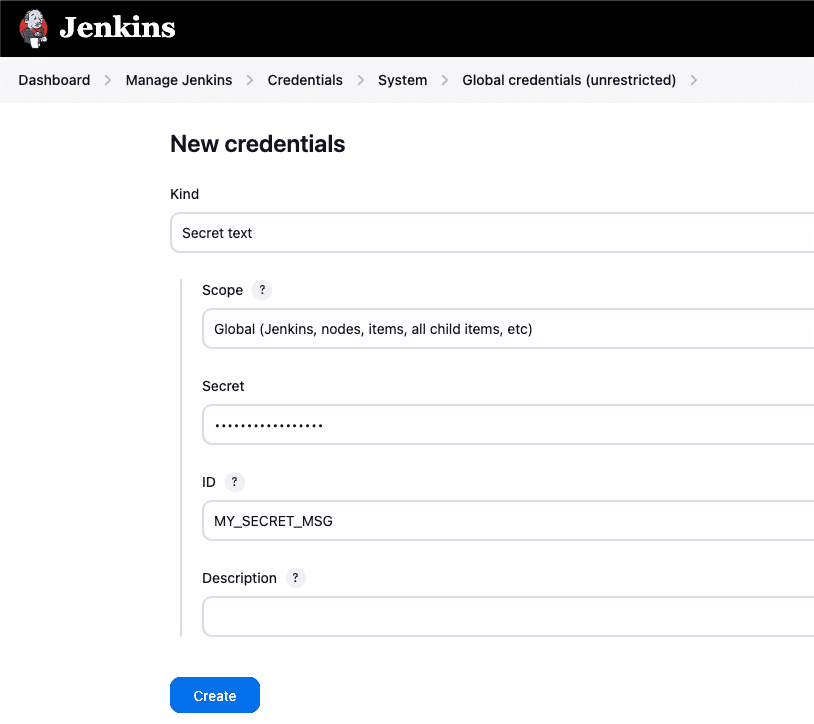
In this example, we are creating a “Secret text” credential in Jenkins.
In the settings, select Kind as “Secret text” and set Scope to “Global” for universal accessibility. Enter the desired secret value in the Secret field and provide a unique ID like “MY_SECRET_MSG” to identify the credential.
Once configured, click the Create option to save the credential securely.
The secret text can be referenced in pipelines or jobs without exposing its value directly in the logs or scripts. As shown below, this method provides a secure way to handle confidential information during automation workflows.
To use the created secret in a Jenkins pipeline, utilize the credentials directive within the pipeline’s environment block. For example, we can reference the secret by its ID (“MY_SECRET_MSG“) and assign it to an environment variable. Here’s a code example:
pipeline {
    agent any
    environment { // accessible to all stages
        HELLO = 'WORLD'
        MY_SECRET = credentials("MY_SECRET_MSG") // credentials directive
    }
    stages {
        stage('Morning') {
            environment { // stage specific env var
                GREETING = 'Good morning!'
            }
            steps {
                echo env.HELLO // valid
                echo env.GREETING // valid
                echo env.MY_SECRET // prints secret text
            }
        }
        stage('Afternoon') {
            steps {
                echo env.HELLO //valid
                echo env.GREETING // invalid
            }
        }
    }
}
The code demonstrates using a “Secret Text” credential in a Jenkins pipeline. It defines a pipeline environment variable called MY_SECRET. This variable retrieves the secret value using the credentials directive with the Secret ID.
The pipeline consists of two stages: “Morning” and “Afternoon.” In the “Morning” stage, the script prints the value in pipeline environment variable HELLO, the stage-specific variable GREETING, and the secret text stored in MY_SECRET. The “Afternoon” stage is not relevant here because it does not use MY_SECRET.
Here’s the output:
.
.
j[Pipeline] echo
WORLD
[Pipeline] echo
Good morning!
[Pipeline] echo
****
[Pipeline] }
[Pipeline] // withEnv
[Pipeline] }
[Pipeline] // stage
[Pipeline] stage
[Pipeline] { (Afternoon)
[Pipeline] echo
WORLD
[Pipeline] echo
null
[Pipeline] }
.
.
The pipeline successfully accesses the secret text stored in the MY_SECRET variable but masks its value in the output log. By masking the secret in logs, Jenkins ensures that unauthorized users cannot view or intercept sensitive information, even if they gain access to the build logs.
Additional credential plugins
Jenkins offers a range of plugins for advanced credential management, enhancing both security and flexibility. These plugins integrate seamlessly with external tools and environments, ensuring efficient and secure handling of sensitive information.
Here are some examples:
- Credentials Binding Plugin: This plugin allows credentials to be bound directly to environment variables for use in builds.
- Kubernetes Credentials Provider: It fetches secrets from Kubernetes clusters to integrate with the Jenkins pipelines.
- AWS Secrets Manager Credentials Provider: It allows you to securely use AWS Secrets Manager as a credentials store for your Jenkins environment. Instead of storing credentials directly in Jenkins, you can store them in AWS Secrets Manager and retrieve them dynamically when needed.
How to view the Jenkins environment variables list
Environment variables in Jenkins store important information about our builds and system settings. Viewing them helps ensure our builds are configured correctly and troubleshoots any issues that may arise during the build process. There are two simple ways to view the environment variables defined in Jenkins:
Viewing Jenkins environment variables via the web browser (env-vars.html)
Using the web browser is the quickest way to see a list of all the environment variables in Jenkins. All you need to do is open your web browser and enter the following URL:
[Jenkins URL]/env-vars.htmlFor example, if you are running Jenkins locally with the default settings, you can enter this URL into your browser:
http://localhost:8080/env-vars.htmlOnce you navigate to this page, you’ll see a list of Jenkins environment variables. These variables provide essential details about the Jenkins environment, such as build information and system configurations.
Viewing environment variables via shell command in a Jenkins Job
If you want to view environment variables in a Jenkins pipeline instead, you can create a pipeline job that runs a command to print them. Here are the steps to create such a pipeline job from scratch:
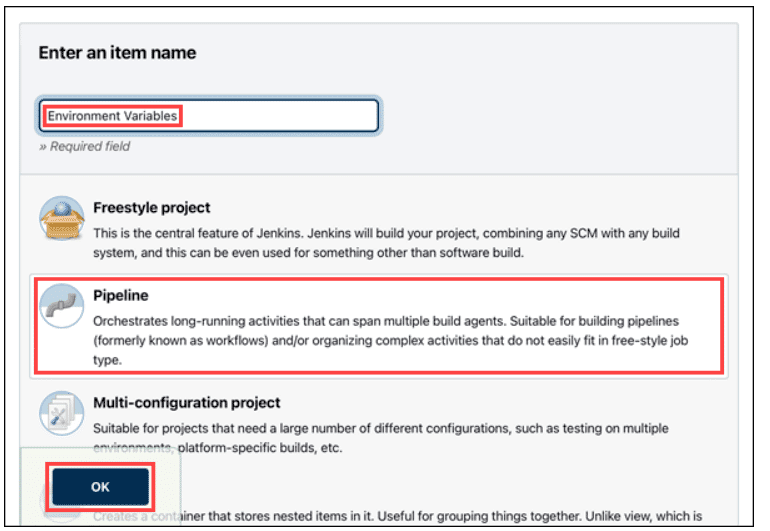
1. Create a new Jenkins job
Go to the Jenkins dashboard and click New Item on the left side. In the prompt that appears, give this new job a name like “Environment Variables”. Choose Pipeline as the type of job and click OK.
2. Set up the pipeline script
Scroll down to the Pipeline section. In the script area, enter a command that tells Jenkins to list all the environment variables.
For Windows systems, enter the following script:
pipeline {
    agent any
    stages {
        stage('Env Variables') {
            steps {
                bat 'set'   // This command lists environment variables for Windows.
            }
        }
    }
}
3. Save and build the job
Once you have entered the script, click Save to save your changes. Then, on the left side of the job page, click Build Now to start the job. This will trigger the job to run and collect the environment variables.

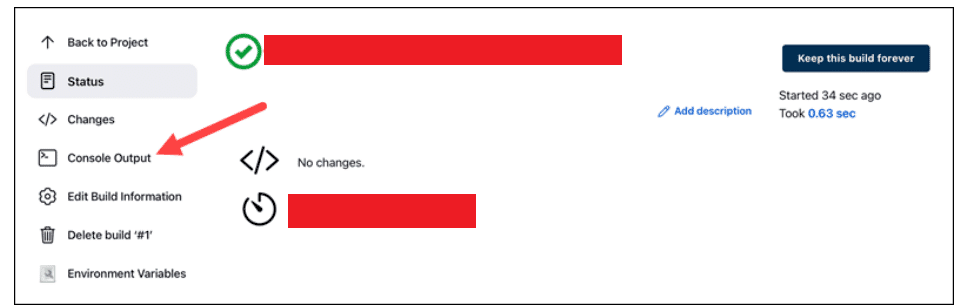
4. View the output
After the job finishes, go to the Build History section and click on the latest build number. Then, click on Console Output. This will show the output of the shell command, which includes the list of environment variables for your Jenkins job.
How to override environment variables in Jenkins
Overriding environment variables in Jenkins allows us to customize our pipelines dynamically. By changing the value of an environment variable, we can adapt the behavior of our builds without modifying the underlying code. Here are the common use cases for overriding environment variables in Jenkins:
- Customizing build behavior: We can override variables to change paths, update configurations, or enable specific features for a job.
- Managing credentials securely: Overriding environment variables lets us use secure credentials, such as API keys or passwords, without exposing them in our pipeline scripts.
- Testing and debugging: By overriding variables temporarily, we can test different scenarios or isolate issues during the development process.
In Jenkins, overriding environment variables follows a set of rules:
- The
withEnv([])block can override any environment variable, regardless of where it was set. - Variables defined using the
envobject can only override other variables set with the env object. - Variables set in the
environment {}block cannot be overridden by those set using theenvobject.
This priority ensures that environment variables are handled securely and consistently within the pipeline. Here are the most useful methods to override environment variables in Jenkins:
1. Overriding environment variables using the global environment configuration
You can override environment variables globally in Jenkins, making them available across all jobs and pipelines. This method is suitable when you need to set or update variables that apply to the entire Jenkins instance.
To do this, you can navigate to Manage Jenkins > Configure System > Global Properties. There you can enable the “Environment Variables” option and define your variables with new values. Once saved, these variables override their previous values and are accessible in all jobs globally.
2. Overriding variables in the environment block
Jenkins declarative pipelines provide an environment {} block where you can define or override variables. Variables defined here are available for the entire pipeline or for specific stages. This method is ideal for customizing variables specific to a particular job or pipeline. For example, you can set variables that apply to all stages of the job at the pipeline level.
3. Overriding variables dynamically using the withEnv() function
The withEnv() function in Jenkins allows you to temporarily override environment variables for specific steps or sections of a pipeline. This is especially useful for short-term modifications, such as testing or one-off adjustments. Once execution within the withEnv() block is complete, the variables automatically revert to their original values.
Alternative to Jenkins - Spacelift
When it comes to infrastructure orchestration, generic CI/CD platforms such as Jenkins or CircleCI are not specialized enough to manage everything you might need in your workflows. That’s where Spacelift shines.
Spacelift is an IaC management platform that helps you implement DevOps best practices. It provides a dependable CI/CD layer for infrastructure tools including OpenTofu, Terraform, Pulumi, Kubernetes, Ansible, and more, letting you automate your IaC delivery workflows.
Spacelift is designed for your whole team. Everyone works in the same space, supported by robust policies that enforce access controls, security guardrails, and compliance standards. This means you can manage your DevOps infrastructure far more efficiently without compromising on safety.
Let’s see how Spacelift avoids the limitations of generic CI/CD tools:
- Policies to control what kind of resources engineers can create, what parameters they can have, how many approvals you need for a run, what kind of task you execute, what happens when a pull request is open, and where to send your notifications
- Stack dependencies to build multi-infrastructure automation workflows with dependencies, having the ability to build a workflow that, for example, generates your EC2 instances using Terraform and combines it with Ansible to configure them
- Self-service infrastructure via Blueprints, enabling your developers to do what matters – developing application code while not sacrificing control
- Creature comforts such as contexts (reusable containers for your environment variables, files, and hooks), and the ability to run arbitrary code
- Drift detection and optional remediation
To learn more about Spacelift, create a free account today or book a demo with one of our engineers.
Key points
Jenkins environment variables play a crucial role in customizing and controlling CI/CD pipeline configurations. Using environment variables provides a flexible way to configure builds, automate workflows, and streamline deployment processes.
In this tutorial, we explored Jenkins’ built-in environment variables, which simplify everyday tasks like defining job and node details. We also covered global variables that enable consistent settings across multiple jobs and local variables that apply to specific jobs or steps.
Additionally, we examined how Jenkins securely manages sensitive information using the Credentials Plugin, ensuring data protection throughout automation tasks. Whether using declarative pipelines or Groovy scripts, we demonstrated how Jenkins environment variables enhance configuration flexibility, making workflows more adaptable to different project needs.
Solve your infrastructure challenges
Spacelift is an alternative to using homegrown solutions on top of a generic CI. It helps overcome common state management issues and adds several must-have capabilities for infrastructure management.
