
GitHub Actions is the continuous integration and delivery (CI/CD) service included with GitHub projects. It allows you to automate the process of building, testing, and deploying your software using scripted pipelines called workflows. GitHub triggers your workflows when events such as commits, merges, and code reviews occur.
In this guide, we’ll discuss the key features available in GitHub Actions workflows. We’ll build a simple example workflow and then show how you can use GitHub Actions to manage IaC deployments with Spacelift.
What we’ll cover:
What are GitHub Actions workflows?
GitHub Actions workflows are automated processes defined in YAML files that run on specified events in a GitHub repository, such as code pushes, pull requests, or scheduled times. They let you automate tasks like testing, building, or deploying code directly from your repo using a customizable series of jobs and steps. Each workflow runs in a GitHub-hosted or self-hosted runner and supports complex logic, matrix builds, environment secrets, and reusable actions.
GitHub Actions is GitHub’s CI/CD system. Within the platform, workflows are the top-level components that define your CI/CD configurations. A workflow in GitHub Actions is equivalent to a pipeline in other CI/CD systems.
A GitHub Actions workflow groups a collection of jobs into a single automated process. When a workflow is triggered, GitHub runs all of the workflow’s jobs in parallel.
You can also configure jobs to run sequentially by specifying job dependencies. Jobs with dependencies won’t start until those dependencies have been completed.
GitHub Actions workflows are designed for modularity. By creating composite actions and reusable workflows, you can share sections of configuration across multiple workflows.
The GitHub Actions Marketplace also contains a huge selection of prebuilt actions you can use in your workflows.
Workflows only run when a trigger event occurs. Over 30 basic trigger types are available, covering all key GitHub events. For instance, you can run workflows when code is pushed, after a Pull Request is merged, on a schedule, or even when new comments are added to a discussion in your repository. This flexibility means you can use GitHub Actions workflows to automate practically any process within your DevOps lifecycle.
Tutorial: Building a GitHub Actions workflow
Let’s examine how to build a basic GitHub Actions workflow. This simple tutorial will help you understand the concepts outlined above.
To follow along, you should first create a new repository in your GitHub account. You can also find this article’s sample code on GitHub.
The steps to building your first GitHub Actions workflow are as follows:
- Create a GitHub Actions workflow file
- Define workflow triggers
- Configure workflow jobs
- Test the complete example
Step 1. Create a GitHub Actions workflow file
GitHub Actions workflows are configured using YAML files within your project’s .github/workflows directory. Each workflow needs its own file in the directory. We’ll save our sample workflow to .github/workflows/demo-workflow.yml.
Once you’ve created your config file, you can begin adding YAML properties to define your workflow’s behavior. Workflows depend on two key properties: on and jobs. These properties function as follows:
on: Defines the triggers that will run your workflow, such as commits and push events.jobs: Configures the jobs that your workflow will execute.
We’ll set these options up in the next two sections.
Step 2. Define workflow triggers
To get started with our sample workflow, first set up a trigger that will launch the workflow when an event occurs:
on:
  push:
    branches: [ "main" ]
This simple trigger runs the workflow when you push new commits to your repository’s main branch.
You can add multiple trigger conditions if you need to. For instance, you may also want to run your workflow when there’s a new pull request against your main branch:
on:
  pull_request:
    branches: [ "main" ]
  push:
    branches: [ "main" ]
With this config, the workflow will run when either a pull request or push event occurs for main.
Step 3. Configure workflow jobs
GitHub Actions workflow jobs are configured by the top-level jobs property in your YAML file. This is an object where each key defines the name of a new job. The job’s settings must then be provided as a nested object:
jobs:
  build:
    runs-on: ubuntu-latest
    steps:
      - name: "Check out repository"
        uses: actions/checkout@v3
      - name: "Build project"
        run: "echo 'Building code...'"
The example above defines a single job called build. The runs-on property configures the type of environment in which the job will run.
We’re using ubuntu-latest for this job, but the GitHub Actions documentation provides a complete list of available runner environments.
Within the job, we’re running two sequential steps:
- The first step uses the GitHub Marketplace’s
checkoutaction to check out your repository into the job’s runner environment. - The second step uses the
runfacility to run a command within the runner’s environment. For our example, the command just runs a simpleechostatement.
You can add more functionality to your workflow by creating additional jobs and steps as needed. Complex workflows may include many different jobs, each with several distinct steps. By default, jobs run in parallel, while steps within each job execute sequentially.
Step 4. Test the complete example
Now we can combine the previous two sections to create a fully working GitHub Actions workflow. Copy the following code to your repository’s .github/workflows/demo-workflow.yml file:
on:
pull_request:
branches: [ "main" ]
push:
branches: [ "main" ]
jobs:
build:
runs-on: ubuntu-latest
steps:
- name: "Check out repository"
uses: actions/checkout@v3
- name: "Build project"
run: "echo 'Building code...'"
verify:
runs-on: ubuntu-latest
steps:
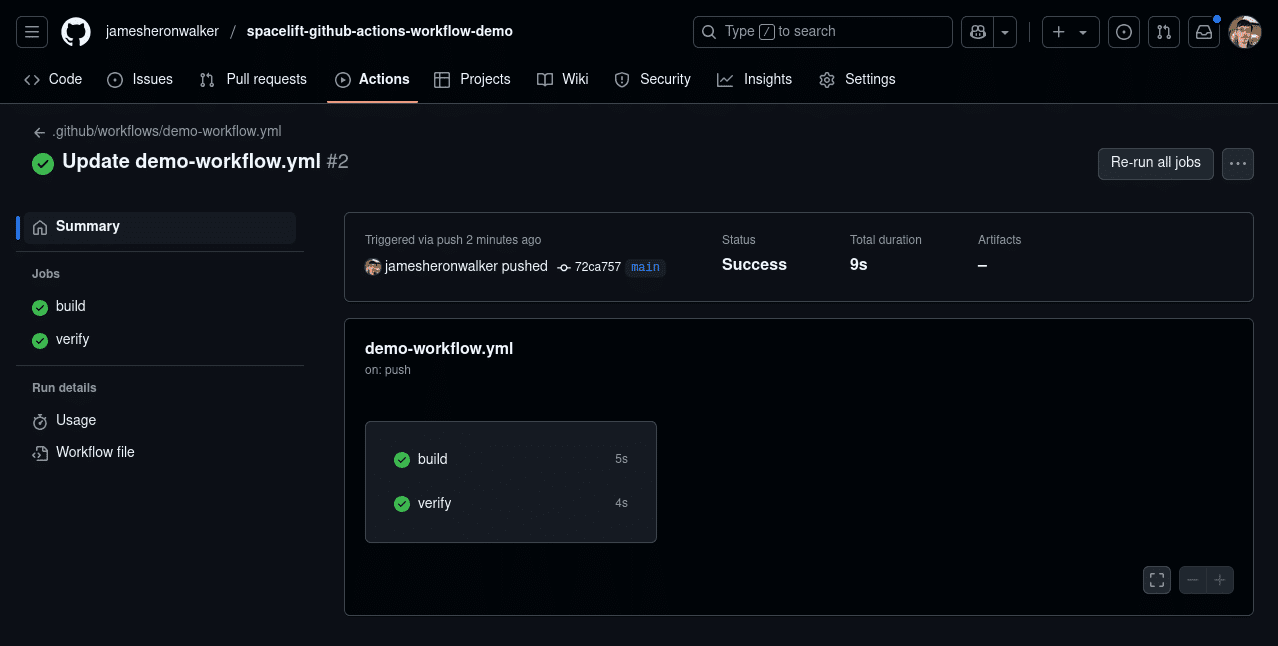
- run: "echo 'Verifying compliance…'"We’ve added a second job, verify, to help demonstrate how jobs within a workflow run in parallel.
After saving the workflow config to your repository, try committing changes to your main branch. If you then head to your repository’s Actions tab, you should see a new run of your workflow:
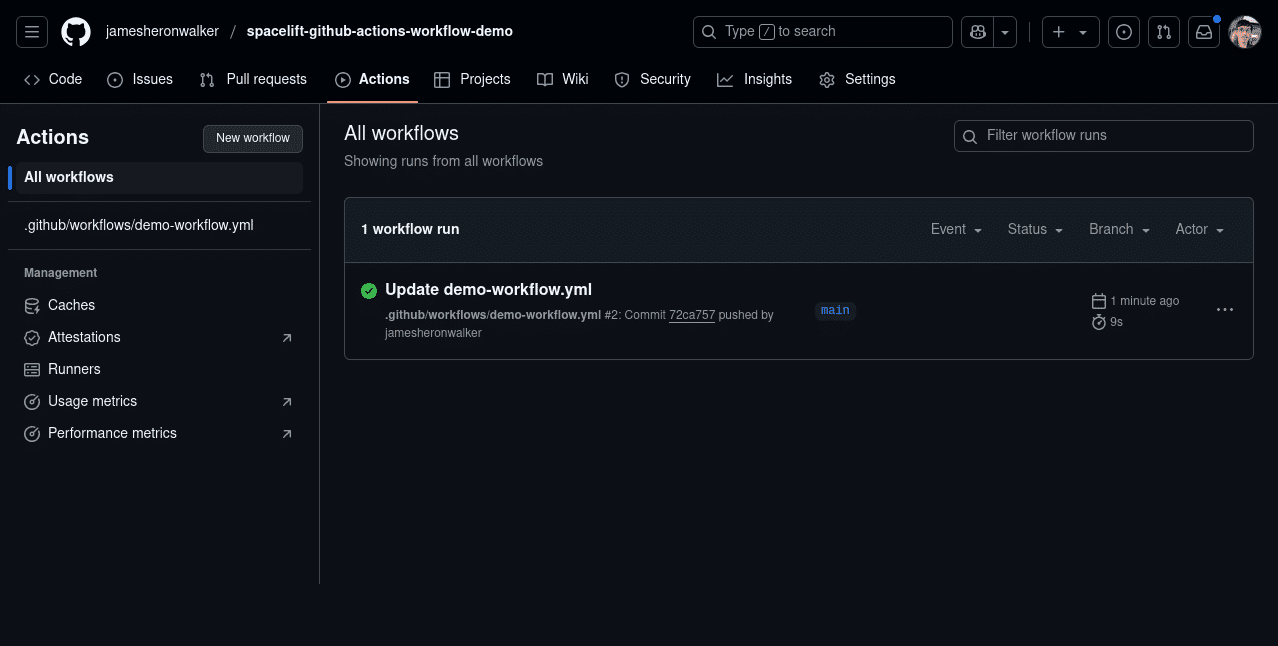
Click the run to view its details on a new screen. You’ll see the two jobs within the run, build and verify. You can then click the jobs to view the logs from their steps.
GitHub Actions workflows features and concepts
The example above is just a high-level overview of how to get started with GitHub Actions workflows. The workflow concept is a powerful architecture for modelling processes within the DevOps lifecycle. By combining different triggers with a mix of parallel jobs and sequential steps, you can easily implement advanced automation for your DevOps requirements.
GitHub Actions supports a huge selection of options for workflows, jobs, and steps. We don’t have space to cover them all, but we’ll share some key features below.
You can also find more examples and tips in our GitHub Actions getting started tutorial.
1. name
The workflow-level name option sets the workflow name that’s displayed within the GitLab UI. It’s an optional field that defaults to the filename of your workflow config file.
name: "Demo workflow"2. on
As shown above, the on section of a workflow config file defines the trigger events that will run the workflow. Each workflow may specify multiple supported trigger events.
Many trigger events have their own options, such as the following example that uses the release trigger’s types option to run the workflow when a new release is published:
on:
  release:
    types: [published]
3. jobs
A workflow’s jobs property specifies the jobs that it will run. We saw this in action in the example above.
jobs:
  job1:
    runs-on: ubuntu-latest
    steps:
      - run: echo "I am job 1"
  job2:
    runs-on: ubuntu-latest
    steps:
      - run: echo "I am job 2"
Each job must specify the steps it will run (steps) and the type of runner it will execute on (runs-on).
4. uses and with
Steps within a workflow job can reference actions available in the GitHub Marketplace, a Docker image, a public repository, or your project’s repository.
Actions are reusable sections of workflow configuration that you can customize with inputs. Inputs are specified as key-value pairs using the step’s with option.
The following example shows how to use the docker/login-action action to log in to Docker Hub within your workflow’s environment:
jobs:
  dockerl:
    runs-on: ubuntu:latest
    steps:
      - name: docker login
        uses: docker/login-action@v3
        with:
          username: ${{ vars.DOCKER_USERNAME }}
          password: ${{ secrets.DOCKER_TOKEN }}
In this example, the action’s inputs reference values that must be configured in your project’s GitHub Actions variables and secrets.
5. env
You can set environment variables for your workflow’s jobs using the env key. This setting is supported at the workflow level, as well as for individual jobs and steps. Workflow-level variables will be injected into every job’s environment.
env:
  GLOBAL_VAR: global

jobs:
  demo:
    runs-on: ubuntu-latest
    env:
      JOB_VAR: job
    steps:
      - run: 'echo "$GLOBAL_VAR $JOB_VAR $STEP_VAR"'
        env:
          STEP_VAR: step
6. needs
The needs job option lets you specify a dependency on other jobs in your workflow. The job won’t start running until those jobs have completed successfully.
jobs:
  job1:
    runs-on: ubuntu-latest
    steps:
      - run: "echo 'I am job 1'"
  job2:
    runs-on: ubuntu-latest
    needs: job1
    steps:
      - run: "echo 'I am job 2'"
  job3:
    runs-on: ubuntu-latest
    needs: [job1, job2]
    steps:
      - run: "echo 'I am job 3'"
In this example, job2 will wait until job1 has finished, while job3 will wait for both job1 and job2. The needs keyword provides advanced controls to specify when jobs run, enabling you to improve workflow performance and reliability.
7. matrix
Software build processes often need to be repeated across many combinations of targets. To avoid repetitive workflow configuration, you can use the matrix option to run a job multiple times with different variable inputs:
jobs:
  build:
    strategy:
      matrix:
        os: [ubuntu-latest, windows-latest]
        node_version: [18, 20]
    runs-on: ${{ matrix.os }}
    steps:
      - uses: actions/setup-node@v4
        with:
          node-version: ${{ matrix.node_version }}
The job shown above will run a total of four times, but with a different combination of operating system and Node version on each run:
ubuntu-lateston Node 14ubuntu-lateston Node 18windows-lateston Node 14windows-lateston Node 18
Using matrix allows you to quickly implement complex job variations.
8. concurrency
Sometimes your GitHub Actions workflows will include jobs that mustn’t run concurrently. For instance, if your job deploys software to production, then you may want to prevent out-of-order deployments so you can be sure only the latest code goes live. The concurrency option allows you to control this behavior.
When specified at the workflow or job level, the concurrency keyword groups multiple jobs together across workflow runs. GitHub Actions then ensures there’s only one running and one pending job within the concurrency group at any time.
You can choose to cancel existing jobs when a new one appears, allowing the new job to start immediately.
jobs:
  deploy:
    runs-on: ubuntu-latest
    concurrency:
      group: deployment
      cancel-in-progress: true
In this example, the deploy job belongs to the deployment concurrency group. When a new job is created in the group, any existing jobs will be cancelled so the latest deployment can instantly begin.
How to build a GitHub Actions workflow for Spacelift IaC deployments
GitHub Actions is a versatile CI/CD system, but it’s primarily designed for software development use cases. It can be difficult to use for IaC deployments where state management, governance, and efficiency are key.
At Spacelift, we solve this problem with our dedicated IaC orchestration platform. Spacelift provides fully automated CI/CD for IaC with self-service access, drift detection, and policy-as-code built in, making it a great fit for infrastructure workflows.
When you use Spacelift, you don’t need to write complex GitHub Actions workflows to provision your infrastructure. Spacelift uses a GitOps strategy to connect to your IaC repositories, monitor for changes, and then automatically run your IaC tools.
Spacelift also directly integrates with your AWS, Azure, and GCP accounts to dynamically generate short-lived cloud credentials for your pipelines.
We think Spacelift stacks are the best way to handle infrastructure automation, but most teams also use CI/CD solutions like GitHub Actions to build code, run tests, and automate other parts of the DevOps lifecycle.
Because you may need to interact with your Spacelift stacks from your GitHub Actions workflows, we provide the setup-spacectl action in the GitHub Marketplace.
Spacelift’s CLI Spacectl allows easy programmatic access to the resources in your Spacelift account. The setup-spacectl action is an automated way to install and configure Spacectl within a GitHub Actions workflow.
Simply adding a step that uses the action lets you run spacectl commands in the following steps:
on:
  push:
    branches: [ "main" ]

jobs:
  deploy:
    runs-on: ubuntu-latest
    steps:
      - name: "Setup Spacectl"
        uses: spacelift-io/setup-spacectl@v1
      - name: "Deploy Spacelift stack"
        env:
          SPACELIFT_API_KEY_ENDPOINT: https:// ${{ vars.SPACELIFT_ACCOUNT_NAME }}.app.spacelift.io
          SPACELIFT_API_KEY_ID: ${{ secrets.SPACELIFT_API_KEY_ID }}
          SPACELIFT_API_KEY_SECRET: ${{ secrets.SPACELIFT_API_KEY_SECRET }}
        run: spacectl stack deploy --id ${{ vars.SPACELIFT_STACK_ID }}
This workflow specifies a job that runs after you push to your repository’s main branch. It uses the setup-spacectl action to install Spacectl within the job’s environment and then runs the spacectl stack deploy command to deploy the stack referenced by the SPACELIFT_STACK_ID workflow variable.
To use this workflow, you must first configure all the referenced variables and secrets in your project’s GitHub Actions settings.
This workflow is a basic example designed to demonstrate the setup-spacectl action. In most cases, it’s easiest to use Spacelift push policies to deploy your stacks automatically when you commit to your repository.
However, using Spacectl within a GitHub Actions job lets you trigger stack deployments as a step in a broader workflow.
While the setup-spacectl action enables you to use any Spacectl command, there’s also an even simpler option when you just need to deploy a stack. The spacelift-stack-deploy action, maintained by Cloud Posse, enables you to deploy a stack using a single GitHub Actions workflow step. Internally, it uses the setup-spacectl action to implement the same steps shown above. Here’s an example of how to use spacelift-stack-deploy:
on:
  push:
    branches: [" main" ]

jobs:
  deploy:
    runs-on: ubuntu-latest
    steps:
      - name: "Deploy Spacelift stack"
        id: spacelift
        uses: cloudposse/github-action-spacelift-stack-deploy@main
        with:
          stack: ${{ vars.SPACELIFT_STACK_ID }}
          organization: ${{ vars.SPACELIFT_ACCOUNT_NAME }}
          api_key_id: ${{ secrets.SPACELIFT_API_KEY_ID }}
          api_key_secret: ${{ secrets.SPACELIFT_API_KEY_SECRET }}
    outputs:
      outputs: ${{ steps.spacelift.outputs.outputs }}
This workflow uses the same secrets and variables as the previous one, but this time they’re supplied as inputs to the spacelift-stack-deploy action. The action automates the process of using Spacectl to deploy a Spacelift stack.
Key points
GitHub Actions workflows are CI/CD pipelines that run in your GitHub repositories when trigger events occur. Each workflow file contains a collection of jobs configured to run in parallel or sequentially. GitHub Actions workflows are commonly used to build, test, and deploy software changes, but the platform’s flexibility and huge community ecosystem allow you to automate any DevOps process.
Because GitHub Actions workflows implement general-purpose CI/CD, specialist solutions like Spacelift can still be a better fit for specific use cases. Our platform solves key infrastructure automation challenges that can be complex to configure in GitHub Actions, such as managing infrastructure state, gaining visibility into deployed resources, and continuously enforcing governance requirements.
With Spacelift, you can fully automate your IaC deployments through direct connections to your IaC repositories and cloud accounts. You can also use GitHub Marketplace actions like setup-spacectl and spacelift-stack-deploy to integrate Spacelift with GitHub Actions. This combination lets you build more capable DevOps systems by triggering Spacelift IaC deployments within your GitHub Actions workflows.
Solve your infrastructure challenges
Spacelift is an alternative to using homegrown solutions on top of a generic CI. It helps overcome common state management issues and adds several must-have capabilities for infrastructure management.
Frequently asked questions
What is the difference between workflow and action in GitHub Actions?
A workflow in GitHub Actions is the overall automation pipeline defined in a YAML file, triggered by events like pushes or pull requests. An action is a reusable unit within that workflow, performing specific tasks like checking out code or setting up a language runtime.
Workflows contain one or more jobs, which in turn use actions. Actions are building blocks; workflows define when and how they run.
How to run a workflow in GitHub Actions?
To run a workflow in GitHub Actions, push code to a branch that matches the workflow’s on trigger. For example, a workflow with
on: pushoron: pull_requestruns automatically when a push or pull request occurs. To run it manually, useworkflow_dispatchin the YAML file, then trigger it from the “Actions” tab in the GitHub UI. Re-runs of previous runs are also available via the UI.Can you have multiple workflows in GitHub Actions?
Yes, you can have multiple workflows in GitHub Actions. Each workflow is defined in a separate YAML file within the
.github/workflows/directory of your repository. Workflows operate independently and can be triggered by different events, branches, or schedules. This allows you to separate CI, CD, linting, or deployment logic for better organization and control.What are the benefits of using GitHub Actions workflows?
GitHub Actions provides native CI/CD inside GitHub, triggered by events like pushes or PRs. It supports parallel jobs, reusable actions, and secret management. Workflows are YAML-based and version-controlled with code, reducing external tools and speeding up builds with caching and containers.
