
GitHub is the most popular source code hosting platform, so many developers were excited when it launched Actions in 2018 because it makes sense to run your continuous integration and deployments close to where you store your code.
With GitHub Actions, developers can turn workflows (series of steps in your pipeline) into reusable units called actions. These actions can then be published on the GitHub marketplace, which is home to over 10,000 actions.
In this post, we will review the checkout action’s use case and explore ways to use it in your workflows.
What is the actions/checkout action?
The checkout action is a GitHub Actions feature that allows you to clone a repository into the workflow’s runner. A runner is a machine hosted by GitHub or self-hosted that executes your workflow steps.
If you’re familiar with Git, you might notice that the name “checkout” resembles the git checkout command, which switches between branches. Switching branches is one capability of the checkout action, but its purpose extends beyond that, offering a range of features to manage repository access during workflows.
For many projects, the checkout action marks the beginning of a workflow. It is typically used to clone the current project repo before performing further steps.
A real-world example of this is the OpenTofu project, which uses the checkout action as part of its pipeline to clone the OpenTofu repository before building the OSS release:
jobs:
  build:
    runs-on: ${{ inputs.runson }}
    name: OpenTofu ${{ inputs.goos }} ${{ inputs.goarch }} v${{ inputs.product-version }}
    steps:
      - uses: actions/checkout@0ad4b8fadaa221de15dcec353f45205ec38ea70b # v4.1.4
Much of the code snippet above has been trimmed for brevity; the important line to pay attention to here is uses: actions/checkout@0ad4b8fadaa221de15dcec353f45205ec38ea70b, which pins the version of the checkout being used, further reducing the chances that any breaking changes to the checkout action will affect the pipeline.
In most cases, you don’t need to pin the version of checkout you are using, but it makes an excellent extra step.
‘actions/checkout’ action options
Here are the most commonly used options to use with the ‘actions/checkout’ action:
ref(default:github.ref) – Specifies the branch, tag, or SHA to check out. When checking out the repository that triggered a workflow, this defaults to the reference or SHA for that event. Otherwise, it uses the default branch.repository(default:github.repository) – Specifies the repository to check out, in the format owner/repotoken(default:github.token) – Provides a personal access token (PAT) for authentication; the PAT is configured with the local Git config, enabling your scripts to run authenticated Git commands. The post-job step removes the PAT. It’s recommended to use a service account with the least permissions necessary.path– Specifies the directory under$GITHUB_WORKSPACEwhere the repository should be checked outfetch-depth(default:1) – Determines how many commits are fetched; set to0to fetch all history for all branches and tags- lfs (default: false) – Enables Git Large File Storage (LFS) support
submodules(default:false) – Specifies whether to checkout submodules; set totrueto checkout submodules orrecursiveto recursively checkout submodulesset-safe-directory(default:true) – Adds the checked-out repository to Git’ssafe.directoryconfiguration by runninggit config --global --add safe.directory <path>ssh-key– Uses an SSH key to fetch the repository; the SSH key is configured with the local Git config, enabling your scripts to run authenticated Git commands. The post-job step removes the SSH key. It’s recommended to use a service account with the least permissions necessary.
persist-credentials(default:true) – Determines whether to configure the token or SSH key with the local Git config; set tofalseif you want to remove the credentials after the checkout, which can be useful for HTTPS-based authentication in later steps.
Key features of actions/checkout
Checkout provides a few standout features that make it an attractive choice for many projects.:
- Time saved: The checkout action eliminates having to re-write the same steps across multiple workflows. To put this in perspective, consider a scenario where you have workflows for building and testing your application on different operating systems — Windows, macOS, and Linux. Without the checkout action, you would need to manually script and maintain the steps for cloning your repository in each workflow.
- Multi-repo support: As highlighted previously, the checkout action also supports cloning multiple repositories, which can save you additional steps in your workflow. This can be particularly useful if your pipeline relies on additional dependencies from outside your repositories.
- Inbuilt authentication: The checkout action handles authenticating to GitHub very intuitively, allowing you to clone private repos and even make commits to repos as needed. Achieving this manually would usually require a lot of shell scripting magic and would easily become repetitive when used across multiple workflows.
Prerequisites
A GitHub account and basic familiarity with GitHub actions are requirements for using GitHub actions. Additionally, you will need the GitHub CLI to follow along with the hands-on demo later in this post.
How to use actions/checkout in GitHub Actions
Including the checkout action in your workflow generally follows this format:
name: CI Workflow
on:
  push:
    branches:
      - main
jobs:
  build:
    runs-on: ubuntu-latest
    steps:
      - name: Checkout repository
        uses: actions/checkout@v4
The snippet above creates a step called “Checkout repository”, which uses the actions/checkout action. The @ character allows you to pin the version of the action—in this case, version v4. You can see previous and future versions in the checkout releases on GitHub.
By default, this step clones the repository where the workflow is running. Although this is ideal in most scenarios, it may not suit all use cases — as we will see in the section that follows.
actions/checkout use cases
Building on the previous example, here are a few more use cases for the checkout action.
1. Working on a specific branch
Sometimes, you may need to work with a branch other than the default one — when testing a specific release or feature branch, for example. To target a specific branch, you can use the with block to enable additional features:
name: CI Workflow
on:
  push:
    branches:
      - main
jobs:
  build:
    runs-on: ubuntu-latest
    steps:
      - name: Checkout specific branch
        uses: actions/checkout@v4
        with:
          ref: feature-branch-name
In the example above, the with block specifies the ref parameter, allowing you to target a branch by its name (e.g., feature-branch-name). This is particularly useful when working on branches other than the one triggering the workflow. The ref parameter can also accept tags or specific commits.
2. Fetching a specific file
Sometimes, you only need a single file from the repository instead of cloning the entire project. The checkout action supports this through sparse checkout, which allows you to fetch specific files or directories:
- uses: actions/checkout@v4
  with:
    sparse-checkout: |
      playbook.yaml
    sparse-checkout-cone-mode: false
In the code snippet above:
sparse-checkoutspecifies the file(s) to be fetched, in this case, README.md.sparse-checkout-cone-modeis set to false to enable manual specification of paths.
Sparse checkout minimizes the amount of data downloaded, making it ideal for workflows focused on single files or lightweight operations.
3. Cloning private repositories
Not all repositories are public, and workflows often need to access private dependencies. The checkout action supports this by allowing you to clone private repositories:
- name: Checkout private tools
  uses: actions/checkout@v4
  with:
    repository: my-org/my-private-tools
    token: ${{ secrets.GH_PAT }}
    path: my-tools
In the snippet above:
repositoryspecifies the target private repository to clone (e.g., my-org/my-private-tools).tokenprovides the authentication required to access the private repository. Note: this should be a token with access to the target repository.pathdefines the directory where the repository will be cloned (e.g., my-tools).
4. Working with submodules
Some projects, usually large monorepos or frameworks, use submodules to include external repositories as part of their structure. Submodules are Git repositories nested inside another repository, allowing projects to manage dependencies as part of their version history.
- name: Checkout with submodules
  uses: actions/checkout@v4
  with:
    submodules: recursive
    token: ${{ secrets.GH_PAT }} # `GH_PAT` is a secret for private submodules
In the snippet above:
submodulesis set to recursive to ensure all submodules, including nested ones, are initialized and updated. This is especially useful for projects with multi-level submodule dependencies.tokenis required if the submodules are private, ensuring secure access to those repositories.
5. Pushing commits to a repository
Another unique use case of the checkout repository is its ability to push commits to a given repository. This is useful when you create files or artifacts within your pipeline.
Achieving this using the checkout action follows this format:
on: pull_request
jobs:
  build:
    runs-on: ubuntu-latest
    steps:
      - uses: actions/checkout@v4
        with:
          ref: ${{ github.head_ref }}
      - run: |
          date > generated.txt
          # Note: the following account information will not work on GHES
          git config user.name "github-actions[bot]"
          git config user.email "41898282+github-actions[bot]@users.noreply.github.com"
          git add .
          git commit -m "generated"
          git push
The workflow above is triggered on each pull request (on: pull_request) and targets the branch associated with the pull request using ref: ${{ github.head_ref }}. The most import piece of configuration to pay attention to here is the git configuration block:
git config user.name "github-actions[bot]"
git config user.email "41898282+github-actions[bot]@users.noreply.github.com"
GitHub Actions uses a preconfigured bot account for commits. The email format follows this structure: {user.id}+{user.login}@users.noreply.github.com
Example of checkout action in a GitHub Actions workflow
With a few use cases covered, let’s build a full example of using the checkout action in a GitHub Actions workflow.
For this tutorial, we will combine some of the use cases above by building a workflow that clones the dev branch of this demo repository and displays a text file from that branch.
Begin by creating a new GitHub repository using the CLI:
gh repo create spacelift-checkout-demo --public --clone && cd spacelift-checkout-demoThis will create a new public repository under your account named spacelift-checkout-demo and switch directories the the new repo once it is cloned, this is because we used the --clone flag when running the create command. The output will be similar to:

Next, create the required directories, GitHub looks for workflows under the path .github/workflows any files under this directory will be run as a workflow:
mkdir -p .github/workflowsWith the directory created, we can create a workflow that uses the checkout action:
cat << 'EOF' > .github/workflows/checkout-demo.yml
name: Checkout Workflow Demo
on:
  push:
    branches:
      - main

jobs:
  checkout-demo:
    runs-on: ubuntu-latest
    steps:
      # Step 1: Checkout the repository and use the `dev` branch
      - name: Checkout dev branch
        uses: actions/checkout@v4
        with:
          repository: s1ntaxe770r/spacelift-checkout-demo
          ref: dev
          sparse-checkout: |
            surprise.txt
          sparse-checkout-cone-mode: false

      # Step 2: Display the contents of `surprise.txt`
      - name: Show surprise.txt content
        run: cat surprise.txt
EOF
In this workflow, we combine a few of the use cases we highlighted earlier. Here’s a breakdown of what’s going on:
- The repository parameter targets the specific repository:
s1ntaxe770r/spacelift-checkout-demo. - The
refparameter specifies the branch to check out—in this case, the dev branch. - The
sparse-checkoutparameter fetches only the surprise.txt file
Finally, the run step executes cat surprise.txt to print the file contents. This verifies that the workflow correctly fetched the file as intended.
Commit and push the changes to trigger the workflow:
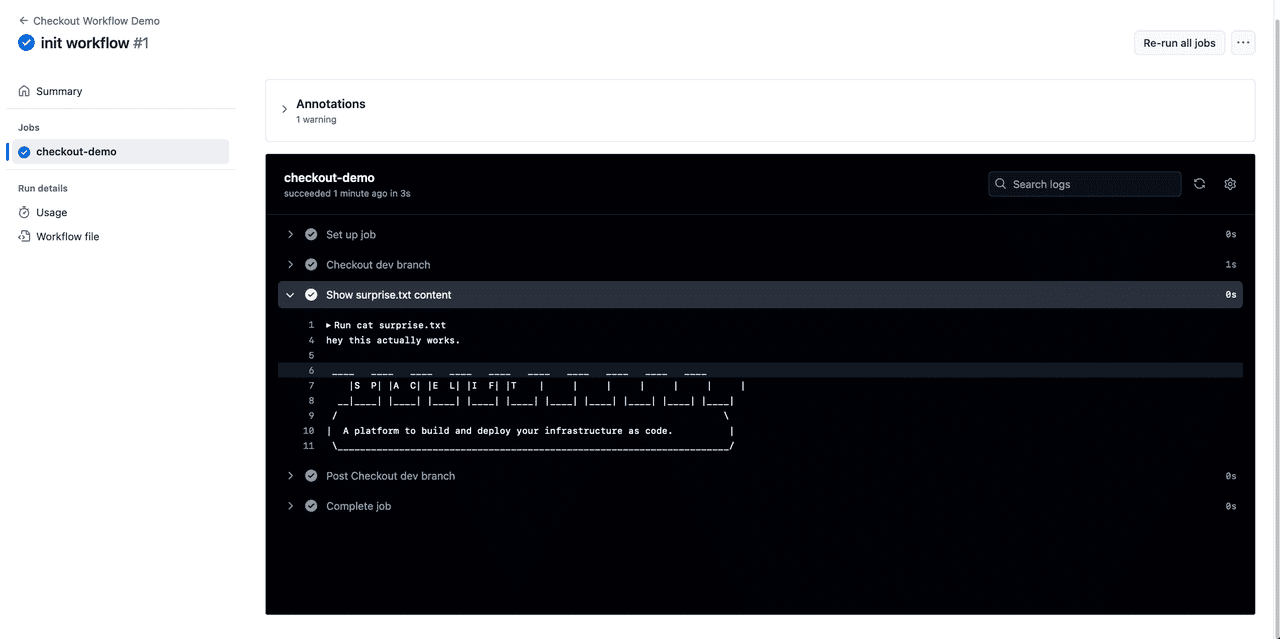
git commit -m"init workflow" && git pushVisiting the actions tab under the repository should produce a similar output:
Why use Spacelift for CI/CD workflows?
Compared to building a custom and production-grade infrastructure management pipeline with a CI/CD tool like GitHub Actions, adopting a collaborative infrastructure delivery tool like Spacelift feels a bit like cheating.
Many of the custom tools and features your team would need to build and integrate into a CI/CD pipeline already exist within Spacelift’s ecosystem, making the whole infrastructure delivery journey much easier and smoother. It provides a flexible and robust workflow and a native GitOps experience. It detects configuration drift and reconciles it automatically if desired. Spacelift runners are Docker containers that allow any type of customizability.

Security, guardrails, and policies are vital parts of Spacelift’s offering for governing infrastructure changes and ensuring compliance. Spacelift’s built-in functionality for developing custom modules allows teams to adopt testing early in each module’s development lifecycle. Trigger Policies can handle dependencies between projects and deployments.
If you want to learn more about Spacelift, create a free account today or book a demo with one of our engineers.
Key points
The GitHub Actions checkout action is essential for initializing many workflows. In this article, we explored its key use cases, including checking out specific branches, fetching individual files with sparse checkout, cloning private repositories, and working with submodules. Each feature demonstrates how checkout can simplify complex scenarios, saving time and effort across your pipelines.
We started by introducing the basics of the checkout action. From there, we examined practical examples, such as targeting a feature branch, cloning private repositories, and handling submodules.
Finally, we brought everything together with a hands-on example, creating a complete workflow that utilized multiple use cases to fetch and display a file from a specific branch.
Next time you set up a GitHub Actions workflow, you should appreciate the power of the checkout action.
Solve your infrastructure challenges
Spacelift is an alternative to using homegrown solutions on top of a generic CI. It helps overcome common state management issues and adds several must-have capabilities for infrastructure management.
