

Azure Pipelines is Microsoft’s cloud-based CI/CD service for automating how you build, test, and deploy code. It is part of the Azure DevOps suite, works with most languages and platforms, and runs on Windows, Linux, and macOS.
In this article, we will explore Azure Pipelines, describing what it is and how it compares to other popular DevOps platforms such as GitHub Actions and Jenkins.
We will look at the components and features that make up Azure Pipelines, including tasks, templates, parameters, variables, triggers, secrets, agents, artifacts, and environments. Lastly, we will move on to some practical examples showing how to configure a Terraform pipeline in Azure DevOps.
What we will cover:
What are Azure Pipelines?
Azure Pipelines is a cloud-based service by Microsoft, part of the Azure DevOps suite, designed to automate the building, testing, and deployment of code projects. It supports continuous integration (CI) and continuous delivery (CD) and can be easily integrated with Azure Repos, Azure Artifacts, Azure Boards, and Azure Test Plans.
Azure Pipelines manages deployments through pipelines with defined stages, approval controls, and rollback capabilities. It supports multiple programming languages and platforms, including Python, Java, JavaScript, .NET, and Terraform, streamlining the software development lifecycle (SDLC) across diverse environments.
Overall, this tool is aimed at automating the process of building your code projects. This can involve tasks like compiling code, running unit tests, and creating artifacts (executable files or packages) for deployment.
How does Azure Pipeline work?
Azure Pipelines supports a wide range of functionalities to streamline the software development lifecycle (SDLC), specifically focusing on CI and CD. CI involves frequently merging code changes into a central repository and automatically building and testing those changes. CD automates the deployment of these tested changes to different environments (staging, production).
It provides functionalities for managing deployments through pipelines. You can define stages for different environments, control approvals, and perform rollbacks if necessary. It works with various programming languages, frameworks, and platforms, so you can build and deploy projects written in Python, Java, JavaScript, .NET, and other major languages.
Azure Pipelines vs GitHub Actions
Azure Pipelines and GitHub Actions are both popular tools for implementing CI/CD pipelines.
Azure Pipelines targets CI/CD workflows, offering comprehensive features for building, testing, and deploying applications. It integrates well with other Azure DevOps services and the wider Azure / Microsoft ecosystem. Azure Pipelines works with various source control systems like Git, SVN, and TFVC. GitHub Actions, on the other hand, is designed specifically for use within GitHub, offering a wide range of built-in actions for common tasks within the GitHub workflow. It excels in automating tasks directly within the GitHub repository and exclusively works with GitHub repositories making it a good choice if your code is held in GitHub already.
GitHub Actions is generally considered easier to learn, especially for those familiar with GitHub workflows. Like Azure pipelines, it uses YAML for configuration and offers a visual editor for simpler pipelines. It has a huge ecosystem of community-created actions available.
Both Azure pipelines and GitHub actions have free and paid tiers available with restrictions on the number of build agents, parallel jobs, and storage.
Azure Pipelines vs Jenkins
Where Azure Pipelines is a cloud-hosted service as part of the Azure DevOps suite, Jenkins is a free and open-source server-based tool that requires installation and management on your own infrastructure. It is, therefore, suitable for organizations with existing infrastructure and a preference for open-source tools.
However, the benefits of the cloud are lost, such as ease of setup and automatic scaling and updates. Scaling, for example, can quickly become a problem for large-scale deployments, requiring more Jenkins servers. Jenkins requires more technical expertise for setup and configuration and the extensive plugin ecosystem can add complexity but also flexibility.
Where Jenkins has no direct cost, be wary of the investment in infrastructure and ongoing operational maintenance costs.
Below, you can find the table comparing these three tools:
| Azure Pipelines | GitHub Actions | Jenkins | |
| Integration | Integrates well with Azure DevOps services, the wider Azure/Microsoft ecosystem, and other tools | Designed specifically for use within GitHub, automating tasks directly within the GitHub repository | Integrates with various tools and services through a vast plugin ecosystem but requires a custom setup |
| Source Control | Works with various source control systems like Git, SVN, and TFVC | Exclusively works with GitHub repositories | Works with various source control systems, including Git, SVN, and more |
| Configuration | YAML-based, visual editor available | YAML-based, visual editor available | Groovy-based (Jenkinsfile), web UI, and plugins |
| Ecosystem | A comprehensive set of features for CI/CD | Extensive library of community-created actions | Extensive plugin ecosystem (can add complexity) |
| Hosting and Management | Cloud-hosted as part of Azure DevOps suite, benefits from cloud ease of setup, scaling, and updates. | Cloud-hosted within GitHub, benefiting from seamless integration and ease of use within GitHub. | Server-based requires installation and management on its own infrastructure; scaling can be complex. |
| Cost | Free and paid tiers (limited build agents and storage) | Free and paid tiers (limited build agents and storage) | Free (but requires infrastructure and maintenance) |
How an Azure Pipeline is structured
Before configuring individual components, it helps to see how they fit together. An Azure pipeline is a nested structure, where each level contains the one below it. Once you can picture that containment, the YAML examples throughout this article are much easier to follow.
From the top down, a pipeline is organized into stages, jobs, and steps:
Pipeline  (azure-pipelines.yml)
└─ Stage        a major phase, such as build, test, or deploy
   └─ Job       a unit of work that runs on a single agent
      └─ Step   a single action, run in order on that agent
Here is what each level does:
- Pipeline: the whole automated process, defined in your
azure-pipelines.ymlfile. It is the top-level container for everything below. - Stage: a major phase of the pipeline, such as build, test, or deploy. Stages run sequentially in the order you declare them, and they are where you set dependencies and conditions between phases.
- Job: a unit of work inside a stage that runs on a single agent. Jobs in the same stage run in parallel by default, and each job starts with a clean agent and workspace.
- Step: a single action inside a job, run in sequence on the agent. A step is either a task or a script.
- Task: a prepackaged, reusable step, such as
TerraformInstaller@1orAzureWebApp@1. A script step runs inline commands instead, which is useful when no task covers what you need.
The following skeleton shows the same hierarchy with real keys:
# Pipeline (azure-pipelines.yml)
stages:
  - stage: Build                      # Stage
    jobs:
      - job: Compile                  # Job (runs on one agent)
        pool:
          vmImage: ubuntu-latest      # The agent for this job
        steps:
          - script: dotnet build              # Step (script)
          - task: PublishBuildArtifacts@1     # Step (task)
Stages and jobs are optional. For a simple pipeline, you can list steps directly, and Azure Pipelines wraps them in a default stage and job for you. That is why many of the shorter examples in this article have no stages: or jobs: keys.
One connection to keep in mind as you read on: every job runs on an agent, the compute resource covered in the Agents section below. Stages, jobs, and steps decide what runs and in what order; the agent is where it runs.
Azure Pipelines features and concepts
Let’s explore each component of pipeline settings that make up an Azure Pipeline to understand them better.
1. Tasks
Azure Pipelines tasks are the building blocks that define the actions performed within your build and deployment pipelines. These tasks automate various activities throughout your software development lifecycle (SDLC). Each task has a specific name and may require configuration parameters to define its behavior.
Here is an Azure task that can be used in Azure Pipelines. This task is used to deploy a web application to Azure App Service.
- task: AzureWebApp@1
  inputs:
    azureSubscription: 'Resource Manager Connection'
    appType: 'webApp'
    appName: 'myWebAppName'
    deployToSlotOrASE: true
    resourceGroupName: 'myResourceGroup'
    slotName: 'staging'
    deploymentMethod: 'auto'
You can chain multiple tasks together to create a multi-step workflow for building, testing, and deploying your application. This chain of tasks forms your pipeline.
- Built-in tasks: These Azure Pipeline tasks handle functionalities like code building, testing, packaging, deployment, and utility operations.
- Community tasks: The Azure DevOps Marketplace provides a vast collection of community-created tasks. These tasks extend the capabilities of pipelines by offering functionalities for specific tools, platforms, and services.
- Custom tasks: You can create your own custom tasks using scripting languages or extensions to cater to unique needs not met by built-in or community tasks.
2. Templates
Azure Pipeline templates are YAML files containing reusable pipeline definitions or configurations. They can define stages, jobs, steps, variables, and even other nested templates for modularity. You reference templates within your main pipeline YAML file using the extends keyword.
extends: path/to/your/template.yaml3. Parameters
Azure Pipeline parameters allow you to define variables within your pipeline YAML code that can be provided values at runtime, either manually when triggering a pipeline run or through configurations. Using parameters, you can configure pipelines without hardcoding values, making them adaptable to different environments or scenarios.
Parameters can be used in conjunction with Azure DevOps variables to manage sensitive information or configurations centrally, and by parameterizing common values, you can avoid duplicating code across different pipeline configurations.
Types of Azure pipelines parameters
- String: Most common type for text values (e.g., environment names, file paths).
- Number: Used for numerical values (e.g., port numbers, build numbers).
- Boolean: True or false values for binary choices (e.g., enable a specific feature).
- Object: Complex data structures containing key-value pairs (less common).
- Step: Definition for a specific pipeline step (advanced use case).
- StepList: Sequence of pipeline steps (advanced use case).
- Job: Definition for a pipeline job (advanced use case).
- JobList: Sequence of pipeline jobs (advanced use case).
- Stage: Definition for a pipeline stage (advanced use case).
- StageList: Sequence of pipeline stages (advanced use case).
Parameters are declared within the parameters section of your pipeline YAML file.
- Each parameter definition specifies a name, type, and, optionally, a default value.
parameters:
 environment: ''  # String parameter with no default value
 buildNumber: 10   # Number parameter with a default value
enableTests: true # Boolean parameter with a default value- You can reference parameters throughout your pipeline YAML code using the
${{ parameters.<parameter_name> }}syntax. - Parameters can be used within variable assignments, task configurations, script arguments, and conditional expressions.
4. Variables
Azure Pipelines variables provide a mechanism to store and manage reusable values within your pipelines. They offer a centralized way to control configurations, secrets, and other data used throughout pipeline definitions.
Types of Azure Pipelines Variables
- System-defined variables: Predefined variables are automatically set by Azure Pipelines, providing information about the pipeline run (e.g., build number, source branch).
- User-defined variables: Variables you create and define within your pipeline YAML code or through the Azure Pipelines web interface.
- Secret variables: A special type of user-defined variable for storing sensitive information like passwords or API keys. These values are encrypted and not exposed in plain text within the pipeline logs.
You can use the variables section of your YAML configuration files to declare variables with names, types (string, bool, etc.), and optional default values. These can then be referenced throughout your pipeline YAML code using the $(variable_name) syntax.
variables:
 buildConfiguration: 'Release'  # Default build configuration
5. Secrets
Azure Pipelines secrets can include passwords, API keys, access tokens, or any other data that should not be exposed in plain text.
Storing secrets separately from your pipeline code prevents them from being accidentally revealed in logs or source code repositories. Managing secrets in a dedicated location (such as Azure Key Vault) allows for better control and access restriction. Team members can collaborate on pipelines without needing to share sensitive information directly, and secrets can be audited on access and usage for enhanced security posture.
Azure Key Vault is commonly used with Azure Pipelines because it integrates directly with Azure DevOps. However, you can also directly create a secret in Azure DevOps under the Library -> Variable Group section by providing a key-value pair, which may be preferable for testing or simple pipelines.
6. Triggers
Azure Pipelines triggers automate the initiation of pipeline runs based on specific events or schedules. They eliminate the need to manually start pipelines for common events, improving efficiency and reducing human error.
Triggers are essential for CI/CD practices, enabling pipelines to run automatically upon code changes, build completions, or scheduled intervals. By automatically triggering pipeline runs, for example, on a code commit, the developer can receive feedback (i.e., success/failure messages) more quickly.
Continuous Integration (CI) Azure Pipelines triggers:
- Branch filters: Start pipelines when code is pushed to specific branches in your repository (e.g., main branch for new features).
- Pull request validation: Trigger pipelines to validate code changes upon pull requests creation. (Supported for GitHub repositories)
- Gated check-in: Enforce code reviews or checks before merging code changes. (Supported for TFVC repositories)
Continuous Delivery (CD) Azure Pipelines triggers:
- Pipeline completion: Start a downstream pipeline upon successful completion of an upstream pipeline.
- Schedule: Run pipelines based on a predefined schedule (e.g., nightly builds, weekly deployments).
- External triggers: Integrate with external events from other services or tools to trigger pipelines.
Triggers are defined within your pipeline YAML code using the trigger section.
trigger:
- main  # Trigger pipeline on pushes to the main branch
7. Agents
In Azure Pipelines, agents are the compute resources that execute the jobs defined within your pipeline. They provide the environment where your build, test, and deployment tasks are carried out.
Microsoft-hosted agents:
- Free tier offering with limited parallel jobs.
- Pre-configured virtual machines with various OS images (e.g., Windows, Ubuntu, macOS) and tools pre-installed.
- Ideal for getting started or building for common platforms without managing your own infrastructure.
Self-hosted agents:
- You install and manage the agent software on your own infrastructure (e.g., on-premises servers and virtual machines in Azure).
- Offer greater control over the environment and customization options.
- Suitable for scenarios requiring specific software installations or access to private resources behind your firewall.
Agents can be grouped together in Agent Pools based on shared characteristics (e.g., OS, capabilities) for easier job assignment.
In your pipeline YAML code, use the pool keyword and specify the name of the agent pool you want to use.
pool:
 vmImage: ubuntu-latest  # Use a pre-configured Microsoft-hosted agent
8. Artifacts
Azure Pipeline artifacts are the files and outputs produced during your build, test, and deployment pipeline stages. They represent the deployable components of your application or the results of intermediate pipeline steps. Artifacts can be used to break down complex pipelines into stages and share artifacts between them, promoting reusability and reducing duplication of effort.
During pipeline execution, tasks can publish artifacts using the Publish Build Artifacts or Publish Pipeline Artifact tasks. These tasks specify the files or folders to be included in the artifact and optionally define a name for the artifact.
Published artifacts are retained according to the pipeline run retention policy, which defaults to 30 days and is configurable under Project settings → Pipelines → Settings. Subsequent pipeline jobs or stages can download artifacts using the Download Build Artifacts or Download Pipeline Artifact tasks. These tasks specify the name of the artifact to download and the local directory to store it.
9. Environments
Environments represent logical targets for deploying your application or infrastructure. They provide a way to group resources and configurations specific to different deployment stages (development, testing, staging, production) or other deployment scenarios.
To set the environment, it can be referenced within the deploy stage:
jobs:
- job: DeployJob
 steps:
 - script: ...  # Build/test scripts here
 deploy:
   environment: 'staging'  # Target the 'staging' environment
or referenced using a variable:
variables:
 targetEnvironment: 'staging'  # Or set this dynamically based on conditions

jobs:
- job: DeployJob
 steps:
 - script: ...  # Build/test scripts here
 deploy:
   environment: '$(targetEnvironment)'  # Use the environment variable
Stages in Azure Pipelines
Stages in Azure Pipelines represent major divisions within your pipeline that group related tasks and functionalities. They provide a way to structure your pipeline for better readability, maintainability, and control over the execution flow.
For example, in a Terraform pipeline, this could mirror the workflow with a separate validate, plan, and apply stage. (See how to run Terraform in an Azure DevOps pipeline.)
Stages are typically executed sequentially. You can configure Azure Pipelines stages to run conditionally based on certain criteria, such as the success or failure of previous stages or pipeline triggers.
Stages are defined within your pipeline YAML code using the stages keyword.
stages:
- stage: Build
 jobs:
 - job: BuildJob
   steps:
   - script: ...  # Build scripts here

- stage: Test
 jobs:
 - job: TestJob
   steps:
   - script: ...  # Test scripts here

- stage: Deploy
 jobs:
 - job: DeployJob
   steps:
   - script: ...  # Deployment scripts here
Benefits of using Azure Pipelines
By leveraging the features of Azure Pipelines effectively, you can achieve faster delivery cycles, higher quality software, and better control over your development workflow.
Here are some of the key benefits of using Azure Pipelines:
- Automated build, test, and deployment process: Azure Pipelines provides a fully automated CI/CD pipeline to build, test, and deploy your code to any target environment (cloud or on-premises), reducing manual intervention and accelerating software delivery.
- Scalable and fast: Azure Pipelines can run multiple jobs in parallel, reducing build and deployment times for complex applications. It automatically scales the underlying infrastructure to meet your needs, ensuring speed and efficiency.
- Customizable pipelines and version control: Pipelines can be defined as code using YAML, allowing version control, transparency, and easier collaboration among developers.
- Security and compliance: Azure Pipelines provides robust security controls, such as secure secrets management, role-based access control, and audit trails, ensuring your CI/CD processes are secure and compliant.
- Support for various languages and frameworks: Azure Pipelines works with any programming language (e.g. .NET, Java, Python, Node.js), platform (Windows, Linux, macOS), and cloud provider (Azure, AWS, GCP). This flexibility allows you to use it for any type of application.
- Wide range of agents: You can choose between using Microsoft-hosted agents (managed by Azure) or self-hosted agents (more control over the environment) based on your requirements.
- Integration with other DevOps tools: As part of the Azure DevOps suite, Azure Pipelines integrates directly with other Azure services and tools, so you can run your full build, test, and deploy workflow in one place.
How to use Azure Pipelines?
Azure Pipelines offers two primary interfaces for defining pipelines: YAML and the Classic interface. YAML is the recommended approach for its flexibility and version control capabilities. However, the classic interface remains available for those accustomed to its visual editor.
Defining pipelines with YAML syntax
Pipelines can be defined using YAML files, which offer flexibility in tailoring the build and deployment process to your specific needs. As a general best practice, your pipelines should be created in code.
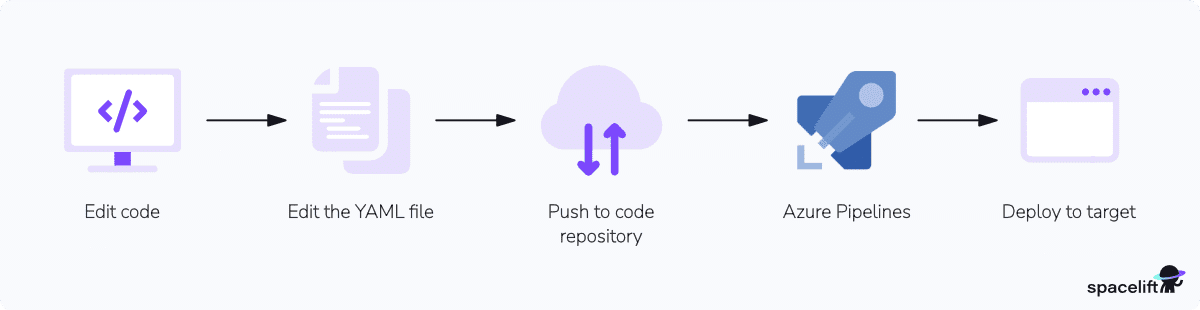
An Azure Pipeline YAML file typically follows this basic structure, including the components listed previously:
pool:  # Agent pool to run the pipeline on
variables:  # Define variables used throughout the pipeline
stages:  # Stages within the pipeline
- stage: Build  # Example stage name
 jobs:  # Jobs within the stage
 - job: BuildJob  # Example job name
   steps:  # Steps (tasks) to be executed within the job
   - script: ...  # Example script step
Available tasks can be referenced on the official Microsoft docs page, which has an extensive library of tasks for various functionalities like building, testing, deploying, and interacting with other services.
Common Tasks include:
script: Executes a script or command-line program within the pipeline job.download: Download files or artifacts from external sources.publish: Publishes artifacts (build outputs) to Azure Pipelines artifact storage for sharing across stages or pipelines.checkout: Check out your source code from a version control system (e.g., Git).publishBuildArtifacts(legacy): Uploads build artifacts (use publish for pipeline artifacts).
Defining pipelines with the classic interface
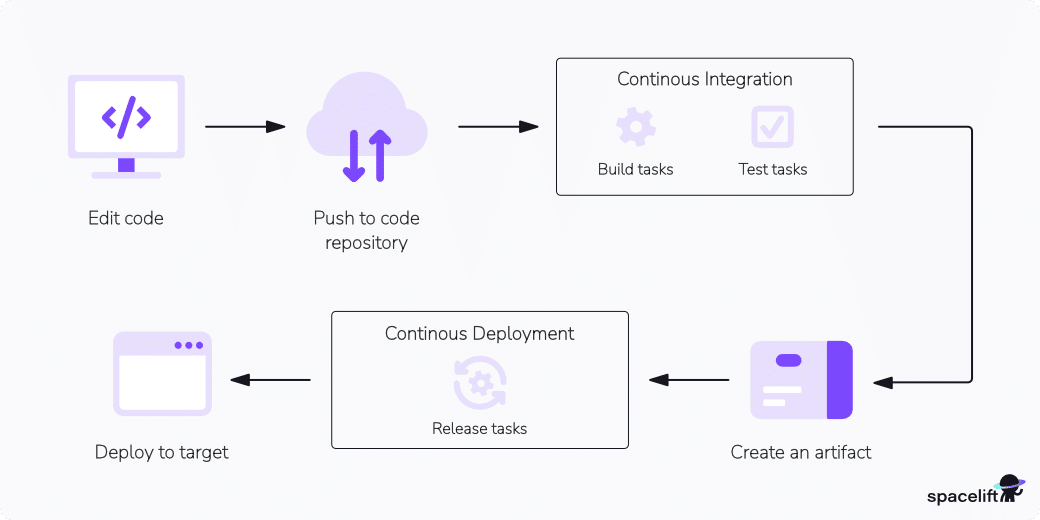
You can also manually configure a build pipeline and release pipeline. To create a pipeline without using YAML code, you can use a visual interface (known as the ‘classic editor’) in Azure DevOps. When the ‘Disable creation of classic build pipelines’ and ‘Disable creation of classic release pipelines’ settings for the projects are turned off, you can find this option in the left hand menu under Pipelines -> New Pipeline -> ‘Use the classic editor’.
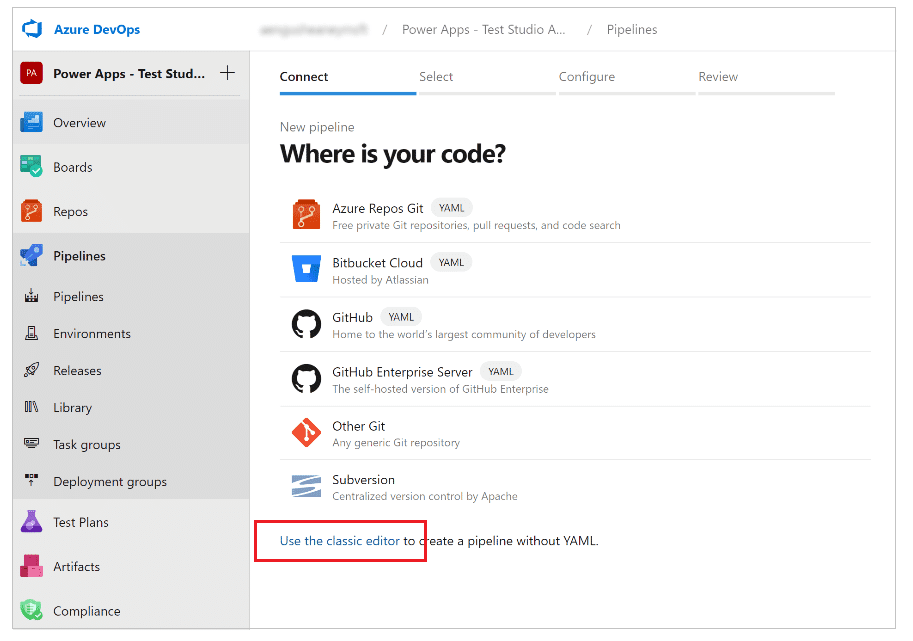
From there, you can find a drag-and-drop editor for defining pipeline stages and tasks and get started quickly with built-in templates for common pipeline scenarios.
Microsoft recommends migrating existing classic pipelines to YAML for better maintainability and future-proofing, as well as more granular control and customization compared to the visual editor. Since 2023, Microsoft has shipped new pipeline features only for YAML, and classic pipelines are now in maintenance mode. Use YAML for anything new.
Tutorial: Creating an Azure DevOps Pipeline
Let’s create our first pipeline. Follow the steps below to run the Azure DevOps Pipeline:
- Define the CI/CD steps in YAML.
An example YAML Terraform pipeline could look like this:
trigger:
  - main

pool:
  vmImage: 'ubuntu-latest'

stages:
  - stage: Plan
    displayName: 'Terraform Plan'
    jobs:
      - job: TerraformPlan
        displayName: 'Terraform Plan'
        steps:
          - task: TerraformInstaller@1
            inputs:
              terraformVersion: 'latest'
          - task: TerraformTaskV4@4
            displayName: 'Terraform Init'
            inputs:
              provider: 'azurerm'
              command: 'init'
              backendServiceArm: '<your-azure-service-connection>'
              backendAzureRmResourceGroupName: '$(resourceGroupName)'
              backendAzureRmStorageAccountName: '$(storageAccountName)'
              backendAzureRmContainerName: '$(containerName)'
              backendAzureRmKey: '$(key)'
          - task: TerraformTaskV4@4
            displayName: 'Terraform Plan'
            inputs:
              provider: 'azurerm'
              command: 'plan'
              environmentServiceNameAzureRM: '<your-azure-service-connection>'
              commandOptions: '-out=tfplan'
          - publish: '$(System.DefaultWorkingDirectory)/tfplan'
            artifact: tfplan

  - stage: Apply
    displayName: 'Terraform Apply'
    dependsOn: Plan
    jobs:
      - job: TerraformApply
        displayName: 'Terraform Apply'
        steps:
          - task: TerraformInstaller@1
            inputs:
              terraformVersion: 'latest'
          - download: current
            artifact: tfplan
          - task: TerraformTaskV4@4
            displayName: 'Terraform Init'
            inputs:
              provider: 'azurerm'
              command: 'init'
              backendServiceArm: '<your-azure-service-connection>'
              backendAzureRmResourceGroupName: '$(resourceGroupName)'
              backendAzureRmStorageAccountName: '$(storageAccountName)'
              backendAzureRmContainerName: '$(containerName)'
              backendAzureRmKey: '$(key)'
          - task: TerraformTaskV4@4
            displayName: 'Terraform Apply'
            inputs:
              provider: 'azurerm'
              command: 'apply'
              environmentServiceNameAzureRM: '<your-azure-service-connection>'
              commandOptions: '$(Pipeline.Workspace)/tfplan/tfplan'
This pipeline runs on an Ubuntu agent (ubuntu-latest) and is triggered whenever changes are pushed to the main branch.
-
- TerraformInstaller@1: Installs Terraform on the build agent.
- Terraform Init: Initializes the working directory and configures the Azure Storage Account backend for remote state, authenticating with your Azure service connection (
backendServiceArm). - Terraform Plan: Generates an execution plan and saves it to a
tfplanfile, published as a pipeline artifact so the apply stage reuses the exact plan. - Terraform Apply: Downloads the plan artifact and applies it with the
azurermprovider, authenticating through the same service connection (environmentServiceNameAzureRM). Passing the saved plan means apply runs exactly what was reviewed.
Define resourceGroupName, storageAccountName, containerName, and key as pipeline variables, and create an Azure Resource Manager service connection rather than passing a storage access key. A service connection keeps credentials out of your build logs, and workload identity federation (OIDC) removes long-lived secrets entirely.
- In Azure DevOps, go to “Pipelines” > “Pipelines” and click on “New Pipeline”.
- Connect the repository that contains your azure-pipelines.yml file.
- Azure DevOps will automatically detect the YAML configuration file. Review and confirm the configuration, then save.
- Go back to “Pipelines” and from the list of available pipelines, choose the one that you want to run.
- Click on “Run pipeline” button at the top right corner.
- Review the results.
Automating CI/CD pipelines with Spacelift
Building infrastructure delivery on a generic CI/CD pipeline means writing and maintaining the glue yourself: state handling, approval gates, policy checks, drift alerts, and the scripts that hold it all together. Most of what your team would build already exists in Spacelift, so your engineers spend their time on infrastructure instead of on the tooling around it.
You get a flexible workflow and a native GitOps experience across Terraform, OpenTofu, Pulumi, CloudFormation, Ansible, Terragrunt, and Kubernetes. Runs execute in Docker containers, so you control the runtime: bring your own image, install the tools you need, and hook into any stage of the run.
Governance is where Spacelift earns its keep. Policy as code, written in Rego with Open Policy Agent (OPA), decides which changes are allowed, who approves them, and what never reaches production. Guardrails travel with every deployment, not just the ones someone remembers to check. The private module registry lets teams test modules early in the module lifecycle, before a broken module propagates to every stack that consumes it.
Stack dependencies pass outputs between projects and enforce deployment order, and trigger policies cover the cases where you need custom logic.
Spacelift connects to GitHub, GitLab, Bitbucket, and Azure DevOps, and it reads public repositories directly through raw Git. It plugs into your pull request workflow, so developers propose infrastructure changes and see the plan and policy results on the PR, inside the guardrails your administrators set. Spacelift also defends against drift, detecting and remediating unexpected changes in your environments before production finds them for you.
Spacelift supports Azure DevOps as the code source for your stacks and modules. You can set up one default Azure DevOps integration per account plus as many Space-level integrations as you need, and you can restrict each one to specific Azure DevOps projects. When you create a stack, choose the Azure DevOps provider and a repository inside it:
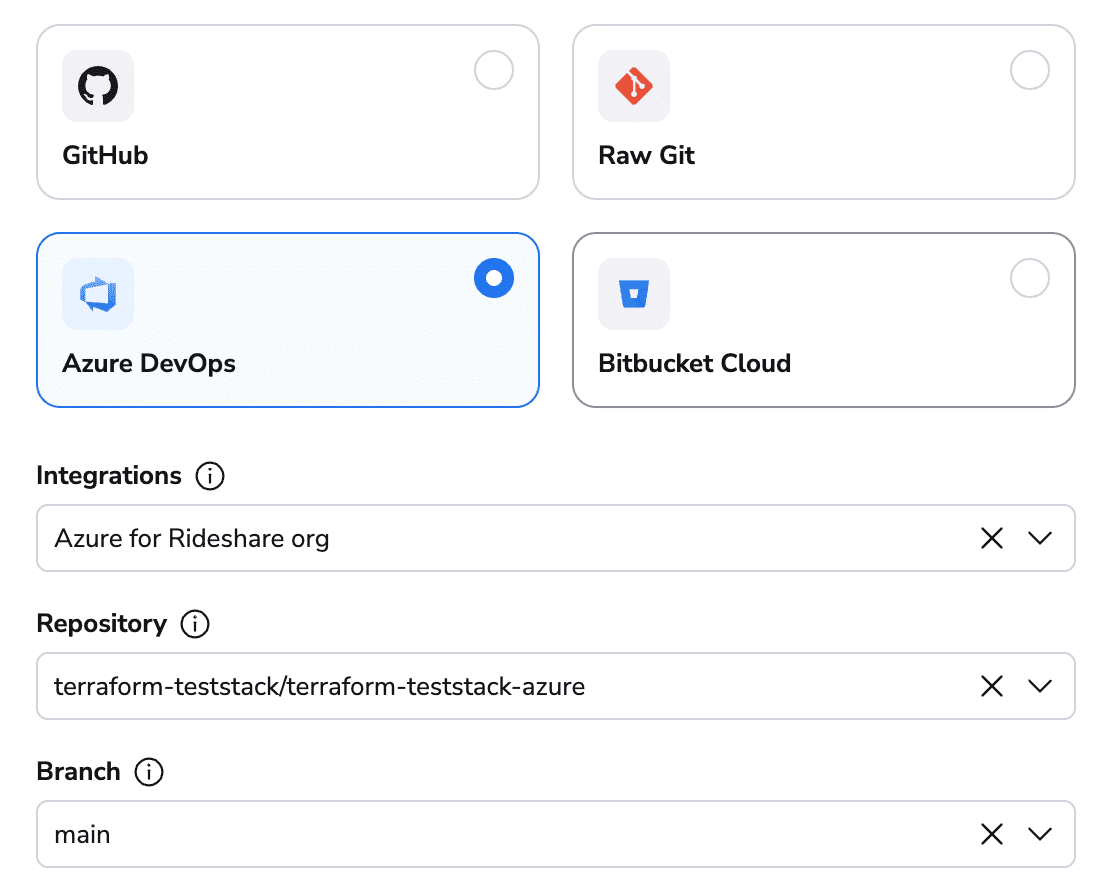
Read more about setting up the integration here.
Key takeaway
Azure Pipelines gives you one CI/CD service to build, test, and deploy across languages, platforms, and clouds. Once you understand how stages, jobs, steps, and tasks fit together, the rest is configuration: triggers to start runs, variables and secrets to manage config, agents to run the work, and environments to control where deployments land.
In this guide, you have seen what each component does, how Azure Pipelines compares to GitHub Actions and Jenkins, and how to build a Terraform pipeline in Azure DevOps from plan to apply.
Spacelift is an alternative to homegrown solutions on top of a generic CI. Start a free trial or book a demo to see it run against your own stacks.
Solve your infrastructure challenges
Spacelift is a flexible orchestration solution for IaC development. It delivers enhanced collaboration, automation, and controls to simplify and accelerate the provisioning of cloud-based infrastructures.
Frequently asked questions
How many types of Pipelines are there in Azure DevOps?
Azure DevOps supports two main types of pipelines: Classic Pipelines and YAML Pipelines.
Classic Pipelines use a graphical user interface for configuring build and release workflows, making them easier for beginners but less flexible for complex automation. YAML Pipelines are code-defined, stored in the repository, and provide full versioning, reusability, and scalability for CI/CD processes.
What are the two types of agents available in Azure Pipelines?
The two types of agents available in Azure Pipelines are Microsoft-hosted agents and self-hosted agents.
Microsoft-hosted agents are managed by Azure and come preconfigured with tools, SDKs, and operating systems, making them suitable for quick setup and short-lived builds. Self-hosted agents run on machines you manage, giving more control over hardware, installed software, and security, which is useful for custom or resource-intensive builds.
When to use Azure Pipelines?
Use Azure Pipelines when you need a fully managed CI/CD service that integrates tightly with Azure, GitHub, or Azure Repos. It’s useful for building, testing, and deploying across platforms like Windows, Linux, and macOS, especially in enterprise or hybrid cloud environments.
Is Azure Pipelines free?
Azure Pipelines has a free tier that includes one Microsoft-hosted CI/CD job with up to 30 hours (1,800 minutes) per month and one self-hosted job with unlimited minutes per organization. Beyond that, additional Microsoft-hosted parallel jobs cost $40 each per month, and extra self-hosted jobs cost $15 each per month.