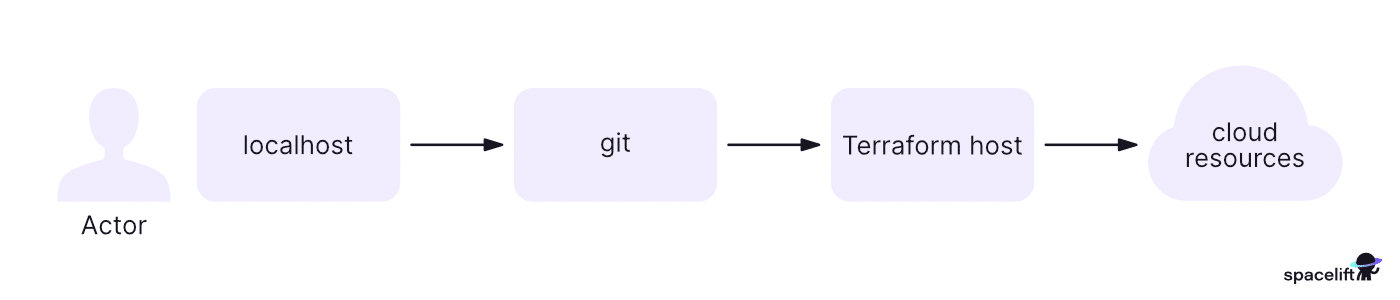
Whenever we think of provisioning infrastructure using Terraform, we think of components like the configuration files, VCS, the Terraform host, the remote backend, etc. A typical Terraform workflow is represented in the diagram below.
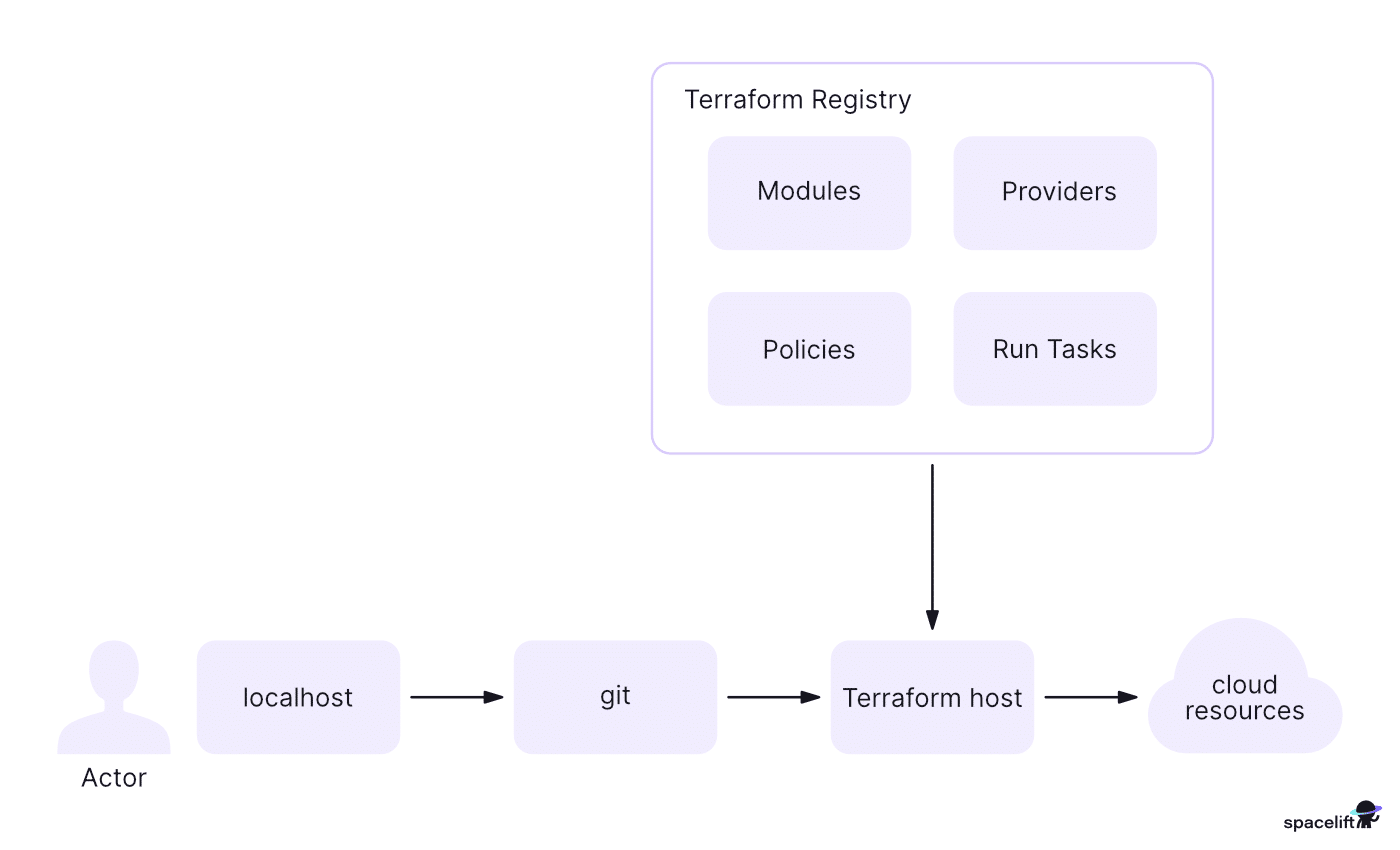
However, we almost never mention the Terraform registry in this interpretation.
The existence of the Terraform registry is always assumed. Unlike the remote backends and VCS repositories, configuring the registry in our project (unless the registry is private) involves no manual steps, but the projects cannot run without the registry.
In this post, we explore many critical aspects of the Terraform registry.
Terraform registry is a comprehensive repository of all providers(integrations), modules(configuration packages), policies, and run tasks designed to simplify Terraform workflows. HashiCorp maintains the registry with contributions from third-party vendors and the community, making building and scaling infrastructure easier.
Terraform is built using a modular approach. When Terraform is installed for the first time on any system, the core responsible for running all the core commands offered by Terraform is installed. However, this does not mean that any config created to provision infrastructure on any cloud provider platform will work. The cloud provider modules still need to be installed for any configuration to work.
Referring to the diagram below, if the Terraform configuration contains IaC for AWS, Azure, and GCP, then corresponding provider modules will be installed before these configurations are provisioned using the CLI or any CI/CD automation.
These modules are installed during the initialization (init) phase of any project. A freshly written or cloned Terraform configuration always needs to be initialized. The terraform init first identifies the provider modules and versions being used to make this configuration work and then downloads and installs them from the Terraform registry.
This is a one-time activity. As long as new providers are not introduced in the config, every subsequent execution of Terraform CLI commands will not require initialization. If the new providers are introduced, Terraform forces reinitialization, which installs the additional provider modules.
If we remember any provider configuration we have written, we always mention the required_providers block within the terraform block. Conventionally, we find this block in the provider.tf config file.
The example below shows that the rest of the configuration depends on only one AWS provider. We also specify the version of the corresponding AWS provider that instructs Terraform to download the appropriate source code.
terraform {
  required_providers {
    aws = {
      source   = "hashicorp/aws"
      version  = "~> 4.18.0"
    }
  }
}
Terraform public vs. private registry
Unlike the public registry, resources published to the Terraform private registry are not publicly accessible. Private resources are generally published and accessed from this private registry, based on RBAC, with everything else working in the same way as the public one.
We will discuss the Terraform private registry later in the article.
Terraform registry is also used for other purposes, as discussed in this section.
Providers
The Terraform registry is a repository of cloud provider modules. We can find the providers for all the major cloud providers and any other cloud providers who wish to support their infrastructure provisioning using Terraform.
The Terraform providers are classified into three different tiers.
- Official – Providers that are developed, maintained, and owned by Hashicorp. For example: AWS, Azure, GCP, Kubernetes, etc.
- Partner – Providers that are developed, maintained, owned, and published by other organizations on the Terraform Registry. These provider modules have undergone a thorough onboarding process and are actively supported by Hashicorp.
- Community – These providers are developed, maintained, owned, and contributed to the Terraform registry by individual contributors. The contributions made may be public or private.
One of the purposes of the Terraform Registry is to provide documentation and support to developers who are using these provider modules in their projects. Thus, all provider documentation contains in-depth information regarding how that module and the related resources are supposed to be used. This includes the required and non-mandatory parameters.
As mentioned earlier, you can publish your own Terraform provider on the Terraform registry for others to use. We will shed some light on this later in this blog post.
Modules
We use modules in Terraform configurations mainly to follow the DRY principle – avoid writing the same configuration multiple times or promoting the reuse of Terraform configurations. Modules are also a way to share the infrastructure designs using the Terraform registry.
In any Terraform project, the configuration files included in the subdirectories are not processed by the Terraform execution workflow. The sub-directories are treated as individual modules and are supposed to be imported into one of the config files in the project root directory.
The Terraform registry also acts as the repository of reusable modules. It is possible to publish a module publicly or privately.
Similar to provider configurations, modules are also declared in Terraform configuration by specifying their source and version.
In the example below, we are trying to use the AWS VPC module with version 3.19.0. When we use this module in such a way, it readily helps us provision a VPC with default values (CIDR ranges, etc.). Thus, by reusing the AWS VPC config, we are able to save quite some development bandwidth.
module "vpc" {
  source  = "terraform-aws-modules/vpc/aws"
  version = "3.19.0"
}
When we declare a “module” block, Terraform understands this and downloads the corresponding module source code (Terraform configuration) in a sub-directory of the project root. Remember that the modules may, in turn, contain submodules.
Along with hosting these modules to support initializations in Terraform workflows, Terraform also provides documentation around these modules. The specific way to pass and retrieve input and output variables when working with modules is outlined in the documentation.
Organizations may choose to standardize their infrastructure provisioning process with appropriate security controls ingrained in the approved modules.
We have discussed using the already published providers and modules in our Terraform configurations. The discussion was mainly geared from a developer’s perspective. However, it is also possible to publish these modules and providers to the Terraform registry so that others, within or outside the team, are able to use them
We need to have a Terraform Cloud account to publish any type of resource to the Terraform registry. There are standards, specific procedures, and conventions in place that enable us to do this.
Publishing a provider
Organizations wanting to extend their products’ support using Terraform are required to create and publish a provider plugin on the Terraform registry. The plugin is then available for developers all over the internet to start building products on the organization’s platform.
Typically, organizations that offer cloud infrastructure services, orchestration, containerization, CI/CD, monitoring, automation, etc., require these plugins to extend the accessibility of their products via IaC. For example, the Spacelift Terraform provider is available in the registry.
Terraform provider plugins are developed using Terraform’s Go SDK. The SDK is used to interpret the given Terraform configuration and perform appropriate provisioning actions (CRUD operations), via the API interface exposed by the organizations.
Once the plugin is published, it can be used by the developers in the same way they do for other providers. Each provider block specifies the required_plugin block, which gives information about the right provider plugin to download.
Terraform Plugin Framework
To develop a Terraform provider, you need to follow the Terraform Plugin Framework. This framework is a package of provider servers, various abstractions like providers and resources, data sources, schemas, etc. The process of developing a provider also involves embedding bits of documentation throughout the development process, which are then rendered appropriately on the registry when published.
Publishing modules
To publish a Terraform module you have to follow the steps below:
- Create your Terraform module configuration.
- Create a GitHub repository for your module in the following format – terraform-<Provider_Name>-<Module_Name>.
- Push the content of your module configuration to the created repository.
- Create a tag for your repository.
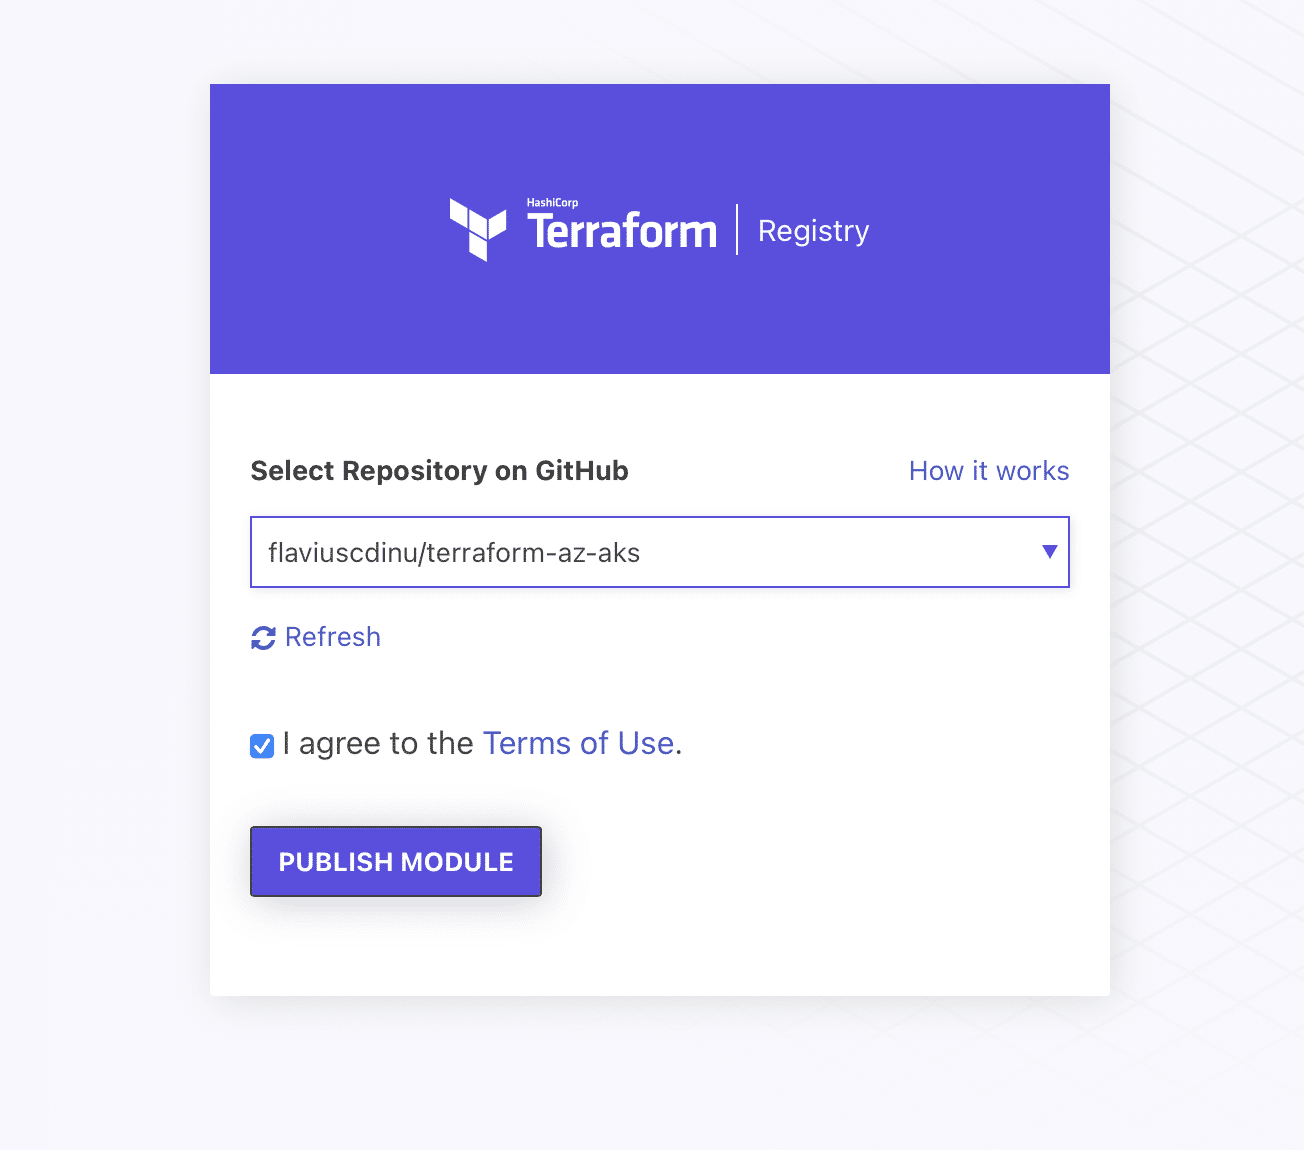
- Go to the Terraform registry and sign in with GitHub.
- Click on publish and select module.
- Select that GitHub repository.
- Success, your module has been published!
For this example, I will use an existing module called terraform-az-aks, which can be found here. This module is in charge of creating an Azure Kubernetes cluster. I already have a tag created for it (1.0.0).

Now, I am on the registry page, already logged in with my GitHub account. Here, I will select the Publish → Module option.
In the next step, I will select the repository containing the AKS module:
After you click on the Publish Module button and wait for a couple of seconds, the module will be published:
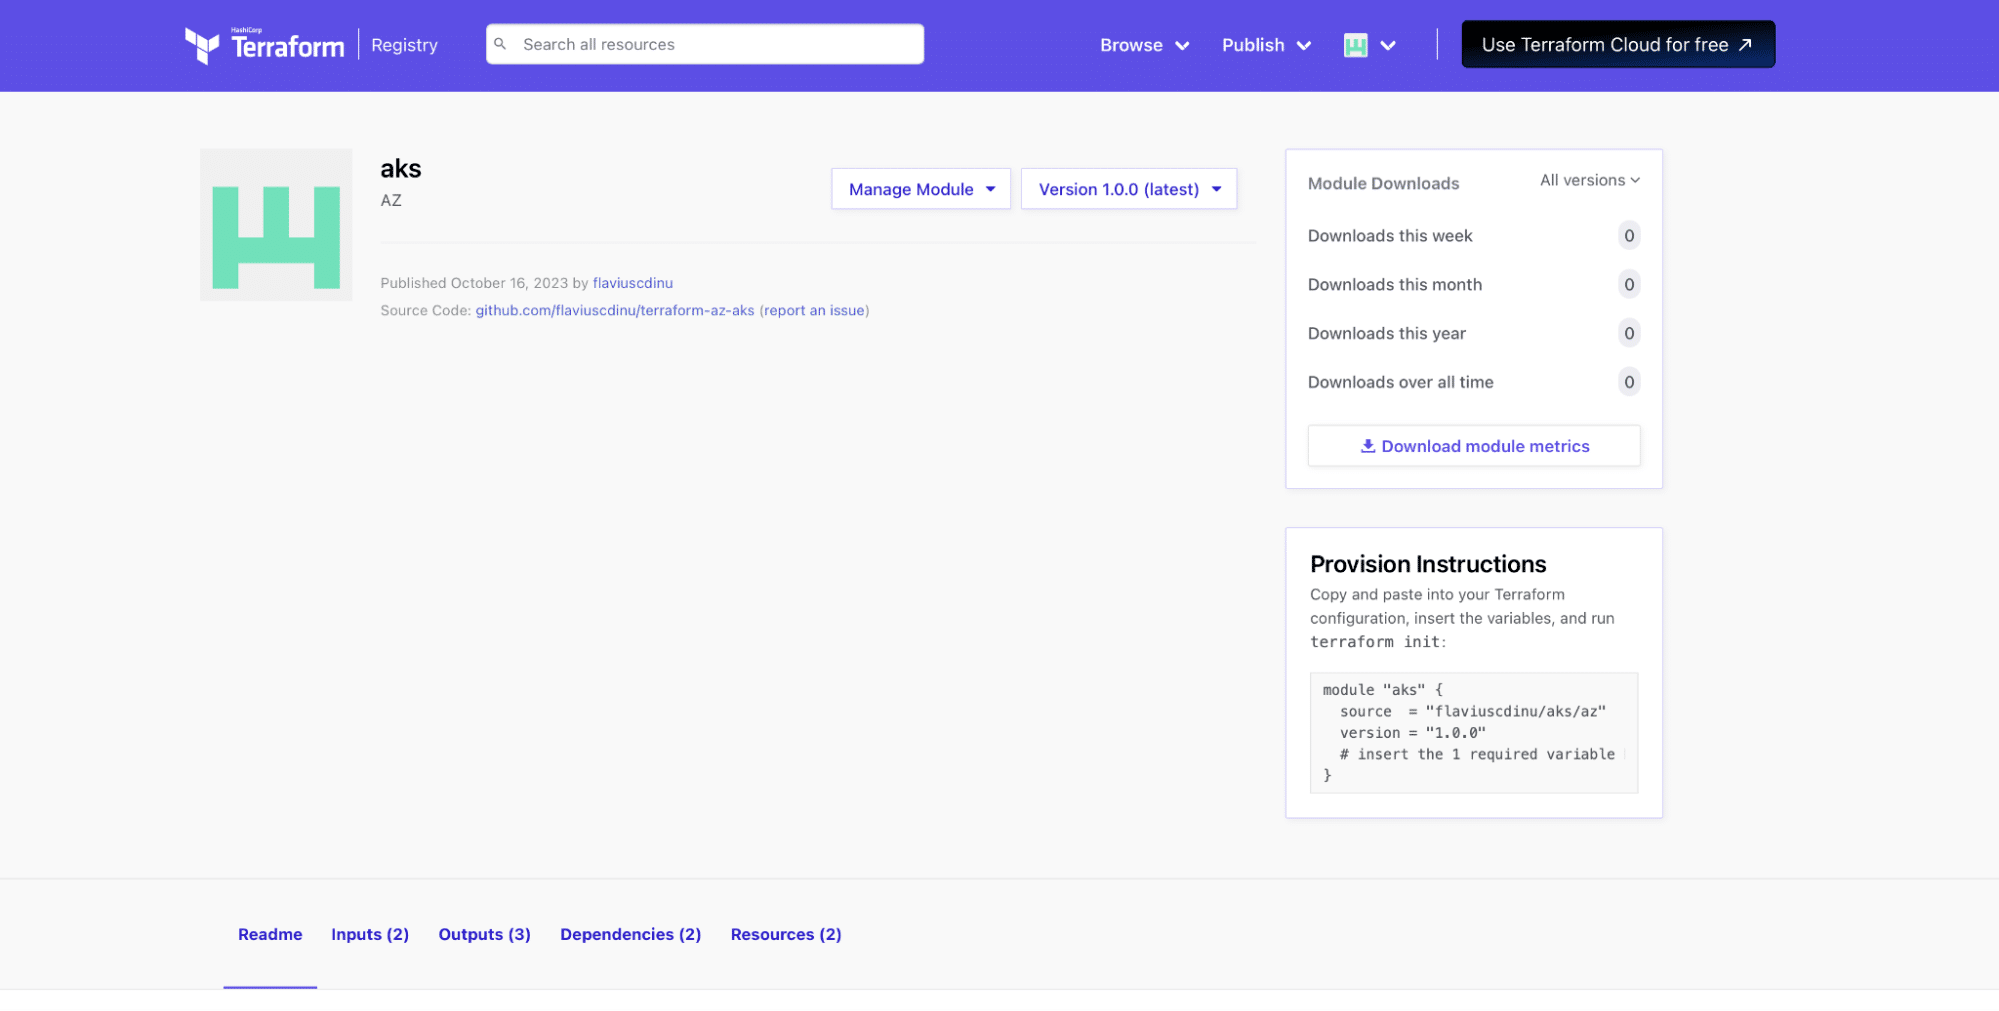
On this page, you will see all the inputs you can provide, outputs, dependencies, and the resources used in your configuration. You also get download statistics and instructions on how to use the module per se.
To see how to use the Terraform registry in practice, we will go through an example of using a module from a public registry.
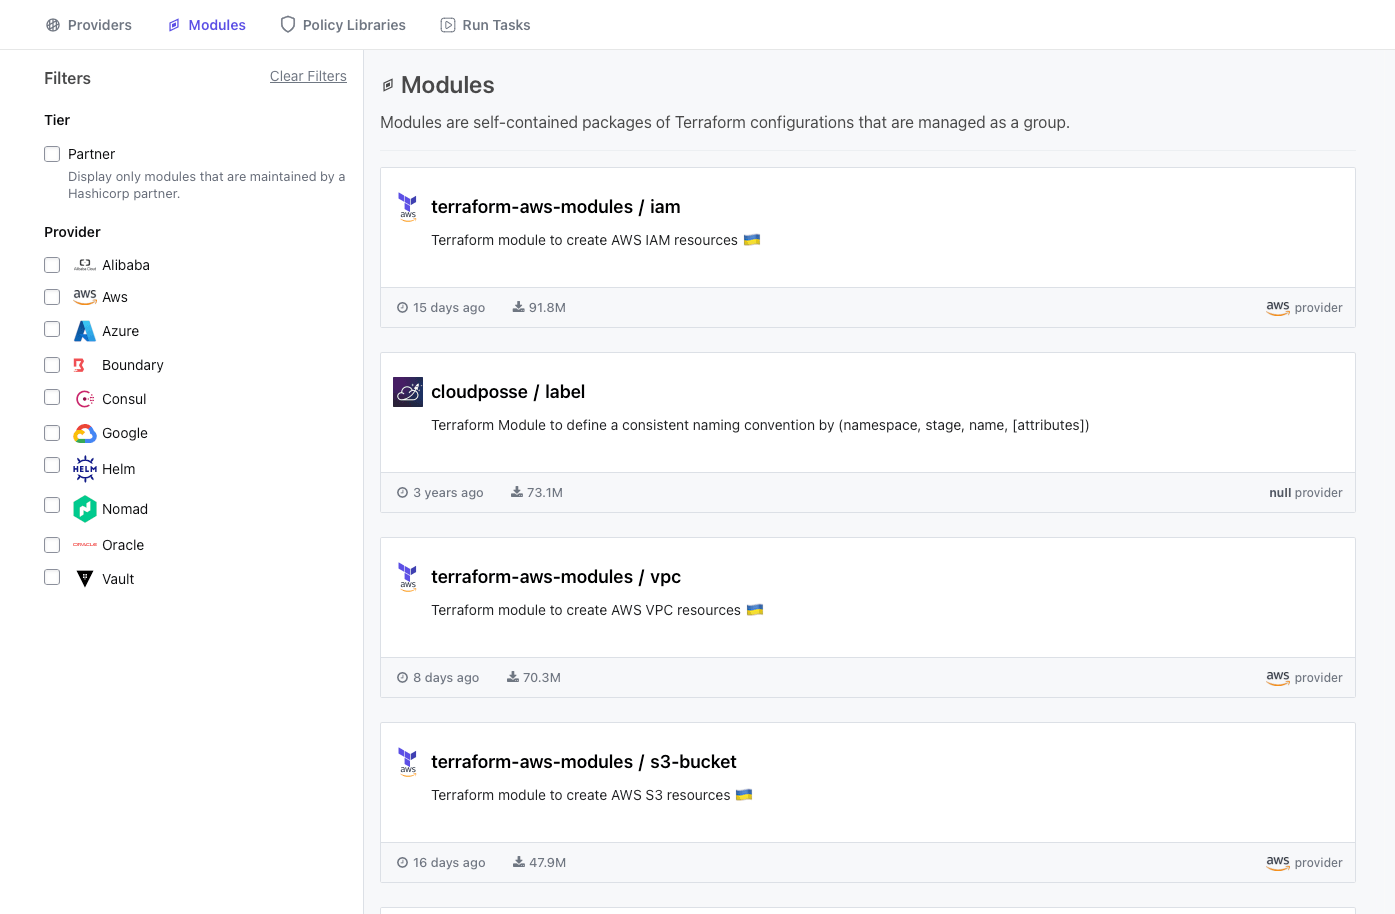
1. Find a module in the registry
To use a module from Terraform’s public registry, you first need to go to its page in the registry. Here, you can filter modules by provider and tier and even search for a module:
2. Select a module
Next, select a module you are interested in and click on it. This will redirect you to the module page:
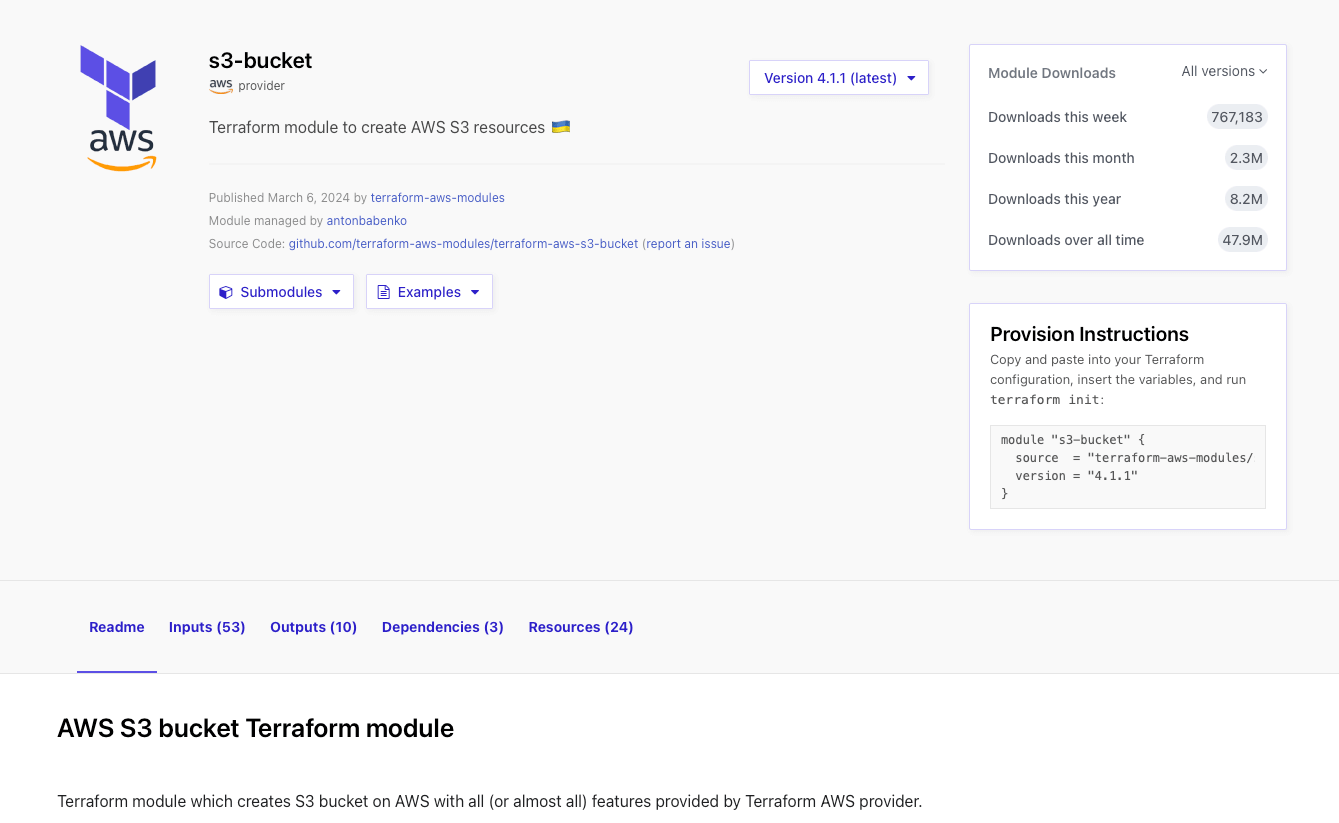
In all module pages, you will see a Readme tab, all the inputs the module has (and also if they are required or not), what outputs are defined, how many dependencies has, and also how many resources it creates. Also, on the right-hand side, you have statistics about the modules, and in addition to that you have the provision instructions which tell you how to use the module.
3. Configure the module in Terraform
Let’s create a configuration based on this module. For that, I will define a main.tf file:
provider "aws" {
 region = "eu-west-1"
}

module "s3-bucket" {
 source  = "terraform-aws-modules/s3-bucket/aws"
 version = "4.1.1"
}
In this file, I’ve added the provider, and I’ve copied the provision instructions.
4. Review the inputs
Now, our work is not yet done. We still need to check the inputs and see if any of the variables are required. Luckily for us, all variables are optional, so we can run a terraform init directly to download the module:
terraform init

Initializing the backend...
Initializing modules...
Downloading registry.terraform.io/terraform-aws-modules/s3-bucket/aws 4.1.1 for s3-bucket...
- s3-bucket in .terraform/modules/s3-bucket

Initializing provider plugins...
- Finding hashicorp/aws versions matching ">= 5.27.0"...
- Installing hashicorp/aws v5.42.0...
- Installed hashicorp/aws v5.42.0 (signed by HashiCorp)

Terraform has created a lock file .terraform.lock.hcl to record the provider
selections it made above. Include this file in your version control repository
so that Terraform can guarantee to make the same selections by default when
you run "terraform init" in the future.

Terraform has been successfully initialized!

You may now begin working with Terraform. Try running "terraform plan" to see
any changes that are required for your infrastructure. All Terraform commands
should now work.

If you ever set or change modules or backend configuration for Terraform,
rerun this command to reinitialize your working directory. If you forget, other
commands will detect it and remind you to do so if necessary.
5. Run terraform plan
Now let’s run a terraform plan and see what happens:
terraform plan
module.s3-bucket.data.aws_region.current: Reading...
module.s3-bucket.data.aws_caller_identity.current: Reading...
module.s3-bucket.data.aws_partition.current: Reading...
module.s3-bucket.data.aws_region.current: Read complete after 0s [id=eu-west-1]
module.s3-bucket.data.aws_partition.current: Read complete after 0s [id=aws]
module.s3-bucket.data.aws_caller_identity.current: Read complete after 0s [id=094873932114]

Terraform used the selected providers to generate the following execution plan. Resource actions are indicated with the following symbols:
  + create

Terraform will perform the following actions:

  # module.s3-bucket.aws_s3_bucket.this[0] will be created
  + resource "aws_s3_bucket" "this" {
      + acceleration_status         = (known after apply)
      + acl                         = (known after apply)
      + arn                         = (known after apply)
      + bucket                      = (known after apply)
      + bucket_domain_name          = (known after apply)
      + bucket_prefix               = (known after apply)
      + bucket_regional_domain_name = (known after apply)
      + force_destroy               = false
      + hosted_zone_id              = (known after apply)
      + id                          = (known after apply)
      + object_lock_enabled         = false
      + policy                      = (known after apply)
      + region                      = (known after apply)
      + request_payer               = (known after apply)
      + tags_all                    = (known after apply)
      + website_domain              = (known after apply)
      + website_endpoint            = (known after apply)
    }

  # module.s3-bucket.aws_s3_bucket_public_access_block.this[0] will be created
  + resource "aws_s3_bucket_public_access_block" "this" {
      + block_public_acls       = true
      + block_public_policy     = true
      + bucket                  = (known after apply)
      + id                      = (known after apply)
      + ignore_public_acls      = true
      + restrict_public_buckets = true
    }

Plan: 2 to add, 0 to change, 0 to destroy.
By default, the module creates an S3 bucket and a bucket public access block. This can be customized to your needs, by modifying the input variables, and you can also fork the repository and bring changes to the module to fully customize its behavior.
The Terraform private registry allows you to publish private resources that won’t be publicly accessible. Some products have a built-in private registry, such as Spacelift and Terraform Cloud, and the most common use case for these registries is to host modules and providers.
In the same way, organizations protect their proprietary code; they will also do it for their proprietary modules and providers, but irrespective of the reasons you’d need to use a private registry, you can establish a secure and efficient workflow by doing so.
The entire discussion around accessing the provider plugins, modules, Sentinel policies, and run tasks has assumed until now that these resources are available publicly on the Terraform registry. They must be public to use them to successfully develop a Terraform configuration. Otherwise, if access to the respective provider plugin is lost, the workflow cannot progress.
However, organizations often need to protect the proprietary providers, modules, and policies from public access. The Terraform Cloud enables the private publishing of resources, so organizations can control which teams can access these resources internally.
Using the privately published modules differs slightly from using public modules in a configuration. This is attributed to the Terraform Cloud API, which explains how the source attribute needs to be specified with reference to the organization.
For full control, Terraform Enterprise offers a self-hosted installation of Terraform Cloud that also includes a private registry. Although the registry is private, it is still possible to make the publicly available plugins and modules available on the private registry as well.
Read more about Terraform Cloud pricing.
For those who use Spacelift to manage infrastructure using Terraform IaC, Spacelift provides a module registry for all the accounts belonging to all the tiers. This in-house registry is better integrated with Stacks – the way infrastructure is managed in Spacelift.
Publishing or creating a module in Spacelift is similar to the way Stacks are created by pointing to the tracked branch of the VCP where module configurations exist.
Using the Spacelift module registry involves the following steps:
- Declaring the module source
- Adding the module to your Spacelift account
- Deploying a version of that module
- Consuming that version
Spacelift’s module registry goes beyond the traditional approach offered by Terraform registry with features like:
- Testing – It is possible to set up automated test cases for the modules being published. Tests are performed by executing the plan-apply-destroy cycle with a given set of inputs in the form of variables. Multiple ordered test cases offer greater code coverage.
- Environment and context – Modules have their environment and contexts. However, it is also possible to pass values from the environment of the associated stacks in a module’s test cases.
- Versioning – Updating modules in Spacelift’s Module Registry follows semantic versioning scheme. New releases are well aligned with the common VCS, where it is completely flexible to follow the branching strategy of your choice.
- Single repo, multiple modules – By setting the correct project_root directory, it is possible to manage multiple modules using a single remote VCS repository.
- Automatic triggering of module consumers – The module registry is inbuilt, so Spacelift keeps track of new releases/updates on the modules. If a module being used is updated, Spacelift automatically triggers the run for the stack consuming it.
Spacelift’s Module Registry has much more to offer. This blog explains the usage of the module registry in-depth.
Apart from a module registry, Spacelift also offers a provider registry as well. If you are building providers for your custom application or even extending the functionality of an existing provider and need a place to host it and easily version it, Spacelift can help with that.
To create a provider in Spacelift, you have three options:
- Using Spacelift’s Terraform provider – this is the preferred option, as it will let you manage your provider declaratively. You also have the option to mark this provider as public, which will make it available to everyone if this is something you want.
- Using Spacelift’s GraphQL API – you can use the terraformProviderCreate mutation for that, read more about Spacelift’s API here.
- Create the provider manually from the UI – in-app, go to the Terraform registry, select provider, and then choose the Create provider option.
After this, you need to register a GPG key, as Terraform uses these to verify the authenticity of the provider. Read more about how to register a GPG key here.
Now that you’ve created your provider and you’ve registered your GPG key, you can set up your CI/CD tool to publish provider versions. You will first need to define a GoReleaser config:
builds:
  - env: ['CGO_ENABLED=0']
    flags: ['-trimpath']
    ldflags: ['-s -w -X main.version={{ .Version }} -X main.commit={{ .Commit }}']
    goos: [darwin, linux]
    goarch: [amd64, arm64]
    binary: '{{ .ProjectName }}_v{{ .Version }}'

archives:
  - format: zip
    name_template: '{{ .ProjectName }}_{{ .Version }}_{{ .Os }}_{{ .Arch }}'

checksum:
  name_template: '{{ .ProjectName }}_{{ .Version }}_SHA256SUMS'
  algorithm: sha256

signs:
  - artifacts: checksum
    args:
      - "--batch"
      - "--local-user"
      - "{{ .Env.GPG_FINGERPRINT }}"
      - "--output"
      - "${signature}"
      - "--detach-sign"
      - "${artifact}"

release:
  disable: true
The above setup assumes that your project name (repository) is terraform-provider-$name, but if it is not, you should hardcode the project name.
You will also need a Spacelift API key to communicate with your Spacelift account. Here’s how to create and use one.
Below you can see a GitHub Actions workflow definition for publishing providers from our repository, that uses the above GoReleaser.
name: release
on:
  push:

permissions:
  contents: write

jobs:
  goreleaser:
    runs-on: ubuntu-latest
    steps:
      - name: Checkout
        uses: actions/checkout@v4

      - name: Unshallow
        run: git fetch --prune --unshallow

      - name: Set up Go
        uses: actions/setup-go@v4
        with:
          go-version-file: 'go.mod'
          cache: true

      - name: Import GPG key
        uses: crazy-max/ghaction-import-gpg@v5
        id: import_gpg
        with:
          # The private key must be stored in an environment variable registered
          # with GitHub. The expected format is ASCII-armored.
          #
          # If you need to use a passphrase, you can populate it in this
          # section, too.
          gpg_private_key: ${{ secrets.GPG_PRIVATE_KEY }}

      - name: Install spacectl
        uses: spacelift-io/setup-spacectl@main
        env:
          GITHUB_TOKEN: ${{ secrets.GITHUB_TOKEN }}

      - name: Run GoReleaser
        # We will only run GoReleaser when a tag is pushed. Semantic versioning
        # is required, but build metadata is not supported.
        if: startsWith(github.ref, 'refs/tags/')
        uses: goreleaser/goreleaser-action@v5
        with:
          version: latest
          args: release --clean
        env:
          GPG_FINGERPRINT: ${{ steps.import_gpg.outputs.fingerprint }}

      - name: Release new version
        if: startsWith(github.ref, 'refs/tags/')
        env:
          GPG_KEY_ID: ${{ steps.import_gpg.outputs.keyid }}

          # This is the URL of the Spacelift account hosting the provider.
          SPACELIFT_API_KEY_ENDPOINT: https://youraccount.app.spacelift.io

          # This is the ID of the API key you generated earlier.
          SPACELIFT_API_KEY_ID: ${{ secrets.SPACELIFT_API_KEY_ID }}

          # This is the secret of the API key you generated earlier.
          SPACELIFT_API_KEY_SECRET: ${{ secrets.SPACELIFT_API_KEY_SECRET }}
        run: # Don't forget to change the provider type!
          spacectl provider create-version --type=TYPE-change-me!!!
Using providers from Spacelift’s private registry is similar to the process of using providers from a public registry. In the terraform block, you need to specify your spacelift account as the source similar to this:
terraform {
  required_providers {
    yourprovider = {
      source  = "spacelift.io/your-org/yourprovider"
    }
  }
}
If you are using these providers inside Spacelift, all runs in the stacks that belong to a provider’s space will be able to read the details from the Spacelift registry. In the case of using providers outside of Spacelift, you will either need to log in interactively if you want to use them on your machine, or you can use an API key for your automations.
Given the plugin-oriented design, the Terraform registry is an integral part of any Terraform workflow. In this post, we have explored its importance and examined various types of available resources.
The Terraform registry is well integrated with Terraform Cloud. Apart from the publicly available provider plugins and modules, it is also possible to publish proprietary modules privately. Terraform Enterprise takes privacy to the next level of self-hosting the Terraform Cloud on-premise.
The core of the communication between various entities, like the Terraform host, cloud, registry, etc., is based on the Registry API. Any installation capable of understanding the registry API can communicate with other Terraform hosts bi-directionally. This is an important point that requires understanding, especially in the case of Enterprise installation.
Note: New versions of Terraform are placed under the BUSL license, but everything created before version 1.5.x stays open-source. OpenTofu is an open-source version of Terraform that expands on Terraform’s existing concepts and offerings. It is a viable alternative to HashiCorp’s Terraform, being forked from Terraform version 1.5.6.
Manage Terraform Better with Spacelift
Build more complex workflows based on Terraform using policy as code, programmatic configuration, context sharing, drift detection, resource visualization and many more.


Terraform Modules Cheatsheet
Grab our ultimate cheat sheet PDF to master building reusable Terraform modules!