The entire network architecture of any cloud-based service is based on a virtual private cloud (VPC). AWS VPCs offer the required network segregation and enable security by efficiently managing aspects like subnets, routing, firewalls, DHCP, etc.
Cloud network design and architecture is a vast field and requires knowledge about networking. However, thanks to the abstractions provided by AWS, we don’t have to dig deep into the internal workings of networking devices.
In this post, we discuss how to develop a basic AWS VPC using Terraform.
There are several considerations to be made while building a VPC for any project. Let’s start to build our VPC from the ground up using Terraform.
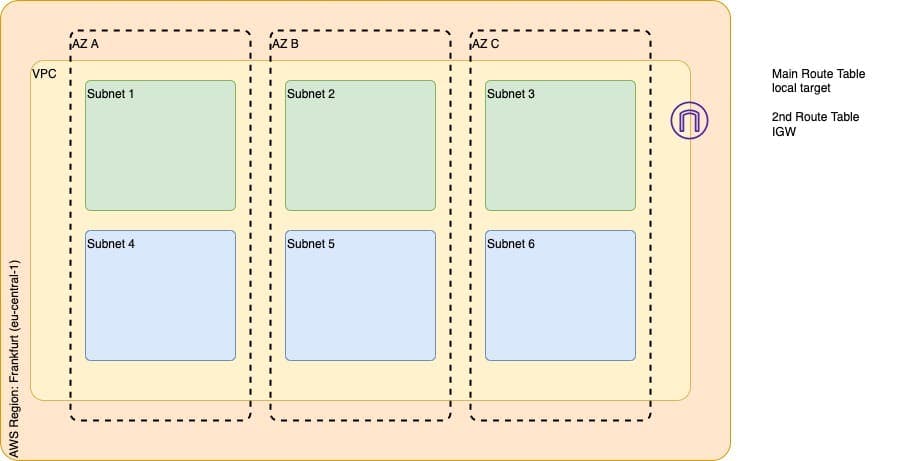
The image above represents a basic target VPC design that consists of the following components.
- VPC in eu-central-1 zone
- 1 Internet Gateway
- 3 Public Subnets, one in each AZ
- 3 Private Subnets, one in each AZ
- Route Table configurations (main and 2nd)
A VPC spans all the Availability Zones (AZ) in a region. It is always associated with a CIDR range (both IPv4 and IPv6) which defines the number of internal network addresses that may be used internally.
Within the VPC, we create subnets that are specific to AZs. It is possible to have multiple subnets in the same AZ. The purpose of subnets is to internally segregate resources contained in the VPC in every AZ. AWS Regions consist of multiple Availability Zones for DR purposes.
When a VPC is created, a corresponding Route Table is also created, which defines a default route that lets the components in the VPC communicate with each other internally. The route table thus created is called the main route table.
Our architecture contains two types of subnets – public and private. Public subnets enable internet access for the components hosted within them, while private subnets don’t. Routes in the route tables drive the decision to enable or disable internet access. When a subnet is associated with a route table that allows internet access, it is called a public subnet. Whereas the subnet associated with the route table that does not allow internet access is called private subnet.
An internet gateway is deployed and associated with the VPC to enable internet traffic within the VPC’s public subnets. Only one internet gateway can be associated with each VPC. Owing to this, and the fact that there is usually a default internet address (0.0.0.0/0) pointing to the internet gateway, as a best practice, it is recommended to create a second route table.
Thus apart from the main route table, our architecture consists of a second route table to which public subnets are explicitly associated. With this as the background, let us start building this VPC design from scratch.
To begin with, let us start by defining our VPC resource in Terraform. To specify a range of IP addresses in a VPC, a CIDR block needs to be provided. We have also provided a Name tag for identification.
resource "aws_vpc" "main" {
cidr_block = "10.0.0.0/16"
tags = {
Name = "Project VPC"
}
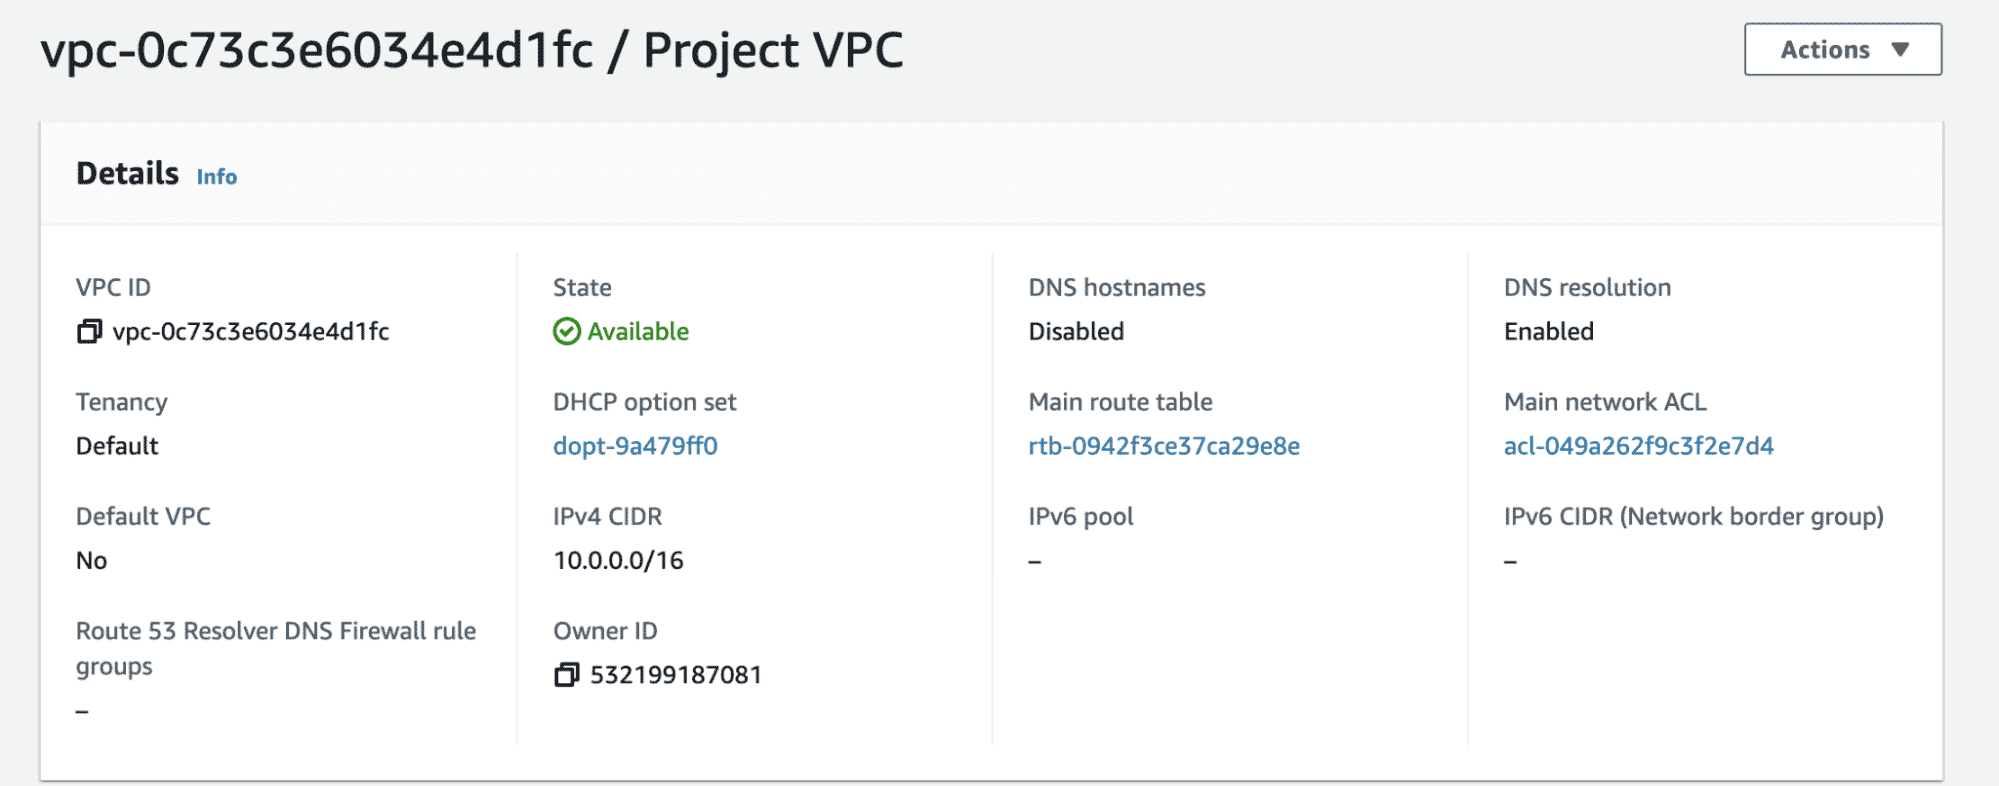
}Just by applying this configuration, since we are creating a VPC – a main Route table, and main Network ACL is also created. The VPC is also associated with a pre-existing DHCP option set, as shown in the below screenshot. We will take note of this as we will need this information later.
The VPC exists across all the Availability Zones in a region. While subnets are associated with a single AZ. The Frankfurt (eu-central-1) region has three AZs, and we need one public and one private subnet in each AZ as per the diagram.
Firstly, we identify the CIDR ranges to be associated with the six new subnets we need to create. In our example, based on the CIDR range of the VPC I have identified the CIDR ranges and defined a couple of variables in our Terraform code (variables.tf).
variable "public_subnet_cidrs" {
 type        = list(string)
 description = "Public Subnet CIDR values"
 default     = ["10.0.1.0/24", "10.0.2.0/24", "10.0.3.0/24"]
}

variable "private_subnet_cidrs" {
 type        = list(string)
 description = "Private Subnet CIDR values"
 default     = ["10.0.4.0/24", "10.0.5.0/24", "10.0.6.0/24"]
}
The above variables define a list of strings that essentially hold the CIDR ranges for each subnet. The two variables represent different lists of CIDR ranges for public and private subnets.
See also: Terraform Cidrsubnet Function Explained with Examples
Back to our main.tf file, it is now time to write the configuration for subnets. The resource blocks below define the required public and private subnets.
resource "aws_subnet" "public_subnets" {
 count      = length(var.public_subnet_cidrs)
 vpc_id     = aws_vpc.main.id
 cidr_block = element(var.public_subnet_cidrs, count.index)

 tags = {
   Name = "Public Subnet ${count.index + 1}"
 }
}

resource "aws_subnet" "private_subnets" {
 count      = length(var.private_subnet_cidrs)
 vpc_id     = aws_vpc.main.id
 cidr_block = element(var.private_subnet_cidrs, count.index)

 tags = {
   Name = "Private Subnet ${count.index + 1}"
 }
}
Creating separate resource blocks for public and private subnets gives us the flexibility to manage them in Terraform IaC. Since we have subnet CIDRs in the form of a list of strings, we have leveraged the length property to create a corresponding number of subnets. Let us apply this configuration and verify the same.
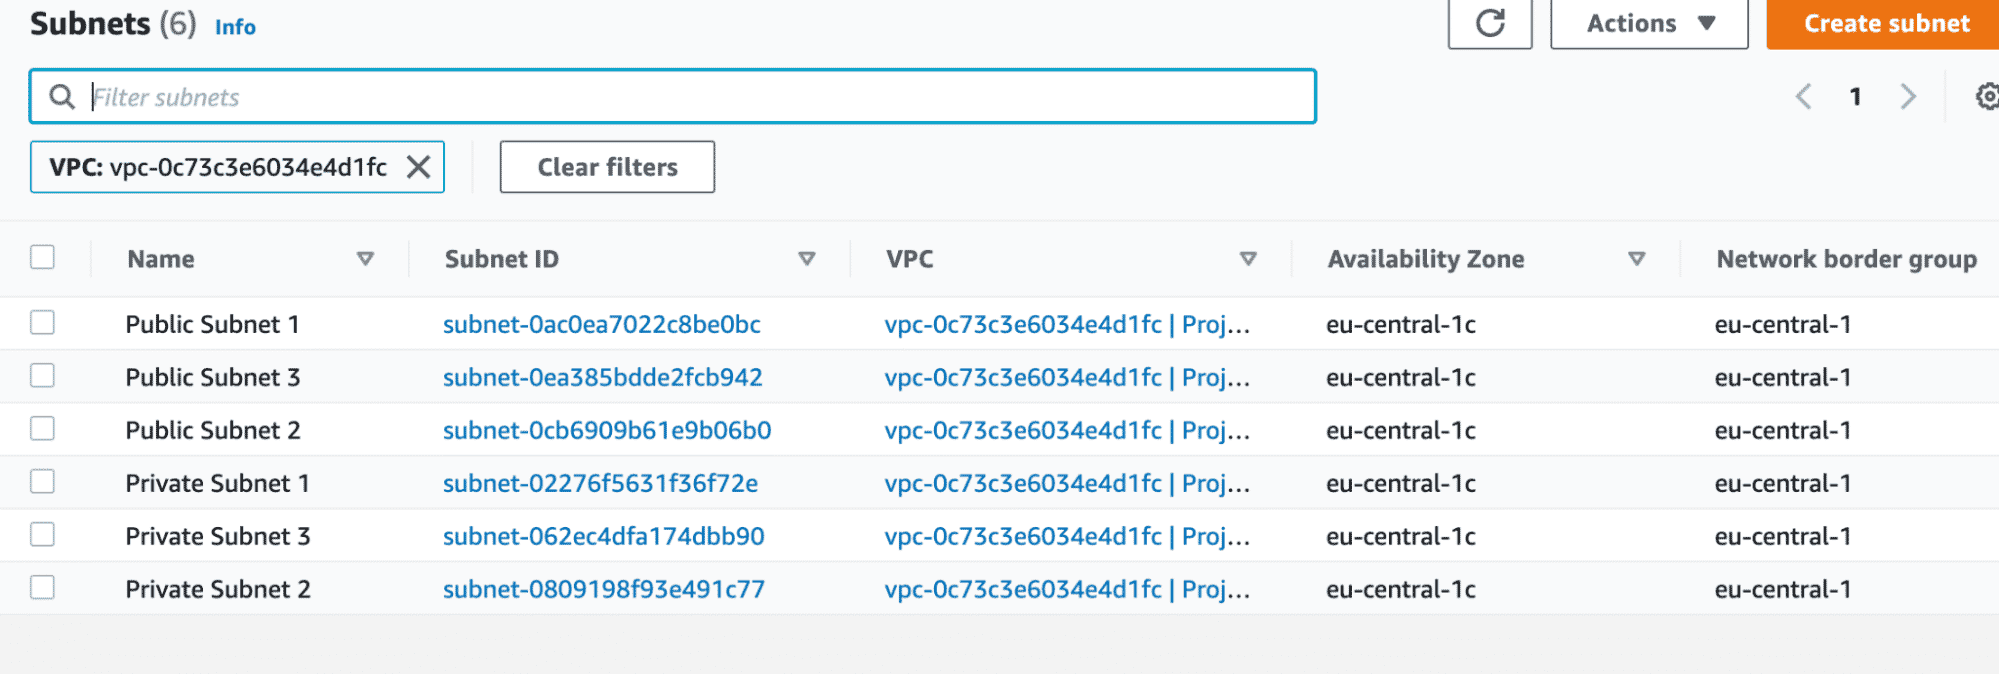
As we can see from the above screenshot, we have successfully created six subnets (three private and three public). However, all of them are placed in the same Availability zone. This is not as per the requirement represented in the diagram.
To tackle this situation, we create another variable to store the list of availability zones as below.
variable "azs" {
 type        = list(string)
 description = "Availability Zones"
 default     = ["eu-central-1a", "eu-central-1b", "eu-central-1c"]
}
In our subnet resource blocks, we use this variable to map each public and private subnet across these availability zones, as shown below.
resource "aws_subnet" "public_subnets" {
 count             = length(var.public_subnet_cidrs)
 vpc_id            = aws_vpc.main.id
 cidr_block        = element(var.public_subnet_cidrs, count.index)
 availability_zone = element(var.azs, count.index)

 tags = {
   Name = "Public Subnet ${count.index + 1}"
 }
}

resource "aws_subnet" "private_subnets" {
 count             = length(var.private_subnet_cidrs)
 vpc_id            = aws_vpc.main.id
 cidr_block        = element(var.private_subnet_cidrs, count.index)
 availability_zone = element(var.azs, count.index)

 tags = {
   Name = "Private Subnet ${count.index + 1}"
 }
}
Apply this configuration and verify the same.
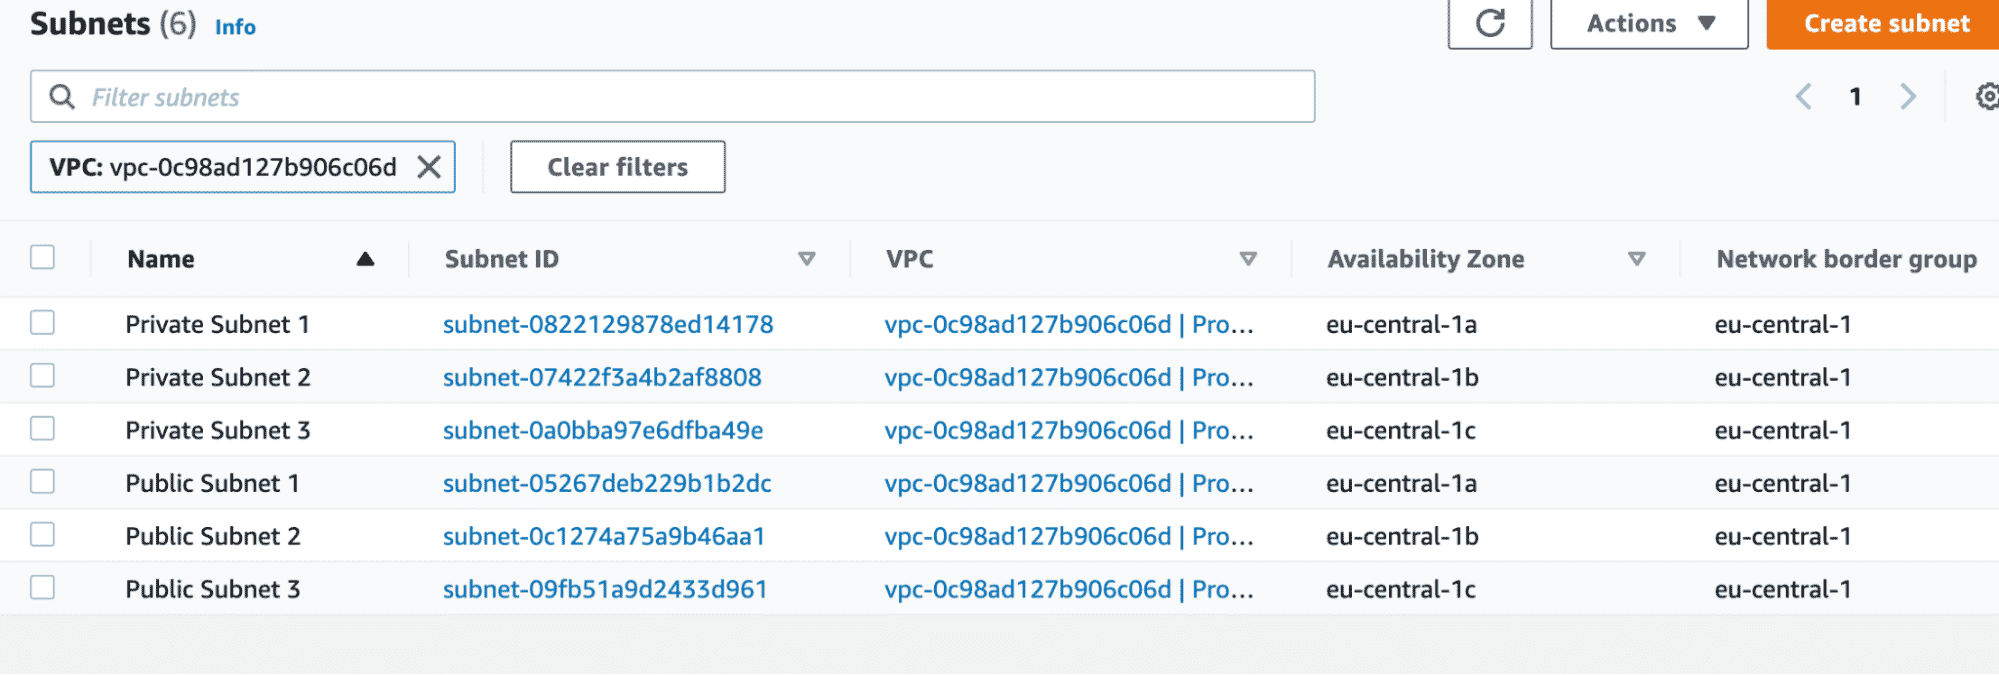
As you can see from the above screenshot, the subnets are now spread across all the availability zones evenly.
Please note that I have rebuilt the VPC, but even if you apply the AZ changes on the existing configuration, you will see a similar output shown above.
Since we have to build public subnets, we need to provide access to the internet in the given VPC. For this, the first thing that we need is an internet gateway. The resource block below is the simplest way to create an internet gateway.
resource "aws_internet_gateway" "gw" {
vpc_id = aws_vpc.main.id
tags = {
Name = "Project VPC IG"
}
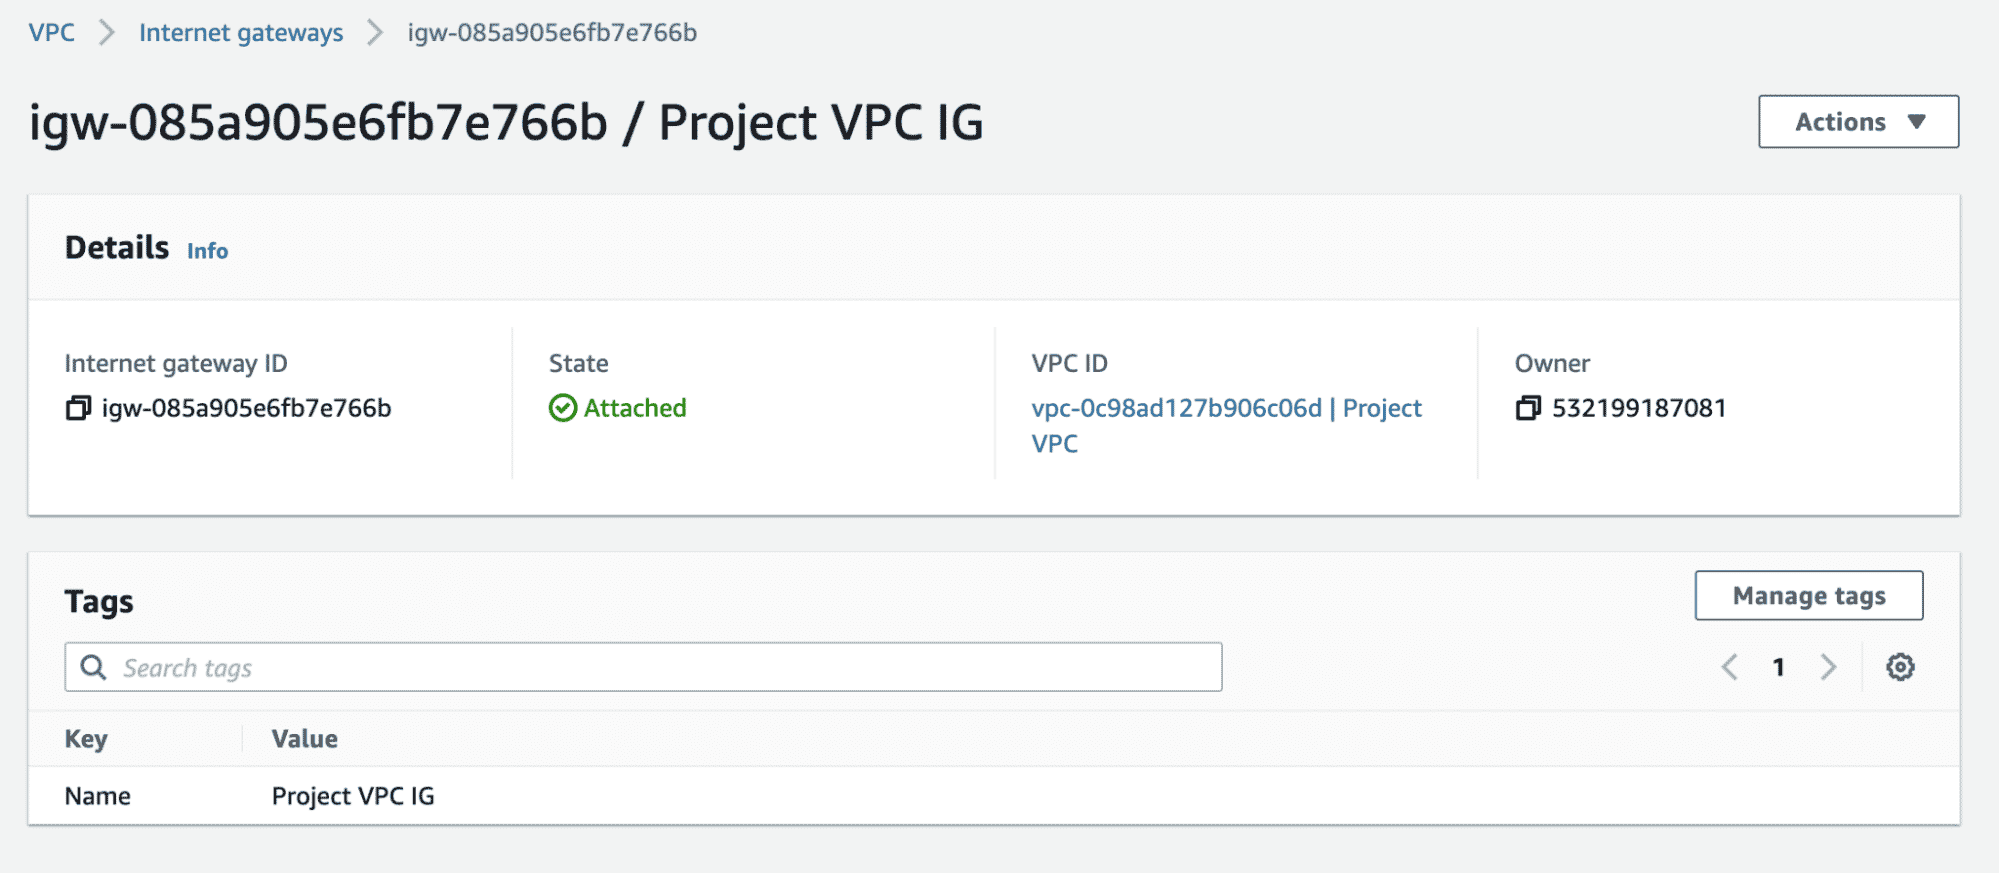
}We have already associated this IG with the VPC we created before by specifying the VPC id attribute. Apply this configuration and verify the same.
We already know that when a VPC is created, a main route table is created as well. The main route table is responsible for enabling the flow of traffic within the VPC.
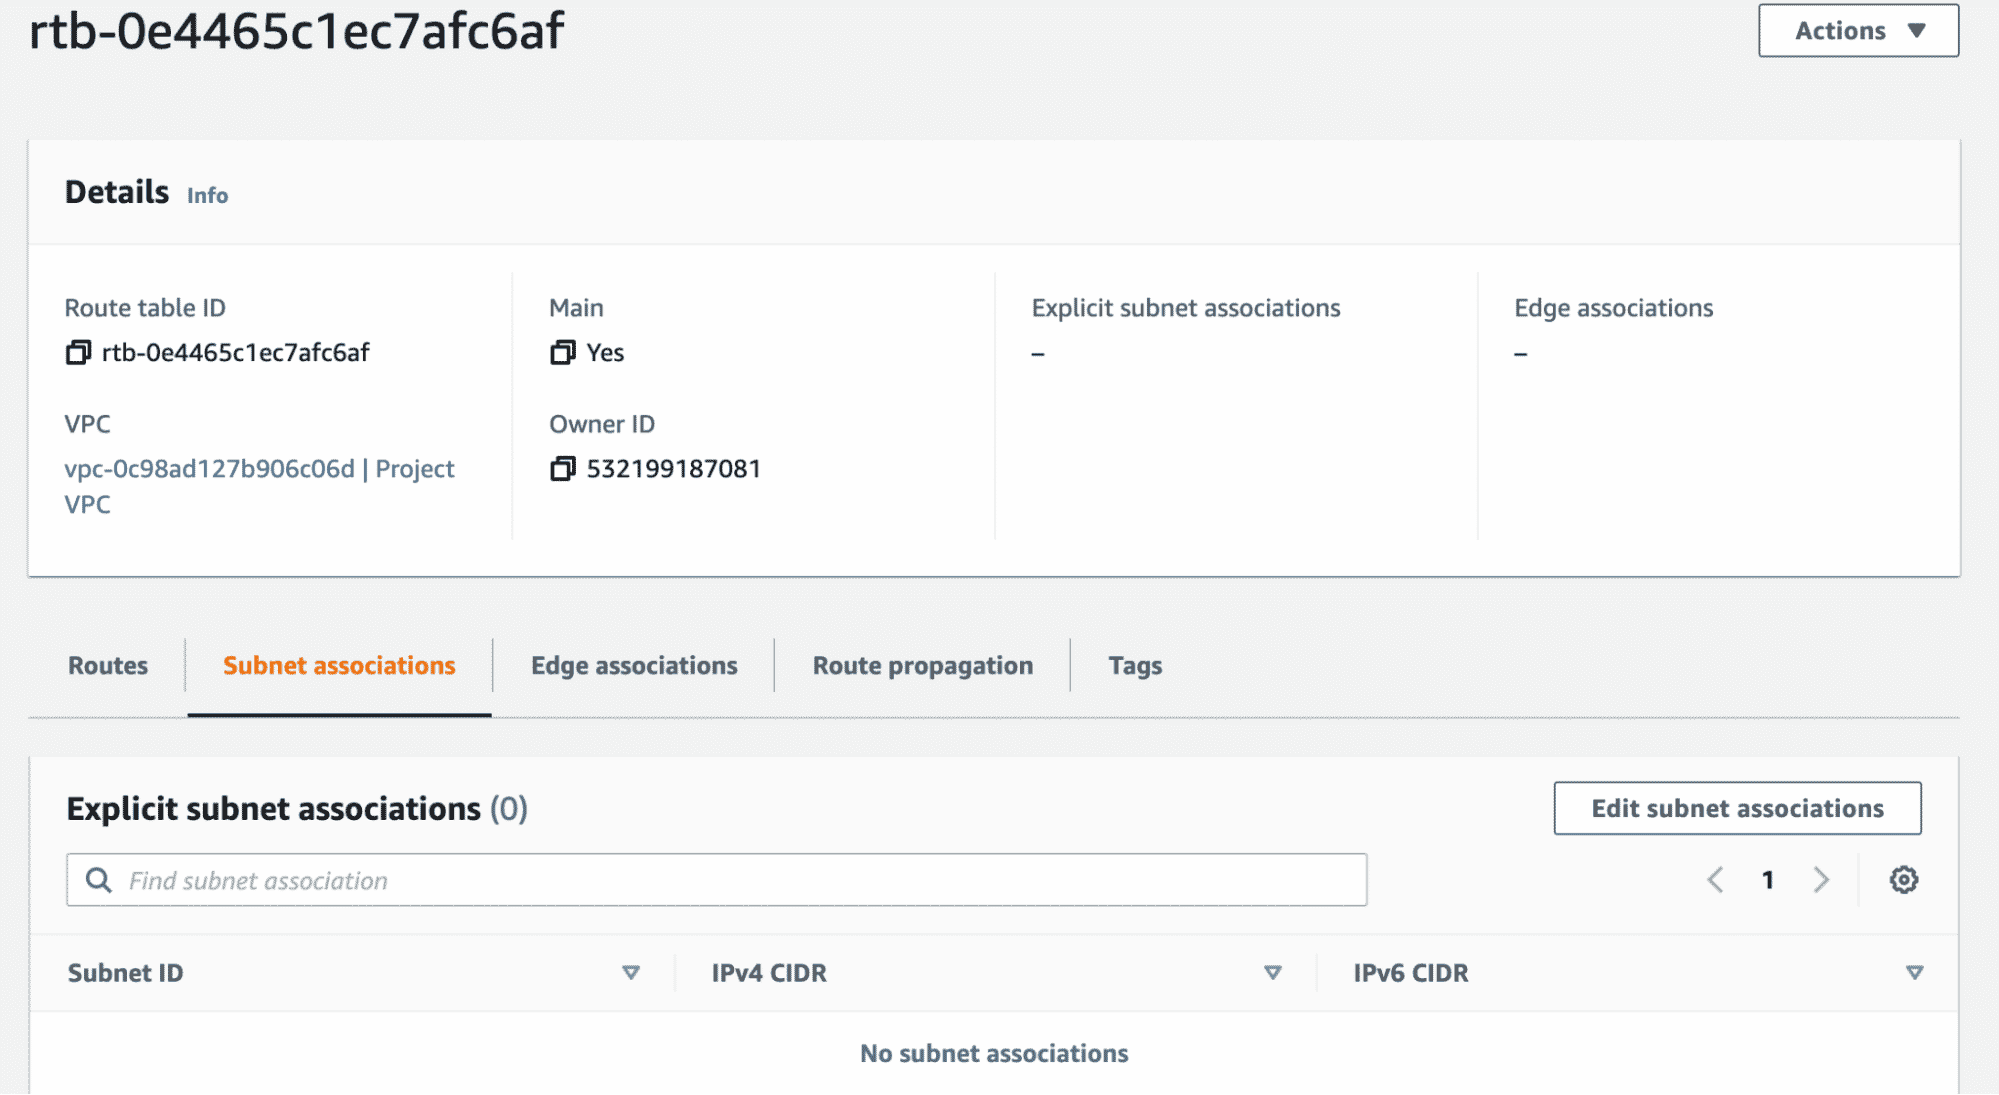
The screenshot above shows the main route table and that there is no explicit association of any subnet to this route table. However, if you scroll down, all the subnets are associated implicitly. This is the default setting.
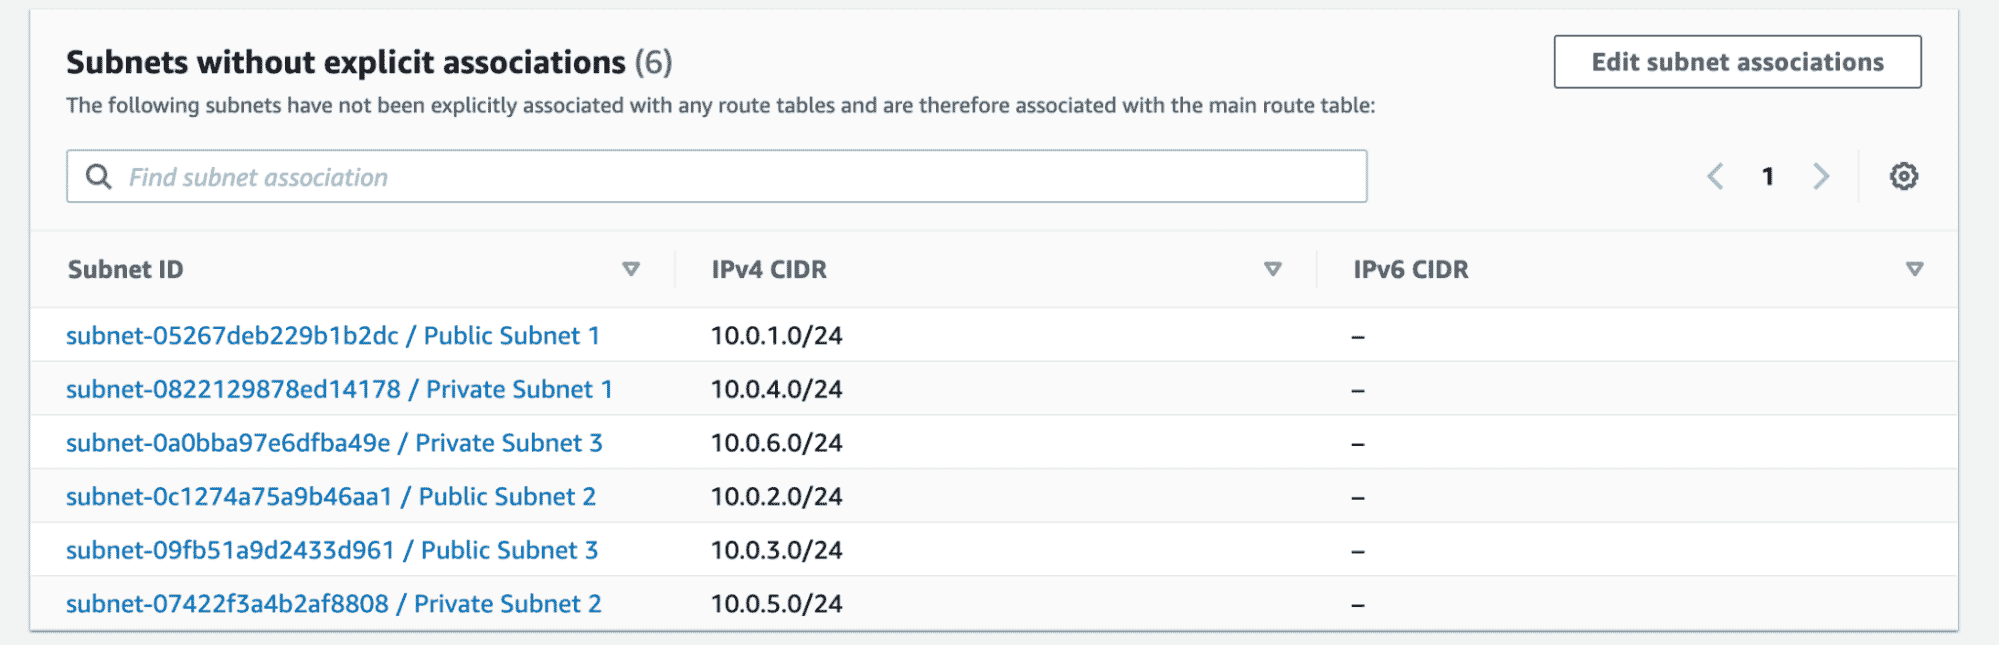
At this moment, even though the subnets are called Public and Private, they are all private. To make the subnets named “Public” public, we have to create routes using IGW which will enable the traffic from the Internet to access these subnets.
As a best practice, we create a second route table and associate it with the same VPC as shown in the below resource block. Note that we have also specified the route to the internet (0.0.0.0/0) using our IGW.
resource "aws_route_table" "second_rt" {
 vpc_id = aws_vpc.main.id

 route {
   cidr_block = "0.0.0.0/0"
   gateway_id = aws_internet_gateway.gw.id
 }

 tags = {
   Name = "2nd Route Table"
 }
}
Verify the creation of the second route table as below and the note the route that enables internet traffic.
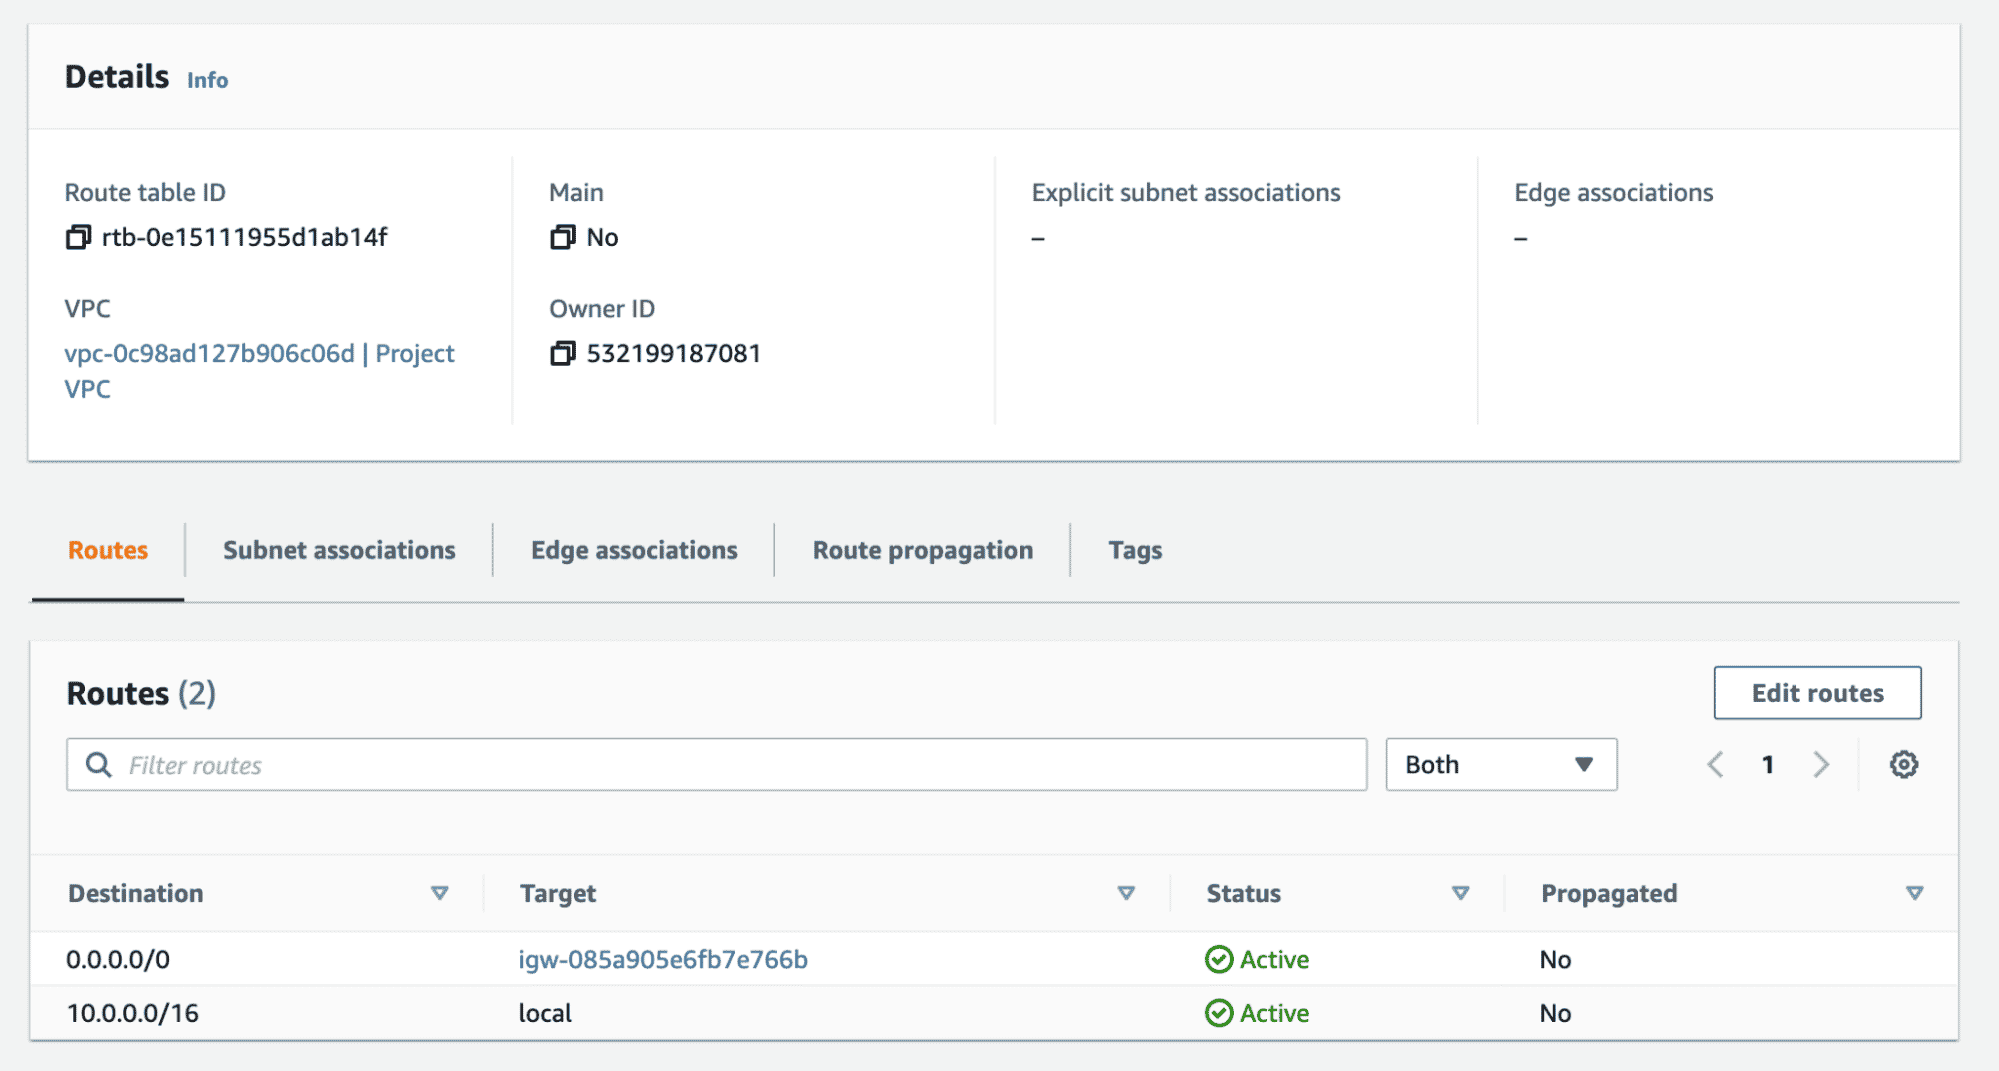
If we take a look at subnet associations for the second route table, it would look similar to the main route table. None of the subnets are explicitly associated in the second route table as well. In this situation, subnets follow the main route table.
We have to explicitly associate all the public subnets with the second route table to enable internet access on them. Add the Terraform configuration resource block below to do the same.
resource "aws_route_table_association" "public_subnet_asso" {
 count = length(var.public_subnet_cidrs)
 subnet_id      = element(aws_subnet.public_subnets[*].id, count.index)
 route_table_id = aws_route_table.second_rt.id
}
Here, we again rely on the length property of the public_subnet_cidrs variable to create the associations. Since we have three public subnets in our design, this configuration will create three corresponding associations of subnets and the second route table.
Apply this configuration and verify the same.
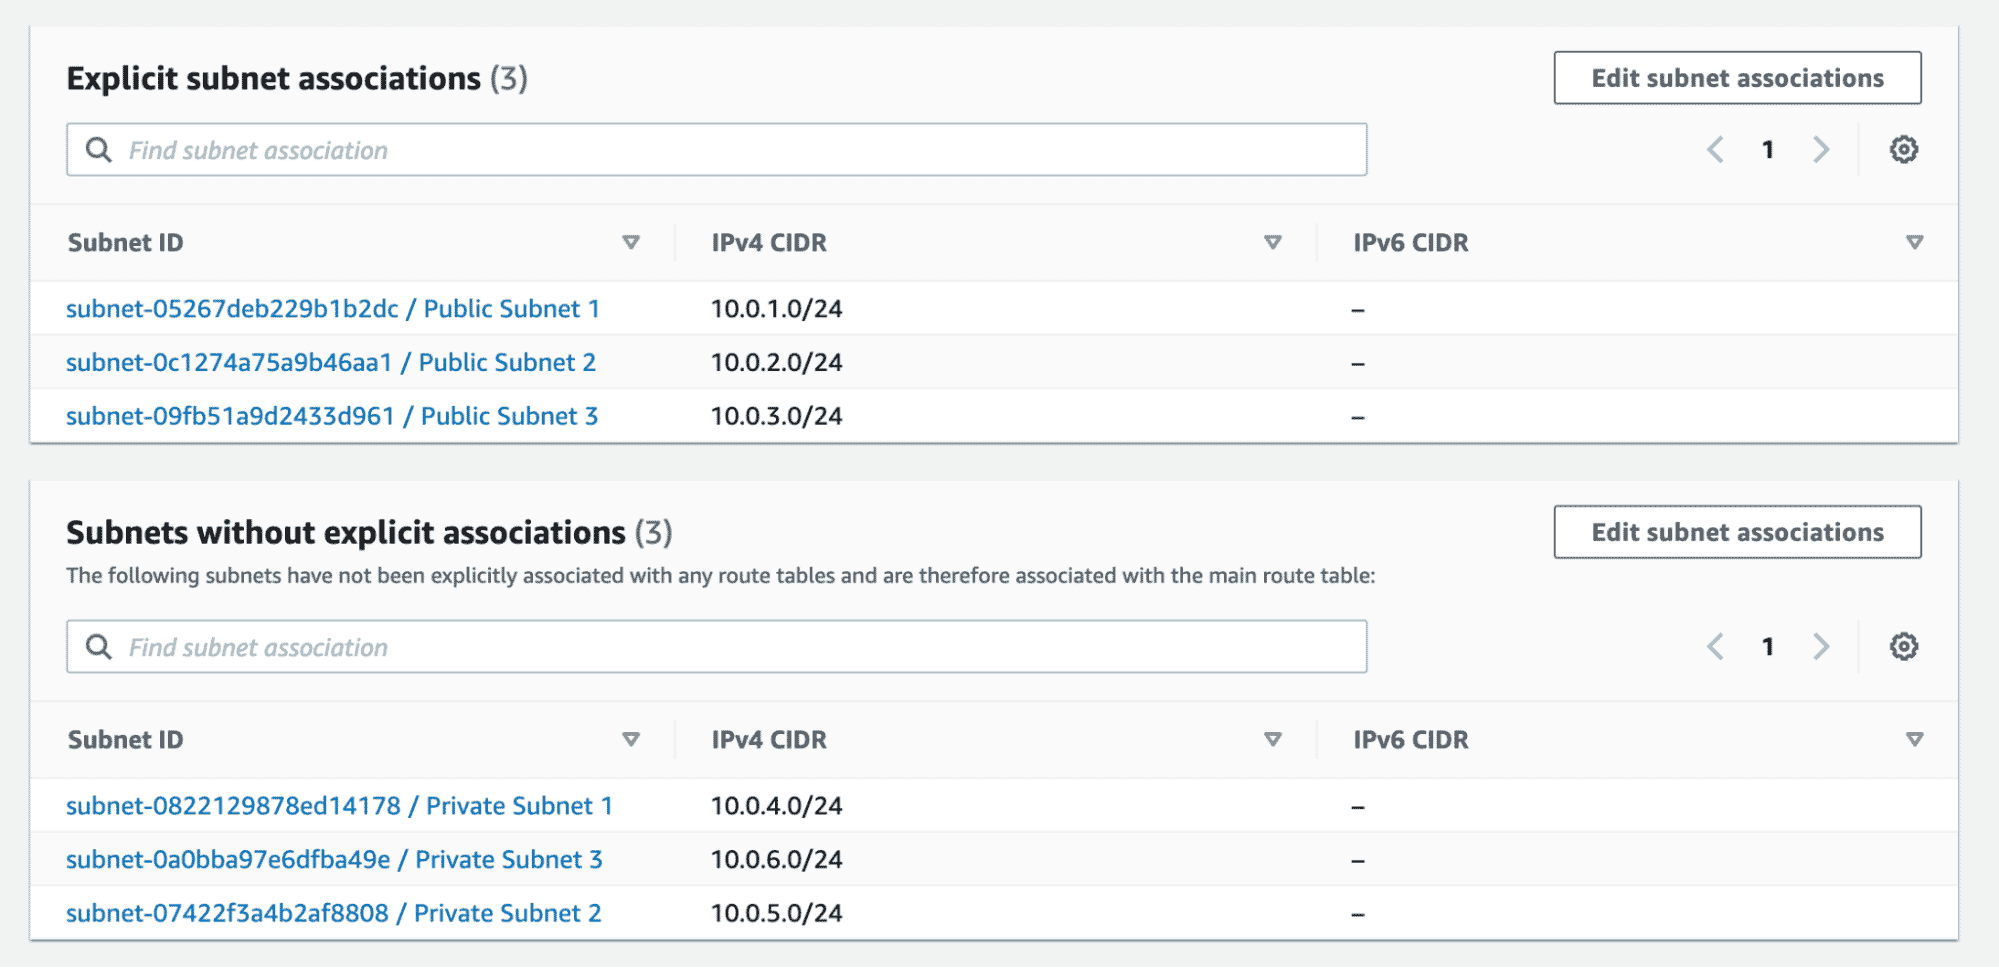
As we can see from the above screenshot, we have explicitly associated public subnets with the second route table, which has a route to the internet via the IGW.
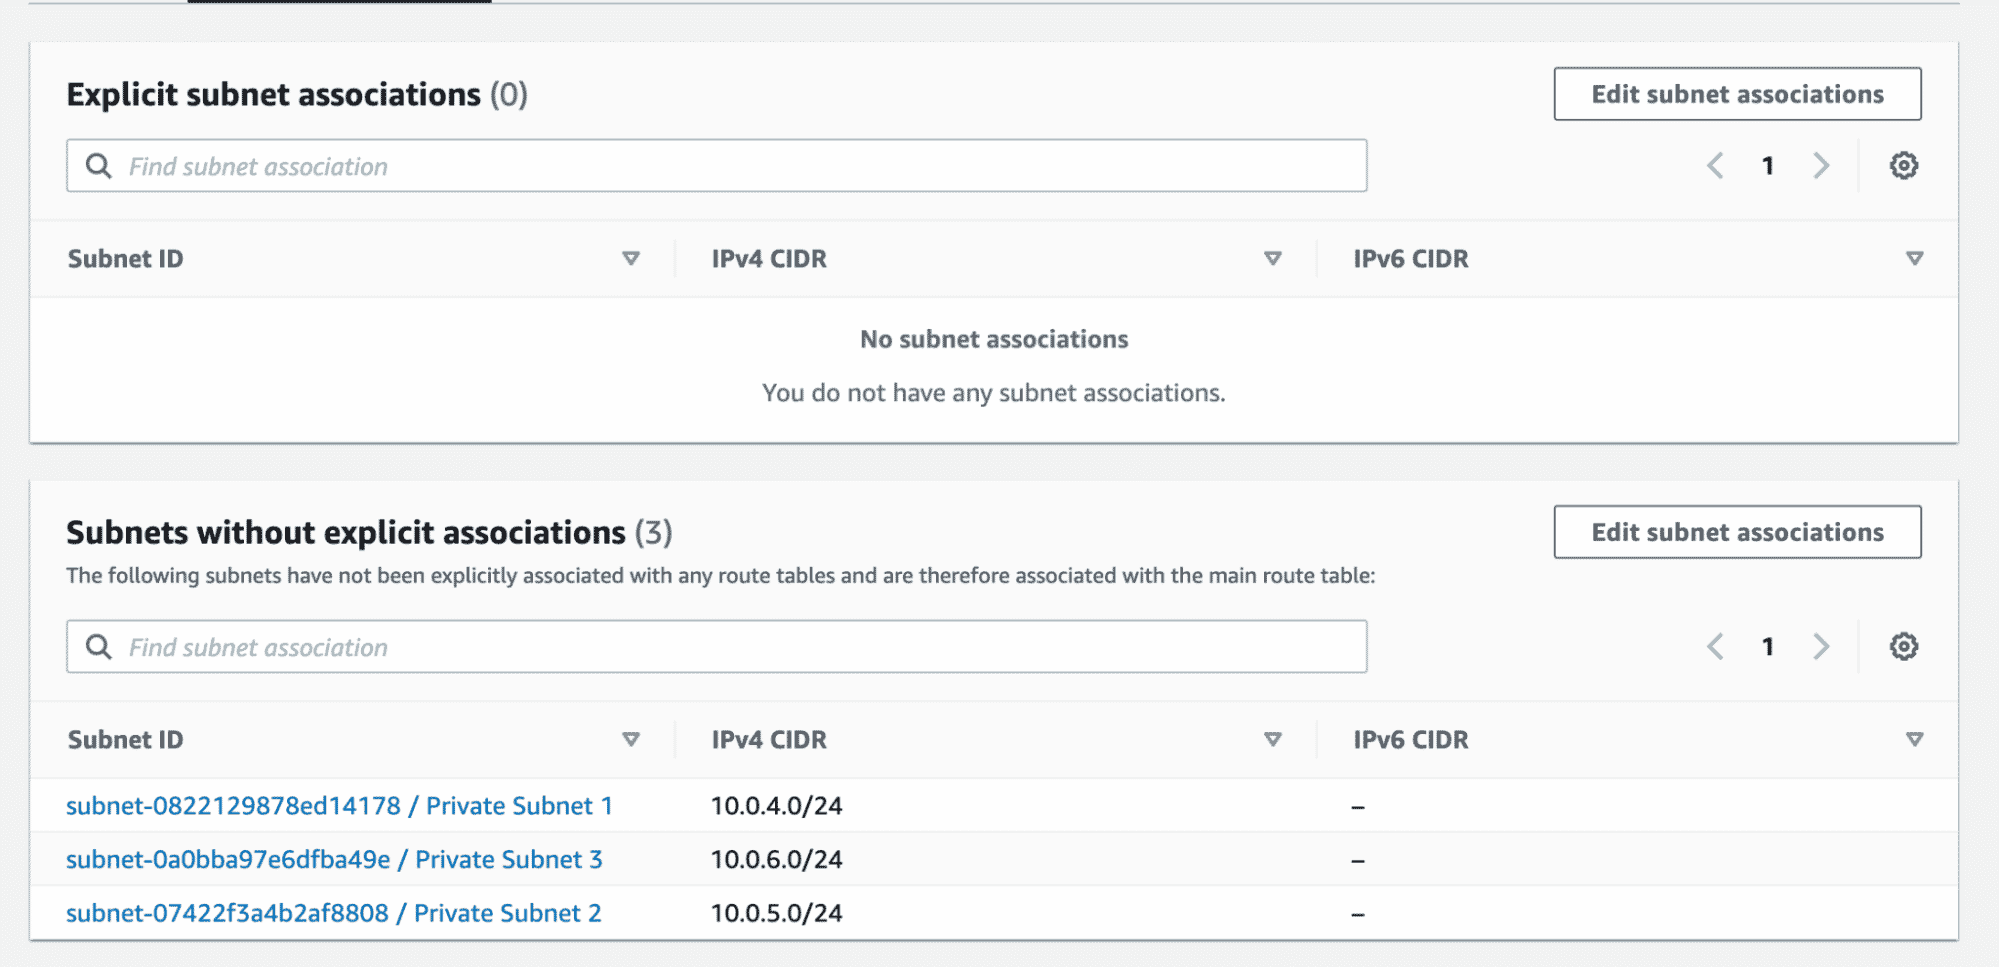
If we now look at our main route table, the public subnet association is automatically removed.
We have now successfully implemented the VPC design represented in the diagram using Terraform. There are more properties that can be configured using Terraform, like – VPC endpoints, network ACLs, DHCP options, etc.
By following the steps above, I hope I have given you a good starting point to build upon.
If you are looking for a quick way to create and manage VPC in AWS, it is always possible to leverage existing Terraform Modules that will help build the VPC and various associated attributes. Modules are a great way to leverage best practices as well as to save time by avoiding reinventing the wheel. Modules are contributed or sponsored and published in the Terraform registry, and it has good support in terms of documentation.
Creating a VPC module usually involves at least the following components:
- VPC(s)
- Subnet(s)
- Internet Gateway(s)
- Route Tables
- NAT Gateway(s) – Optional
- Security Group(s) – These can also be part of an EC2 module or a separate module
- Network Access Control List(s) – Optional
- Peering – Optional
The best practices for creating a module should be respected:
- Use VCS to host your module – This enhances collaboration, enables versioning, and keeps track of all the changes made to your code
- Keep Modules focused – Each module should have a specific purpose and manage a single responsibility. Avoid creating overly complex modules that manage multiple unrelated resources.
- Tag your module – Versioning ensures that you’re using a known and tested version of your module, and it makes it easier to roll back to a previous version if needed.
- Use variables and variable validations – Parametrizing configurations makes them reusable.
- Define outputs – A apart from showing you some details of the resources that have been created, outputs have the ability to expose different fields outside your modules. This is beneficial, especially if you use multiple modules inside a configuration.
- Take advantage of loops, conditionals, and dynamic blocks inside your configuration – This keeps your configuration DRY and offers flexibility.
- Create thorough documentation that aids understanding of what was done inside your module.
This is the minimum structure of a module:
- main.tf: Contains the core resource declarations and configurations for the module.
- variables.tf: Defines input variables that allow users to customize the module’s behavior.
- outputs.tf: Provides information about the created resources.
- providers.tf: Defines the versions used for the providers and terraform
- README.md: Documentation on how to use the module, including descriptions of input variables and outputs.
Now, let’s create a minimum viable terraform module for a vpc. The module code can be found here.
main.tf
resource "aws_vpc" "this" {
  for_each             = var.vpc_parameters
  cidr_block           = each.value.cidr_block
  enable_dns_support   = each.value.enable_dns_support
  enable_dns_hostnames = each.value.enable_dns_hostnames
  tags = merge(each.value.tags, {
    Name : each.key
  })
}

resource "aws_subnet" "this" {
  for_each   = var.subnet_parameters
  vpc_id     = aws_vpc.this[each.value.vpc_name].id
  cidr_block = each.value.cidr_block
  tags = merge(each.value.tags, {
    Name : each.key
  })
}

resource "aws_internet_gateway" "this" {
  for_each = var.igw_parameters
  vpc_id   = aws_vpc.this[each.value.vpc_name].id
  tags = merge(each.value.tags, {
    Name : each.key
  })
}

resource "aws_route_table" "this" {
  for_each = var.rt_parameters
  vpc_id   = aws_vpc.this[each.value.vpc_name].id
  tags = merge(each.value.tags, {
    Name : each.key
  })

  dynamic "route" {
    for_each = each.value.routes
    content {
      cidr_block = route.value.cidr_block
      gateway_id = route.value.use_igw ? aws_internet_gateway.this[route.value.gateway_id].id : route.value.gateway_id
    }
  }
}

resource "aws_route_table_association" "this" {
  for_each       = var.rt_association_parameters
  subnet_id      = aws_subnet.this[each.value.subnet_name].id
  route_table_id = aws_route_table.this[each.value.rt_name].id
}
With the above configuration, I can create as many VPCs, Subnets, Internet Gateways, Route tables, and Route tables associations as I want, based on my input. I can create links between resources based on name, and all these links will be created when I provide the variable value.
variables.tf
variable "vpc_parameters" {
  description = "VPC parameters"
  type = map(object({
    cidr_block           = string
    enable_dns_support   = optional(bool, true)
    enable_dns_hostnames = optional(bool, true)
    tags                 = optional(map(string), {})
  }))
  default = {}
}


variable "subnet_parameters" {
  description = "Subnet parameters"
  type = map(object({
    cidr_block = string
    vpc_name   = string
    tags       = optional(map(string), {})
  }))
  default = {}
}

variable "igw_parameters" {
  description = "IGW parameters"
  type = map(object({
    vpc_name = string
    tags     = optional(map(string), {})
  }))
  default = {}
}


variable "rt_parameters" {
  description = "RT parameters"
  type = map(object({
    vpc_name = string
    tags     = optional(map(string), {})
    routes = optional(list(object({
      cidr_block = string
      use_igw    = optional(bool, true)
      gateway_id = string
    })), [])
  }))
  default = {}
}
variable "rt_association_parameters" {
  description = "RT association parameters"
  type = map(object({
    subnet_name = string
    rt_name     = string
  }))
  default = {}
}
All variables are defined as map(object), as this gives us the flexibility of simply adding a new object in our map to create a new resource. We are using the optional parameters in some of the values, as we want to be able to omit them in our configuration for most of the cases, but still have the flexibility of providing that particular value if it is required in other use cases.
outputs.tf
output "vpcs" {
  description = "VPC Outputs"
  value       = { for vpc in aws_vpc.this : vpc.tags.Name => { "cidr_block" : vpc.cidr_block, "id" : vpc.id } }
}
For the outputs, I have only declared one for all the vpcs. It will provide maps containing the vpc name as the key, and you will see the values of the cidr_blocks and the id of it.
providers.tf
terraform {
  required_version = "~> 1.5.0"
  required_providers {
    aws = {
      source  = "hashicorp/aws"
      version = ">= 5.0.0"
    }
  }
}
For the providers file, we are defining the required version of Terraform and the required version for all of the providers used inside our configuration (only AWS for this particular example).
README.md
The README.md file is automatically generated using tf-docs. It offers details about everything that was configured in this module, the values different variables can have, and more.
In the repository, there is also an example folder that contains an example instantiation of the module. For that example, there is one instance of each resource created and you can see how the linkings are done between resources.
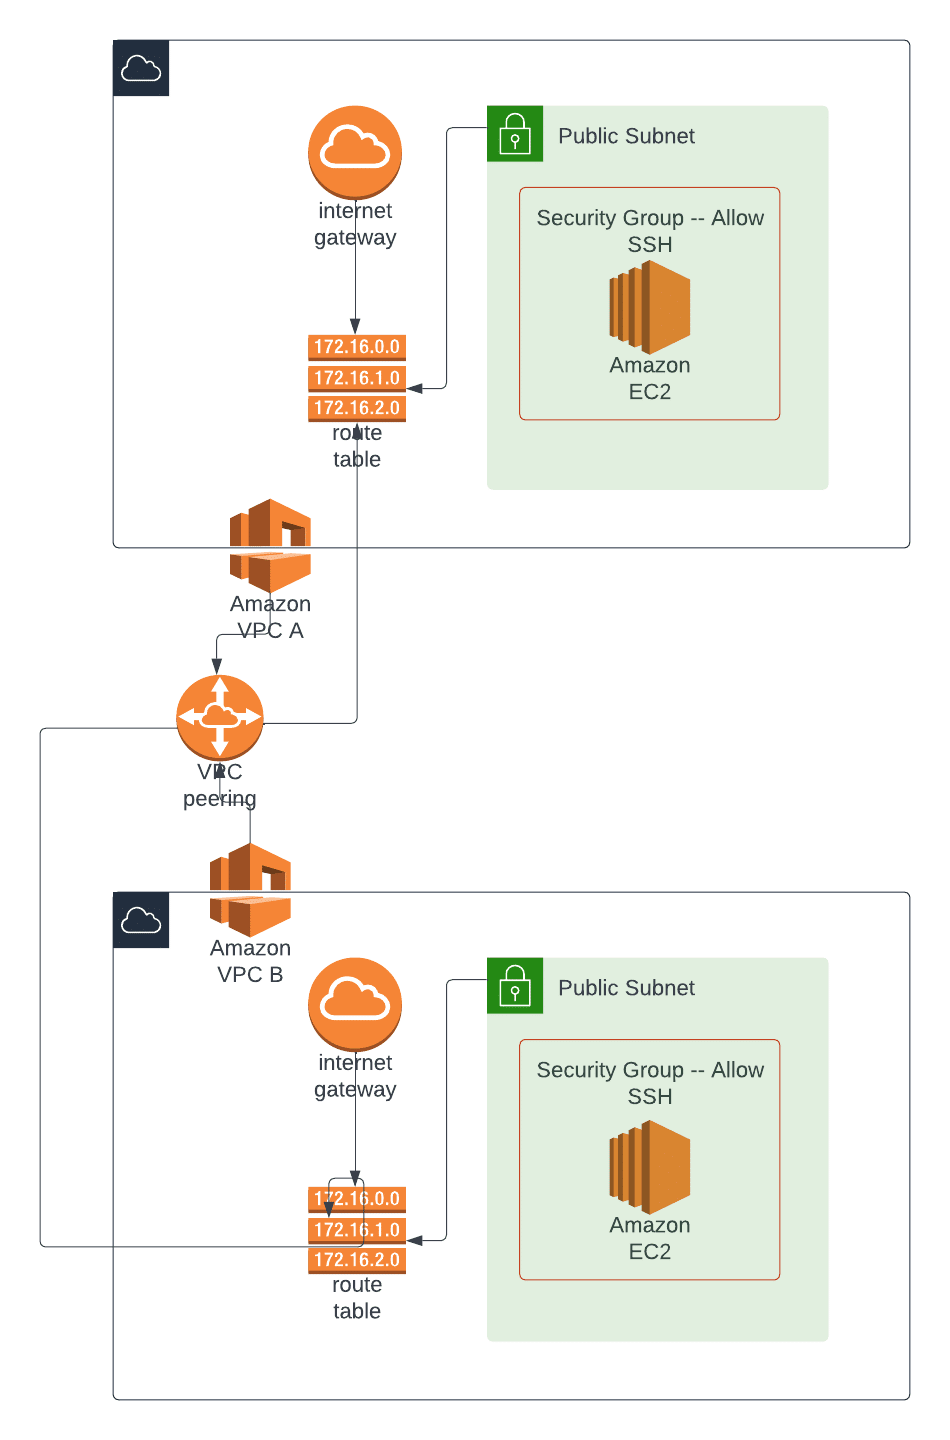
VPC peering is a network connection between two VPCs that enables private communication between resource in the VPCs as if they were in the same network.
Let’s start a configuration from scratch. We will create the following resources:
- 2 VPCs
- 2 Subnets
- 2 Internet Gateways
- 2 Route Tables
- 2 Security Groups
- 2 EC2 Instances
- 1 Peering Resource
- 1 AWS Key Pairs
For the peering itself, we don’t need all those resources, but in order to test the peering itself, we will need to open traffic, be able to connect to the ec2 instances via ssh, and also be able to connect from one instance to another using the private ips to make sure our configuration sticks.
The peering itself is only done by one resource called aws_vpc_peering_connection. This resource only takes the two vpcs as inputs and a parameter called auto_accept that accepts the peering without any manual intervention.
The code for this configuration can be found here.
The following diagram explains how the peering is done and what resources are going to be created.
After a terraform apply, the following outputs are exported:
Outputs:
ec2_instances = {
  "instanceA_privateIp" = "10.0.1.16"
  "instanceA_publicDNS" = "ec2-63-33-191-89.eu-west-1.compute.amazonaws.com"
  "instanceB_privateIp" = "11.0.1.30"
  "instanceB_publicDNS" = "ec2-52-213-60-214.eu-west-1.compute.amazonaws.com"
}
Now we can connect to either of the instances by using ssh (let’s use instanceA for this example):
ssh ubuntu@ec2-63-33-191-89.eu-west-1.compute.amazonaws.comFrom this instance, to verify if the peering is successful, we can try to ssh to second instance by using its private ip:
ubuntu@ip-10-0-1-16:~$ ssh ubuntu@11.0.1.30
The authenticity of host '11.0.1.30 (11.0.1.30)' can't be established.
ECDSA key fingerprint is SHA256:c60Zc+yETrcnHjHhCG1nrzoWnekNgLbYPJdVoxT/x3Y.
Are you sure you want to continue connecting (yes/no/[fingerprint])? yes
Warning: Permanently added '11.0.1.30' (ECDSA) to the list of known hosts.
ubuntu@11.0.1.30: Permission denied (publickey).
The connection already works, but we are getting a permission denied error because we don’t have the private key used to connect to the second instance on the first instance.
Let’s copy it from our local machine and retry.
# Local Machine

scp ~/.ssh/id_rsa ubuntu@ec2-63-33-191-89.eu-west-1.compute.amazonaws.com:~/.ssh/
ssh ubuntu@ec2-63-33-191-89.eu-west-1.compute.amazonaws.com
Welcome to Ubuntu 20.04.6 LTS (GNU/Linux 5.15.0-1047-aws x86_64)
Last login: Mon Oct 16 12:42:36 2023 from 5.12.29.10
To run a command as administrator (user "root"), use "sudo <command>".
See "man sudo_root" for details.


# Instance A
ubuntu@ip-10-0-1-16:~$ ssh 11.0.1.30
Welcome to Ubuntu 20.04.6 LTS (GNU/Linux 5.15.0-1047-aws x86_64)
To run a command as administrator (user "root"), use "sudo <command>".
See "man sudo_root" for details.

ubuntu@ip-11-0-1-30:~$
Now everything is working as expected.
Terraform is really powerful, but to achieve an end-to-end secure Gitops approach, you need to use a product that can run your Terraform workflows. Spacelift takes managing Terraform to the next level by giving you access to a powerful CI/CD workflow and unlocking features such as:
- Policies (based on Open Policy Agent) – You can control how many approvals you need for runs, what kind of resources you can create, and what kind of parameters these resources can have, and you can also control the behavior when a pull request is open or merged.
- Multi-IaC workflows – Combine Terraform with Kubernetes, Ansible, and other infrastructure-as-code (IaC) tools such as OpenTofu, Pulumi, and CloudFormation, create dependencies among them, and share outputs
- Build self-service infrastructure – You can use Blueprints to build self-service infrastructure; simply complete a form to provision infrastructure based on Terraform and other supported tools.
- Integrations with any third-party tools – You can integrate with your favorite third-party tools and even build policies for them. For example, see how to integrate security tools in your workflows using Custom Inputs.
Spacelift enables you to create private workers inside your infrastructure, which helps you execute Spacelift-related workflows on your end. Read the documentation for more information on configuring private workers.

A Brazil-based online marketplace for home products, MadeiraMadeira migrated to Spacelift when their bills more than tripled following changes to their Terraform provider’s pricing model. The ease of use, flexibility, and open communication they have experienced with Spacelift have made MadeiraMadeira’s team even happier with the change.
You can check Spacelift for free by creating a trial account or booking a demo with one of our engineers.
We have covered a couple of ways to create and manage AWS VPCs – building them from scratch and using certified, published modules.
Certified published modules may save time initially, but as the project and product requirement grows, it makes more sense to build a VPC from scratch with has all the specifics covered.
Note: New versions of Terraform are placed under the BUSL license, but everything created before version 1.5.x stays open-source. OpenTofu is an open-source version of Terraform that expands on Terraform’s existing concepts and offerings. It is a viable alternative to HashiCorp’s Terraform, being forked from Terraform version 1.5.6.
Terraform Management Made Easy
Spacelift effectively manages Terraform state, more complex workflows, supports policy as code, programmatic configuration, context sharing, drift detection, resource visualization and includes many more features.


Terraform Modules Cheatsheet
Grab our ultimate cheat sheet PDF to master building reusable Terraform modules!